Scalextric A1 GP Slot Car
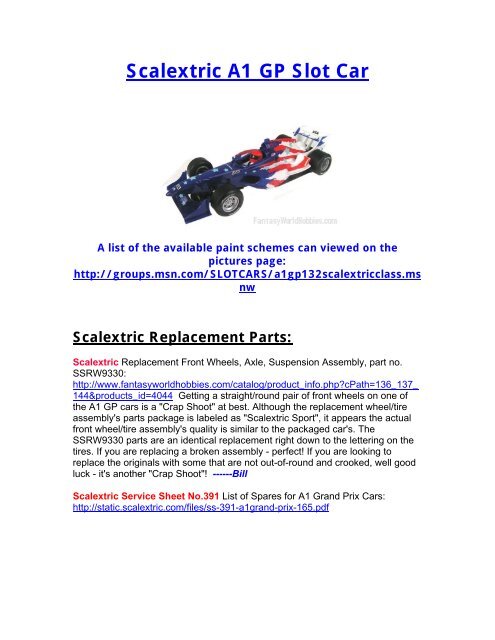
Scalextric A1 GP Slot Car
Scalextric A1 GP Slot Car
Create successful ePaper yourself
Turn your PDF publications into a flip-book with our unique Google optimized e-Paper software.
<strong>Scalextric</strong> <strong>A1</strong> <strong>GP</strong> <strong>Slot</strong> <strong>Car</strong><br />
A list of the available paint schemes can viewed on the<br />
pictures page:<br />
http://groups.msn.com/SLOTCARS/a1gp132scalextricclass.ms<br />
nw<br />
<strong>Scalextric</strong> Replacement Parts:<br />
<strong>Scalextric</strong> Replacement Front Wheels, Axle, Suspension Assembly, part no.<br />
SSRW9330:<br />
http://www.fantasyworldhobbies.com/catalog/product_info.php?cPath=136_137_<br />
144&products_id=4044 Getting a straight/round pair of front wheels on one of<br />
the <strong>A1</strong> <strong>GP</strong> cars is a "Crap Shoot" at best. Although the replacement wheel/tire<br />
assembly's parts package is labeled as "<strong>Scalextric</strong> Sport", it appears the actual<br />
front wheel/tire assembly's quality is similar to the packaged car's. The<br />
SSRW9330 parts are an identical replacement right down to the lettering on the<br />
tires. If you are replacing a broken assembly - perfect! If you are looking to<br />
replace the originals with some that are not out-of-round and crooked, well good<br />
luck - it's another "Crap Shoot"! ------Bill<br />
<strong>Scalextric</strong> Service Sheet No.391 List of Spares for <strong>A1</strong> Grand Prix <strong>Car</strong>s:<br />
http://static.scalextric.com/files/ss-391-a1grand-prix-165.pdf
Performance Parts:<br />
Monte's recommendations: <strong>Slot</strong>.it Rear Wheels, Axle, Gear, Bushings,<br />
part no.SIKK06:<br />
http://www.fantasyworldhobbies.com/catalog/product_info.php?cPath=136_215<br />
_221&products_id=3144 This is a "drop in" set up, no modifications necessary.<br />
<strong>Slot</strong>.it Rear Tires for the above assembly, package of 4, part no. SIPT16:<br />
http://www.fantasyworldhobbies.com/catalog/product_info.php?cPath=136_215<br />
_216&products_id=3062
Performance Tips:<br />
Overall Impression/Review of the <strong>Scalextric</strong> <strong>A1</strong> <strong>GP</strong> cars:<br />
http://www.homeracingworld.com/a1grandprix.htm<br />
Art on bullet-proofing the rear axle assembly: When I first got my <strong>A1</strong><strong>GP</strong>, I<br />
was sanding the rear wheels, and I noticed the axle bearings turning. they are<br />
very loose. I did not want the problem,you mentioned, about glueing them in<br />
and ruining the car. So I " Hot Glued" them in. Hot glue can be taken apart<br />
without ruining everything!
Rear Wheels: I had the misfortune of breaking a rear wheel during a practice<br />
session. The wheel hub split and broke at the backside of the wheel spokes.<br />
Thus the wheel let loose from the axle and flew through the air. Cool looking but<br />
a major bummer under race conditions! In searching my "spare parts bin" for a<br />
replacement rear assembly I found a rear wheel set that appears to be from a<br />
Ferrari of some sort. The wheels look much more "beefy" than the stock <strong>A1</strong> <strong>GP</strong><br />
wheels. The wheel spokes are not cut out, they're just molded into a solid wheel<br />
center. I reinforced the wheel hub by forcing Household "GOOP" brand glue (if<br />
you've never used this stuff, you're missing out! It's great!) into the cavity<br />
between the wheel hub and the wheel rim. I also applied the glue to the axle<br />
and wheel hub connection. One more thing about crooked and out of round<br />
wheels. Be sure the wheels are pressed fully onto the axle. One of these Ferrari<br />
style wheels was pretty bad, but I noticed the rear assembly width was wider<br />
than the <strong>A1</strong> <strong>GP</strong>'s. I pushed both wheels onto the axle just a tad further and what<br />
do you know, they both ended up a little straighter. --------------Bill
Here’s what the inside of the rear wheels looked like after reinforcing with<br />
“GOOP”.
Rear Tires: On these <strong>A1</strong> <strong>GP</strong> cars, at a minimum you MUST sand the tires for<br />
better traction! Here's how I like to do it. I use short leads with alligator clips<br />
(Crock Clips to "Aussies") to connect a small power supply to the car's guide flag<br />
electrical wipers/braid pickups.
I used contact cement to glue a piece of sandpaper to a test block. The other<br />
end of the test block I insulated with black electrician's tape to prevent electrical<br />
shorts of the guide flag wipers/braid.<br />
With the electrical leads from my power supply connected to the car's guide flag<br />
wipers/braid, with the power "on", while the motor is running I gently lower the<br />
rear of the chassis onto the test block sandpaper.
Take your time with the sanding and monitor the motor’s temperature.<br />
I've witnessed some pretty aggressive tire sanding with motors suffering no ill<br />
effects. But my advice would be to take it easy. Do a little sanding, let the motor<br />
cool a bit, and then resume. Most of the rear tires I've seen require quite a bit of<br />
sanding to true them up! The performance gain from sanding and truing the tires<br />
on these cars is well worth the time and effort! I scored a win with the car<br />
pictured here on its first time out. I'm convinced the extra time I took sanding<br />
the rear tires well, to make sure they were round and had a good contact patch<br />
with the track surface, is what made the difference in this car's performance! --<br />
---------------Bill
Guide Flags: I have seen more than one guide flag on the <strong>A1</strong> <strong>GP</strong> cars come<br />
apart during a race. Even had it happen to me.........once. After that experience I<br />
put a small amount of silicone sealer on the leading edge of the guide flag. The<br />
<strong>A1</strong> <strong>GP</strong> guide flags are a two piece assembly. There is a round top piece that slips<br />
on to hold the motor wire connectors in place against the wiper/braided pickups.<br />
In a crash where the guide flag impacts something the top piece can dislodge<br />
enough to cause the wires to lose contact with the wiper braid. I've also seen<br />
racers use different types of glue with great success. I use silicone sealer<br />
because I can remove it easily, change braid, and reapply the silicone sealer. I<br />
use white so I can be sure it's still in place throughout the race. Looks kinda<br />
ugly, but it works! -------------Bill
Rear Axle Uprights: The chassis rear axle uprights seem to be a weak point on<br />
the <strong>A1</strong> <strong>GP</strong>s. I have 3 chassis that broke on the right side. I have also seen other<br />
racers have breakage problems in this area, so it's not just me (in fact the<br />
photos below were taken while repairing chassis for another racer)! The process<br />
I use to repair them uses brass round tubing and JB Weld epoxy. The repair is<br />
permanent, and much stronger than stock. I use two types of repairs. One repair<br />
allows the use of the stock rear axle assembly, the other requires the use of<br />
bronze oilites, a 3/32 steel axle, and a crown gear and wheels for the 3/32 axle<br />
(normally set-screw type wheels and gear). Pictured below are photos of the<br />
finished repairs. You can view the step-by-step photos in the pictures section. -<br />
--------------------Bill<br />
This is what the finished repair looks like for a chassis that will be fitted with a<br />
stock rear axle assembly. The plastic axle bushings require a modification to fit<br />
this application. The outside flange on each axle bushing must be taken off<br />
(ground off or cut off) to allow the bushing to slide into the brass tubing/bushing<br />
mount. A drop of super glue holds the bushing in place.
It may take a couple applications of JB Weld to get it “built up” around the<br />
tubing. The JB Weld wants to run a bit before it hardens up.
The slot cut into the tubing should be just wide enough for the axle to slip<br />
through.
Below are photos of the finished repair which allows the use of standard 3/32<br />
oilites, and a 3/32 axle assembly (standard slot car parts for commercial track<br />
type slot cars).


