Eton E1 - MANUAL - Monitoring Times
Eton E1 - MANUAL - Monitoring Times
Eton E1 - MANUAL - Monitoring Times

You also want an ePaper? Increase the reach of your titles
YUMPU automatically turns print PDFs into web optimized ePapers that Google loves.
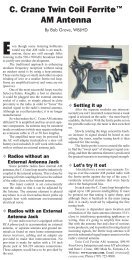
www.etoncorp.com<br />
<strong>E1</strong><br />
<strong>MANUAL</strong><br />
AM/FM/SHORTWAVE RADIO
<strong>E1</strong> <strong>MANUAL</strong><br />
<strong>E1</strong> AM/FM/Shortwave Radio<br />
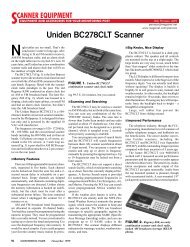
FRONT PANEL DESCRIPTION (See page 12)<br />
1<br />
2<br />
3<br />
20<br />
19<br />
18<br />
4<br />
17<br />
16<br />
15<br />
5<br />
6<br />
7<br />
8<br />
14<br />
13<br />
12<br />
11<br />
10<br />
9<br />
TOP PANEL DESCRIPTION (See page 16)<br />
1<br />
2<br />
3<br />
1<br />
2<br />
3<br />
4<br />
5<br />
6<br />
7<br />
8<br />
SIDE PANEL<br />
DESCRIPTION<br />
(See page 19)<br />
9<br />
DECLARATION OF CONFORMITY<br />
RESPONSIBLE PARTY : etón Corporation<br />
1015 Corporation Way<br />
Palo Alto, CA 94303 USA<br />
TEL: (650) 903-3866<br />
TRADE NAME: etón Corporation<br />
MODEL NUMBER: <strong>E1</strong><br />
This device complies with Part 15 of the FCC Rules.<br />
Operation is subject to the following two conditions:<br />
1. This device may not cause harmful interference, and<br />
2. This device must accept any interference received,<br />
including interference that may cause undesired operation.<br />
1
<strong>E1</strong> <strong>MANUAL</strong><br />
<strong>E1</strong> AM/FM/Shortwave Radio<br />
IMPORTANT SAFEGUARDS<br />
An appliance and cart combination should be moved<br />
with care. Quick stops, excessive force and uneven surfaces<br />
m ay cause the appliance and cart combination<br />
to overturn.<br />
The lightning flash with arrow head symbol, within an<br />
equilateral triangle, is intended to alert the user to the<br />
presence of uninsulated “dangerous voltage” within<br />
the product’s enclosure that may be of sufficient magnitude<br />
to constitute a risk of electric shock to persons.<br />
<strong>E1</strong> DISPLAY DESCRIPTION (See page 17)<br />
An exclamation point within an equilateral triangle is<br />
intended to alert the user to the presence of important<br />
operating and maintenance (servicing) instructions in<br />
the literature accompanying the appliance.<br />
WARNING<br />
WARNING: TO REDUCE THE RISK OF FIRE OR ELECTRIC SHOCK, DO NOT EXPOSE THE APPLIANCE TO RAIN OR MOISTURE. DO NOT OPEN<br />
THE CABINET, REFER SERVICING TO QUALIFIED PERSONNEL ONLY.<br />
CAUTION<br />
TO PREVENT ELECTRIC SHOCK, DO NOT USE THE THREE WIRE CORD W ITH AN EXTENSION CORD RECEPTACLE OR OTHER OUTLET<br />
UNLESS THE BLADES CAN BE FULLY INSERTED TO PREVENT BLADE EXPOSURE.<br />
ATTENTION<br />
POUR PREVENIR LES CHOCS ELECTRIQUES, NE PAS UTILISER CETTE FICHE POLARISEE AVEC UN PROLONGATEUR, UNE PRISE DE<br />
COURANT OU UNE AUTRE SORTIE DE COURANT, SAUF S I LES LAMES PEUVENT ETRE INSEREES A FOND SANS EN LAISSER AUCUNE PAR-<br />
TIE A DECOUVERT.<br />
1. Read Instructions - All the safety and operating instructions<br />
should be read before the appliance is operated.<br />
2. Retain Instructions - The safety and operating instructions<br />
should be retained for future reference.<br />
3. Heed Warnings - All warnings on the appliance should be<br />
adhered to.<br />
4. Follow Instructions - All operating and use instructions<br />
should be followed.<br />
5. Cleaning - Unplug this appliance from the wall outlet before<br />
cleaning. Do not use liquid cleaners or aerosol cleansers.<br />
Use a dam p cloth for cleaning.<br />
6. Attachments - Do not use attachments that are not recommended<br />
by the manufacturer or they may cause hazards.<br />
7. Water and Moisture - Do not use this product near water-for<br />
example, near a bathtub, wash bowl, kitchen sink, laundry<br />
tub; in a wet basement; or near a swimming pool-and the<br />
like.<br />
8. Accessories - Do not place this product on an unstable cart,<br />
stand, tripod, bracket, or table. The product may fall, causing<br />
serious injury to a child or adult, and serious damage to the<br />
product. Any mounting of the product should follow the<br />
manufacturer’s instructions, and should use a mounting<br />
accessory recommended by the manufacturer.<br />
9. A product and cart combination should be moved with care.<br />
Quick stops, excessive force, and uneven surfaces may cause<br />
the product and cart combination to overturn.<br />
10. Ventilation - S lots and openings in the cabinet are provided<br />
for ventilation and to ensure reliable operation of the product<br />
and to protect it from overheating, and these openings<br />
must not be blocked or covered. The openings should never<br />
be blocked or by placing the product on a bed, sofa, rug, or<br />
similar surface. This product should not be placed in a builtin<br />
installation such as a bookcase or rack unless proper ventilation<br />
is provided or the manufacturer’s instructions have<br />
been adhered to. KEEP CURTAINS AND OTHER FLAMMABLE<br />
MATERIALS OUT OF DIRECT CONTACT WITH THE AC<br />
ADAPTER.<br />
11. Power Sources - This product should be operated only from<br />
the type of power source indicated on the marking label of<br />
the supplied AC Adapter. If you are not sure of the type of<br />
power supplied to your home, consult your appliance dealer<br />
or local power company. For products intended to operate<br />
from battery power, or other sources, refer to the operating<br />
instructions.<br />
12. Grounding or Polarization - This product may be equipped<br />
with a polarized alternating-current line plug (a plug hav ing<br />
one blade wider than the other). This plug will fit into the<br />
power outlet only one way. This is a safety feature. If you are<br />
unable to insert the plug fully into the outlet, try reversing<br />
the plug. If the plug should still fail to fit, contact your electrician<br />
to replace your obsolete outlet. Do not defeat the<br />
safety purpose of the polarized plug. Alternate W arnings- If<br />
this product is equipped with a three-wire grounding-type<br />
plug, a plug having a third (grounding) pin, the plug will<br />
only fit into a grounding-type power outlet. This is a safety<br />
feature. If you are unable to insert the plug into the outlet,<br />
contact your electrician to replace your obsolete outlet. Do<br />
not defeat the safety purpose of the grounding-type plug.<br />
13. Power-Cord Protection - Power supply cords should be routed<br />
so that they are not likely to be walked on or pinched by<br />
2 3
<strong>E1</strong> <strong>MANUAL</strong><br />
IMPORTANT SAFEGUARDS continued<br />
items placed upon or against them, paying particular attention<br />
to cords at plugs, convenience receptacles, and the<br />
point where they exit from the product.<br />
14. Outdoor Antenna Grounding - If an outside antenna or<br />
cable system is connected to the product, be sure the antenna<br />
or cable system is grounded so as to provide some protection<br />
against voltage surges and built-up static charges.<br />
Article 810 of the National Electrical Code, ANSI/NFPA 70,<br />
provides information with regard to proper grounding of the<br />
m ast and supporting structure, grounding of the leadin wire<br />
to an antenna discharge unit, size of grounding conductors,<br />
location of antenna-discharge unit, connection to grounding<br />
electrodes, and requirements for the grounding electrode.<br />
See figure A .<br />
15. Lightning - For added protection for this product during a<br />
lightning storm, or when it is left unattended and unused for<br />
long periods of time, unplug the AC adapter from the wall<br />
outlet and disconnect the antenna or cable system. This will<br />
prevent damage to the product due to lightning and powerline<br />
surges.<br />
16. Power Lines - An outside antenna system should not be<br />
located in the vicinity of overhead power lines, other electric<br />
light or power circuits, where it can fall into such power<br />
lines or circuits. W hen installing an outside antenna system,<br />
extreme care should be taken to keep from touching such<br />
power lines or circuits as contact with them m ay be fatal.<br />
17. Overloading - Do not overload wall outlets and extension<br />
cords or integral convenience receptacles as this can result<br />
in a risk of fire or electric shock.<br />
18. Object and Liquid Entry - Never push objects of any kind<br />
into this product through openings as they may touch dangerous<br />
voltage points or short-out parts that could result in<br />
fire or electric shock. Never spill liquid of any kind on the<br />
product.<br />
19. Servicing - Do not attempt to service this product yourself as<br />
opening or removing covers may expose you to dangerous<br />
voltage or other hazards. Refer all servicing to qualified service<br />
personnel.<br />
20. Damage Requiring Service - Unplug this product from the<br />
wall outlet and refer servicing to qualified service personnel<br />
under the following conditions:<br />
a. When the AC adapter cord or plug is damaged.<br />
b. If liquid has been spilled, or objects have fallen into the<br />
product.<br />
c. If the AC adapter has been exposed to rain or water.<br />
d. It the product does not operate normally by following the<br />
operating instructions. Adjust only those controls that are<br />
covered by the operating instructions. An improper adjustment<br />
may result in damage and will often require extensive<br />
work by a qualified technician to res tore the product to its<br />
normal operation.<br />
e. If the product has been dropped or the cabinet has been<br />
damaged in any way and<br />
f. When the product exhibits a distinct change in performance-<br />
this indicates a need for service.<br />
21. Replacement Parts - W hen replacement parts are required,<br />
be sure the service technician has used replacement parts<br />
specified by the manufacturer or have the same characteristics<br />
as the original parts. Unauthorized substitutes may<br />
result in fire, electric shock or other hazards.<br />
22. Safety Check - Upon completion of any service or repairs to<br />
this product, ask the service technician to perform safety<br />
checks to determine that the product is in proper operating<br />
condition.<br />
23. Wall or Ceiling Mounting - The product should be mounted<br />
to a wall or ceiling only as recommended by the manufacturer.<br />
24. Heat - The product should be situated away from heat<br />
sources such as radiators, heat registers, stoves, or other<br />
products (including amplifiers) that product heat.<br />
2 TABLE OF CONTENTS<br />
THANK YOU FOR PURCHASING THE etón <strong>E1</strong> RECEIVER. THIS RECEIVER HAS BEEN DESIGNED AND MANUFACTURED TO HIGH QUAL-<br />
ITY STANDARDS, AND WILL PROVIDE RELIABLE OPERATION FOR MANY YEARS. PLEASE CAREFULLY READ THE OWNER’S <strong>MANUAL</strong> IN<br />
ORDER TO TAKE ADVANTAGE OF THE MANY INTERESTING FEATURES THAT WILL PROVIDE ENJOYABLE LISTENING TO RADIO BROAD-<br />
CASTS AROUND THE WORLD.<br />
IMPORTANT SAFEGUARDS p.3<br />
TABLE OF CONTENTS p.5<br />
GENERAL DESCRIPTION p.7<br />
POWER SUPPLY p.7<br />
• AC ADAPTER and EXTERNAL DC POWERING<br />
• BATTERY INSTALLATION<br />
• BATTERY OPERATION<br />
• BATTERY CONDITION<br />
INSTALLATION p.9<br />
• UNPACKING<br />
• LOCATION<br />
• FIXED INSTALLATION<br />
• PORTABLE OPERATION<br />
• ANTENNA REQUIREMENTS<br />
• VIEWING ANGLE<br />
• INSTALLATION DIAGRAM<br />
<strong>E1</strong> FRONT PANEL DESCRIPTION p.12<br />
TOP PANEL DESCRIPTION p.16<br />
<strong>E1</strong> DISPLAY DESCRIPTION p.17<br />
SIDE PANEL DESCRIPTION p.19<br />
GETTING STARTED p.20<br />
• GENERAL OPERATING INFORMATION<br />
• FIRST STEPS<br />
• DIRECT FREQUENCY ENTRY<br />
• SHORTWAVE ‘METER' BAND DESIGNATOR ENTRY<br />
• FREQUENCY RESOLUTION<br />
• FRONT PANEL LOCK (UNLOCK)<br />
• AM SYNCHRONOUS OPERATION<br />
• SSB OPERATION<br />
• PASSBAND TUNING<br />
• FM OPERATION<br />
• AGC OPERATION<br />
• BEEP TONES<br />
• DELETING A MEMORY CHANNEL<br />
COUNTRY FUNCTIONS p.27<br />
• COUNTRY DESCRIPTION<br />
• THE COUNTRY DISPLAY<br />
• STORING A COUNTRY CHANNEL<br />
• RECALLING A COUNTRY CHANNEL<br />
• DELETING A COUNTRY CHANNEL<br />
• CHANGING OR ADDING COUNTRY NAMES<br />
<strong>E1</strong> MENUS p.30<br />
• MAIN MENU<br />
• RADIO SETTINGS<br />
• AUDIO SETTINGS<br />
• SET CLOCKS<br />
• CLOCK MODES<br />
• TIMERS<br />
• TIMER 1 ENABLE / DISABLE<br />
• TIMER 2 ENABLE / DISABLE<br />
• LOCAL / GMT TIME SELECT<br />
SEEK FUNCTION p.39<br />
• DESCRIPTION<br />
• VFO MODE<br />
• MEMORY & COUNTRY MODE<br />
T.SCAN FUNCTION p.40<br />
• DESCRIPTION<br />
• MARKING CHANNELS FOR T.SCAN<br />
• UNMARKING T.SCAN CHANNELS<br />
• SELECTING THE SCAN STOP METHOD<br />
• INITIATING AND STOPPING THE T.SCAN<br />
CLOCK AND TIMER FUNCTIONS p.41<br />
• TIME DISPLAY<br />
• SETTING 24 HOUR CLOCKS AUTOMATICALLY<br />
• SETTING THE 24 HOUR CLOCKS <strong>MANUAL</strong>LY<br />
• TIMER OPERATION<br />
• SETTING TIMER ON/OFF TIMES<br />
• SETTING A W AKE OR SLEEP TIMER<br />
• SETTING TIMER MEMORY CHANNELS<br />
• ENABLING/DISABLING TIMER OPERATION<br />
ENVIRONMENT<br />
Disposal<br />
According to the European Directive 2002/96/EC all electrical and<br />
electronic products must be collected separately by a local collection<br />
system. Please act according to your local rules and do not dispose<br />
of your old products with your normal household waste.<br />
MEMORY FUNCTIONS p.25<br />
• MEMORY DESCRIPTION<br />
• THE MEMORY DISPLAY<br />
• STORING A MEMORY CHANNEL<br />
• RECALLING A MEMORY CHANNEL<br />
SPECIAL USE FEATURES AND FUNCTIONS p.45<br />
• LOCK ALL ENTRY TO KEYPAD<br />
• BROADCAST BAND TUNING STEP SIZE<br />
• DELETE ALL MEMORY OR COUNTRY CHANNELS<br />
• DELETE ALL MEMORY AND COUNTRY CHANNELS<br />
• DISPLAY LIGHTING<br />
4 5
<strong>E1</strong> <strong>MANUAL</strong><br />
TABLE OF CONTENTS continued<br />
GENERAL DESCRIPTION<br />
QUICK REFERENCE GUIDE p.48<br />
GLOSSARY OF TERMS p.51<br />
TROUBLESHOOTING p.52<br />
SERVICE INFORMATION p.53<br />
ONE YEAR LIMITED WARRANTY p.53<br />
APPENDIX p.54<br />
• UNDERSTANDING SHORTWAVE BANDS p.54<br />
- WHAT IS SHORTWAVE?<br />
- SOME BASIC RULES OF THUMB<br />
- WHAT ARE BANDS?<br />
- A HELPFUL ANALOGY ABOUT BANDS<br />
- DAY BANDS v s. NIGHT BANDS<br />
- SUNSET AND SUNRISE<br />
- DAYTIME LISTENING<br />
- EVENING/NIGHT LISTENING<br />
- SHORTWAVE DIRECTORY<br />
- SHORTWAVE ANTENNAS<br />
- FULL-SIZED PASSIVE SHORTWAVE ANTENNAS<br />
- ACTIVE SHORTWAVE ANTENNAS<br />
- SHORTWAVE ANTENNAS FOR USE ON BOATS<br />
- LONG-WIRE SHORTWAVE ANTENNAS<br />
- AM ANTENNAS<br />
- FINDING ANTENNAS<br />
- TIME STATIONS<br />
- GETTING STARTED W ITH SINGLE SIDEBAND (SSB)<br />
- WEATHER FAX FREQUENCIES<br />
- MORE INFORMATION ABOUT SSB<br />
- MONTHLY MAGAZINES W ITH SSB RELATED INFO<br />
- TIME STATIONS (not SSB)<br />
• ETON <strong>E1</strong> QUICK GUIDE p.58<br />
- INTRODUCTION<br />
- SET-UP INFORMATION<br />
- TUNING-IN FM AND MW STATIONS<br />
- USING DIRECT FREQUENCY ENTRY<br />
- USING THE SEEK FEATURE<br />
- LISTENING TO SHORTWAVE STATIONS<br />
- CHOOSING THE BEST SHORTWAVE BAND<br />
- GETTING INTO A SHORTWAVE BAND<br />
- TUNING AROUND IN A SHORTWAVE BAND<br />
- STORING FREQUENCIES INTO MEMORY<br />
- ACCESSING W HAT YOU HAVE STORED INTO MEMORY<br />
- DELETING THE CONTENTS OF A MEMORY<br />
- SETTING THE CLOCK TO YOUR LOCAL TIME<br />
- SETTING THE DISPLAY FOR LOCAL OR GMT TIME<br />
- SETTING THE TIMER AS AN ALARM CLOCK<br />
- USING TIMER 1 AS A W AKE-UP TIMER<br />
- USING TIMER 2 AS A SLEEP TIMER<br />
- TO ENABLE OR DISABLE THE TIMERS<br />
SPECIFICATIONS p.62<br />
BLOCK DIAGRAM p.64<br />
The etón <strong>E1</strong> is a microprocessor controlled, synthesized,<br />
world band receiver with continuous coverage capability<br />
from 100 kHz through 30 MHz and from 76 MHz<br />
through 108 MHz which includes the AM broadcast and<br />
shortwave bands as well as the FM broadcast band.<br />
The receiver offers excellent sensitivity, selectivity,<br />
dynamic range, and features that permit easy tuning of<br />
desired stations. Conveniently located front panel controls<br />
allow for rapid operator programming and ease of<br />
use. The units can be operated from either the supplied<br />
AC ADAPTER, an external 7 to 14 VDC source, or from<br />
four "D" cell batteries (not supplied) for portable operation.<br />
A low battery voltage indication is displayed when<br />
that condition exists.<br />
Three electronically switched IF filters are provided to<br />
provide optimum interference rejection for each mode.<br />
The front panel dot matrix liquid crystal display provides<br />
feedback of the current status of the receiver. The seven<br />
digit frequency display provides resolution to 10 Hz in<br />
the AM broadcast and Shortwave bands. Resolution to<br />
20 kHz is displayed in the FM broadcast band.<br />
Backlighting of the display is selectable by a “LIGHT”<br />
key on top of the cabinet. To prolong battery life with<br />
internal battery operation, the backlighting automatically<br />
turns off after a short delay following a function change<br />
or retuning of the receiver unless it is specifically locked<br />
in the ON mode.<br />
When the receiver is turned off, the display provides<br />
either the Local time or Greenwich Mean time (GMT),<br />
selectable in either the off or on state by the user.<br />
Reception modes include Single Sideband (LSB & USB)<br />
and AM in the Shortwave, MW (AM broadcast) and LW<br />
bands. For the LW, Shortwave and MW bands, a selectable<br />
sideband synchronous detector (SYNC) allows for<br />
enhanced AM reception by eliminating or reducing distortion<br />
due to fading signals or a strong adjacent signal.<br />
During FM broadcast use, stereo reception is available<br />
POWER SUPPLY<br />
AC ADAPTER and EXTERNAL DC POWERING<br />
The etón <strong>E1</strong> receiver is supplied with an AC ADAPTER.<br />
The AC ADAPTER is designed to be plugged into a wall<br />
outlet that supplies AC power, or another source of external<br />
filtered DC power between 7 and 12 VDC may be<br />
used.<br />
Connect the output connector of the AC adapter, or other<br />
power source, to the 9 VDC, 1 amp connector on the side<br />
of the receiver.<br />
through the use of headphones, or by connecting the<br />
line out jack to an external stereo system.<br />
Other built-in reception aids include selectable slow,<br />
fast, or automatic AGC time constant, scanning of memory<br />
channels, either by time or by carrier presence, passband<br />
tuning and squelch as well as treble and bass controls.<br />
Two independent, real time clocks provide Local or<br />
GMT time selection. Also provided are a two event<br />
timer, a SLEEP timer, and a SNOOZE mode.<br />
A programmable memory area allows for 1700 independent<br />
receiver set up memories. The first 500 of these<br />
memory channels allow names to be attached to the<br />
frequencies and modes stored. The remaining 1200<br />
memory channels allow frequencies to be stored by<br />
country. There are 111 country names factory stored in<br />
this bank of memory with 10 memory channels available<br />
per country and 90 memory channels remaining with no<br />
country assigned. These country names can be modified<br />
or added to by the user. These memories do not require<br />
battery backup and are thus unaffected by power interruptions.<br />
All parameters associated with a particular memory<br />
channel are stored including the frequency, mode, bandwidth,<br />
passband tuning setting, fast, slow, or automatic<br />
AGC and synchronous detector state. These memory<br />
channels may be accessed manually or through a time<br />
scan with each channel monitored for a 5 second period,<br />
or carrier presence.<br />
If batteries are installed and external power is lost, the<br />
receiver will continue to operate on battery power even<br />
with the DC plug inserted. If this occurs, the receiver will<br />
alert the user with a POWER LOSS indication, and with a<br />
POWER LOSS beep if the POWER LOSS beep feature is<br />
enabled. More details concerning power loss can be<br />
found on page 20, paragraph 27b.<br />
6 7
<strong>E1</strong> <strong>MANUAL</strong><br />
POWER SUPPLY continued<br />
POWER SUPPLY continued<br />
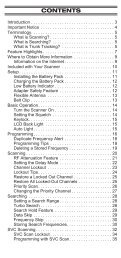
MADE IN CHINA<br />
MODEL: KA23D090100015G<br />
INPUT: 230V ~ 50Hz<br />
OUTPUT: 9V — 1000mA<br />
AC ADAPTOR<br />
MADE IN CHINA<br />
AC ADAPTER<br />
Keep curtains and other flammable materials out of<br />
direct contact with the AC ADAPTER to avoid overheating.<br />
BATTERY INSTALLATION<br />
The etón <strong>E1</strong> receiver is also designed to operate from<br />
four "D” cell batteries (not supplied). NOTE: Check the<br />
batteries periodically for leakage. IF UNIT IS TO BE<br />
STORED OR OTHERWISE NOT USED FOR AN EXTENDED<br />
PERIOD OF TIME, REMOVE THE BATTERIES TO PREVENT<br />
CORROSION AND POSSIBLE DAMAGE TO THE RECEIVER.<br />
Damage caused by battery acid leakage is not covered<br />
under the warranty.<br />
(1) Position the receiver with the front panel towards<br />
you.<br />
(2) Open the battery access door located at the lower<br />
left corner of the front panel. (Shown as #5 in the<br />
front panel drawing.)<br />
(3) Inside you will find an additional door as shown in<br />
the following illustration.<br />
Battery<br />
Access<br />
Panel<br />
MODEL: KA23D090100015G<br />
INPUT: 230V ~ 50Hz<br />
OUTPUT: 9V — 1000mA<br />
AC ADAPTOR<br />
Simultaneously press<br />
down and pull outward<br />
to open<br />
(4) Insert the first of four “D” sized batteries into the<br />
battery opening with the plus end of the battery to<br />
your left. See the following illustration.<br />
Insert battery with “+” end to the<br />
left, and slide battery to the right<br />
(5) Slide the battery to the right and continue in this<br />
manner until all four batteries are installed. Replace<br />
the inner door and close the outer door.<br />
BATTERY OPERATION<br />
The etón <strong>E1</strong> receiver does not rely on the batteries for<br />
retention of memory channels. However, to insure that<br />
clocks are maintained following the loss of AC power<br />
and battery removal, the receiver must first be connected<br />
to a source of AC power or have batteries installed.<br />
Clock settings are maintained for a time period of<br />
approximately 10 minutes after all power is removed.<br />
New batteries should be installed before this time period<br />
elapses or clock settings will be lost.<br />
BATTERY CONDITION<br />
Battery condition can be observed when the unit is<br />
turned on or if the ‘LIGHT’ button is pressed if no AC<br />
ADAPTER is connected to the receiver. W hen the<br />
POWER key is pressed, or when the ‘LIGHT’ button is<br />
pressed, a screen will be observed similar to the following<br />
illustration during the first two seconds after depres-<br />
INSTALLATION<br />
UNPACKING<br />
Carefully remove the etón <strong>E1</strong> receiver and included AC<br />
ADAPTER wall transformer from the shipping carton and<br />
examine them for evidence of damage. If any damage is<br />
noted, immediately contact the transportation company<br />
responsible for delivery, or return the unit to the dealer<br />
from whom it was purchased. Keep the shipping carton<br />
and all packing material for the transportation company<br />
to inspect. The original carton and packing material<br />
should be retained for repackaging should it be necessary<br />
to return the receiver. Inspect the packing material for<br />
any accessories or printed material before storing the<br />
box. Locate the registration card, fill it out, and immediately<br />
return it to etón to insure registration and validation<br />
of warranty.<br />
LOCATION<br />
For fixed locations, the etón <strong>E1</strong> receiver should be operated<br />
from the AC ADAPTER. Keep curtains and other<br />
flammable material away from direct contact with the A<br />
ADAPTER to avoid overheating the transformer which<br />
could result in failure or fire.<br />
sion. After that time, the normal <strong>E1</strong> display will be<br />
observed.<br />
(1) Battery Condition Graph - This bar graph shows the<br />
relative charge of the batteries installed in the<br />
receiver. You will note that on the left, there is an<br />
“EMPTY” notation and on the right is a “FULL”<br />
notation. A fully charged set of batteries will produce<br />
a graph reaching the “FULL” notation, and as<br />
the batteries discharge, the graph will extend only<br />
slightly passed the “EMPTY” notation.<br />
(2) LOW BATT - If this flashing reversed video indicator<br />
is observed, the batteries are too low for satisfactory<br />
operation and must be replaced.<br />
Note: Regardless of battery condition, neither items 1<br />
or 2 above will be observed if the unit is connected to<br />
the AC ADAPTER. If the AC ADAPTER is not connected,<br />
the condition graph will only be observed upon power<br />
up or with depression of the ‘LIGHT’ button.<br />
PORTABLE OPERATION<br />
For use in a portable environment, the etón <strong>E1</strong> receiver is<br />
operated from four (4) internally mounted "D" cell batteries.<br />
These batteries are not supplied and must be<br />
installed prior to portable operation of the receiver. See<br />
BATTERY INSTALLATION section on page 9 of this manual.<br />
For longest battery life, alkaline batteries are recommended<br />
for this product. NOTE: REMOVE THE BAT-<br />
TERIES IF THE RECEIVER IS TO BE STORED OR OTH-<br />
ERWISE NOT OPERATED FOR AN EXTENDED PERI-<br />
OD OF TIME TO AVOID DAMAGE TO THE etón <strong>E1</strong><br />
DUE TO POSSIBLE BATTERY LEAKAGE OR CORRO-<br />
SION EFFECTS. The etón <strong>E1</strong> receiver does not rely on<br />
the batteries for retention of memory channels. If power<br />
is lost, clock settings are maintained for a period of<br />
approximately 10 minutes to allow time to install new<br />
batteries. As long as good batteries are installed in the<br />
unit, the clocks are maintained regardless of whether<br />
there is external power applied or not.<br />
ANTENNA REQUIREMENTS<br />
(Refer to Figure 1, page 12)<br />
The etón <strong>E1</strong> receiver incorporates side panel switches to<br />
select between the internal telescopic antenna and various<br />
types of external antennas. The built-in telescopic<br />
antenna is available for use on all bands. A PAL type<br />
antenna connector, also located on the left side panel, is<br />
provided for external antennas for LF, MW, SW (HF is<br />
used to designate these ranges) and FM bands. A PN<br />
FIXED INSTALLATION<br />
After unpacking the unit, connect the antenna system to<br />
the ‘EXT ANTENNA’ input, or select the INTERNAL antenna<br />
and extend the build in telescopic antenna. Plug the<br />
Remove this door by pressing down and pulling outward<br />
on the “OPEN” tab.<br />
Plug the AC ADAPTER into a source of AC power. Refer<br />
to the Figure 1 on page 12 for the diagram of a typical<br />
fixed installation.<br />
8 9
<strong>E1</strong> <strong>MANUAL</strong><br />
INSTALLATION continued<br />
INSTALLATION continued<br />
278-265B adapter, sold by Radio Shack, Maplin<br />
Electronic Supplies (www.maplin.com) or an equivalent<br />
adapter, will adapt a female type F connection to the<br />
PAL-TO-F type connector on the etón <strong>E1</strong>.<br />
RIGHT SIDE AND REAR VIEWS<br />
Connect the outside antenna feed to the “EXT. ANTEN-<br />
NA“ jack located on the left side panel. The best antenna<br />
for any of the previously mentioned frequency bands<br />
will depend on the frequency range and time of day for<br />
the particular signal in question. Refer to publications<br />
such as the ARRL Handbook or ARRL Antenna Manual<br />
(available in most public libraries) for help on selection<br />
and/or construction of the antennas mentioned above.<br />
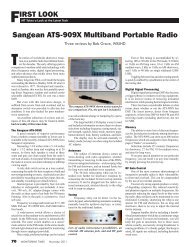
FIGURE 1: <strong>E1</strong> INSTALLATION DIAGRAM<br />
Low Impedance Antenna<br />
To Tape Recorder<br />
or Stereo System<br />
From CD or<br />
Tape Player<br />
VIEWING ANGLE<br />
On the back of the receiver is a hinged panel. This panel<br />
can be pulled out, and the receiver tilted back on it to<br />
provide a convenient viewing angle when operating the<br />
etón <strong>E1</strong> receiver on a table or similar surface in front of<br />
you, as shown below.<br />
TV/FM<br />
Splitter<br />
PAL<br />
Connector<br />
Telescopic<br />
antenna<br />
External<br />
Speaker<br />
VIEWING ANGLE OPTION<br />
Stereo Headphones<br />
LEFT VIEW<br />
Viewing angle<br />
fold out panel<br />
Antennas such as dipoles, trap dipoles, verticals and<br />
long wires will provide the best results on the LF, MW,<br />
and SW bands. The type to use for best results depends<br />
upon the desired receiving frequency, and will normally<br />
provide adequate results on the FM band. Outside TV<br />
antennas, folded dipoles, or coaxial antennas will provide<br />
the best results for reception of the FM broadcast<br />
band, but will not provide optimum results on LF, MW<br />
and SW bands.<br />
When viewing at a new angle, it may be desirable to<br />
readjust the LCD contrast control located behind the pull<br />
down door. See page 13, item 5.<br />
REAR VIEW<br />
10 11
<strong>E1</strong> <strong>MANUAL</strong><br />
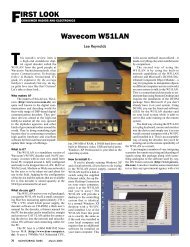
<strong>E1</strong> FRONT PANEL DESCRIPTION<br />
<strong>E1</strong> FRONT PANEL DESCRIPTION continued<br />
1<br />
2<br />
3<br />
4<br />
23<br />
22<br />
21<br />
20<br />
19<br />
18<br />
17<br />
16<br />
15<br />
knob will be ineffective, and “LOCK” and “TUN LOCK“<br />
will appear on the LCD display. To return to normal<br />
operating mode, once again press the ‘CLEAR/LOCK’ key<br />
for three seconds.This control can also be used when<br />
the receiver is turned off. Press ‘CLEAR/LOCK’ for 3 seconds.<br />
A message will appear confirming lock. If power is<br />
then pressed, a “Press CLEAR/LOCK for 3 seconds to<br />
unlock” message will appear. The user must perform this<br />
action before the ‘POWER’ key will allow power up.<br />
From either MEMORY or COUNTRY modes. Note that<br />
VFO (Variable Frequency Oscillator) is a register used to<br />
store the frequency to which the main ‘TUNING’ control<br />
is set. Turning the ‘TUNING’ control will change this frequency.<br />
sideband (LSB). When AM synchronous detection mode<br />
is first selected using the ‘AM’ softkey, pressing the ‘SSB’<br />
used to store the frequency to which the main ‘TUNING’<br />
control is set. Turning the ‘TUNING’ control will change<br />
this frequency.<br />
Pressing ‘TUNE’ transfers the frequency last listened to<br />
while in the MEMORY or COUNTRY modes to the VFO,<br />
along with the current associated function parameters.<br />
This allows for fine tuning of and around the transferred<br />
frequency or modifying its parameters. When ‘TUNE’ is<br />
pressed, “VFO STORED” will briefly appear on the display.<br />
This softkey is functional in MEMORY and COUN-<br />
TRY modes only.<br />
5<br />
6<br />
7<br />
8<br />
1. Squelch<br />
This control allows muting of the receiver’s audio when<br />
no signals are present. Adjust the control until background<br />
noise just disappears when no signal is being<br />
received. An indicator is provided on the display directly<br />
under the signal strength display to show how the<br />
squelch is set relative to received signal strength. (See<br />
the display description starting on page 18). Squelch<br />
also sets the threshold for carrier scan stop. Muting can<br />
be disabled in AUDIO SETTINGS menu, Item 4. However,<br />
carrier stop threshold will be controlled by the Squelch<br />
control regardless of whether or not muting has been<br />
disabled.<br />
2. Treble<br />
This control adjusts the audio frequency response at the<br />
high end of the audio spectrum. Adjust clockwise fo<br />
more treble response.<br />
3. Bass<br />
This control adjusts the audio frequency response at the<br />
low end of the audio spectrum. Adjust clockwise for<br />
more bass response.<br />
4. Volume<br />
With the receiver on, adjust this control clockwise to<br />
increase the audio level from the receiver’s speaker or<br />
from headphones. Be certain to set the volume setting<br />
at the desired level for TIMER use.<br />
5. Access Door<br />
Provides access to the battery access panel, to the<br />
microprocessor Reset button access hole, to the Display<br />
Contrast Knob, and to the Factory Programming<br />
Connector. The Factory Programming Connector should<br />
be used only by a factory authorized service center. The<br />
Display Contrast Knob should be adjusted for best display<br />
contrast from the normal viewing position. The<br />
Reset button “reboots” the microprocessor and should<br />
be pressed using a straightened paperclip in the unlikely<br />
event that the receiver exhibits erratic operation,<br />
“freezes”, or displays a flashing “UNLOCK” on the display.<br />
(See the following diagram for the location of<br />
these items).<br />
Battery<br />
Access<br />
Panel<br />
Reset<br />
Button<br />
14<br />
13<br />
12<br />
11<br />
10<br />
9<br />
Display<br />
Contrast<br />
Knob<br />
Factory<br />
Programming<br />
Connector<br />
6. Direct- Key-Input<br />
Numeric Keys - Keys 0 thru 9 plus the ‘.’ key are used to<br />
make direct numeric entries of frequencies, memory<br />
channel numbers, meter band designators, menu selections,<br />
and timer settings. CLEAR / LOCK - Press this key<br />
to clear an incorrectly entered frequency or other value.<br />
Pressing and holding this key for three seconds will<br />
cause the receiver to be locked in its present configuration.<br />
All front panel key controls as well as the ‘TUNING’<br />
7. FM / LW / MW / SW Mode - Function Softkeys<br />
The function of each of these softkeys is shown along<br />
the bottom edge of the display when the receiver is in<br />
the ON state. From left to right their functions when a<br />
menu is not displayed are as follows:<br />
MENU - Pressing this softkey displays the first of several<br />
menus used for setting clocks, timers and various other<br />
receiver functions. Each additional press advances to<br />
another menu page.<br />
AGC - Pressing this softkey will toggle the AGC decay<br />
time between fast, slow, and auto in all modes but FM.<br />
When in FM mode, there will be no display function<br />
shown for this softkey.<br />
BW - Press repeatedly to scroll through the three available<br />
IF bandwidths of 7.0, 4.0, and 2.3 kHz in all modes<br />
but FM. When in the FM mode, there will be no display<br />
function shown for this softkey.<br />
PBT - Pressing this softkey enables/disables the function<br />
of the PBT (passband tuning) knob in all modes except<br />
FM. The displacement in kHz of the IF passband relative<br />
to its nominal position is shown on the display directly<br />
above the PBT softkey when it is enabled. When in FM<br />
mode, there will be no display function shown for this<br />
softkey.<br />
AM - Press to select AM (amplitude modulation) mode.<br />
When AM mode is selected, a second press of the softkey<br />
selects AM synchronous detection mode (AM SYNC).<br />
Repeated depressions of this softkey will cycle the synchronous<br />
detection mode on and off. When in FM mode,<br />
there will be no display function shown for this softkey.<br />
SSB - Press to select SSB (Single Sideband) mode. Once<br />
SSB mode is selected, repeatedly pressing the SSB softkey<br />
will cycle between upper sideband (USB) and lower<br />
8. < SELECT ><br />
In VFO mode, pressing the ‘’ ends of this key will<br />
cause the frequency to increment or decrement in 5 kHz<br />
steps on LF and SW bands, in either 9 or 10 kHz steps<br />
on the MW (AM broadcast) band depending on a menu<br />
setting, and in 100 kHz steps on the FM band. When in<br />
MEMORY or COUNTRY modes, each press of the ‘’ ends of the key causes the display to decrement or<br />
increment respectively one memory page. When in<br />
MEMORY or COUNTRY modes, holding down the ‘’ will cause the unit to scroll through the MEMORY or<br />
COUNTRY pages. When programming in MEMORY<br />
mode, pressing ‘’ moves the curser left or right<br />
respectively for entering the names for stored frequencies.<br />
9. STORE<br />
This key is used to store various pieces of information<br />
including setting the Local and GMT clocks, setting<br />
parameters and labels in the 500 MEMORY channels,<br />
and saving parameters in the 1200 COUNTRY channels.<br />
10. DELETE<br />
Use this key to delete entries in the 500 MEMORY or<br />
1200 COUNTRY.<br />
11. TAG<br />
Pressing this key adds (or removes) a tag shown as a<br />
“T” on MEMORY and COUNTRY displays from any<br />
of the MEMORY and COUNTRY for selective scanning.<br />
12. T. SCAN<br />
Used to initiate or stop a scan of MEMORY or COUNTRY<br />
channels marked with a “T” tag.<br />
13. SEEK<br />
Pressing the SEEK key will cause the frequency to increment<br />
in 5 kHz steps on LW, and SW modes, 9 or 10 kHz<br />
steps in MW, depending on the setting of item 4 in the<br />
12 13
<strong>E1</strong> <strong>MANUAL</strong><br />
<strong>E1</strong> FRONT PANEL DESCRIPTION continued<br />
<strong>E1</strong> FRONT PANEL DESCRIPTION continued<br />
“RADIO SETTINGS” menu, and 200 kHz steps on FM<br />
mode, until a signal is encountered that is stronger than<br />
the SQUELCH setting. While SEEK is engaged, the word<br />
“SEEK” will appear on the display.<br />
14. TIME<br />
Pressing the ‘TIME’ key will cause the TIMER 1 screen to<br />
appear on the display, allowing TIMER 1 to be enabled<br />
or disabled. Pressing it a second time will cause the<br />
TIMER 2 screen to appear, allowing it also to be enabled<br />
or disabled. Pressing the TIME key the third time brings<br />
up the “CLOCKS” menu which will allow selection of<br />
GMT or LOCAL time for the time display. Pressing the<br />
‘TIME’ key the fourth time will return the display to the<br />
VFO, MEMORY or COUNTRY screens, depending upon<br />
which of these screens was being displayed when the<br />
‘TIME’ key was pressed the first time. The receiver displays<br />
the time when in the off mode, and when in this<br />
state, pressing the ‘TIME’ key will toggle the displa<br />
between Local and GMT time.<br />
15. PBT<br />
The PBT (PassBand Tuning) knob varies the IF passband<br />
of the receiver plus or minus 2 kHz relative to the detector<br />
beat frequency oscillator (BFO) in SSB mode, and relative<br />
to the displayed frequency when on AM mode. This<br />
is particularly useful in reducing or eliminating interference<br />
to the desired signal from nearby signals. The PBT<br />
knob will be ineffective unless the ‘PBT’ softkey beneath<br />
the display is pressed. The amount of IF frequency displacement<br />
from nominal will be displayed directly above<br />
the ‘PBT’ function label on the display. PBT tuning is not<br />
available in FM or AUX modes. In MEMORY or COUN-<br />
TRY modes, the stored PBT value will always be recalled<br />
and “MEM” will be indicated above the ‘PBT’ softkey<br />
until changed.<br />
16. DX<br />
The ‘DX’ softkey turns on or off an RF preamplifier which<br />
is useful in improving the readability of very weak signals,<br />
especially when using the built in telescopic antenna<br />
or other short antennas. When the preamplifier is<br />
enabled, “DX” will appear on the display. When using<br />
long antennas or when the receiver is in close proximity<br />
to very strong broadcast transmitters, the receiver will<br />
perform best with ‘DX’ off. The DX function is not available<br />
in AUX mode. Note that battery life will be reduced<br />
somewhat if DX is enabled during portable operation.<br />
17. FAST / TUNING LOCK<br />
Repeatedly pressing the FAST / TUNING LOCK key cycles<br />
through the available tuning rates for the current operating<br />
mode, as explained in more detail under “Tuning”<br />
which follows. Holding down the ‘FAST / TUNING LOCK’<br />
key for approximately 2 seconds will lock out the ‘TUN-<br />
ING’ knob and will cause “TUN LOCK” appear on the<br />
display. Depressing the key again for approximately 2<br />
seconds will unlock the ‘TUNING’ knob and “TUN<br />
LOCK” will disappear from the display.<br />
18. Tuning<br />
The 'TUNING' knob is the primary tuning control of the<br />
<strong>E1</strong> receiver. In VFO mode, clockwise rotation of the dial<br />
increases frequency and counterclockwise rotation<br />
decreases frequency. The rate at which frequency is<br />
increased or decreased is determined by the band being<br />
tuned and by pressing the ‘FAST/TUNING LOCK’ key on<br />
a given band. In VFO mode, the ‘FAST/TUNING LOCK’<br />
key also changes the displayed frequency resolution. In<br />
MEMORY mode, the ‘TUNING’ knob scrolls through the<br />
500 MEMORY channels one at a time. If the ‘FAST/TUN-<br />
ING LOCK’ key is pressed, “FAST” appears on the display<br />
and the ‘TUNING’ control scrolls through the 500<br />
MEMORY channels 10 at a time as long as the ‘TUN-<br />
ING’ knob is being turned. If the ‘TUNING’ knob is not<br />
moved for three seconds, the “FAST” on the display will<br />
disappear and the ‘TUNING’ knob will revert to tuning<br />
MEMORY channels one at a time.<br />
The ‘TUNING’ knob is also used when programming in<br />
MEMORY mode to scroll through all available alphanumeric<br />
characters when entering names for each MEMO-<br />
RY entry.<br />
In COUNTRY mode, the ‘TUNING’ knob scrolls through<br />
COUNTRY memory channels one at a time. If the<br />
‘FAST/TUNING LOCK’ key is pressed, “FAST” appears on<br />
the display and the ‘TUNING’ knob scrolls through the<br />
available countries one country at a time with 10 memory<br />
channels being available per country.<br />
In SW BAND mode, the ‘TUNING’ control will scroll<br />
through the available shortwave broadcast bands from<br />
120 meters through 11 meters.<br />
19. Mode Softkeys<br />
The purpose of each of these softkeys is shown along<br />
the right edge of the display when the receiver is in the<br />
ON state. From top to bottom their descriptions are as<br />
follows:<br />
FM / AUX - Pressing this softkey toggles between the<br />
FM broadcast band and the AUX function. The selected<br />
function will be in reverse video. The first press of this<br />
softkey selects the FM broadcast band (76.0 - 90.0 MHz<br />
or 87.0 -108.0 MHz) and causes the label for this key to<br />
appear as “ FM / AUX ”. When in FM mode, only the<br />
MENU function softkey along the bottom of the display<br />
will be active. Pressing this softkey a second time toggles<br />
to the AUX function which causes the softkey label<br />
to appear as “ FM / AUX ”. The AUX function allows<br />
stereo audio fed into the LINE IN connector on the side<br />
panel to be fed to the internal speaker or to headphones<br />
plugged into the stereo headphone jack, which<br />
is also on the side panel. The ‘VOLUME’, ‘TREBLE’, and<br />
‘BASS’ controls will be active in this mode.<br />
SW BAND - Pressing the ‘SW BAND’ softkey once<br />
enables the shortwave band (1.800 - 30.000 MHz). The<br />
MW / LW - Repeatedly pressing the ‘MW / LW’ softkey<br />
toggles between the LW band (100 - 499.99 kHz) and<br />
the MW band (500 - 1799.99 kHz).<br />
VFO - This softkey returns to the VFO mode from MEM-<br />
ORY or COUNTRY modes. The frequency displayed will<br />
be the same as the frequency last selected in VFO mode<br />
before MEMORY or COUNTRY modes were selected.<br />
MEMORY - Selects MEMORY mode which allows programming<br />
or listening to the programmed contents of<br />
memory channels 1 through 500.<br />
Shortwave Band Designators<br />
Band<br />
120 Meter<br />
90 Meter<br />
75 Meter<br />
60 Meter<br />
49 Meter<br />
41 Meter<br />
31 Meter<br />
25 Meter<br />
22 Meter<br />
19 Meter<br />
16 Meter<br />
13 Meter<br />
11 Meter<br />
Low<br />
2300 kHz<br />
3200 kHz<br />
3900 kHz<br />
4750 kHz<br />
5800 kHz<br />
7100 kHz<br />
9500 kHz<br />
11,600 kHz<br />
13,570 kHz<br />
15,100 kHz<br />
17,480 kHz<br />
21,450 kHz<br />
25,600 kHz<br />
20. POWER<br />
Pressing this key toggles the unit on and off.<br />
21. Display<br />
This is a dot matrix LCD display. See the DISPLAY<br />
description for details.<br />
COUNTRY - Selects COUNTRY mode which allows programming<br />
or listening to the contents of memory<br />
channels 501 through 1700. These 1200 memory channels<br />
are divided among 111 countries from Afghanistan<br />
to Yugoslavia with 10 memory channels per country, and<br />
with 90 memory channels remaining with no country<br />
assigned. Display will appear as “BAND ”. Pressing the<br />
‘SW BAND’ softkey again once SW has been selected<br />
will cause the ‘--’ portion of “SW -- M” on the display<br />
to flash and the display will show “ SW BAND ” for<br />
approximately SW BAND 2 seconds. During this 2 second<br />
interval, entering the meter designator for the<br />
desired meter band will cause the receiver to go to the<br />
low end of the frequency range for the desired meter<br />
band. During this 2 second interval one can also scroll<br />
through the available SW bands using the ‘TUNING’<br />
knob or the ‘< SELECT >’ key. Each keypress or TUNING<br />
input resets the two second timer. The frequency ranges<br />
for the defined meter shortwave bands are as shown in<br />
the ‘Shortwave Band Designators’ table which follows.<br />
High Freq<br />
2500 kHz<br />
3400 kHz<br />
4000 kHz<br />
5060 kHz<br />
6200 kHz<br />
7600 kHz<br />
9900 kHz<br />
12,100 kHz<br />
13,870 kHz<br />
15,800 kHz<br />
17,900 kHz<br />
21,850 kHz<br />
26,100 kHz<br />
22. Speaker<br />
This is the opening for the internal speaker for the <strong>E1</strong><br />
receiver.<br />
23. Telescopic Antenna<br />
This is a 39 1/4“ (1.003 meters) telescopic antenna for<br />
use on all bands.<br />
14 15
<strong>E1</strong> <strong>MANUAL</strong><br />
TOP PANEL DESCRIPTION<br />
<strong>E1</strong> DISPLAY DESCRIPTION<br />
1<br />
2<br />
3<br />
1. TELESCOPIC ANTENNA<br />
This is a 39 1/4“ (1.003 meters) telescopic antenna for<br />
use on all bands.<br />
2. LIGHT<br />
Pressing this key while the receiver is turned ON cycles<br />
the display illumination through four brightness states;<br />
Off, Dim, Medium and Bright. When the receiver is in the<br />
OFF state and connected to external power, the display,<br />
when lit, will be DIM. Pressing the ‘LIGHT button will<br />
cycle the display illumination on and off with no time<br />
out. If the unit is operating from batteries, the display will<br />
be lit only briefly when the unit is turned OFF. If, when<br />
OFF, the ‘LIGHT’ button is pressed once, the display will<br />
illuminate for 10 seconds and then go out. In the ON<br />
state, the display will be lit only briefly following control<br />
inputs. However, holding down the LIGHT key for 3 seconds<br />
will override the time out and allow the light to<br />
remain on continuously when the receiver is ON. The user<br />
must keep in mind, however that keeping the light on<br />
continuously when operating on batteries will considerably<br />
reduce battery life. More details concerning display<br />
illumination can be found on page 57 under “DISPLAY<br />
LIGHTING”.<br />
3. SNOOZE / SLEEP<br />
When the receiver is ON, or turned on by the timer, pressing<br />
this bar will activate the SNOOZE mode, causing the<br />
receiver to turn OFF for 5,10, 20, or 30 minutes, depending<br />
upon the setting of item 5 of the “CLOCK MODES”<br />
menu. After the selected number of minutes have passed,<br />
the receiver will turn back on.To cancel a SNOOZE period<br />
early, cycle power OFF/ON with the ‘POWER’ key. When<br />
SNOOZE mode is active, “SNOOZE” will appear on the<br />
display.<br />
When the receiver is OFF, other than in SNOOZE,pushing<br />
this bar will activate the SLEEP timer. This will turn the<br />
receiver ON for the default set time of 15 minutes, after<br />
which it will turn back OFF. To change the set time length<br />
from the default 15 minutes to 1 through 99 minutes,<br />
turn the receiver OFF and rotate the ‘TUNING’ control<br />
after pressing the SNOOZE / SLEEP bar. After setting the<br />
desired SLEEP time, press the bar again to activate SLEEP<br />
mode, or automatic entry will occur in 15 seconds. The<br />
displayed time is always in minutes. When SLEEP mode is<br />
active, a flashing “s XX” will appear in the lower left<br />
hand corner of the display, where “XX” is a number indicating<br />
the minutes of SLEEP time remaining.<br />
The following section describes the main display which<br />
will be seen when operating in the VFO mode, This is<br />
the display which the user will see most of the time.<br />
There are several other screens which may appear on<br />
this display under various conditions. These additional<br />
conditions will be covered later.<br />
1. SIGNAL<br />
The signal meter indicates the signal strength of the<br />
incoming signal. The stronger the signal, the more vertical<br />
bars appear from left to right across the display.<br />
From 100 through 30,000 kHz, the signal meter is calibrated<br />
in S units from 1 thru 9 and in decibels (dB)<br />
above S9 up to +60 dB. On the FM band, the signa<br />
strength is just relative.<br />
2. SQUELCH LEVEL INDICATOR<br />
This bar advances as the ‘SQUELCH’ knob is turned<br />
clockwise. It indicates the level at which the incoming<br />
signal is strong enough to overcome the SQUELCH setting.<br />
If the SQUELCH muting is enabled (which is done<br />
by menu) a signal level that is higher than the<br />
SQUELCH setting will be audible, while one that is<br />
below the SQUELCH setting will not. A signal stronger<br />
than the SQUELCH setting will cause scanning to stop<br />
on that frequency if the “CARRIER” stop mode is<br />
selected in the “RADIO SETTINGS” menu (item 2).<br />
3. INTERNAL/EXTERNAL ANTENNA INDICATOR<br />
EXT ANT or INT ANT will be displayed depending upon<br />
whether or not the mode in use (FM or HF) has its<br />
respective antenna switch on the side panel in the<br />
internal or external position.<br />
4. DX<br />
This indicator appears when the DX key is pressed,<br />
indicating that an RF preamplifier has been enabled to<br />
improve performance on weak signals. The DX setting<br />
will slightly reduce battery life when operating on battery<br />
power.<br />
5. SEEK<br />
This indicator is visible when the SEEK mode is enabled<br />
by pressing the SEEK key.<br />
6. VFO STORED<br />
This indicator appears when the ‘TUNE’ softkey is<br />
pressed. The ‘TUNE’ softkey is active in the COUNTRY<br />
and MEMORY modes.<br />
7. FREQUENCY DISPLAY<br />
This is the main frequency readout of the receiver.<br />
8. SW -- M<br />
Indicates the meter band to which the receiver is tuned<br />
when in SW mode. See the “Shortwave Band<br />
Designators” table on page 22 for a listing of meter<br />
bands. LW, MW or FM also appear here when those<br />
bands are selected.<br />
9. STEREO<br />
STEREO or MONO appear here when on the FM band.<br />
STEREO will appear if stereo is enabled from the<br />
“AUDIO SETTINGS” menu, and a stereo signal is being<br />
received.<br />
16 17
<strong>E1</strong> <strong>MANUAL</strong><br />
<strong>E1</strong> DISPLAY DESCRIPTION continued<br />
<strong>E1</strong> DISPLAY DESCRIPTION continued<br />
10. MHz / kHz<br />
Indicates whether the frequency displayed is shown in<br />
megahertz or kilohertz.<br />
11. MENU<br />
Labels the ‘MENU’ softkey which is used to bring up a<br />
series of menus. Repeatedly pressing this key will<br />
advance through additional menu pages.<br />
12. AGC<br />
Labels the ‘AGC’ (Automatic Gain Control) softkey and<br />
shows its release time status (Slow, Fast, or Auto).<br />
Auto mode selects SLOW release time but automatically<br />
switches to fast release only while tuning.<br />
13. BW<br />
Labels the Bandwidth softkey and shows its status<br />
(2.3, 4.0, or 7.0 kHz).<br />
14. PBT<br />
Labels the ‘PBT’ softkey. The ‘PBT’ softkey enables and<br />
disables the ‘PBT’ (Passband Tuning) knob. W hen the<br />
softkey is enabled, its frequency displacement relative<br />
to nominal is shown above “PBT”. The reading will be<br />
between +2.0 and - 2.0 kHz.<br />
15. AM<br />
Labels the ‘AM’ softkey, and shows its status. The ‘AM’<br />
softkey enables AM mode. When AM is enabled,“AM”<br />
appears over the “AM” softkey label. If the softkey is<br />
pressed a second time, “AM SYNC” appears over the<br />
“AM” label to indicate that the synchronous detector<br />
is operating.<br />
16. SSB<br />
This labels the ‘SSB’ softkey and shows its status.<br />
Pressing the ‘SSB’ softkey enables single sideband<br />
reception, causing either “USB” or “LSB” to appear<br />
above the “SSB” label. Pressing the ‘SSB’ softkey again<br />
after SSB is selected will toggle the display between<br />
“USB” and “LSB”. When AM SYNC has been selected,<br />
pressing the ’SSB’ softkey will toggle through the<br />
modes of the AM synchronous detector: USB, LSB and<br />
DSB.<br />
17. COUNTRY<br />
This labels the ‘COUNTRY’ softkey. When this softkey is<br />
pressed, Country mode is selected and the label<br />
appears as “COUNTRY”.<br />
18. TUN LOCK<br />
This indicator appears when the ‘FAST / TUNING LOCK’<br />
softkey has been pressed for 2 seconds. It indicates<br />
that the ‘TUNING’ knob has been locked out and will<br />
have no affect.<br />
19. MEMORY<br />
This labels the ‘MEMORY’ softkey. W hen this softkey is<br />
pressed, MEMORY mode is selected and the label<br />
appears as “MEMORY”.<br />
20. VFO<br />
This labels the ‘VFO’ softkey. W hen this softkey is<br />
pressed, the receiver returns to the VFO mode from<br />
COUNTRY or MEMORY modes, but the frequency being<br />
received from the MEMORY or COUNTRY modes is not<br />
transferred. The frequency displayed will be the same<br />
as was last being received when last in VFO mode. The<br />
indicator will appear as “VFO” when VFO mode is<br />
active.<br />
21. MW / LW<br />
This indicator labels the ‘MW / LW’ select softkey.<br />
Pressing this softkey will select either MW (AM<br />
Broadcast) or LW (Long Wave) frequency ranges.<br />
Repeatedly pressing this softkey will toggle between<br />
these two modes. Depending upon the mode selected,<br />
this indicator will appear either as “MW / LW” or<br />
“MW / LW”.<br />
22. SW BAND<br />
This indicator labels the ‘SW BAND’ softkey. Pressing<br />
this softkey once selects the SW (Short Wave) band<br />
(1.8 - 30.0 MHz). This gives an indication of “SW<br />
BAND” on the display. Pressing this softkey a second<br />
time causes the display to appear as “SW BAND”, and<br />
permits the tuning knob or the ‘< SELECT >’ key to<br />
scroll through the available meter bands as shown on<br />
the “Shortwave Band Designator” table on page 16. If<br />
no movement of the ‘TUNING’ knob or input to the ‘<<br />
SELECT >’ key occurs for 3 seconds, the display will<br />
revert back to “SW BAND” and normal tuning will<br />
resume.<br />
23. AUX<br />
This labels the ‘AUX’ softkey. Pressing this softkey<br />
activates the AUX mode and causes the indicator<br />
to appear as “AUX“. Selecting this mode enables<br />
audio fed in the LINE IN jack on the side panel to be<br />
fed through to the <strong>E1</strong> receiver’s audio system.<br />
24. FM<br />
Pressing this softkey once selects the FM Broadcast<br />
band (76 - 90<br />
MHz or 87 - 108 MHz) and causes the indicator to<br />
appear as “FM / AUX“.<br />
25. TIMER 1 2<br />
This display appears when one or both of the event<br />
timers are enabled.<br />
26. TIME DISPLAY<br />
This displays the time, which can be either Greenwich<br />
Mean Time (GMT) or Local time (L). If the time display<br />
is flashing, this is an indication that the time has not<br />
been set. See “Clock and Timer Functions” on page<br />
52.<br />
27a. LOW BATT<br />
This flashing reverse video indicator appears when no<br />
external AC Adapter is connected, and the battery voltage<br />
is too low for satisfactory operation. If this flashing<br />
indicator is seen, the batteries should be replaced.<br />
27b. POWER LOSS<br />
This indicator, which appears in the same location on<br />
the display as “LOW BATT”, will be seen when the<br />
power is lost. It means that the receiver is operating<br />
SIDE PANEL DESCRIPTION<br />
1<br />
2<br />
3<br />
4<br />
5<br />
6<br />
7<br />
8<br />
9<br />
from the internal batteries, if so equipped. If the<br />
POWER LOSS BEEP is enabled (AUDIO SETTINGS<br />
menu, selection 3), there will also be four beeps in<br />
rapid succession, once per minute. (Volume controlled).<br />
28. LOCK<br />
This indicator appears when the ‘CLEAR/LOCK’ key has<br />
been pressed for 3 seconds. W hen this condition<br />
exists, all front panel keys (except for ‘CLEAR/LOCK’)<br />
plus the ‘TUNING’ and ‘PBT’ knobs will be ineffective.<br />
Pressing ‘CLEAR/LOCK’ again for 3 seconds will enable<br />
normal operation, and the “LOCK” indicator will disappear.<br />
29. ERROR<br />
This indicator will appear along with an audio beep<br />
when an error condition exists, such as pressing one of<br />
the softkeys which has no label in the mode selected.<br />
1. TELESCOPIC ANTENNA<br />
The receiver has a built-in telescopic antenna that can<br />
be used on all bands. Note that the pivot point section<br />
of the antenna must be exposed out of its nesting tube<br />
to permit moving the antenna from its vertical orientation.<br />
Extend the telescopic sections and position the<br />
antenna for best signal reception. Be sure the corresponding<br />
side panel antenna select switches are set to<br />
the ‘INTERNAL’ position for TELESCOPIC antenna<br />
reception.<br />
2. LINE IN<br />
This 1/8" diameter stereo jack is used to feed in audio<br />
from an external source such as a CD or cassette tape<br />
player. The input level should be approximately 300<br />
mV, at an impedance of 47K ohm. This input is enabled<br />
when the AUX mode is selected. When in this mode,<br />
the VOLUME, BASS and TREBLE controls are effective.<br />
3. LINE OUT<br />
This 1/8" diameter stereo jack provides a constant low<br />
level audio source that is independent of the front<br />
panel ‘VOLUME’, ‘TREBLE’ and ‘BASS’ control settings.<br />
It is designed to interface to a tape recorder, CW /<br />
RTTY demodulators, stereo amplifiers, etc.<br />
18 19
<strong>E1</strong> <strong>MANUAL</strong><br />
SIDE PANEL DESCRIPTION continued<br />
GETTING STARTED continued<br />
4. ANTENNA HF<br />
This switch selects between the internal TELESCOPIC<br />
antenna and the external antenna connector when<br />
receiving LW, MW, or SW frequency ranges.<br />
5. ANTENNA FM<br />
This switch selects between the internal TELESCOPIC<br />
antenna and the external antenna connector when<br />
receiving the FM Broadcast band (76 - 90 MHz or 87 –<br />
108 MHz).<br />
6. EXT ANTENNA<br />
This PAL type male input connector is designed for an<br />
unbalanced 50 to 75 ohm input connection that is<br />
encountered with coaxial feeds.<br />
GETTING STARTED<br />
GENERAL OPERATING INFORMATION<br />
The etón <strong>E1</strong> receiver has been designed for ease of<br />
use. Please take a few moments to read through this<br />
section and familiarize yourself with general operating<br />
information. In this manual, the term AM stands for<br />
Amplitude Modulation, not the commercial AM broadcast<br />
band of 530 - 1710 kilohertz. When referring to<br />
the commercial AM broadcast band, the term MW<br />
(medium wave) is used.<br />
FIRST STEPS<br />
Please refer to the front panel illustration on page 13<br />
and set the controls as described below.<br />
(1) Install 4 "D" batteries or connect AC ADAPTER.<br />
(2) Fully extend the telescopic antenna and adjust to a<br />
vertical position, or connect an external antenna to<br />
the side panel EXT. ANTENNA jack. Set side panel<br />
‘ANTENNA HF’ and/or ‘ANTENNA FM' switch(es) to<br />
appropriate position(s) (INTERNAL or EXTERNAL).<br />
(3) Press ‘POWER’ and adjust ‘VOLUME’ to a<br />
comfortable level.<br />
(4) Select the desired band by pressing the ‘FM’, ‘SW’<br />
or ‘MW/LW’ softkeys until the desired band is dis<br />
played on the front panel display. The selected<br />
band will be indicated by reverse video on the<br />
display. For example: “MW / LW “.<br />
(5) Enter the desired frequency by using one of several<br />
methods as described in “DIRECT FREQUENCY<br />
ENTRY” or use the ‘TUNING’ knob to tune until<br />
the desired frequency is displayed.<br />
7. DC IN 9 V<br />
Connect the AC ADAPTER wall transformer output<br />
cable to this connector. The receiver requires 9 VDC<br />
power at approximately 1 Amp current. With external<br />
DC power applied, the internal batteries are not used.<br />
8. EXT SPEAKER<br />
This 1/8“ monophonic connector provides 1.25 to 3.0<br />
watts audio output for an external 4 to 8 ohm speaker.<br />
9. HEADPHONE<br />
This connector accepts a 1/8" (3.175 mm)<br />
stereo/mono headphone connector. Stereo reception is<br />
possible only in the FM mode. All speaker outputs are<br />
automatically switched off when<br />
DIRECT FREQUENCY ENTRY<br />
Direct entry of a desired frequency is possible using the<br />
‘Direct-Key-Input’ keys. While entering a frequency, if<br />
an incorrect frequency is entered, pressing the<br />
‘CLEAR/LOCK’ key will clear the entry in progress and<br />
return the receiver to its previous settings. The second<br />
depression of the decimal (.) key acts as an ‘ENTER'<br />
and causes immediate response to the entered frequency.<br />
If you do not press the decimal (.) key a second<br />
time at the end, the receiver will automatically<br />
enter the frequency after a slight delay. Enter frequency<br />
as follows:<br />
(A) The LW and MW (AM broadcast) bands enter and<br />
display in kHz (Kilohertz). A maximum of 6 digits may<br />
be entered.<br />
Examples:<br />
700 KHz<br />
Press ‘7', ’0' , ’0' , ’.’ ,’ .’ **<br />
1290.00 kHz<br />
Press ‘1', ‘2', ‘9', ‘0', ‘.’, ‘0’, ‘0’ *<br />
* When the maximum number of allowed digits is<br />
entered, the decimal point will be automatically placed<br />
between the 1 kHz and .1 kHz digits and need not be<br />
entered.<br />
** The second depression of the ‘.’ key acts as an<br />
‘ENTER’ and causes immediate response to the<br />
entered frequency. If you do not press the decimal ‘.’ a<br />
second time at the end, the receiver will automatically<br />
enter the frequency after a slight delay.<br />
(B) The SW band (1.8 - 30.0 MHz) frequencies are displayed<br />
and entered in kHz or MHz, depending upon<br />
the user’s selection from item 5 of the RADIO SET-<br />
TINGS menu. A maximum of 7 digits may be entered.<br />
To make the menu selection, press the ‘MENU’ softkey<br />
once. Then press ‘Direct-Key-Input’ key ‘5'. Repeatedly<br />
pressing the ‘5' key toggles between kHz and MHz as<br />
the display and entry method for the SW band. Leave<br />
the reverse video entry 0on the desired display<br />
method. For example, line 5 on the menu should<br />
appear as follows for entry in kHz:<br />
“ 5 SW BAND ENTRY kHz / MHz“.<br />
After making this selection, press ‘Direct-Key-Input’ key<br />
‘9' to exit the menu. Note that if kHz is selected from<br />
the menu, the display will show frequencies from 1.8 -<br />
30.0 MHz in Kilohertz, and entries should be made in<br />
kHz.<br />
Example:<br />
14,258.1 kHz<br />
Press ‘1', ‘4', ‘2', ‘5', ‘8', ’.’, ‘1', ‘.’ **<br />
OR Press ‘1', ‘4', ‘2', ‘5', ‘8', ‘.’, ‘1', ‘0' *<br />
If MHz was selected from the menu all frequency<br />
entries should be made in MHz.<br />
Example:<br />
14.2581 MHz<br />
Press ‘1', ‘4', ‘.’, ‘2', ‘5', ‘8', ‘1', ‘.’ **<br />
OR Press ‘1', ‘4', ‘.’, ‘2', ‘5', ‘8', ‘1', ‘0' *<br />
* When the maximum number of allowed digits is<br />
entered, the 7th digit acts as an enter key, and a second<br />
‘.’ need not be entered<br />
** The second depression of the ‘.’ key acts as an<br />
‘ENTER’ and causes immediate response to the<br />
entered frequency. If you do not press the decimal ‘.’ a<br />
second time at the end, the receiver will automatically<br />
Shortwave Band Designators<br />
Band<br />
120 Meter<br />
90 Meter<br />
75 Meter<br />
60 Meter<br />
49 Meter<br />
41 Meter<br />
31 Meter<br />
25 Meter<br />
22 Meter<br />
19 Meter<br />
16 Meter<br />
13 Meter<br />
11 Meter<br />
Low<br />
2300 kHz<br />
3200 kHz<br />
3900 kHz<br />
4750 kHz<br />
5800 kHz<br />
7100 kHz<br />
9500 kHz<br />
11,600 kHz<br />
13,570 kHz<br />
15,100 kHz<br />
17,480 kHz<br />
21,450 kHz<br />
25,600 kHz<br />
enter the frequency after a slight delay.<br />
(C) FM broadcast band enters and displays in MHz<br />
(megahertz) regardless of the RADIO SETTINGS menu<br />
setting. A maximum of 5 digits may be entered for FM.<br />
Examples:<br />
97.7 MHz<br />
Press ‘9', ‘7', ‘.’, ‘7' ‘.’ **<br />
107.7 MHz<br />
Press ‘1', ‘0', ‘7', ‘.’, ’7', ‘.’ **<br />
OR Press ‘1', ‘0', ‘7', ‘.’, ‘7', ‘0' *<br />
Attempting to enter a frequency outside the tuning<br />
range of the etón <strong>E1</strong> receiver will cause the ERROR<br />
annunciator to flash and an error beep to be heard.<br />
The receiver will then return to its previous settings.<br />
SHORTWAVE ‘METER' BAND DESIGNATOR ENTRY<br />
To facilitate tuning to particular sections of the shortwave<br />
band that contain many worldwide broadcasts of<br />
news, information and music, the etón <strong>E1</strong> receiver permits<br />
entry of the ‘METER' band designator. In some<br />
cases, the worldwide broadcast station may not<br />
announce its exact operating frequency, but will<br />
announce the ’METER' band in which it is operating or<br />
to which band it will move to improve worldwide<br />
reception at a particular time of day. By entering this<br />
'METER' band number, the receiver automatically tunes<br />
to the low frequency end of the corresponding<br />
‘METER' band. The search for the new station location<br />
is thus limited to a particular smaller section of the<br />
entire shortwave band spectrum.<br />
The Shortwave Band Designators and corresponding<br />
frequency ranges are as follows:<br />
High Freq<br />
2500 kHz<br />
3400 kHz<br />
4000 kHz<br />
5060 kHz<br />
6200 kHz<br />
7600 kHz<br />
9900 kHz<br />
12,100 kHz<br />
13,870 kHz<br />
15,800 kHz<br />
17,900 kHz<br />
21,850 kHz<br />
26,100 kHz<br />
20 21
<strong>E1</strong> <strong>MANUAL</strong><br />
GETTING STARTED continued<br />
GETTING STARTED continued<br />
Press the ‘SW BAND’ softkey to enter the shortwave<br />
band tuning mode. The SW portion of the display indicator<br />
will now be in reverse video. Now press the ‘SW<br />
BAND’ softkey a second time.<br />
The display indicator will now appear as “SW BAND”,<br />
and the ‘METER’ number entry prompt on the display<br />
will be flashing. (See #8 on the LCD Display<br />
Description on page 18). At this point, you have<br />
approximately 3 seconds to do one of the following:<br />
(1) You can enter a shortwave band ‘METER’ number<br />
with the ‘Direct-Key-Input’ keys. For example, key<br />
in ‘4', ‘1' for the 41 meter band.<br />
(2) You can scroll through the available meter bands<br />
using the ‘TUNING’ knob or the ‘< SELECT >’ key,<br />
stopping on the desired ‘METER’ band. If you stop<br />
on a “METER” band for more than 3 seconds, the<br />
FREQUENCY RESOLUTION<br />
The <strong>E1</strong> receive tunes in the following steps:<br />
Mode<br />
Display *Resolution<br />
receiver will tune to that band, the “SW BAND”<br />
indicator will appear as “BAND“, and the<br />
shortwave band SW “METER” prompt will quit<br />
flashing.<br />
To enter a shortwave band ‘METER' designator, press<br />
the ‘SW BAND’ softkey to display a flashing ‘METER'<br />
number entry prompt. The prompt will flash for approximately<br />
3 seconds after the ‘SW BAND’ softkey is<br />
pressed. While it is still flashing, enter one of the listed<br />
two or three digit Band numbers corresponding to the<br />
desired ‘METER' band designator using the ‘Direct-Key-<br />
Input’ keys. While the ‘METER' annunciator is flashing,<br />
the ‘< SELECT >’ keys can also be used to step quickly<br />
from band to band. After selection of the ‘METER’<br />
band, use the ‘TUNING’ knob or ‘< SELECT >’ keys to<br />
change the frequency, or press the ‘Direct-Key-Input’<br />
keys to make a direct frequency entry.<br />
Tuning *Resolution<br />
< SELECT ><br />
all AM (LW, MW and SW) broadcasting generally uses<br />
double-sideband transmission, detection of either of<br />
the two sidebands results in full reception of the transmitted<br />
information. The selectable sideband tuning and<br />
detection not only aids reception by permitting tuning<br />
to the stronger or less distorted sideband, but also permits<br />
rejection of the sideband nearer to the interfering<br />
signal(s).<br />
The synchronous detector will lock to the strongest signal<br />
that is within the IF passband when it is activated.<br />
Most of the time, the strongest signal will be the carrier<br />
of the desired signal. First, be sure the main tuning<br />
is set to within 1 kHz of the desired station's transmiting<br />
frequency. Press the ‘AM’ softkey after AM is<br />
already selected to activate synchronous operation.<br />
‘AM SYNC’ will briefly flash on and off above the ‘AM’<br />
softkey and will then stop flashing as the AM SYNC<br />
detector locks on to the carrier frequency.<br />
SSB OPERATION<br />
Tuning in a single sideband (SSB) signal can be somewhat<br />
frustrating for the first time listener. In either of<br />
the <strong>E1</strong> receiver’s SSB modes, LSB (lower sideband), or<br />
USB (upper sideband), the receiver will select the 2.3<br />
kHz bandwidth automatically. Generally LSB is used<br />
below 10 MHz and USB is used above 10 MHz. When<br />
initially tuning in the desired station, tune slowly. If the<br />
station is unintelligible, try the other sideband, again<br />
tuning slowly. A station tuned in on the wrong sideband<br />
is totally unreadable but a station mistuned on<br />
the correct sideband may sound like ‘Donald Duck’.<br />
Further tuning will result in a more normal voice pitch.<br />
Always start with the ‘PBT’ off when initially tuning<br />
SSB signals.<br />
PASSBAND TUNING<br />
The passband tuning (PBT) feature allows for moving<br />
the IF passband of the receiver relative to the detector<br />
BFO (beat frequency oscillator) when operating in SSB<br />
mode. This can be quite useful in receiving a weak signal<br />
in the presence of nearby interference. Passband<br />
tuning is available on the LW, MW, and SW bands, and<br />
is engaged or disengaged by pressing the ‘PBT’ softkey.<br />
MW AM:<br />
MW SSB:<br />
LW & SW AM<br />
LW & SW SSB<br />
FM<br />
* Selectable using ‘FAST’ button.<br />
10 Hz<br />
100 Hz<br />
1 kHz<br />
10 Hz<br />
1 kHz<br />
10 Hz<br />
100 Hz<br />
1 kHz<br />
10 Hz<br />
1 kHz<br />
10 kHz<br />
100 kHz<br />
FRONT PANEL LOCK (UNLOCK)<br />
All front panel keys (with the exception of the ‘CLEAR /<br />
LOCK’ key), as well as the ‘TUNING’ knob can be<br />
locked if desired. First, be sure the <strong>E1</strong> receiver is not in<br />
T.SCAN or SEEK mode. Press and hold the<br />
‘CLEAR/LOCK’ key which is one of the ‘Direct-Key-<br />
Input’ keys. The “LOCK” and “TUN LOCK” annunciators<br />
will appear indicating the front panel controls are<br />
locked out. ‘‘VOLUME’, ‘BASS’, ‘TREBLE’, and<br />
‘SQUELCH’ are still functional. Press and hold the<br />
‘CLR/LOCK’ key to unlock. The “LOCK” and “TUN<br />
LOCK” annunciators will disappear, indicating the front<br />
panel controls are once again active. The ‘CLEAR /<br />
10 Hz<br />
100 Hz<br />
1 kHz<br />
10 Hz<br />
1 kHz<br />
10 Hz<br />
100 Hz<br />
1 kHz<br />
10 Hz<br />
1 kHz<br />
20 kHz<br />
100 kHz<br />
10 kHz /<br />
9 kHz<br />
10 kHz /<br />
9 kHz<br />
5 kHz<br />
5 kHz<br />
100 kHz<br />
LOCK’ key may be used even when the radio is off to<br />
lock the ‘POWER’ key to prevent accidental power activation.<br />
AM SYNCHRONOUS OPERATION<br />
For general tuning and listening, normal AM is best. If,<br />
however, the received signal sounds distorted, or interference<br />
from adjacent stations is present, AM synchronous<br />
should be engaged. The synchronous detector in<br />
your receiver can greatly reduce the severe audio distortion<br />
that can occur due to signal fading. The detector<br />
also permits selectable tuning to either the upper<br />
or lower sideband portion of an AM signal. Since most<br />
If adjacent channel interference or any other undesired<br />
signal is sufficiently strong, the synchronous detector<br />
may lock to it instead. In that case, press the ‘AM’ softkey<br />
again to turn the synchronous detector off, and<br />
repeat the tuning process. For severe cases of fading,<br />
set the bandwidth to 4 kHz by pressing the ‘BW’ softkey<br />
until 4.0 kHz appears above the ‘BW’ softkey. If<br />
interference is present, repeatedly press the ‘SSB’ softkey<br />
to select whichever of USB, DSB or LSB produces<br />
the least interference once ‘AM SYNC’ has been selected.<br />
If the interference is sufficiently severe to prevent<br />
reception, select a narrower IF bandwidth and retune<br />
to the desired signal. After reception is obtained, select<br />
a wider bandwidth and/or alternate sideband if<br />
desired. When ‘AM SYNC’ has been activated, moving<br />
the ‘TUNING’ knob will cause the SYNC circuit to<br />
momentarily disengage (indicated by “AM SYNC”<br />
flashing), then back on again when tuning has<br />
stopped. The PBT control can sometimes help in reducing<br />
adjacent interference. For more details see “PASS-<br />
BAND TUNING” in the next column.<br />
AM SYNC will not operate properly on intermittent<br />
transmissions such as those encountered on CB radio<br />
band. For those types of transmissions, use the AM<br />
mode. Press the ‘AM’ softkey to turn the synchronous<br />
detector off before selecting LSB or USB modes for SSB<br />
operation.<br />
PBT status is shown on the display directly above<br />
the softkey.<br />
When it is engaged, the displacement in kilohertz from<br />
the BFO frequency is shown directly above the softkey<br />
label, and the degree of IF passband displacement is<br />
controlled by the PBT knob. When PBT is disengaged,<br />
there will be no information displayed above the ‘PBT’<br />
softkey label, and the PBT knob will have no affect.<br />
To use PBT, tune in the desired SSB signal for best<br />
audio quality as you normally would with PBT off.You<br />
will find that PBT is most effective when the 2.3 kHz IF<br />
bandwidth is used. Then press the ‘PBT’ softkey and<br />
adjust the PBT knob for the best compromise between<br />
minimum adjacent signal interference and acceptable<br />
audio quality of the desired signal.<br />
Enhanced SSB, when engaged (RADIO SETTINGS<br />
Menu, item 1), provides 30 dB of additional rejection<br />
of the undesired sideband through the use of audio<br />
phasing circuitry. Using this in combination with<br />
Passband Tuning can effectively narrow the IF to less<br />
than the 2.3 kHz IF filter.<br />
PBT also functions in AM and AM SYNC modes, but in<br />
these modes it acts primarily as a frequency offset,<br />
which can also be accomplished with the ‘TUNING<br />
knob. When operating in AM SYNC mode, tuning the<br />
22 23
<strong>E1</strong> <strong>MANUAL</strong><br />
GETTING STARTED continued<br />
MEMORY FUNCTIONS<br />
PBT knob will cause ‘AM SYNC’ to flash on and off<br />
temporarily until the system once again locks on to the<br />
desired carrier.<br />
FM OPERATION<br />
FM reception is perhaps the easiest mode to use on<br />
the etón <strong>E1</strong> receiver. The AGC and BANDWIDTH settings<br />
are not used in FM. In fact, all of the function<br />
softkeys along the bottom edge of the display except<br />
the ‘MENU’ softkey have no function on FM and the<br />
labels on the display for these softkeys disappear.<br />
Attempting to use one of these softkeys will result in<br />
an ‘ERROR’ beep. All FM stations in the U.S. end in an<br />
odd 100 kHz, i.e. 97.7 MHz, and are spaced 200 kHz<br />
apart. The etón <strong>E1</strong> receiver has the ability to tune in<br />
20 kHz steps to allow tuning in between stations to<br />
help eliminate interference to weaker stations that<br />
could be covered up by stronger adjacent stations.<br />
Additionally, when headphones are used, or if the LINE<br />
OUT jack is fed into an external stereo sound system,<br />
true stereo reception is possible. The ‘STEREO’ indicator<br />
on the display will appear when a stereo station is<br />
tuned in. ‘MONO’ will appear in this location if the<br />
transmitting station is not in stereo, if no signal is<br />
being received, or if MONO is selected from the AUDIO<br />
SETTINGS menu. To select between STEREO and<br />
MONO from the AUDIO SETTINGS menu, proceed as<br />
follows:<br />
• Press the ‘MENU’ softkey.<br />
• Press the ‘Direct-Key-Input’ ‘2' key or press ‘MENU’<br />
two more times. This will access the AUDIO<br />
SETTINGS menu.<br />
• Press the ‘Direct-Key-Input’ ‘1' key to cycle<br />
between MONO and STEREO.<br />
When STEREO is enabled, the receiver will automatically<br />
switch to stereo and provide left and right audio<br />
from the HEADPHONE and LINE OUT jacks when a<br />
stereo FM signal is being received. If the headphones<br />
are removed while listening to a stereo broadcast the<br />
receiver will provide monaural audio from the internal<br />
or an external speaker.<br />
AGC OPERATION<br />
The etón <strong>E1</strong> receiver provides the ability to select a<br />
SLOW, FAST, or AUTO AGC setting. Each of the three<br />
settings will permit automatic control of the receiver’s<br />
gain thereby producing a constant audio output free of<br />
distortion. Generally, the SLOW AGC setting is preferred<br />
for reception of AM and SSB signals. The FAST<br />
AGC setting allows more rapid automatic receiver gain<br />
adjustment to quickly fading signal levels. The AUTO<br />
setting provides FAST AGC while tuning between stations<br />
to prevent the user from missing weak stations<br />
between strong ones. However, once a station is tuned<br />
in, it automatically switches to SLOW for smoother<br />
audio output. The AGC does not function in the FM<br />
mode.<br />
MICROPROCESSOR RESET<br />
A power-up reset routine will be activated anytime<br />
after the receiver COMPLETELY loses power, from internal<br />
batteries and external DC input. However, short<br />
term power failures of up to 10 minutes are masked by<br />
an internal back-up capacitor. This will allow ample<br />
time for battery replacement without loss of the internal<br />
clock. Note: Any programmed memory channels<br />
and timer settings will NOT be lost under a power-up<br />
reset due to the memory design of the etón <strong>E1</strong> receiver.<br />
BEEP TONES<br />
The etón <strong>E1</strong> receiver responds to nearly all key depressions<br />
with an audible beep unless the beep has been<br />
disabled by means of menu entry 2 in AUDIO SET-<br />
TINGS menu. This menu is accessed by pressing the<br />
‘MENU‘ softkey three times, or by pressing the ‘MENU’<br />
softkey once to access the MAIN MENU, and then<br />
pressing the ‘\Direct-Key-Input’ ‘2' key. No beep is generated<br />
under any condition for depressions of the “ <<br />
SELECT >” keys when in VFO mode. Beep tones indicate<br />
the following:<br />
• One short tone for a key depression.<br />
• One short, high tone when storing a MEMORY or<br />
COUNTRY channel.<br />
• One long, low tone for any illegal key depression.<br />
• Four quick beeps at one minute intervals if<br />
batteries are installed, an external power source is<br />
connected, and the external power is lost.<br />
This feature must be enabled from AUDIO SETTINGS<br />
menu item 3. Note that the volume of the beep tones<br />
is controlled by the ‘VOLUME’ control, so if the ‘VOL-<br />
UME’ control is turned all the way down, no beep<br />
tones will be heard.<br />
MEMORY DESCRIPTION<br />
The <strong>E1</strong> receiver contains 1700 memory channels that<br />
can be used to store and recall commonly monitored<br />
frequencies. The first 500 of these are referred to simply<br />
as MEMORY channels. The remaining 1200 are<br />
referred to as COUNTRY channels. More on COUNTRY<br />
in the next section. The 500 MEMORY channels are<br />
displayed in groups of 10 per screen and each saved<br />
frequency can be stored with an identifying name. They<br />
can be scanned using the SEEK function which can<br />
stop on any stored channel that has a predetermined<br />
signal level, or the MEMORY channels can be scanned<br />
selectively using the T.SCAN function. With MEMORY<br />
channels programmed, you can use the T.SCAN function<br />
to selectively monitor desired MEMORY frequencies.<br />
The following operating parameters may be stored<br />
in any MEMORY channel: (1) Frequency, (2) Mode, (3)<br />
Bandwidth, (4) AGC setting, (5) PBT setting, (6)<br />
Synchronous Detector setting.<br />
THE MEMORY DISPLAY<br />
Please refer to the numbered figure above.<br />
1. Channel Frequency<br />
This is the frequency that is stored in the selected<br />
MEMORY channel.<br />
2. MEMORY<br />
This indicator identifies the screen as a MEMORY display<br />
as opposed to a COUNTRY display.<br />
3. Curser<br />
This reverse video segment identifies the selected<br />
MEMORY channel. This Curser is moved up or down<br />
through the ten displayed channels one at a time using<br />
the ‘TUNING’ knob or a page at a time (10 channels)<br />
using the ‘< SELECT >’ key. If the ‘FAST / TUNING<br />
LOCK’ key is pressed, the ‘TUNING’ knob will scroll<br />
through the channels ten at a time.<br />
4. T<br />
This indicator marks this channel as being one selected<br />
for T.SCAN. T.SCAN searches through all MEMORY and<br />
COUNTRY channels marked with the ‘T’ and will ignore<br />
all others. T.SCAN will stop in any channel marked with<br />
a ‘T’ which has a signal strength greater than the<br />
SQUELCH setting. It will proceed to the next marked<br />
channel either based on a 5 second time interval, or<br />
will stay on the channel on which it stopped until the<br />
‘T.SCAN’ key is pressed again. Which of these T.SCAN<br />
methods is used is determined by setting 2 in the<br />
RADIO SETTINGS menu. The “T” tag is added to or<br />
removed from the MEMORY channel on which the<br />
curser rests by pressing the ‘TAG’ key.<br />
5. Channel Numbers<br />
These numbers identify the memory channels from 1 to<br />
500, ten at a time. When the curser reaches the end of<br />
a group of ten, the numbers displayed advance by ten.<br />
For example if the curser were sitting on 10, and the<br />
right hand ‘< SELECT >’ key was pressed, the curser<br />
would jump to the top of the column with numbers 11<br />
thru 20 displayed.<br />
6. Function Key Labels<br />
These labels, with their associated parameters, disappear<br />
if you scroll through a channel that is programmed<br />
on an FM band frequency.<br />
7. MEMORY<br />
The ‘MEMORY’ softkey label appears as “MEMORY”<br />
when the softkey is pressed, indicating that MEMORY<br />
24 25
<strong>E1</strong> <strong>MANUAL</strong><br />
MEMORY FUNCTIONS continued<br />
MEMORY FUNCTIONS continued<br />
mode has been selected.<br />
8. Meter Band Identifier<br />
Identifies the meter band of the selected SW frequency.<br />
If the channel is an FM broadcast band frequency,<br />
“STEREO” or “MONO” appears in this location.<br />
9. Band Identifier<br />
Indicates whether the memory channel is in the LW,<br />
MW, SW, or FM bands.<br />
10. MHz / kHz<br />
Identifies whether the frequency is displayed in megahertz<br />
or kilohertz.<br />
STORING A MEMORY CHANNEL<br />
There are two ways to store a channel. The first is from<br />
VFO mode, and the other is from MEMORY mode.<br />
To store a channel from VFO mode proceed as follows:<br />
(A.) First select the mode and frequency that you wish<br />
to store, as you normally would do in VFO mode.<br />
Make sure you have set all the function parameters<br />
to your preference.<br />
(B.) Then press the ‘STORE’ key, followed by the<br />
‘MEMORY’ softkey. This will take you to the<br />
MEMORY screen similar to that shown above<br />
(C.) Use the ‘TUNING’ knob or the ‘< SELECT >’ key<br />
to select the desired blank MEMORY number.<br />
(D.) Press the ‘STORE’ key again. The selected frequency<br />
will appear at the selected MEMORY<br />
channel in reverse video, and a flashing white<br />
curser will appear in front of the selected channel<br />
number.<br />
(E.) Within 10 seconds, you must either begin to program<br />
a name for the desired channel, or press<br />
the ‘STORE’ key again to store the channel without<br />
a name or to use the previously stored name.<br />
(F.) To name the channel, while the white curser is<br />
flashing, use the ‘TUNING’ knob to scroll through<br />
the alphanumeric characters until you find the<br />
one you want. Then press the right hand ‘<<br />
SELECT >’ key to advance the curser to the next<br />
position. Repeat this process until you have<br />
entered all the characters you need. Previously<br />
named channels can be revised in a similar manner.<br />
(G.) When you have finished entering the channel<br />
name, press the ‘STORE’ key again. You will hear<br />
a confirming beep and will be returned to the<br />
VFO mode.<br />
To store a memory channel from MEMORY mode, first<br />
enter MEMORY mode by pressing the ‘MEMORY’ softkey.<br />
Then proceed as follows:<br />
(A.) Select an empty MEMORY channel number using<br />
the ‘TUNING’ knob, or the ‘< SELECT >’ keys.<br />
(B.) Press the Mode softkey for the frequency range<br />
that contains the frequency you wish to store, for<br />
example, ‘FM’, ‘MW / LW’, or ‘SW’. This will cause<br />
the ‘MEMORY’ softkey indicator to return to normal<br />
video, and the pressed Mode softkey indicator<br />
will appear in reverse video.<br />
(C.) Use the ‘TUNING’ knob to tune in the desired frequency,<br />
and use the Function softkeys (except for<br />
FM mode) to set the parameters as desired.<br />
(D.) Press the ‘STORE’ key. This will take you back to<br />
the MEMORY screen with the curser on the previously<br />
selected MEMORY location. Then press the<br />
‘STORE’ key again. You will see a white curser<br />
flashing within the reverse video curser.<br />
(E.) Within 5 seconds, you must either begin to program<br />
a name for the desired channel, or press<br />
the ‘STORE’ key again to store the channel without<br />
a name.<br />
(F.) To name the channel, while the white curser is<br />
flashing, use the ‘TUNING’ knob to scroll through<br />
the alphanumeric characters until you find the<br />
one you want. Then press the right hand<br />
‘’ key to advance the curser to the<br />
next position. Repeat this process until you have<br />
entered all the characters you need.<br />
(G.) When you have finished entering the channel<br />
name, press the ‘STORE’ key again. You will hear<br />
a confirming beep. The ‘MEMORY’ softkey indicator<br />
will return to reverse video, and you will be<br />
able to scroll through all MEMORY channels<br />
using the ‘TUNING’ knob and the ‘< SELECT >’<br />
keys.<br />
RECALLING A MEMORY CHANNEL<br />
To select a specific memory channel, press the ‘MEMO-<br />
RY’ softkey to enter memory mode. This will cause<br />
‘MEMORY’ softkey label to appear in reverse video.<br />
Then use the ‘TUNING’ knob or the ‘< SELECT >’ key<br />
to scroll through the MEMORY numbers. Note that<br />
pressing the ‘FAST / TUNING LOCK’ key will cause the<br />
‘TUNING’ knob to advance through the channels ten<br />
at a time instead of one at a time. For this to occur,<br />
you must start moving the ‘TUNING’ knob within 3<br />
seconds of pressing the ‘FAST / TUNING LOCK’ key.<br />
Pressing the ‘FAST / TUNING LOCK’ key will NOT, however<br />
cause the ‘< SELECT >’ key tuning rate to change.<br />
It will continue to scroll through MEMORY channels<br />
ten channel numbers at a time.<br />
If you know the number of the MEMORY channel you<br />
want to receive, you can go to it directly by entering<br />
the number on the ‘Direct- Key-Input’ keypad. If less<br />
than a four digit number is entered, there may be a<br />
slight delay between the time you enter the number<br />
and the time the channel change actually takes place.<br />
However, if you enter a four digit number, the channel<br />
change will occur immediately upon entry of the fourth<br />
number.<br />
Example:<br />
To enter MEMORY channel 475, press ‘0', ‘4', ‘7', ‘5'.<br />
If you want to temporarily change a parameter of a<br />
received MEMORY channel, or simply want to “tune<br />
around” the stored frequency, there are two ways to<br />
do this.<br />
The first is to simply press any of the Function softkeys<br />
below the display which are labeled in reverse video,<br />
or the ‘FM’, ‘SW BAND’, or ‘MW/LW’ softkeys as<br />
appropriate. This will cause the ‘MEMORY’ softkey to<br />
be displayed in normal video, the ‘VFO’ label will be<br />
COUNTRY FUNCTIONS<br />
COUNTRY DESCRIPTION<br />
The etón <strong>E1</strong> receiver contains 1200 memory channels<br />
grouped in a category named “COUNTRY”. These are<br />
in addition to the 500 MEMORY channels described in<br />
the previous section. These 1200 COUNTRY memory<br />
channels are divided among 111 countries from<br />
Afghanistan to Yugoslavia with 10 memory channels<br />
assigned per country and with 90 memory channels<br />
remaining with no country assigned. These COUNTRY<br />
memory channels are numbered from 501 to 1700.<br />
shown in reverse video, and will allow you to tune the<br />
frequency, change parameters, or change bands. To<br />
return to scrolling through MEMORY channels with the<br />
‘TUNING’ knob, simply press the ‘MEMORY’ softkey<br />
again.<br />
The other method is to press the ‘TUNE’ softkey. This<br />
will return the receiver to the VFO mode and will transfer<br />
the MEMORY channel frequency and all associated<br />
parameters to the VFO for further tuning.<br />
DELETING A MEMORY CHANNEL<br />
Select the MEMORY channel to be deleted as<br />
described in “RECALLING A MEMORY CHANNEL”.<br />
Press and hold the ‘DELETE’ key for 3 seconds. A high<br />
pitched beep will be heard to indicate that the contents<br />
stored in the selected MEMORY channel number<br />
have been deleted, and you will see the name and frequency<br />
disappear from the selected MEMORY channel<br />
location.<br />
They are displayed in groups of ten, and can be used<br />
to store and recall commonly monitored frequencies.<br />
Unlike the MEMORY channels described previously,<br />
COUNTRY channels cannot have names assigned to<br />
each channel.<br />
While the intention here was to make it easier for the<br />
user to group interesting frequencies by country, any<br />
frequency can be stored in any COUNTRY channel.<br />
26 27
<strong>E1</strong> <strong>MANUAL</strong><br />
COUNTRY FUNCTIONS continued<br />
COUNTRY FUNCTIONS continued<br />
COUNTRY channels can be scanned using the SEEK<br />
function which can stop on any stored channel that<br />
has a predetermined signal level. With COUNTRY<br />
channels programmed with a “T” tag, you can use the<br />
T.SCAN function to selectively monitor desired<br />
COUNTRY frequencies. The following operating<br />
parameters may be stored in any COUNTRY channel:<br />
(1) Frequency, (2) Mode, (3) Bandwidth, (4)<br />
AGC setting, (5) PBT setting, (6) Synchronous<br />
Detector setting.<br />
THE COUNTRY DISPLAY<br />
Please refer to the numbered figure above.<br />
(1) Channel Frequency - This is the frequency that is<br />
stored in the selected COUNTRY channel.<br />
(2) COUNTRY - This indicator identifies the screen as<br />
a COUNTRY display as opposed to a MEMORY<br />
display.<br />
(3) T - This indicator marks this channel as being one<br />
selected for T.SCAN. T.SCAN searches through all<br />
COUNTRY channels marked with the “T” and will<br />
ignore all others. T.SCAN will stop on any channel<br />
marked with a “T” which has a signal strength<br />
greater than the SQUELCH setting. It will proceed<br />
to the next marked channel either based on a 5<br />
second time interval, or will stay on the channel it<br />
stopped on until the ‘T.SCAN’ key is pressed<br />
again. Which of these T.SCAN methods is used is<br />
determined by the setting of item 2 in the RADIO<br />
SETTINGS menu. The “T” tag is added to or<br />
removed from the COUNTRY channel on which<br />
the curser rests by pressing the ‘TAG’ key.<br />
(4) Curser - This reverse video segment identifies the<br />
selected COUNTRY channel. This Curser is moved<br />
up or down through the ten displayed channels<br />
one at a time using the ‘TUNING’ knob or a page<br />
at a time (10 channels) using the ‘’<br />
key. If the ‘FAST / TUNING LOCK’ key is pressed,<br />
the ‘TUNING’ knob and ‘< SELECT >’ keys will<br />
scroll through the channels ten at a time. This is<br />
the way to scroll through all available countries in<br />
minimum time.<br />
(5) Channel Numbers - These numbers identify the<br />
COUNTRY channels from 500 to 1700, ten at a<br />
time. When the curser reaches the end of a group<br />
of ten, the numbers displayed advance by ten. For<br />
example if the curser was sitting on 600, and the<br />
right hand ‘< SELECT >’ key was pressed, the<br />
curser would jump to the top of the column with<br />
numbers 601 thru 610 displayed.<br />
(6) Function Key Labels - These labels, with their associated<br />
parameters, disappear if you scroll through<br />
a channel that is programmed on an FM band<br />
frequency.<br />
(7) COUNTRY - The ‘COUNTRY’ softkey label appears<br />
as “COUNTRY” when the softkey is pressed, indicating<br />
that mode has been selected.<br />
(8) Country Identifier - This label identifies the country<br />
to which the ten displayed channel numbers<br />
are assigned.<br />
(9) Meter Band Identifier - Identifies the meter band<br />
of the selected SW frequency. If the channel is an<br />
FM broadcast band frequency, “STEREO” or<br />
“MONO” appears in this location.<br />
(10) Band Identifier - Indicates whether the memory<br />
channel is in the LW, MW, SW, or FM bands.<br />
(11) MHz / kHz - Identifies whether the frequency is<br />
displayed in megahertz or kilohertz.<br />
STORING A COUNTRY CHANNEL<br />
There are two ways to store a channel. The first starts<br />
from VFO mode, and the other starts from COUNTRY<br />
mode. To store a channel from VFO mode proceed as<br />
follows:<br />
(A.) First press the ‘VFO’ softkey and select the mode<br />
and frequency that you wish to store, as you normally<br />
would do in VFO mode. Make sure you<br />
have set all the function parameters to your<br />
preference.<br />
(B.) Press the ‘STORE’ key and then press the ‘COUN-<br />
TRY’ softkey. This will take you to the COUNTRY<br />
screen similar to that shown on the previous<br />
page.<br />
(C.) Use the ‘TUNING’ knob or the ‘< SELECT >’ key<br />
to select the desired blank MEMORY number.<br />
(D.) Press the ‘STORE’ key again within 5 seconds.<br />
This will store the frequency and its associated<br />
parameters in the selected channel number. You<br />
will hear a confirming beep and will be returned<br />
to the VFO mode.<br />
To store a memory channel from COUNTRY mode, first<br />
enter COUNTRY mode by pressing the ‘COUNTRY’<br />
softkey. Then proceed as follows:<br />
(A.) Select an empty COUNTRY channel number using<br />
the ‘TUNING’ knob, or the ‘< SELECT >’ keys.<br />
(B.) Press the ‘TUNE’ softkey. This will return you to<br />
the VFO mode. Select the mode for the frequency<br />
range that contains the frequency you wish to<br />
store. For example, ‘FM’, ‘MW / LW’, or ‘SW<br />
BAND’.<br />
(C.) Use the ‘TUNING’ knob or the ‘< SELECT >’ keys<br />
to tune in the desired frequency, and use the<br />
Function softkeys (except for FM mode) to set the<br />
parameters as desired.<br />
(D.) Press the ‘STORE’ key. This will take you back to<br />
COUNTRY mode with the curser still on the channel<br />
number you selected previously. Press the<br />
‘STORE’ key again. You will hear a confirming<br />
beep and “COUNTRY STORED” will briefly appear<br />
on the display. The ‘VFO’ softkey indicator will<br />
return to reverse video indicating that normal<br />
VFO mode has been restored.<br />
To store a memory channel from COUNTRY mode, first<br />
enter COUNTRY mode by pressing the ‘COUNTRY’ softkey.<br />
Then proceed as follows:<br />
(A.) Select an empty COUNTRY channel number using<br />
the ‘TUNING’ knob, or the ‘< SELECT >’ keys.<br />
(B.) Press the ‘TUNE’ softkey. This will return you to the<br />
VFO mode. Select the mode for the frequency<br />
range that contains the frequency you wish to<br />
store. For example, ‘FM’, ‘MW / LW’, or ‘SW<br />
BAND’.<br />
(C.) Use the ‘TUNING’ knob or the ‘< SELECT >’ keys<br />
to tune in the desired frequency, and use the<br />
Function softkeys (except for FM mode) to set the<br />
parameters as desired.<br />
(D.) Press the ‘STORE’ key. This will take you back to<br />
COUNTRY mode with the curser still on the channel<br />
number you selected previously. Press the<br />
‘STORE’ key again. You will hear a confirming<br />
beep and “COUNTRY STORED” will briefly appear<br />
on the display. The ‘VFO’ softkey indicator will<br />
return to reverse video indicating that normal VFO<br />
mode has been restored.<br />
RECALLING A COUNTRY CHANNEL<br />
To select a specific COUNTRY channel, press the<br />
‘COUNTRY’ softkey to enter COUNTRY mode. This will<br />
cause the ‘COUNTRY’ softkey label to appear in<br />
reverse video. Then use the ‘TUNING’ knob or the ‘<<br />
SELECT >’ key to scroll through the COUNTRY numbers.<br />
Note that pressing the ‘FAST / TUNING LOCK’ key<br />
will cause ‘TUNING’ knob to advance through the<br />
channels ten at a time instead of one at a time. For<br />
this to occur, you must start moving the ‘TUNING’<br />
knob within 3 seconds of pressing the ‘FAST / TUNING<br />
LOCK’ key. Pressing the ‘FAST / TUNING LOCK’ key will<br />
NOT, however cause the ‘< SELECT >’ key tuning rate<br />
to change. It will continue to scroll through COUNTRY<br />
channels ten channel numbers at a time.<br />
If you know the number of the COUNTRY channel you<br />
want to receive, you can go to it directly by entering<br />
the number on the ‘Direct- Key-Input’ keypad. If less than<br />
a four digit number is entered, there may be a slight delay<br />
between the time you enter the number and the time the<br />
channel change actually takes place. However, if you enter<br />
a four digit number, the channel change will occur immediately<br />
upon entry of the fourth number.<br />
Example: To enter COUNTRY channel 765, press ‘0',<br />
‘7', ‘6', ‘5'.<br />
If you want to temporarily change a parameter of a<br />
received COUNTRY channel, or simply want to “tune<br />
around” the stored frequency, there are two ways to<br />
do this.<br />
The first method is simply press any of the Function<br />
softkeys below the display which are labeled in reverse<br />
video, or the ‘FM’, ‘SW BAND’, or ‘MW/LW’ softkeys as<br />
appropriate. This will return you to the VFO mode, will<br />
cause the ‘COUNTRY’ softkey to be displayed in normal<br />
video, and will allow you to tune the frequency,<br />
change parameters, or change bands. To return to<br />
scrolling through COUNTRY channels with the ‘TUN-<br />
ING’ knob, simply press the ‘COUNTRY’ softkey again.<br />
The other method is to press the TUNE’ softkey. This<br />
will return the receiver to the VFO mode and will transfer<br />
the COUNTRY channel frequency and all associated<br />
parameters to the VFO for further tuning.<br />
DELETING A COUNTRY CHANNEL<br />
Select the COUNTRY channel to be deleted as<br />
described in “RECALLING A COUNTRY CHANNEL”.<br />
Press and hold the ‘DELETE’ key for 3 seconds. A high<br />
pitched beep will be heard to indicate that the contents<br />
stored in the selected memory channel number<br />
have been deleted, and you will see the frequency disappear<br />
from the selected MEMORY channel number.<br />
CHANGING OR ADDING COUNTRY NAMES<br />
You can add to or modify the country names. To do so<br />
proceed as follows:<br />
• Press the ‘COUNTRY’ softkey and use the ‘TUNING<br />
’knob or ‘< SELECT >’ keys to select the named ten<br />
channel block the name of which you wish to<br />
change or name. Note that each ten channel block<br />
begins with on 1 and ends on 10. For example, 501<br />
- 510, 1691 - 1700. The reverse video curser can be<br />
on any number within the selected block of ten.<br />
• Press and hold the ‘COUNTRY’ softkey for 3<br />
seconds. “EDIT NAME” will appear on the display,<br />
and a flashing curser( “ _ “) will appear.<br />
• Within 3 seconds, use the ‘TUNING’ knob to select<br />
the first letter of the new name, and press the right<br />
‘< SELECT >’ key to advance the curser to the<br />
position of the next letter or number to be added.<br />
• Proceed in this manner until the full name of the<br />
country has been entered.<br />
• When all of the desired alphanumerics have been<br />
added, press the ‘STORE’ key. You will hear a con<br />
firming beep, and “COUNTRY STORED” will appear<br />
briefly on the display.<br />
28 29
<strong>E1</strong> <strong>MANUAL</strong><br />
<strong>E1</strong> MENUS<br />
In the following discussion concerning menus, the numbers presented in front of each item refer to the keys on the<br />
Direct-Key- Input keypad. To activate a menu item, simply press the numbered key corresponding to the menu number.<br />
On keys that toggle between two conditions, the selected condition will appear in reverse video.<br />
MAIN MENU<br />
The MAIN MENU is the first menu encountered when the ‘MENU’ softkey (left hand softkey below the display) is<br />
pressed. It appears as shown in the following illustration.<br />
<strong>E1</strong> MENUS continued<br />
MAIN MENU<br />
1. RADIO SETTINGS - Pressing ‘1' takes you to the RADIO SETTINGS menu which allows setting parameters for<br />
enhanced SSB, scan stop mode, FM band frequency range, MW band tuning step size, and whether the SW band is<br />
displayed in kilohertz (kHz) or megahertz (MHz).<br />
2. AUDIO SETTINGS - Pressing ‘2' takes you to the AUDIO SETTINGS menu which allows setting audio related parameters<br />
including mono / stereo output, entry beep on/off, power loss beep on/off, and squelch muting on/off.<br />
3. SET CLOCKS - Pressing ‘3' takes you to the SET CLOCKS menu. From this menu, the local and GMT clocks can be<br />
set.<br />
4. CLOCK MODES - Pressing ‘4' takes you to the CLOCK MODES menu. This menu allows setting various clock<br />
related parameters including auto clock set on/off, automatic daylight savings time compensation on/off, local time<br />
offset from GMT time, snooze time, and whether or not timers override the lock function.<br />
5. TIMERS - Pressing ‘5' takes you to the TIMERS menu. From this menu the start times, stop times, and memory<br />
channels for both event timers can be set.<br />
6. Unused<br />
7. Unused<br />
8. Unused<br />
9. EXIT - Pressing ‘9' takes you back to the display you were viewing when MENU was pressed. This would be either<br />
the VFO, MEMORY or COUNTRY.<br />
RADIO SETTINGS<br />
The radio settings menu is reached either by pressing the MENU softkey twice, or by pressing ‘1' when the MAIN<br />
MENU is displayed. It appears as shown below.<br />
30 31
<strong>E1</strong> <strong>MANUAL</strong><br />
<strong>E1</strong> MENUS continued<br />
1. ENHANCED SSB OFF / ON - Pressing ‘1' toggles ENHANCED SSB ON and OFF. Enhanced SSB provides 30 Db of<br />
additional rejection of the undesired sideband through audio phasing circuitry, as shown in the following diagram.<br />
<strong>E1</strong> MENUS continued<br />
AUDIO SETTINGS<br />
The AUDIO SETTINGS menu is reached either by pressing the MENU softkey thre times, or pressing the MENU softkey<br />
once and then pressing the ‘2' key. It appears as shown in the following illustration.<br />
Using this in combination with passband tuning can narrow the IF to less than the normal IF filter bandwidth, and<br />
can provide considerable additional help in receiving weak signals in the presence of strong adjacent signals.<br />
2. SCAN STOP MODE TIME / CARRIER - The ‘2' key toggles between TIME and CARRIER. When “TIME” is selected,<br />
a T.SCAN will stop on each MEMORY or COUNTRY channel that is marked with a “T” for 5 seconds, and will<br />
then move on to the next marked channel. If CARRIER is selected, a T.SCAN will stop on a carrier that exceeds the<br />
SQUELCH setting and will remain there as long as the carrier strength remains at that level. If the carrier goes away,<br />
or if its strength drops below the squelch setting, the T.SCAN will move on to the next marked channel.<br />
3. FM 76 - 90 MHz / 87 MHz - 108 MHz - Pressing ‘3' toggles the frequency coverage on FM mode between 76 -<br />
90 MHz and 87 - 108 MHz.<br />
4. MW TUNING STEPS 9 / 10 kHz - When listening on the MW (AM broadcast) band, pressing the ‘’ ends<br />
of the ‘’ key will tune through the band in either 9 or 10 kHz steps, depending on this setting. In the USA,<br />
broadcast stations are spaced at 10 kHz intervals. However in some other parts of the world, they are spaced at 9<br />
kHz intervals. Therefore, if you are in the USA, select 10 kHz, but if you are in Europe, select 9 kHz. Use the ‘4' key to<br />
toggle between 9 and 10 kHz.<br />
5. SW BAND ENTRY kHz / MHz - Use the ‘5' key to toggle between kHz and MHz. This determines whether frequencies<br />
on the SW band (1800 - 30,000 kHz) are displayed in kilohertz or megahertz.<br />
6. POWER LOSS - Use the ‘6' key to toggle between BATTERY and AUTO OFF. When the AC Adapter is plugged in<br />
and powering unit, and AC power is lost, BATTERY keeps the unit running on battery power. AUTO OFF switches the<br />
unit off after 10 seconds to extend battery life.<br />
7. MAIN MENU - Pressing the ‘7' key returns the user to the main menu.<br />
8. MORE - Pressing ‘8' scrolls forward through the available menus. For example, the first press takes you to AUDIO<br />
SETTINGS, then SET CLOCKS, then CLOCK MODES, then TIMERS and then back to the MAIN<br />
MENU.<br />
9. EXIT - Pressing ‘9' takes you back to the display you were viewing when MENU was pressed. This would be either<br />
the VFO, MEMORY or COUNTRY display.<br />
1. AUDIO OUTPUT MONO / STEREO - Pressing ‘1' selects between MONO and STEREO when receiving on the FM<br />
broadcast band. When STEREO is selected, “STEREO” will appear on the VFO, MEMORY, and COUNTRY displays<br />
when an FM stereo signal is being received, and stereo audio will be available from the ‘Headphone’, and ‘Line Out’<br />
jacks. When MONO is selected, “MONO” will appear on the above mentioned displays when receiving any FM broadcast<br />
signal regardless of whether or not it is transmitting in stereo, and only mono audio output will be available. It is<br />
occasionally advantageous to switch to MONO mode when receiving a weak stereo station because it will reduce the<br />
background noise.<br />
2. ENTRY BEEP - Use the ‘2' key to toggle between beep ON and beep OFF. When beep is ON, beep tones will be<br />
heard when keys are pressed, error conditions exist, or various pieces of information are stored. If beep is OFF, no<br />
tones will be heard under any condition.<br />
3. POWER LOSS BEEP - Use the ‘3' key to toggle POWER LOSS BEEP function between ON & OFF. When ON, this<br />
function produces four beeps in quick succession at one minute intervals when the following conditions exist:<br />
• The receiver has batteries installed.<br />
• The AC Adapter or other external power source is plugged in but is producing no power.<br />
• The receiver is turned on.<br />
• The loudness of the beeps is a function of the ‘VOLUME’ control setting.<br />
4. SQUELCH MUTING OFF / ON - Pressing the ‘4' key toggles between muting ON and OFF. W hen ON is selected,<br />
no audio will be heard from any receiver audio output if the signal strength of the received signal is less than the<br />
SQUELCH setting as observed on the Signal Strength meter and the Squelch setting display. If OFF is selected, signals<br />
(and noise) will be heard regardless of whether or not they exceed the squelch setting. However, the SQUELCH setting<br />
will still be the determining factor for whether or not SEEK or T.SCAN stop on a particular signal, regardless of<br />
whether ON or OFF is selected.<br />
5. Unused<br />
6. Unused<br />
7. MAIN MENU - Pressing the ‘7' key returns the user to the main menu as described previously.<br />
8. MORE - Scrolls forward through available menus as described previously.<br />
9. EXIT - Exits the menu loop and returns to the VFO, MEMORY or COUNTRY.<br />
32 33
<strong>E1</strong> <strong>MANUAL</strong><br />
<strong>E1</strong> MENUS continued<br />
SET CLOCKS<br />
This menu is reached from the AUDIO SETTINGS menu described above by pressing the ‘8' (MORE) key once, or from<br />
the MAIN MENU by pressing ‘3'. It is used to manually set the GMT and Local clocks. It appears as shown in the following<br />
illustration.<br />
<strong>E1</strong> MENUS continued<br />
CLOCK MODES<br />
This menu is reached from the SET CLOCKS menu described above by pressing the ‘8' (MORE) key once, or from the<br />
MAIN MENU by pressing ‘4'. It is used to set several parameters pertaining to clock, snooze, and timer operation. It<br />
appears as shown in the following illustration.<br />
SET CLOCKS<br />
1. LOCAL TIME SET - To set Local time, press the ‘1' key. This will cause the menu numbers to disappear, and the<br />
time numbers in the LOCAL TIME SET row to appear in reverse video. Use the ‘Direct-Key-Input’ keypad to enter the<br />
desired time, ignoring the colon. The time entered should be slightly ahead of the actual time to allow yourself adequate<br />
time to make the entry. When the actual local time agrees with the time entered, press the ‘STORE’ key. You<br />
will hear a beep, the clock will start, the menu numbers will return, and the entered time will return to normal video.<br />
2. GMT TIME SET - To set GMT time, press the ‘2' key and follow the same procedure as described for setting Local<br />
time. Example: Set GMT to 13:00 hours<br />
• Press the ‘2' key. Menu numbers will disappear and the time entry window for GMT TIME SET will appear in<br />
reverse video.<br />
• To enter 13:00 hours, press ‘1', ‘3', ‘0', ‘0' on the ‘Direct-Key-Input’ keypad.<br />
• When the actual GMT time agrees with the time entered, press ‘STORE’.<br />
• You will hear a confirming beep, the clock will start, the entered time will return to normal video, and the menu<br />
numbers will reappear.<br />
3. Unused<br />
4. Unused<br />
5. Unused<br />
6. Unused<br />
7. MAIN MENU - Pressing the ‘7' key returns the user to the main menu as described previously.<br />
8. MORE - Scrolls forward through available menus as described previously.<br />
9. EXIT - Exits the menu loop and returns to the VFO, MEMORY or COUNTRY.<br />
CLOCK MODES<br />
1. AUTO CLOCK SET OFF / ON - Pressing ‘1' toggles this function OFF and ON. If this feature is ON, the receiver<br />
searches the available WWV (or WWVH) National Institute of Standards and Technology frequencies for the best signal.<br />
It then uses this signal to set the clocks automatically while the receiver is in the OFF state.<br />
2. AUTO CLOCK DST OFF / ON - Pressing ‘2' toggles between OFF and ON. When this feature is ON, the receiver<br />
automatically sets the Local time to compensate for daylight savings time (DST). W hen it is disabled, it sets the Local<br />
time without daylight savings time compensation, based on the GMT offset, as entered in menu items 3 and 4.<br />
3. LOCAL TIME OFFSET - The ‘3' key selects between a ‘+’ or a ‘-’ offset of the Local time relative to GMT. The<br />
amount of the offset will be the amount entered in menu item ‘4'. This menu item as well as item 4 can be ignored if<br />
you choose to disable AUTO CLOCK SET and set the clocks manually.<br />
4. LOCAL TIME OFFSET - This menu item provides the means of telling the receiver the number of hours of offset<br />
of Local time from GMT. For example, if you live in the eastern USA you are in the Eastern Standard time zone, so the<br />
offset is minus 5 hours. To enter this information, press ‘3' until the ‘-’ appears in reverse video. Then press ‘4'. This<br />
will cause a reverse video window to appear on the menu item 4 line, and the menu item numbers will disappear.<br />
Use the keypad to enter ‘5', ‘0', ‘0' in this reverse video window. Press the ‘STORE’ key to enter this information and<br />
return the menu item numbers.<br />
5. SNOOZE TIME - Repeatedly pressing the ‘5' key toggles the SNOOZE time through 5, 10, 20, or 30 minutes. The<br />
SNOOZE function is activated by pressing the SNOOZE bar on top of the receiver while the receiver is in the ON state.<br />
6. TIMER OVERRIDES LOCK NO / YES - Pressing ‘6’ toggles between whether or not the timer, when enabled,<br />
overrides the locked condition if the radio is locked using the ‘CLEAR/LOCK key.<br />
7. MAIN MENU - Pressing the ‘7' key returns the user to the main menu as described previously.<br />
8. MORE - Scrolls forward through available menus as described previously.<br />
9. EXIT - Exits the menu loop and returns to the VFO, MEMORY or COUNTRY display.<br />
34 35
<strong>E1</strong> <strong>MANUAL</strong><br />
<strong>E1</strong> MENUS continued<br />
TIMERS<br />
This menu is used to set the ON time, OFF time, and associated MEMORY or COUNTRY for<br />
timers 1 and 2. It is reached by pressing the ‘8' (MORE) key from the CLOCK MODES menu or the ‘5' key from the<br />
MAIN MENU. It appears as is shown in the following illustration.<br />
<strong>E1</strong> MENUS continued<br />
TIMER 1 ENABLE / DISABLE<br />
This menu is used to enable and disable event timer number 1. It is reached by pressing the ‘TIME’ key once. The ON<br />
time, OFF time, and MEMORY or COUNTRY channel shown on this menu must be entered using the TIMERS<br />
menu.<br />
1. TIMER 1 ON TIME - Press ‘1' to set the start time for timer number 1. When ‘1' is pressed, the menu numbers<br />
will disappear, “ENTER NUMBER & PRESS “STORE” TO ENTER” will appear at the bottom of the display, and the<br />
timer 1 start time window will change to reverse video. To set the time, enter the numbers on the ‘Direct-Key-Input’<br />
keypad. When the numbers have been entered, press the ‘STORE’ key. This will cause a beep to be heard, the menu<br />
numbers will reappear, and the timer 1 start time window will change back to normal video, indicating that the start<br />
time has been stored in memory.<br />
Example: Enter a start time of 11:30 for Timer 1<br />
• Press the ‘1' key. Menu numbers will disappear and the time entry window for Timer 1 will appear in reverse video.<br />
• To enter 11:30 hours, press ‘1', ‘1', ‘3', ‘0' on the ‘Direct-Key-Input’ keypad.<br />
• Press the ‘STORE’ key. You will hear a confirming beep, the entered time will return to normal video and the menu<br />
numbers will reappear.<br />
2. TIMER 1 OFF TIME - Press ‘2' to set the off time for timer 1. Proceed in the same manner as in 1 above.<br />
3. TIMER 1 MEM CH - Using the same technique as in 1 and 2 above, key in the number of the MEMORY or<br />
COUNTRY channel that you want the <strong>E1</strong> receiver to receive when timer 1 activates.<br />
4. TIMER 2 ON TIME - Press ‘4' to set the start time for timer number 2.<br />
1. TIMER 1 - This display entry identifies this menu as being associated with Timer 1.<br />
2. START TIME - This shows the time that Timer 1 is set up to turn on when enabled.<br />
3. STOP TIME - This shows the time that Timer 1 is set to turn off when enabled.<br />
4. Memory or Country channel selected - This menu entry identifies the MEMORY or COUNTRY channel<br />
which was programmed into Timer 1. This is the frequency that will be received when the Timer 1 on time is<br />
reached.<br />
5. DISABLE - Press the ‘DISABLE’ softkey to disable Timer 1.<br />
6. ENABLE - Press the ‘ENABLE’ softkey to activate Timer 1.<br />
7. TIMER 1 - This display entry will appear when Timer 1 has been enabled. It will be present on all menus and displays<br />
as long as Timer 1 is active. If both Timer 1 and 2 are active, it will read “TIMER 1 2". If neither timer is active,<br />
it will not be visible on any menu.<br />
5. TIMER 2 OFF TIME - Press ‘5' to set the off time for timer number 2.<br />
6. TIMER 2 MEM CH - Press ‘6' to set the number of the MEMORY or COUNTRY channel that you want the etón<br />
<strong>E1</strong> to receive when timer 2 activates.<br />
7. MAIN MENU - Pressing the ‘7' key returns the user to the main menu as described previously.<br />
8. MORE - Scrolls forward through available menus as described previously.<br />
9. EXIT - Exits the menu loop and returns to the VFO, MEMORY or COUNTRY.<br />
36 37
<strong>E1</strong> <strong>MANUAL</strong><br />
<strong>E1</strong> MENUS continued<br />
TIMER 2 ENABLE / DISABLE<br />
This menu is used to enable and disable event timer number 2. It is reached by pressing the ‘TIME’ key a second<br />
time. The ON time, OFF time, and MEMORY or COUNTRY channel shown on this menu must be entered using the<br />
TIMERS menu. The TIMER 2 ENABLE / DISABLE display appears as shown in the following illustration.<br />
<strong>E1</strong> MENUS continued<br />
This display is shown in the following illustration.<br />
LOCAL / GMT TIME SELECT<br />
1. TIMER 2 - This display entry identifies this menu as being associated with Timer 2.<br />
2. START TIME - This shows the time that Timer 2 is set up to turn on when enabled.<br />
1. CLOCKS - This identifies the menu as being the CLOCK GMT / LOCAL selection menu.<br />
2. LOCAL - Press this softkey to cause Local time to be shown on all menus and displays.<br />
3. GMT - Press this softkey to cause universal (GMT) time to be shown on all menus and displays.<br />
4. TIMER 1 2 - This indicates that either timer 1, 2, or both are enabled.<br />
5. L / GMT - Indicates that the time displayed is either Local (L) or universal (GMT) time.<br />
3. STOP TIME - This shows the time that Timer 2 is set to turn off when enabled.<br />
4. Memory or Country channel selected - This menu entry identifies the MEMORY or COUNTRY channel<br />
which was programmed into Timer 2. This is the frequency that will be received when timer 2 on time is reached.<br />
5. DISABLE - Press the ‘DISABLE softkey to disable Timer 2.<br />
6. ENABLE - Press the ‘ENABLE’ softkey to activate Timer 2.<br />
7. TIMER 2 - This display entry will appear when Timer 2 has been enabled. It will be present on all menus and displays<br />
as long as Timer 2 is active. If both Timer 1 and 2 are active, it will read “TIMER 1 2". If neither timer is active,<br />
it will not be visible on any menu.<br />
LOCAL / GMT TIME SELECT<br />
This menu is used to select whether the clock displayed on all other displays shows time in GMT or Local time. It is<br />
reached by pressing the ‘TIME’ key a third time. Pressing the ‘TIME’ key a fourth time takes the user back to the VFO,<br />
MEMORY or COUNTRY display, whichever was in use when ‘TIME’ was pressed initially.<br />
SEEK FUNCTION<br />
DESCRIPTION<br />
The etón <strong>E1</strong> incorporates a SEEK function which<br />
allows the user to search for signals in VFO, MEMORY<br />
or COUNTRY mode which have signal strengths that<br />
exceed a predetermined level which the user determines<br />
by the setting of the SQUELCH knob.<br />
VFO MODE<br />
To use SEEK in VFO mode, proceed as follows:<br />
(1) Select the frequency range you would like to scan.<br />
This can be FM, MW, LW, or SW.<br />
(2) Set the SQUELCH control so that the Squelch Level<br />
Indicator (located below the signal strength<br />
indicator) is set at the desired level.<br />
(3) Press the ‘SEEK’ key. The receiver will scan through<br />
the selected band in 5 kHz steps on LW band, 9 or<br />
10 kHz steps on MW band, 5 kHz steps on SW<br />
band, and 200 kHz steps on FM band. Signals that<br />
are strong enough to cause the signal strength<br />
indicator display bars to extend further to the right<br />
than the Squelch Level indicator will cause SEEK to<br />
stop on that signal, and the signal will be heard.<br />
(4) The receiver will remain on that signal until the<br />
‘SEEK’ key is pressed again.<br />
(5) If the receiver continues to SEEK but cannot find a<br />
signal, you may press ‘SEEK’ again to stop the<br />
SEEK.<br />
MEMORY & COUNTRY MODE<br />
To use SEEK in MEMORY and COUNTRY modes, selected<br />
frequencies must be programmed into several of<br />
the MEMORY and/or COUNTRY channels. Programming<br />
of MEMORY channels is covered on page 26 and programming<br />
of COUNTRY channels is covered on page<br />
28. Once MEMORY and/or COUNTRY channels are programmed<br />
as desired, proceed as follows:<br />
(1) Press the ‘MEMORY’ or ‘COUNTRY’ softkey to enter<br />
the desired mode.<br />
(2) Set the ‘SQUELCH’ knob to the desired level. (HINT:<br />
Set the ‘SQUELCH’ control high enough (clockwise)<br />
38 39
<strong>E1</strong> <strong>MANUAL</strong><br />
SEEK FUNCTION continued<br />
CLOCK AND TIMER FUNCTIONS<br />
that signals breaking the squelch are not noisy.)<br />
(3) Press the ‘SEEK’ key. The receiver will step through<br />
all programmed MEMORY or COUNTRY locations<br />
until it finds a signal that exceeds the squelch<br />
setting. It will stop on that signal and will stay there<br />
until the ‘SEEK’ key is pressed again.<br />
T.SCAN FUNCTION<br />
DESCRIPTION<br />
The T.SCAN function of the etón <strong>E1</strong> allows the user to<br />
mark numerous channels in the MEMORY, and/or<br />
COUNTRY, memories for selective scanning. Once the<br />
channels are marked, pressing the T.SCAN key when in<br />
MEMORY or COUNTRY mode will cause the unit to<br />
scan through each of the marked channels in that<br />
mode, and to stop on each one which has a signal<br />
strength greater than a predetermined level which the<br />
user determines by the setting of the SQUELCH knob.<br />
The user then has two options as to how the T.SCAN<br />
will proceed. It can remain on the marked channel as<br />
long as the signal level exceeds the SQUELCH setting,<br />
or it can remain on the channel for 5 seconds and then<br />
resume the scan regardless of signal level. The selection<br />
of which of these options is chosen is made from<br />
the RADIO SETTINGS menu, item 2 by selecting either<br />
TIME or CARRIER. The T.SCAN function works on<br />
MEMORY and COUNTRY modes. It does not work on<br />
the VFO mode.<br />
Therefore, if T.SCAN is enabled, the scan will proceed<br />
through marked channels in CATEGORY or FAVORITES<br />
mode, whichever is currently active when the ‘T.SCAN’<br />
key is pressed, and will remain on each one for<br />
approximately five seconds, regardless of whether TIME<br />
or CARRIER is selected on the RADIO SETTINGS menu<br />
item 2.<br />
MARKING CHANNELS FOR T.SCAN<br />
This discussion assumes that the user has already programmed<br />
numerous channels in MEMORY or COUN-<br />
TRY modes. Programming in MEMORY and COUNTRY<br />
modes is covered on pages 26 and 28 respectively.<br />
(1) Select either MEMORY or COUNTRY mode. The<br />
choice will depend entirely on the user’s preference<br />
and the number of channels programmed in MEM-<br />
ORY or COUNTRY modes.<br />
(2) Using the ‘TUNING’ knob or the ‘< SELECT >’ key,<br />
scroll through the programmed MEMORY or<br />
COUNTRY channels until the reverse video curser is<br />
on the one you want to mark for scan.<br />
(3) To mark the channel for T.SCAN, press the ‘TAG’<br />
key. (Number 11 on the Front Panel Description<br />
drawing on page 13.) You will hear a beep tone<br />
and see a “T” appear to the left of the channel<br />
number.<br />
UNMARKING T.SCAN CHANNELS<br />
(1) To exclude a marked channel from a T.SCAN, select<br />
that channel in MEMORY or COUNTRY modes<br />
as described previously.<br />
(2) With the reverse video curser on the selected channel,<br />
simply press the ‘TAG’ key again. You will hear<br />
a beep tone and see the “T” disappear from the<br />
left of the selected channel number.<br />
SELECTING THE SCAN STOP METHOD<br />
(1) Press the ‘MENU’ softkey twice to bring up the<br />
RADIO SETTINGS menu.<br />
(2) Note that item 2 on the RADIO SETTINGS menu<br />
reads: “2 SCAN STOP MODE TIME / CARRIER” OR<br />
“2 SCAN STOP MODE TIME / CARRIER”<br />
(3) Repeatedly pressing the ‘2' key on the ‘Direct-Key-<br />
Input’ keypad will cause the reverse video curser to<br />
toggle back and forth between “TIME” and “CAR-<br />
RIER”. Leave the curser on the desired option, and<br />
press ‘9' to exit the menu.<br />
(4) If “TIME” is chosen, the scan will stop on a channel<br />
that has a signal strength that exceeds the<br />
SQUELCH setting, will remain there for 5 seconds,<br />
and will resume scanning. If CARRIER is chosen,<br />
the scan will stop on a carrier that has a signal<br />
strength that exceeds the SQUELCH setting, and<br />
will remain there until the carrier strength drops<br />
below the squelch setting.<br />
INITIATING AND STOPPING THE T.SCAN<br />
(1) Once desired channels have been marked and the<br />
SCAN STOP method has been selected, the T.SCAN<br />
can be initiated by pressing the ‘T.SCAN’ key. This<br />
will initiate the scan and will cause the “MEMO-<br />
RY” or “CHANNEL” entry on their respective displays<br />
to be replaced with “SCAN”<br />
(2) To stop a T.SCAN, simply press the ‘T.SCAN’ key<br />
again. This will cause the scan to stop and the<br />
“MEMORY” or “COUNTRY” labels on their respective<br />
displays to return, replacing “SCAN”.<br />
TIME DISPLAY<br />
The <strong>E1</strong> incorporates dual time clocks allowing two 24<br />
hour clocks to be set and maintained. During loss of<br />
AC power, or during battery changing, clock operation<br />
is maintained for a period of approximately 10 minutes,<br />
if the receiver has been connected to an AC<br />
power source or had the batteries installed. The twoevent<br />
timer functions are also derived from the displayed<br />
clock. Therefore the clocks must be set first for<br />
proper TIMER operation, and the clock selected for display<br />
must be the same one (GMT or Local) for which<br />
the timers are programmed.<br />
TIMER settings are stored in non volatile memory and<br />
are maintained regardless of how long power has<br />
been removed. When the receiver is in the ON state,<br />
the time is displayed in the upper right hand corner of<br />
the display, regardless of which menu or operating<br />
mode is selected. When the receiver is in the OFF state,<br />
the time is displayed prominently in the upper portion<br />
of the display, and if either timer is enabled, timer settings<br />
are displayed in the bottom portion of the display.<br />
If the time in any menu or display is observed to be<br />
flashing on and off at one second intervals, this is an<br />
indication that the selected clock is not set.<br />
Selecting between Local time and GMT time is accomplished<br />
by pressing and releasing the ‘TIME’ key three<br />
times. This will bring up the CLOCKS menu, which<br />
allows the user to press the softkey along the right<br />
hand side of the display labeled GMT or LOCAL. When<br />
the receiver is in the OFF state, pressing the ‘TIME’ key<br />
will toggle between Local and GMT.<br />
SETTING 24 HOUR CLOCKS AUTOMATICALLY<br />
The etón <strong>E1</strong> has the capability of setting both the<br />
GMT and Local clocks automatically. To do this, the<br />
receivers must be operating from the AC ADAPTER.<br />
Reception must bo form one of the five available WWV<br />
or WWVH National Institute of Standards and<br />
Technology stations with a good quality signal. These<br />
stations are located at 2500.0, 5000.0, 10,000.0,<br />
15,000.0, and 20,000.0 kHz. In addition, several items<br />
on the CLOCK MODES menu must be set properly. To do<br />
this proceed as follows:<br />
(1) With the receiver turned on, press the ‘MENU ‘ soft<br />
key which will activate the MAIN MENU. Then<br />
press the ‘4' key on the ‘Direct-Key-Input’ keypad,<br />
to activate the CLOCK MODES menu.<br />
(2) Item 1 on the CLOCK MODES menu reads: “AUTO<br />
CLOCK SET OFF / ON ”. You will note that either<br />
“ON” or “OFF” is shown in reverse video. Pressing<br />
‘1' on the ‘Direct-Key-Input’ keypad, will toggle the<br />
reverse video curser between “ON” and “OFF”. If<br />
necessary, press the ‘1' key to move the curser to<br />
“ON”.<br />
(3) Item 2 on the menu reads: “2 AUTO CLOCK DST<br />
OFF / ON”. Pressing the ‘2' key on the ‘Direct-Key-<br />
Input’ keypad will toggle the curser between<br />
“OFF” and “ON”. You should leave this on “ON” if<br />
you live in a location that has daylight savings time<br />
(DST). If you live in a location that does not have<br />
DST, then you should select “OFF”. (DST applies<br />
only in North America). Note that automatic update<br />
of Daylight Savings Time at the transition date<br />
through WWV or WWVH requires a good signal<br />
and that the receiver be in the OFF state.<br />
(4) Item 3 on the menu reads: “LOCAL TIME OFFSET - /<br />
+”. This refers to whether or not your Local time is<br />
less than or greater than GMT. For example, the<br />
Western hemisphere is less than GMT and the<br />
Eastern hemisphere is greater. Therefore, if you<br />
lived in the Western hemisphere, you would use the<br />
‘3' key to toggle the curser to ‘- ‘<br />
(5) Item 4 on the menu reads: “LOCAL TIME OFFSET<br />
00:00 HOURS”. This refers to how much your Local<br />
time is offset from GMT. For example, in the<br />
Eastern USA, the time offset is 5:00 hours.<br />
• To make this setting, press ‘4' on the ‘Direct-Key-<br />
Input’ keypad. This will cause the menu item<br />
numbers to disappear, and the time entry for item 4<br />
to be displayed in reverse video.<br />
• Use the ‘Direct-Key-Input’ keypad keys to enter the<br />
desired offset, ignoring the colon. For example, for<br />
5:00 hours press ‘0', ‘5', ‘0', ‘0'. Line 4 of the dis<br />
play will then read: “LOCAL TIME OFFSET 5.00<br />
HOURS”.<br />
• Then press the ‘STORE’ key to store the entry. You<br />
will hear a beep, the menu item numbers will reap<br />
pear, and the reverse video curser will disappear.<br />
• Press the ‘9' key to exit the menu and return to<br />
normal operation.<br />
Note that on the <strong>E1</strong>, for the clocks to automatically<br />
set, the receiver must be receiving power through the<br />
AC Adapter and must be in the OFF state. The clocks<br />
will not set automatically when operating from batteries.<br />
While in the OFF state, it will search for the WWV<br />
or WWVH signal that is the strongest, and will then<br />
use it to set the clocks. Allow at least 15 minutes for<br />
the clocks to set. This could take considerably longer<br />
under weak signal conditions.<br />
SETTING THE 24 HOUR CLOCKS <strong>MANUAL</strong>LY<br />
If you are not in a location where adequate signal<br />
quality can be obtained on one of the WWV or WWVH<br />
signals, the Local and GMT clocks will need to<br />
40 41
<strong>E1</strong> <strong>MANUAL</strong><br />
CLOCK AND TIMER FUNCTIONS continued<br />
CLOCK AND TIMER FUNCTIONS continued<br />
be set manually. This is accomplished using the SET<br />
CLOCKS menu. To reach this menu, the unit must be in<br />
the ON state. Then press the ‘MENU’ softkey. This will<br />
bring up the MAIN MENU. From the MAIN MENU,<br />
press the ‘3' key on the ‘Direct-Key-Input’ keypad. This<br />
will activate the SET CLOCKS menu.<br />
Setting Local Time<br />
(1) To set the Local time, press the ‘1' key. This will<br />
cause the numbers along the left side of the SET<br />
CLOCKS menu to disappear, and the time shown to<br />
the left of the ‘LOCAL TIME SET’ line on the menu<br />
to appear in reverse video. Example: “ LOCAL TIME<br />
SET 00:00”<br />
(2) Using the ‘Direct-Key-Input’ keypad, key in the<br />
desired time, ignoring the colon. (HINT: Key in a<br />
time about one minute ahead of the actual time.)<br />
Example: For 16:05, press in sequence ‘1', ‘6', ‘0',<br />
‘5'. The Local time set line on the display will now<br />
appear as: “ LOCAL TIME SET 16:05"<br />
(3) When the actual time agrees with the displayed<br />
time, press the ‘STORE’ key. This will cause a beep,<br />
the entered time will now be shown in normal<br />
video, the menu numbers will return, and the clock<br />
will begin running. Line 1 of the MENU will now<br />
look like the following: “1 LOCAL TIME SET 16:05"<br />
(4) To exit the SET CLOCKS menu, press the ‘9' key on<br />
the ‘Direct-Key-Input’ keypad.<br />
Setting GMT Time<br />
Access the SET CLOCKS menu as described in the previous<br />
section.<br />
(1) To set GMT, press the ‘2' key. This will cause the<br />
numbers along the left side of the MENU -CLOCKS<br />
menu to disappear, and the time shown to the left<br />
of the “GMT TIME SET” line on the menu to<br />
appear in reverse video. Example: “GMT TIME SET<br />
00:00”<br />
(2) Using the ‘Direct-Key-Input’ keypad, enter the<br />
desired time, ignoring the colon. (HINT: Key in a<br />
time about one minute ahead of the actual time.)<br />
Example: For 21:05, press in sequence ‘2', ‘1', ‘0',<br />
‘5'. The Local time set line on the display will now<br />
appear as: “ GMT TIME SET 21:05".<br />
(3) When the actual time agrees with the displayed<br />
time, press the ‘STORE’ key. This will cause a beep,<br />
the entered time will now be shown in normal<br />
video, the menu numbers will return, and the clock<br />
will begin running. Line 2 of the MENU will now<br />
look like the following: “2 GMT TIME SET 21:05".<br />
(4) To exit the SET CLOCKS menu, press the ‘9' key on<br />
the ‘Direct-Key-Input’ keypad.<br />
NOTE: If the AUTO CLOCK SET is left in the ON state,<br />
then manual setting of the clock may result in only a<br />
temporary change of the time settings.<br />
TIMER OPERATION<br />
The <strong>E1</strong> includes two programmable event timers allowing<br />
the receivers to turn ON or OFF at preset times. The<br />
timers may be used separately or together and may<br />
recall a currently displayed frequency, MEMORY channel,<br />
COUNTRY channel, or a combination of those. In addition,<br />
programming only an OFF time provides a Sleep<br />
timer, and programming only an ON time provides a<br />
Wake timer.<br />
Note that the timers, when activated, respond to the<br />
last displayed clock. Programming the timers is a three<br />
step process. Step one is to set the ON time, and step 2<br />
is to assign the OFF time. Step three is to assign a<br />
MEMORY or COUNTRY channel to a timer.<br />
SETTING TIMER ON/OFF TIMES<br />
Enter the TIMERS menu by pressing the ‘MENU’ key to reach MAIN MENU, and then pressing the ‘5' key on the<br />
‘Direct-Key- Input’ keypad. This brings up the TIMERS menu as shown below.<br />
TIMERS<br />
(1) Press ‘1' on the ‘Direct-Key-Input’ keypad. This will cause the menu numbers on the left to disappear and the ON<br />
time entry for TIMER 1 will turn to reverse video, as shown here: “TIMER 1 ON TIME 11:30“<br />
(2) Key in the desired ON time for TIMER 1, ignoring the colon. For example, for an ON time of 18:41, press the<br />
following keys: ‘1', ‘8', ‘4', ‘1'. The TIMER 1 ON TIME curser will now show “18:41”.<br />
(3) Press ‘STORE’ to save the TIMER 1 ON time in memory. You will hear a beep, the reverse video window will<br />
change to normal video, and the menu numbers will return.<br />
To set the OFF time for TIMER 1, select item 2 from the menu by pressing ‘2' on the ‘Direct-Key-Input’ keypad and<br />
follow the same procedure as you used to set ON time.<br />
SETTING A WAKE OR SLEEP TIMER<br />
If you want a timer to act as a wake timer only, you would program an ON time and clear an OFF time. This will<br />
cause the receiver to turn on at the designated time and stay on until turned off manually.<br />
If you want the timer to act as a sleep timer only, you would clear any existing ON time and program an OFF time.<br />
This will cause the receiver to turn off at a designated time and stay off until turned on manually.<br />
To program only an off time, or only an on time, clear the unwanted time on the selected timer as follows:<br />
(1) Select the timer ON time or OFF time to be cleared by pressing the ‘Direct-Key-Input’ keypad key corresponding to<br />
the menu number of the desired timer ON time or OFF time. This will cause the menu numbers to disappear and a<br />
reverse video curser to appear on the selected timer ON time or OFF time.<br />
(2) Press the ‘CLEAR/LOCK’ key on the ‘Direct-Key-Input’ keypad. This will cause the numbers in the reverse video<br />
curser to disappear. Only the colon will remain.<br />
(3) Press ‘STORE’. This will cause the reverse video curser to disappear, a beep will be heard, the menu numbers will<br />
reappear, and the null time information will be stored in memory.<br />
SETTING TIMER MEMORY CHANNELS<br />
To set the memory channel on the <strong>E1</strong> receiver which will be activated by TIMER 1, press ‘3' on the ‘Direct-Key-Input’<br />
keypad, and then key in the number of the MEMORY or COUNTRY channel. For example, assume you want TIMER 1 to<br />
activate COUNTRY channel 1460.<br />
42 43
<strong>E1</strong> <strong>MANUAL</strong><br />
CLOCK AND TIMER FUNCTIONS continued<br />
• Press ‘3' for “TIMER 1 MEM CH”. You will see a reverse video curser appear.<br />
• Press ‘1', ‘4', ‘6', ‘0'.<br />
• You will see “TIMER 1 MEM CH 1460“.<br />
• Press the ‘STORE’ key to save this entry in memory.<br />
• You will hear a beep, the reverse video curser will go away, the menu numbers on the left will return, and the<br />
entered COUNTRY channel will be stored in the TIMER 1 memory.<br />
CLOCK AND TIMER FUNCTIONS continued<br />
ENABLING/DISABLING TIMER OPERATION<br />
Press the ‘TIME’ button. This will activate the TIMER 1 display. It will appear as shown in the “ENABLING/DISABLING<br />
TIMER” illustration which follows.<br />
ENABLING/DISABLING TIMER<br />
This display shows the start time and stop time set for TIMER 1 as well as the MEMORY or COUNTRY menu number, frequency,<br />
and name (if any) programmed in for the TIMER 1 MEM CH.<br />
MENU – TIMERS<br />
If it is desired to set TIMER 2, use the same procedure as that for TIMER 1. If you want TIMER 1 or TIMER 2 to turn<br />
on the receiver to what ever frequency was tuned in last, simply clear the channel information from the respective<br />
TIMER 1 MEM CH or TIMER 2 MEM CH as follows:<br />
• Press the TIMERS menu ‘3' or ‘6' as desired on the ‘Direct-Key-Input’ keypad. This will cause the selected menu line<br />
to display a reverse video curser, and the menu line numbers will disappear. Assuming menu item 3 for TIMER 1<br />
was selected, the line will appear as follows: “TIMER 1 MEM CH 1460“.<br />
• Press the ‘CLEAR / LOCK’ key on the ‘Direct-Key-Input’ keypad. This will produce a beep and will cause any numbers<br />
in the reverse video curser to disappear.<br />
• Press the ‘STORE’ key. This will cause another beep, the menu numbers will reappear, the reverse video curser will<br />
disappear, and this null information will be stored in memory, Use this same procedure if you choose to store null<br />
information for TIMER 2. To exit the timer menu and go back to a normal operating mode, press ‘9' on the ‘Direct-<br />
Key-Input’ keypad.<br />
To enable TIMER 1, press the ‘ENABLE’ softkey. This will cause “TIMER 1" to appear in the upper right hand corner of<br />
this display (as well as all other displays and menus), indicating that TIMER 1 is enabled.<br />
To disable TIMER 1, press the ‘DISABLE’ softkey. If TIMER 1 was the only one enabled, “TIMER 1" will disappear from<br />
the display. If TIMER 2 was also enabled, only the ‘1' will disappear. If both timers are enabled you will see “TIMER 1<br />
2"in the upper right hand corner of this and all other displays and menus.<br />
To enable or disable TIMER 2, press the ‘TIME’ key again. This will activate the TIMER 2 display. This display is identical<br />
to the TIMER 1 display except for its name. Follow exactly the same procedure to enable or disable TIMER 2.<br />
To return to normal operation from the TIMER 2 display, press the ‘TIME’ key twice. The first press will take you to the<br />
CLOCKS display, and the second will take you back to the VFO, MEMORY or COUNTRYdisplay. Note that repeatedly<br />
pressing the ‘TIME’ key will cycle through the TIMER 1, TIMER 2, CLOCKS, and normal screens.<br />
SPECIAL USE FEATURES AND FUNCTIONS<br />
The etón <strong>E1</strong> receiver has several special features that<br />
are referred to in the main body of this USE AND CARE<br />
GUIDE, but may require additional explanation.<br />
LOCK ALL ENTRY TO KEYPAD<br />
The receiver front panel keys with the exception of the<br />
‘CLEAR/LOCK’ key may be locked or disabled by pressing<br />
and holding the ‘CLEAR/LOCK’ key for 3 seconds. Press the<br />
‘CLEAR/LOCK’ key and hold for 3 seconds. An acknowledging<br />
beep will be heard, and both “LOCK” and “TUN<br />
LOCK” will appear on the front panel display after 3 seconds<br />
to indicate that the front panel keys and ‘TUNING’<br />
control are locked.<br />
Press the ‘CLR/LOCK’ again for 3 seconds to unlock the<br />
front panel keys and ‘TUNING’ control. The beep will again<br />
be heard when the key is pressed and the “LOCK” and<br />
“TUN LOCK” indications on the front panel display will<br />
disappear after 3 seconds, indicating that the ‘TUNING’<br />
control and front panel keys have been released.<br />
44 45
<strong>E1</strong> <strong>MANUAL</strong><br />
SPECIAL USE FEATURES AND FUNCTIONS continued<br />
SPECIAL USE FEATURES AND FUNCTIONS continued<br />
This control can also be used when the receiver is<br />
turned off. Press ‘CLEAR/LOCK’ for 3 seconds. A message<br />
will appear confirming lock. If power is then<br />
pressed, a “Press CLEAR/LOCK for 3 seconds to<br />
unlock” message will appear. The user must perform<br />
this action before the ‘POWER’ key will allow the<br />
receiver to be turned on.<br />
BROADCAST BAND TUNING STEP SIZE<br />
In the AM broadcast band, the <strong>E1</strong> receiver increments<br />
the frequency in 10 kHz steps when pressing the ‘<<br />
SELECT >’ keys. The 10 kHz step size is practical for<br />
tuning the U.S. and Canadian broadcast bands.<br />
However, the step size can be changed to 9 kHz to<br />
permit practical tuning of European broadcast stations.<br />
The tuning step size is held in nonvolatile memory and<br />
thus is not lost during power failure or battery changing.<br />
To select the alternate step size:<br />
Press the ‘MENU’ softkey to activate the MAIN MENU.<br />
Then press ‘1' on the ‘Direct-Key-Input’ keypad. This<br />
will take you to the RADIO SETTINGS menu. On that<br />
menu, item number 4 reads as follows:<br />
“4 MW TUNING STEPS 9 / 10 kHz”<br />
Pressing ‘4' on the ‘Direct-Key-Input’ keypad will toggle<br />
the reverse video curser between 9 kHz and 10<br />
kHz. Leave the curser on the desired MW band step<br />
size. If the step size was 10 kHz prior to performing<br />
the above procedure, then the 9 kHz step size for the<br />
broadcast band is now programmed. To change back<br />
to 10 kHz, repeat the same procedure. To exit the<br />
RADIO SETTINGS menu, press ‘9' (EXIT) on<br />
the ‘Direct-Key-Input’ keypad.<br />
DELETE ALL MEMORY OR COUNTRY CHANNELS<br />
The following procedure will delete either all MEMORY<br />
or all COUNTRY channels.<br />
• Place the receiver in either MEMORY or COUNTRY<br />
mode by pressing the ‘MEMORY’ or ‘COUNTRY’<br />
softkeys.<br />
• Press ‘POWER’ to power down the receiver.<br />
• Press the ‘POWER’ key again and hold.<br />
• While holding the ‘POWER’ key, press the ‘MEMORY’<br />
or ‘COUNTRY’ softkey for two seconds.<br />
• This will cause the message “DELETE PAGE ?” to<br />
appear on the display. You can now release the keys.<br />
• If you hadn’t already pressed ‘MEMORY’ or ‘COUN-<br />
TRY’ you can do so now.<br />
• While the “DELETE PAGE ?” message is still visible,<br />
press the ‘DELETE’ key for two seconds to delete<br />
the page.<br />
Note that if the “DELETE PAGE ?” message disappears<br />
from the display before you press the ‘DELETE’ key, you<br />
must start over.<br />
DELETE ALL MEMORY AND COUNTRY CHANNELS<br />
If it is desired to delete all MEMORY AND COUNTRY<br />
channels in one operation, proceed as follows:<br />
• Place the receiver in either MEMORY or COUNTRY<br />
mode by pressing the ‘MEMORY’ or ‘COUNTRY’<br />
softkey.<br />
• Turn the receiver off by pressing the ‘POWER’ key.<br />
• Press and hold the ‘POWER’ key.<br />
• Press the ‘DELETE’ key for two seconds while still<br />
holding down the ‘POWER’ key.<br />
• This will cause the message “Are you really sure you<br />
want to delete the program information in all 1700<br />
memory channels?” to appear.<br />
• While this message is still displayed, press the<br />
‘DELETE’ key for two seconds to clear MEMORY and<br />
CHANNEL memories.<br />
DISPLAY LIGHTING<br />
With AC Adapter<br />
When the unit is operating from the external AC<br />
adapter or other DC power source and is turned OFF,<br />
the display lighting will revert to one of the following<br />
states.<br />
• If Dim, Medium, or Bright was selected using the<br />
‘LIGHT’ key when the unit was ON, the display will<br />
be Dim when the unit is turned OFF.<br />
• If no backlighting was selected using the ‘LIGHT’<br />
key when the unit was ON, the display will not be<br />
illuminated when the receiver is turned OFF.<br />
• When the receiver is in the OFF state, the display<br />
illumination can be toggled on and off with the<br />
‘LIGHT’ key. If toggled on, the illumination will<br />
remain on indefinitely.<br />
Regardless of display lighting, the LCD display will<br />
remain ON, displaying the time indefinitely, and can be<br />
switched between Local and GMT time using the<br />
‘TIME’ key.<br />
With Batteries Only<br />
When the receiver is turned OFF when operating from<br />
batteries the display lighting will do one of the following.<br />
• If Dim, Medium, or Bright was selected using the<br />
‘LIGHT’ key when the unit was ON, the display will<br />
be Dim when turned OFF, and will remain lit dis<br />
playing Local or GMT time for ten seconds, after<br />
which both the Dim lighting and the LCD “TIME”<br />
display will turn off.<br />
• If no backlighting was selected using the ‘LIGHT’<br />
key when the unit was ON, the display will not be<br />
illuminated when the receiver is turned OFF. The<br />
LCD display will show Local or GMT time for ten<br />
seconds and then turn OFF.<br />
• Pressing the ‘LIGHT’ key when the receiver is OFF<br />
will cause the display illumination to be toggled<br />
between being on and off. The LCD display and<br />
any illumination will turn off after 10 seconds.<br />
When the unit is OFF, pressing the ‘TIME’ key once<br />
will activate the LCD “TIME” display and<br />
additional presses of the ‘TIME’ key will cycle the<br />
“TIME” display between Local and GMT. If any dis<br />
play illumination was selected when the unit was<br />
last in the ON state, Dim display lighting will be<br />
turned on with the first press of the ‘TIME’ key<br />
along with the LCD display. Both illumination and<br />
the LCD display will turn OFF ten seconds after the<br />
last press of the ‘TIME’ key. When the receiver is<br />
ON, and either Dim, Medium, or Bright<br />
backlighting is selected, the illumination will turn<br />
OFF ten seconds after the last control input.<br />
Changing any control setting other than<br />
‘SQUELCH’, ‘TREBLE’, ‘BASS’, or ‘VOLUME’ will<br />
cause the display to come back ON and remain ON<br />
for ten seconds after the last control setting<br />
change and then turn back OFF. This “time out”<br />
feature can be disabled by holding down the<br />
‘LIGHT’ key for three seconds. You will hear a<br />
confirming beep. This will cause the illumination to<br />
stay ON until the receiver is turned OFF. However,<br />
the user should keep in mind that this mode of<br />
operation will result in a considerable reduction in<br />
battery life. The illumination timeout feature can be<br />
re-enabled in one of two ways.<br />
• Hold down the ‘LAMP’ key for three seconds. A<br />
beep will be heard, confirming that the feature has<br />
been enabled.<br />
• Turn the receiver ‘POWER’ OFF and back ON.<br />
46 47
<strong>E1</strong> <strong>MANUAL</strong><br />
QUICK REFERENCE GUIDE<br />
QUICK REFERENCE GUIDE continued<br />
QUICK REFERENCE GUIDE<br />
The 3 symbol indicates that the key is to be<br />
pressed within three seconds.<br />
Select normal frequency display (VFO) (page 19 item 20)<br />
Select normal frequency display (VFO) (page 19 item 21,<br />
22, 23)<br />
• Press ‘VFO’<br />
• Press ‘FM’, SW, MW or LW softkeys to select FM<br />
Broadcast, Shortwave,AM Broadcast or Long Wave<br />
bands. When in Shortwave mode, press ‘SW’ two or<br />
three digit entry from ‘Direct-Key-Input’ keypad for<br />
Shortwave Meter band designation.<br />
Program ON/OFF timers (starting 53)<br />
• Press MENU to activate MAIN MENU<br />
• Press ‘5' to activate TIMERS menu.<br />
• Press ‘1' and set TIMER 1 ON time using Keypad.<br />
• Press ‘STORE’ to save.<br />
• Press ‘2' and set TIMER 1 OFF time using keypad.<br />
• Press ‘STORE’ to save.<br />
• Press ‘3' and set TIMER 1 Memory Channel using keypad<br />
and press ‘STORE’ to save.<br />
• Repeat for TIMER 2 using menu entries 4, 5, and 6.<br />
• Press ‘9' to exit menu.<br />
Adjust Frequency (page 21) • Select Band. Turn ‘TUNING’ knob, Press ‘< SELECT >’<br />
keys, use ‘Direct-Key-Entry’ keypad.<br />
Select Mode (page 22-25)<br />
• Press ‘AM’ for displayed ‘AM’<br />
• Press ‘AM’ again to toggle to ‘AM SYNCH’<br />
• Press ‘SSB’ to scroll between ‘USB’, ‘LSB’ and DSB<br />
when ‘AM SYNCH’ is displayed.<br />
• Press ‘FM’ as required to display ‘FM’.<br />
• Press ‘SSB’ to select SSB mode. (AM SYNC must be<br />
off. To turn off, press AM).<br />
Select AM SYNC (page 23)<br />
Select Bandwidth (page 19, item 13)<br />
Select AGC (page 19, item 12)<br />
DX (preamplifier) On or Off (page 15 item 16)<br />
Set Time (page 52)<br />
Display GMT or Local Time (page 48)<br />
• With unit in ‘AM’ mode, press ‘AM’ again. ‘AM SYNC’<br />
will flash and then lock on.<br />
• Press ‘BW’ for displayed ‘7.0', ‘4.0' or ‘2.3' kHz (not<br />
active in FM).<br />
• Press ‘AGC’ for displayed ‘SLOW’, ‘FAST’, or AUTO (not<br />
active in FM).<br />
• Press ‘DX’ for displayed ‘DX’ or blank.<br />
• Press ‘MENU’ to display MAIN MENU. Then press ‘3’ to<br />
display SET CLOCKS display.<br />
• Press ‘1', set Local time using keypad, and press<br />
STORE to start clock.<br />
• Press ‘2', set GMT time using keypad and press<br />
‘STORE’ to start clock.<br />
• Press ‘9' to exit SET CLOCKS display<br />
• Press ‘TIME’ key 3 times.<br />
• Press GMT or LOCAL softkey to select.<br />
• Press ‘TIME’ key again to exit menu.<br />
• Time is always displayed in upper right corner when<br />
on, and in center of display when off.<br />
Quick Reference Guide continued > > ><br />
Activate (Enabling) Timer (page 56)<br />
Lock (or Unlock) Controls (page 56)<br />
Display light On/Off (page 57)<br />
Disable Beep (page 25)<br />
MEMORY FUNCTIONS<br />
• Store MEMORY Channel (page 26)<br />
• Store COUNTRY Channel (page 28)<br />
• Recall MEMORY Channel (page 26)<br />
• Recall COUNTRY Channel (page 28)<br />
Select MEMORY or COUNTRY Channel<br />
for T.SCAN (page 51)<br />
• Delete a MEMORY Channel (page 28)<br />
• Delete a COUNTRY Channel (page 30)<br />
• Press ‘TIME’ to activate TIMER 1 menu.<br />
• Press ‘ENABLE‘ to activate.<br />
• Press ‘TIME’ again to activate TIMER 2 menu.<br />
• Press ‘ENABLE’ to activate.<br />
• Press ‘TIME’ again twice to return to normal operation.<br />
• TIMER 1 and/or 2 will be displayed below the clock to<br />
indicate activation.<br />
• Press and hold ‘CLR/LOCK’ until “LOCK” is displayed<br />
(extinguishes).<br />
• Pushbuttons (except POWER) and ‘TUNING’ knob are<br />
inactive (active).<br />
• Press ‘LIGHT’ to scroll display lighting through bright,<br />
medium, dim and off.<br />
• Press ‘MENU’ to enable MAIN MENU.<br />
• Press ‘2' to enable the AUDIO SETTINGS menu.<br />
• Press ‘2' to toggle Beep on and off.<br />
• Press ‘9' to exit menu.<br />
• Select frequency, bandwidth, AGC and mode.<br />
• Press ‘STORE’. This will activate MEMORY or COUNTRY<br />
memory mode.<br />
• Press MEMORY or COUNTRY to select your preference.<br />
• Select an empty location using ‘TUNING’ or ‘< SELECT >’.<br />
• Press ‘STORE’ to save.<br />
• If in MEMORY mode, use ‘TUNING’ and ‘< SELECT >’ to<br />
assign name, and press STORE again.<br />
• Press ‘MEMORY’ or ‘COUNTRY’.<br />
• Use ‘TUNING’ and/or ‘< SELECT >’ to select desired<br />
memory channel.<br />
• Recall a MEMORY or COUNTRY channel as above.<br />
• Press ‘TAG’ to mark the channel for T.SCAN.<br />
• Set SQUELCH to desired level.<br />
• Press ‘T.SCAN’ to activate scan.<br />
• ‘Select a MEMORY or COUNTRY channel to delete as<br />
described above.<br />
• Press and hold ‘DELETE’ for 3 seconds. A high pitched<br />
beep will be heard and listed channel will be deleted.<br />
Quick Reference Guide continued > > ><br />
48 49
<strong>E1</strong> <strong>MANUAL</strong><br />
QUICK REFERENCE GUIDE continued<br />
GLOSSARY OF TERMS<br />
Delete all MEMORY and COUNTRY Channels (page 57)<br />
Mark Channels for T.Scan (page 51)<br />
T.SCAN MODE - The scan feature only works with channels<br />
programmed with a ‘T’ as described above. T.SCAN<br />
FUNCTION (page 51)<br />
SIDE PANEL CONTROLS<br />
HF Antenna Select (page 20)<br />
FM Antenna Select (page 20)<br />
• Press ‘MEMORY’ or ‘COUNTRY.<br />
• Turn off with ‘POWER’ key.<br />
• Press & hold ‘POWER’ key & press ‘DELETE’ for 2<br />
seconds.<br />
• When warning appears, release ‘DELETE’ & press it<br />
again for 2 seconds.<br />
• This will clear all memory locations.<br />
• Select either MEMORY or COUNTRY.<br />
• Select the MEMORY or COUNTRY channel to be<br />
marked using<br />
• TUNING knob or the < SELECT > key.<br />
• Press the ‘TAG’ key to mark the channel.<br />
• Select MEMORY or COUNTRY mode.<br />
• Set SQUELCH to desired level.<br />
• Press T.SCAN to begin scan.<br />
• Press T.SCAN again to stop scan.<br />
• Set ANTENNA - HF Internal/External switch as appropriate<br />
for antennas available.<br />
• Set ANTENNA - FM Internal/External switch as appropriate<br />
for antenna available.<br />
AC Input - Alternating Current power source available<br />
at wall outlet sockets.<br />
AM - Signals in which the information is conveyed by<br />
amplitude changes of the signal. Amplitude<br />
Modulation is used for the AM broadcast bands.<br />
AGC - Automatic Gain Control which is employed in<br />
receivers to adjust the amount of gain in the receiver's<br />
circuitry to prevent distortion and maintain a nearly<br />
constant audio volume level over wide variations in<br />
received signal strength.<br />
CW - Continuous Wave transmission signals. Actually,<br />
the signal is keyed on and off at precise intervals to<br />
convey information. Morse code is the most common<br />
CW signal.<br />
DC Input - Direct Current power source such as is<br />
available from batteries or regulated power supplies.<br />
DX - Refers to stations which are unusually distant<br />
from the receiver and are therefore frequently difficult<br />
to receive. In the context of this manual, DX refers to a<br />
built in preamplifier, which, when enabled, makes<br />
these “DX”stations more readable.<br />
Dynamic Range - Ability of the receiver to faithfully<br />
reproduce high quality audio over a wide range of signal<br />
strength conditions - from very weak signals to<br />
very strong signals.<br />
Frequency - Rate of reoccurrence in hertz or cycles<br />
per second of electromagnetic wave or carrier.<br />
FM - Signals in which the information is conveyed by<br />
frequency changes of the signal. Frequency Modulation<br />
is used for the FM broadcast bands.<br />
Electronically Switched Filter - A multi bandwidth<br />
filter with high adjacent channel attenuationswitched<br />
electronically.<br />
LCD - Liquid-Crystal Display - Low power consumption<br />
displays used for wristwatches and information displays<br />
on many types of electronic equipment.<br />
LSB - Lower Side Band - The lower frequency portion,<br />
excluding the carrier, of an AM signal. A single-sideband<br />
signal, in this case the lower sideband, contains<br />
all of the modulation information of amplitude modulation<br />
in one half the bandwidth.<br />
RF - Radio frequency<br />
RTTY - Radio Teletype communications.<br />
Softkeys - Keys surrounding the display that have different<br />
functions under different conditions. The current<br />
function of each individual softkey is shown on the display.<br />
Squelch - A user controlled adjustment which mutes<br />
the audio output below a certain signal strength.<br />
Synchronous Detector - An amplitude modulation<br />
detector which utilizes a replica of the original transmitted<br />
carrier signal to improve the reception of weak<br />
signals.<br />
Synthesized - Capable of generating a large number<br />
of different output frequencies, all related to a single,<br />
highly stable reference source.<br />
USB - Upper Side Band - The higher frequency portion,<br />
excluding the carrier of an AM signal. A single sideband<br />
signal, in this case the upper sideband, contains<br />
all of the modulation information of amplitude modulation<br />
in one half the bandwidth.<br />
UTC - Universal Time Coordinated.<br />
VFO - Variable Frequency Oscillator.<br />
VHF - Very High Frequency band extends from approximately<br />
30 MHz to 300 MHz.<br />
GMT - Greenwich Mean Time.<br />
HF - High Frequency band. This consists of the LW,<br />
MW, and SW bands on the <strong>E1</strong> receiver.<br />
50 51
<strong>E1</strong> <strong>MANUAL</strong><br />
TROUBLESHOOTING<br />
SERVICE INFORMATION<br />
Problem<br />
No front panel display or light.<br />
No signals heard when antenna is connected<br />
or sensitivity is low.<br />
Probable Cause<br />
(A) Power connection.<br />
(B) Defective AC ADAPTER unit.<br />
(C) Batteries are discharged or not installed<br />
for portable operation, no AC power.<br />
(D) Light turned off with ‘LIGHT’ key.<br />
(A) Incorrect antenna input selected.<br />
(B) Squelch set too high.<br />
Solution<br />
(A) Check power supply cables.<br />
(B) Check AC ADAPTER.<br />
(C) Check/install batteries for portable<br />
operation.<br />
(D) Turn light on with ‘LIGHT’ key.<br />
(A) Select correct antenna input.<br />
(B) Set Squelch to lower level.<br />
You may contact etón Corporation Service Department<br />
for additional information or assistance by calling tollfree<br />
Monday through Friday, 8:30am -4:00pm Pacific<br />
Standard Time:<br />
1(800) 872-2228 (US)<br />
1(800) 673-1648 (CN)<br />
650-903-3866 (World-wide)<br />
pack the receiver carefully using the original carton or<br />
other suitable container. Write your return address<br />
clearly on the shipping carton and on an enclosed cover<br />
letter describing the service required, symptoms or<br />
problems. Also, include your daytime telephone number<br />
and a copy of your proof of purchase. The receiver will<br />
be serviced under the terms of the etón Corporation<br />
Limited Warranty and returned to you.<br />
Signal Strength indication but no sound<br />
heard.<br />
(A) Improper mode selected.<br />
(B) External speaker connected but defective.<br />
(C) Squelch set too high.<br />
(A) Check mode selection.<br />
(B) Check external speaker.<br />
(C) Set Squelch to lower level.<br />
Call for a Return Authorization prior to shipping your<br />
unit. Should you want to return your unit for service,<br />
No front panel operation such as tuning, frequency<br />
entry, etc.<br />
Timer does not operate.<br />
(A) Lock enabled.<br />
(A) Clock(s) not set.<br />
(B) Timer not properly set.<br />
(C) Alternate clock selected.<br />
(D) Timer(s) not enabled.<br />
(A) Press ‘CLEAR/LOCK’ and hold for 3 seconds<br />
to unlock front panel.<br />
(A) Set clock(s).<br />
(B) Set clock(s) and program timer ON/OFF<br />
times.<br />
(C) Check that last displayed clock is the<br />
desired one for timer event.<br />
(D) Enable timers. Observe TIMER 1 or 2 on<br />
display.<br />
ONE YEAR LIMITED WARRANTY<br />
etón warrants to the original purchaser this product<br />
shall be free from defects in material or workmanship<br />
for one year from the date of original purchase.<br />
During the warranty period etón or an authorized etón<br />
service facility will provide, free of charge, both parts<br />
and labor necessary to correct defects in material and<br />
workmanship. At their option, etón may replace a<br />
defective unit.<br />
(1) Complete and send in the Warranty Registration<br />
Card within ten (10) days of purchase.<br />
(2) Call etón or the nearest authorized service facility,<br />
as soon as possible after discovery of a possible<br />
defect. Have ready:<br />
(a) the model and serial number.<br />
(b) the identity of the seller and the approximate<br />
date of purchase.<br />
(c) a detailed description of the problem, including<br />
details on the electrical connection to associated<br />
equipment and the list of such equipment.<br />
(3) etón will issue a Return Authorization number and<br />
the address to which the unit can be shipped. Ship<br />
the unit in its original container or equivalent, fully<br />
insured and shipping charges prepaid.<br />
(2) Misuse, abuse, neglect or improper installation.<br />
(3) Accidental or intentional damage.<br />
(4) Battery leakage.<br />
All implied warranties, if any, including warranties of<br />
merchantability and fitness for a particular purpose,<br />
terminate one (1) year from the date of the original<br />
purchase. The foregoing constitutes etón Corporation<br />
entire obligation with respect to this product, and the<br />
original purchaser shall have no other remedy and no<br />
claim for incidental or consequential damages, losses,<br />
or expenses. Some states do not allow limitations on<br />
how long an implied warranty lasts or do not allow the<br />
exclusions or limitation of incidental or consequential<br />
damages, so the above limitation and exclusion may<br />
not apply to you. This warranty give you specific legal<br />
rights and you may also have other rights, which vary<br />
from state to state.<br />
For service information contact:<br />
etón Corporation<br />
1015 Corporation Way<br />
Palo Alto, CA 94303<br />
USA<br />
Correct maintenance, repair, and use are important to<br />
obtain proper performance from this product. Therefore<br />
carefully read the Instruction Manual. This warranty<br />
does not apply to any defect that etón determines is<br />
due to:<br />
(1) Improper maintenance or repair, including the<br />
installation of parts or accessories that do not con<br />
form to the quality and specification of the original<br />
parts.<br />
52 53
<strong>E1</strong> <strong>MANUAL</strong><br />
APPENDIX<br />
APPENDIX - UNDERSTANDING SHORTWAVE BANDS continued<br />
UNDERSTANDING SHORTWAVE<br />
BANDS - THE KEY TO<br />
SUCCESSFULLY USING YOUR<br />
SHORTWAVE RADIO<br />
Do You Need Help?<br />
Monday-Friday, 8:30 a.m. - 4:00 p.m.,<br />
North American Pacific Time.<br />
1-800-872-2228 from the U.S.<br />
1-800-637-1648 from Canada<br />
1-650-903-3866, worldwide<br />
FAX: 650-903-3867<br />
customersvc@etoncorp.com<br />
www.etoncorp.com<br />
Mailing Address:<br />
etón Corporation<br />
1015 Corporation Way<br />
Palo Alto, CA 94303<br />
USA<br />
WHAT IS SHORTWAVE?<br />
Now that you have a shortwave radio, no doubt you’ll<br />
want to hear worldwide stations right away. What is<br />
shortwave? What will you hear? Shortwave is a broadcast<br />
frequency range that allows stations’ signals to be<br />
heard over vast distances, usually thousands of miles.<br />
You’ll hear news and information along with culturally<br />
oriented programming, sometimes including music. The<br />
programming may or may not be biased or propagandized.<br />
If you’re new to shortwave, please take some<br />
time to learn the basics outlined below. To successfully<br />
listen to shortwave stations you must know how to find<br />
them. They are found in the shortwave bands. If you’re<br />
an experienced shortwave listener, you’ll know what<br />
bands are and how to use them, but if you’re new,<br />
you’ll need to learn about bands first. After that you will<br />
have excellent success. Please read on.<br />
SOME BASIC RULES OF THUMB<br />
• Night shortwave reception is usually better than daytime<br />
shortwave. This can change from time-to-time,<br />
so it’s worth checking the bands during the day as<br />
well.<br />
• Shortwave is usually better in the winter than other<br />
times of year.<br />
• Typically, the best daytime shortwave bands are 13,<br />
15, 16, 19, and 22 meters, 16 and 19 usually the<br />
best. At night, the best bands are 25, 31, 41 and 49<br />
meters, with 31 and 49 usually best.<br />
• Around sunset and sunrise, both the day and night<br />
bands may often be exceptionally good, often making<br />
listening at these times quite rewarding.<br />
• Because the construction materials of some buildings<br />
severely block shortwave signals, it may be best to<br />
hold the radio in your hands and get very close to a<br />
window or use an external antenna mounted next to<br />
the window or outside.<br />
WHAT ARE BANDS?<br />
This is the most important concept to learn right away. If<br />
you have ever listened to AM or FM radio, then you<br />
already know what a band is. The AM band is a frequency<br />
range stretching from 530 to 1600 kilohertz, the<br />
FM band is 66-108 megahertz. A band is a frequency<br />
range where stations are located. When looking for stations<br />
in these ‘bands’, you tune around with your tuning<br />
buttons (or the tuning knob on an analog radio) until<br />
you find a station you like. Shortwave is similar and the<br />
shortwave bands have names like 25 meters, 31 meters,<br />
49 meters, etc. These are abbreviated 25m, 31m and<br />
49m. Just like in AM and FM radio, one simply gets into<br />
the shortwave band and tunes around, looking for stations.<br />
Each band represents a frequency range, as shown<br />
in the band chart below. For example, the 19 meter<br />
shortwave band encompasses the frequency range of<br />
15100 to 15600 kilohertz. Since some radios show frequency<br />
in megahertz (MHz) and some in kilohertz (KHz),<br />
both are shown here. Look at your radios tuning scale or<br />
its digital display to determine frequency designation it<br />
uses in shortwave. On some shortwave radios these frequencies<br />
will look like 15100 KHz, 15105 KHz or 15110<br />
KHz and on other radios they might look like 15.1 MHz,<br />
15.105 Mhz or 15.11 MH. The exact frequency ranges<br />
for these bands may vary somewhat from one radio<br />
model to another. This is perfectly OK. On some radios<br />
the band names, e.g. 19 meters, are clearly marked, on<br />
others they are not marked at all. If it is not apparent<br />
how to get into a band on your radio, consult the owners<br />
manual.<br />
A HELPFUL ANALOGY ABOUT BANDS<br />
A shortwave band is like a street with many addresses<br />
on it. In this case, the individual addresses are called frequencies,<br />
each one a potential home of a broadcaster.<br />
For example, in the 19 meter band (it could be called 19<br />
Meter Street), 15110 kilohertz is the home of Radio<br />
Spain International, 15190 is the home of BBC World<br />
Service and 15275 is the home of Deutsche Welle<br />
(Germany). As on any street, the occupants at a specific<br />
address are not always at home.<br />
BAND<br />
120 Meter<br />
90 Meter<br />
75 Meter<br />
60 Meter<br />
49 Meter<br />
41 Meter<br />
31 Meter<br />
25 Meter<br />
22 Meter<br />
19 Meter<br />
16 Meter<br />
13 Meter<br />
11 Meter<br />
MEGAHERTZ (MHz)<br />
2.300 - 2.500 MHz<br />
3.20 - 3.40 MHz<br />
3.90 - 4.00 MHz<br />
4.750 - 5.060 MHz<br />
5.950 - 6.20 MHz<br />
7.10 - 7.60 MHz<br />
9.20 - 9.90 MHz<br />
11.600 - 12.100 MHz<br />
13.570 - 13.870 MHz<br />
15.10 - 15.80 MHz<br />
17.480 - 17.90 MHz<br />
21.450 - 21.850 MHz<br />
25.60 - 26.10 MHz<br />
KILOHERTZ (KHz)<br />
2300 - 2500 KHz<br />
3200 - 3400 KHz<br />
3900 - 4000 KHz<br />
4750 - 5060 KHz<br />
5900 - 6200 KHz<br />
7100 - 7600 KHz<br />
9200 - 9900 KHz<br />
11600 - 12,100 KHz<br />
13570 - 13,870 KHz<br />
15100 - 15,800 KHz<br />
17480 - 17,900 KHz<br />
21450 - 21,850 KHz<br />
25600 - 26,100 KHz<br />
DAY BANDS vs. NIGHT BANDS - it’s important<br />
Because shortwave signals depend on such factors as<br />
the sun, the ionosphere and interaction with the earth<br />
itself, signals cannot be heard on all bands throughout<br />
the day. Some bands are best during the daylight<br />
hours, and some are best at night. In general, the<br />
bands with frequencies below 13 MHz (13000 KHz)<br />
are better at night and the bands with frequencies<br />
above 13 MHz (13000 KHz) are best during the day.<br />
Follow these guidelines for best listening results.<br />
SUNSET AND SUNRISE - often the best time to<br />
listen.<br />
This is when shortwave signals are often strongest and<br />
clearest, in a window of time around sunset and sunrise.<br />
Sometimes it’s a two-hour window, at other times<br />
three or four hours. Experiment to determine when it’s<br />
best in your area.<br />
DAYTIME LISTENING<br />
Shortwave listening is generally at its poorest during<br />
the daylight hours of about 10 a.m. to 3 p.m. The<br />
major reason for this is that the broadcasters are not<br />
transmitting to regions at this time, assuming that we<br />
are all either at work or at school and are not able to<br />
listen during the day. In North America, daytime shortwave<br />
tends to be better in the East and Midwest. The<br />
day bands are 13, 16, 19, 22 and 25 meters, often<br />
with 16 and 19 being the best. In the summer, these<br />
bands may stay open into the evening hours.<br />
EVENING/NIGHT LISTENING<br />
This is the best time to listen, because the broadcasters<br />
are deliberately transmitting to you, wherever you are,<br />
at least up to about 11 pm. These bands may be<br />
extremely good around sunset and sunrise too. The<br />
night bands are 25, 31, 41, 49 and 60 meters. In the<br />
winter, these bands produce results earlier than in the<br />
summer months, often starting around 3 pm on 25<br />
and 31 meters and 5 pm on 41, 49 and 60 meters. In<br />
the summer these bands start later, around 5 pm for<br />
25 and 31 meters and around 7 pm for 41, 49 and 60.<br />
IMPORTANT NOTE: Getting close to a window may<br />
substantially improve reception. Shortwave signals<br />
penetrate wood frame buildings easiest, while concrete<br />
and brick buildings usually block signals. If you are in a<br />
building with one or more stories above you, signals<br />
can also be impaired in strength. In such a situation,<br />
position yourself, and especially the radio's antenna,<br />
as close to a window as possible while listening. Use<br />
an external antenna if necessary.<br />
SHORTWAVE DIRECTORY<br />
We recommend the use of a comprehensive shortwave<br />
directory, especially to seek specific countries or to<br />
determine what you’re listening to. Such a directory<br />
lists the countries broadcasting on shortwave, showing<br />
their language, target area, broadcast time and frequency<br />
that is used. A frequency-by-frequency listing<br />
help to determine what is being heard. The two such<br />
directories listed below are found in major bookstores,<br />
on-line bookstores. Internet sources of shortwave<br />
broadcast information can be found via your favorite<br />
search site by searching for ‘shortwave broadcast<br />
schedules’.<br />
PASSPORT TO WORLD BAND RADIO,<br />
WORLD RADIO TV HANDBOOK.<br />
SHORTWAVE ANTENNAS<br />
An external shortwave antenna, especially when<br />
mounted outside, can greatly enhance reception. If<br />
your shortwave radio has an antenna socket, professionally<br />
engineered antennas can usually be used.<br />
etón Corporation does not manufacture or sell shortwave<br />
antennas, however, there are many excellent<br />
models available to significantly enhance your shortwave<br />
reception.<br />
NOTE: When ordering any antenna, let the retailer<br />
know what radio it’s for and that you want the proper<br />
plug fitting or adaptor installed on the coaxial cable<br />
for your model, or else the antenna’s coax cable won’t<br />
plug into the radio’s antenna socket. This may cost a<br />
few dollars more, but it’s well worth it and saves you<br />
time if such fittings and adaptors are not available<br />
from a local store in your area.<br />
54 55
<strong>E1</strong> <strong>MANUAL</strong><br />
APPENDIX - UNDERSTANDING SHORTWAVE BANDS continued<br />
APPENDIX - UNDERSTANDING SHORTWAVE BANDS continued<br />
FULL-SIZED PASSIVE SHORTWAVE ANTENNAS<br />
These normally give the best performance. Generically<br />
they have names such as dipoles, trapped dipoles, parallel<br />
dipoles and slopers. They are characteristically fed<br />
with 50 or 75 ohm coaxial cable that leads to the<br />
radio’s antenna socket. Even if you build one of these<br />
using instructions from a book, these antennas are an<br />
‘engineered system’, thus optimizing performance.<br />
ACTIVE SHORTWAVE ANTENNAS (usually small)<br />
Active antennas are much smaller than others and<br />
employ the use of amplifiers to compensate for their<br />
small size. There are many models to choose from. They<br />
usually do not perform as well as passive or nonamplified,<br />
professionally engineered models but are<br />
useful when a short, small size is needed.<br />
levels may still be quite high. Such antennas are<br />
attached directly to the radio’s telescopic antenna with<br />
an ‘alligator’ clip or other secure attachment device.<br />
AM ANTENNAS<br />
We are often asked about AM antennas. Such antennas,<br />
usually AM-Loop antennas, are made by a variety<br />
of manufacturers and often work extremely well to<br />
boost signals. One brand, Select-A-Tenna, is a timeproven<br />
performer and includes models ranging from<br />
about $60-$200.<br />
FINDING ANTENNAS<br />
One way to find antennas is by performing a search on<br />
the Internet.<br />
GETTING STARTED WITH SINGLE SIDEBAND<br />
(SSB)<br />
Many high-end shortwave radios have a feature called<br />
SSB, a highly efficient way of electronically processing<br />
transmitted and received signals for two-way communication.<br />
Examples of this are amateur radio (hams),<br />
maritime and aeronautical communication. Either<br />
upper side band (USB) or lower side band (LSB) can be<br />
used.<br />
Receiving SSB signals is not always easy. Since this is<br />
two-way communications, transmissions are often very<br />
short and sporadic. Also, most two-way communications<br />
uses relatively low power, 50 to 1000 watts. The<br />
amateur radio operators are easiest to find; the others<br />
can be very difficult. Best results are experienced when<br />
using an outdoor shortwave antenna such as a dipole.<br />
Finding SSB signals can be like seeking a “needle in a<br />
haystack”, so be patient! The easiest place to find SSB<br />
communications is at night in the amateur band<br />
shown below at 3650-4000 kHz. Follow your radio’s<br />
instructions on how to engage its SSB feature. Below<br />
are some selected frequency ranges on which SSB<br />
communications can be found. All frequencies are<br />
shown in kilohertz.<br />
SHORTWAVE ANTENNAS FOR USE ON BOATS<br />
RF Systems makes the model MARINE BALUN KIT<br />
(about $90 USD), which can turn a backstay or a long<br />
piece of wire into an efficient shortwave receiving<br />
antenna. McKay Dymek makes the model DA-100EM<br />
(about $200 USD), mountable on a mast or railing, the<br />
antenna being only about 1.5 meter high (4 ft. 8 in.).<br />
LONG-WIRE SHORTWAVE ANTENNAS<br />
If your radio does not have an antenna socket, or if<br />
you want to take a simpler or less costly approach, this<br />
type of antenna can improve signal levels. Understand,<br />
however, that this not an engineered system and noise<br />
Amateur Radio<br />
80m: 3650-4000, LSB, night.<br />
40m: 7150-7300, LSB, day/night.<br />
20m: 14150-14350, USB, day.<br />
15m: 21150-21450, USB, day.<br />
10m: 28300-28600, USB, day.<br />
Aeronautical<br />
(usually USB)<br />
2850-3155<br />
3400-3500<br />
4650-4750<br />
5480-5730<br />
6525-6765<br />
8815-9040<br />
10005-10100<br />
11175-11400<br />
13200-13360<br />
Aeronautical<br />
(usually USB)<br />
15010-15100<br />
17900-18030<br />
21870-22000<br />
23200-23350<br />
Maritime (usually USB)<br />
4063-4438<br />
6200-6525<br />
8195-8815<br />
12230-13200<br />
16360-17410<br />
18780-18900<br />
19680-19800<br />
22000-22720<br />
25070-25110<br />
TIME STATIONS<br />
TIME STATIONS not SSB<br />
CHU-time (Canada)<br />
3,330 kHz<br />
Best at night<br />
CHU-time (Canada)<br />
3,330 kHz<br />
Best at night<br />
CHU-time(Canada)<br />
7,335 kHz<br />
Day/night<br />
CHU-time(Canada)<br />
7,335 kHz<br />
Day/night<br />
CHU-time (Canada)<br />
14,670 kHz<br />
Best during daylight<br />
CHU-time (Canada)<br />
14,670 kHz<br />
Best during daylight<br />
WWV-time/weather(US)<br />
2,500 KHZ<br />
Best at night<br />
WWV-time/weather(US)<br />
2,500 KHZ<br />
Best at night<br />
WWV-time/weather(US)<br />
5,000 KHz<br />
Best at night<br />
WWV-time/weather(US)<br />
5,000 KHz<br />
Best at night<br />
WWV-time/weather(US)<br />
10,000 kHz<br />
Day/night<br />
WWV-time/weather(US)<br />
10,000 kHz<br />
Day/night<br />
WWV-time/weather(US)<br />
15,000 kHz<br />
Best during daylight<br />
WWV-time/weather(US)<br />
15,000 kHz<br />
Best during daylight<br />
WWV-time/weather(US)<br />
20,000 kHz<br />
Best during daylight<br />
WWV-time/weather(US)<br />
20,000 kHz<br />
Best during daylight<br />
56 57
<strong>E1</strong> <strong>MANUAL</strong><br />
APPENDIX - etón <strong>E1</strong> QUICK GUIDE<br />
APPENDIX - etón <strong>E1</strong> QUICK GUIDE continued<br />
Do You Need Help?<br />
Monday-Friday, 8:30 a.m. - 4:00 p.m.,<br />
North American Pacific Time.<br />
1-800-872-2228 from the U.S.<br />
1-800-637-1648 from Canada<br />
1-650-903-3866, worldwide<br />
FAX: 650-903-3867<br />
customersvc@etoncorp.com<br />
www.etoncorp.com<br />
Mailing Address:<br />
etón Corporation<br />
1015 Corporation Way<br />
Palo Alto, CA 94303<br />
USA<br />
INTRODUCTION<br />
This Quick Guide outlines the basics for listening to<br />
AM, FM and Shortwave. It also covers setting the clock<br />
and timers and storing stations into memory. Not all<br />
features and capabilities of the <strong>E1</strong> are addressed here.<br />
We encourage you to refer to the owner’s manual for a<br />
full understanding of the <strong>E1</strong>.<br />
SET-UP INFORMATION<br />
Power the <strong>E1</strong> with the AC adaptor or insert 4 new,<br />
identical alkaline D size batteries of the same brand<br />
and type (never intermix non-identical batteries). The<br />
battery compartment is accessed via the outer and<br />
inner door on the lower left front of the <strong>E1</strong>. When<br />
inserting 4 D alkaline batteries, follow the battery<br />
polarity diagram printed on the inner door. Turn the <strong>E1</strong><br />
and off by pressing the POWER button.<br />
For FM and Shortwave reception, pull up the telescopic<br />
antenna.<br />
The buttons (also called keys), knobs and switches<br />
referred to in this Quick Guide can be found by carefully<br />
looking at the radio. Some of the buttons (also<br />
called ‘keys’) are located surrounding the display<br />
(LCD). The function of these buttons is defined within<br />
the LCD. Full descriptions of controls and their locations<br />
are found in owner’s manual pages.<br />
Note that the AM broadcast band, 520-1710 KHz, is<br />
designated as MW (Medium Wave) in the display and<br />
in all explanations. While using this Quick Guide, set<br />
the SQUELCH knob fully counterclockwise, assure that<br />
both ANTENNA switches are in the INTERNAL position<br />
and use the DX button to assure that DX appears in<br />
the upper left area of the display.<br />
If reception is poor, get very close to a window. The<br />
construction materials of some buildings block signals.<br />
TUNING-IN FM AND MW STATIONS<br />
Stations are tuned-in with the SELECT button, the<br />
TUNING knob, by Direct Frequency Entry (see below) or<br />
the SEEK key (see below). If you are in Europe, the<br />
Middle East or in the Mediterranean area, LW stations<br />
can also be accessed (there are no LW broadcast stations<br />
in the Americas).<br />
USING DIRECT FREQUENCY ENTRY<br />
Direct frequency entry is performed by pressing the<br />
numbered keys and can be used for FM, MW, LW and<br />
SW. Enter the frequency with the numbered keys. After<br />
the last key is pressed, the frequency will auto enter<br />
after a delay of a few seconds. While entering a frequency,<br />
if an incorrect frequency is entered, pressing<br />
the CLEAR/LOCK key will clear the entry in progress.<br />
FM frequencies always have a decimal point in them,<br />
e.g. 88.5 MHz. Be sure to include this decimal point in<br />
your entry.<br />
The slight auto-entry delay that occurs after entering<br />
the last digit of the frequency can be eliminated as follows.<br />
After entering an FM frequency, press the ‘.’ key<br />
once. After entering a MW, SW or LW frequency that is<br />
in KHz, press the ‘.’ key twice. With this method, the<br />
decimal key acts as an ‘ENTER’ key and causes immediate<br />
response to the entered frequency, eliminating<br />
the delay.<br />
USING THE SEEK FEATURE<br />
The SEEK feature (often called auto-tuning) enables<br />
the tuner to automatically scan and stop on stations.<br />
To engage this feature, press the SEEK key. Scanning<br />
automatically starts and will stop when a stations is<br />
found. It is normal for the SEEK feature to sometimes<br />
stop on noise. The SEEK can be stopped manually by<br />
pressing the SEEK button.<br />
LISTENING TO SHORTWAVE STATIONS<br />
Absolutely no technical knowledge is necessary to fully<br />
enjoy listening to shortwave stations from around the<br />
world. It’s crucial to understand ‘bands’. The owners<br />
manual’s APPENDIX has all the information needed for<br />
this. Below is some condensed information.<br />
A complete shortwave band chart is in the owner’s<br />
manual. Only the most used bands are mentioned<br />
below. The band name and frequency range is shown.<br />
Note that some of the ranges below are slightly<br />
expanded compared to those in the owner’s manual.<br />
13m, 21450-21850 KHz; 16m, 17480-17900 KHz;<br />
19m, 15100-15800 KHz; 22m, 13570-13870 KHz;<br />
25m, 11600-12200 KHz; 31m, 9200-10000 KHz; 41m,<br />
7100-7600 KHz; 49m, 5800-6200 KHz; 60m, 4750-<br />
5060 KHz.<br />
CHOOSING THE BEST SHORTWAVE BAND<br />
Here are the best bands for the various times of day.<br />
This information is true worldwide. Notice that some<br />
bands overlap several periods of the day. It always<br />
pays to experiment.<br />
• SUNRISE AND EARLY MORNING, 5 - 9 a.m.: 25,<br />
31, 41, and 49 meters are usually good.<br />
• MID DAY: 13, 16, 19, 22 and, in some areas, 25<br />
meters. Sometimes these bands open up early, so<br />
test them in the morning too.<br />
• LATE AFTERNOON AND AROUND SUNSET: 19,<br />
22, 25, 31, 41 and 49 meters.<br />
• NIGHT: 60, 49, 41, 31, 25 meters, with 49, 31 and<br />
25 usually the best. In the summer months, the 16<br />
and 19 meter day bands sometimes stay open at<br />
night.<br />
GETTING INTO A SHORTWAVE BAND<br />
Press the ‘SW BAND’ key twice to highlight SW BAND<br />
in the display (if the <strong>E1</strong> is already in SW, then only one<br />
press is needed). Note that, for just a few seconds, ‘SW<br />
BAND’ is highlighted in the display and that the two<br />
dashes ‘- -‘ or meter band numbers are flashing in the<br />
display, under the frequency. Within 3 seconds, use the<br />
numbered keys to enter the band of your choice.<br />
Alternately, use the SELECT button or the tuning knob<br />
to scroll through the available meter bands. The new<br />
band number will replace the flashing dashes or the<br />
old band number. Stop on the band that you wish to<br />
select and it will ‘autoenter’ within about 3 seconds.<br />
TUNING AROUND IN A SHORTWAVE BAND<br />
After you have used the techniques described above to<br />
get into a shortwave band, the radio is tuned to the<br />
lowest frequency in that band. To tune through the<br />
band you must tune upward in frequency. Use the<br />
SELECT button, TUNING knob or the SEEK button to<br />
find and tune-in stations. If you are new to shortwave,<br />
for best results, stay within the frequency ranges of the<br />
shortwave bands shown in this Quick Guide.<br />
STORING FREQUENCIES INTO MEMORY<br />
Storing a frequency into memory involves three basic<br />
steps: 1. Tune to the station/frequency that you wish to<br />
store. 2. Select the memory to store it into. 3. Store it.<br />
First, tune to the station/frequency that you wish to<br />
store. To store it, do the following in a quick, smooth<br />
sequence. Press STORE, then use the TUNING knob or<br />
the SELECT key to select the desired memory number<br />
that you wish to store into. Press the STORE button<br />
twice to complete the storing process and exit the<br />
memory mode. For memory labeling instructions and<br />
other memory information, refer to the owner’s manual.<br />
ACCESSING WHAT YOU HAVE STORED INTO<br />
MEMORY<br />
Press the MEMORY key to access the memory mode.<br />
Use the TUNING knob or the SELECT key to scroll<br />
through the memory numbers and listen to the desired<br />
stored station. To exit memory mode, press the VFO<br />
button.<br />
DELETING THE CONTENTS OF A MEMORY<br />
Access the desired memory channel number as<br />
described above. Press and hold the DELETE key for<br />
about 3 seconds or until its frequency disappears from<br />
the selected memory channel location. To exit memory<br />
mode, press the VFO button.<br />
SETTING THE CLOCK TO YOUR LOCAL TIME<br />
This procedure shows how set the clock automatically.<br />
The receiver must be OFF with the appropriate antenna<br />
connected for WWV setting.<br />
For manual clock setting and more detailed clock setting<br />
information, consult the owner’s manual.<br />
58 59
<strong>E1</strong> <strong>MANUAL</strong><br />
APPENDIX - etón <strong>E1</strong> QUICK GUIDE continued<br />
Sequentially press the button below MENU in the display<br />
until CLOCK MODES appears. If AUTO CLOCK SET<br />
is OFF, press 1 to turn it ON. If AUTO CLOCK DST is<br />
OFF, press 2 to turn it on if you want automatic daylight<br />
saving time (recommended). For LOCAL TIME<br />
OFFSET, if your country is east of the International<br />
Dateline, press 3 to set it to +. If you are west of the<br />
International Dateline, press 3 to set it to –. For example,<br />
if you live in North or South America, set it to -. To<br />
enter your specific LOCAL TIME OFFSET, press 4, then<br />
use the numeric keypad to enter the number of hours<br />
you are offset from GMT. For example, in North<br />
America use 5 hours for EST, 6 hours CST, 7 hours MST,<br />
8 hours PST. Press 9 (EXIT) when finished. After completing<br />
the above steps the <strong>E1</strong> must be turned off.<br />
While off, it will automatically tune to one of the<br />
National Bureau Of Standards WWV stations for automatic<br />
time-set. It will automatically tune to the<br />
strongest WWV station it can find. At night, this is likely<br />
to be 5000 or 10000 kilohertz. During the day it<br />
may use 10000, 15000 or 20000 kilohertz. If the signal<br />
is not strong enough to activate auto-time-set, see<br />
the owner’s manual to set the time manually.<br />
SETTING THE DISPLAY FOR LOCAL OR GMT TIME<br />
With the radio turned on, sequentially press the TIME<br />
key until CLOCKS appears in the display. Select GMT or<br />
LOCAL by pressing the key to its right. W hen finished,<br />
press the CLEAR/LOCK button.<br />
SETTING THE TIMER AS AN ALARM CLOCK OR<br />
SLEEP TIMER<br />
Turn the <strong>E1</strong> on. The following instructions are for setting<br />
and activating Timer 1 as a wake up alarm and<br />
Timer 2 as a sleep timer. Many more options are available.<br />
For more detailed timer instructions and capabilities,<br />
refer to the owner’s manual.<br />
Press the ‘2’ key to highlight the turn-off time. Use the<br />
CLEAR/LOCK key to clear any entry that is present in<br />
this window. Press STORE to save this null entry. Press<br />
the ‘3' key to highlight the timer 1 mem channel. Press<br />
CLEAR/LOCK to clear any entry in the window. Press<br />
the STORE key to save this null entry. When finished,<br />
press the ‘9' key to exit the timer programming mode.<br />
Tune the <strong>E1</strong> to the radio station that you wish to hear<br />
when the timer turns on. Enable the timer with the<br />
instructions provided below.<br />
USING TIMER 2 AS A SLEEP TIMER<br />
Sequentially press the MENU key to display the TIMERS<br />
MENU. Use the ‘4’ key to select the turn-on time and<br />
clear any entry in this window using the CLEAR/LOCK<br />
and STORE keys as described above. Press the ‘5’ key<br />
to set a turn-off time as in the example above. Use the<br />
‘6' key to highlight the timer 2 mem ch and clear any<br />
entry that appears here using the CLEAR/LOCK and<br />
STORE keys. When finished, press the 9 key to exit the<br />
timer programming mode. Tune the <strong>E1</strong> to the radio station<br />
that you wish to hear. Enable the timer with the<br />
instructions provided below. At the preset time, the<br />
unit will turn off and will remain off until manually<br />
turned on, or turned on by timer 1 if it is enabled.<br />
TO ENABLE OR DISABLE THE TIMERS<br />
Press the TIME key sequentially to show either TIMER 1<br />
or TIMER 2 in the display. To enable the timer of your<br />
choice, press the ENABLE key and assure that that<br />
timer’s number appears in the upper right corner of the<br />
display under the time. To disable the timer of your<br />
choice, press the DISABLE key and assure that its number<br />
does not appear in the upper right corner of the<br />
display under the time. To exit this mode, press the<br />
TIME key until the normal radio frequency display<br />
screen shows.<br />
NOTE: The timers will reference the time that has<br />
been selected to show in the display, GMT or LOCAL.<br />
Most customers will want to display LOCAL when<br />
using the timers.<br />
USING TIMER 1 AS A WAKE-UP TIMER (ALARM<br />
CLOCK)<br />
These instructions set Timer 1 to turn on as a wake-up<br />
alarm and play the last station tuned to. Once on, the<br />
<strong>E1</strong> will play indefinitely or until turned off.<br />
Sequentially press the MENU key to display the TIMERS<br />
MENU. Press the ‘1’ key to highlight the turn-on time.<br />
Use the numeric keypad to enter the turn-on time in<br />
24 hour time format. Press the STORE key.<br />
60 61
<strong>E1</strong> <strong>MANUAL</strong><br />
etón <strong>E1</strong> SPECIFICATIONS<br />
Frequency Range<br />
• AM, LSB, USB:<br />
- LW: 100 to 500 kHz<br />
- MW: 500 to 1800 kHz<br />
- SW: 1800 to 30,000 kHz<br />
• FM:<br />
- 76 to 90 Mhz or 87 to 108 MHz, selectable<br />
Sensitivity: SSB (10 dB S+N/N)<br />
• Less than .25 :V 0.1 to 30 MHz (DX on)<br />
• Less than 0.5 :V, 0.1 to 30 MHz (Normal)<br />
Sensitivity: AM (10 dB S+N/N) (1000 Hz, 30%<br />
Mod)<br />
• Less than 2.0 :V. 0.1 - 30 MHz (DX on)<br />
• Less than 4.0 :V. 0.1 - 30 MHz (Normal)<br />
Sensitivity: FM (20 dB S/N) (monaural)<br />
• Less than 1.5 :V, 87 - 108 MHz, (DX on)<br />
• Less than 4 :V, 87 - 108 MHz, (Normal)<br />
Frequency Resolution<br />
• 10 Hz in SSB & AM modes<br />
• 20 kHz in FM mode.<br />
Frequency Stability: ± 10 ppm, 0º to 50ºC<br />
Frequency Accuracy: Better than ± 100 Hz, @ 25ºC<br />
Selectivity - SSB, AM:<br />
• 7 kHz @ -6 dB, less than 12 kHz @ -60 dB<br />
• 4 kHz @ -6 dB, less than 9 kHz @ -60 dB<br />
• 2.3 kHz @ -6 dB, less than 5 kHz @ -60 dB<br />
IF Frequency - SSB, AM:<br />
• 1st IF 45.0 MHz<br />
• 2nd IF 455 kHz<br />
FM: 1st IF: 10.7 MHz (Single Conversion)<br />
Image Rejection<br />
• Greater than 70 dB, 0.1 to 30 MHz<br />
• Greater than 55 dB, 76 to 108 MHz<br />
IF Rejection<br />
• Greater than 80 dB, 45.0 MHz<br />
• Greater than 80 dB, 455 kHz<br />
IP3 - Intercept Point (@ 50 ohm Ant. Input)<br />
• Greater than +10 dBm @ 20 kHz spacing (Normal)<br />
• Greater than -20 dBm @ 5 kHz spacing (Normal)<br />
- dBm @ 20 kHz spacing (DX)<br />
• -30 dBm @ 5 kHz spacing (DX)<br />
AGC Performance<br />
• Threshold: 1.0 :V<br />
• Attack Time: 1 mSec - Bandwidth dependent.<br />
• Release Time<br />
- SLOW: 3 sec.<br />
- FAST: 300 mSec.<br />
• Less than 2 dB change in audio output for 90 dB<br />
• RF input change referenced from the AGC threshold<br />
point plus 3 dB.<br />
Internal Antenna<br />
• 39 1/4“ (1.003 meters) telescopic antenna (for use<br />
on all bands).<br />
External Antenna<br />
• 50 to 75 Ohms, PAL type, Male (PAL to F type<br />
adapter included)<br />
External Speaker Output<br />
• 4 to 8 Ohms. External jack is 1/8" (3.175 mm)<br />
Audio Power (internal or external speaker):<br />
• 1.25 W nominal - battery operation<br />
• 3 W nominal - Operation from 9 VDC<br />
• AC Adapter<br />
Internal Speaker: 4" (10.16 cm). 8 Ohms<br />
Line Audio Output<br />
• Stereo left and right.<br />
• 300 mV, 1K ohms for each output.<br />
Line Audio Input: 300 mV, 47K ohms<br />
Line Audio Input Jack: 1/8 inch (3.175 mm) stereo<br />
Headphone Jack: 1/8 inch (3.175 mm) stereo<br />
DC Power Requirements:<br />
• Input: 7-14 VDC, supplied from AC ADAPTER W all<br />
Transformer, external DC Power Supply or 3.6 to 6.0<br />
VDC supplied by (4) internally mounted "D” cell<br />
(I.5V) batteries (not supplied). Current requirements<br />
(approximate) from 9.0<br />
VDC Supply:<br />
• Worst case at max volume<br />
• 850 mA nominal with lamp off<br />
• 900 mA nominal with lamp on<br />
Current requirements from Batteries with 1/4 W<br />
average Audio Output:<br />
• Nominal battery currents<br />
• FM mode:<br />
- 175 mA backlight off<br />
- 225 mA backlight on<br />
• LW/MW/SW:<br />
- 210 mA backlight off<br />
- 260 mA backlight on<br />
Operating Temperature: 0º to +50ºC<br />
Shipping Weight: 6 lbs (2.72 kg), (includes AC<br />
ADAPTER) (batteries NOT included)<br />
Size<br />
• Width: 13-1/8" (33.37 cm)<br />
• Height: 7-1/2" (19.05 cm)<br />
• Depth: 2-9/16" (6.5 cm)<br />
Supplied AC ADAPTER<br />
• Input: 120 VAC ± 10%, (USA Version)<br />
• Output: 9 VDC @ 1 Amp maximum Center<br />
conductor of connector is positive. Negative is<br />
connected to input ground.<br />
62 63
<strong>E1</strong> <strong>MANUAL</strong><br />
BLOCK DIAGRAM - etón <strong>E1</strong> SIGNAL FLOW BLOCK DIAGRAM<br />
64 65
www.etoncorp.com<br />
www.etoncorp.com<br />
etón Corporation<br />
Corporate Headquarters<br />
1015 Corporation Way<br />
Palo Alto, California 94303 USA<br />
tel +1 650-903-3866<br />
tel +1 800-872-2228<br />
fax +1 650-903-3867<br />
etón Corporation<br />
Berlin Office<br />
Rosenstrasse 2<br />
D-10178 Berlin, Germany<br />
tel +49 [0]30 243102149<br />
etón Corporation<br />
Toronto Office<br />
1 Yonge Street, Suite 1801<br />
Toronto, Ontario M5E 1W7 Canada<br />
tel +1 416-214-6885<br />
v. 05-04-06