NETSCAPE COMPOSER WEB PAGE DESIGN
NETSCAPE COMPOSER WEB PAGE DESIGN
NETSCAPE COMPOSER WEB PAGE DESIGN

Create successful ePaper yourself
Turn your PDF publications into a flip-book with our unique Google optimized e-Paper software.
<strong>NETSCAPE</strong> <strong>COMPOSER</strong> <strong>WEB</strong> <strong>PAGE</strong> <strong>DESIGN</strong><br />
Many thanks to Patsy Lanclos for this valuable contribution.<br />
With the newer versions of Netscape, you can build web pages for free using the built in web page program called<br />
Composer. Using Netscape Composer to create web pages is much like using any other word processor. For<br />
schools on a tight budget, this is the way to go!!<br />
I. PLAN YOUR <strong>WEB</strong> <strong>PAGE</strong><br />
See the “Creating a School/District Web Site Guide” in the “Curricular Tools” section before beginning with<br />
Netscape Composer.<br />
A. Before you begin, plan your web site by deciding on content. This includes page titles, link sections, color<br />
schemes, backgrounds, text styles, etc.<br />
B. Develop a storyboard and outline. Determine the text, images, and multimedia resources you will need for<br />
your pages and how they will be related to one another.<br />
II.<br />
CREATE A NEW FOLDER<br />
A. Select New Folder from the File menu to create a new folder for your project in an easy to find location<br />
(e.g., the Desktop).<br />
B. Name the folder something unique (lowercase letters, no spaces) so you will remember it. You should<br />
place all the pages and objects used by the pages in this same folder/directory.<br />
C. Inside this folder, create another folder and name it “images”. This folder will be used to store all GIF and<br />
JPEG images in which to save all of your web pages (html), graphics, music, videos, and anything else<br />
associated with your web pages.<br />
III. GATHER OR CREATE IMAGES, TEXT AND OTHER RESOURCES<br />
A. Make sure all text, images and multimedia resources to be used on your web page are all stored in this<br />
resource folder. Store graphics, pictures, etc. in the “images” folder.<br />
IV. OPEN <strong>NETSCAPE</strong> <strong>COMPOSER</strong> TO BEGIN A NEW <strong>PAGE</strong><br />
A. From the Netscape Composer window, go to File and select New Blank Page.<br />
B. Or, open your previously created Bookmark, AppleWorks, or MS Word File.<br />
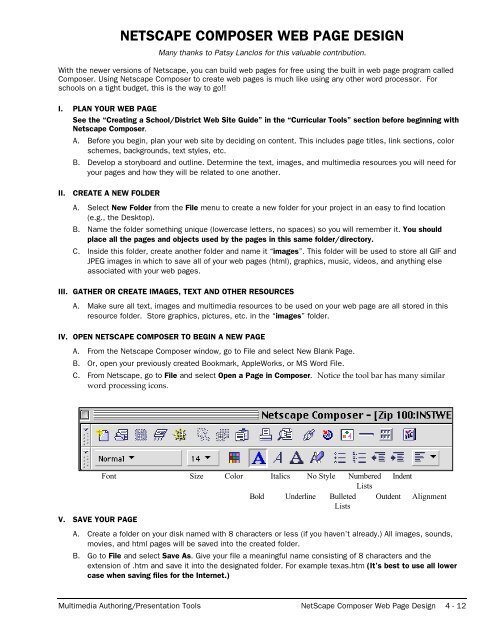
C. From Netscape, go to File and select Open a Page in Composer. Notice the tool bar has many similar<br />
word processing icons.<br />
Font Size Color<br />
Bold<br />
Italics No Style Numbered<br />
Lists<br />
Indent<br />
Underline Bulleted<br />
Lists<br />
Outdent Alignment<br />
V. SAVE YOUR <strong>PAGE</strong><br />
A. Create a folder on your disk named with 8 characters or less (if you haven’t already.) All images, sounds,<br />
movies, and html pages will be saved into the created folder.<br />
B. Go to File and select Save As. Give your file a meaningful name consisting of 8 characters and the<br />
extension of .htm and save it into the designated folder. For example texas.htm (It’s best to use all lower<br />
case when saving files for the Internet.)<br />
Multimedia Authoring/Presentation Tools NetScape Composer Web Page Design 4 - 12
VI. FORMATTING YOUR <strong>PAGE</strong><br />
A. Although Netscape has a variety of “Headings” which determine size and style of font, many prefer to set<br />
the font to normal and control the size and style manually. When choosing a color for your text, remember<br />
that the “hot” links are normally blue or violet and underlined; therefore, it is wise not to select those<br />
choices for text that is not a link.<br />
VII. ADDING A LINK<br />
A. To add a link, highlight the words that will be the link and select Insert a Link (from the menu bar or click<br />
on the Image icon )<br />
B. Type in the URL (address) in the URL box. The selected words will become blue (or purple) and underlined.<br />
When the file is saved and viewed in Netscape Navigator, the link will be “hot.”<br />
VIII. IMAGES<br />
A. To save an image from the web, (Mac) hold the mouse button down on an image, (PC) hold the right<br />
mouse button down on an image.<br />
B. Chose Save Image As and select the destination in which to save the image.<br />
IX. CITING IMAGES<br />
According to the Fair Use Guidelines for Multimedia1 ,<br />
A. “6.2 Attribution and Acknowledgement:<br />
Educators and students are reminded to credit the sources and display the copyright notice © and<br />
copyright ownership information if this is shown in the original source, for all works incorporated as part<br />
of the educational multimedia projects prepared by educators and students, including those prepared<br />
under fair use. Crediting the source must adequately identify the source of the work, giving a full<br />
bibliographic description where available (including author, title, publisher, and place and date of<br />
publication). The copyright ownership information includes the copyright notice (©, year of first publication<br />
and name of the copyright holder).<br />
B. The credit and copyright notice information may be combined and shown in a separate section of the<br />
educational multimedia project (e.g., credit section) except for images incorporated into the project for the<br />
uses described in Section 3.2.3. In such cases, the copyright notice and the name of the creator of the<br />
image must be incorporated into the image when, and to the extent, such information is reasonably<br />
available; credit and copyright notice information is considered "incorporated" if it is attached to the<br />
image file and appears on the screen when the image is viewed.”<br />
C. On the first page must appear:<br />
Certain materials are included under the fair use exemption of the U.S. Copyright Law and have been<br />
prepared according to the multimedia fair use guidelines and are restricted from further use.<br />
Multimedia Authoring/Presentation Tools NetScape Composer Web Page Design 4 - 13
X. INSERTING IMAGES INTO THE <strong>WEB</strong> <strong>PAGE</strong><br />
A. Position the cursor where you want the image to be inserted. Either go to the Insert menu bar and select<br />
Insert Image or click on the Insert Image icon on the button bar. The Image Format window will be<br />
displayed.<br />
B. Select Choose File and navigate to the desired image. (Remember: the image *must* be in the *same*<br />
folder with the html page into which it will be inserted.)<br />
C. Important: You must delete all of the pathname inserted except the actual image name.<br />
Example:file: ///MacintoshHD/PatsyData/GRAPHICSSOUNDS/ angels.jpg<br />
D. Once the image is inserted, the attributes (size, wrap, link, etc.) can be changed by double clicking on the<br />
image. The above Image Format window will again appear.<br />
XI. INCORPORATING A CITATION WITH IMAGE<br />
A. To create an image with an “incorporated” citation:<br />
1. Open AppleWorks Draw document (or a MSWord document)<br />
2. Select File to Insert the desired image.<br />
3. From the Options menu, Turn the Autogrid Off.<br />
4. Select the Text Tool and type the copyright symbol (Mac: Option G; PC: alt 0169)<br />
5. Type the URL source, date and any other copyright information.<br />
6. From the Edit menu, Select All.<br />
7. From the Arrange menu, select Group.<br />
8. From the File menu, select Save As.<br />
9. Change to type from AppleWorks to GIF (if using MSWord, you will have to use a graphic converter to<br />
change the Word file to a .gif file.)<br />
10. Save with a one word name and the extension.gif<br />
if<br />
original,<br />
or<br />
© Patsy Lanclos 1998<br />
© http://www.disinet.com/planclos/<br />
XII. INSERTING SOUND<br />
A. To make a sound file play automatically when your page is opened, the addition of tags (raw HTML) is<br />
necessary. Netscape uses the tag while Internet Explorer uses the tag. Below is the<br />
scripting necessary to enable the sounds to play:<br />
<br />
<br />
Multimedia Authoring/Presentation Tools NetScape Composer Web Page Design 4 - 14
B. The QuickTime resource is cross platform and plays over 60 different file formats. Other extensions (such<br />
as .wav or .mid can be substituted for .mov).<br />
C. To continuously play the sounds, add these tags:<br />
<br />
<br />
XIII. CREATING TABLES<br />
A. Once a table is inserted into a web page, columns and rows can be inserted by selecting the Insert menu<br />
bar and select Table. Slide over to the desired option.<br />
B. Parts of a table can be changed by selecting Format and Table Info. From this menu, one of three<br />
additional menus can be selected.<br />
XIV. TO CHANGE THE COLOR OF THE TABLE<br />
A. Select Format on the menu bar.<br />
B. Drag the mouse to Table Info. and release the mouse button.<br />
C. Be sure that you have selected Table rather than Row or Cell.<br />
D. Click on Color and then on the blank rectangle next to the word Color. This will open the color screen that<br />
allows you to select from the CrayonPicker or the color wheel.<br />
E. You can change the color of a single row or a single cell by following the same procedure after opening the<br />
Row or Cell file.<br />
XV. FINISHING TOUCHES<br />
A. Title Bar<br />
1. If the title in the title bar is not correct, open your web page with Simple Text or Word Pad. This will<br />
open the file as raw HTML. (If you open with AppleWorks or MSWord, the file must be saved as a text<br />
file with the .htm or .html extension.<br />
2. Locate the Name tag in the Head part of the html page. Change the text that appears<br />
between the title tags and save your file. This will put the desired name of your web page in the title<br />
bar.<br />
Multimedia Authoring/Presentation Tools NetScape Composer Web Page Design 4 - 15
B. Design hints<br />
1. Leave enough white space on your page so that it “breathes.”<br />
2. Use the Enter key (not the Return) key on the Macintosh to create row spaces.<br />
3. Use the Indent icons on the menu bar to indent, not the Tab key.<br />
4. Don’t underline text or make it blue/purple unless it’s a link.<br />
5. Use the Indent icon to place graphics. However, for effective “word wrap” around graphics, use tables.<br />
6. Be sure there is enough contrast between the background color (or background image) and the color<br />
of the font you have used for text.<br />
7. Too many animated GIFs makes your page “wiggle” which can be irritating.<br />
8. Remember, sometimes “Less is More!”<br />
XVI. CREATING A STAND ALONE <strong>PAGE</strong><br />
A. Create a folder to save all pages. Save the first page as index.htm<br />
B. Navigate to each link that you want to be active when not on the Internet and save the file as filename.htm<br />
C. Save each graphic in the folder.<br />
D. When all of the files have been saved in the same folder, open the first page in Composer.<br />
E. Go to each link, highlight it and select the link icon from the menu bar.<br />
F. From the button Choose File, select the file to which the link will be attached. Remove all text in front of<br />
the actual file name.<br />
G. Resave the first page and Preview in Navigator.<br />
Multimedia Authoring/Presentation Tools NetScape Composer Web Page Design 4 - 16