Create successful ePaper yourself
Turn your PDF publications into a flip-book with our unique Google optimized e-Paper software.
OPERATION MANUAL<br />
with COOKBOOK<br />
R-<strong>85STM</strong>-A<br />
MICROWAVE OVEN<br />
with TOP & BOTTOM GRILLS<br />
and CONVECTION<br />
900W (IEC 60705)
OPERATION MANUAL<br />
This operation manual contains important information which you should<br />
read carefully before using your microwave oven.<br />
IMPORTANT:<br />
There may be a serious risk to health if this operation manual is not<br />
followed or if the oven is modified so that it operates with the door open.<br />
If you require any advice or assistance regarding your<br />
<strong>Sharp</strong> product, please visit our website:<br />
www.sharp.co.uk/customersupport<br />
Customers without Internet access may telephone:<br />
08705 274277 (9am - 5pm)<br />
(01) 676 0648 (from Ireland)<br />
A. Information on Disposal for Users (private households)<br />
Attention: Your<br />
product is marked<br />
with this symbol.<br />
It means that used<br />
electrical and<br />
electronic<br />
products should<br />
not be mixed with<br />
general household<br />
waste. There is a<br />
separate collection<br />
system for these<br />
products.<br />
1. In the European Union<br />
Attention: If you want to dispose of this equipment, please do not use the ordinary dust bin!<br />
Used electrical and electronic equipment must be treated separately and in accordance with legislation<br />
that requires proper treatment, recovery and recycling of used electrical and electronic equipment.<br />
Following the implementation by members states private households within the EU states may return<br />
their used electrical and electronic equipment to designated collection facilities free of charge*.<br />
In some countries* your local retailer may also take back your old product free of charge if you<br />
purchase a similar new one.<br />
*) Please contact your local authority for further details.<br />
If your used electrical or electronic equipment has batteries or accumulators, please dispose of these<br />
separately beforehand according to local requirements.<br />
By disposing of this product correctly you will help ensure that the waste undergoes the necessary<br />
treatment, recovery and recycling and thus prevent potential negative effects on the environment and<br />
human health which could otherwise arise due to inappropriate waste handling.<br />
2. In other Countries outside the EU<br />
If you wish to discard this product, please contact your local authorities and ask for the correct<br />
method of disposal.<br />
For Switzerland: Used electrical or electronic equipment can be returned free of charge to the dealer,<br />
even if you don’t purchase a new product. Further collection facilities are listed on the homepage of<br />
www.swico.ch or www.sens.ch.<br />
1. In the European Union<br />
B. Information on Disposal for Business Users.<br />
If the product is used for business purposes and you want to discard it:<br />
Please contact your SHARP dealer who will inform you about the take-back of the product. You might<br />
be charged for the costs arising from take-back and recycling. Small products (and small amounts)<br />
might be taken back by your local collection facilities.<br />
For Spain: Please contact the established collection system or your local authority for take-back of<br />
your used products.<br />
2. In other Countries outside the EU<br />
If you wish to discard of this product, please contact your local authorities and ask for the correct<br />
method of disposal.
CONTENTS<br />
YOUR OVEN AND ACCESSORIES . . . . . . . . . . . . . . . . . . . . . . . . . . . . . . . . . . . . . . . . . . . . . . 2<br />
CONTROL PANEL . . . . . . . . . . . . . . . . . . . . . . . . . . . . . . . . . . . . . . . . . . . . . . . . . . . . . . . . . . 3<br />
SAFETY:<br />
Important Safety Instructions . . . . . . . . . . . . . . . . . . . . . . . . . . . . . . . . . . . . . . . . . . . . . . 4<br />
Installation . . . . . . . . . . . . . . . . . . . . . . . . . . . . . . . . . . . . . . . . . . . . . . . . . . . . . . . . . . . . . 4 - 5<br />
OPERATION:<br />
Heating Category . . . . . . . . . . . . . . . . . . . . . . . . . . . . . . . . . . . . . . . . . . . . . . . . . . . . . . . 6<br />
How Your Oven Works . . . . . . . . . . . . . . . . . . . . . . . . . . . . . . . . . . . . . . . . . . . . . . . . . . . 6<br />
Before <strong>Operation</strong> . . . . . . . . . . . . . . . . . . . . . . . . . . . . . . . . . . . . . . . . . . . . . . . . . . . . . . . 7<br />
Microwave Power Levels . . . . . . . . . . . . . . . . . . . . . . . . . . . . . . . . . . . . . . . . . . . . . . . . . . 7<br />
Energy Save Mode . . . . . . . . . . . . . . . . . . . . . . . . . . . . . . . . . . . . . . . . . . . . . . . . . . . . . . . 8<br />
Setting the Clock . . . . . . . . . . . . . . . . . . . . . . . . . . . . . . . . . . . . . . . . . . . . . . . . . . . . . . . . 9<br />
How to Operate Your Oven . . . . . . . . . . . . . . . . . . . . . . . . . . . . . . . . . . . . . . . . . . . . . . . 10 - 11<br />
Note for Reheating Ready Meals . . . . . . . . . . . . . . . . . . . . . . . . . . . . . . . . . . . . . . . . . . . 10<br />
Grill Cooking . . . . . . . . . . . . . . . . . . . . . . . . . . . . . . . . . . . . . . . . . . . . . . . . . . . . . . . . . . . 12<br />
Preheating the Oven . . . . . . . . . . . . . . . . . . . . . . . . . . . . . . . . . . . . . . . . . . . . . . . . . . . . . 13<br />
Convection Cooking . . . . . . . . . . . . . . . . . . . . . . . . . . . . . . . . . . . . . . . . . . . . . . . . . . . . . 14<br />
Dual Cooking. . . . . . . . . . . . . . . . . . . . . . . . . . . . . . . . . . . . . . . . . . . . . . . . . . . . . . . . . . . 15 - 16<br />
Instant Cook . . . . . . . . . . . . . . . . . . . . . . . . . . . . . . . . . . . . . . . . . . . . . . . . . . . . . . . . . . . 17 - 18<br />
Express Cook / Express Defrost. . . . . . . . . . . . . . . . . . . . . . . . . . . . . . . . . . . . . . . . . . . . 19 - 21<br />
CONVENIENT FUNCTIONS<br />
Sequence Cooking. . . . . . . . . . . . . . . . . . . . . . . . . . . . . . . . . . . . . . . . . . . . . . . . . . . . . . . 22<br />
Less and More . . . . . . . . . . . . . . . . . . . . . . . . . . . . . . . . . . . . . . . . . . . . . . . . . . . . . . . . . . 23<br />
Kitchen Timer . . . . . . . . . . . . . . . . . . . . . . . . . . . . . . . . . . . . . . . . . . . . . . . . . . . . . . . . . . 24<br />
Auto Minute. . . . . . . . . . . . . . . . . . . . . . . . . . . . . . . . . . . . . . . . . . . . . . . . . . . . . . . . . . . . 24<br />
Information Guide . . . . . . . . . . . . . . . . . . . . . . . . . . . . . . . . . . . . . . . . . . . . . . . . . . . . . . . 25<br />
COOKING ADVICE:<br />
Microwave Cooking Advice . . . . . . . . . . . . . . . . . . . . . . . . . . . . . . . . . . . . . . . . . . . . . . . . 26 - 27<br />
Suitable Cookware . . . . . . . . . . . . . . . . . . . . . . . . . . . . . . . . . . . . . . . . . . . . . . . . . . . . . . 28<br />
Defrosting Advice . . . . . . . . . . . . . . . . . . . . . . . . . . . . . . . . . . . . . . . . . . . . . . . . . . . . . . . 29<br />
Reheating Advice . . . . . . . . . . . . . . . . . . . . . . . . . . . . . . . . . . . . . . . . . . . . . . . . . . . . . . . . 30<br />
AFTERCARE:<br />
Cleaning and Maintenance. . . . . . . . . . . . . . . . . . . . . . . . . . . . . . . . . . . . . . . . . . . . . . . . . 31<br />
Troubleshooting. . . . . . . . . . . . . . . . . . . . . . . . . . . . . . . . . . . . . . . . . . . . . . . . . . . . . . . . . 32 - 33<br />
To Replace the Mains Plug. . . . . . . . . . . . . . . . . . . . . . . . . . . . . . . . . . . . . . . . . . . . . . . . . 34<br />
Calling for Service . . . . . . . . . . . . . . . . . . . . . . . . . . . . . . . . . . . . . . . . . . . . . . . . . . . . . . . 34<br />
COOKBOOK . . . . . . . . . . . . . . . . . . . . . . . . . . . . . . . . . . . . . . . . . . . . . . . . . . . . . . . . . . . . . . . 35 - 62<br />
GUARANTEE. . . . . . . . . . . . . . . . . . . . . . . . . . . . . . . . . . . . . . . . . . . . . . . . . . . . . . . . . . . . . . . 63<br />
SPECIFICATIONS. . . . . . . . . . . . . . . . . . . . . . . . . . . . . . . . . . . . . . . . . . . . . . . . . . . . . . . . . . . . 64<br />
Quick guide for commonly cooked food.<br />
MENU<br />
Frozen Ready Meals<br />
(non-stirrable e.g. Lasagne)<br />
Chilled Ready Meals<br />
(non-stirrable e.g. Lasagne)<br />
Jacket Potatoes<br />
(250g/9oz - each)<br />
(fresh)<br />
WEIGHT<br />
400g<br />
400g<br />
2<br />
Potatoes<br />
CONTAINER<br />
INSTRUCTION<br />
Flan dish on low<br />
rack<br />
Flan dish on low<br />
rack<br />
Directly on<br />
turntable<br />
Defrost Minced Beef 500g Flan dish on<br />
turntable<br />
COOKING<br />
INSTRUCTION<br />
Place the ready meal<br />
in a heat-resistant flan<br />
dish on the low rack.<br />
Place the ready meal<br />
in a heat-resistant flan<br />
dish on the low rack.<br />
Pierce in several<br />
places. Place on the<br />
edge of the turntable.<br />
Turn over halfway<br />
through cooking.<br />
Place in a flan dish on<br />
the turntable.<br />
Turn over half way<br />
through cooking.<br />
1<br />
COOKING<br />
TIME/POWER LEVEL<br />
Stage1:1 minute on 100%<br />
Stage2:13 minutes on 50%<br />
Stage1:2 minutes on 100%<br />
Stage2:4 minutes on 50%<br />
Stage1:5 minutes on 100%<br />
Stage2:5 minutes on 100%<br />
Stage1:2 minutes 45 secs on 30%<br />
Stage2:2 minutes 45 secs on 30%<br />
STANDING<br />
TIME<br />
2 Minutes<br />
2 Minutes<br />
5 Minutes<br />
15 - 30<br />
Minutes
YOUR OVEN AND ACCESSORIES<br />
13<br />
10<br />
9 8 7 6 5<br />
4<br />
1<br />
2<br />
3<br />
11<br />
12<br />
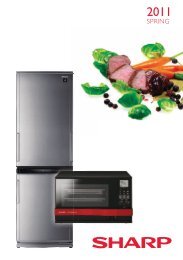
OVEN:<br />
1. Control panel<br />
2. Oven lamp<br />
3. Door opening button<br />
4. Waveguide cover (DO NOT REMOVE)<br />
5. Bottom grill heating element<br />
6. Turntable motor shaft<br />
7. Oven cavity<br />
8. Door seals and sealing surfaces<br />
9. Door latches<br />
10. Top grill heating element<br />
11. Ventilation openings<br />
12. Outer cabinet<br />
13. Power cord<br />
ACCESSORIES:<br />
Check to make sure the following accessories are<br />
provided:<br />
14. Turntable 15. High rack<br />
16. Low rack<br />
• Place the turntable on to the turntable motor<br />
shaft, ensuring it is located firmly.<br />
• To avoid turntable damage, ensure dishes or<br />
containers are lifted clear of the turntable rim<br />
when removing them from the oven.<br />
• For use of the racks, refer to the grill, convection<br />
and dual cooking sections on pages 12 to 16.<br />
Never touch the grills when they are hot.<br />
NOTES:<br />
• The waveguide cover is fragile. Care should be taken when cleaning inside the oven to ensure that it<br />
is not damaged.<br />
• After cooking fatty foods without a cover, always clean the cavity and especially the grill heating<br />
elements thoroughly, these must be dry and free from grease. Built-up grease may overheat and begin<br />
to smoke or catch fire.<br />
• Always operate the oven with the turntable fitted correctly. This promotes thorough, even cooking.<br />
A badly fitted turntable may rattle, may not rotate properly and could cause damage to the oven.<br />
• The turntable rotates clockwise or anti-clockwise. The rotary direction may change each time you<br />
start the oven. This does not affect cooking performance.<br />
• When you order accessories, please quote both the PART NAME and MODEL NUMBER to<br />
your dealer or SHARP approved service facility. The model number is located at the bottom of the<br />
control panel.<br />
16<br />
15<br />
14<br />
WARNING:<br />
The door, outer cabinet, oven cavity, accessories, dishes and especially the grills will become<br />
very hot during operation. To prevent burns, always use thick oven gloves.<br />
2
CONTROL PANEL<br />
15<br />
14<br />
1<br />
2<br />
3<br />
4<br />
5<br />
6<br />
1. DIGITAL DISPLAY<br />
KEYS:<br />
2. TIME<br />
3. CONV. (ºC)<br />
4. COMBI<br />
5. INSTANT COOK<br />
6. EXPRESS COOK<br />
7. EXPRESS DEFROST<br />
8. LESS/MORE<br />
9. INFO<br />
10. START/AUTO MINUTE<br />
11. STOP/CLEAR<br />
12. KITCHEN TIMER/CLOCK SET<br />
13. WEIGHT UP/DOWN<br />
14. MICRO POWER<br />
15. GRILL<br />
7<br />
13<br />
8<br />
12<br />
9<br />
11<br />
10<br />
8<br />
7<br />
6<br />
9<br />
5<br />
4<br />
10<br />
11<br />
3 2<br />
1<br />
DIGITAL DISPLAY<br />
INDICATORS:<br />
1. LESS/MORE<br />
2. INFO<br />
3. MICROWAVE POWER LEVEL<br />
4. WEIGHT<br />
5. MICROWAVE<br />
6. CONVECTION<br />
7. BOTTOM GRILL<br />
8. TOP GRILL<br />
9. COOK<br />
10. DEFROST<br />
11. AUTO<br />
3
IMPORTANT SAFETY INSTRUCTIONS<br />
PLEASE READ CAREFULLY AND KEEP FOR FUTURE REFERENCE<br />
Oven Use:<br />
• The oven is for domestic food use only.<br />
• Never operate when empty, except as directed in<br />
the NOTE of “Grill cooking” section on page 12.<br />
• Do not leave or store anything inside the oven<br />
when not in use.<br />
• Never attempt to use the oven with the door<br />
open. It is important not to force or tamper<br />
with the door safety latches.<br />
• Never operate the oven with any object caught<br />
in the door.<br />
• Do not insert fingers or objects in the holes of<br />
the door latches or air-vent openings as this may<br />
damage the oven and cause an electric shock.<br />
• If water or food drops inside the air vent<br />
openings switch the oven off immediately,<br />
unplug it and call a SHARP approved service<br />
facility. (See page 33).<br />
• Never move the oven while it is operating.<br />
• The door, outer cabinet, oven cavity, turntable,<br />
dishes, accessories and especially the grill will<br />
become very hot during operation. Care<br />
should be taken to avoid touching these areas.<br />
To prevent burns, always use thick oven gloves.<br />
Before cleaning make sure they are not hot.<br />
Pacemaker: If you have a heart pacemaker,<br />
consult your doctor or the pacemaker<br />
manufacturer prior to oven use.<br />
INSTALLATION<br />
WARNING: Only allow children to use<br />
the oven without supervision when<br />
adequate instructions have been given so<br />
that the child is able to use the oven in a<br />
safe way and understands the hazards of<br />
improper use.<br />
When the appliance is operated in the<br />
GRILL, CONVECTION, DUAL, INSTANT<br />
COOK and EXPRESS COOK modes,<br />
children should only use the oven under adult<br />
supervision due to the temperature generated.<br />
Accessible parts may become hot during<br />
use. Young children should be kept away.<br />
This appliance is not intended for use by<br />
persons (including children) with reduced<br />
physical, sensory or mental capabilities,<br />
or lack of experience and knowledge,<br />
unless they have been given supervision or<br />
instruction concerning use of the appliance<br />
by a person responsible for their safety.<br />
Children should be supervised to ensure that<br />
they do not play with the appliance.<br />
WARNING: Liquids and other foods<br />
must not be heated in sealed containers<br />
since they are liable to explode.<br />
Microwave heating of beverages can<br />
result in delayed eruptive boiling,<br />
therefore care has to be taken when<br />
handling the container. Stir the liquid<br />
prior to and during heating/ reheating,<br />
let liquid stand for at least 20 seconds in<br />
the oven after cooking.<br />
FIRE: If smoke is observed, switch off and<br />
unplug the appliance and keep the door<br />
closed in order to stifle any flames.<br />
WARNING:<br />
Inspect the Oven:<br />
• Check the oven carefully for damage<br />
before and regularly after installation.<br />
• Make sure the door closes properly,<br />
that it is not misaligned or warped.<br />
• Check the hinges and door safety<br />
latches are not broken or loose.<br />
• Ensure the door seal and sealing<br />
surfaces are not damaged. If the door<br />
or door seals are damaged, the oven<br />
must not be operated until it has been<br />
repaired by a competent person.<br />
• Inspect the oven interior and door for<br />
dents.<br />
4<br />
IMPORTANT:<br />
If any damage is apparent, do not operate<br />
the oven in any way, until it has been<br />
repaired by a SHARP trained engineer.<br />
1. Remove all packing materials including the<br />
feature sticker (if applicable). The waveguide<br />
cover prevents food and grease from<br />
entering the waveguide area where it could<br />
cause damage. DO NOT REMOVE THE<br />
WAVEGUIDE COVER.<br />
2. The oven door will become hot during<br />
cooking. Place or mount the oven so that the<br />
bottom of the oven is 85cm or more above<br />
the floor. Ensure the surface or mounting
INSTALLATION<br />
position is strong enough to take the oven<br />
weight, plus the heaviest item likely to be<br />
cooked in the oven.<br />
3. The minimum<br />
height of free space<br />
19cm<br />
necessary above the<br />
top surface of the<br />
oven is 19cm.<br />
4. Do not place the<br />
oven where heat, moisture or high humidity<br />
are generated, (for example, near or above<br />
a conventional oven) or near combustible<br />
materials (for example, curtains). Do not block<br />
or obstruct air vent openings. Do not place<br />
objects on top of the oven.<br />
5. Make sure the power supply cord<br />
is undamaged (See “ELECTRICAL<br />
CONNECTION” below).<br />
Do not allow the power supply cord to<br />
run over any hot or sharp surfaces, such<br />
as the hot air vent area at the top rear of<br />
the oven.<br />
6. The socket must be readily accessible so that<br />
it can be easily unplugged in an emergency.<br />
7. Do not use the oven outdoors.<br />
BUILDING-IN-KIT.<br />
This oven is designed for counter top or built-in<br />
use. Do not place the oven in a cabinet.<br />
An installation frame is available which enables<br />
the microwave oven to be integrated within a<br />
kitchen unit.<br />
The microwave oven is not designed to be built<br />
above or near a conventional oven.<br />
SHARP recommend the use of the build in kit<br />
EBR-47ST, available from your SHARP dealer.<br />
Only the use of this frame will guarantee the<br />
quality and safety of the oven.<br />
ELECTRICAL CONNECTION.<br />
• Do not allow water to come into contact with<br />
the power supply cord or plug.<br />
• Insert the plug properly into the socket.<br />
• Do not connect other appliances to the same<br />
socket using an adaptor plug.<br />
• If the power supply cord is damaged, it must be<br />
replaced by a SHARP approved service facility<br />
or a similarly qualified person to avoid a hazard.<br />
• When removing the plug from the socket<br />
always grip the plug, never the cord as this<br />
may damage the power supply cord and the<br />
connections inside the plug.<br />
• If the plug fitted to your oven is a rewireable<br />
type and in the event of the socket outlet in<br />
your home not being compatible with the plug<br />
supplied, remove the plug properly (do not cut<br />
off).<br />
• If the plug fitted to your oven is a nonrewirable<br />
type and in the event of the socket<br />
outlet in your home not being compatible with<br />
the plug supplied, cut-off the mains plug.<br />
• Refit with a suitable type, observing the wiring<br />
code given in `To replace the mains plug’ on<br />
page 34.<br />
WARNING: THIS APPLIANCE<br />
MUST BE EARTHED<br />
To wire an appropriate plug, follow the wiring<br />
code given in `To replace the mains plug’ on<br />
page 34.<br />
IMPORTANT!<br />
• The fuse from the cut-off plug should be<br />
removed and the plug disposed of in a safe<br />
manner.<br />
• Under no circumstances should the cut-off<br />
plug be inserted into a socket outlet as a<br />
serious electric shock may occur.<br />
• The plug must not be used without the fuse<br />
cover fitted.<br />
• If you have any doubt about your microwave<br />
oven obtain the help of a qualified electrician.<br />
• When replacing the plug please ensure that<br />
you use a BSI or ASTA approved plug to<br />
BS1363, this should be fitted with a brown<br />
coloured 13 amp fuse approved by BSI or<br />
ASTA to BS1362. If you have any doubt about<br />
electrical connection seek the help of a<br />
qualified electrician.<br />
5
HEATING CATEGORY<br />
Microwave Symbol.<br />
Microwave output power<br />
in Watts (based on<br />
international (IEC 60705)<br />
standard).<br />
Letter representing the<br />
oven heating category.<br />
The heating category (a letter A to E) developed<br />
by MAFF (Ministry of Agriculture, Fisheries<br />
and Food) with microwave oven and food<br />
manufacturers indicates the ability of the oven<br />
to heat small quantities of food (up to 500g<br />
[1lb 2oz]). It does not represent the general<br />
performance of the oven.<br />
OVEN<br />
OUTPUT<br />
POWER<br />
OVEN<br />
OUTPUT<br />
CATEGORY<br />
Less heating time required<br />
600 700 800 900 1000 Watts<br />
More heating time required<br />
Less heating time required<br />
A B C D E<br />
More heating time required<br />
Food packs carry cooking instructions for<br />
heating categories A to E. Follow instructions for<br />
the letter corresponding to the oven’s heating<br />
category. The higher the output power and<br />
heating category of the oven the less heating time<br />
is required as shown opposite.<br />
HOW YOUR OVEN WORKS<br />
Microwaves are energy waves, similar to those<br />
used for TV and radio signals.<br />
Electrical energy is converted into microwave<br />
energy, which is directed into the oven cavity via<br />
a waveguide. To prevent food and grease entering<br />
the wave guide it is protected by the waveguide<br />
cover.<br />
Microwaves cannot pass through metal, because<br />
of this the oven cavity is made of metal and there<br />
is a fine metal mesh on the door.<br />
During cooking the microwaves bounce off the<br />
sides of the oven cavity at random.<br />
Microwaves will pass through certain materials,<br />
such as glass and plastic, to heat the food.<br />
(See ‘Suitable Cookware’ on page 28).<br />
Water, sugar and fat in food absorb microwaves<br />
which cause them to vibrate. This creates heat<br />
by friction, in the same way your hands get warm<br />
when you rub them together.<br />
The outer areas of the food are heated by the<br />
microwave energy, then the heat moves to the<br />
centre by conduction, as it does in conventional<br />
cooking. It is important to turn, rearrange or stir<br />
food to ensure even heating.<br />
Once cooking is complete, the oven automatically<br />
stops producing microwaves.<br />
Standing time is necessary after cooking, as it<br />
enables the heat to disperse equally throughout<br />
the food.<br />
6
BEFORE OPERATION<br />
Your oven comes pre-set in Energy Save Mode (see page 8 for details).<br />
To operate the oven in Energy Save Mode:<br />
1. Plug in the oven. Nothing will appear on the display at this time.<br />
2. Open the door.<br />
The display will flash:<br />
3. Close the door.<br />
The display will show:<br />
NOTES: In Energy Save Mode, if you do not operate the oven for 3 minutes or more (i.e. after<br />
closing the door, pressing the STOP/CLEAR key, or at the end of cooking), you will not be<br />
able to operate the oven until you open and close the oven door.<br />
When new, the very first time the grills are used, smoke and odour will be given off.<br />
To avoid this happening when food is being cooked, heat the grills without food for approx.<br />
20 minutes. (Please refer to note on page 12.)<br />
MICROWAVE POWER LEVELS<br />
Power Level Press the Percentage<br />
MICRO<br />
POWER key<br />
HIGH x 1 100%<br />
MEDIUM HIGH x 2 70%<br />
MEDIUM x 3 50%<br />
MEDIUM LOW x 4 30%<br />
(Defrost)<br />
LOW x 5 10%<br />
(Defrost)<br />
MICRO POWER<br />
KEY<br />
• Your oven has 5 power levels, as shown<br />
opposite.<br />
• To change the power level for cooking, enter<br />
the cooking time and then press the MICRO<br />
POWER key.<br />
Power level:<br />
The microwave power level is varied by the<br />
microwave energy switching on and off.<br />
When using power levels other than 100% you<br />
will be able to hear the microwave energy pulsing<br />
on and off as the food cooks or defrosts.<br />
IMPORTANT: The microwave power<br />
level will cook at 100% unless you press the<br />
MICRO POWER key to the desired setting.<br />
Check the power level:<br />
To check the microwave power level during<br />
cooking, press the MICRO POWER key.<br />
As long as your finger is pressing the MICRO<br />
POWER key the power level will be displayed.<br />
The oven continues to count down although the<br />
display will show the power level.<br />
7
ENERGY SAVE MODE<br />
Your oven has an Energy Save Mode.<br />
This facility saves electricity when the oven is not<br />
in use.<br />
• If the oven is not used, it will default to Energy<br />
Save Mode after 3 minutes. The display is blank<br />
and the oven cannot be operated.<br />
• To operate the oven, open and then close<br />
the door. “0” will be displayed and the oven is<br />
ready to use.<br />
1. Time of day appears on the display.<br />
2. Press the KITCHEN TIMER/CLOCK<br />
SET key 3 times.<br />
x3<br />
To cancel Energy Save Mode, set the clock.<br />
(Please refer to page 9.)<br />
To cancel the clock, follow the procedure<br />
opposite. (This will restart Energy Save Mode.)<br />
Notes:<br />
• If you unplug your oven at any stage you will<br />
have to reset the clock to cancel Energy Save<br />
Mode.<br />
• If the clock has been set, cancelling Energy<br />
Save Mode, then your oven has a safety feature<br />
which prevents INSTANT COOK and<br />
START/AUTO MINUTE key from working<br />
if the oven has not been in use for more than<br />
3 minutes. Press the STOP/CLEAR key or<br />
open and close the door to re-use the oven.<br />
3. Press the START/AUTO MINUTE key.<br />
The power will be off and the display will<br />
show nothing.<br />
x1<br />
8
SETTING THE CLOCK<br />
Your oven has a 12 hour clock.<br />
• To select the 12 hour clock, press the<br />
KITCHEN TIMER/CLOCK SET key twice.<br />
1. Select the clock.<br />
x2<br />
x2<br />
To set the time of day follow the instructions<br />
opposite.<br />
2. Enter the hours by pressing the TIME keys.<br />
NOTES:<br />
• Press the STOP/CLEAR key if you make a<br />
mistake during programming.<br />
• If you press any of the TIME keys too many<br />
times, continue to press the key until the<br />
desired time re-appears.<br />
• To check the time of day during a cooking<br />
process, press the KITCHEN TIMER/<br />
CLOCK SET key and the time of day will<br />
remain on the display as long as you keep<br />
your finger on the key. This does not affect the<br />
cooking process.<br />
• If the clock is set, when cooking is complete,<br />
the display will show the correct time of day.<br />
If the clock has not been set, the display will<br />
only show “.0” when cooking is complete.<br />
• If the electrical power supply to your<br />
microwave oven is interrupted, the display will<br />
intermittently show “.0” after the power is<br />
reinstated. If this occurs during cooking, the<br />
programme will be erased. The time of day will<br />
also be erased.<br />
• When you want to reset the time of day, follow<br />
the opposite example again.<br />
3. Press the KITCHEN TIMER/CLOCK SET<br />
key once.<br />
x1<br />
4. Enter the minutes by pressing the TIME keys.<br />
5. To start the clock, press the KITCHEN<br />
TIMER/ CLOCK SET key once.<br />
x1<br />
9
HOW TO OPERATE YOUR OVEN<br />
Opening and closing the door:<br />
To open the oven door, push the door opening<br />
button.<br />
Starting the oven:<br />
Close the door and press<br />
the START/AUTO<br />
MINUTE key.<br />
Stopping the oven:<br />
If you want to stop the oven<br />
during cooking, press the<br />
STOP/CLEAR key once<br />
or open the oven door.<br />
If you want to cancel the<br />
cooking programme, press<br />
the STOP/CLEAR key<br />
twice.<br />
Your oven enables you to cook and defrost food<br />
using the automatic programmes, or to cook and<br />
defrost food manually.<br />
Automatic cooking and defrosting allows you<br />
to cook and defrost using preset programmes<br />
where the timings have been calculated for you,<br />
e.g Express Cook and Express Defrost.<br />
<strong>Manual</strong> cooking and defrosting allows you to<br />
cook/defrost foods and weights which are not<br />
included in the automatic programmes.<br />
The following are examples of manual cooking<br />
and defrosting.<br />
For automatic cooking and defrosting refer to<br />
pages 17 - 21.<br />
Example:<br />
To cook for 2 minutes 30 seconds on 70%<br />
microwave power.<br />
1. Enter the cooking time by pressing the<br />
1 MIN. key twice, then the 10 SEC. key<br />
three times.<br />
x2<br />
2. Input the power level by pressing the MICRO<br />
POWER key twice.<br />
x2<br />
x3<br />
3. Press the START/AUTO MINUTE key<br />
once to start cooking.<br />
x1<br />
The display will count down<br />
through the cooking time.<br />
MANUAL COOKING<br />
• Enter the cooking time and use microwave<br />
power levels 10% to 100% to cook (refer to<br />
page 7).<br />
• Stir or turn the food, where possible, 2 - 3<br />
times during cooking, if required.<br />
• After cooking, cover the food and leave to<br />
stand, if required.<br />
• Refer to the cooking charts in the cookbook<br />
section, pages 37 - 44.<br />
NOTE FOR REHEATING READY MEALS:<br />
Place the ready meal in a heat-resistant flan dish<br />
on the low rack.<br />
10
HOW TO OPERATE YOUR OVEN<br />
MANUAL DEFROSTING<br />
• Enter the defrosting time and use microwave<br />
power levels 10% or 30% to defrost (refer to<br />
page 7).<br />
• Stir or turn the food, where possible, 2 - 3<br />
times during defrosting.<br />
• After defrosting, cover the food in foil and<br />
leave to stand until thoroughly defrosted.<br />
• Refer to the defrosting charts in the cookbook<br />
section, page 36.<br />
Example:<br />
To defrost for 10 minutes on 30% microwave<br />
power.<br />
1. Enter the defrosting time by pressing the<br />
10 MIN. key once.<br />
x1<br />
NOTES FOR MANUAL COOKING AND<br />
DEFROSTING:<br />
• When the oven starts, the oven lamp will light<br />
and the turntable will rotate clockwise or<br />
anti-clockwise.<br />
• Your oven can be programmed up to 99<br />
minutes, 90 seconds (99.90).<br />
• If the door is opened during cooking/defrosting<br />
to stir or turn over food, the cooking time on<br />
the display stops automatically. The cooking/<br />
defrosting time starts to count down again<br />
when the door is closed and the START/<br />
AUTO MINUTE key is pressed.<br />
• When cooking/defrosting is complete, the time<br />
of day will reappear on the display, if the clock<br />
has been set.<br />
• If you want to know the power level during<br />
cooking, press the MICRO POWER key.<br />
As long as your finger is touching the key, the<br />
power level will be displayed.<br />
2. Input the power level by pressing the MICRO<br />
POWER key 4 times.<br />
x4<br />
3. Press the START/AUTO MINUTE key<br />
once to start defrosting.<br />
x1<br />
The display will count down<br />
through the defrosting time.<br />
11
GRILL COOKING<br />
The oven has top and bottom grills which can<br />
be used separately or combined. These have one<br />
power setting only. The grill is assisted by the<br />
turntable which rotates simultaneously to ensure<br />
even browning.<br />
Use the racks for grilling small items of food<br />
such as bacon, gammon and teacakes, turn over<br />
halfway through grilling.<br />
Food can be placed either directly onto the racks,<br />
or into a flan dish/heat-resistant plate on the high<br />
rack.<br />
To select the grill(s) required (Top, Bottom or<br />
Combined), enter the grilling time and follow the<br />
table below.<br />
Cooking Mode<br />
GRILL-1 (Top Grill)<br />
GRILL-2 (Bottom Grill)<br />
GRILL-3 (Top and<br />
Bottom Grill)<br />
Press<br />
GRILL key<br />
Once<br />
Twice<br />
3 Times<br />
Example:<br />
To grill for 20 minutes, using GRILL-3.<br />
1. Enter the cooking time by pressing the<br />
10 MIN. key twice.<br />
2. Select GRILL-3 by pressing the GRILL key<br />
3 times.<br />
x3<br />
x2<br />
NOTE: When new, the very first time the<br />
grills are used, smoke and odour will<br />
be given off.<br />
To avoid this happening when food is<br />
being cooked, heat the grills without<br />
food for approx. 20 minutes.<br />
NOTES:<br />
• It is not necessary to preheat the grill before<br />
cooking.<br />
• Follow the recommended grilling times and<br />
procedures in the charts on page 39 of the<br />
cookbook section.<br />
• When browning foods in a deep container,<br />
place on the turntable or low rack.<br />
• After cooking is complete the cooling fan<br />
will continue working for a short time to<br />
lower the temperature of the electrical<br />
and mechanical parts. The display may show<br />
“NOW COOLING”.<br />
WARNING:<br />
12<br />
3. Press the START/AUTO MINUTE key<br />
once to start grilling.<br />
x1<br />
The display will count down<br />
through the grilling time.<br />
The door, outer cabinet, oven cavity, accessories, dishes and especially the grills will become<br />
very hot during operation. To prevent burns, always use thick oven gloves.
PREHEATING THE OVEN<br />
Your oven can be preheated to<br />
a desired temperature prior to<br />
convection cooking.<br />
NOTES:<br />
• When the oven reaches the desired<br />
temperature, the audible signal will sound and<br />
the temperature will be displayed in ºC.<br />
Do not press the STOP/CLEAR key after<br />
opening and closing the door, as this will<br />
cancel the Convection mode.<br />
• The preheated temperature will be maintained<br />
for approximately 30 minutes.<br />
After this time, preheat will be cancelled.<br />
• During preheating and convection cooking, you<br />
will hear the cooling fan cycling on and off.<br />
This is completely normal and will not affect<br />
the cooking.<br />
• You can check the actual temperature during<br />
preheating by pressing the CONV. (ºC) key.<br />
The temperature will appear on the display.<br />
This will not affect the oven operation.<br />
• If you prefer not to preheat the oven where<br />
recommended in the cookbook section, allow<br />
extra cooking time.<br />
Example:<br />
To preheat the oven to 180ºC.<br />
1. Enter the temperature by pressing the<br />
CONV. (ºC) key 5 times.<br />
x5<br />
2. Press the START/AUTO MINUTE key<br />
once to start preheating.<br />
x1<br />
3. When the oven reaches 180ºC, the audible<br />
signal will sound and the oven will display<br />
180ºC. Place food in the oven, enter the<br />
desired cooking time and press the START/<br />
AUTO MINUTE key.<br />
WARNING:<br />
The door, outer cabinet, oven cavity, accessories, dishes and especially the grills will become<br />
very hot during operation. To prevent burns, always use thick oven gloves.<br />
13
CONVECTION COOKING<br />
Your oven can be programmed<br />
to cook with ten different<br />
temperatures by combining the<br />
top and bottom grills with the<br />
convection fan. (Please refer to<br />
the notes below.)<br />
Example:<br />
To cook for 20 minutes at 200ºC convection.<br />
1. Enter the cooking time by pressing the<br />
10 MIN. key twice.<br />
x2<br />
The temperatures available in ºC are:<br />
250ºC, 230ºC, 220ºC, 200ºC, 180ºC,<br />
160ºC, 130ºC, 100ºC, 70ºC, 40ºC.<br />
• Convection cooking is ideal for roasting and<br />
baking.<br />
• When using the CONVECTION key, all<br />
metal cookware can be used. (See ‘Suitable<br />
Cookware’ on page 28).<br />
NOTES:<br />
• Follow convection times and procedures in the<br />
charts and recipes in the cookbook section.<br />
• Food manufacturers instructions are only a<br />
guideline, so cooking times may need to be<br />
adjusted.<br />
• Pressing the CONV. (ºC) key during cooking<br />
will display the programmed temperature. This<br />
will not affect the programme or cooking time.<br />
• Temperature measurements taken whilst the<br />
oven is in convection mode will differ from the<br />
displayed level. This is due to the grill elements<br />
turning on and off in order to regulate the<br />
oven temperature. This will not affect the<br />
cooking results as long as the operation manual<br />
and cookbook are followed correctly.<br />
• After cooking is complete the cooling fan will<br />
continue working for a short time to lower the<br />
temperature of the electrical and mechanical<br />
parts. The display may show “NOW COOLING”.<br />
• Heat generated by the oven during convection<br />
cooking may cause the backplate of the oven<br />
to discolour. This is completely normal and will<br />
not affect the performance of the oven.<br />
• This oven is not suitable for baking Yorkshire<br />
Puddings.<br />
2. Input the temperature by pressing the<br />
CONV. (ºC) key 4 times.<br />
x4<br />
3. Press the START/AUTO MINUTE key<br />
once to start cooking.<br />
x1<br />
The display will count down<br />
through the cooking time.<br />
WARNING:<br />
The door, outer cabinet, oven cavity, accessories, dishes and especially the grills will become<br />
very hot during operation. To prevent burns, always use thick oven gloves.<br />
14
DUAL COOKING<br />
Dual Cook combines microwave<br />
power with convection or grill.<br />
The combination of microwave power with<br />
convection or grill reduces cooking time and<br />
provides a crisp, brown finish.<br />
There are three Dual Cook modes:<br />
1. Dual-1 - Convection with microwave.<br />
2. Dual-2 - Top grill with microwave.<br />
3. Dual-3 - Bottom grill with microwave.<br />
To select the dual cook mode required, enter the<br />
cooking time and follow the table below.<br />
Dual Cook Mode<br />
DUAL-1 (Convection<br />
and Microwave*)<br />
DUAL-2 (Top Grill<br />
and Microwave*)<br />
DUAL-3 (Bottom Grill<br />
and Microwave*)<br />
Press COMBI<br />
key<br />
Once<br />
Twice<br />
3 Times<br />
NOTES:<br />
• Dual Cook is preset with 30% microwave<br />
power. If you wish to change the microwave<br />
power level, press the MICRO POWER key<br />
until the desired power level is shown on the<br />
display.<br />
* You can select power levels 10%, 30%, and<br />
50% for DUAL-1.<br />
* You can select power levels 10%, 30%, 50%,<br />
70% and 100% for DUAL-2 and DUAL-3.<br />
• DUAL-1 is preset with 250ºC convection.<br />
To adjust the convection temperature, press<br />
the CONV. ºC key.<br />
Example for Microwave and Convection:<br />
To cook for 20 minutes using Dual-1, 230ºC,<br />
10% microwave power.<br />
1. Enter the cooking time by pressing the<br />
10 MIN. key twice<br />
2. Select Dual-1 by pressing the COMBI key<br />
once.<br />
x1<br />
3. Change the temperature by pressing the<br />
CONV. ºC key once.<br />
x1<br />
4. Change the power level by pressing the<br />
MICRO POWER key once.<br />
x1<br />
x2<br />
5. Press the START/AUTO MINUTE key<br />
once to start cooking.<br />
WARNING:<br />
The door, outer cabinet, oven cavity,<br />
accessories, dishes and especially the grills<br />
will become very hot during operation.<br />
To prevent burns, always use thick oven<br />
gloves.<br />
15<br />
x1<br />
The display will count down<br />
through the cooking time.
DUAL COOKING<br />
Example for Microwave and Grill:<br />
To cook for 15 minutes using Dual-2, 50%<br />
microwave power.<br />
1. Enter the cooking time by pressing the 10<br />
MIN. key once and the 1 MIN. key 5 times.<br />
2. Select Dual-2 by pressing the COMBI key<br />
twice.<br />
x2<br />
x1<br />
x5<br />
NOTES:<br />
• For DUAL-2 and DUAL-3 it is not necessary<br />
to preheat the grill.<br />
• Follow the recommended dual cooking times<br />
and procedures in the charts on pages 40 - 43.<br />
• When browning foods in a deep container,<br />
place on the turntable or low rack.<br />
• Temperature measurements taken whilst the<br />
oven is in convection mode will differ from the<br />
displayed level. This is due to the grill elements<br />
turning on and off in order to regulate the<br />
oven temperature. This will not affect the<br />
cooking results as long as the operation manual<br />
and cook book are followed correctly.<br />
• After cooking is complete the cooling fan<br />
will continue working for a short time to<br />
lower the temperature of the electrical<br />
and mechanical parts. The display may show<br />
“NOW COOLING”.<br />
3. Change the power level by pressing the<br />
MICRO POWER key 4 times.<br />
x4<br />
4. Press the START/AUTO MINUTE key<br />
once to start cooking.<br />
x1<br />
The display will count down<br />
through the cooking time.<br />
WARNING:<br />
The door, outer cabinet, oven cavity,<br />
accessories, dishes and especially the grills<br />
will become very hot during operation.<br />
To prevent burns, always use thick oven<br />
gloves.<br />
16
INSTANT COOK<br />
INSTANT COOK enables you to cook 4<br />
popular foods.<br />
Example:<br />
To cook three Baked Potatoes.<br />
1. Select the menu required by pressing the<br />
BAKED POTATO key 3 times.<br />
x3<br />
For cooking instructions please refer to the chart<br />
on page 18.<br />
Follow the example opposite for details on how<br />
to operate this function.<br />
After 2 seconds the<br />
oven will start cooking<br />
automatically and<br />
the display will count<br />
down through the<br />
cooking time.<br />
NOTES:<br />
• Press the MORE or LESS key once within 2 seconds after entering the weight as instructed in the<br />
chart.<br />
• When action is required (example, to turn food over), the oven stops, the audible signal sounds and<br />
instructions will appear on the display. To continue cooking, press the START/AUTO MINUTE key.<br />
• The final food temperature will vary according to the initial food temperature. Check food is<br />
thoroughly heated after cooking. If necessary, you can extend the cooking time manually.<br />
• All menus on INSTANT COOK use a combination of microwave power and grill or convection.<br />
• The INSTANT COOK function can only be input within 3 minutes after cooking completion, closing<br />
the door or pressing the STOP/CLEAR key.<br />
WEIGHT RANGE:<br />
• Weigh all foods prior to cooking as the labelled weight is only approximate.<br />
• Food weight should be rounded up to the nearest 0.1kg, for example, 0.65kg to 0.7kg.<br />
• You are restricted to cook a weight within the range given in the charts.<br />
• To cook weights or foods not included in the chart, please refer to the charts in the cookbook<br />
section.<br />
• You can enter the weight by holding down or pressing the desired INSTANT COOK key until the<br />
desired weight is displayed.<br />
WARNING:<br />
The door, outer cabinet, oven cavity, accessories, dishes and especially the grills will become<br />
very hot during operation. To prevent burns, always use thick oven gloves.<br />
17
INSTANT COOK CHART<br />
INSTANT COOK<br />
MENU WEIGHT RANGE COOKING INSTRUCTIONS<br />
Baked Potatoes 1 - 4 potatoes (pieces) • Pierce each potato in several places and place towards<br />
1 potato = the edge of the turntable.<br />
approx. 250g) • After cooking, leave to stand for 2 - 3 minutes.<br />
Pizza 0.1kg - 0.9kg • Lightly grease the turntable with oil.<br />
(Thin & Crispy or • Remove all packaging and place on the turntable.<br />
Deep Pan type) • After cooking, remove from the turntable.<br />
NOTE: For Frozen Pizza use the MORE key.<br />
Chicken 1 - 4 pieces • Place chicken quarters, best side down, in a flan dish<br />
Quarters Leg quarter = 300g on the low rack.<br />
Breast quarter = 400g • Turn chicken over when the audible signal sounds.<br />
• After cooking, stand for 5 minutes, wrapped in<br />
aluminium foil.<br />
NOTES:<br />
• For breast & wing quarters use the MORE key.<br />
• It is not possible to use the LESS key with this menu.<br />
Oven Chips 0.1kg - 0.4kg • Spread the chips evenly on the turntable.<br />
• After cooking, remove from the turntable.<br />
NOTES:<br />
• For thin oven chips use the LESS key.<br />
• For thick oven chips use the MORE key.<br />
• Chilled foods are cooked from 5ºC.<br />
• Frozen foods are cooked from -18ºC.<br />
• For converting to Lb/oz see the conversion chart on page 35.<br />
18
EXPRESS COOK / EXPRESS DEFROST<br />
EXPRESS COOK enables you to cook 6 popular menus from<br />
frozen or chilled. Please refer to the chart on pages 20.<br />
EXPRESS DEFROST enables you to defrost 3 popular menus.<br />
Please refer to the chart on page 21.<br />
Follow the examples below for details on how to operate<br />
these functions.<br />
EXPRESS COOK Example:<br />
To cook 0.6kg of Roast Beef from frozen.<br />
1. Press the ROAST BEEF/LAMB key once to<br />
select cooking from frozen.<br />
x1<br />
EXPRESS DEFROST Example:<br />
To defrost a 1.8kg Meat Joint.<br />
1. Press the MEAT JOINT<br />
key once.<br />
x1<br />
2. Enter the weight by pressing the WEIGHT<br />
UP key once.<br />
x1<br />
2. Enter the weight by pressing the WEIGHT<br />
DOWN key once.<br />
x1<br />
3. Press the START/AUTO MINUTE key<br />
once to start cooking.<br />
x1<br />
3. Press the START/AUTO MINUTE key<br />
once to start defrosting.<br />
x1<br />
The display will count down<br />
through the cooking time.<br />
The display will count down<br />
through the cooking time.<br />
NOTES:<br />
• If the DOWN ( ▼ ) WEIGHT key is pressed the display will count down from the highest weight<br />
range, each time the key is pressed.<br />
• If the UP ( ▲ ) WEIGHT key is pressed the display will count up from the lowest weight range,<br />
each time the key is pressed.<br />
• You can enter the weight by holding down or pressing the WEIGHT keys until the desired weight<br />
is displayed.<br />
19
EXPRESS COOK / EXPRESS DEFROST<br />
EXPRESS COOK CHART<br />
MENU WEIGHT RANGE COOKING PROCEDURE<br />
Roast Beef/Lamb 0.6kg - 1.8kg • Place meat in a flan dish on the low rack.<br />
• After cooking, leave meat to stand wrapped in<br />
aluminium foil for 10 minutes.<br />
NOTES:<br />
x1: Frozen • Select MORE for well done.<br />
x2: Chilled • It is not possible to use the LESS key for beef/lamb.<br />
• For frozen only:Turn meat over when the<br />
audible signal sounds.<br />
Roast Pork 0.6kg - 1.8kg • Place meat in a flan dish on the low rack.<br />
• After cooking, leave meat to stand wrapped in<br />
aluminium foil for 10 minutes.<br />
NOTES:<br />
x1: Frozen • It is not possible to use the LESS key for pork.<br />
x2: Chilled • For frozen only:Turn meat over when the<br />
audible signal sounds.<br />
Roast Poultry 1.2kg - 1.8kg • Pierce skin (chilled only) a few times and place<br />
poultry, breast side down, in a flan dish on the<br />
low rack.<br />
• After cooking, leave poultry to stand wrapped in<br />
x1: Frozen aluminium foil for 10 minutes.<br />
x2: Chilled NOTES:<br />
• It is not possible to use the LESS key for poultry.<br />
• This menu is only suitable for cooking whole poultry.<br />
• For frozen only:Turn poultry over when the audible<br />
signal sounds. When cooking frozen poultry with<br />
giblets, remove the giblets at first or second turn over.<br />
• Chilled foods are cooked from 5ºC.<br />
• Frozen foods are cooked from -18ºC.<br />
• For converting to Lb/oz see the conversion chart on page 35.<br />
WARNING:<br />
The door, outer cabinet, oven cavity, accessories, dishes and especially the grills will become<br />
very hot during operation. To prevent burns, always use thick oven gloves.<br />
NOTES FOR EXPRESS COOK / EXPRESS DEFROST:<br />
• Press the MORE or LESS keys before pressing the START/AUTO MINUTE key as instructed in<br />
the charts.<br />
• When action is required (example, to turn food over), the oven stops, the audible signals sound and<br />
instructions will appear on the display. To continue cooking, press the START/AUTO MINUTE key.<br />
• The final food temperature will vary according to the initial food temperature. Check food is<br />
thoroughly heated after cooking. If necessary, you can extend the cooking time manually.<br />
• All menus on EXPRESS COOK use a combination of microwave power and convection.<br />
• Before freezing foods, ensure food is fresh and of good quality.<br />
20
EXPRESS COOK / EXPRESS DEFROST<br />
EXPRESS DEFROST CHART<br />
MENU WEIGHT RANGE COOKING PROCEDURE<br />
Meat Joint: 0.6kg - 1.8kg • Place meat in a flan dish on the turntable.<br />
Beef/Lamb/Pork<br />
• Turn meat over when the audible signal sounds.<br />
• Stand, wrapped in foil, for 60 - 90 minutes until<br />
thoroughly defrosted.<br />
Chicken Quarters 0.3kg - 1.2kg • Place quarters, best side-up, in a flan dish on the<br />
turntable.<br />
• Turn over and rearrange when the audible signal<br />
sounds.<br />
• Stand, wrapped in foil, for 15 - 30 minutes until<br />
thoroughly defrosted.<br />
Whole Poultry 1.2kg - 1.8kg • Place poultry, breast side-up, in a flan dish on the<br />
turntable.<br />
• Turn over when the audible signal sounds.<br />
• Stand, wrapped in foil, for 60 - 90 minutes until<br />
thoroughly defrosted.<br />
• Frozen foods are defrosted from -18ºC.<br />
• For converting to Lb/oz see the conversion chart on page 35.<br />
NOTES FOR EXPRESS DEFROST:<br />
• If necessary, shield small areas of meat or poultry with flat pieces of aluminium foil. This will prevent<br />
the areas from becoming warm during defrosting. Ensure the foil does not touch the oven walls.<br />
• Do not cook the meat or poultry until thoroughly defrosted.<br />
• Do not use the racks for defrosting.<br />
WEIGHT RANGE FOR EXPRESS COOK / EXPRESS DEFROST:<br />
• Weigh all meat and poultry prior to cooking/defrosting as the labelled weight is only approximate.<br />
• Food weight should be rounded up to the nearest 0.1kg, for example, 0.65kg to 0.7kg.<br />
• You are restricted to cook/defrost a weight within the range given in the charts.<br />
• To cook/defrost weights or foods not included in these charts, please refer to the charts in the<br />
cookbook section.<br />
21
CONVENIENT FUNCTIONS<br />
1. SEQUENCE COOKING<br />
This function allows you to cook using up to 4<br />
automatic cooking stages for microwave mode<br />
and 2 automatic cooking stages for grill and dual<br />
cooking modes.<br />
Once programmed there is no need to interfere<br />
with the cooking operation as the oven will<br />
automatically move onto the next stage.<br />
Example:<br />
To cook for:<br />
5 minutes on 70% microwave power (Stage 1)<br />
6 minutes on Grill-1 (Stage 2)<br />
3 minutes on Dual-1, 200ºC,<br />
30% microwave power (Stage 3)<br />
STAGE 1<br />
1. Enter the cooking time by pressing the<br />
1 MIN. key 5 times.<br />
2. Input the power level by pressing the MICRO<br />
POWER key twice.<br />
x2<br />
x5<br />
4. Select Grill-1 by pressing the GRILL key once.<br />
x1<br />
STAGE 3<br />
5. Enter the cooking time by pressing the<br />
1 MIN. key 3 times.<br />
6. Select Dual-1 by pressing the COMBI<br />
key once, then change the convection<br />
temperature by pressing the CONV. ºC key<br />
3 times.<br />
x1<br />
x3<br />
x3<br />
STAGE 2<br />
3. Enter the cooking time by pressing the<br />
1 MIN. key 6 times.<br />
7. Press the START/AUTO MINUTE key<br />
once to start cooking.<br />
x1<br />
x6<br />
NOTE: If 100% is required on the final stage, it is<br />
not necessary to input the power level.<br />
22
CONVENIENT FUNCTIONS<br />
2. LESS AND MORE<br />
The LESS ( ▼ ) and MORE ( ▲ ) keys enable you to:<br />
• Cook/defrost food for less or more time than the automatic programmes.<br />
• Decrease or increase cooking/defrosting time whilst the oven is in use (manual cooking only).<br />
TO USE WITH AUTOMATIC<br />
PROGRAMMES:<br />
EXPRESS COOK / EXPRESS DEFROST<br />
Press the LESS ( ▼ ) / MORE ( ▲ ) key before<br />
pressing the START/AUTO MINUTE key.<br />
INSTANT COOK<br />
Press the LESS ( ▼ ) / MORE ( ▲ ) key within<br />
2 seconds after pressing the desired key.<br />
Example:<br />
If you prefer Baked Potatoes which are cooked,<br />
but still firm, use the LESS ( ▼ ) key.<br />
Alternatively, if you prefer Baked Potatoes softer,<br />
use the MORE ( ▲ ) key.<br />
NOTES:<br />
• If you select MORE the display will show, ( ▲ ).<br />
If you select LESS, the display will show, ( ▼ ).<br />
• Some menus cannot use the LESS function.<br />
If you select LESS for them, then press the<br />
START/AUTO MINUTE key,<br />
TO USE WITH MANUAL COOKING:<br />
Example:<br />
To cook for 10 minutes on 50% microwave power<br />
and then decrease the cooking time by 2 minutes.<br />
1. Enter the cooking time by pressing the<br />
10 MIN. key once.<br />
2. Input the power level by pressing the MICRO<br />
POWER key 3 times.<br />
x3<br />
x1<br />
3. Press the START/AUTO MINUTE key<br />
once to start cooking.<br />
x1<br />
will be displayed.<br />
• To cancel LESS / MORE, press the same key<br />
again.<br />
• To change MORE to LESS, press the<br />
LESS ( ▼ ) key.<br />
• To change LESS to MORE, press the<br />
MORE ( ▲ ) key.<br />
4. Reduce the cooking time by pressing the<br />
LESS ( ▼ ) key twice.<br />
x2<br />
23<br />
The cooking time is reduced by 2 minutes and<br />
continues to count down.<br />
NOTES:<br />
• The cooking/defrosting time will increase/<br />
decrease in multiples of 1 minute.<br />
• The overall time can be extended to a<br />
maximum of 99 minutes.
CONVENIENT FUNCTIONS<br />
3. KITCHEN TIMER Example:<br />
Use the KITCHEN TIMER as a minute timer or to<br />
To set the timer for 5 minutes.<br />
monitor the standing time for cooked/defrosted 1. Press the KITCHEN TIMER key once.<br />
food.<br />
x1<br />
NOTES:<br />
• You can enter any time up to 99 minutes, 90<br />
seconds.<br />
• To cancel the KITCHEN TIMER simply press<br />
the STOP/CLEAR key and the display will<br />
return to the time of day, if set.<br />
• The KITCHEN TIMER function cannot be used<br />
whilst the oven is in use.<br />
2. Enter the desired time by pressing the<br />
1 MIN. key 5 times.<br />
x5<br />
3. Press the START/AUTO MINUTE key<br />
once to the timer.<br />
x1<br />
4. AUTO MINUTE<br />
AUTO MINUTE enables you:<br />
• To cook on 100% microwave power in<br />
multiples of 1 minute. (direct start)<br />
• To extend cooking time in multiples of 1<br />
minute.<br />
NOTE:<br />
• The AUTO MINUTE function for direct start<br />
can only be used within 3 minutes after cooking<br />
completion, closing the door or pressing the<br />
door or pressing the STOP/CLEAR key.<br />
• The overall time can be extended to a maximum<br />
of 99 minutes.<br />
Example:<br />
To cook for 2 minutes, press the<br />
START/AUTO MINUTE key twice.<br />
x2<br />
24
CONVENIENT FUNCTIONS<br />
5. INFORMATION GUIDE<br />
The INFO key provides a step-by-step information guide to the keys on the oven.<br />
Your oven comes set with the Information Guide ON.<br />
There are two options (A and B) when you use the INFO key:<br />
A. GUIDE OF KEYS allows you to press a<br />
key to display information about it.<br />
Example:<br />
To display the information for EXPRESS COOK<br />
“Frozen Roast Pork”.<br />
1. Press the INFO key once.<br />
Info will appear on the display.<br />
x1<br />
B. GUIDE ON/OFF allows you to turn<br />
the information guide on or off.<br />
1. Press the INFO key twice.<br />
x2<br />
2. Press the ROAST PORK<br />
key once to select Frozen<br />
Roast Pork.<br />
x1<br />
2. Press the START/AUTO MINUTE key to<br />
turn the information guide on, or, press the<br />
STOP/CLEAR key to turn the information<br />
guide off.<br />
x1<br />
OR<br />
x1<br />
NOTES:<br />
• The display will flash a series of messages,<br />
including weight range and action required<br />
during or after cooking, e.g. when to stir or<br />
turn food.<br />
• The message will be repeated twice, then the<br />
display will return to the time of day, if set.<br />
• If you want to cancel the guide, press the<br />
STOP/CLEAR key.<br />
25<br />
The display will return to the time of day, if set.<br />
NOTE: Whenever Info is lit on the display, it is<br />
possible to press the Info key to obtain<br />
further information. (This is possible<br />
even when the information guide has<br />
been turned off.)
MICROWAVE COOKING ADVICE<br />
Microwaves cook food faster than conventional<br />
cooking. It is therefore essential that certain<br />
techniques are followed to ensure good results.<br />
COOKING ADVICE NOTES:<br />
• Always attend the oven when in use.<br />
• Ensure that the utensils are suitable for<br />
use in a microwave oven. (See ‘Suitable<br />
Cookware’ on page 28).<br />
• Refer to the charts in the cookbook section for<br />
recommended cooking times and power levels.<br />
• Do not place hot foods/utensils on a cold<br />
turntable or cold foods/utensils on a hot<br />
turntable.<br />
Many of the following techniques are similar to<br />
those used in conventional cooking.<br />
• Liquids and foods must not be heated in<br />
sealed containers or jars/containers with<br />
lids on, as pressure will build up inside and<br />
may cause the container/jar to explode.<br />
• Only use microwave popcorn within<br />
the recommended packaging (follow the<br />
manufacturers instructions). Never use oil<br />
unless specified by the manufacturer and never<br />
cook for longer than instructed.<br />
WARNING:<br />
Follow instructions in the SHARP operation manual at all times.<br />
If you exceed recommended cooking times and use power levels that are too high, food<br />
may overheat, burn and, in extreme circumstances, catch fire and damage the oven.<br />
Cooking Techniques<br />
Arrange<br />
Place the thickest parts of food towards the outside of the<br />
dish. e.g. Chicken drumsticks.<br />
Foods that are placed towards the outside of the dish will<br />
receive more energy, so cook quicker, than those in the<br />
centre.<br />
Cover<br />
Pierce<br />
Certain foods benefit from being covered during microwave cooking, follow<br />
recommendations where given.<br />
Use vented microwave cling film or a suitable lid.<br />
Foods with a shell, skin or membrane must be pierced<br />
in several places before cooking or reheating as steam<br />
will build up and may cause food to explode.<br />
e.g. Potatoes, Fish, Chicken, Sausages.<br />
NOTE: Eggs in their shells and hard / soft boiled eggs should not be<br />
heated in the microwave oven as they may explode, even<br />
after cooking has ended.<br />
Stir, turn and<br />
rearrange<br />
Stand<br />
For even cooking it is essential to stir, turn and rearrange food during cooking.<br />
Always stir and rearrange from the outside towards the centre.<br />
Standing time is necessary after cooking so it enables the heat to disperse<br />
equally throughout the food.<br />
26
MICROWAVE COOKING ADVICE<br />
Food Characteristics<br />
Composition Foods high in fat or sugar (e.g. Christmas pudding, mince pies) require less<br />
heating time. Care should be taken as overheating can lead to fire.<br />
Bones in food conduct heat, making the food cook more quickly. Care must be<br />
taken so that the food is cooked evenly.<br />
Density<br />
Quantity<br />
Size<br />
Shape<br />
Temperature of<br />
food<br />
Food density will affect the amount of cooking time needed.<br />
Light porous foods, such as cakes or bread, cook more quickly than heavy,<br />
dense foods, such as roasts and casseroles.<br />
The number of microwaves in your oven remains the same regardless of<br />
how much food is being cooked. The cooking time must be increased as the<br />
amount of food placed in the oven increases.<br />
e.g. Four potatoes will take longer to cook than two.<br />
Small foods and small pieces cook faster than large ones, as microwaves can<br />
penetrate from all sides to the centre. For even cooking make all the pieces<br />
the same size.<br />
Foods which are irregular in shape, such as chicken breasts or drumsticks, take<br />
longer to cook in the thicker parts. For even cooking, place the thickest parts<br />
to the outside of the dish where they will receive more energy.<br />
Round shapes cook more evenly than square shapes when microwave cooking.<br />
The initial temperature of food affects the amount of cooking time needed.<br />
Chilled foods will take longer to cook than food at room temperature.<br />
e.g. a cake made with chilled ingredients, (i.e. margarine) will take longer to<br />
cook than a cake made with ingredients at room temperature.<br />
The temperature of the container is not a true indication of the temperature<br />
of the food or drink. Cut into foods with fillings, for example jam doughnuts,<br />
to release heat or steam.<br />
Face & Hands: Always use oven gloves to remove food or cookware from<br />
the oven. Stand back when opening the oven door to allow heat or steam to<br />
disperse. When removing covers (such as cling film), opening roasting bags or<br />
popcorn packaging, direct steam away from face and hands.<br />
Check the temperature of food and drink and stir before serving. Take special<br />
care when serving to babies, children or the elderly. The contents of feeding<br />
bottles and baby food jars are to be stirred or shaken and the temperature is<br />
to be checked before consumption to avoid burns.<br />
27
SUITABLE COOKWARE<br />
To cook/defrost food in a microwave oven, the<br />
microwave energy must be able to pass through<br />
the container to penetrate the food. Therefore it<br />
is important to choose suitable cookware.<br />
Round/oval dishes are preferable to square/<br />
oblong ones, as the food in the corners tends to<br />
overcook. A variety of cookware can be used as<br />
listed below.<br />
Cookware<br />
Aluminium foil<br />
Foil Containers<br />
Microwave<br />
Safe<br />
✔ / ✘<br />
Grill<br />
✔<br />
Dual<br />
Cook<br />
✔ / ✘<br />
Convection<br />
✔<br />
Comments<br />
Small pieces of aluminium foil can be used to<br />
shield food from overheating. Keep foil at least<br />
2cm from the oven walls, as arcing may occur.<br />
Foil containers are not recommended unless<br />
specified by the manufacturer, e.g. Microfoil ®,<br />
follow instructions carefully.<br />
Browning dishes<br />
✔<br />
✘<br />
✘<br />
✘<br />
Always follow the manufacturers instructions.<br />
Do not exceed heating times given. Be very<br />
careful as these dishes become very hot.<br />
China and<br />
ceramics<br />
✔ / ✘<br />
✘<br />
✔<br />
Dual Conv.<br />
only<br />
✔<br />
Porcelain, pottery, glazed earthenware and<br />
bone china are usually suitable, except for<br />
those with metallic decoration.<br />
Glassware<br />
e.g. Pyrex ®<br />
✔<br />
✔<br />
✔<br />
✔<br />
Care should be taken if using fine glassware<br />
as it can break or crack if heated suddenly.<br />
Metal<br />
✘<br />
✔<br />
✘<br />
✔<br />
It is not recommended to use metal<br />
cookware when using microwave power as it<br />
will arc, which can lead to fire.<br />
Plastic/Polystyrene<br />
E.g. fast food<br />
containers<br />
✔<br />
✘<br />
✘<br />
✔ / ✘<br />
Care must be taken as some containers warp,<br />
melt or discolour at high temperatures.<br />
Cling film<br />
✔<br />
✘<br />
✘<br />
✘<br />
Should not touch the food and must be<br />
pierced to let the steam escape.<br />
Freezer/Roasting<br />
bags<br />
✔<br />
✘<br />
✘<br />
✔ / ✘<br />
Must be pierced to let steam escape. Ensure<br />
bags are suitable for microwave or convection<br />
use. Do not use plastic or metal ties, as they<br />
may melt or catch fire due to the metal arcing.<br />
Paper plates/cups<br />
and kitchen paper<br />
✔<br />
✘<br />
✘<br />
✘<br />
Only use for warming or to absorb moisture.<br />
Care must be taken as overheating may cause<br />
fire.<br />
Straw and wooden<br />
containers<br />
✔<br />
✘<br />
✘<br />
✘<br />
Always attend the oven when using these<br />
materials as overheating may cause fire.<br />
Recycled paper<br />
and newspaper<br />
✘<br />
✘<br />
✘<br />
✘<br />
May contain extracts of metal which will<br />
cause ‘arcing’ and may lead to fire.<br />
Racks<br />
✔<br />
✔<br />
✔<br />
✔<br />
The metal racks supplied have been specially<br />
designed for all cooking modes and will not<br />
damage the oven.<br />
WARNING: When heating food in plastic or paper containers, monitor the oven<br />
due to the possibility of ignition.<br />
28
DEFROSTING ADVICE<br />
Defrosting food using your microwave oven is<br />
the quickest method of all.<br />
It is a simple proccess but the following<br />
instructions are essential to ensure the food is<br />
thoroughly defrosted.<br />
Rearrange<br />
Separate<br />
Shield<br />
Stand<br />
Turn over<br />
Foods that are placed towards the outside of the dish will defrost quicker than<br />
foods in the centre. It is therefore essential that the food is rearranged up to 4<br />
times during defrosting.<br />
Move closely packed pieces from the outside to the centre and rearrange<br />
over-lapping areas.<br />
This will ensure that all parts of the food defrosts evenly.<br />
Foods may be stuck together when removed from the freezer. It is important<br />
to separate foods as soon as it is possible during defrosting.<br />
e.g. bacon rashers, chicken fillets.<br />
Some areas of food being defrosted may become warm. To prevent them<br />
becoming warmer and starting to cook, these areas can be shielded with small<br />
pieces of foil, which reflect microwaves, e.g. legs and wings on a chicken.<br />
Standing time is necessary to ensure food is thoroughly defrosted.<br />
Defrosting is not complete once the food is removed from the microwave<br />
oven. Food must stand, covered, for a length of time to ensure the centre has<br />
completely defrosted.<br />
It is essential that all foods are turned over at least 3 - 4 times during defrosting.<br />
This is important to ensure thorough defrosting.<br />
NOTES:<br />
• Remove all packaging and wrapping before defrosting.<br />
• To defrost food, use microwave power levels 30% or 10%.<br />
• Please refer to the defrosting chart on page 36 for further information.<br />
29
REHEATING ADVICE<br />
For the reheating of foods, follow the advice and guidelines below to ensure food is thoroughly<br />
reheated before serving.<br />
Plated meals<br />
Sliced meat<br />
Poultry portions<br />
Casseroles<br />
Remove any poultry or meat portions, reheat<br />
these separately, see below.<br />
Place smaller items of food to the centre of the plate,<br />
larger and thicker foods to the edge. Cover with vented<br />
microwave cling film and reheat on 50%, stir/rearrange<br />
halfway through reheating.<br />
NOTE: Ensure the food is thoroughly reheated before<br />
serving.<br />
Cover with vented microwave cling film and reheat on<br />
50%. Rearrange at least once to ensure even reheating.<br />
NOTE: Ensure the meat is thoroughly reheated before<br />
serving.<br />
Place thickest parts of the portions to the outside of the<br />
dish, cover with vented microwave cling film and reheat<br />
on 70%.<br />
Turn over halfway through reheating.<br />
NOTE: Ensure the poultry is thoroughly reheated<br />
before serving.<br />
Cover with vented microwave cling film or a suitable lid<br />
and reheat on 50%.<br />
Stir frequently to ensure even reheating.<br />
NOTE: Ensure the food is thoroughly reheated before<br />
serving.<br />
To achieve the best results when reheating, select a suitable microwave power level appropriate to<br />
the type of food. e.g. A bowl of vegetables can be reheated using 100%, while a lasagne which contains<br />
ingredients that cannot be stirred, should be reheated using 50%.<br />
NOTES:<br />
• Remove food from foil or metal containers before reheating.<br />
• Reheating times will be affected by the shape, depth, quantity and temperature of food together with<br />
the size, shape and material of the container.<br />
Never heat liquids in narrow-necked containers, as this could result in the<br />
contents erupting from the container and may cause burns.<br />
• To avoid overheating and fire, special care must be taken when reheating foods with a high sugar or<br />
fat content, e.g. mince pies or Christmas pudding.<br />
• Never heat oil or fat for deep frying as this may lead to overheating and fire.<br />
• Canned potatoes should not be heated in the microwave oven, follow the manufacturer’s instructions<br />
on the can.<br />
The contents of feeding bottles and baby food jars are to be stirred or shaken<br />
and the temperature is to be checked before consumption to avoid burns.<br />
30
CLEANING & MAINTENANCE<br />
OVEN INTERIOR<br />
• It is important to clean the interior of your<br />
microwave oven after each use.<br />
• To clean the oven interior, use a mild detergent<br />
solution, such as washing-up liquid, with warm<br />
water on a soft cloth.<br />
• Heat up your oven regularly by using the<br />
grills, refer to NOTE on page 12. Remaining<br />
food or fat splashed can cause smoke or bad<br />
smell.<br />
• Food and liquid splashes will build-up on the<br />
oven walls and ceiling. If grease, fat and food<br />
debris is allowed to build-up in the oven<br />
interior it may overheat, smoke or even catch<br />
fire when next using the oven.<br />
• Keep the waveguide cover clean at all times.<br />
The waveguide cover is constructed from a<br />
fragile material and should be cleaned with<br />
care (follow the cleaning instructions above).<br />
NOTE: Excessive soaking may cause<br />
disintegration of the waveguide cover.<br />
The waveguide cover is a consumable part and<br />
without regular cleaning, will need to be replaced.<br />
Cleaning tip - For easier cleaning of your oven:<br />
Place half a lemon in a bowl, add 300ml (1/2 pint) water and heat on 100% for 10 - 12 minutes.<br />
Wipe the oven clean using a soft, dry cloth.<br />
OUTER CABINET<br />
• Wipe the outside of the microwave oven with<br />
a mild detergent solution, such as washing-up<br />
liquid, with warm water on a soft cloth.<br />
• The control panel must be wiped clean<br />
and dried with the door open, therefore<br />
inactivating the oven.<br />
31<br />
• Food will release steam during cooking and<br />
cause condensation inside the oven and door.<br />
It is important to wipe the oven dry. A buildup<br />
of condensation will eventually lead to rust<br />
forming on the oven interior.<br />
• Do not allow grease or dirt to buildup<br />
on the door seals or areas around<br />
the door. This may prevent the door<br />
from closing correctly and may cause<br />
a leakage of microwaves (follow the<br />
cleaning instructions opposite).<br />
• Ensure the accessories are cleaned after every<br />
use with a mild washing-up liquid solution and<br />
dried. This will prevent the build-up of grease<br />
and food debris.<br />
The accessories are dishwasher safe.<br />
• CLEAN THE OVEN AT REGULAR<br />
INTERVALS AND REMOVE ANY FOOD<br />
DEPOSITS.<br />
Failure to maintain the oven in a clean<br />
condition could lead to a deterioration of<br />
the surface that could adversely affect<br />
the life of the appliance and possibly<br />
result in a hazardous situation.<br />
DOOR<br />
• To remove all trace of dirt, regularly clean both<br />
sides of the door, the door seals and adjacent<br />
parts with a soft, damp cloth.<br />
• Do not use harsh abrasive cleaners or sharp<br />
metal scrapers to clean the oven door glass<br />
since they can scratch the surface, which<br />
may result in shattering of the glass.<br />
NOTES:<br />
• Never use spray cleaners, oven pads or abrasive scourers as these damage the surface of the oven.<br />
• A steam cleaner should not be used.<br />
• Take care not to let soapy water drip through the small holes in the oven walls and the cavity floor.<br />
Excess water spillage through these holes will cause damage to the oven interior.<br />
• Slight tarnishing of the oven cavity, around the area of the grills, is likely to occur. This is normal and<br />
will not affect the ovens performance.<br />
WARNING:<br />
Before cleaning, make sure the oven cavity, door, oven cabinet, accessories and especially<br />
the grills are completely cool.
If you think the oven is not working properly<br />
there are some simple checks you can carry out<br />
yourself before calling an engineer. This will help<br />
prevent unnecessary service calls if the fault is<br />
something simple.<br />
Follow this simple check below:<br />
Place half a cup of water on the turntable and<br />
close the door. Programme the oven to cook for<br />
1 minute using 100% microwave power.<br />
1. Does the oven lamp come on when it is<br />
cooking?<br />
2. Does the turntable rotate?<br />
3. Does the cooling fan work? (Check by placing<br />
your hand above the air vent openings.)<br />
4. After 1 minute does the audible signal sound?<br />
5. Is the water in the cup hot?<br />
Take the cup of water out of the oven and close<br />
the door. Programme the oven to cook for 3<br />
minutes using the top and bottom grills.<br />
6. After 3 minutes, do both the grill heating<br />
elements become red?<br />
Programme the oven to cook for 3 minutes using<br />
the convection on 180ºC.<br />
7. After 3 minutes, is the oven cavity hot?<br />
If you answer “NO” to any question first check<br />
that the oven is plugged in properly and the fuse<br />
has not blown. If there is no fault with either,<br />
check against the troubleshooting chart on the<br />
following page.<br />
NOTES:<br />
• If you cook food for more than the standard<br />
time (see chart opposite) using the same<br />
cooking mode, the oven’s safety mechanisms<br />
automatically activate. The microwave power<br />
level will be reduced or the grill heating<br />
elements will turn on and off.<br />
• After manual or automatic cooking using the<br />
Grill, Dual Cook or Convection modes, the<br />
cooling fan will switch on to cool the oven<br />
cavity. When the cooling fan works, the display<br />
may show “NOW COOLING”. To clear it,<br />
press the STOP/CLEAR key and the display<br />
will return to the time of day, if set.<br />
During these modes, the cooling fan will carry<br />
on working after you have pressed the STOP/<br />
CLEAR key. You may feel hot air blowing out<br />
of the air-vent openings.<br />
TROUBLESHOOTING<br />
32<br />
WARNING:<br />
Never adjust, repair or modify the<br />
oven yourself. It is hazardous for anyone<br />
other than a SHARP trained engineer to<br />
carry out servicing or repairs.<br />
This is important as it may involve the<br />
removal of covers that provide protection<br />
against microwave energy.<br />
• The door seal stops microwave leakage during<br />
oven operation, but does not form an airtight<br />
seal. It is normal to see drops of water, light or<br />
feel warm air around the oven door. Food with<br />
a high moisture content will release steam and<br />
cause condensation inside the door which may<br />
drip from the oven.<br />
• Repairs and Modifications: Do not attempt to<br />
operate the oven if it is not working properly.<br />
• Outer Cabinet & Lamp Access: Never remove<br />
the outer cabinet. This is very dangerous due<br />
to high voltage parts inside which must never<br />
be touched, as this could be fatal.<br />
Your oven is not fitted with a lamp access<br />
cover. If the lamp fails, do not attempt to<br />
replace the lamp yourself, call a SHARP<br />
approved service facility.<br />
IMPORTANT:<br />
If the display is blank and has gone dark, even if<br />
the power plug is properly connected, the oven<br />
may be in Energy Save Mode. To cancel it, open<br />
and then close the oven door, see page 8.<br />
Cooking Mode<br />
Microwave 100%<br />
cooking<br />
Grill-1<br />
Grill-2<br />
Grill-3<br />
Dual Cook-2<br />
Microwave 100%<br />
Microwave 10 - 70%<br />
Dual Cook-3<br />
Microwave 100%<br />
Microwave 10 - 70%<br />
Standard Time<br />
20 Minutes<br />
30 Minutes<br />
45 Minutes<br />
Top Grill 15 Minutes<br />
Btm Grill 15 Minutes<br />
Microwave 20 Minutes<br />
Top Grill 15 Minutes<br />
Top Grill 30 Minutes<br />
Microwave 20 Minutes<br />
Btm Grill 15 Minutes<br />
Btm Grill 45 Minutes
TROUBLESHOOTING<br />
TROUBLESHOOTING CHART<br />
QUERY<br />
Draught circulates<br />
around the door.<br />
Condensation forms in<br />
the oven, and may drip<br />
from the door.<br />
Flashing or arcing from<br />
within the cavity when<br />
cooking.<br />
Arcing potatoes.<br />
The display is lit but the<br />
control panel will not<br />
work when pressed.<br />
Oven cooks too slowly.<br />
Oven makes a noise.<br />
Outer cabinet is hot.<br />
The display shows<br />
message for “DEMO<br />
MODE”, or the time in<br />
the display is counting<br />
down very rapidly.<br />
ANSWER<br />
When the oven is working, air circulates within the cavity.<br />
The door does not form an airtight seal so air may escape from the door.<br />
The oven cavity will normally be colder than the food being cooked, and so<br />
steam produced when cooking will condense on the colder surface.<br />
The amount of steam produced depends on the water content of the food<br />
being cooked. Some foods, such as potatoes have a high moisture content.<br />
Condensation trapped in the door glass should clear after a few hours.<br />
Arcing will occur when a metallic object comes into close proximity to<br />
the oven cavity during cooking. This may possibly roughen the surface of<br />
the cavity, but would not otherwise damage the oven.<br />
Ensure all “eyes” are removed from the potatoes and that they have been<br />
pierced, place directly onto the turntable or in a heat resistant flan dish or<br />
similar.<br />
Check the door is closed properly.<br />
Ensure correct power level has been selected.<br />
The microwave energy pulses ON and OFF during cooking/defrosting.<br />
The cabinet may become warm to the touch - keep children away.<br />
Your oven may be set in Demo Mode. To cancel Demo Mode, unplug the<br />
oven from the socket and replug.<br />
33
TO REPLACE THE MAINS PLUG<br />
The wires in the mains cable are colour coded as<br />
shown:<br />
Green and yellow stripes = EARTH<br />
Blue = NEUTRAL<br />
Brown = LIVE<br />
As the colours in the mains lead of your oven<br />
may not correspond with the coloured marking<br />
identifying the terminals in your plug, connect the<br />
wires as described:<br />
• The green and yellow wire to the plug terminal<br />
marked E or or coloured green or<br />
coloured green and yellow.<br />
• The blue wire to the plug terminal marked N<br />
or coloured black or coloured blue.<br />
• The brown wire to the plug terminal marked L<br />
or coloured red or coloured brown.<br />
Make sure the terminal screws are tight and the<br />
cable is held securely by the cable grip where it<br />
enters the plug.<br />
Like most appliances in your home, your oven<br />
must be connected to a single phase 230-240V,<br />
50Hz alternating current supply.<br />
If you do not make the proper electrical<br />
connections you might damage the oven or injure<br />
yourself. Neither SHARP nor the supplier will be<br />
liable if this happens.<br />
WARNING: THIS APPLIANCE<br />
MUST BE EARTHED<br />
If you have any doubts about your<br />
electrical supply ask a qualified<br />
electrician.<br />
CALLING FOR SERVICE<br />
• If you are unable to resolve a problem using<br />
the checks covered on the last few pages, do<br />
not attempt to service this microwave<br />
oven yourself.<br />
• Contact the dealer or supplier from whom the<br />
oven was purchased in order to obtain service.<br />
Where this is not possible, please contact the<br />
SHARP Customer Information Centre.<br />
Telephone: 08705 274277 (office hours).<br />
• For general information and assistance with<br />
oven queries, please contact our<br />
Customer Information Centre:<br />
U.K.: 08705 274277 (office hours)<br />
Ireland: 01 676 0648 (office hours)<br />
Website: www.sharp.co.uk/customersupport<br />
• Replacement accessories may be obtained<br />
from our main parts distributor:<br />
Willow Vale Electronics Ltd.<br />
Telephone: 0121 766 5414<br />
34
COOKBOOK<br />
CONTENTS<br />
INTRODUCTION & CONVERSION CHARTS. . . . . . . . . . . . . . . . . . . . . . . . . . . . . . . . . . . . . . . . . .35<br />
DEFROSTING CHART:<br />
Meat, Poultry, Fish and Fruit . . . . . . . . . . . . . . . . . . . . . . . . . . . . . . . . . . . . . . . . . . . . . . . . . .36<br />
COOKING CHART<br />
Fish, Fresh & Frozen Vegetables and Fruit . . . . . . . . . . . . . . . . . . . . . . . . . . . . . . . . . . . . . . . .37<br />
Rice, Pasta and Eggs . . . . . . . . . . . . . . . . . . . . . . . . . . . . . . . . . . . . . . . . . . . . . . . . . . . . . . . . .38<br />
GRILLING CHART . . . . . . . . . . . . . . . . . . . . . . . . . . . . . . . . . . . . . . . . . . . . . . . . . . . . . . . . . . . . .39<br />
DUAL - 1 COOKING CHART . . . . . . . . . . . . . . . . . . . . . . . . . . . . . . . . . . . . . . . . . . . . . . . . . . . . .40<br />
DUAL - 2 COOKING CHART . . . . . . . . . . . . . . . . . . . . . . . . . . . . . . . . . . . . . . . . . . . . . . . . . . . .41 - 43<br />
REHEATING CHART . . . . . . . . . . . . . . . . . . . . . . . . . . . . . . . . . . . . . . . . . . . . . . . . . . . . . . . . . . . .44<br />
RECIPES . . . . . . . . . . . . . . . . . . . . . . . . . . . . . . . . . . . . . . . . . . . . . . . . . . . . . . . . . . . . . . . . . . . . .45 - 62<br />
INTRODUCTION<br />
This Cookbook contains a wide variety of recipes developed specifically for your microwave oven. These will<br />
give you successful results and will save time and electricity. The recipes demonstrate the capabilities of your<br />
oven and prove that microwave technology is the efficient and effective alternative to conventional cooking.<br />
The cookery notes below compliment all cooking procedures in this cookbook and should be read in<br />
advance of recipe preparation.<br />
COOKERY NOTES<br />
• Please weigh all meat and poultry prior to defrosting and cooking, as labelled weights are only approximate.<br />
• Where dishes are covered use vented microwave cling film unless otherwise stated. Where dishes are<br />
lined, use greaseproof paper unless otherwise stated.<br />
• Please note that all preparation times and serving quantities are approximate.<br />
• All ingredients are given in both metric and imperial measures. Use either set but not a combination of<br />
both measures.<br />
• Cooking times in the charts and recipes are based on standard conditions. Cooking results will vary<br />
according to the condition of foods, utensils and the oven. Please check the cooking result and, if<br />
necessary, adjust cooking times accordingly.<br />
• Serve all dishes immediately unless otherwise stated.<br />
• Butter and margarine can be interchanged on recipes, as preferred.<br />
• Half-fat, skimmed or full-fat milk may be used in all recipes, as preferred.<br />
• Where it is necessary to blend foods, use a food processor, liquidiser or press through a sieve.<br />
• Chilled foods are to be cooked from 5°C. DO NOT COOK FROM FROZEN.<br />
• Ambient/fresh/dried/canned foods are to be cooked from 20°C. DO NOT COOK FROM FROZEN.<br />
• Frozen foods are to be cooked from -18°C.<br />
CONVERSION CHARTS<br />
WEIGHT MEASURES<br />
15g 1<br />
/2oz<br />
25g 1oz<br />
50g 2oz<br />
100g 4oz<br />
175g 6oz<br />
225g 8oz<br />
450g 1lb<br />
VOLUME MEASURES<br />
30ml 1floz<br />
100ml 3floz<br />
150ml 5floz ( 1 /4 pint)<br />
300ml 10floz ( 1 /2 pint)<br />
600ml 20floz (1 pint)<br />
35<br />
SPOON MEASURES<br />
1.25ml 1<br />
/4 teaspoon<br />
2.5ml 1<br />
/2 teaspoon<br />
5ml 1 teaspoon<br />
15ml 1 tablespoon
DEFROSTING CHART<br />
Meat Joints<br />
(Beef,Lamb,Pork)<br />
Minced Meat<br />
Steak<br />
2cm (3/4”) thick<br />
Chops and Sausages<br />
Bacon<br />
❖ Whole Poultry<br />
(Chicken,Turkey,Duck)<br />
Chicken Legs<br />
Chicken/Turkey<br />
(Breasts & Fillets)<br />
Minced Turkey<br />
Whole Fish<br />
(Trout, Mackerel)<br />
Fish Fillets/Steaks<br />
Apples<br />
FOOD DEFROST MICRO ▼ METHOD ● STANDING<br />
TIME POWER LEVEL TIME<br />
Blackcurrants/Redcurrants/<br />
Raspberries/Blackberries<br />
Gooseberries/Rhubarb/<br />
Strawberries<br />
Bread (sliced)<br />
Pastry<br />
(Puff or Shortcrust)<br />
Meat & Fruit Pies<br />
(cooked)<br />
22 - 23 Minutes/<br />
450g<br />
5 - 8 Minutes/<br />
450g<br />
11 - 12 Minutes/<br />
450g<br />
16 - 18 Minutes/<br />
450g<br />
11 - 12 Minutes/<br />
450g<br />
20 - 21 Minutes/<br />
450g<br />
8 - 9 Minutes/<br />
450g<br />
11 - 12 Minutes/<br />
450g<br />
11 - 12 Minutes/<br />
450g<br />
9 Minutes/<br />
450g<br />
7 - 8 Minutes/<br />
450g<br />
8 - 9 Minutes/<br />
450g<br />
6 - 7 Minutes/<br />
450g<br />
7 - 8 Minutes/<br />
450g<br />
6 Minutes/<br />
400g<br />
5 Minutes/<br />
450g<br />
7 - 8 Minutes/<br />
large pie<br />
10%<br />
30%<br />
30%<br />
30%<br />
30%<br />
10%<br />
30%<br />
30%<br />
30%<br />
30%<br />
30%<br />
30%<br />
30%<br />
30%<br />
30%<br />
30%<br />
30%<br />
NOTE: Do not use the racks for defrosting.<br />
▼ Method: If shielding is necessary, use small pieces of foil.<br />
❖ Poultry: Chicken, turkey and duck must be defrosted without giblets.<br />
● Standing Time: During recommended standing time, wrap or cover food in foil.<br />
Place in a flan dish. Turn over 4 - 5<br />
times during defrosting. Shield.<br />
Place on a plate.<br />
Turn over 3 - 4 times, removing<br />
defrosted mince each time.<br />
Place in a flan dish. Turn 2 - 3 times,<br />
separate during defrosting. Shield.<br />
Place in a flan dish. Turn 2 - 3 times,<br />
separate during defrosting. Shield.<br />
Place on a plate. Separate and rearrange<br />
twice during defrosting.<br />
Shield.<br />
Place in a flan dish. Turn 4 - 5 times,<br />
during defrosting. Shield.<br />
Place in a flan dish. Turn 2 - 3 times,<br />
separate during defrosting. Shield.<br />
Place in a flan dish. Turn 2 - 3 times,<br />
separate during defrosting. Shield.<br />
Place in a bowl. Turn 3 - 4 times,<br />
removing defrosted mince each time.<br />
Place in a flan dish. Separate and<br />
re-arrange twice during defrosting.<br />
Shield.<br />
Place in a flan dish. Separate and<br />
re-arrange twice during defrosting.<br />
Shield.<br />
Place in a dish. Stir during defrosting.<br />
Shield.<br />
Place in a dish. Stir during defrosting.<br />
Shield.<br />
Place in a dish. Stir during defrosting.<br />
Shield.<br />
Place on the turntable. Separate and<br />
rearrange during defrosting.<br />
Place on a plate. Turn over half way<br />
through defrosting.<br />
Remove from foil container. Place in<br />
a flan dish.<br />
60 - 90 Minutes<br />
15 - 30 Minutes<br />
15 - 30 Minutes<br />
15 - 30 Minutes<br />
5 - 10 Minutes<br />
60 - 90 Minutes<br />
25 - 30 Minutes<br />
25 - 30 Minutes<br />
15 - 20 Minutes<br />
15 - 30 Minutes<br />
15 - 30 Minutes<br />
15 - 20 Minutes<br />
15 - 20 Minutes<br />
15 - 20 Minutes<br />
5 - 10 Minutes<br />
10 - 15 Minutes<br />
15 - 20 Minutes<br />
36
COOKING CHART<br />
FOOD COOKING MICRO METHOD STANDING<br />
TIME POWER LEVEL TIME<br />
Fish Fillets<br />
100%<br />
Place in a single layer in a flan dish. 2 - 3 Minutes<br />
Cover and cook.<br />
Whole Fish & Steaks<br />
Aubergines &<br />
Broccoli (fresh)<br />
Green Beans and<br />
Sprouts (fresh)<br />
Cabbage, Carrots,<br />
Cauliflower, Celery<br />
(fresh)<br />
Corn on the Cob<br />
(fresh)<br />
Courgettes &<br />
Leeks (fresh)<br />
Parsnips & Spinach<br />
(fresh)<br />
Potatoes, Jacket<br />
(250g/9oz - each)<br />
(fresh)<br />
Potatoes, Boiled<br />
(old & new - fresh)<br />
Swede & Turnips<br />
(fresh)<br />
Beans & Cabbage<br />
(green - frozen)<br />
Broccoli/<br />
Leaf Spinach<br />
/Brussels Sprouts<br />
(frozen)<br />
Carrots - sliced<br />
(frozen)<br />
Cauliflower florets<br />
(frozen)<br />
Corn on the Cob<br />
(frozen)<br />
Peas, Sweetcorn &<br />
Mixed Vegetables<br />
(frozen)<br />
Apples & Rhubarb<br />
(fresh)<br />
Blackberries/<br />
Raspberries/<br />
Redcurrants<br />
7 Minutes/<br />
450g<br />
7 - 8 Minutes/<br />
450g<br />
5 Minutes/<br />
225g<br />
5 - 6 Minutes/<br />
225g<br />
5 Minutes/<br />
225g<br />
6 - 7 Minutes/<br />
225g<br />
4 - 5 Minutes/<br />
225g<br />
5 - 6 Minutes/<br />
225g<br />
10 - 12 Minutes/<br />
2 potatoes<br />
9 - 10 Minutes/<br />
450g<br />
7 - 8 Minutes/<br />
225g<br />
5 - 6 Minutes/<br />
225g<br />
6 - 7 Minutes/<br />
225g<br />
6 Minutes/<br />
225g<br />
5 - 6 Minutes/<br />
225g<br />
10 - 11 Minutes/<br />
2 cobs<br />
5 - 6 Minutes/<br />
225g<br />
5 - 6 Minutes/<br />
450g<br />
5 - 6 Minutes/<br />
450g<br />
100%<br />
100%<br />
100%<br />
100%<br />
100%<br />
100%<br />
100%<br />
100%<br />
100%<br />
100%<br />
100%<br />
100%<br />
100%<br />
100%<br />
100%<br />
100%<br />
100%<br />
100%<br />
37<br />
Place in a single layer in a flan dish.<br />
Cover and cook.<br />
Slice. Add 30ml (2 tbsp) water. Cover dish.<br />
Stir halfway through cooking.<br />
Add 30ml (2 tbsp) water. Cover dish.<br />
Stir halfway through cooking.<br />
Slice or break into florets<br />
Add 30ml (2 tbsp) water. Cover.<br />
Stir halfway through cooking.<br />
Add 45ml (3 tbsp) water. Cover.<br />
Stir halfway through cooking.<br />
Slice. Add 30ml (2 tbsp) water. Cover dish.<br />
Stir halfway through cooking.<br />
Slice. Add 45ml (3 tbsp) water. Cover.<br />
Stir halfway through cooking.<br />
Pierce in several places.<br />
Place on the edge of the turntable.<br />
Cut into quarters. Add 60ml (4 tbsp) water.<br />
Cover. Stir halfway through cooking.<br />
Dice. Add 45ml (3 tbsp) water. Cover dish.<br />
Stir halfway through cooking.<br />
Place in dish. Add 15ml (1 tbsp) water.<br />
Cover dish. Stir halfway through cooking.<br />
Place in dish. Add 15ml (1 tbsp) water.<br />
Cover dish. Stir halfway through cooking.<br />
Place in dish. Add 15ml (1 tbsp) water.<br />
Cover dish. Stir halfway through cooking.<br />
Place in dish. Add 15ml (1 tbsp) water.<br />
Cover dish. Stir halfway through cooking.<br />
Place in dish. Cover dish.<br />
Turnover halfway through cooking.<br />
Place in dish. Cover dish.<br />
Stir halfway through cooking.<br />
Peel & slice. Place in a dish and cover.<br />
Stir during cooking.<br />
Place in a dish and cover.<br />
Stir during cooking.<br />
NOTE:<br />
• Prior to cooking fresh vegetables and fruit are at ambient temperature (20°C)<br />
• Frozen vegetables are cooked from -18°C.<br />
2 - 3 Minutes<br />
2 Minutes<br />
2 Minutes<br />
2 Minutes<br />
2 Minutes<br />
2 Minutes<br />
2 Minutes<br />
5 Minutes<br />
4 Minutes<br />
2 Minutes<br />
2 Minutes<br />
2 Minutes<br />
3 Minutes<br />
2 Minutes<br />
3 Minutes<br />
2 Minutes<br />
2 Minutes<br />
2 Minutes
COOKING CHART<br />
FOOD ❇ COOKING MICRO ▼ METHOD ● STANDING<br />
TIME POWER LEVEL TIME<br />
White rice 14 - 15 Minutes 70% Add 300ml (1/2 pint) boiling water/100g rice. 2 Minutes<br />
(long grain)<br />
Do not cover. Stir twice during cooking.<br />
Brown rice<br />
DRIED PASTA<br />
Spaghetti<br />
(short cut)<br />
Macaroni<br />
(short cut)<br />
Tagliatelle<br />
Pasta shells<br />
FRESH PASTA<br />
Spaghetti/<br />
Tagliatelle<br />
Fusilli/Penne/<br />
Conchiglie/<br />
Farfalle<br />
Ravioli<br />
Tortellini<br />
(white)<br />
Tortellini<br />
(brown)<br />
Scrambled Eggs<br />
Omlette<br />
21 - 22 Minutes<br />
11 - 12 Minutes<br />
12 - 13 Minutes<br />
10 - 11 Minutes<br />
11 - 12 Minutes<br />
8 Minutes<br />
8 Minutes<br />
12 Minutes<br />
12 Minutes<br />
14 Minutes<br />
15g butter<br />
2 eggs (medium)<br />
30ml (2 tbsp) milk<br />
salt & pepper<br />
15g butter<br />
4 eggs (medium)<br />
90ml (6 tbsp) milk<br />
salt & pepper<br />
70%<br />
70%<br />
70%<br />
70%<br />
70%<br />
70%<br />
70%<br />
70%<br />
70%<br />
70%<br />
70%<br />
100%<br />
Add 400ml (14fl.oz) boiling water/100g rice.<br />
Do not cover. Stir twice during cooking.<br />
Add 300ml (1/2 pint) boiling water/100g pasta.<br />
Do not cover. Stir twice during cooking.<br />
Add 300ml (1/2 pint) boiling water/100g pasta.<br />
Do not cover. Stir twice during cooking.<br />
Add 300ml (1/2 pint) boiling water/100g pasta.<br />
Do not cover. Stir twice during cooking.<br />
Add 300ml (1/2 pint) boiling water/100g pasta.<br />
Do not cover. Stir twice during cooking.<br />
Add 300ml (1/2 pint) boiling water/100g pasta.<br />
Do not cover. Stir twice during cooking.<br />
Add 300ml (1/2 pint) boiling water/100g pasta.<br />
Do not cover. Stir twice during cooking.<br />
Add 300ml (1/2 pint) boiling water/100g pasta.<br />
Do not cover. Stir twice during cooking.<br />
Add 300ml (1/2 pint) boiling water/100g pasta.<br />
Do not cover. Stir twice during cooking.<br />
Add 300ml (1/2 pint) boiling water/100g pasta.<br />
Do not cover. Stir twice during cooking.<br />
1 Melt the butter in a bowl on 70%<br />
for 30 seconds.<br />
2 Add the eggs, milk and seasoning and<br />
mix well.<br />
3 Cook on 70% for 3 minutes, stirring<br />
every 30 seconds.<br />
1 Whisk together eggs and milk. Season.<br />
2 Place butter in a 25cm flan dish.<br />
Heat on 100% for 1 minute, until melted.<br />
Coat the dish with the melted butter.<br />
3 Pour omelette mixture into flan dish. Cook<br />
on 100% for 2 minutes. Whisk mixture and<br />
cook again on 100% for 4 minutes.<br />
2 Minutes<br />
2 Minutes<br />
2 Minutes<br />
2 Minutes<br />
2 Minutes<br />
2 Minutes<br />
2 Minutes<br />
2 Minutes<br />
2 Minutes<br />
2 Minutes<br />
30 Seconds<br />
• Ensure you read all cookery notes on page 35.<br />
• Eggs and Fresh Pasta are cooked from chilled (5°C).<br />
❇ Cooking Time: Cooking time is constant for any quantity of rice or pasta, quantity of boiling water has to be<br />
adjusted according to quantity of rice or pasta, see Method.<br />
● Standing Time: After standing, rinse rice and pasta in boiling water prior to serving.<br />
38
GRILL - 3 COOKING CHART<br />
FOOD COOKING METHOD COOKING<br />
TIME<br />
MODE<br />
Tea Cakes and<br />
Muffins<br />
4 - 5 Minutes for<br />
1 - 6 halves<br />
Slice in half. Place directly onto the turntable.<br />
Turn over halfway through cooking.<br />
GRILL - 3<br />
Crumpets<br />
Cheese on Toast<br />
Oven Chips<br />
(thin cut)<br />
Oven Chips<br />
(standard cut)<br />
Oven Chips<br />
(thick cut)<br />
Bacon<br />
Gammon Steak<br />
Sausages (thin)<br />
Sausages (thick)<br />
Beefburgers<br />
(chilled)<br />
Beefburgers<br />
(frozen)<br />
Fish Fingers<br />
(frozen)<br />
5 - 6 Minutes for<br />
1 - 6 crumpets<br />
6 Minutes for<br />
2 slices<br />
6 - 7 Minutes for 100g<br />
8 - 9 Minutes for 200g<br />
10 - 11 Minutes for 300g<br />
6 - 7 Minutes for 100g<br />
8 - 9 Minutes for 200g<br />
10 - 11 Minutes for 300g<br />
8 - 9 Minutes for 200g<br />
11 - 12 Minutes for 300g<br />
13 - 14 Minutes for 400g<br />
9 - 10 Minutes for<br />
1 - 6 rashers<br />
8 - 9 Minutes for 225g<br />
13 - 14 Minutes for 450g<br />
8 Minutes for 225g<br />
12 Minutes for 450g<br />
9 Minutes for 225g<br />
12 Minutes for 450g<br />
9 Minutes for 225g<br />
(2 burgers)<br />
12 Minutes for 450g<br />
(4 burgers)<br />
9 Minutes for 225g<br />
(4 burgers)<br />
12 Minutes for 450g<br />
(8 burgers)<br />
10 - 11 Minutes for<br />
1 - 12 fingers<br />
NOTES: • Chilled foods are cooked from 5°C.<br />
• Frozen foods are cooked from -18°C.<br />
• No standing time is required for the foods in this chart.<br />
Place directly onto the turntable.<br />
Turn over halfway through cooking.<br />
Place bread directly onto the turntable.<br />
Grill for 3 minutes.<br />
Turn over and cover with 80g (3oz) grated cheese.<br />
Grill for 3 minutes.<br />
Place directly onto the turntable.<br />
Turn over 3/4 of the way through cooking.<br />
Place directly onto the turntable.<br />
Turn over 3/4 of the way through cooking.<br />
Place directly onto the turntable.<br />
Turn over 3/4 of the way through cooking.<br />
Place in a flan dish on the turntable.<br />
Turn over 3/4 of the way through cooking.<br />
Place directly onto the turntable.<br />
Turn over halfway through cooking.<br />
Pierce skin, place directly onto the turntable.<br />
Turn over twice during cooking.<br />
Pierce skin, place directly onto the turntable.<br />
Turn over twice during cooking.<br />
Place directly onto the turntable.<br />
Turn over 3/4 of the way through cooking.<br />
Place directly onto the turntable.<br />
Turn over 3/4 of the way through cooking.<br />
Place directly onto the turntable.<br />
Turn over halfway through cooking.<br />
GRILL - 3<br />
GRILL - 3<br />
GRILL - 3<br />
GRILL - 3<br />
GRILL - 3<br />
GRILL - 3<br />
GRILL - 3<br />
GRILL - 3<br />
GRILL - 3<br />
GRILL - 3<br />
GRILL - 3<br />
GRILL - 3<br />
39
DUAL -1 COOKING CHART<br />
FOOD COOKING METHOD COOKING<br />
TIME<br />
MODE<br />
Beef (rare)<br />
(chilled)<br />
10 - 11 Minutes<br />
per 450g<br />
Place on the low rack.<br />
Calculate cooking time.<br />
DUAL - 1<br />
160°C, 50%<br />
Beef/Lamb<br />
(medium)<br />
(chilled)<br />
Beef/Lamb<br />
(well done)<br />
(chilled)<br />
Pork<br />
(chilled)<br />
Poultry*<br />
(Max. 31/2kg)<br />
(chilled)<br />
Fish<br />
(Fillets, Steaks,<br />
whole) (chilled)<br />
Sausage Rolls<br />
(uncooked,<br />
frozen)<br />
Garlic Bread<br />
(chilled)<br />
Garlic Bread<br />
(frozen)<br />
Baked<br />
Potatoes<br />
Roast<br />
Potatoes<br />
13 - 14 Minutes<br />
per 450g<br />
17 - 18 Minutes<br />
per 450g<br />
20 - 21 Minutes<br />
per 450g<br />
10 - 11 Minutes<br />
per 450g<br />
15 Minutes<br />
per 450g<br />
14 - 15 Minutes<br />
for 6 sausage<br />
rolls (approx.<br />
50g each)<br />
6 Minutes for 1<br />
baguette<br />
6 Minutes for 1<br />
baguette<br />
19 - 20 Minutes<br />
for 2 potatoes<br />
(250g each)<br />
30 - 35 Minutes<br />
for 675g<br />
potatoes<br />
Place on the low rack.<br />
Calculate cooking time.<br />
Place on the low rack.<br />
Calculate cooking time.<br />
Place on the low rack.<br />
Calculate the cooking time.<br />
Place breast side up on the low rack.<br />
Stand for 10 minutes after cooking.<br />
Preheat oven to 200°C.<br />
Place in a flan dish on the low rack.<br />
Stand for 2 - 3 minutes after cooking.<br />
Preheat oven to 220°C.<br />
Glaze and place in a flan dish on the low rack.<br />
Stand for 3 - 4 minutes after cooking.<br />
Preheat oven to 250°C. Remove any packaging.<br />
Place in a flan dish on the low rack.<br />
No standing time is required.<br />
Preheat oven to 250°C. Remove any packaging.<br />
Place in a flan dish on the low rack.<br />
No standing time is required.<br />
Preheat oven to 250°C.<br />
Pierce each potato in several places.<br />
Place on the low rack.<br />
No standing time is required.<br />
Preheat oven to 250°C.<br />
Cut into even sized pieces. Brush with oil.<br />
Place in a flan dish on the low rack.<br />
No standing time is required.<br />
* For poultry weighing 2.4kg or more, place in a flan dish on the turntable.<br />
NOTES: • Chilled foods are cooked from 5°C.<br />
• Frozen foods are cooked from -18°C.<br />
DUAL - 1<br />
160°C, 50%<br />
DUAL - 1<br />
160°C, 50%<br />
DUAL - 1<br />
160°C, 50%<br />
DUAL - 1<br />
200°C, 50%<br />
Preheat 220°C<br />
DUAL - 1<br />
220°C, 30%<br />
Preheat 220°C<br />
DUAL - 1<br />
220°C, 30%<br />
Preheat 250°C<br />
DUAL - 1<br />
250°C, 10%<br />
Preheat 250°C<br />
DUAL - 1<br />
250°C, 30%<br />
Preheat 250°C<br />
DUAL - 1<br />
250°C, 50%<br />
Preheat 220°C<br />
DUAL - 1<br />
220°C, 30%<br />
40
DUAL - 2 COOKING CHART<br />
FOOD COOKING METHOD COOKING<br />
TIME<br />
MODE<br />
10 - 11 Minutes<br />
per 450g<br />
Stage 1: 70%<br />
Beef rare<br />
(chilled)<br />
Beef/Lamb<br />
medium<br />
(chilled)<br />
Beef/Lamb<br />
(Well done)<br />
(chilled)<br />
Pork<br />
(chilled)<br />
Poultry<br />
(Max. 1.8kg/4lb)<br />
(chilled)<br />
Chicken Fillets<br />
(with skin)<br />
(chilled)<br />
Chicken Legs<br />
(chilled)<br />
Chicken Breasts<br />
(chilled)<br />
12 - 13 Minutes<br />
per 450g<br />
16 - 17 Minutes<br />
per 450g<br />
17 - 18 Minutes<br />
per 450g<br />
11 - 12 Minutes<br />
per 450g<br />
10 - 11 Minutes<br />
per 450g<br />
9 - 10 Minutes<br />
per 450g<br />
13 - 14 Minutes<br />
per 450g<br />
Place fat side down in a flan dish on the low rack.<br />
Calculate the cooking time.<br />
Use Sequence cooking. (Page 22).<br />
Stage 1: Cook on 70% throughout cooking time, apart<br />
from the last 4 minutes. Turn over, remove juices<br />
halfway through Stage 1.<br />
Stage 2: Cook on DUAL - 2, 70% for the final 4 minutes of<br />
cooking time. Stand for 10 minutes after cooking.<br />
As above<br />
As above<br />
Place fat side down in a flan dish on the low rack.<br />
Calculate the cooking time.<br />
Use Sequence cooking. (Page 22).<br />
Stage 1: Cook on 70% throughout, apart from the last 4<br />
minutes. Turn over, remove juices halfway through<br />
Stage 1.<br />
Stage 2: Cook on DUAL - 2, 70% for the final 4 minutes<br />
of cooking time. Stand for 10 minutes after cooking.<br />
Place breast side down in a flan dish on the low rack.<br />
Calculate the cooking time.<br />
Use Sequence cooking. (Page 22).<br />
Stage 1: Cook on 70% throughout cooking time, apart<br />
from the last 3 minutes. Turn over, remove juices<br />
halfway through Stage 1.<br />
Stage 2: Cook on DUAL - 2, 70% for the final 3 minutes of<br />
cooking time. Stand for 10 minutes after cooking.<br />
Place skin side down in a flan dish on the low rack.<br />
Calculate the cooking time.<br />
Use Sequence cooking. (Page 22).<br />
Stage 1: Cook on 70% for the first half of cooking time.<br />
Turn over, remove juices after Stage 1.<br />
Stage 2: Cook on DUAL - 2, 70% for the second half of<br />
cooking time. Stand for 2 minutes after cooking.<br />
As above<br />
As above<br />
Stage 2:<br />
DUAL - 2, 70%<br />
As above<br />
As above<br />
Stage 1: 70%<br />
Stage 2:<br />
DUAL - 2, 70%<br />
Stage 1: 70%<br />
Stage 2:<br />
DUAL - 2, 70%<br />
Stage 1: 70%<br />
Stage 2:<br />
DUAL - 2, 70%<br />
As above<br />
As above<br />
NOTES: • Chilled foods are cooked from 5°C.<br />
• Frozen foods are cooked from -18°C.<br />
• No standing time is required for the foods in this chart.<br />
41
DUAL - 2 COOKING CHART<br />
FOOD COOKING METHOD COOKING<br />
TIME<br />
MODE<br />
10 Minutes<br />
per 450g<br />
Stage 1:<br />
DUAL - 2, 70%<br />
Lamb Chops<br />
(chilled)<br />
Pork Chops<br />
(Boneless)<br />
(chilled)<br />
Pork Chops<br />
(with bone)<br />
(chilled)<br />
Crispy Crumb<br />
Foods<br />
(chilled)<br />
Crispy Crumb<br />
Foods<br />
(frozen)<br />
Pizza<br />
(thin and deep)<br />
(chilled)<br />
14 Minutes<br />
per 450g<br />
16 Minutes<br />
per 450g<br />
7 - 8 Minutes<br />
for 100g<br />
11 - 12 Minutes<br />
for 300g<br />
14 - 15 Minutes<br />
for 500g<br />
8 - 9 Minutes<br />
for 100g<br />
11 - 12 Minutes<br />
for 300g<br />
15 - 16 Minutes<br />
for 500g<br />
4 Mins. 30 Secs.<br />
for 200g<br />
6 Mins. 30 Secs.<br />
for 400g<br />
8 Mins. 30 Secs.<br />
for 800g<br />
Place in a flan dish on the low rack.<br />
Calculate the cooking time.<br />
Use Sequence cooking. (Page 22).<br />
Stage 1: Cook on DUAL - 2, 70% throughout, apart from the<br />
last 3 minutes. Turn over, remove juices after Stage 1.<br />
Stage 2: Cook on GRILL - 1 for the final 3 minutes of<br />
cooking time.<br />
As above<br />
Place in a flan dish on the low rack.<br />
Use Sequence cooking. (Page 22).<br />
Stage 1: Cook on DUAL - 2, 30% for the first half of cooking<br />
time. Turn over after Stage 1.<br />
Stage 2: Cook on GRILL - 1 for second half of cooking time.<br />
As above.<br />
As above.<br />
Place in a flan dish on the low rack.<br />
Use Sequence cooking. (Page 22).<br />
Stage 1: Cook on DUAL GRILL - 1, 50% for the first half of<br />
cooking time. Turn over after Stage 1.<br />
Stage 2: Cook on GRILL - 1 for second half of cooking time.<br />
As above.<br />
As above.<br />
Remove all packaging and place directly onto the turntable.<br />
Use Sequence cooking. (Page 22).<br />
Stage 1: Cook on DUAL - 2, 100% for 1 min and 30 secs.<br />
Stage 2: Cook on GRILL - 3 for 3 minutes.<br />
Stage 1: Cook on DUAL - 2, 100% for 2 Mins and 30 secs.<br />
Stage 2: Cook on GRILL - 3 for 4 minutes.<br />
Stage 1: Cook on DUAL - 2, 100% for 3 mins and 30 secs.<br />
Stage 2: Cook on GRILL - 3 for 5 minutes.<br />
NOTES: • Chilled foods are cooked from 5°C.<br />
• Frozen foods are cooked from -18°C.<br />
• No standing time is required for the foods in this chart.<br />
Stage 2:<br />
GRILL - 1<br />
Stage 1:<br />
DUAL - 2, 70%<br />
Stage 2:<br />
GRILL - 1<br />
As above<br />
Stage 1:<br />
DUAL - 2, 30%<br />
Stage 2:<br />
GRILL - 1<br />
As above.<br />
As above.<br />
Stage 1:<br />
DUAL GRILL - 1,<br />
50%<br />
Stage 2:<br />
GRILL - 1<br />
As above.<br />
As above.<br />
Stage 1:<br />
DUAL - 2, 100%<br />
Stage 2:<br />
GRILL - 3<br />
As above.<br />
As above.<br />
42
DUAL - 2 COOKING CHART<br />
FOOD COOKING METHOD COOKING<br />
TIME<br />
MODE<br />
Remove all packaging and place directly onto the turntable. Stage 1:<br />
Use Sequence cooking. (Page 22).<br />
DUAL - 2, 100%<br />
Pizza<br />
(thin and deep)<br />
(frozen)<br />
Baked Potatoes<br />
(fresh)<br />
Roast Potatoes<br />
(fresh)<br />
Garlic Bread<br />
(chilled)<br />
Garlic Bread<br />
(frozen)<br />
Toasted<br />
Sandwich<br />
4 Mins. 30 Secs.<br />
for 200g<br />
6 Mins. 30 Secs.<br />
for 400g<br />
8 Mins. 30 Secs.<br />
for 800g<br />
16 - 17 Minutes<br />
for 2 Potatoes<br />
(250g each)<br />
20 - 25 Minutes<br />
675g<br />
Potatoes<br />
5 Minutes<br />
for 1 baguette<br />
6 Minutes<br />
for 1 baguette<br />
5 Minutes<br />
for 1 sandwich<br />
6 Minutes<br />
for 2 sandwiches<br />
Stage 1: Cook on DUAL - 2, 100% for 1 min and 30 sec.<br />
Stage 2: Cook on GRILL - 3 for 3 minutes.<br />
Stage 1: Cook on DUAL - 2, 100% for 2 min and 30 sec.<br />
Stage 2: Cook on GRILL - 3 for 4 minutes.<br />
Stage 1: Cook on DUAL - 2, 100% for 3 min and 30 sec.<br />
Stage 2: Cook on GRILL - 3 for 5 minutes.<br />
Pierce each potato in several places.<br />
Place in a flan dish on the low rack.<br />
Turn over halfway through cooking time.<br />
Cut into even sized pieces. Brush with oil.<br />
Place in a flan dish on the low rack.<br />
Turn over halfway through cooking time.<br />
Remove any packaging.<br />
Place in a flan dish on the low rack.<br />
Remove any packaging.<br />
Place in a flan dish on the low rack.<br />
Prepare sandwich:<br />
Place two slices of ham and 50g grated cheese between<br />
2 slices of bread and butter.<br />
Place sandwich directly onto the turntable.<br />
Use Sequence cooking. (Page 22).<br />
Stage 1: Cook on GRILL - 3, for 4 minutes.<br />
Stage 2: Cook on DUAL - 3, 30% for 1 minute.<br />
Prepare sandwich:<br />
As above, double the ingredients.<br />
Place sandwiches directly onto the turntable.<br />
Use Sequence cooking. (Page 22).<br />
Stage 1: Cook on GRILL - 3, for 4 minutes.<br />
Stage 2: Cook on DUAL - 3, 30% for 2 minutes.<br />
NOTES: • Chilled foods are cooked from 5°C.<br />
• Frozen foods are cooked from -18°C.<br />
• No standing time is required for the foods in this chart.<br />
Stage 2:<br />
GRILL - 3<br />
As above.<br />
As above.<br />
DUAL - 2, 50%<br />
DUAL - 2, 50%<br />
DUAL - 2, 10%<br />
DUAL - 2, 30%<br />
Stage 1:<br />
GRILL - 3<br />
Stage 2:<br />
DUAL - 3, 30%<br />
As above<br />
43
REHEATING CHART<br />
FOOD COOKING METHOD COOKING<br />
TIME<br />
MODE<br />
6 - 7 Minutes for<br />
425g can<br />
70%<br />
Canned foods<br />
(soups, beans,<br />
vegetables, etc.)<br />
Christmas<br />
pudding<br />
Sausage rolls<br />
(cooked, chilled<br />
approx. 50g (2oz)<br />
each)<br />
Quiche,<br />
(cooked, chilled)<br />
Meat Pie<br />
(cooked, chilled)<br />
Fruit Pie<br />
(cooked, chilled)<br />
Cornish Pasties<br />
(cooked, chilled)<br />
Bread rolls/<br />
Croissants<br />
Garlic bread<br />
(cooked, chilled)<br />
Pizza<br />
(cooked, chilled)<br />
Pizza<br />
(cooked, frozen)<br />
40 - 50 seconds for<br />
125g slice<br />
1 Minute for<br />
175g pudding<br />
4 - 5 Minutes for<br />
450g pudding<br />
5 Minutes for<br />
6 sausage rolls<br />
6 Minutes for<br />
225g quiche<br />
8 Minutes for<br />
450g quiche<br />
8 Minutes for<br />
225g pie<br />
12 Minutes for<br />
450g pie<br />
15 - 30 Seconds for<br />
50g - 70g pie<br />
6 Minutes for<br />
225g pie<br />
10 Minutes for<br />
450g pie<br />
4 Minutes for<br />
175g<br />
5 Minutes for<br />
225g<br />
20 - 30 seconds<br />
for 2<br />
3 Minutes for 1<br />
(25cm) baguette<br />
4 - 5 Seconds for<br />
125g<br />
2 - 3 Minutes for<br />
400g<br />
2 - 3 Minutes for<br />
125g<br />
5 - 6 Minutes for<br />
400g<br />
Remove from the can. Place in a dish, cover. Stir<br />
halfway through cooking.<br />
Stand for 2 minutes after cooking.<br />
Place in a flan dish. Do not exceed cooking time<br />
advised by food manufacturer.<br />
Stand for 30 seconds after cooking.<br />
As above<br />
Place in a flan dish. Do not exceed cooking time<br />
advised by food manufacturer.<br />
Stand for 1 minute after cooking.<br />
Place in a flan dish on the low rack.<br />
Stand for 2 minutes after cooking.<br />
Remove foil container.<br />
Place in a flan dish on the turntable.<br />
Stand for 3 minutes after cooking.<br />
Remove foil container.<br />
Place in a flan dish on the low rack.<br />
Stand for 3 minutes after cooking.<br />
Remove foil container. Place in a flan dish on the<br />
turntable. Stand for 1 minute after cooking.<br />
Remove foil container.<br />
Place in a flan dish on the low rack.<br />
Stand for 3 minutes after cooking.<br />
Place in a flan dish on the low rack.<br />
Stand for 3 minutes after cooking.<br />
Place on the turntable.<br />
Place on the turntable, uncovered.<br />
Place on a plate, uncovered.<br />
Place on a plate, uncovered.<br />
Place on a plate, uncovered.<br />
Place on a plate, uncovered.<br />
NOTES:<br />
• Take care when heating foods with high sugar or fat content, for example, Christmas pudding and mince pies.<br />
• DO NOT EXCEED THE REHEATING TIMES GIVEN IN THE CHART ABOVE.<br />
44<br />
70%<br />
70%<br />
70%<br />
DUAL - 1<br />
220°C, 30%<br />
DUAL - 1<br />
220°C, 50%<br />
DUAL - 1<br />
250°C, 30%<br />
50%<br />
DUAL - 1<br />
250°C, 10%<br />
DUAL - 1<br />
220°C, 50%<br />
70%<br />
100%<br />
100%<br />
100%
RECIPES<br />
Serves 4 - 6<br />
75g celery, sliced<br />
125g carrots, chopped<br />
2 cloves garlic, crushed (see tip, page 48)<br />
100g leeks, sliced<br />
125g black eyed beans, cooked<br />
125g chick peas, chopped<br />
125g kidney beans, cooked<br />
100g sweetcorn, canned<br />
400g chopped tomatoes, canned<br />
1 pint hot vegetable stock<br />
salt and pepper to taste<br />
VEGETABLE & BEAN SOUP<br />
1 Place the celery, carrots, garlic and leeks in a 2.5 litre<br />
bowl and cook on 100% for 3 minutes.<br />
2 Place the remaining ingredients into the bowl and<br />
mix well.<br />
3 Cook on 50% for 35 minutes, stirring 2 - 3 times<br />
during cooking.<br />
Serves 4<br />
15ml (1 tbsp) sunflower oil<br />
225g onion, finely chopped<br />
400g broccoli, broken into small florets<br />
25g plain flour<br />
1 litre (1 3 /4 pints) hot vegetable stock<br />
300ml ( 1 /2 pint) milk<br />
225g Double Gloucester cheese, grated<br />
salt and pepper to taste<br />
BROCCOLI & CHEESE SOUP<br />
1 Place oil, onion and broccoli in a large bowl, mix well.<br />
Cover and cook on 100% for 5 minutes.<br />
2 Stir in the flour to form a paste, add the stock, milk<br />
and cheese, mix well. Cover and cook on 100% for 10<br />
minutes.<br />
3 Blend in a food processor. Return to bowl and season.<br />
Heat on 70% for 18 minutes, stir 3 - 4 times.<br />
Serves 2 - 4<br />
50g butter<br />
50g fresh brown breadcrumbs<br />
75g cooked ham, finely chopped<br />
90ml (6 tbsp) double cream<br />
salt and pepper to taste<br />
5ml (1 tsp) fresh parsley, chopped<br />
2 large ripe avocados<br />
15ml (1 tbsp) lemon juice<br />
75g Double Gloucester cheese, grated<br />
fresh parsley sprigs to garnish<br />
AVOCADO AU GRATIN<br />
1 Place the butter in a bowl and heat on 100% for<br />
30 seconds. Stir in the breadcrumbs and ham, add<br />
enough cream to bind the mixture. Season with salt<br />
and pepper to taste and stir in the parsley.<br />
2 Cut the avocados in half, remove the stone and brush<br />
the flesh with lemon juice. Fill each avocado half with<br />
the breadcrumb mixture.<br />
3 Place the avocados in a large flan dish and sprinkle<br />
with the grated cheese.<br />
4 Place the dish on the low rack, use sequence<br />
programming to cook on 100% for 2 minutes, then<br />
on GRILL - 1 for 8 minutes until brown and crispy.<br />
Serves 2 - 3<br />
6 medium open cap mushrooms<br />
75g butter<br />
2 cloves garlic, crushed (see tip, page 48)<br />
75g fresh breadcrumbs<br />
50g cheese, grated<br />
CRISPY STUFFED MUSHROOMS<br />
1 Remove and chop mushroom stalks. Place mushroom<br />
caps on the turntable, open side up.<br />
2 Heat butter with garlic on 100% for 1 minute, stir<br />
in chopped mushroom stalks and breadcrumbs. Fill<br />
mushrooms with mixture, sprinkle with cheese.<br />
3 Cook on GRILL - 3 for 10 minutes.<br />
Stilton stuffed mushrooms: Omit garlic and grated cheese. Add 100g Stilton crumbled at Stage 2.<br />
45
RECIPES<br />
Serves 4<br />
200g white long grain rice<br />
600ml (1 pint) hot chicken stock<br />
2.5ml ( 1 /2 tsp) turmeric<br />
salt and pepper to taste<br />
1 red pepper, seeded and sliced<br />
100g prawns, peeled and cooked<br />
100g peas<br />
100g cockles, cooked<br />
100g mussels, cooked<br />
100g whole baby corn<br />
225g chicken, cooked and chopped<br />
PAELLA<br />
1 Place the rice in a large bowl and add the stock,<br />
turmeric and seasoning. Cook on 70% for 14 - 15<br />
minutes, until the rice is tender, stir 2 - 3 times during<br />
cooking. Drain.<br />
2 Stir in the red pepper, prawns, peas, cockles, mussels,<br />
baby corn and chicken. Cook on 100% for 8 minutes,<br />
stirring after 4 minutes.<br />
Serves 4<br />
4 salmon steaks (approx. 200g each<br />
45ml (3 tbsp) dry white wine<br />
300ml ( 1 /2 pint) mustard sauce (see page 61)<br />
sprig of fresh rosemary to garnish<br />
POACHED SALMON WITH MUSTARD SAUCE<br />
1 Place the salmon steaks in a flan dish, pierce in several<br />
places and add the wine. Cover and cook on 70% for<br />
12 minutes. Allow to stand whilst preparing the sauce.<br />
2 Place salmon steaks in a serving dish, reheat on 70%<br />
for 2 minutes. Serve the sauce separately.<br />
Serves 4<br />
200g canned asparagus, chopped<br />
350g salmon fillet, cooked, flaked<br />
200g cream cheese and chives (see tip, page 51)<br />
salt and pepper to taste<br />
15ml (1 tbsp) fresh dill, chopped<br />
450g puff pastry<br />
1 egg, to glaze<br />
SALMON & CHEESE PARCELS<br />
1 Drain asparagus, place in a bowl with the salmon,<br />
cream cheese, seasoning and dill, mix well.<br />
2 Preheat the oven to convection 200°C.<br />
3 Divide pastry into four and roll out to 17cm squares.<br />
4 Place equal amounts of mixture into the centre of<br />
each square. Brush edges with egg. Form parcels by<br />
folding the corners over the filling. Pinch edges to<br />
form a raised edge. Brush with egg. Place in two large,<br />
greased flan dishes.<br />
5 Place one dish on the low rack, the other on the high<br />
rack. Cook on convection 200°C for 20 minutes.<br />
Swap the trays over and cook for a further 20<br />
minutes until golden.<br />
Serves 6<br />
50g butter<br />
3 cloves garlic, crushed (see tip, page 48)<br />
250g tiger prawns, cooked and peeled<br />
5ml (1 tsp) fresh parsley, chopped<br />
GARLIC PRAWNS<br />
1 Heat the butter on 100% for 30 seconds. Stir in the<br />
garlic and cook on 100% for a further minute.<br />
2 Stir in the prawns and cook on 50% for 7 minutes,<br />
stirring every minute. Sprinkle with parsley to serve.<br />
Serve in ramekin dishes with French bread.<br />
Garlic mushrooms:<br />
Substitute prawns with 250g mushrooms, cut into quarters.<br />
46
RECIPES<br />
Serves 4<br />
450g white fish fillets (Cod or Haddock)<br />
50g butter<br />
275g courgettes, sliced<br />
100g mushrooms, sliced<br />
450ml ( 3 /4 pint) white sauce (see tip, page 61)<br />
2.5ml ( 1 /2 tsp) dried tarragon (see tip, page 55)<br />
2.5ml ( 1 /2 tsp) dried basil (see tip, page 55)<br />
10ml (2 tsp) English mustard powder<br />
TOPPING:<br />
900g potato, peeled and quartered<br />
300ml ( 1 /2 pint) water<br />
100g margarine<br />
60ml (4 tbsp) milk<br />
salt and pepper to taste<br />
100g cheddar cheese, grated<br />
FISH PIE<br />
1 Arrange fish in a single layer in a flan dish.<br />
Cover and cook on 100% for 7 minutes.<br />
2 Place butter, courgettes and mushrooms in a 2.5 litre<br />
(approx. 4 pint) casserole dish. Cover and cook on<br />
100% for 3 minutes.<br />
3 Break the fish into flakes and add to the vegetables.<br />
4 Stir herbs and mustard powder into the sauce.<br />
5 Add to fish mixture.<br />
6 Place the potatoes into a bowl with 300ml ( 1 /2 pint)<br />
water and cook on 100% for 20 minutes, stirring twice.<br />
7 Drain the potatoes and mash with butter, milk and<br />
seasoning.<br />
8 Spread over the fish mixture and sprinkle with the<br />
cheese.<br />
9 Place on the low rack and cook on DUAL - 1, 200°C,<br />
30% for 35 minutes.<br />
Serves 4<br />
5ml (1 tsp) green peppercorns, crushed<br />
15ml (1 tbsp) fresh tarragon<br />
2.5ml ( 1 /2 tsp) salt<br />
4 fresh tuna steaks (approx. 200g each)<br />
juice and grated rind of 2 medium oranges<br />
olive oil to sprinkle<br />
15ml (1 tbsp) cornflour mixed with<br />
15ml (1 tbsp) water<br />
GRILLED TUNA STEAK WITH ORANGE<br />
1 Mix together peppercorns, tarragon and salt. Rub<br />
evenly onto the steaks and arrange in a flan dish, add<br />
orange juice and rind. Sprinkle generously with oil.<br />
Marinade in fridge for 2 - 3 hours.<br />
2 Remove fish from the marinade and place in a flan dish.<br />
3 Place on the low rack and cook on DUAL - 2, 70% for<br />
10 minutes.<br />
4 Stir cornflour mixture into marinade. Heat on 100%<br />
for 4 minutes until thickened, stir after 2 minutes.<br />
5 Return the fish steaks to the sauce and heat on 70%<br />
for 3 - 4 minutes.<br />
Serve with new potatoes and fresh vegetables.<br />
Serves 2 - 4<br />
4 wooden skewers (see tip, page 53)<br />
2 courgettes, cut into 8 chunks<br />
4 medium mushrooms, stalks removed<br />
450g firm fleshed fish skinned and cut<br />
into 16 cubes<br />
4 slices of orange<br />
2 firm medium tomatoes, halved<br />
5ml (1 tsp) fresh dill, chopped<br />
50g butter<br />
FISH KEBABS<br />
1 Thread pieces of courgette, mushroom, fish, orange<br />
and tomato onto each skewer in a regular sequence.<br />
Leave no wood exposed.<br />
2 Heat the dill and butter in a small bowl on 100% for<br />
30 seconds. Brush kebabs with the dill butter, place in<br />
a flan dish on the low rack.<br />
3 Cook on DUAL - 2, 50% for 18 minutes. Turn over<br />
and rearrange the kebabs every 6 minutes.<br />
47
RECIPES<br />
Serves 6<br />
225g carrots, diced<br />
150g celery, sliced<br />
175g onion, finely chopped<br />
600g pork, cubed<br />
400g chopped tomatoes, canned<br />
400g canned apricot halves, drained<br />
2 cloves garlic, crushed (see tip below)<br />
juice and rind of half a lemon<br />
150ml ( 1 /4 pint) hot stock<br />
salt and pepper to taste<br />
CITRUS PORK CASSEROLE<br />
1 Place the carrots, celery and onion into a 2.5 litre<br />
casserole dish and cook on 100% for 4 minutes.<br />
2 Add the remaining ingredients and stir thoroughly.<br />
3 Place the dish on the low rack and cook on<br />
DUAL - 1, 180°C, 50% for 35 minutes.<br />
Microwave Tip: Peeling garlic easily<br />
Place 3 - 4 cloves of garlic on the turntable. Heat on 100% for 30 seconds, squeeze at one end until<br />
the clove pops out.<br />
Serves 4<br />
45ml (3 tbsp) vegetable oil<br />
150g onion, finely chopped<br />
100g celery, finely chopped<br />
2 cloves garlic, crushed (see tip above)<br />
75g bacon, finely chopped<br />
1 bay leaf<br />
400g canned, chopped tomatoes<br />
30ml (2 tbsp) tomato purée<br />
450g lean minced beef<br />
15ml (1 tbsp) dried mixed herbs (see tip, page 55)<br />
450g canned red kidney beans<br />
5 - 15ml (1 - 3 tsp) chilli powder, to taste<br />
300ml ( 1 /2 pint) red wine<br />
300ml ( 1 /2 pint) hot beef stock<br />
salt and pepper to taste<br />
CHILLI CON CARNE<br />
1 Place oil, onion, celery, garlic and bacon into a large<br />
bowl, mix well. Cover and cook on 100% for 7 - 8<br />
minutes.<br />
2 Add the bay leaf, tomatoes, purée and minced beef<br />
to the vegetable mixture. Cook on 100% for 9 - 10<br />
minutes, stir 2 - 3 times during cooking.<br />
3 Add herbs, kidney beans, chilli powder, wine and<br />
stock. Season, mix well. Cover and cook on 100%<br />
for 5 minutes, then for 21 - 22 minutes on 50% until<br />
sauce is thick. Stir 2 - 3 times during cooking.<br />
Sheperds Make as above, omit the wine. Place in a<br />
Pie: dish and top with 700g mashed potato. Place<br />
on turntable and cook on DUAL - 2, 70%<br />
for 9 - 10 minutes until evenly brown.<br />
Serves 4<br />
225g lean minced beef, pork or lamb<br />
2 cloves garlic, crushed (see tip above)<br />
75g onion, chopped<br />
2 fresh, green chillis, chopped<br />
225g canned, chopped tomatoes<br />
100g canned, red kidney beans<br />
8 taco shells, pre-cooked<br />
175g Cheddar cheese, grated<br />
MEXICAN TACOS<br />
1 Place the mince, garlic and onion in a bowl, mix well.<br />
Cook on 100% for 7 - 8 minutes, stir twice.<br />
2 Stir in chillis, tomatoes and beans. Cook on 100%<br />
for 18 minutes. Place taco shells on kitchen paper on<br />
turntable. Heat on 100% for 2 minutes. Fill with chilli<br />
bean mixture, sprinkle with cheese.<br />
3 Pack tacos together, open end up in a large casserole<br />
or flan dish. Place on turntable, cook on DUAL - 2,<br />
30% for 7 - 8 minutes.<br />
48
RECIPES<br />
Serves 4<br />
450g stewing steak, chopped<br />
100g kidney, chopped<br />
125g onion, chopped<br />
2.5ml ( 1 /2 tsp) dried mixed herbs (see tip, page 55)<br />
450ml ( 3 /4 pint) beef stock<br />
15ml (1 tbsp) cornflour mixed with a little water<br />
PASTRY:<br />
225g self-raising flour<br />
2.5ml ( 1 /2 tsp) salt<br />
5ml (1 tsp) baking powder<br />
100g suet<br />
150ml ( 1 /4 pint) cold water<br />
15ml (1 tbsp) milk to glaze<br />
STEAK & KIDNEY PUDDING<br />
1 Place steak, kidney, onion, mixed herbs and stock<br />
in a casserole dish. Cover and cook on 70% for 40<br />
minutes. Stir after half the cooking time and add the<br />
cornflour to thicken.<br />
2 To make the pastry, place the flour, salt, baking<br />
powder and suet in a bowl, mix well.<br />
3 Add enough cold water to form a soft dough. Roll<br />
out 2 /3 of the pastry and use it to line the base and<br />
sides of a greased 1.2 litre (2 pint) pudding basin.<br />
4 Fill pastry lined basin with meat leaving room for the<br />
lid. Roll out remaining pastry, cut out a circle to cover<br />
pudding. Brush with milk. Make a slit in the centre.<br />
Cover with cling film, pierce and cook on 100% for<br />
14 minutes.<br />
Serves 6<br />
60ml (4 tbsp) plain flour<br />
salt and pepper<br />
15ml (1 tbsp) dried mixed herbs (see tip, page 55)<br />
500g braising steak, sliced thinly<br />
75g streaky bacon rashers, chopped<br />
25g butter<br />
225g carrots, sliced<br />
225g courgettes, sliced<br />
100g baby onions, whole<br />
225g potatoes, par-boiled and chopped<br />
300ml ( 1 /2 pint) hot beef stock<br />
300ml ( 1 /2 pint) red wine<br />
30ml (2 tbsp) cornflour blended with water<br />
CASSEROLE<br />
1 Mix together the flour, salt, pepper and herbs. Toss<br />
the beef and bacon in the seasoned flour until well<br />
coated.<br />
2 Put the butter in a 2.5 litre (approx. 4 pint) casserole<br />
dish and melt on 100% for 30 seconds. Stir in the<br />
beef, bacon, carrots, courgettes, onions and potatoes.<br />
3 Pour in the beef stock, wine and blended cornflour,<br />
mix well. Cover with lid, place on low rack and cook<br />
on DUAL - 1, 180°C, 30% for 50 minutes. Stir 2 - 3<br />
times.<br />
4 Leave to stand for 5 minutes before serving, so that<br />
the meat relaxes to improve the texture.<br />
Serves 6<br />
30ml (2 tbsp) cornflour<br />
150ml ( 1 /4 pint) soured cream<br />
45ml (3 tbsp) clear honey<br />
45ml (3 tbsp) wholegrain mustard<br />
150ml ( 1 /4 pint) white wine<br />
900g pork, cubed<br />
250g fresh apples, chopped<br />
125g onion, chopped<br />
175g puff pastry<br />
eggwash to glaze<br />
PORK MUSTARD SURPRISE<br />
1 Mix the cornflour and cream together in a 2.5 litre<br />
(approx. 4 pint) casserole dish.<br />
2 Stir in the honey, mustard, wine and stock thoroughly.<br />
3 Add the pork, apples and onion, mixing well.<br />
4 Place the dish on the low rack and cook on<br />
DUAL - 1, 180°C, 50% for 35 minutes, stirring twice<br />
during cooking.<br />
5 Roll out the pastry to fit the top of the dish. Cover<br />
the filling wth the pastry and brush with egg to glaze.<br />
6 Place the dish on the low rack and cook on 220°C<br />
for 15 minutes.<br />
49
RECIPES<br />
Serves 4<br />
MARINADE:<br />
15ml (1 tbsp) groundnut oil<br />
15ml (1 tbsp) lemon juice<br />
60ml (4 tbsp) satay sauce<br />
1 clove garlic, crushed (see tip, page 48)<br />
Tabasco sauce to taste<br />
450g chicken fillets, cubed<br />
4 wooden skewers (see tip, page 53)<br />
CHICKEN SATAY<br />
1 Place all the marinade ingredients in a large bowl, mix<br />
well. Stir in the chicken, refrigerate for 2 hours to<br />
marinate.<br />
2 Thread the chicken onto skewers leaving no wood<br />
exposed. Place in a large flan dish on the high rack.<br />
Cook on DUAL - 2, 70% for 12 - 14 minutes. Turn<br />
over and rearrange skewers every 3 - 4 minutes.<br />
Serves 4<br />
4 large chicken breast fillets, skinned<br />
(approx. 200g each)<br />
100g Camembert, finely chopped<br />
3 spring onions, finely chopped<br />
2.5ml ( 1 /2 tsp) dried parsley<br />
salt and pepper to taste<br />
cocktail sticks to secure<br />
75g Cheddar cheese, grated<br />
CHICKEN & CAMEMBERT ROLLS<br />
1 Open out chicken breasts, flatten with a rolling pin.<br />
2 Place Camembert, onions, parsley and seasoning in<br />
a bowl, mix well. Place a quarter of the mixture at<br />
one end of each breast. Roll up tight and secure with<br />
cocktail sticks. Ensure no filling is visible.<br />
3 Place the breasts seam side upwards in a flan dish.<br />
4 Place on the low rack and cook on DUAL - 2, 70% for<br />
18 minutes, turn over and add cheese after 8 minutes.<br />
Sprinkle with toasted almonds to serve.<br />
Microwave Tip: Toasting Almonds<br />
Place 25g (1oz) almonds in a shallow flan dish with a knob of butter, heat on 100% for 3 minutes, stir<br />
every minute until golden.<br />
Serves 6<br />
1 red chilli, chopped<br />
2 green chillies, chopped<br />
125g onion, chopped<br />
2.5cm root ginger, chopped<br />
1 piece lemon grass, chopped<br />
10ml (2 tsp) paprika<br />
2.5ml ( 1 /2 tsp) ground turmeric<br />
2.5ml ( 1 /2 tsp) cumin seeds<br />
2.5ml ( 1 /2 tsp) coriander seeds<br />
30ml (2 tbsp) thai fish sauce<br />
6 chicken fillets (approx. 200g each)<br />
400ml (14 fl.oz) coconut milk<br />
150ml ( 1 /4 pint) hot chicken stock<br />
salt and pepper to taste<br />
Fresh coriander, chopped, to garnish<br />
THAI CHICKEN<br />
1 Place the chillies, onion, ginger, lemon grass, spices and<br />
seeds into a 2.5 litre (approx. 4 pints) casserole dish,<br />
mix well and cook on 100% for 3 minutes.<br />
2 Add the remaining ingredients, stirring thoroughly.<br />
3 Place the dish on the low rack and cook on DUAL -1,<br />
180°C, 30% for 45 minutes.<br />
Sprinkle with coriander and serve with rice.<br />
50
RECIPES<br />
Serves 4 - 6<br />
125g green peppers, chunks<br />
125g red peppers, chunks<br />
125g yellow peppers, chunks<br />
head of garlic, seperate cloves and peel<br />
150g onion, sliced<br />
800g chicken fillets, cubed<br />
400g chopped tomatoes, canned<br />
5ml (1 tsp) caster sugar<br />
10ml (2 tsp) fresh basil, chopped<br />
salt and pepper to taste<br />
GARLIC CHICKEN<br />
1 Place the peppers, garlic, onion and chicken into a 2.5<br />
litre (approx. 4 pints) bowl and cook on 100% for 4<br />
minutes.<br />
2 Add the remaining ingredients and mix well.<br />
3 Place on the low rack, cook on DUAL - 1, 180°C,<br />
30% for 45 minutes, stirring 3 - 4 times during<br />
cooking.<br />
Garnish with black olives and fresh basil.<br />
Serves 4<br />
4 chicken fillets (200g each)<br />
45ml (3 tbsp) clear honey<br />
5ml (1 tsp) whole grain mustard<br />
2.5ml ( 1 /2 tsp) dried tarragon (see tip, page 55)<br />
15ml (1 tbsp) tomato purée<br />
150ml ( 1 /4 pint) chicken stock<br />
15ml (1 tbsp) cornfour<br />
salt and pepper<br />
HONEYED CHICKEN<br />
1 Place the chicken breasts in a casserole dish.<br />
2 Mix all remaining ingredients together and pour over<br />
the chicken.<br />
3 Cook on 70% for 22 minutes. Turnover and coat the<br />
chicken with the sauce several times during cooking.<br />
Microwave Tip: Softening crystalised honey<br />
Place 100g honey in a bowl. Heat on 100% for 1 minute until runny.<br />
Microwave Tip: Softening cream cheese<br />
Place 225g cream cheese on a plate. Heat on 30% for 1 minute until soft.<br />
Serves 4<br />
600g chicken, cubed<br />
225g button mushrooms, sliced<br />
225g leeks, sliced<br />
salt and pepper<br />
50g butter<br />
SAUCE:<br />
25g butter<br />
25g plain flour<br />
5ml ( 1 /2 tsp) cayenne pepper<br />
30ml (2 tbsp) English mustard powder<br />
300ml ( 1 /2 pint) milk<br />
salt and pepper<br />
250g mascarpone cheese<br />
CHICKEN & MUSHROOM BAKE<br />
1 Place the chicken, mushrooms, leeks, salt and pepper<br />
into a 2.5 litre (approx. 4 pints) bowl with 50g butter<br />
and cook on 100% for 8 minutes, stir twice.<br />
2 Place 25g butter in a bowl and heat on 100% for 30<br />
seconds until melted.<br />
3 Stir in the flour, cayenne pepper and mustard.<br />
4 Whisk in the milk and cook on 100% for 6 minutes,<br />
stir every 2 minutes until thick and smooth. Season<br />
with salt and pepper.<br />
5 Mix the mascarpone cheese into the sauce and pour<br />
the sauce over chicken mixture. Mix well.<br />
6 Place on the low rack and bake on DUAL - 1, 200°C,<br />
50% for 20 minutes. Stir halfway through the cooking<br />
time.<br />
51
RECIPES<br />
Serves 4 - 6<br />
30ml (2 tbsp) olive oil<br />
175g onion, chopped<br />
2 cloves garlic, crushed (see tip, page 48)<br />
75g tomato purée<br />
225g carrots, chopped<br />
1 red pepper, seeded and sliced<br />
1 green pepper, seeded and sliced<br />
150g fresh baby sweetcorn, chopped<br />
4 sticks celery, sliced<br />
225g courgettes, sliced<br />
5ml (1 tsp) ground cumin<br />
10ml (2 tsp) mild chilli powder<br />
2.5ml ( 1 /2 tsp) cayenne pepper<br />
400g canned, chopped tomatoes<br />
225g canned haricot beans, drained<br />
400g canned red kidney beans in chilli sauce<br />
300ml ( 1 /2 pint) hot vegetable stock<br />
15ml (1 tbsp) cornflour blended with water<br />
VEGETABLE CHILLI<br />
1 Place the oil, onion, garlic and tomato purée in a large<br />
bowl. Heat on 100% for 2 minutes.<br />
2 Add the carrots, red and green pepper and<br />
sweetcorn, mix well. Cover and cook on 100% for 3<br />
minutes.<br />
3 Stir in the remaining ingredients (apart from the<br />
cornflour). Mix well and cook on 70% for 20 minutes,<br />
stir 3 - 4 times during cooking.<br />
4 Add the blended cornflour, mix well and cook on<br />
100% for 5 - 6 minutes.<br />
Serve hot with rice or as a filling for tacos.<br />
Microwave Tip: Heating taco shells<br />
Place 8 - 10 pre-cooked crisp taco shells on kitchen<br />
paper on the turntable. Heat on 100% for 1 1 /2 - 2<br />
minutes until warm. Spoon in filling as preferred.<br />
Serves 4 - 6<br />
10ml (2 tsp) olive oil<br />
175g onion, chopped<br />
2 cloves garlic, crushed (see tip, page 48)<br />
175g leeks, sliced<br />
100g mushrooms, thickly sliced<br />
10ml (2 tsp) chopped fresh basil<br />
10ml (2 tsp) chopped fresh oregano<br />
225g red split lentils<br />
45ml (3 tbsp) tomato purée<br />
800g canned chopped tomatoes<br />
300ml ( 1 /2 pint) hot vegetable stock<br />
1 bay leaf<br />
salt and pepper to taste<br />
12 sheets lasagne (spinach)<br />
600ml (1 pint) cheese sauce (see page 61)<br />
50g cheddar cheese, grated<br />
RED LENTIL LASAGNE<br />
1 Place the oil, onion and garlic in a bowl, cook on<br />
100% for 2 minutes.<br />
2 Add the leeks, mushrooms, basil, oregano and lentils<br />
and then cook on 100% for a further 5 minutes.<br />
3 Stir in the purée, tomatoes, vegetable stock and the<br />
bay leaf.<br />
4 Cover and cook on 70% for 20 minutes.<br />
5 Season with salt and pepper then remove the bay leaf.<br />
6 Make the cheese sauce.<br />
7 Put a layer of the lentil mixture into the base of a<br />
deep, 25cm square dish. Cover with some lasagne<br />
and then some of the cheese sauce.<br />
Repeat, making the last layer cheese sauce, add the<br />
grated cheese.<br />
8 Place on low rack and cook on DUAL - 1, 180°C,<br />
30% for 25 minutes.<br />
Serves 4<br />
500g tofu, drained<br />
100g Mozzarella, thinly sliced<br />
75g Danish Blue, thinly sliced<br />
1 quantity Spicy Tomato Sauce (see page 61)<br />
STUFFED TOFU WITH SPICY TOMATO SAUCE<br />
1 Cut tofu in half to make 4 pieces.<br />
2 Slice each piece horizontally along one side to make a<br />
pocket. Fill each pocket with sliced cheese, place in a<br />
large flan dish. Pour in sauce.<br />
3 Place on turntable, cook on 50% for 12 - 14 minutes.<br />
52
RECIPES<br />
Serves 2<br />
2 baking potatoes (approx. 250g each)<br />
50g butter<br />
100g Double Gloucester cheese, finely<br />
chopped<br />
15ml (1 tbsp) chives, chopped<br />
50g mushrooms, finely chopped<br />
salt and pepper to taste<br />
CHEESY JACKETS<br />
1 Prick each potato in several places. Place in a flan dish on<br />
low rack. Cook on DUAL - 1, 250°C, 50% for 20 minutes<br />
until brown and crispy. Turnover after 7 minutes.<br />
2 Halve each potato and scoop the flesh into a bowl, add<br />
the butter, cheese, chives and mushrooms, mix well.<br />
Season. Pile the mixture back into the potato skins.<br />
3 Place the filled potatoes in a flan dish on the low rack.<br />
Cook on DUAL - 2, 30% for 10 minutes until brown<br />
and crispy.<br />
Cheese & sweetcorn Omit the Double Gloucester cheese, chives and mushrooms.<br />
jackets: Add 100g of grated Cheddar cheese and 50g sweet corn kernels at Stage 2.<br />
Cook’s Tip: Wooden Skewers<br />
To remove food easily from wooden skewers, soak the skewers in water for 30 minutes prior to using them.<br />
Serves 4<br />
600g canned, chopped tomatoes<br />
150g red pesto<br />
300g sun-dried tomatoes, drained and chopped<br />
salt and pepper to taste<br />
600g fresh ravioli (meat or vegetarian)<br />
600ml (1 pint) cheese sauce (see page 61)<br />
150g mozzarella cheese<br />
TOMATO, PASTA LAYER<br />
1 Empty the tomatoes into a large bowl and cook on<br />
100% for 8 minutes to reduce the juice.<br />
2 Combine the Pesto and sun-dried tomatoes with the<br />
tomatoes and season.<br />
3 Spread a 1 /2 of this sauce over the base of a greased<br />
25cm square dish, then place a single layer of ravioli.<br />
Next, spread 1 /2 of the cheese sauce over the ravioli.<br />
Layer until all ingredients have been used, with the<br />
last layer being cheese sauce.<br />
4 Sprinkle the grated mozzarella all over and place on<br />
the low rack. Cook on DUAL - 1, 220°C, 30% for 25<br />
minutes.<br />
Serves 4 - 6<br />
300g short crust pastry<br />
6 rashers of bacon, chopped<br />
125g onion, finely chopped<br />
4 eggs (medium)<br />
300ml ( 1 /2 pint) milk<br />
salt and pepper to taste<br />
5ml (1 tsp) dried mixed herbs (see tip, page 55)<br />
225g Cheddar cheese, grated<br />
Stilton & mushrooms:<br />
QUICHE LORRAINE<br />
1 Preheat the oven to 200°C.<br />
2 Line a 25cm flan dish with pastry, place on the low<br />
rack and cook on 200°C for 10 minutes.<br />
3 Place bacon and onion in a bowl, cook on 100% for 3<br />
minutes.<br />
4 Place eggs, milk, seasoning in a bowl, mix well.<br />
5 Spread bacon and onion evenly over the pastry. Pour<br />
egg mixture over, top with grated cheese.<br />
6 Place on the low rack, and cook on DUAL - 1, 220°C,<br />
30% for 25 minutes until set and brown.<br />
Replace bacon with 125g sliced mushrooms and Cheddar with Stilton.<br />
53
RECIPES<br />
Serves 4<br />
1 aubergine, thickly sliced<br />
cooking salt<br />
3 x 30ml (2 tbsp) vegetable oil<br />
1 red pepper, large chunks<br />
1 yellow pepper, large chunks<br />
3 courgettes, thickly sliced<br />
125g onion, sliced<br />
100g mushrooms, thickly sliced<br />
225g leeks, sliced<br />
2 cloves garlic, crushed (see tip, page 48)<br />
350g pasta (bows, shells, or tubes), cooked<br />
100 g feta cheese, crumbled<br />
MEDITERRANEAN PASTA<br />
1 Place the aubergines in a colander, sprinkle with<br />
salt and leave to drain for 30 minutes, pat dry with<br />
kitchen paper.<br />
2 Grease the turntable with 30ml (2 tbsp) oil and<br />
spread the peppers evenly on the turntable.<br />
3 Cook using GRILL - 3 for 10 minutes, turnover<br />
halfway through cooking, leave on one side until<br />
needed. Repeat this process for the courgette and<br />
aubergine slices.<br />
4 Place the onion, mushrooms, leeks and garlic into a<br />
2.5 litre (approx. 4 pint) casserole dish, mix well and<br />
cook on 100% for 5 minutes, stirring once.<br />
5 Add the peppers, cougettes, aubergine, pasta and<br />
cheese to the bowl and cook on 100% for 8 minutes,<br />
stirring twice.<br />
Serves 4<br />
125g onion, chopped<br />
2 cloves garlic, crushed (see tip, page 48)<br />
25g butter<br />
450g lean minced beef<br />
100g mushrooms, chopped<br />
15ml (1 tbsp) tomato purée<br />
400g canned chopped tomatoes<br />
150ml ( 1 /4 pint) hot beef stock<br />
salt and pepper to taste<br />
12 pieces of lasagne<br />
300ml ( 1 /2 pint) cheese sauce (see page 61)<br />
extra grated cheese to sprinkle<br />
15ml (1 tbsp) fresh oregano, chopped to<br />
garnish<br />
CANNELLONI<br />
1 Place onion, garlic and butter in a bowl, heat on 100%<br />
for 2 minutes. Add the mince, cook on 100% for 7<br />
minutes, stir halfway through cooking.<br />
2 Add mushrooms, purée, tomatoes, stock and<br />
seasoning. Cook on 70% for 25 minutes until<br />
thickened, stir every 5 minutes.<br />
3 Place 3 - 4 pieces of lasagne in a bowl, cover with<br />
boiling water. Cook on 100% for 4 minutes until<br />
tender enough to bend. Remove from water, dry on<br />
kitchen paper. Repeat for the remaining lasagne.<br />
4 Place a large spoonful of meat mixture at one end of<br />
a piece of lasagne, roll up and place seam side down<br />
in a deep, square 25cm dish. Repeat for remaining<br />
lasagne. Place any remaining meat around the filled<br />
lasagne.<br />
5 Pour the cheese sauce on top of the filled lasagne.<br />
Sprinkle generously with cheese and oregano.<br />
6 Place on low rack, cook on DUAL - 1, 220°C, 70% for<br />
20 minutes until brown and crispy.<br />
Serves 4<br />
4 beef tomatoes<br />
125g white long grain rice, cooked<br />
50g cooked ham, chopped<br />
50g peas<br />
15ml (1 tbsp) fresh oregano, chopped<br />
salt and pepper to taste<br />
75g Mozzarella cheese, chopped<br />
15ml (1 tbsp) fresh oregano, chopped to garnish<br />
STUFFED TOMATOES<br />
1 Slice the top of each tomato and scoope out the flesh<br />
into a bowl, stir in the rice, ham, peas, oregan, salt and<br />
pepper.<br />
2 Fill each tomato shell with the rice mixture and<br />
place in a large flan dish. Sprinkle generously with the<br />
Mozzarella cheese and oregano.<br />
3 Place on the low rack and cook on DUAL - 2, 50%<br />
for 10 minutes until the tomatoes are tender and the<br />
cheese is brown and crispy.<br />
54
RECIPES<br />
Serves 4 - 6<br />
450g carrots, sliced<br />
450g swede, diced<br />
350g celery, sliced<br />
225g onion, sliced<br />
1.2 litres (2 pints) hot vegetable stock<br />
250g cous cous<br />
VEGETABLE COUS COUS<br />
1 Place the carrots, swede, celery, onion and stock into a<br />
3 litre (5 pint) casserole dish, mix well and cook on 70%<br />
for 20 minutes, stirring twice.<br />
2 Add the cous cous, mix well and cook on 70% for 10<br />
minutes.<br />
Serve hot as an accompaniment or cold as a salad.<br />
Microwave Tip: Drying breadcrumbs<br />
Spread 100g fresh breadcrumbs evenly over a large plate. Heat on 100% for 2 - 3 minutes, stir every<br />
minute until crispy.<br />
Serves 4<br />
30ml (2 tbsp) vegetable oil<br />
10ml (2 tsp) ground cinnamon<br />
10ml (2 tsp) ground coriander<br />
5ml (1 tsp) cayenne pepper<br />
10ml (2 tsp) sesame seeds<br />
5ml (1 tsp) caraway seeds<br />
50g butter<br />
1.3cm fresh root ginger, peeled & grated<br />
2 cloves garlic, crushed (see tip, page 48)<br />
675g cooked potatoes, cut into<br />
2.5cm pieces<br />
pinch of salt<br />
SPICY POTATOES<br />
1 Place the oil, cinnamon, coriandar, cayenne pepper,<br />
sesame and caraway seeds in a 2.5 litre (approx. 4 pint)<br />
casserole dish, mix well. Heat on 100% for 1 minute.<br />
2 Add the butter, ginger and garlic. Cook on 70% for 3<br />
minutes. Stir in the potatoes and salt.<br />
3 Place the dish on the turntable, cook on 50% for<br />
8 - 10 minutes, stir every 2 - 3 minutes.<br />
Garnish with fresh chopped coriander, serve with<br />
grilled or roasted meats.<br />
Microwave Tip: Drying herbs<br />
Place a handful of fresh herbs between two sheets of kitchen paper on the turntable. Heat on 70% for<br />
3 minutes until dry. Ensure the herbs do not become too dry. Woody herbs will take a little longer.<br />
Serves 4<br />
15ml (1 tbsp) sunflower oil<br />
1 clove garlic, crushed (see tip, page 48)<br />
2 medium carrots, cut into strips<br />
150g fresh baby sweetcorn<br />
100g button mushrooms, halved<br />
50g beansprouts<br />
100g mange-tout<br />
1 red pepper, seeded and thinly sliced<br />
1 yellow pepper, seeded and thinly sliced<br />
6 spring onions, chopped<br />
100g canned water chestnuts, sliced<br />
2 sticks celey, sliced<br />
225g canned pineapple chunks<br />
300g cabbage, shredded<br />
1 quantity of sweet and sour sauce (see page 61)<br />
SWEET & SOUR VEGETABLES<br />
1 Place the oil, garlic, carrots and sweetcorn in a large<br />
bowl and mix well. Cover and cook on 100% for 4 - 5<br />
minutes.<br />
2 Stir in the mushrooms, beansprouts, mange-tout, red<br />
and yellow pepper, spring onion, chestnuts, celery,<br />
pineapple and cabbage.<br />
3 Cover and cook on 100% for 6 - 8 minutes until the<br />
vegetables are tender, stir thoroughly halfway through<br />
cooking and add the sweet and sour sauce.<br />
55
RECIPES<br />
Serves 6<br />
125g dried figs, roughly chopped<br />
125g dried apricots, roughly chopped<br />
100g raisins<br />
100g currants<br />
60ml (4 tbsp) brandy<br />
75g plain flour<br />
2.5ml ( 1 /2 tsp) allspice<br />
2.5ml ( 1 /2 tsp) grated nutmeg<br />
2.5ml ( 1 /2 tsp) ground cinnamon<br />
50g fresh breadcrumbs<br />
75g shredded suet<br />
100g soft brown sugar<br />
50g blanched almonds, roughly chopped<br />
grated rind of 1 medium orange<br />
grated rind of 1 medium lemon<br />
1 eating apple, grated<br />
15ml (1 tbsp) black treacle<br />
1 egg (medium), beaten<br />
FIGGY PUDDING<br />
1 Place figs, apricots, raisins, currants, and brandy in a<br />
large bowl, mix well. Leave for 2 hours.<br />
2 Place the flour, spices, breadcrumbs, suet, sugar,<br />
almonds, orange and lemon rind and apple in a bowl,<br />
mix well. Stir into the dried fruit mixture along with<br />
the treacle and beaten egg.<br />
3 Grease 1.2 litre (2 pints) pudding basin and line the<br />
base with a circle of kitchen paper. Spoon in the<br />
pudding mixture, smooth the surface and cover with<br />
cling film.<br />
4 Cook on 50% for 16 - 17 minutes until firm to the<br />
touch.<br />
Serve with brandy sauce, see page 62.<br />
Microwave Tip: Reheating Christmas pudding<br />
Place a 500g (1lb 2oz) pudding in a shallow flan dish.<br />
Cover and heat on 70% for 3 - 4 minutes.<br />
Serves 6<br />
PASTRY:<br />
150g butter<br />
350g flour<br />
50g caster sugar<br />
2 egg yolks (medium)<br />
cold water to mix<br />
FILLING:<br />
1kg cooking apples, peeled and sliced<br />
100g demerara sugar<br />
10ml (2 tsp) ground cinnamon (optional)<br />
grated rind of 1 orange (optional)<br />
1 egg (medium) mixed with a little milk to glaze<br />
demerara sugar<br />
Makes 675g<br />
150g milk chocolate, broken into pieces<br />
100g butter, melted<br />
450g icing sugar, sieved<br />
45ml (3 tbsp) milk<br />
APPLE PIE<br />
1 For pastry, rub butter into flour until mixture<br />
resembles breadcrumbs. Stir in sugar and bind with<br />
egg yolk. Add enough cold water to make a soft, but<br />
not sticky, dough. Chill whilst making the filling.<br />
2 For filling, combine apple, sugar, cinnamon (optional)<br />
and orange rind (optional) in a large bowl. Cook on<br />
100% for 8 minutes, stirring twice.<br />
3 Line the base of a greased 20cm x 2.5cm pie dish<br />
with half the pastry. Cook the pastry base on 50%<br />
for 7 - 8 minutes. Spoon in apple mixture, roll out<br />
remaining pastry and cover.<br />
4 Pinch pastry edges to seal and make a slit in the<br />
centre with a sharp knife. Brush with egg mixture to<br />
glaze and prinkle generously with sugar.<br />
5 Place on the low rack, cook on DUAL - 1, 220°C,<br />
10% for 20 - 25 minutes, until golden brown.<br />
CHOCOLATE FUDGE<br />
1 Place the chocolate in a bowl and heat on 100% for 2<br />
minutes, stir every 30 seconds until melted.<br />
2 Stir in butter, icing sugar and milk. Heat on 100% for<br />
2 - 3 minutes, stir vigorously every minute until the<br />
mixture is thick and glossy.<br />
3 Pour into a greased, rectangular 20 x 15cm dish, chill<br />
to set before cutting.<br />
56
RECIPES<br />
Serves 6 - 8<br />
150ml ( 1 /4 pint) sunflower oil<br />
225g soft brown sugar<br />
3 eggs (medium), beaten<br />
175g self raising flour<br />
5ml (1 tsp) bicarbonate of soda<br />
1.25 ml ( 1 /4 tsp) salt<br />
10ml (2 tsp) cinnamon<br />
300g carrots, grated<br />
100g walnut halves, roughly chopped<br />
ICING:<br />
225g cream cheese (see tip, page 51)<br />
grated rind of 1 lemon<br />
5ml (1 tsp) lemon juice<br />
30ml (2 tbsp) icing sugar<br />
25g walnuts, finely chopped to sprinkle<br />
MOIST CARROT CAKE<br />
1 Combine the oil, sugar and eggs. Fold in the flour,<br />
bicarbonate of soda, salt and cinnamon. Add the<br />
carrots and walnuts, mix well.<br />
2 Grease and line a 20cm soufflé dish with greaseproof<br />
paper, pour in the cake mixture.<br />
3 Place on turntable, cook on DUAL - 1, 180°C, 30%<br />
for 26 minutes. Allow to cool before decorating.<br />
4 To prepare icing, combine cream cheese, lemon rind,<br />
lemon juice and icing sugar until smooth. Spread on<br />
top of the cake, sprinkle with walnuts.<br />
If iced with cream cheese, keep cake refrigerated.<br />
Eat within 2 days.<br />
Carrot & Courgette:<br />
Substitute 150g of the carrots with 150g grated<br />
courgettes. Add with the carrots and walnuts in stage<br />
1.<br />
Serves 6 - 8<br />
225g margarine<br />
225g caster sugar<br />
7.5ml (1 1 /2 tsp) vanilla essence<br />
4 eggs (medium), beaten<br />
100g plain flour<br />
50g cocoa powder<br />
2.5ml ( 1 /2 tsp) baking powder<br />
150g cooking chocolate, chunks<br />
CHOCOLATE BROWNIES<br />
1 Combine the margarine, sugar, vanilla essence and<br />
eggs together until smooth.<br />
2 Stir in the remaining ingredients.<br />
3 Grease and line the base of a deep, square 20cm<br />
dish with greaseproof paper, spoon in the brownie<br />
mixture and smooth the surface.<br />
4 Place on the turntable, cook on DUAL - 1, 180°C,<br />
30% for 15 minutes.<br />
Serves 8<br />
250g self raising flour<br />
Large pinch of salt<br />
175g butter, cut into small pieces<br />
100g ground almonds<br />
100g caster sugar<br />
2 eggs (medium), beaten<br />
60ml (4 tbsp) milk<br />
10ml (2 tsp) almond essence<br />
150g white chocolate, chopped<br />
300g fresh raspberries<br />
Icing sugar, for dusting<br />
RASPBERRY & CHOCOLATE CAKE<br />
1 Grease a 20cm round cake tin and line the base with<br />
greaseproof paper.<br />
2 Sift the flour and salt into a large bowl. Rub the<br />
butter into the flour until the mixture resembles<br />
breadcrumbs. Stir in the ground almonds and sugar.<br />
3 Beat the eggs, milk and almond essence together and<br />
mix into the flour mixture. Add the chocolate and<br />
raspberries and mix in gently.<br />
4 Spread the mixture into the cake tin, place on the low<br />
rack and cook on DUAL - 1, 180°C, 50% for<br />
25 - 30 minutes. Allow the cake to cool. Dust with<br />
icing sugar.<br />
57
RECIPES<br />
Serves 4 - 6<br />
100g margarine<br />
100g caster sugar<br />
2 eggs (medium), beaten<br />
100g self raising flour<br />
30 - 45ml (2 - 3 tbsp) water<br />
PLAIN MICROWAVE CAKE<br />
1 Cream margarine and sugar, beat in the eggs. Fold<br />
in the flour and water. Grease and line the base of a<br />
18cm cake dish with kitchen paper. Spoon mixture<br />
into dish and smooth.<br />
2 Cook on 100% for 4 - 5 minutes until firm. Allow to<br />
cool slightly before turning out.<br />
Serves 6<br />
175g butter<br />
175g caster sugar<br />
3 eggs (medium)<br />
175g plain flour<br />
5ml (1 tsp) baking powder<br />
100g glacé cherries, quartered<br />
75g ground almonds<br />
5ml (1 tsp) almond essence<br />
15ml (1 tbsp) milk<br />
CHERRY & ALMOND CAKE<br />
1 Cream the butter and sugar together until light and<br />
fluffy, beat in the eggs.<br />
2 Fold in flour and baking powder, stir in the cherries,<br />
ground almonds, almond essence and milk.<br />
3 Grease and line the base of a 18cm cake dish with<br />
greaseproof paper. Spoon in the cake mixture and<br />
smooth the surface.<br />
4 Place on the turntable, cook on DUAL - 1, 200°C,<br />
30%, for 17 minutes.<br />
Serves 6 - 8<br />
175g margarine<br />
100g caster sugar<br />
225g self raising flour<br />
50g milk chocolate, finely chopped<br />
25g walnuts, finely chopped<br />
The biscuits will be soft when hot but<br />
will harden as they cool.<br />
CHOCOLATE CHIP COOKIES<br />
1 Cream margarine and sugar until light and fluffy. Stir<br />
in the flour, chocolate and walnuts to make a soft but<br />
firm dough.<br />
2 Divide mixture into 8 even sized balls, place apart in<br />
two large flan dishes and flatten slightly.<br />
3 Place one dish on low rack and the other on the high<br />
rack. Bake on CONVECTION 180°C for 30 minutes<br />
until golden brown around the edges. Swap the dishes<br />
round after 20 minutes.<br />
4 Allow to cool before removing from the dish.<br />
Serves 4 - 6<br />
100g butter<br />
75g golden syrup<br />
175g black treacle<br />
225g plain flour<br />
10ml (2 tsp) ground ginger<br />
5ml (1 tsp) bicarbonate of soda<br />
25g caster sugar<br />
150ml ( 1 /4 pint) milk<br />
2 eggs (medium), beaten<br />
GINGERBREAD<br />
1 Place the butter, syrup and treacle into a bowl, heat<br />
on 100% for 2 minutes and stir well.<br />
2 In a separate bowl, place the flour, ginger, bicarbonate<br />
and sugar.<br />
3 Add the milk into the melted syrup mixture then add<br />
the eggs and mix well.<br />
4 Stir into the dry ingredients and beat thoroughly.<br />
5 Pour into a greased and lined 20cm square dish.<br />
6 Place on the low rack and cook on DUAL - 1, 180°C,<br />
30%, for 18 minutes.<br />
58
RECIPES<br />
Serves 4<br />
325g potato, cooked and mashed<br />
325g parsnips, cooked and mashed<br />
225g self raising flour<br />
2 cloves garlic, crushed (see tip, page 48)<br />
10ml (2 tsp) whole grain mustard<br />
2 eggs (medium), beaten<br />
75ml (5 tbsp) milk<br />
5ml (1 tsp) fresh parsley, chopped to sprinkle<br />
POTATO BREAD<br />
1 Place the potato, parsnips, flour, garlic and mustard in<br />
a large bowl, mix well.<br />
2 Add the egg and milk, mix to form a soft dough.<br />
Knead the dough into a round shape approx. 20cm<br />
in diameter. Place in a 25cm flan dish, sprinkle with<br />
parsley.<br />
3 Place on the low rack and cook on DUAL - 1, 220°C,<br />
30% for 25 minutes until golden.<br />
Serve with soup, cheese or salad.<br />
Serves 6 - 8<br />
175g figs, chopped<br />
150ml ( 1 /4 pint) boiling water<br />
225g plain flour<br />
125g wholemeal flour<br />
125g caster sugar<br />
2.5ml ( 1 /2 tsp) salt<br />
2.5ml ( 1 /2 tsp) bicarbonate of soda<br />
100g butter<br />
125g walnuts, roughly chopped<br />
150ml ( 1 /4 pint) milk<br />
1 egg (medium), beaten<br />
FIG & WALNUT BREAD<br />
1 Place figs in a large bowl, add the boiling water, leave<br />
aside to cool.<br />
2 Preheat the oven to Convection 180°C.<br />
3 Place flours, sugar, salt and bicarbonate of soda in a<br />
bowl, mix well. Rub in butter until mixture resembles<br />
fine breadcrumbs, stir in walnuts.<br />
4 Add the fig mixture, milk and egg, mix well.<br />
5 Grease and line the base of a 1.5 litre (2 1 /2 pint),<br />
straight-sided loaf dish with greaseproof paper. Spoon<br />
in loaf mixture and smooth the surface.<br />
6 Place on the low rack, cook in a preheated oven on<br />
DUAL - 1, 180°C, 50% for 20 minutes, until a skewer<br />
comes out cleanly.<br />
Serve sliced, spread generously with butter.<br />
Microwave Tip: Toasting coconut<br />
Spread 100g desiccated coconut on a plate. Heat on 100% for 2 - 3 minutes, stir every minute.<br />
Serves 4<br />
225g wholemeal self raising flour<br />
150g medium oatmeal<br />
2.5ml ( 1 /2 tsp) salt<br />
2.5ml ( 1 /2 tsp) bicarbonate of soda<br />
50g butter<br />
120ml (4fl.oz) natural yoghurt<br />
90ml (6 tbsp) milk<br />
1 egg (medium), beaten to glaze<br />
sesame seeds to sprinkle<br />
SODA BREAD<br />
1 Combine flour, oatmeal, salt, bicardonate of soda in a<br />
large bowl. Rub in the butter.<br />
2 Add the yoghurt and milk, mix to form a soft but not<br />
sticky dough.<br />
3 Knead lightly into a round shape approx. 20cm in<br />
diameter. Place in a greased 25cm flan dish.<br />
4 Use a knife to mark into 8 wedges, cut only halfway<br />
through the dough. Glaze surface with egg, sprinkle<br />
with sesame seeds.<br />
5 Place on low rack, bake in a preheated oven on<br />
DUAL - 1, 200°C, 10% for 17 - 18 minutes until golden.<br />
Serve with cheese and a salad.<br />
59
RECIPES<br />
Makes 8 biscuits<br />
BISCUITS:<br />
100g butter<br />
50g caster sugar<br />
100g self raising flour<br />
25g cocoa powder<br />
2.5ml ( 1 /2 tsp) vanilla essence<br />
BUTTERCREAM:<br />
50g butter<br />
75g icing sugar<br />
30ml (2 tbsp) cocoa powder<br />
CHOCOLATE CREAMS<br />
1 Grease two small round baking trays<br />
2 Combine all the biscuit ingredients in a bowl, rub in<br />
then mix well.<br />
3 Preheat the oven to CONVECTION 200°C.<br />
4 Divide the mixture into 16 even sized pieces and roll<br />
into balls, Place apart on two greased baking trays.<br />
Flatten each ball slightly with a fork.<br />
5 Place one tray on the low rack and the other on<br />
the high rack. Bake at CONVECTION 200°C for 12<br />
minutes. Rotate and change the trays over halfway<br />
through cooking time.<br />
6 To prepare the butter cream, cream the butter and<br />
icing sugar until fluffy. Add the cocoa and mix well.<br />
7 When biscuits are cool, spread with butter cream and<br />
sandwich together to make 8 chocolate creams.<br />
Serves 4<br />
1.5 litres (2 pints) milk<br />
200g pudding rice<br />
75g caster sugar<br />
50g butter<br />
5ml (1 tsp) ground nutmeg (optional)<br />
RICE PUDDING<br />
1 Place the milk into a 1.5 litre (2 1 /2 pint) casserole dish.<br />
heat on 100% for 8 minutes.<br />
2 Stir in the rice, sugar and butter. Heat on 100% for 5<br />
minutes.<br />
3 Place on the low rack and cook on DUAL - 1, 180°C,<br />
30% for 60 minutes. Stir 2 - 3 times during cooking<br />
and again at the end of cooking.<br />
4 Sprinkle with ground nutmeg to serve.<br />
Makes 12 scones<br />
450g self raising flour<br />
100g butter<br />
100g caster sugar<br />
100g sultanas<br />
2 eggs (medium), beaten with milk to<br />
make 300ml ( 1 /2 pint)<br />
1 egg (medium), beaten to glaze<br />
FRUIT SCONES<br />
1 Preheat the oven to 220°C.<br />
2 Place the flour in the bowl and rub in the butter.<br />
3 Add the sugar and the fruit.<br />
4 Mix together the milk and egg.<br />
5 Make a well in the flour, add almost all of the liquid<br />
and mix with a round bladed knife.<br />
6 On a floured surface, knead the dough very lightly<br />
until it is just smooth.<br />
7 Divide the mixture in two, flatten until approx. 2cm<br />
thick, then cut each peice of dough into seven rounds<br />
(approx. 6.2cm each).<br />
8 Grease two flan dishes, place seven scones in each<br />
dish. Place one dish on the high rack and the other<br />
dish on the low rack.<br />
9 Cook at 220°C for 12 minutes, then swap the<br />
position of the dishes and cook for a further 10<br />
minutes, until well-risen and brown.<br />
Wholemeal scones: Substitute white self raising flour with wholemeal self raising flour, omit raisins.<br />
Cheese & chive scones: Omit sugar and sultanas. Add 175g grated Cheddar cheese, 15ml<br />
(1 tbsp) dried chives, salt and pepper at Stage 2.<br />
60
RECIPES<br />
Makes 300ml ( 1 /2 pint)<br />
25g butter<br />
25g plain flour<br />
300ml ( 1 /2 pint) milk<br />
salt and pepper to taste<br />
WHITE SAUCE<br />
1 Place the butter in a bowl and heat on 100% for 1<br />
minute, until melted.<br />
2 Stir in the flour and whisk in the milk. Cook on 100%<br />
for 8 minutes, stir every 2 minutes until thick and<br />
smooth. Season with salt and pepper to taste.<br />
Cheese sauce: Stir in 75g grated cheese and 5ml (1 tsp) mustard powder at Stage 2.<br />
Serve with vegetables, fish or meat.<br />
Parsley sauce: Stir 15 - 30ml (1 - 2 tbsp) chopped parsley into the finished sauce. Serve with fish.<br />
Onion sauce: Stir 225g cooked onion, finely chopped, into the finished sauce.<br />
Heat on 100% for 1 minute before serving. Serve with meat or vegetables.<br />
Sweet white sauce: Omit salt and pepper from basic recipe. Add 15 - 30ml (1 - 2 tbsp) caster sugar at<br />
Stage 2. Serve with puddings as an alternative to custard.<br />
Makes 600ml (1 pint)<br />
125g onion, finely chopped<br />
1 green pepper, finly chopped<br />
2 cloves garlic, crushed (see tip, page 48)<br />
30g butter<br />
30g plain flour<br />
30ml (2 tbsp) white wine vinegar<br />
30ml (2 tbsp) soy sauce<br />
300ml ( 1 /2 pint) hot chicken stock<br />
50g soft dark brown sugar<br />
SWEET & SOUR SAUCE<br />
1 Place the onion, green pepper, garlic and butter in a<br />
bowl, mix well. Cook on 100% for 2 minutes.<br />
2 Stir in the flour, gradually add the vinegar, soy sauce,<br />
stock and sugar. Cook on 100% for 3 - 4 minutes, stir<br />
every minute until the mixture has thickened. Blend in<br />
a food processor for a smoother sauce.<br />
Makes 600ml (1 pint)<br />
3 rashers bacon, chopped (optional)<br />
150g carrot, chopped<br />
225g onion, chopped<br />
2 cloves garlic, crushed (see tip, page 48)<br />
800g canned, chopped tomatoes<br />
300ml ( 1 /2 pint) red wine<br />
45 - 60ml (3 - 4 tsp) medium chilli sauce<br />
10ml (2 tsp) whole grain mustard<br />
30ml (2 tbsp) tomato purée<br />
SPICY TOMATO SAUCE<br />
1 Place bacon, carrot, onion and garlic in a large bowl,<br />
cover and heat on 100% for 3 minutes.<br />
2 Add all other ingredients to bacon mixture and mix<br />
well. Cook 70% for 35 minutes.<br />
3 Blend in a food processor until smooth, return to<br />
bowl and cook on 70% for 3 minutes.<br />
Serve with stuffed tofu, see page 52.<br />
Makes 300ml ( 1 /2 pint)<br />
25g butter<br />
45ml (3 tbsp) whole grain mustard<br />
200ml (7fl.oz) soured cream<br />
salt and pepper to taste<br />
MUSTARD SAUCE<br />
1 Place butter in a bowl, heat on 100% for 30 seconds. Add<br />
the mustard, soured cream, salt, and pepper, mix well.<br />
2 Cook on 100% for 4 minutes, stir every minute, until<br />
smooth and thick.<br />
Serve with meat or fish.<br />
61
RECIPES<br />
Makes 450ml ( 3 /4 pint)<br />
75g Blue Stilton cheese, finely chopped<br />
300ml ( 1 /2 pint) soured cream<br />
150ml ( 1 /4 pint) white wine<br />
15ml (1 tbsp) cornflour blended with water<br />
30ml (2 tbsp) fresh parsley, chopped<br />
salt and pepper to taste<br />
BLUE CHEESE SAUCE<br />
1 Place the cheese, cream wine, cornflour and parsley<br />
in a bowl, mix well. Season.<br />
2 Heat on 100% for 8 minutes, stir twice during<br />
cooking and again before serving.<br />
Ideal served with pasta.<br />
Makes 600ml (1 pint)<br />
50g butter<br />
50g plain flour<br />
75g brown sugar<br />
15ml (1 tbsp) golden syrup<br />
150ml ( 1 /4 pint) double cream<br />
300ml ( 1 /2 pint) milk<br />
60ml (4 tbsp) brandy to taste<br />
BRANDY SAUCE<br />
1 Place butter in a bowl, heat on 100% for 1 minute<br />
until melted. Stir in flour, heat on 100% for 1 minute.<br />
2 Combine sugar, syrup, cream and milk, heat on 100%<br />
for 2 minutes.<br />
3 Gradually add cream mixture to the butter and flour<br />
mixture. Heat on 100% for 5 - 6 minutes, stir every<br />
minute until smooth and thick. Stir in brandy.<br />
Serve hot with Figgy Pudding (page 56).<br />
Microwave Tip: Softening avocados<br />
Pierce an unpeeled avocado in several places. Place on the turntable and heat on 100% for 1 minute.<br />
Allow to cool before peeling.<br />
Makes 675g<br />
675g strawberries, washed, hulled and<br />
quartered<br />
45ml (3 tbsp) lemon juice<br />
675g preserving sugar<br />
Raspberry jam:<br />
STRAWBERRY JAM<br />
1 Place strawberries and lemon juice in a very large bowl.<br />
2 Heat on 100% for 5 minutes until strawberries have<br />
softened. Add the sugar, mix well.<br />
3 Cook on 70% for 40 minutes until setting point (*) is<br />
reached, stir every 4 - 5 minutes.<br />
4 Pour into hot, clean jars. Cover, seal and label.<br />
Replace 675g strawberries with 675g raspberries.<br />
* Setting point<br />
To determine, place 5ml (1 tsp) jam onto a saucer. Chill.<br />
Move surface of jam with finger, if it wrinkles, setting point has been reached.<br />
Makes 675g<br />
100g butter<br />
450g caster sugar<br />
45ml (3 tbsp) cornflour<br />
juice of 4 medium lemons<br />
grated rind of 2 lemons<br />
4 egg yolks (medium), beaten<br />
LEMON CURD<br />
1 Place butter and sugar in a bowl. Heat on 100% for 2<br />
minutes until melted.<br />
2 Mix cornflour, lemon juice and rind. Stir into the<br />
butter and sugar mixture. Heat on 100% for 2<br />
minutes until sugar has dissolved. Cool slightly.<br />
3 Beat in the egg yolks, cook on 50% for 10 - 12<br />
minutes, stir every 2 minutes until thickened.<br />
4 Pour into hot, clean jars. Cover, seal and label.<br />
62
GUARANTEE<br />
<strong>Sharp</strong> Electronics (UK) Ltd. (“<strong>Sharp</strong>”) guarantees that for a period of 12 months from the date of<br />
purchase the enclosed product will be free from defects in materials and workmanship. <strong>Sharp</strong> agrees<br />
to provide for the repair or, at its option, the replacement of a defective product. <strong>Sharp</strong> reserves the<br />
right to replace defective parts, or the product, with new or refurbished items. Items that are replaced<br />
become the property of <strong>Sharp</strong>.<br />
To benefit from this guarantee, any fault that occurs must be notified to <strong>Sharp</strong>, or its appointed Service<br />
Facility, within one year from the date the product was purchased. Proof of purchase, such as a receipt<br />
or invoice, must be provided.<br />
If the product is exchanged, the replacement shall be covered by the unexpired portion of the original<br />
guarantee.<br />
In the unlikely event of the product requiring repair, please contact the supplier from whom it was<br />
purchased. Where this is not possible, please contact an appointed Service Facility. Details of Service<br />
Facilities appointed by <strong>Sharp</strong> can be obtained from www.sharp.co.uk/customersupport/service or<br />
by contacting the <strong>Sharp</strong> Customer Information Centre whose details are given below.<br />
This guarantee shall only apply to faults that are due to inferior workmanship or materials. It does<br />
not cover faults or damage caused by accident, misuse, fair wear and tear, neglect, tampering with the<br />
product, or repair other than by a Service Facility appointed by <strong>Sharp</strong>.<br />
The product is intended for private domestic use only. The guarantee will not apply if the product is<br />
used in the course of a business, trade or profession.<br />
The guarantee does not cover:<br />
• Glass/ceramic turntables, as they can be damaged by handling/cleaning methods.<br />
• Faults resulting from inadequate cleaning. Regular cleaning is required to prevent a build up of food<br />
residue that can also affect the performance of the product.<br />
• Carriage costs to or from the repair centre.<br />
No person has any authority to vary the terms or conditions of this guarantee.<br />
This guarantee is offered as an additional benefit to your statutory rights, and does not affect these<br />
rights in any way.<br />
You may not transfer your rights or obligations under this warranty to anyone else.<br />
If you have any difficulty operating the product, or would like information on other <strong>Sharp</strong> products,<br />
please telephone the <strong>Sharp</strong> Customer Information Centre on the number given below.<br />
<strong>Sharp</strong> Customer Information Centre<br />
Website: www.sharp.co.uk/customersupport<br />
Telephone:<br />
08705 274277 (01 676 0648 in Southern Ireland)<br />
<strong>Sharp</strong> Electronics (UK) Ltd is a company registered in England under number 965877<br />
whose registered office is at<br />
4 Furzeground Way, Stockley Park, Uxbridge, Middlesex, UB11 1EZ.<br />
63
SPECIFICATIONS<br />
AC Line Voltage . . . . . . . . . . . . . . . . . . . . . . . . . . . . . . . . . . . . . Single phase 230-240V, 50Hz<br />
Power Consumption:<br />
Microwave . . . . . . . . . . . . . . . . . . . . . . . . . . . . . . . . . . . . . . . 1.45kW<br />
Top Grill . . . . . . . . . . . . . . . . . . . . . . . . . . . . . . . . . . . . . . . . 1.00kW<br />
Bottom Grill . . . . . . . . . . . . . . . . . . . . . . . . . . . . . . . . . . . . . 0.55kW<br />
Convection . . . . . . . . . . . . . . . . . . . . . . . . . . . . . . . . . . . . . . 1.525kW<br />
Top and Bottom Grill . . . . . . . . . . . . . . . . . . . . . . . . . . . . . . 1.50kW<br />
Microwave/Top Grill . . . . . . . . . . . . . . . . . . . . . . . . . . . . . . . 2.40kW<br />
Microwave/Bottom Grill . . . . . . . . . . . . . . . . . . . . . . . . . . . . 1.95kW<br />
Microwave/Convection . . . . . . . . . . . . . . . . . . . . . . . . . . . . . 2.425kW<br />
Input Current:<br />
Microwave . . . . . . . . . . . . . . . . . . . . . . . . . . . . . . . . . . . . . . . 6.5A<br />
Output Power:<br />
Microwave . . . . . . . . . . . . . . . . . . . . . . . . . . . . . . . . . . . . . . . 900W (IEC 60705)<br />
Top Grill . . . . . . . . . . . . . . . . . . . . . . . . . . . . . . . . . . . . . . . . 950W<br />
Bottom Grill . . . . . . . . . . . . . . . . . . . . . . . . . . . . . . . . . . . . . 500W<br />
Convection . . . . . . . . . . . . . . . . . . . . . . . . . . . . . . . . . . . . . . 1450W<br />
MAFF Heating Category . . . . . . . . . . . . . . . . . . . . . . . . . . . . . . E<br />
Microwave Frequency . . . . . . . . . . . . . . . . . . . . . . . . . . . . . . . . 2450MHz * (Group 2/Class B)<br />
Outside Dimensions . . . . . . . . . . . . . . . . . . . . . . . . . . . . . . . . . 520(W) x 309(H) x 488(D)mm<br />
Cavity Dimensions . . . . . . . . . . . . . . . . . . . . . . . . . . . . . . . . . . . 343(W) x 209(H) x 357(D)mm **<br />
Oven Capacity . . . . . . . . . . . . . . . . . . . . . . . . . . . . . . . . . . . . . . 26 litres **<br />
Cooking uniformity . . . . . . . . . . . . . . . . . . . . . . . . . . . . . . . . . . Turntable diameter 325mm<br />
Weight . . . . . . . . . . . . . . . . . . . . . . . . . . . . . . . . . . . . . . . . . . . . Approx. 20kg<br />
* This Product fulfils the requirement of the European standard EN55011.<br />
In conformity with this standard, this product is classified as group 2 class B equipment.<br />
Group 2 means that the equipment intentionally generates radio-frequency energy in the form of<br />
electromagnetic radiation for heating treatment of food.<br />
Class B equipment means that the equipment is suitable to be used in domestic establishments.<br />
** Internal capacity is calculated by measuring maximum width, depth and height.<br />
Actual capacity for holding food is less.<br />
As part of a policy of continuous improvement,<br />
we reserve the right to alter design and<br />
specifications without notice.<br />
No part of this publication may be reproduced,<br />
stored in a retrieval system or transmitted in<br />
any form, electronic, mechanical, photocopying,<br />
recording, translating or other means without<br />
prior permission from SHARP Electronics<br />
(U.K.) Ltd.<br />
The illustrations, technical information and data<br />
contained in this publication are, to our best<br />
knowledge, correct at the time of going to print.<br />
The right to change specifications, at any time,<br />
without notice, is reserved a part of our policy of<br />
continuous development and improvement.<br />
64
<strong>Sharp</strong> Electronics (U.K.) Ltd<br />
London, U. K.<br />
U.K.: 08705 274277 (office hours)<br />
Ireland: 01 676 0648 (office hours)<br />
Website: http://www.sharp.co.uk/support<br />
PRINTED IN THAILAND<br />
TINS-A711WRRZ-K72