Assembling the new side pods in the HRS2 chassis This ... - SLOT.IT
Assembling the new side pods in the HRS2 chassis This ... - SLOT.IT
Assembling the new side pods in the HRS2 chassis This ... - SLOT.IT

Create successful ePaper yourself
Turn your PDF publications into a flip-book with our unique Google optimized e-Paper software.
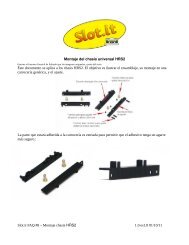
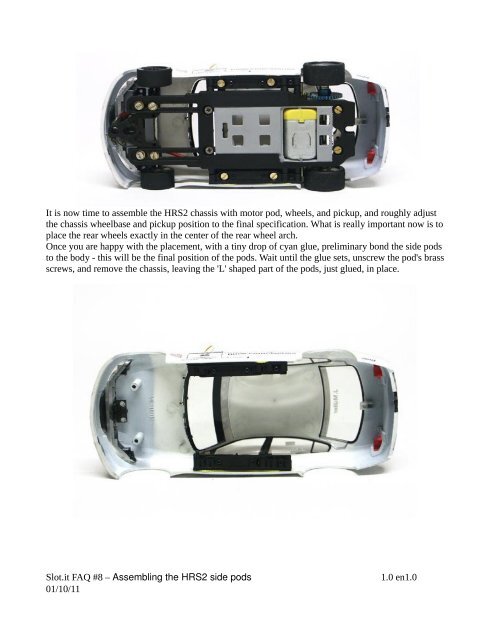
It is now time to assemble <strong>the</strong> <strong>HRS2</strong> <strong>chassis</strong> with motor pod, wheels, and pickup, and roughly adjust<br />
<strong>the</strong> <strong>chassis</strong> wheelbase and pickup position to <strong>the</strong> f<strong>in</strong>al specification. What is really important now is to<br />
place <strong>the</strong> rear wheels exactly <strong>in</strong> <strong>the</strong> center of <strong>the</strong> rear wheel arch.<br />
Once you are happy with <strong>the</strong> placement, with a t<strong>in</strong>y drop of cyan glue, prelim<strong>in</strong>ary bond <strong>the</strong> <strong>side</strong> <strong>pods</strong><br />
to <strong>the</strong> body - this will be <strong>the</strong> f<strong>in</strong>al position of <strong>the</strong> <strong>pods</strong>. Wait until <strong>the</strong> glue sets, unscrew <strong>the</strong> pod's brass<br />
screws, and remove <strong>the</strong> <strong>chassis</strong>, leav<strong>in</strong>g <strong>the</strong> 'L' shaped part of <strong>the</strong> <strong>pods</strong>, just glued, <strong>in</strong> place.<br />
Slot.it FAQ #8 – <strong>Assembl<strong>in</strong>g</strong> <strong>the</strong> <strong>HRS2</strong> <strong>side</strong> <strong>pods</strong><br />
01/10/11<br />
1.0 en1.0