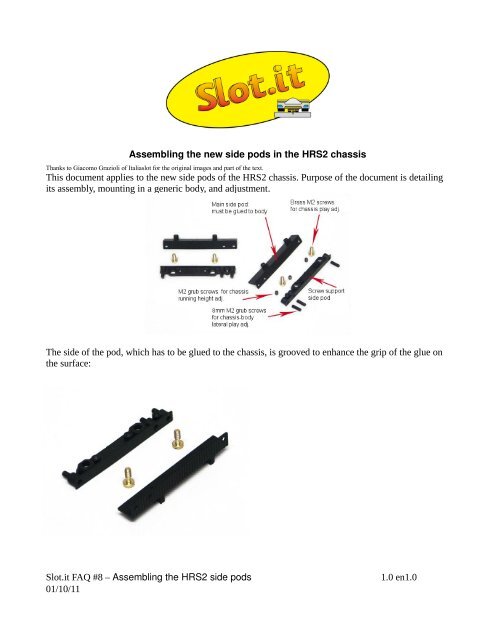
Assembling the new side pods in the HRS2 chassis This ... - SLOT.IT
Assembling the new side pods in the HRS2 chassis This ... - SLOT.IT
Assembling the new side pods in the HRS2 chassis This ... - SLOT.IT

Create successful ePaper yourself
Turn your PDF publications into a flip-book with our unique Google optimized e-Paper software.
<strong>Assembl<strong>in</strong>g</strong> <strong>the</strong> <strong>new</strong> <strong>side</strong> <strong>pods</strong> <strong>in</strong> <strong>the</strong> <strong>HRS2</strong> <strong>chassis</strong><br />
Thanks to Giacomo Grazioli of Italiaslot for <strong>the</strong> orig<strong>in</strong>al images and part of <strong>the</strong> text.<br />
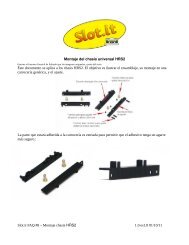
<strong>This</strong> document applies to <strong>the</strong> <strong>new</strong> <strong>side</strong> <strong>pods</strong> of <strong>the</strong> <strong>HRS2</strong> <strong>chassis</strong>. Purpose of <strong>the</strong> document is detail<strong>in</strong>g<br />
its assembly, mount<strong>in</strong>g <strong>in</strong> a generic body, and adjustment.<br />
The <strong>side</strong> of <strong>the</strong> pod, which has to be glued to <strong>the</strong> <strong>chassis</strong>, is grooved to enhance <strong>the</strong> grip of <strong>the</strong> glue on<br />
<strong>the</strong> surface:<br />
Slot.it FAQ #8 – <strong>Assembl<strong>in</strong>g</strong> <strong>the</strong> <strong>HRS2</strong> <strong>side</strong> <strong>pods</strong><br />
01/10/11<br />
1.0 en1.0
Completely assemble <strong>the</strong> <strong>side</strong> <strong>pods</strong> with <strong>the</strong> brass screws (two each <strong>side</strong>) and <strong>the</strong> long grub screws<br />
(three each)<br />
and assemble it <strong>in</strong> <strong>the</strong> selected <strong>chassis</strong>:<br />
The brass screws should be tightened, so as to leave no play between <strong>the</strong> two halves of <strong>the</strong> <strong>side</strong> <strong>pods</strong>.<br />
Slot.it FAQ #8 – <strong>Assembl<strong>in</strong>g</strong> <strong>the</strong> <strong>HRS2</strong> <strong>side</strong> <strong>pods</strong><br />
01/10/11<br />
1.0 en1.0
Now, place <strong>the</strong> semi-assembled <strong>chassis</strong> <strong>in</strong><strong>side</strong> <strong>the</strong> body of <strong>the</strong> model<br />
and adjust <strong>the</strong> overall width of <strong>the</strong> <strong>chassis</strong> to <strong>the</strong> width of <strong>the</strong> model itself, by sett<strong>in</strong>g <strong>the</strong> 8mm grub<br />
screws' position:<br />
Slot.it FAQ #8 – <strong>Assembl<strong>in</strong>g</strong> <strong>the</strong> <strong>HRS2</strong> <strong>side</strong> <strong>pods</strong><br />
01/10/11<br />
1.0 en1.0
It is now time to assemble <strong>the</strong> <strong>HRS2</strong> <strong>chassis</strong> with motor pod, wheels, and pickup, and roughly adjust<br />
<strong>the</strong> <strong>chassis</strong> wheelbase and pickup position to <strong>the</strong> f<strong>in</strong>al specification. What is really important now is to<br />
place <strong>the</strong> rear wheels exactly <strong>in</strong> <strong>the</strong> center of <strong>the</strong> rear wheel arch.<br />
Once you are happy with <strong>the</strong> placement, with a t<strong>in</strong>y drop of cyan glue, prelim<strong>in</strong>ary bond <strong>the</strong> <strong>side</strong> <strong>pods</strong><br />
to <strong>the</strong> body - this will be <strong>the</strong> f<strong>in</strong>al position of <strong>the</strong> <strong>pods</strong>. Wait until <strong>the</strong> glue sets, unscrew <strong>the</strong> pod's brass<br />
screws, and remove <strong>the</strong> <strong>chassis</strong>, leav<strong>in</strong>g <strong>the</strong> 'L' shaped part of <strong>the</strong> <strong>pods</strong>, just glued, <strong>in</strong> place.<br />
Slot.it FAQ #8 – <strong>Assembl<strong>in</strong>g</strong> <strong>the</strong> <strong>HRS2</strong> <strong>side</strong> <strong>pods</strong><br />
01/10/11<br />
1.0 en1.0
Now, with epoxy res<strong>in</strong> or o<strong>the</strong>r glue of your choice, bond <strong>the</strong> 'L' shaped bars permanently to <strong>the</strong> body.<br />
Cyan glue is not recommended for this operation as it is quite fragile <strong>in</strong> case of hard hit on <strong>the</strong> flexible<br />
plastic.<br />
Once this is done and set, <strong>the</strong> rid<strong>in</strong>g height of <strong>the</strong> body can be adjusted by means of <strong>the</strong> three 3mm grub<br />
screws as described by <strong>the</strong> picture:<br />
:<br />
Slot.it FAQ #8 – <strong>Assembl<strong>in</strong>g</strong> <strong>the</strong> <strong>HRS2</strong> <strong>side</strong> <strong>pods</strong><br />
01/10/11<br />
1.0 en1.0
In detail:<br />
Slot.it FAQ #8 – <strong>Assembl<strong>in</strong>g</strong> <strong>the</strong> <strong>HRS2</strong> <strong>side</strong> <strong>pods</strong><br />
01/10/11<br />
1.0 en1.0
The model's stance can hence be adjusted ast will:<br />
Slot.it FAQ #8 – <strong>Assembl<strong>in</strong>g</strong> <strong>the</strong> <strong>HRS2</strong> <strong>side</strong> <strong>pods</strong><br />
01/10/11<br />
1.0 en1.0