Installation, backup and recovery of Windows XP embedded systems
Installation, backup and recovery of Windows XP embedded systems
Installation, backup and recovery of Windows XP embedded systems

Create successful ePaper yourself
Turn your PDF publications into a flip-book with our unique Google optimized e-Paper software.
<strong>Installation</strong>, <strong>backup</strong> <strong>and</strong> <strong>recovery</strong> <strong>of</strong> <strong>Windows</strong> <strong>XP</strong><br />
<strong>embedded</strong> <strong>systems</strong><br />
Introduction<br />
S<strong>of</strong>tware <strong>of</strong> the MEFI control system includes <strong>Windows</strong> <strong>XP</strong> <strong>embedded</strong>, control s<strong>of</strong>tware (WinCNC <strong>and</strong> f PLC)<br />
<strong>and</strong> other applications <strong>and</strong> drivers (drivers for additional devices, CAD/CAM s<strong>of</strong>tware, etc.). The s<strong>of</strong>tware is<br />
designed to comply with the following conditions:<br />
1. Simple <strong>and</strong> uncomplicated first installation, requiring minimum attention <strong>of</strong> the operator (the<br />
installation process is not fully automated <strong>and</strong> require some knowledge <strong>of</strong> the problems. However, it is<br />
assumed, that it will be done only in MEFI. It could be done elsewhere only if the hard disk (or other<br />
storage media) has been damaged <strong>and</strong> no external <strong>backup</strong> is available.<br />
2. Possibility to recover all data after disk damage. The procedure will be similar to the initial installation<br />
process but the manual setup <strong>and</strong> installation process <strong>of</strong> additional applications will be done from the<br />
<strong>backup</strong>, saved on external storage media.<br />
3. Possibility <strong>of</strong> easy <strong>recovery</strong> back to the manufacture default setting (will be used if extensive <strong>and</strong><br />
unwanted changes in the system disk occurred).<br />
4. Possibility <strong>of</strong> simple <strong>backup</strong> <strong>and</strong> simple <strong>recovery</strong>, based on this <strong>backup</strong>. The <strong>backup</strong> may be done <strong>and</strong><br />
saved on external storage media.<br />
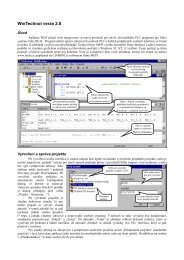
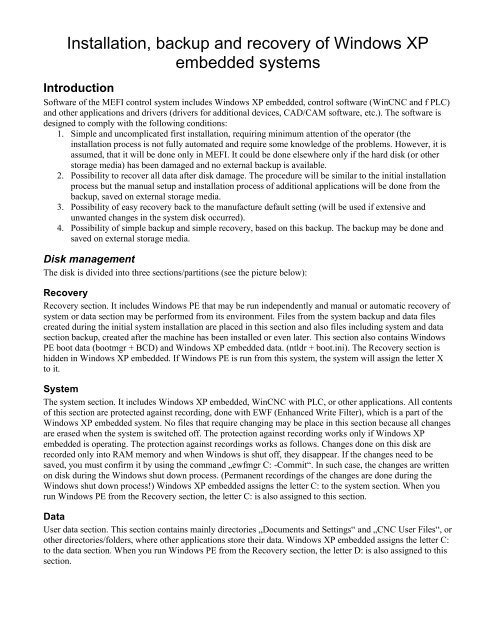
Disk management<br />
The disk is divided into three sections/partitions (see the picture below):<br />
Recovery<br />
Recovery section. It includes <strong>Windows</strong> PE that may be run independently <strong>and</strong> manual or automatic <strong>recovery</strong> <strong>of</strong><br />
system or data section may be performed from its environment. Files from the system <strong>backup</strong> <strong>and</strong> data files<br />
created during the initial system installation are placed in this section <strong>and</strong> also files including system <strong>and</strong> data<br />
section <strong>backup</strong>, created after the machine has been installed or even later. This section also contains <strong>Windows</strong><br />
PE boot data (bootmgr + BCD) <strong>and</strong> <strong>Windows</strong> <strong>XP</strong> <strong>embedded</strong> data. (ntldr + boot.ini). The Recovery section is<br />
hidden in <strong>Windows</strong> <strong>XP</strong> <strong>embedded</strong>. If <strong>Windows</strong> PE is run from this system, the system will assign the letter X<br />
to it.<br />
System<br />
The system section. It includes <strong>Windows</strong> <strong>XP</strong> <strong>embedded</strong>, WinCNC with PLC, or other applications. All contents<br />
<strong>of</strong> this section are protected against recording, done with EWF (Enhanced Write Filter), which is a part <strong>of</strong> the<br />
<strong>Windows</strong> <strong>XP</strong> <strong>embedded</strong> system. No files that require changing may be place in this section because all changes<br />
are erased when the system is switched <strong>of</strong>f. The protection against recording works only if <strong>Windows</strong> <strong>XP</strong><br />
<strong>embedded</strong> is operating. The protection against recordings works as follows. Changes done on this disk are<br />
recorded only into RAM memory <strong>and</strong> when <strong>Windows</strong> is shut <strong>of</strong>f, they disappear. If the changes need to be<br />
saved, you must confirm it by using the comm<strong>and</strong> „ewfmgr C: -Commit“. In such case, the changes are written<br />
on disk during the <strong>Windows</strong> shut down process. (Permanent recordings <strong>of</strong> the changes are done during the<br />
<strong>Windows</strong> shut down process!) <strong>Windows</strong> <strong>XP</strong> <strong>embedded</strong> assigns the letter C: to the system section. When you<br />
run <strong>Windows</strong> PE from the Recovery section, the letter C: is also assigned to this section.<br />
Data<br />
User data section. This section contains mainly directories „Documents <strong>and</strong> Settings“ <strong>and</strong> „CNC User Files“, or<br />
other directories/folders, where other applications store their data. <strong>Windows</strong> <strong>XP</strong> <strong>embedded</strong> assigns the letter C:<br />
to the data section. When you run <strong>Windows</strong> PE from the Recovery section, the letter D: is also assigned to this<br />
section.
Disk management<br />
PT (MBR) IPL<br />
PBR (Recovery)<br />
bootmgr<br />
BCD<br />
ntldr<br />
boot.ini<br />
<strong>Windows</strong> PE<br />
Factory <strong>backup</strong><br />
User <strong>backup</strong><br />
PBR (System)<br />
<strong>Windows</strong> <strong>XP</strong> <strong>embedded</strong><br />
+<br />
WinCNC, PLC<br />
+<br />
application s<strong>of</strong>tware<br />
PBR (Data)<br />
User data<br />
PT<br />
MBR<br />
IPL<br />
PBR<br />
bootmgr<br />
BCD<br />
ntldr<br />
boot.ini<br />
Partition Table<br />
Master Boot Record<br />
Initial Program Loader<br />
Partition Boot Record<br />
boot magager z <strong>Windows</strong> Vista (zobrazí startovací menu a podle zvolené položky zavolá další kód, který<br />
pokračuje v bootování; využívá BCD)<br />
Boot Configuration Data (volby pro bootování, ukládá se do souboru \boot\BCD, na základě tohoto souboru se<br />
vytváří startovací menu; obdoba boot.ini z <strong>Windows</strong> před Vistou)<br />
Boot manager kombinovaný se zavaděčem z <strong>Windows</strong> <strong>XP</strong>, využívá boot.ini<br />
soubor s volbami pro bootování pro ntldr<br />
bootmgr <strong>Windows</strong> Vista boot manager (displays the start menu <strong>and</strong> calls additional code according to the<br />
selected option that will be used during the booting process; it uses BCD)<br />
BCD Boot Configuration data (booting options are stored in the \boot\BCD\, the start up menu is<br />
created based on this file; similar to boot.ini from <strong>Windows</strong> <strong>XP</strong> (before Vista)<br />
ntldr Boot manager combined with a loader from <strong>Windows</strong> <strong>XP</strong>, it uses boot.ini.<br />
boot.ini File containing booting options for ntldr<br />
Uživatelská data<br />
User data<br />
aplikace<br />
application<br />
Tovární záloha<br />
Manufacturer <strong>backup</strong><br />
Uživatelská záloha User <strong>backup</strong><br />
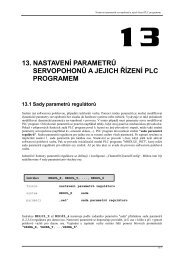
Boot process<br />
The following picture shows the boot process, after the “Backup <strong>and</strong> Recovery” is selected from the start menu.<br />
BIOS will run IPL, IPL will initiate PBR <strong>of</strong> the active section (the “Recovery” section is set as the active<br />
section) <strong>and</strong> this will initiate the boot manager. The boot manager will display the start menu, based on items in<br />
BCD.<br />
After selecting the “Backup <strong>and</strong> Recovery” the <strong>Windows</strong> PE boot file (\<strong>Windows</strong>\system32\boot\winload.exe)<br />
is initiated <strong>and</strong> own operating system <strong>of</strong> <strong>Windows</strong> PE is installed.
PT (MBR) IPL<br />
PBR (Recovery)<br />
bootmgr<br />
BCD<br />
ntldr<br />
boot.ini<br />
<strong>Windows</strong> PE<br />
Factory <strong>backup</strong><br />
User <strong>backup</strong><br />
PBR (System)<br />
<strong>Windows</strong> <strong>XP</strong> <strong>embedded</strong><br />
+<br />
WinCNC, PLC<br />
+<br />
application s<strong>of</strong>tware<br />
PBR (Data)<br />
User data<br />
Uživatelská data<br />
aplikace<br />
Tovární záloha<br />
Uživatelská záloha<br />
User data<br />
application<br />
Manufacturer <strong>backup</strong><br />
User <strong>backup</strong><br />
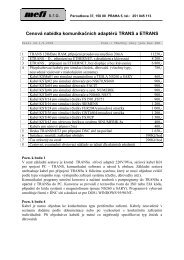
The following picture shows the boot procedures after you have selected the "CNC" option from the start menu<br />
(the start item is selected automatically, when few seconds <strong>of</strong> the timeout period has passed). In the same way<br />
as described earlier, the BIOS will run IPL, IPL will initiate PBR <strong>of</strong> the active section the “Recovery” <strong>and</strong> this<br />
will initiate the boot manager. After you have selected the “CNC" option, the boot manager <strong>and</strong> the <strong>Windows</strong><br />
<strong>XP</strong> loader ntldr. is initiated. This time, this may display other start menu, based on the contents <strong>of</strong> the boot. ini.<br />
file. However, this file contains one item only <strong>and</strong> therefore the ntldr will load the operating system <strong>Windows</strong><br />
<strong>XP</strong> <strong>embedded</strong> from the second file.<br />
PT (MBR) IPL<br />
PBR (Recovery)<br />
bootmgr<br />
BCD<br />
ntldr<br />
boot.ini<br />
Uživatelská data<br />
aplikace<br />
Tovární záloha<br />
Uživatelská záloha<br />
<strong>Windows</strong> PE<br />
Factory <strong>backup</strong><br />
User <strong>backup</strong><br />
PBR (System)<br />
User data<br />
application<br />
Manufacturer <strong>backup</strong><br />
User <strong>backup</strong><br />
<strong>Windows</strong> <strong>XP</strong> <strong>embedded</strong><br />
+<br />
WinCNC, PLC<br />
+<br />
application s<strong>of</strong>tware<br />
PBR (Data)<br />
User data<br />
Creation <strong>of</strong> bootable USB Recovery flash disk<br />
This procedure creates a USB flash disk that may be used to boot <strong>and</strong> completely install (or recover) <strong>Windows</strong><br />
<strong>XP</strong> <strong>embedded</strong> system or other tools as well. To create bootable USB flash disk you will need the “Recovery”<br />
CD.
Step 1: Prepare a USB flash disk that you will use for the boot procedure<br />
Note: There are several procedures how to create a bootable USB flash disk but not all will work at all times.<br />
The reason for this is, that the USB flash disk may contain (or may not contain) information that helps the<br />
system recognizes it as an external storage disk. The procedure described here should work in all situations, but<br />
it must be done from the <strong>Windows</strong> PE system.<br />
Caution: When using the below described procedure, keep in mind that <strong>Windows</strong> system does not treat the USB<br />
flash disk as an external storage disk <strong>and</strong> uses cache memory instead. Due to this, (if the USB flash disk gets<br />
disconnected without shutting it down safely – function "Safely remove hardware”), it is probable that all data<br />
will be lost!<br />
1. Run the Recovery CD from any computer.<br />
2. Connect the USB flash disk.<br />
3. Type this following comm<strong>and</strong> in the comm<strong>and</strong> line:<br />
diskpart<br />
4. Select the desired disk to continue. This is done with comm<strong>and</strong>:<br />
select disk n<br />
n is the letter <strong>of</strong> the USB disk. Overview <strong>of</strong> all disks connected to your computer may be displayed<br />
with comm<strong>and</strong>:<br />
list disk<br />
5. Remove the original disk contents (warning, all data on the disk will be lost!):<br />
clean<br />
6. Create a primary partition on the disk:<br />
create partition primary<br />
7. Set the partition you just created as primary:<br />
active<br />
8. Format the partition (e.g. with file system NTFS):<br />
format fs=NTFS label=“Recovery“ quick<br />
Step 2: Transfer all data from the Recovery CD on the flash disk<br />
All data from the Recovery CD will be copied on the flash disk. The copying may be done on any computer,<br />
For example: In <strong>Windows</strong> <strong>XP</strong> explorer.<br />
First installation <strong>of</strong> operating system s<strong>of</strong>tware<br />
Procedure that describes the first installation <strong>of</strong> operating system s<strong>of</strong>tware. It includes (besides others)<br />
installation <strong>of</strong> <strong>Windows</strong> <strong>XP</strong> <strong>embedded</strong> system <strong>and</strong> its first configuration, installation <strong>of</strong> additional drivers,<br />
installation <strong>of</strong> WinCNC <strong>and</strong> creation <strong>of</strong> manufacture default settings <strong>backup</strong>. This procedure is used to create<br />
operating system if irreversible damage <strong>of</strong> the disk occurs <strong>and</strong> external <strong>backup</strong> is not available.<br />
Step 1: <strong>Installation</strong> <strong>of</strong> <strong>Windows</strong> <strong>XP</strong> <strong>embedded</strong><br />
These steps will prepare (divide) the hard disk (it will be divided in three partitions <strong>and</strong> formatted....). Then the<br />
<strong>Windows</strong> PE system, used for <strong>recovery</strong> <strong>and</strong> <strong>backup</strong>, as well as <strong>Windows</strong> <strong>XP</strong> <strong>embedded</strong> will be loaded.<br />
1. Set the BIOS system (see the manual supplied with your motherboard). Make sure to select boot from<br />
USB CD-ROM or USB flash memory.<br />
2. Boot from the installation medium (CD, USB flash) used for the applicable hardware configuration <strong>of</strong><br />
the operating system (one folder usually contains files for several configurations). The application<br />
“Setup <strong>and</strong> Recovery Wizard” will initiate automatically.<br />
3. Press the "Setup/Full <strong>recovery</strong>“ button to start the installation process. You must select the applicable<br />
hardware configuration for the applicable operating system from the listing at the beginning <strong>of</strong> the<br />
installation. The entire process last several minutes…or more. It depends on how quickly the data on the<br />
installation media are read, as well as on the speed <strong>of</strong> the operating system.<br />
4. After the installation process is over, close the installation progress window by pressing the “OK”<br />
button <strong>and</strong> restart the operating system by pressing the "Restart" button. Before restarting, make sure to<br />
remove the installation media, or change the order <strong>of</strong> the boot devices to boot from the disk. Note: The<br />
record about the installation process is stored in file “Setup_FullRecovery.log” in root directory <strong>of</strong> the
system disk (X:). Because during the installation process, run from the installation media, the system<br />
uses RAM memory as the system disk, all data in RAM will be lost after restart.<br />
Step 2: <strong>Installation</strong> <strong>of</strong> drivers, application <strong>and</strong> WinCNC. Primary configuration.<br />
In this step you must install all drivers <strong>and</strong> applications that are not part <strong>of</strong> the image <strong>of</strong> the <strong>Windows</strong> <strong>XP</strong><br />
<strong>embedded</strong> system <strong>and</strong> you must also perform first or primary configuration according to customer<br />
requirements. Some drivers <strong>and</strong> applications are not included in the installation image, because they cannot be<br />
installed due to various reasons or that are usually installed as an option, or according to specific customer<br />
needs, or they are <strong>of</strong>ten changed (e.g revisions <strong>of</strong> WinCNC that are released every few days <strong>and</strong> would not be<br />
wise to included them in the installation disk or storage media). However, installation programmes used to<br />
install majority <strong>of</strong> drivers <strong>and</strong> application are included on the installation media in folder “DriversAndApp“.<br />
Some applications on the installation media may be outdated <strong>and</strong> therefore it may be better if you download<br />
their current versions from Internet server at: www.mefi.cz (for example: WinCNC) or directly from the<br />
application manufacture webpage.<br />
1. Depending on your monitor, set the display resolution (usually 1024x768 pixels) <strong>and</strong> other parameters if<br />
needed. If the image <strong>of</strong> <strong>Windows</strong> <strong>XP</strong> <strong>embedded</strong> does not contain drivers for your graphic card, you<br />
must install them first.<br />
2. Calibrate the Touch Screen (if you have the display panel that will be used by the system available) <strong>and</strong><br />
set the double click area on the touch screen to maximum („Start“ – „All Programs“ – „MicroTouch MT<br />
7“ –“Control Panel“, on bookmark “Touch settings“ in area “Double-click“, set the moveable rider for<br />
the “Double-click area“ to maximum).<br />
3. Local <strong>and</strong> regional settings. Display dialog window “Regional <strong>and</strong> Language Options“ (e.g. by pressing<br />
Start“ – „Control Panel“ – „Switch to Classic View“ – „Regional <strong>and</strong> Language Options“). On the<br />
“Regional Option” bookmark in “St<strong>and</strong>ards <strong>and</strong> formats”, select the language for number, time, date etc.<br />
formatting <strong>and</strong> in the part “Location”, select the geographic location <strong>of</strong> the operating system (country or<br />
location where the system will be used). On the “Languages“ bookmark you may add additional<br />
keyboard layout, (by pressing the “Details“ button). Here you must set the user interface language<br />
(“Language used in menus <strong>and</strong> dialogs“).<br />
4. Install the WinCNC (if possible, download the most updated version from www.mefi.cz) <strong>and</strong> also if<br />
available, the required PLC (PLC installation must be designed for the version <strong>of</strong> the WinCNC you have<br />
installed). Enter password in the registry <strong>of</strong> WinCNC (option “Password0“ type REG_SZ in key<br />
„HKEY_LOCAL_MACHINE\SOFTWARE\MEFI\WinCNC\Persistent\Channels\Channel0\Passwords“<br />
).<br />
5. Set the WinCNC as shell. This may be done by creating the “Shell“ item, type REG_SZ in key<br />
„HKEY_CURRENT_USER\S<strong>of</strong>tware\Micros<strong>of</strong>t\<strong>Windows</strong> NT\CurrentVersion\Winlogon“ in <strong>Windows</strong><br />
registry <strong>and</strong> by setting the value to “%SystemRoot%\Shell.cmd“. This item may be simply created by<br />
clicking on the file WinCncAsShell.reg in the main directory <strong>of</strong> the installation media.<br />
6. Activate the Enhanced Write Filter. First, you must restart your system. After reboot, the WinCNC will<br />
run automatically <strong>and</strong> you must open the comm<strong>and</strong> line by running it from the s<strong>of</strong>tware menu “System“<br />
– „External tools“ – „Comm<strong>and</strong> Line“. In the comm<strong>and</strong> line you type “ewfmgr C: -enable“. Now you<br />
must turn your system <strong>of</strong>f, using the comm<strong>and</strong> "Switch <strong>of</strong>f" in the WinCNC s<strong>of</strong>tware menu.<br />
Step 3: Creating <strong>backup</strong> <strong>of</strong> manufacture default settings<br />
These steps will help you create a <strong>backup</strong> file that may be used later to "restore" the operating system setting<br />
back to its initial default setting - as set by the manufacturer in the factory.<br />
1. Select the “Backup <strong>and</strong> Recovery“ option during the boot process.<br />
2. The application “Setup <strong>and</strong> Recovery Wizard” will initiate automatically.<br />
3. By pressing the “Factory Backup“ button you will start the <strong>backup</strong> creation process.<br />
Operating system s<strong>of</strong>tware <strong>backup</strong><br />
This will help you to create <strong>backup</strong> <strong>of</strong> your operating system. This procedure is used to create operating system<br />
<strong>backup</strong> if s<strong>of</strong>tware damage <strong>of</strong> the disk occurred. The <strong>backup</strong> should always be created before the machine is<br />
delivered to the customer (after debugging process <strong>of</strong> PLC <strong>and</strong> necessary configuration is finished), or later if
s<strong>of</strong>tware changes or changes in the operating system will be performed. The <strong>backup</strong> should be stored on<br />
external storage media, in case the disk in the control system is physically damaged. As an option, you may<br />
store it in the Recovery section in the operating system, because you will have it available there at all times <strong>and</strong><br />
when system s<strong>of</strong>tware or data damage occurs. Procedure:<br />
1. Select the “Backup <strong>and</strong> Recovery“ option during the boot process.<br />
2. The application “Setup <strong>and</strong> Recovery Wizard” will initiate automatically.<br />
3. By pressing the “Backup“ button you will start the <strong>backup</strong> creation process.<br />
4. Select whether you want to create <strong>backup</strong> <strong>of</strong> the System section or the Data section.<br />
5. Select location where you want to store the <strong>backup</strong> files. The <strong>backup</strong> creation process lasts several<br />
minutes.<br />
Recovery <strong>of</strong> manufacturer default settings<br />
This process will recover the operating system back to its initial settings as set by the manufacturer in the<br />
factory. This process will overwrite the entire system <strong>and</strong> data sections with the <strong>backup</strong> files <strong>and</strong> data!<br />
Procedure:<br />
1. Select the “Backup <strong>and</strong> Recovery“ option during the boot process.<br />
2. The application “Setup <strong>and</strong> Recovery Wizard” will initiate automatically.<br />
3. Recovery process from the <strong>backup</strong> file is initiated by pressing the “Restore to Factory defaults“ button.<br />
Restoration from the <strong>backup</strong> file<br />
This process will restore the operating s<strong>of</strong>tware system back to settings used before the <strong>backup</strong> was created.<br />
This process will overwrite the entire system <strong>and</strong> data sections with the <strong>backup</strong> files <strong>and</strong> data! Procedure:<br />
1. Select the “Backup <strong>and</strong> Recovery“ option during the boot process.<br />
2. The application “Setup <strong>and</strong> Recovery Wizard” will initiate automatically.<br />
3. The <strong>recovery</strong> process from the <strong>backup</strong> file is initiated by pressing the “Restore from Backup“ button