Fido - SPYPOINT
Fido - SPYPOINT
Fido - SPYPOINT

Create successful ePaper yourself
Turn your PDF publications into a flip-book with our unique Google optimized e-Paper software.
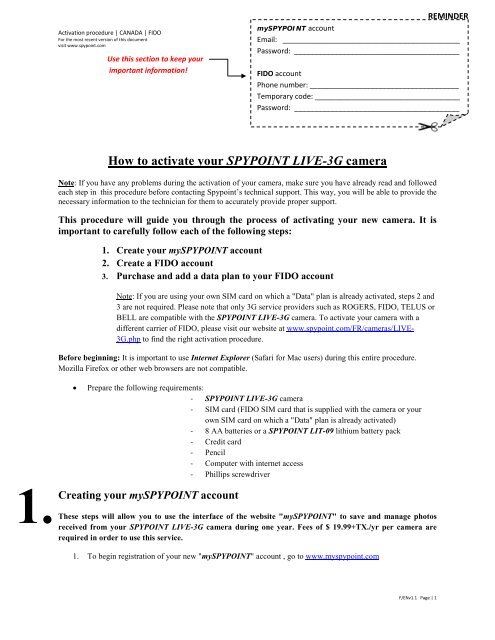
Activation procedure | CANADA | FIDO<br />
For the most recent version of this document<br />
visit www.spypoint.com<br />
Use this section to keep your<br />
important information!<br />
REMINDER<br />
my<strong>SPYPOINT</strong> account<br />
Email: ____________________________________________<br />
Password: _________________________________________<br />
FIDO account<br />
Phone number: _____________________________________<br />
Temporary code: ____________________________________<br />
Password: _________________________________________<br />
1.<br />
How to activate your <strong>SPYPOINT</strong> LIVE-3G camera<br />
Note: If you have any problems during the activation of your camera, make sure you have already read and followed<br />
each step in this procedure before contacting Spypoint’s technical support. This way, you will be able to provide the<br />
necessary information to the technician for them to accurately provide proper support.<br />
This procedure will guide you through the process of activating your new camera. It is<br />
important to carefully follow each of the following steps:<br />
1. Create your my<strong>SPYPOINT</strong> account<br />
2. Create a FIDO account<br />
3. Purchase and add a data plan to your FIDO account<br />
Note: If you are using your own SIM card on which a "Data" plan is already activated, steps 2 and<br />
3 are not required. Please note that only 3G service providers such as ROGERS, FIDO, TELUS or<br />
BELL are compatible with the <strong>SPYPOINT</strong> LIVE-3G camera. To activate your camera with a<br />
different carrier of FIDO, please visit our website at www.spypoint.com/FR/cameras/LIVE-<br />
3G.php to find the right activation procedure.<br />
Before beginning: It is important to use Internet Explorer (Safari for Mac users) during this entire procedure.<br />
Mozilla Firefox or other web browsers are not compatible.<br />
• Prepare the following requirements:<br />
- <strong>SPYPOINT</strong> LIVE-3G camera<br />
- SIM card (FIDO SIM card that is supplied with the camera or your<br />
own SIM card on which a "Data" plan is already activated)<br />
- 8 AA batteries or a <strong>SPYPOINT</strong> LIT-09 lithium battery pack<br />
- Credit card<br />
- Pencil<br />
- Computer with internet access<br />
- Phillips screwdriver<br />
Creating your my<strong>SPYPOINT</strong> account<br />
These steps will allow you to use the interface of the website "my<strong>SPYPOINT</strong>" to save and manage photos<br />
received from your <strong>SPYPOINT</strong> LIVE-3G camera during one year. Fees of $ 19.99+TX./yr per camera are<br />
required in order to use this service.<br />
1. To begin registration of your new "my<strong>SPYPOINT</strong>" account , go to www.myspypoint.com<br />
F/ENv1.1 Page | 1
Activation procedure | CANADA | FIDO<br />
For the most recent version of this document<br />
visit www.spypoint.com<br />
2. Click "REGISTER NOW" and enter your personal information as indicated, then click "Subscribe" (this<br />
may take few seconds)<br />
3. You will be asked to confirm your registration via email. An email from "info@myspypoint.com" will be<br />
automatically sent to your personal email, the one you entered in #2.<br />
4. Once confirmed, a new page will open and you will have access to your new account.<br />
5. From this new "my<strong>SPYPOINT</strong>" website page, click "Account".<br />
6. Click "Add" in the upper right hand corner of the page to link your <strong>SPYPOINT</strong> LIVE-3G camera to your<br />
account.<br />
7. Enter a name for your camera. For example, if your camera is installed at your house, you can call it<br />
"HOUSE".<br />
8. Insert your SIM card into the <strong>SPYPOINT</strong> LIVE-3G camera. The SIM card compartment is located under<br />
the batteries. You need to use a Phillips screwdriver to open and close the compartment. (see section<br />
"Installing the SIM card" of the user manual for more details)<br />
9. Turn on your camera and choose “SETTINGS” mode. Be sure the “MODE” is set to “Cellular”, the<br />
country to “Canada” and the “CARRIER” to “FIDO”<br />
10. Still in the “SETTINGS” mode, select “INFO” mode. Wait a couple of seconds and you will see SIM<br />
number appearing in the display.<br />
11. Back to your computer, enter the SIM card number that appears on the screen of your camera in “INFO”<br />
mode.<br />
12. Enter the serial number of your camera (displayed at the bottom left corner of the camera screen in the<br />
main menu S/N: xxxxxxx) and click "Continue".<br />
13. Select the monthly data transfer limit according to your service provider data plan. This option makes sure<br />
you do not exceed the amount of data permitted on your data plan. An email will be sent to the address<br />
related to your account when you have reached 80% of your monthly limit. The picture transmission to<br />
your my<strong>SPYPOINT</strong> account will be automatically blocked if the amount of data transfer reaches 95% of<br />
the limit chosen (the camera continues recording locally on the SD card). This monthly data transfer limit<br />
can be changed at a later time through the cameras management section of your account under the<br />
"Account" tab.<br />
14. An invoice will appear to pay your registration. This will give you access to your my<strong>SPYPOINT</strong> account<br />
linked with your <strong>SPYPOINT</strong> LIVE-3G camera for one year. Enter your credit card information as<br />
requested.<br />
15. Check the box "I have read and I accept the methods of transaction." and click "Pay".<br />
16. If you are using your own SIM card on which a "Data" plan is already activated, you are ready to use your<br />
camera. Otherwise, you must open a FIDO account using the FIDO SIM card supplied with the camera. Go<br />
to the section "Creating a FIDO account".<br />
2.<br />
Creating a FIDO account<br />
Note<br />
: If an error occurs during the creation of your <strong>Fido</strong> account, you might be invited to reach the customer<br />
service at <strong>Fido</strong>. If so, please join the Spypoint technical support instead, they will be able to help you.<br />
17. Using a computer with internet access, go to FIDO's website at www.fido.ca<br />
18. Click "Activate your FIDO" in the lower left hand corner of the page.<br />
19. Click "START"<br />
20. Select "PREPAID SERVICE"<br />
21. Select "NO" to the question: "Was your phone purchased on <strong>Fido</strong>.ca?"<br />
22. Enter the 20 digit of the FIDO SIM card supplied with the camera <strong>SPYPOINT</strong> LIVE-3G in the appropriate<br />
field (this number can also be found on the SIM card support).<br />
23. Click "Continue".<br />
F/ENv1.1 Page | 2
Activation procedure | CANADA | FIDO<br />
For the most recent version of this document<br />
visit www.spypoint.com<br />
24. Choose "By the minute 30¢ Anytime" by clicking the "Add" button associated with this column. This plan<br />
is located at the bottom of the page.<br />
25. On the page "3 : Enhance with add-ons", select "500 MB Data Add-on" for $25.00/monthly or "100 MB<br />
Data Add-on" for $10.00/monthly.<br />
Approximate comparison between data plans to help you choose your FIDO data plan:<br />
100 MB = 5 000 thumbnails OR 1 000 high resolution pictures = $ 10.00 / month<br />
500 MB = 25 000 thumbnails OR 5 000 high resolution pictures = $ 25.00 / month<br />
26. Once you have selected a data plan, click "Add" at the bottom of the page.<br />
27. On the page "Shopping Cart Summary", select your province of residence in the section "Sub-total" and<br />
click "Check Out ".<br />
28. On the page "Pick your phone number", choose your province of residence and city. If your city does not<br />
appear in the list, choose the nearest to yours. Then click "FIND AVAILABLE NUMBERS".<br />
29. Select the desired number among the list, write it down in the section called "Reminder" located at the first<br />
page of this procedure and click "Continue".<br />
30. Enter your personal information as requested. (Address & Payment)<br />
31. At the bottom of the page, select "No thanks" and then "Continue".<br />
32. On the page "4. Review", double check your information and check the box "I agree to these terms &<br />
conditions" and click "Place your order" at the bottom of the page.<br />
33. Your FIDO account is now created. You will receive an email from FIDO confirming the activation of your<br />
account. You will find a summary of your account information such as your personal identification number<br />
(PIN). This number is only required if you want to refill your account by phone or using a prepaid card.<br />
34. Turn on your <strong>SPYPOINT</strong> LIVE-3G camera.<br />
35. Go to the SETTINGS menu and change the option "Carrier" to FIDO.<br />
36. Go back to main menu and choose TEST mode. Make sure that the signal strength icon on the upper left<br />
corner of the screen shows at least one white bar.<br />
37. Now go in “SMS” tab of the “SETTINGS” menu. When you select “Inbox”, you should see a message<br />
from FIDO giving you your temporary code. (this process may take up to 5 minutes). Write down this<br />
temporary code in the "Reminder" section. Delete this message by pressing OK.<br />
38. After receiving the first text message, it is possible that you receive other confirmation messages from<br />
FIDO, press OK to delete them.<br />
3.<br />
Purchasing and adding a data plan to your FIDO account.<br />
39. Return to FIDO's website at www.fido.ca<br />
40. On the homepage, click "Already a customer, log in" in the upper right corner.<br />
41. In the section "Not Yet Registered?", enter the phone number (without dashes or spaces) that you have<br />
selected yourself when creating your account and click "Continue".<br />
42. In the field provided for that purpose, enter your temporary code. If you have not received your temporary<br />
code, an option located on the right side of the page will allow you to resend this code to the camera. Make<br />
sure the camera is set to TEST mode and that the signal strength icon shows at least 1 white bar.<br />
43. Then choose your own password, make sure to note this new password in the "Reminder" section because<br />
you will need it to refill your account once a month. Click "Continue".<br />
44. The main page of your account will appear. To add a data plan to your account and start using your new<br />
<strong>SPYPOINT</strong> LIVE-3G camera, click "Register your credit card for one time refill and/or to set up Auto<br />
Refill" in the section "Payment method".<br />
45. Enter the required information in the appropriate fields to register your credit card.<br />
F/ENv1.1 Page | 3
Activation procedure | CANADA | FIDO<br />
For the most recent version of this document<br />
visit www.spypoint.com<br />
46. Check the box "I authorize <strong>Fido</strong> to validate the credit card information I've provided above." and click<br />
"Submit ".<br />
47. On the page "Thank you for registering your credit card" click "Back to my account".<br />
48. The main page of your account will appear. To add an amount of money to your account valid for 1 month,<br />
go to the option "One time refill" in the section "Refill" and continue to point # 48. If you want to set up a<br />
monthly automatic recharge of your account, go to the option "Auto Refill" in the section "Payment<br />
Method" and then skip to step # 50.<br />
IMPORTANT: Your FIDO account works like a bank account into which you place money. Withdrawals<br />
are made each month to cover expenses related to the "Data" option that you chose previously<br />
(100Mo/month or 500Mo/month for sending photos via myspypoint). Mandatory fee for access to 911<br />
emergency services are also withdrew each month (about $ 1.15 / month, depending on your province of<br />
residence). For this reason, it is necessary that the balance on your account always includes the amount of<br />
your "Data" option as well as the fee for access to emergency services. When opening your account, we<br />
suggest adding $ 20 extra, which will cover the fee for access to emergency services for the upcoming<br />
months.<br />
49. In the section "One time refill", choose the amount you want to add to your account under the option<br />
"Select the amount" then click "Continue". Several options are available, here are the most advantageous<br />
options depending on the data plan you chose in step # 24:<br />
Select an amount of "$ 10 valid for 30 days" if you chose a data plan of 100 MB for $ 10 / month and<br />
click "Continue"<br />
OR<br />
Select an amount of "$ 30 valid for 30 days" if you chose a data plan of 500 MB for $ 25 / month and<br />
click "Continue" (<strong>Fido</strong> does not refill for $ 25)<br />
OR<br />
Select an amount of "$ 100 valid for 365 days" if you want a long term solution without losing your<br />
balance each month for unused data.<br />
50. On the page "Order Summary", you will find the details of your transaction. Click "Submit" at the bottom<br />
of the page once you have verified the information.<br />
51. In the section "Auto Refill", select the option "Sign up for Auto Refill".<br />
52. On the page "Sign up for Auto Refill" check the box "Sign up to the Monthly option" and then select the<br />
desired amount.<br />
53. Check the confirmation box at the bottom of the page and then click the "Submit" button.<br />
54. You will now be ready to use your <strong>SPYPOINT</strong> LIVE-3G camera.<br />
55. To verify the configuration, go to the “SETTINGS” menu again and select “CONN. TEST”. After a few<br />
seconds, the camera will try its first communication with your account on "my<strong>SPYPOINT</strong>.com". Don’t<br />
forget to select “FIDO” carrier in the “SETTINGS” menu. If an error message shows up, power cycle<br />
the camera and go back to TEST mode to verify the signal strength of the network. If the signal bars are<br />
still red after 2 minutes, that’s mean the cellular signal is not enough powerful at this place. You can try to<br />
make this test outside of your home to get a better signal. If you can't find the solution to the problem, refer<br />
to the section "Error Messages" of your user manual and please contact our technical department at 1-888-<br />
779-7646 during business hours from Monday to Friday from 8:30 to 17:00 −05:00) (UTC or at the<br />
following email address: tech@spypoint.com<br />
F/ENv1.1 Page | 4