Kamai 510 Quick Start Guide - Entone Technologies
Kamai 510 Quick Start Guide - Entone Technologies
Kamai 510 Quick Start Guide - Entone Technologies

Create successful ePaper yourself
Turn your PDF publications into a flip-book with our unique Google optimized e-Paper software.
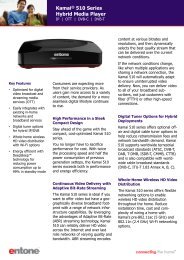
<strong>Kamai</strong><br />
Hybrid TV Media Player<br />
<strong>510</strong> Series <strong>Quick</strong> <strong>Start</strong> <strong>Guide</strong><br />
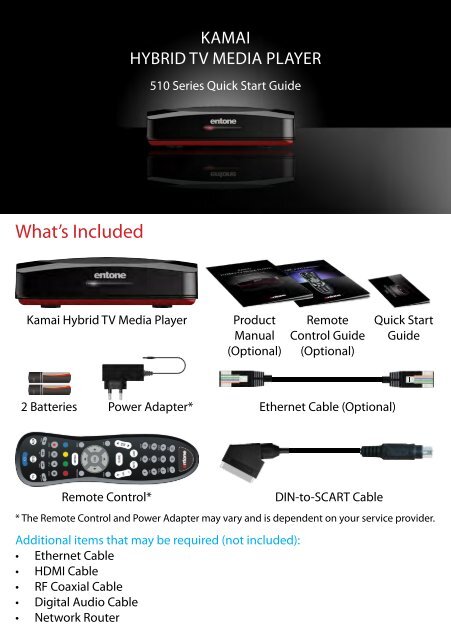
What’s Included<br />
<strong>Kamai</strong> Hybrid TV Media Player<br />
Product<br />
Manual<br />
(Optional)<br />
Remote<br />
Control <strong>Guide</strong><br />
(Optional)<br />
<strong>Quick</strong> <strong>Start</strong><br />
<strong>Guide</strong><br />
2 Batteries Power Adapter*<br />
Ethernet Cable (Optional)<br />
Remote Control*<br />
Additional items that may be required (not included):<br />
• Ethernet Cable<br />
• HDMI Cable<br />
• RF Coaxial Cable<br />
• Digital Audio Cable<br />
• Network Router<br />
DIN-to-SCART Cable<br />
* The Remote Control and Power Adapter may vary and is dependent on your service provider.
<strong>Kamai</strong> at a glance<br />
Smart Card Reader<br />
(Optional)<br />
Factory<br />
Reset<br />
USB<br />
SD Card Reader<br />
Power<br />
Indicator<br />
Antenna/Cable<br />
Connector (Optional)<br />
SD Video<br />
Connector<br />
Ethernet<br />
Connector<br />
Digital<br />
Audio<br />
HDMI<br />
Connector<br />
DC Power<br />
Jack<br />
Basic Remote Functions<br />
Power on/off<br />
▲<br />
◄OK►<br />
▼<br />
ARROW KEYS to navigate within<br />
the menus and OK to select<br />
■ ► || Stop / <strong>Start</strong> / Pause playback<br />
GUIDE Displays program guide INFO Displays program information<br />
CH|PG Changes channel up/down MENU Displays menu or home screen<br />
VOL Increases or decreases volume BACK Goes back one level within menus<br />
MUTE Mutes volume EXIT Exits the current menu item
S-VIdeO<br />
S-VIdeO<br />
Step 1: Connecting to TV<br />
Select only one TV option, then proceed to TV Source<br />
Option #1 Connect via HDMI (Recommended)<br />
Cable not included<br />
Option #2 Connect via DIN-to-SCART<br />
SDTV<br />
Cable included<br />
Step 2: Connecting TV Source (Optional)<br />
Connect to basic unencrypted Cable TV Source or Antenna Source<br />
(Outdoor or Indoor Antenna)<br />
Cable not included
Step 3: Connecting to Network<br />
Select only one Networking option, then proceed to Powering Up<br />
Option #1 Connect to a Wired Network via DSL, Cable Modem or Network<br />
Router<br />
Cable not included<br />
Option #2 Connect to a Wireless Network via a Wireless Network Router<br />
NOTE: Internal Wi-Fi is an optional feature of <strong>Kamai</strong>. Please contact your<br />
service provider for the availability and detailed instructions on the wireless<br />
network configuration.<br />
Step 4: Powering Up<br />
Setting Up Remote Control<br />
1. Open the battery cover by pressing down on the battery cover latch and<br />
sliding it off.<br />
2. Insert the batteries, matching the “+” and “-” marks on the batteries with<br />
the interior of the remote control.<br />
3. Snap the battery cover to close.<br />
NOTE: Please refer to the Remote Control <strong>Guide</strong> for details<br />
Connecting to Power Source<br />
1. Connect the power cord to the POWER port on the back of the <strong>Kamai</strong>.<br />
2. Plug the AC power adapter to a power outlet.<br />
3. Follow the on-screen instructions.<br />
NOTE: Make sure your TV is turned on and the<br />
correct video input is selected.
Important Safety Instructions<br />
• WARNING: To reduce the risk of fire or electric shock, do not expose this<br />
apparatus to rain or moisture.<br />
• The apparatus shall not be exposed to dripping or splashing and that no<br />
objects filled with liquids, such as vases, shall be placed on the apparatus.<br />
• Read these instructions.<br />
• Keep these instructions.<br />
• Heed all warnings.<br />
• Follow all instructions.<br />
• Do not use this apparatus near water.<br />
• Clean only with dry cloth.<br />
• Do not block any ventilation openings. Install in accordance with the<br />
manufacturer’s instructions.<br />
• Do not defeat the safety purpose of the polarized or grounding-type plug.<br />
A polarized plug has two blades with one wider than the other. a grounding<br />
type plug has two blades and a third grounding prong. The wide blade<br />
or the third prongs are provided for your safety. If the provided plug does<br />
not fit into your outlet, consult an electrician for replacement of the obsolete<br />
outlet.<br />
• Protect the power cord from being walked on or pinched particularly at<br />
plugs, convenience receptacles, and the point where they exit from the<br />
apparatus.<br />
• Only use attachments/accessories specified by the manufacturer.<br />
• Unplug this apparatus during lightning storms or when unused for long<br />
periods of time.<br />
• Refer all servicing to qualified service personnel. Servicing is required<br />
when the apparatus has been damaged in any way, such as power-supply<br />
cord or plug is damaged, liquid has been spilled or objects have fallen into<br />
the apparatus, the apparatus has been exposed to rain or moisture, does<br />
not operate normally, or has been dropped.<br />
• To reduce the risk of electric shock, DO NOT remove cover or back panel.<br />
No user serviceable parts inside. Refer servicing to qualified personnel.
Important Safety Instructions (Continued)<br />
• To help prevent electric shock, plug the power cable into properly grounded<br />
sources. Use only properly grounded extension cords and adaptors, if<br />
they are needed.<br />
• The AC main plug is used as the disconnect device, the disconnect device<br />
shall remain readily operable.<br />
• Make sure nothing is lying on any of the cables.<br />
• Be sure the cables are located where they will not be stepped on or tripped<br />
over.<br />
• Do not spill food or liquids onto the unit.<br />
• Do not push any objects into the free slots. Doing so will damage the unit,<br />
can cause fire or electrical shock, and can short out interior components.<br />
• Do not install near any heat sources such as radiators, heat registers,<br />
stoves, or other apparatus (including amplifiers) that produce heat.<br />
• Do not block cooling vents.<br />
• Do not place the equipment in a closed-in wall unit.<br />
• When you disconnect a cable, pull on its connector or on its strain relief<br />
loop, not on the cable itself. Some cables have a connector with locking<br />
tabs; if you are disconnecting this type of cable, press in on the locking<br />
tabs before disconnecting the cables.<br />
• When you connect a cable, make sure both connectors are correctly oriented<br />
and aligned before connecting to avoid bending connector pins.<br />
• For PLUGGABLE EQUIPMENT, the socket-outlet should be installed near the<br />
equipment for easy access.<br />
• Changes or modifications not expressly approved by the party responsible<br />
could void the user’s authority to operate this device.
Declaration of Conformity<br />
To ensure proper use of this product, please read this manual carefully and retain it for future reference.<br />
Should the unit require maintenance, contact an authorized service location.<br />
WARNING: This symbol indicates the presence of uninsulated dangerous voltage within the product’s<br />
enclosure that constitutes a risk of electric shock. Do not open the product’s case.<br />
CAUTION: This symbol indicates you must take care; there is risk of damage to the equipment or to<br />
yourself.<br />
Declaration of Conformity (Europe Only)<br />
This product is in conformity with the Council Directives:<br />
• EMC Directive 2004/108/EC<br />
• Low voltage Directive 2006/95/EC<br />
Industry Canada statement:<br />
This device complies with RSS-210 of the Industry Canada Rules. Operation is subject to the following<br />
two conditions: (1) This device may not cause harmful interference, and (2) this device must accept any<br />
interference received, including interference that may cause undesired operation.<br />
Ce dispositif est conforme à la norme CNR-210 d’Industrie Canada applicable aux appareils radio<br />
exempts de licence. Son fonctionnement est sujet aux deux conditions suivantes: (1) le dispositif ne doit<br />
pas produire de brouillage préjudiciable, et (2) ce dispositif doit accepter tout brouillage reçu, y compris<br />
un brouillage susceptible de provoquer un fonctionnement indésirable.<br />
Radiation Exposure Statement:<br />
This equipment complies with IC radiation exposure limits set forth for an uncontrolled environment.<br />
This equipment should be installed and operated with minimum distance 20cm between the radiator &<br />
your body.<br />
Déclaration d’exposition aux radiations:<br />
Cet équipement est conforme aux limites d’exposition aux rayonnements IC établies pour un environnement<br />
non contrôlé. Cet équipement doit être installé et utilisé avec un minimum de 20 cm de distance<br />
entre la source de rayonnement et votre corps.
Declaration of Conformity (Continued)<br />
To prevent fire or shock hazard, do not expose this product to rain or moisture. To reduce the risk of<br />
electric shock, DO NOT remove the cover or back. No user serviceable parts are inside. For servicing refer<br />
to qualified personnel.<br />
Declaration of Conformity (United States Only)<br />
This device complies with Part 15 of the FCC Rules. Operation is subject to the following conditions:<br />
(1) this device may not cause harmful interference, and (2) this device must accept any interference<br />
received, including interference that may cause undesired operation. This equipment has been tested<br />
and found to comply with the limits for a Class B digital device, pursuant to Part 15 of the Federal Communication<br />
Commission (FCC) Rules. These limits are designed to provide reasonable protection against<br />
harmful interference in a residential installation. This equipment generates, uses, and can radiate radio<br />
frequency energy, and if not installed and used in accordance with the instructions, may cause harmful<br />
interference to radio communications. However, there is no guarantee that interference will not occur in<br />
a particular installation. If this equipment does cause harmful interference to radio or television reception,<br />
which can be determined by turning the equipment OFF and ON, the user is encouraged to try to<br />
correct the interference by one or more of the following measures:<br />
• Reorient or relocate the receiving antenna.<br />
• Increase the separation between the equipment and the receiver.<br />
• Connect the equipment to a different circuit from that to which the receiver is connected.<br />
• Consult the dealer or an experienced radio/TV technician for help.<br />
FCC Caution: Any changes or modifications not expressly approved by the party responsible for compliance<br />
could void the user’s authority to operate this equipment.<br />
This transmitter must not be co-located or operating in conjunction with any other antenna or transmitter.<br />
Radiation Exposure Statement:<br />
This equipment complies with FCC radiation exposure limits set forth for an uncontrolled environment.<br />
This equipment should be installed and operated with minimum distance 20cm between the radiator &<br />
your body.<br />
COPyrIGHT ©2012 <strong>Entone</strong>, Inc. All rights reserved. <strong>Entone</strong>, <strong>Kamai</strong> and “connecting the home” are registered trademarks<br />
of <strong>Entone</strong>, Inc. All other trademarks or registered trademarks belong to their respective owners.<br />
This item incorporates copy protection technology that is protected by U.S. patents and other intellectual property<br />
rights of Rovi Corporation. Reverse engineering and disassembly are prohibited.<br />
P/N: 99-708904-02 - V1.5