WS-100/WS-200S
WS-100/WS-200S
WS-100/WS-200S

You also want an ePaper? Increase the reach of your titles
YUMPU automatically turns print PDFs into web optimized ePapers that Google loves.
Getting Started<br />
Recording<br />
Playing Back<br />
DIGITAL VOICE RECORDER<br />
<strong>WS</strong>-<strong>100</strong>/<strong>WS</strong>-<strong>200S</strong><br />
EN INSTRUCTIONS<br />
Thank you for purchasing an Olympus<br />
Digital Voice Recorder.<br />
Please read these instructions for information<br />
about using the product correctly and safely.<br />
Keep the instructions handy for future reference.<br />
To ensure successful recordings, we recommend that<br />
you test the record function and volume before use.<br />
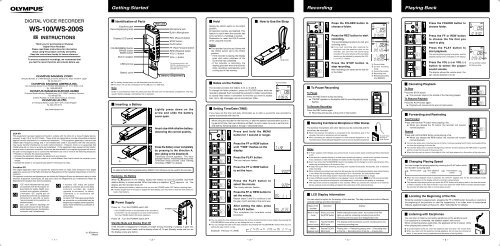
4 Identification of Parts<br />
Earphone jack<br />
Recording/playing lamp<br />
Display (LCD panel)<br />
FOLDER/MENU button<br />
ERASE button<br />
INDEX button<br />
Built-in speaker<br />
USB terminal<br />
Battery cover<br />
Main unit<br />
Microphone jack<br />
Built-in Microphone*<br />
REC (Record) button<br />
STOP button<br />
PLAY button<br />
FF (Fast Forward) button<br />
REW (Rewind) button<br />
VOL (+) button<br />
VOL (–) button<br />
*The microphone built in the<br />
<strong>WS</strong><strong>100</strong> is located only on one<br />
side, and the sound will be<br />
recorded with mono.<br />
Battery compartment<br />
4 Hold<br />
Setting the HOLD switch to the HOLD<br />
position.<br />
All operation buttons are disabled. This<br />
feature is useful when the recorder has<br />
to be carried in a handbag or pocket.<br />
Remember to reset the HOLD switch<br />
when using the recorder.<br />
Notes<br />
s The recorder functions as follows with<br />
the HOLD switch set to the HOLD<br />
position:<br />
– If the recorder is playing, the display<br />
goes dark when playback of the<br />
current file has completed.<br />
– If the recorder is recording, the<br />
display goes dark when the recorder<br />
stops recording automatically upon<br />
running out of free memory.<br />
4 How to Use the Strap<br />
Strap hole<br />
1<br />
Press<br />
2<br />
Press<br />
3<br />
Press<br />
the FOLDER button to<br />
choose a folder.<br />
the REC button to start<br />
recording.<br />
The recording/playing lamp turns red, and<br />
recording starts.<br />
s If you start recording after inserting the<br />
earphone into the earphone jack on the<br />
recorder, you can hear the sound being<br />
recorded. The sound volume on the recording<br />
monitor can be adjusted by pressing the VOL<br />
(+) or VOL (–) button.<br />
the STOP button to<br />
stop recording.<br />
New recordings are saved as the last file<br />
in the folder.<br />
a<br />
b<br />
c<br />
d<br />
e<br />
a Current folder<br />
b Current recording<br />
mode<br />
c Current file number<br />
d Recording time<br />
e Remaining recording<br />
time (REMAIN)<br />
1<br />
Press<br />
2<br />
Press<br />
3<br />
Press<br />
4<br />
Press<br />
the FOLDER button to<br />
choose folder.<br />
the FF or REW button<br />
to choose the file that you<br />
want to play.<br />
the PLAY button to<br />
start playback.<br />
The recording/playing lamp turns green, and the<br />
elapsed playing time is indicated on the display.<br />
the VOL (+) or VOL (–)<br />
button to select the proper<br />
sound volume.<br />
The display shows the volume level. You<br />
can choose between 0 to 30.<br />
a<br />
b<br />
a Current file number<br />
b Playing time<br />
USA RFI<br />
This equipment has been tested and found to comply with the limits for a Class B digital device,<br />
pursuant to part 15 of the FCC Rules. These limits are designed to provide reasonable protection<br />
against harmful interference in a residential installation. This equipment generates, uses and can<br />
radiate radio frequency energy and, if not installed and used in accordance with the instructions,<br />
may cause harmful interference to radio communications. However, there is no guarantee that<br />
interference will not occur in a particular installation. If this equipment does cause harmful interference<br />
to radio or television reception, which can be determined by turning the equipment off and on,<br />
the user is encouraged to try to correct the interference by one or more of the following measures:<br />
• Reorient or relocate the receiving antenna.<br />
• Increase the separation between the equipment and receiver.<br />
• Connect the equipment into an outlet on a circuit different from that to which the receiver is connected.<br />
• Consult the dealer or an experienced radio/TV technician for help.<br />
Canadian RFI<br />
This digital apparatus does not exceed the Class B limits for radio noise emissions from digital<br />
apparatus as set out in the Radio Interference Regulations of the Canadian Department of Communications.<br />
Cet appareil numérique ne dépasse pas les limites de Catégorie B pour les émissions de bruit radio<br />
émanant d’appareils numériques, tel que prévu dans les Règlements sur l’Interférence Radio du<br />
Département Canadien des Communications.<br />
“CE” mark indicates that this product<br />
complies with the European requirements<br />
for safety, health, environment<br />
and customer protection.<br />
L’indication “CE” signfie que ce<br />
produit est conforme aux exigences<br />
concernant la sécurité, la santé,<br />
l’environnement et la protection du<br />
consommateur.<br />
Das „CE“ Zeichen bestätigt die<br />
übereinstimmung mit den Europäischen<br />
Bestimmungen für Betriebssicherheit<br />
und Umweltschutz.<br />
Il marchio “CE” indica che questo<br />
prodotto è conforme alle norme della<br />
comunità europea per quanto<br />
riguarda la sicurezza, la salute,<br />
l’ambiente e la protezione del<br />
consumatore.<br />
La marca “CE” indica que este producto<br />
se encuentra ne conformidad con las<br />
exigencias europeas sobre seguridad,<br />
salud, medio ambiente y protección al<br />
consumidor.<br />
U1-BZ8099-01<br />
AP0501<br />
s The battery compartment can be detached from the main unit.<br />
s The main unit can be connected to a PC USB port or a USB hub.<br />
Note<br />
Under no circumstances insert any other parts than the main unit into the battery compartment. This may<br />
result in battery leakage, overheating, fire or explosion.<br />
4 Inserting a Battery<br />
A<br />
1<br />
Lightly<br />
2<br />
Insert<br />
3<br />
Close<br />
press down on the<br />
arrow and slide the battery<br />
cover open.<br />
size-AAA alkaline battery,<br />
observing the correct polarity.<br />
the battery cover completely<br />
by pressing to the direction A,<br />
then sliding to the direction B.<br />
Time/Date screen appears. The hour<br />
indicator flashes, indicating the start of the<br />
Time/Date setup process. (See “Setting<br />
Time/Date (TIME)” for details)<br />
An optional Ni-MH Rechargeable battery (BR401) from Olympus can be used for the recorder.<br />
Replacing the Battery<br />
When appears on the display, replace the battery as soon as possible. Size-AAA<br />
alkaline battery is recommended. When the battery is depleted, appears on the<br />
display, and the recorder shuts off.<br />
s When replacing the battery, make sure that you turn the POWER switch OFF before replacing them.<br />
s If it takes longer than 15 minutes to replace the dead battery, you may have to reset the time when you<br />
load a fresh battery.<br />
4 Power Supply<br />
Power on…Turn the POWER switch ON.<br />
If the POWER switch on the backside of this recorder is<br />
turned OFF, it is not possible to use any of the functions.<br />
Turn the POWER switch ON before operation.<br />
Power off…Turn the POWER switch OFF.<br />
B<br />
POWER switch<br />
Standby Mode and Display Shut Off<br />
If the recorder is stopped for 5 minutes or longer during recording or playing, it goes into<br />
Standby (power-save) mode, and the display shuts off. To exit Standby mode and turn on<br />
the display, press any button.<br />
4 Notes on the Folders<br />
The recorder provides five folders, A, B, C, D and E.<br />
To change the folder selection, press the FOLDER button while the<br />
recorder is stopped. Each recorded file is stored in a folder. Using folders<br />
to classify files makes it convenient to find files you want to access<br />
later. Up to 199 messages can be recorded per folder.<br />
4 Setting Time/Date (TIME)<br />
1<br />
Press<br />
2<br />
Press<br />
3<br />
Press<br />
4<br />
Press<br />
5<br />
Press<br />
6<br />
Press<br />
7<br />
After<br />
s You can switch the time indication between the 12-hour system and the 24-hour system by pressing the<br />
FOLDER/MENU button while you are setting the hour or minute.<br />
s You can change the order of the date indication by pressing the FOLDER/MENU button while you are<br />
setting the year, month, or day.<br />
(Example: February 14, 2005)<br />
and hold the MENU<br />
button for 1 second or longer.<br />
the FF or REW button<br />
until “TIME” flashes on the<br />
display.<br />
the PLAY button.<br />
The hour indicator flashes.<br />
the FF or REW button<br />
to set the hour.<br />
the PLAY button to<br />
select the minute.<br />
The minute indicator flashes.<br />
the FF or REW button to<br />
set the minute.<br />
Repeat steps 5 and 6 to continue to set<br />
the year, month and date in the same way.<br />
setting the date, press<br />
the PLAY button.<br />
This completes the time/date setup<br />
procedure.<br />
Current folder<br />
If you have set the time and date, information as to when a sound file was recorded is<br />
stored automatically with that file.<br />
When using the recorder for the first time, or after the battery has been taken out for a<br />
log period of time, the hour indication will flash. In such a case, be sure to set the time<br />
and date by following steps 4 through 7 described below.<br />
4 To Pause Recording<br />
To Pause<br />
Press the REC button during recording.<br />
➥ “PAUSE” appears on the display and the recording/playing lamp<br />
flashes.<br />
To Resume Recording<br />
Press the REC button again.<br />
➥ Recording will resume at the point of interruption.<br />
4 Recording from External Microphone or Other Devices<br />
The external microphone and other devices can be connected and the<br />
sound can be recorded.<br />
s When the external microphone is connected to the microphone jack of the<br />
recorder, the built-in microphone will not operate.<br />
s When connecting an external microphone or other external equipment to the<br />
microphone jack, choose adequate equipment, such as a mono microphone (optional).<br />
Notes<br />
s If “FULL” appears on the display, you cannot record. In such a case, erase unnecessary files or download<br />
to PC.<br />
s If the recorder is placed directly on a table when recording a meeting, it tends to pick up table vibrations.<br />
Put a notebook or other item between the table and the recorder for clearer recording.<br />
s Even if you press the FOLDER/MENU button, the display will not change to current recording time if the<br />
remaining recording time is 5 minutes or less.<br />
s A beep will sound when remaining recording time reaches 60 seconds, 30 seconds, and 10 seconds<br />
while recording.<br />
s When remaining recording time is less than 60 seconds, the recording/playing display lamp starts flashing<br />
in red. When the recording time is decreasing to 30 or 10 seconds, the lamp flashes faster.<br />
s The recorder will enter Stop mode if it has been left paused for 60 minutes or longer.<br />
s In case of difficult acoustic conditions or low speaker’s voice, recording in HQ or HQ is recommended.<br />
Also, usage of an external microphone (sold separately) could improve the quality of recordings.<br />
s The input level cannot be adjusted on this recorder. When you connect the recorder to an external<br />
device, execute a test recording and adjust the output level of the external device.<br />
4 LCD Display Information<br />
To audio input<br />
terminal of<br />
other devices<br />
You can select an option for the display of the recorder. This help review and confirm different<br />
recorder settings and file information.<br />
State of the<br />
recorder<br />
While in stop<br />
mode<br />
While in<br />
record mode<br />
While in<br />
playback mode<br />
Operation<br />
Press and hold<br />
the STOP button<br />
Press the FOLDER/<br />
MENU button<br />
Press the FOLDER/<br />
MENU button<br />
Display<br />
While holding the button down, the number of all files<br />
lights up and the remaining recording time and the<br />
remaining memory space are displayed by turns.<br />
The display switches between current recording time and<br />
remaining recording time.<br />
Playing time → Remaining playing time → Recording date<br />
of the file → Recording time of the file → Playing time . . .<br />
4 Canceling Playback<br />
To Stop<br />
Press the STOP button.<br />
➥ The recorder stops in the middle of the file being played.<br />
To Resume Playback<br />
Press the PLAY button again.<br />
➥ Playback will resume at the point of interruption.<br />
4 Forwarding and Rewinding<br />
Fast Forward<br />
Press and hold the FF button while playing a file.<br />
➥ When you release the FF button, the recorder will resume<br />
normal playback.<br />
Rewind<br />
Press and hold the REW button while playing a file.<br />
➥ When you release the REW button, the recorder will resume<br />
normal playback.<br />
s The recorder stops when it reaches the end of the file. Continue pressing the FF button to proceed with the<br />
cue from the beginning of the next file.<br />
s The recorder stops when it reaches the beginning of the file. Continue pressing the REW button to proceed<br />
with the review from the end of the previous file.<br />
s When the index mark is shown in the middle of a file, it will stop temporarily in the position of the index mark.<br />
4 Changing Playing Speed<br />
You can change the playing speed by pressing the PLAY button while<br />
the recorder is playing back.<br />
Normal speed<br />
Slow playback<br />
(-25%)<br />
Fast playback<br />
(+50%)<br />
s When the slow playback mode is selected, the “S.PLAY” appears and, for the fast playback mode,<br />
“F.PLAY” appears on the display while the recorder is playing back.<br />
s The recorder stops playing when you press the STOP button while playing back in the slow/fast mode,<br />
or when it reaches to the end of the file. If you once press the STOP button and start playback again,<br />
the recorder will play back files in normal speed as well.<br />
4 Locating the Beginning of the File<br />
While the recorder is playing back, pressing the FF or REW button forwards or rewinds to<br />
the beginning of the previous or next file respectively. If an index mark is encountered<br />
midway, playback begins at that point. (See “Index Marks” for details)<br />
4 Listening with Earphones<br />
You can listen to files by connecting earphones to the earphone jack.<br />
If an earphone is connected, the speaker doesn't emit sound.<br />
When connecting stereo earphones, the playback will be in stereo. (Only<br />
when playing back stereo files.)<br />
s To avoid irritation to the ear, insert the earphone after turn down the volume level.<br />
s When you listen with the earphone during playback, do not raise the volume too<br />
much. It may cause hearing impairment and decrease in hearing ability.<br />
- 1 -<br />
- 2 - - 3 -<br />
- 4 - - 5 -
➜<br />
➜<br />
Erase<br />
Menu<br />
Other Functions<br />
For safe And Correct Usage<br />
4 Erasing<br />
You can easily erase unnecessary files. Sequential file numbers are reassigned automatically.<br />
Erasing One File at a Time<br />
1<br />
Press<br />
2<br />
Press<br />
3<br />
Press<br />
4<br />
Press<br />
Erase All Files from a Folder<br />
1<br />
Press<br />
2<br />
Press<br />
3<br />
Press<br />
the FOLDER button<br />
to choose a folder.<br />
the FF or REW button<br />
to choose the file you want<br />
to erase.<br />
the ERASE button for<br />
less than 3 seconds.<br />
The “ERASE” indicator flashes.<br />
the ERASE button<br />
again.<br />
“DONE” blinks for two seconds and<br />
the deletion will be complete.<br />
the FOLDER button<br />
to choose a folder.<br />
and hold the ERASE<br />
button for 3 seconds or<br />
longer.<br />
The “ERASE” indicator flashes.<br />
the ERASE button<br />
again.<br />
“DONE” blinks for two seconds and<br />
the deletion will be complete.<br />
Notes<br />
s An erased file cannot be restored.<br />
s The file set to erase lock will not be erased.<br />
s If operation is not executed for 8 seconds during the setting, it will return to the stop<br />
status.<br />
s Completion of erasing may take several tens of seconds. Do not remove the battery or<br />
detach the battery compartment from the recorder during in that time. Otherwise data<br />
may be damaged.<br />
4 Display (LCD panel)<br />
1 7<br />
2<br />
8<br />
3<br />
9<br />
4<br />
0<br />
5<br />
6<br />
File to be erased<br />
Folder to be erased<br />
1 Folder indicator<br />
2 Record mode indicator<br />
3 Microphone sensitivity display<br />
4 VCVA (Variable Control Voice Actuator) indicator<br />
5 Erase lock indicator<br />
6 Current time/date, recording date (REC DATE), remaining<br />
recording time (REMAIN), menu display, file length<br />
7 Battery indicator<br />
8 Index indicator<br />
9 Stereo display<br />
0 Current file number<br />
4 Menu List<br />
HQ<br />
HQ<br />
SP<br />
LP<br />
HI<br />
LO<br />
4 Basic Operation of the Menu Mode<br />
Using the menu function, you can change various settings according to your preference.<br />
1<br />
Press<br />
2<br />
Press<br />
3<br />
Press<br />
4<br />
Use<br />
5<br />
Press<br />
6<br />
Press<br />
OFF<br />
On<br />
AM/PM<br />
Month/Day/Year<br />
s The recorder will stop if you leave it idle for 3 minutes during a menu setup operation, when a selected<br />
item is not applied.<br />
s If you press the STOP or REC button during a menu setup operation, the recorder will stop and apply<br />
the items that were set to that point.<br />
4 Recording Modes (MOdE)<br />
and hold the MENU<br />
button for 1 second or longer<br />
while the recorder is stopped.<br />
the FF or REW button<br />
to select what you would like<br />
to set up.<br />
the PLAY button to<br />
select the item to be set up.<br />
the FF or REW button to<br />
change the setting.<br />
the PLAY button to<br />
confirm the setting.<br />
the STOP button to<br />
close the menu.<br />
The recording mode can be chosen from HQ (stereo high quality<br />
sound recording) and HQ (high quality sound recording), SP (standard<br />
recording), and LP (long-term recording).<br />
In Menu mode selection... HQ, HQ, SP, LP<br />
Current recording mode<br />
s The recording time shown above is for one continuous file. The available recording time may be shorter<br />
than specified if several files are recorded. (Use the remaining time and recorded time only as references.)<br />
s HQ is only available for the <strong>WS</strong>-<strong>200S</strong>.<br />
nO<br />
yES<br />
OFF<br />
On<br />
On<br />
OFF<br />
OFF<br />
➜: Press the FF or REW button./ ➞ : Press the PLAY button./ ■ : Initial setting<br />
s HQ is only available for the <strong>WS</strong>-<strong>200S</strong>.<br />
s <strong>WS</strong>-<strong>200S</strong> is set to HQ by default.<br />
s <strong>WS</strong>-<strong>100</strong> is set to HQ by default.<br />
Mode<br />
Model<br />
<strong>WS</strong>-<strong>200S</strong><br />
<strong>WS</strong>-<strong>100</strong><br />
HQ HQ SP LP<br />
Approx.4 hours 20 minutes Approx.8 hours 50 minutes Approx.17 hours 25 minutes Approx.54 hours 50 minutes<br />
On<br />
Approx.4 hours 20 minutes Approx.8 hours 40 minutes Approx.27 hours 20 minutes<br />
4 Microphone Sensitivity (MIC)<br />
Microphone sensitivity is adjustable to meet your recording needs.<br />
In Menu mode selection... HI, LO<br />
HI: High-sensitivity mode that records sounds in all directions.<br />
LO: Low-sensitivity mode suited for dictation.<br />
s To ensure successful recording, make a test recording to choose appropriate<br />
microphone sensitivity before recording.<br />
s If you choose “HI”, we recommend setting the recording mode to HQ or<br />
HQ to best take advantage of the higher sensitivity.<br />
s If you choose “HI”, background noise may be high depending on the recording conditions.<br />
4 Locking Files (LOCK)<br />
Locking a file keeps important data from being accidentally erased.<br />
Locked files are not erased when you choose to erase all files from a folder.<br />
In Menu mode selection... On, OFF<br />
On: Locks the file and prevents it from being erased.<br />
OFF: Unlocks the file and allows it to be erased.<br />
4 Formatting the Recorder (FORMAT)<br />
If you format the recorder, all function settings will return to their defaults.<br />
All files stored in the recorder will be deleted.<br />
If you have important files that you want to save, connect the recorder to a computer and<br />
transfer those files from the recorder to the computer before formatting the device.<br />
1 Press the MENU button.<br />
2 Press the FF or REW button to choose “FORMAT”.<br />
3 When the PLAY button is pressed, “nO” is displayed.<br />
4 Press FF or REW to select “yES”, and press the<br />
PLAY button.<br />
After “ARE yOU SURE” is displayed, “nO” will be displayed.<br />
5 Press FF or REW to select “yES”, and press the<br />
PLAY button.<br />
“DONE” displays when formatting ends.<br />
Erase lock indicator<br />
s It may take up to several tens of seconds to finish the initialization. Do not remove the battery or detach<br />
the battery compartment from the recorder during that time. Otherwise data may be damaged.<br />
s Never format the recorder from a PC.<br />
s When the recorder is formatted, all the stored data, including locked files, are erased.<br />
4 Continuous Playback (All PLAY)<br />
This function allows you to listen to all your recordings of one folder in<br />
one go without any stop between the files.<br />
In Menu mode selection... On, OFF<br />
On: Continuous playback.<br />
OFF: Returns to normal playback mode.<br />
s After the last file in the folder plays, “END” appears on the screen and playback<br />
stops automatically.<br />
4 System Sounds (bEEP)<br />
The recorder beeps to alert you to button operations or warn you of<br />
errors. System sounds may be turned off.<br />
In Menu mode selection... On, OFF<br />
4 Using The Variable Control Voice Actuator (VCVA)<br />
When the microphone senses that sounds have reached a preset<br />
volume, the built-in Variable Control Voice Actuator (VCVA) starts<br />
recording automatically, and stops it when the volume drops.<br />
Particularly helpful for extended recording, the VCVA not only conserves<br />
memory by turning off recording during silent periods, but also makes<br />
playback more efficient and convenient.<br />
In Menu mode selection... On, OFF<br />
s Using the FF and REW buttons, the VCVA level can be adjusted in 15 levels.<br />
s The recording/playing lamp is lit during recording. When the recorder is in Standby<br />
mode, the recording/playing lamp flashes and “VCVA” flashes on the display.<br />
Microphone<br />
sensitivity display<br />
VCVA indicator<br />
4 Connecting to Your PC<br />
Apart from using this unit as a recorder, you can use it as an external memory for your<br />
computer, as a storage device.<br />
s You can save the voice files recorded with this recorder on your PC as back-up.<br />
s You can save images, text data, etc. on this recorder.<br />
s The recorder will record in WMA (Windows Media Audio) format.<br />
s The audio files recorded by this recorder can be played back on your computer using Windows Media<br />
Player. You can also transfer the WMA files downloaded with Windows Media Player to your recorder<br />
and enjoy them (excluding files with copyright protection).<br />
1 Before you detach the recorder, turn the<br />
POWER switch OFF and make sure that the<br />
display is turned off.<br />
If you detach the recorder before the display is turned off,<br />
data may be damaged.<br />
2 Connect the recorder’s USB terminal to a PC USB port<br />
or USB hub.<br />
While connecting to the PC, “PC” is displayed blinking.<br />
Once “PC LINK” is displayed, you can save or read the data.<br />
While transmitting data, “bUSy” is displayed, and the recording/<br />
playing lamp flashes.<br />
3 Transfer the audio files to your computer.<br />
Connect the recorder to your computer and launch Explorer. The<br />
recorder will be recognized as a removable disk.<br />
Each of the five folders is named as DSS_FLDA, B, C, D and E.<br />
The audio files are saved in these folders.<br />
All the audio files recorded by this recorder will be in .WMA format.<br />
( i.e. V_200001.WMA)<br />
You can copy them to any folder on your computer. Double click<br />
the audio file, and Windows Media Player will be launched and<br />
start playing back.<br />
If you are using Windows 2000, Windows Media Player must be<br />
installed on the PC.<br />
4 Before you detach the recorder from the PC, carry out<br />
“Remove Removable Media Device” and make sure<br />
that the display is turned off.<br />
Using the recorder on your PC<br />
PC:<br />
Operating System:<br />
USB port:<br />
Notes<br />
IBM PC/AT compatible PC<br />
Microsoft Windows Me/ 2000 Professional/XP Professional,Home Edition<br />
One free port<br />
The support service will not cover if your PC has been updated from Windows 95 or 98 to Windows Me/<br />
2000/XP. Any failure on a self-modified PC will not be covered under the operational warranty.<br />
s NEVER disconnect the USB cable while the record/play indicator lamp is flashing. If you do, the data<br />
will be destroyed.<br />
s Be sure to push the cable connector all the way in. Otherwise, the recorder may not operate properly.<br />
s Refer to the user's manual for your PC regarding the USB port or USB hub on your PC.<br />
s Use the supplied USB extension cable depending on situations.<br />
4 Index Marks<br />
Index marks can be placed in a file during recording or playback to provide and quick and<br />
easy way of keeping track of important sections in the file.<br />
1 Press the INDEX button during recording (pause recording) or playback to set<br />
an index mark.<br />
An index number appears on the display.<br />
Clearing an Index Mark<br />
Press the ERASE button while the index number appears on the display.<br />
s Up to 16 index marks can be set in a file.<br />
s Sequential index marks numbers are reassigned automatically.<br />
s Index marks cannot be set or cleared in a locked file.<br />
s Index marks can be placed only on to the files recorded by this recorder or Olympus IC recorder.<br />
General Precautions<br />
USB terminal<br />
Read this manual carefully to ensure that you know how to operate it safely and correctly.<br />
Keep this manual in an easily accessible location for future reference.<br />
• The warning symbols indicate important safety related information. To protect yourself and others<br />
from personal injury or damage to property, it is essential that you always read the warnings<br />
and information provided.<br />
Warning regarding data loss<br />
Recorded content in memory may be destroyed or erased by operating mistakes, unit malfunction,<br />
or during repair work. For important recorded content, we recommend you to write it down somewhere<br />
or make a back-up by downloading to a PC.<br />
• Do not leave the recorder in hot, humid locations such as inside a closed automobile<br />
under direct sunlight or on the beach in the summer.<br />
• Do not store the recorder in places exposed to excessive moisture or dust.<br />
• Do not use organic solvents such as alcohol and lacquer thinner to clean the unit.<br />
• Do not place the recorder on top of or near electric appliances such as TVs or refrigerators.<br />
• Avoid sand or dirt. These can cause irreparable damage.<br />
• Avoid strong vibrations or shocks.<br />
• Do not disassemble, repair or modify the unit yourself.<br />
• Do not operate the unit while operating a vehicle (such as a bicycle, motorcycle, or go-cart).<br />
• Keep the unit out of the reach of children.<br />
Batteries<br />
Warning<br />
• Under no circumstances insert any other parts than the main unit into the battery compartment.<br />
This may result in battery leakage, overheating, fire or explosion.<br />
• Batteries should never be exposed to flame, heated, short-circuited or disassembled.<br />
• Do not attempt to recharge alkaline, lithium or any other non-rechargeable batteries.<br />
• Never use any battery with a torn or cracked outer cover.<br />
• Keep batteries out of the reach of children.<br />
• If you notice anything unusual when using this product such as abnormal noise, heat,<br />
smoke, or a burning odor:<br />
1 remove the batteries immediately while being careful not to burn yourself, and;<br />
2 call your dealer or local Olympus representative for servicing.<br />
Troubleshooting<br />
Q1 Nothing happens when a button is pressed.<br />
A1 • The HOLD switch may be set to HOLD.<br />
• The batteries may be depleted.<br />
• The batteries may be inserted incorrectly.<br />
Q2 No sound or quiet sound is heard from the speaker while playing back.<br />
A2 • The earphone plug may be plugged into the recorder.<br />
• The volume may be set to the minimum level.<br />
Q3 Recording is not possible.<br />
A3 By pressing the STOP button repeatedly while the recorder stops, check if the<br />
display shows:<br />
• The remaining recording time in the selected folder may have reached“00:00”.<br />
• The number of files is 199.<br />
Check if the display shows “FULL” by pressing the REC button.<br />
Q4 The playback speed is too fast (slow).<br />
A4 The recorder may be set to Fast (slow) Playback.<br />
Specifications<br />
Recording medium:<br />
Recording time:<br />
Microphone:<br />
Speaker:<br />
Maximum power:<br />
Earphone jack (stereo):<br />
Microphone jack:<br />
(<strong>WS</strong>-<strong>200S</strong>: stereo)<br />
(<strong>WS</strong>-<strong>100</strong>: monaural)<br />
Power supply:<br />
Continuous battery use time (LP):<br />
Dimensions:<br />
Weight:<br />
Built-in flash memory<br />
<strong>WS</strong>-<strong>200S</strong>: 128 MB<br />
HQ mode: Approx. 4 hours 20 minutes<br />
HQ mode: Approx. 8 hours 50 minutes<br />
SP mode: Approx. 17 hours 25 minutes<br />
LP mode: Approx. 54 hours 50 minutes<br />
<strong>WS</strong>-<strong>100</strong>: 64 MB<br />
HQ mode: Approx. 4 hours 20 minutes<br />
SP mode: Approx. 8 hours 40 minutes<br />
LP mode: Approx. 27 hours 20 minutes<br />
Electret Condenser Microphone (monaural)<br />
Built-in ø 16 mm round dynamic speaker<br />
<strong>100</strong> mW<br />
ø 3.5 mm diameter, impedance 8 Ω<br />
ø 3.5 mm diameter, impedance 2 kΩ<br />
AAA (LR03 or R03) battery or<br />
Ni-MH rechargeable battery<br />
Alkaline battery: Approx. 13 hours<br />
Ni-MH rechargeable battery: Approx. 12 hours<br />
94 (L) × 40 (W) × 15.1 (T) mm<br />
<strong>WS</strong>-<strong>200S</strong>: 54 g (including battery)<br />
<strong>WS</strong>-<strong>100</strong>: 54 g (including battery)<br />
* Battery life is measured by Olympus. It varies greatly according to the type of batteries<br />
used and the conditions of use.<br />
* Your recorded contents are for your personal use or pleasure only. It is prohibited to record<br />
copyrighted material without permission of the copyright holders according to copyright law.<br />
* Specifications and design are subject to change without notice for improvement of performance.<br />
Accessories (Optional)<br />
Ni-MH Rechargeable Battery Charger: BU-400 (Europe only)<br />
Ni-MH Rechargeable Battery: BR401<br />
Connecting cord (Earphone jack ↔ Microphone jack): KA333<br />
Stereo microphone: ME51S (for <strong>WS</strong>-<strong>200S</strong>)<br />
Noise Cancellation monaural microphone: ME12<br />
Electret condenser microphone: ME15<br />
Telephone pickup: TP7<br />
- 6- - 7 - - 8 - - 9 - - 10 -