important safety instructions read and follow all ... - aquarium line
important safety instructions read and follow all ... - aquarium line
important safety instructions read and follow all ... - aquarium line

You also want an ePaper? Increase the reach of your titles
YUMPU automatically turns print PDFs into web optimized ePapers that Google loves.
IMPORTANT SAFETY INSTRUCTIONS<br />
USA<br />
WARNING – To guard against injury, basic <strong>safety</strong> precautions<br />
should be observed, including the <strong>follow</strong>ing.<br />
a) READ AND FOLLOW ALL<br />
SAFETY INSTRUCTIONS.<br />
b) DANGER – To avoid possible electric shock, special care<br />
should be taken since water is employed in the use of <strong>aquarium</strong><br />
equipment. For each of the <strong>follow</strong>ing situations, do not<br />
attempt repairs by yourself; return the appliance to an authorized<br />
service facility for service or discard the appliance.<br />
1) If the appliance f<strong>all</strong>s into the water, DON’T reach for it!<br />
First unplug it <strong>and</strong> then retrieve it. If electrical components<br />
of the appliance get wet, unplug the appliance immediately.<br />
(Non-immersible equipment only)<br />
2) If the appliance shows any sign of abnormal water leakage,<br />
immediately unplug it from the power source. (Immersible<br />
equipment only).<br />
3) Carefully examine the appliance after inst<strong>all</strong>ation. It should<br />
not be plugged in if there is water on parts not intended to<br />
be wet.<br />
4) Do not operate any appliance if it has a damaged cord or<br />
plug, or if it is malfunctioning or has been dropped or damaged<br />
in any manner.<br />
5) To avoid the possibility of the appliance plug or receptacle<br />
getting wet, position <strong>aquarium</strong> st<strong>and</strong> <strong>and</strong> tank to one side of<br />
a w<strong>all</strong>-mounted receptacle to prevent water from dripping onto<br />
the receptacle or plug.<br />
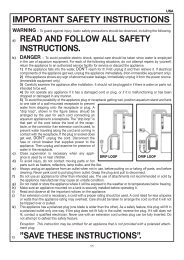
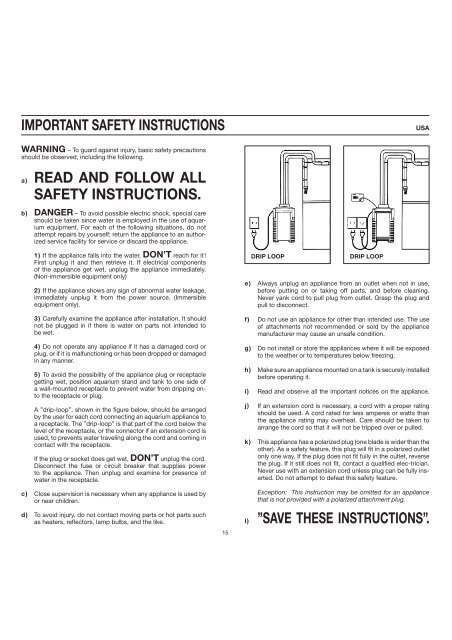
A ”drip-loop”, shown in the figure below, should be arranged<br />
by the user for each cord connecting an <strong>aquarium</strong> appliance to<br />
a receptacle. The ”drip-loop” is that part of the cord below the<br />
level of the receptacle, or the connector if an extension cord is<br />
used, to prevents water traveling along the cord <strong>and</strong> coming in<br />
contact with the receptacle.<br />
If the plug or socket does get wet, DON’T unplug the cord.<br />
Disconnect the fuse or circuit breaker that supplies power<br />
to the appliance. Then unplug <strong>and</strong> examine for presence of<br />
water in the receptacle.<br />
c) Close supervision is necessary when any appliance is used by<br />
or near children.<br />
d) To avoid injury, do not contact moving parts or hot parts such<br />
as heaters, reflectors, lamp bulbs, <strong>and</strong> the like.<br />
15<br />
DRIP LOOP<br />
DRIP LOOP<br />
e) Always unplug an appliance from an outlet when not in use,<br />
before putting on or taking off parts, <strong>and</strong> before cleaning.<br />
Never yank cord to pull plug from outlet. Grasp the plug <strong>and</strong><br />
pull to disconnect.<br />
f) Do not use an appliance for other than intended use. The use<br />
of attachments not recommended or sold by the appliance<br />
manufacturer may cause an unsafe condition.<br />
g) Do not inst<strong>all</strong> or store the appliances where it will be exposed<br />
to the weather or to temperatures below freezing.<br />
h) Make sure an appliance mounted on a tank is securely inst<strong>all</strong>ed<br />
before operating it.<br />
i) Read <strong>and</strong> observe <strong>all</strong> the <strong>important</strong> notices on the appliance.<br />
j) If an extension cord is necessary, a cord with a proper rating<br />
should be used. A cord rated for less amperes or watts than<br />
the appliance rating may overheat. Care should be taken to<br />
arrange the cord so that it will not be tripped over or pulled.<br />
k) This appliance has a polarized plug (one blade is wider than the<br />
other). As a <strong>safety</strong> feature, this plug will fit in a polarized outlet<br />
only one way. If the plug does not fit fully in the outlet, reverse<br />
the plug. If it still does not fit, contact a qualified elec-trician.<br />
Never use with an extension cord unless plug can be fully inserted.<br />
Do not attempt to defeat this <strong>safety</strong> feature.<br />
Exception: This instruction may be omitted for an appliance<br />
that is not provided with a polarized attachment plug.<br />
l) ”SAVE THESE INSTRUCTIONS”.
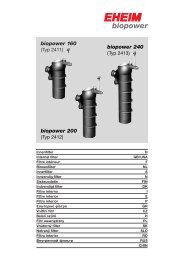
EHEIM professionel wet/dry canister filter 2227 <strong>and</strong> 2229<br />
EHEIM professionel wet/dry thermofilter 2327 <strong>and</strong> 2329<br />
Pump head Sealing gasket Output pipe Lattice<br />
screen Media containers EZ clips Filter canister<br />
Wet/dry floater compartment Sealing ring Wet/dry<br />
floating control valve Locking pins Integrated double<br />
tap connector Hose clamp Security outlet pipe Spray<br />
bar <strong>and</strong> end cap Intake pipe Intake strainer Foam<br />
prefilter Intake/outtake for breather tube Tubing 21 Suction<br />
cups with clips 22 Key for locking pins 23 Vase<strong>line</strong><br />
24 Cleaning brush Thermofilter: 25 Thermostat 26 Temperature<br />
sensor 27 Velcro tape<br />
Attention: 2327 <strong>and</strong> 2329 thermofilters should only be<br />
used for freshwater.<br />
When unpacking, please check to make sure that <strong>all</strong> parts<br />
have been included.<br />
Assembly<br />
Attention: In order to guarantee the synchronized functioning<br />
of the wet/dry filter, use only the enclosed original parts.<br />
Changes should not be made in the intake or output areas.<br />
Flip out <strong>all</strong> four EZ clips <strong>and</strong> push upwards. With the help of<br />
the two recessed lid h<strong>and</strong>les, the pump head of the filter can<br />
be easily removed.<br />
Now fill the media containers to just below the edge, ONLY<br />
with original SUBSTRATpro or EHFISUBSTRAT filter media.<br />
Attention: Do not overfill. Do not clog flow-through<br />
pipe. In <strong>all</strong> media containers only use SUBSTRATpro<br />
or EHFISUBSTRAT.<br />
Then, thoroughly rinse filter media under running water until<br />
<strong>all</strong> cloudiness has disappeared.<br />
After you have checked to be sure that the wet/dry connection<br />
supports are not soiled, put the first media container<br />
back into the filter canister. When doing so, be sure that the<br />
flow-through opening sits above the wet/dry connection<br />
supports. Firmly press the media container downwards until<br />
it rests on the support frames. This guarantees a secure seal<br />
between media container <strong>and</strong> filter canister.<br />
Take out the lattice<br />
screen as well as the<br />
individual media containers<br />
one at a time.<br />
The retractable h<strong>and</strong>les<br />
of the media containers<br />
can be pulled<br />
out in an upward direction.<br />
Push in the second (<strong>and</strong> third) media container in the same<br />
manner, so that the pipe openings lie on top of each other.<br />
Again lower the retractable h<strong>and</strong>les for each of them <strong>and</strong><br />
be sure that <strong>all</strong> of the media containers lie flush on top of<br />
each other. Place lattice screen.<br />
16
Examine the wet/dry floater compartment to make sure it is<br />
securely attached to the filter canister: the upper connection<br />
must be firmly inserted into the canister; the two lower<br />
locking pins must be closed so that the slots are each in<br />
a horizontal position (horizontal = closed, vertical = open).<br />
Easy access to the locking pins is provided by the enclosed<br />
locking key.<br />
ATTENTION: Before the integrated double tap connector is<br />
inserted into the pump head of the filter, examine <strong>all</strong> three o-<br />
rings for damage <strong>and</strong> correct fitting. Lightly grease the o-<br />
rings with Vase<strong>line</strong> to help inst<strong>all</strong>ation.<br />
Fully insert the integrated double tap connector, with the<br />
locking clamp in an upright position, into the opening on the<br />
pump head. To fasten the locking clamp into its sealed position,<br />
push the h<strong>and</strong>le downwards.<br />
Tubing Inst<strong>all</strong>ation<br />
Shut off the integrated double tap connector by shifting the<br />
two levers to the OFF position.<br />
Slightly lubricate the o-ring of the output pipe <strong>and</strong> insert it<br />
firmly into the pump cover. Examine the sealing gasket on the<br />
pump head of the filter for clean<strong>line</strong>ss <strong>and</strong> proper fit.<br />
With the output pipe inserted into the intake of the impeller<br />
lid, place the pump head onto the filter canister, so that the<br />
output pipe is guided through the openings of the media containers<br />
<strong>and</strong> fits correctly into the wet/dry connection at the<br />
bottom of the canister. Close <strong>all</strong> four EZ clips.<br />
on<br />
off<br />
off<br />
on<br />
Push the enclosed tubing onto the corresponding tubing<br />
openings of the adaptor as far as they will go, starting with the<br />
sm<strong>all</strong>est tube diameter. If this is difficult to do, soak the hoses<br />
in warm water beforeh<strong>and</strong> to make them softer.<br />
It is very <strong>important</strong> to use original EHEIM hoses only.<br />
17
Attach the two-part tubing clamp around the inst<strong>all</strong>ed<br />
tubing, hang into the proper position <strong>and</strong> clip into place.<br />
Place the <strong>read</strong>y to use filter into the lower cabinet <strong>and</strong><br />
observe the prescribed inst<strong>all</strong>ation height: The distance<br />
between the water surface <strong>and</strong> the bottom of the filter<br />
must be within 100 - 120 cm (3’3” - 3’11”). This inst<strong>all</strong>ation<br />
height is absolutely vital to guarantee the correct rhythmic<br />
functioning of the wet/dry filter.<br />
Attention: The foam prefilter is only to be used during the<br />
running-in period, approx. 6 - 8 weeks. Afterwards the bacteria<br />
strains in the filter media take over the biological <strong>and</strong><br />
mechanical filtration. The foam prefilter should then be<br />
removed.<br />
Note:<br />
When using with an EHEIM<br />
professionel hood, the intake<br />
pipe is simply clipped into<br />
place <strong>and</strong> you don’t need the<br />
suction cups.<br />
Connect the security outlet pipe <strong>and</strong> spray bar with a short<br />
piece of tubing <strong>and</strong> inst<strong>all</strong> in the <strong>aquarium</strong> with the help of the<br />
clip <strong>and</strong> suction cup. Close the open side of the spray bar with<br />
the enclosed end cap.<br />
100 - 120 cm<br />
Fix the intake strainer onto<br />
the intake pipe <strong>and</strong> attach<br />
the pipe onto the interior<br />
glass of the tank with 2 clips<br />
<strong>and</strong> suction cups.<br />
Place the foam prefilter<br />
over the intake strainer.<br />
Now direct <strong>all</strong> three tubes, starting from the filter, through<br />
the back w<strong>all</strong> of the cabinet. First connect the inst<strong>all</strong>ed<br />
breathing tube (9/12 mm), without kinks <strong>and</strong> slack. Shorten<br />
the breathing tube to the required length, connect to the<br />
breather pipe <strong>and</strong> attach to the <strong>aquarium</strong> w<strong>all</strong> with the<br />
clip <strong>and</strong> suction cup. Avoid placing the pipe opening<br />
too close to the water’s surface.<br />
18
Important note: You may use your wet/dry filter as a continuous-flow<br />
filter for the short-term treatment with medication<br />
<strong>and</strong> its consequent removal. Extract filter media from<br />
the canister <strong>and</strong> store it in a<br />
basin with tank water, <strong>and</strong><br />
fill the filter entirely with EH-<br />
FISYNTH or filter wadding.<br />
Close the breather pipe with<br />
a pipe cap (no. 7272350).<br />
Following medication treatment,<br />
filter with carbon<br />
(EHFIAKTIV) for 4 - 6 days<br />
to remove medicaments,<br />
then revert to using SUB-<br />
STRATpro or EHFISUB-<br />
STRAT, remembering to remove<br />
the cap from the<br />
breather pipe.<br />
C°<br />
Thermofilter<br />
Heater Inst<strong>all</strong>ation<br />
Attach the temperature<br />
sensor with 2 clips <strong>and</strong><br />
suction cups into the tank<br />
in such a manner that it is<br />
positioned beneath the<br />
surface of the water.<br />
Do not inst<strong>all</strong> the temperature<br />
sensor near the filter outflow.<br />
The thermostat can be placed on the <strong>aquarium</strong> hood<br />
or attached with the enclosed Velcro tape to either the<br />
<strong>aquarium</strong> hood or the pump head of the filter.<br />
Protect against splashing water.<br />
Connect the inst<strong>all</strong>ed intake pipe <strong>and</strong> spray bar to the<br />
respective hoses.<br />
Attention:<br />
In order to guarantee the flawless functioning of the<br />
wet/dry filter, the two tubes for the intake <strong>and</strong> output<br />
must only be shortened to the same length!<br />
Be sure that the tubes are laid out smoothly <strong>and</strong> that<br />
there are no kinks in them.<br />
Direct the control cable from the filter canister to the thermostat.<br />
Connect the plug – you should hear it snap into<br />
place.<br />
Do not yet connect the<br />
heater’s mains plug to the<br />
w<strong>all</strong> socket.<br />
TIP: If you place the tubing into warm water for some<br />
time beforeh<strong>and</strong>, they will become soft <strong>and</strong> possible<br />
kinks can be easily squeezed out.<br />
19
Setting into operation<br />
Attention: Do not fill the <strong>aquarium</strong> to its maximum height<br />
since the water level varies through the change of water<br />
level in the filter.<br />
Open the tap connector of the intake pipe (IN) <strong>and</strong> establish<br />
the syphon. Alternatively use the EHEIM suction device (order<br />
no. 4003540) or the priming aid (order no. 4005540, ø 16 mm).<br />
The filter will then fill up with water. After that, open the tap<br />
connector of the outlet pipe (OUT).<br />
No. 4005540<br />
C°<br />
Thermofilter<br />
in<br />
out<br />
Attention:<br />
Only when the filter is working smoothly should the<br />
heater’s mains plug be connected to the w<strong>all</strong> socket.<br />
Never operate the heater when dry.<br />
No. 4003540<br />
off<br />
on<br />
in<br />
out<br />
Set the filter into operation by<br />
plugging in the mains socket.<br />
As soon as the pump has<br />
started up, the water level in<br />
the filter canister must sink<br />
down to the lower switch<br />
point.<br />
Once this point has been<br />
reached, the floating control<br />
valve will automatic<strong>all</strong>y close<br />
the suction intake, <strong>and</strong> the<br />
filter canister will fill up again with water. Meanwhile, a sm<strong>all</strong>,<br />
continuously filtered amount of water will be directed back into<br />
the <strong>aquarium</strong> through the bypass opening, so as to keep the<br />
impeller lubricated. The water level inside the floater compartment<br />
does not rise. Only when the upper filter media container<br />
is filled with water, does the floater compartment get filled with<br />
water through a slit in the floating control valve; now the latter<br />
will open the suction intake <strong>and</strong> the filter empties again.<br />
20<br />
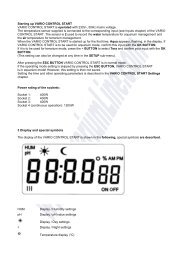
The display on the thermostat shows the actual water<br />
temperature in the <strong>aquarium</strong>. Use the adjusting knob to<br />
select the temperature you desire (e.g. 27°C). A symbol<br />
( ) indicates when the heater is in operation. If the symbol<br />
goes off, the set temperature has been reached <strong>and</strong><br />
the heater is automatic<strong>all</strong>y switched off. If the temperature<br />
in the tank sinks below the set temperature, the heater<br />
automatic<strong>all</strong>y turns itself on again. By slightly turning the<br />
adjusting knob, a precise adjustment can be achieved.<br />
Attention: When first inst<strong>all</strong>ing the filter or <strong>read</strong>justing the<br />
temperature, the temperature shown in the display will take<br />
some time to reach the required value. The ambient temperature<br />
is also significant for time delays.<br />
Should the power supply be cut off, the value indicated on<br />
the display changes <strong>and</strong> the heater stops working. When<br />
the power is restored the heater works norm<strong>all</strong>y.
Maintenance <strong>and</strong> Servicing<br />
C°<br />
Thermofilter<br />
First pull out the heater’s mains plug. Close the tap lever<br />
on the intake side (IN) of the integrated double tap<br />
connector, so that the filter empties itself.<br />
Open <strong>all</strong> four EZ clips <strong>and</strong><br />
remove the pump head from<br />
the filter.<br />
In order to clean the pump<br />
chamber, open the sealing<br />
ring of the pump head by<br />
turning it anticlockwise.<br />
Take off the pump cover <strong>and</strong><br />
then remove the impeller <strong>and</strong><br />
shaft.<br />
As soon as the pump loudly sucks in air, close the tap lever<br />
on the output side (OUT) of the integrated double tap<br />
connector <strong>and</strong> pull the mains plug out of the socket.<br />
Thoroughly clean pump parts, impeller chamber <strong>and</strong> lubrication<br />
channel with the EHEIM cleaning set (order no.<br />
4009580.)<br />
Carefully rinse off the shaft (risk of breakage!), then put<br />
the impeller back together again <strong>and</strong> insert into proper<br />
position.<br />
Swing the locking clamp upwards<br />
<strong>and</strong> then remove the<br />
double tap connector from<br />
the pump head. Extract the<br />
filter out of the cabinet by<br />
using the recessed h<strong>and</strong>les.<br />
Attention:<br />
Do not pull on the wet/<br />
dry floater compartment.<br />
Pay attention to the proper fit of the shaft bushings, pump<br />
cover <strong>and</strong> sealing ring. Then lock the pump with the sealing<br />
ring.<br />
TIP:<br />
If cleaning water should get<br />
into the cover of the filter’s<br />
pump head, the cover can be<br />
unscrewed <strong>and</strong> wiped dry<br />
with a cloth.<br />
21
Filter media:<br />
Remove the lattice screen as well as the filter media<br />
containers from the filter canister.<br />
Thoroughly wash out the SUBSTRATpro or EHFISUB-<br />
STRAT filter media with used <strong>aquarium</strong> water – until no<br />
more clouding can been seen.<br />
TIP:<br />
When renewing SUBSTRATpro or EHFISUBSTRAT (the<br />
fine pores get clogged up with time), retain at least 1/3<br />
of used filter medium <strong>and</strong> mix with new material, to<br />
speed-up bacteria recolonization.<br />
C°<br />
Thermofilter<br />
Wash out the filter canister. Periodic<strong>all</strong>y clean the<br />
heating element from sludge. Do not bend the heating<br />
element! Do not submerge filter canister underwater.<br />
Protect the heater’s electrics from splashing water.<br />
Clean the connecting supports on the container <strong>and</strong> the<br />
floater compartment (including the bypass opening) with a<br />
brush. Reassemble the wet/dry floater compartment <strong>and</strong><br />
attach it to the filter canister. Take care that the sealing rings<br />
are correctly positioned.<br />
Now remove the wet/dry floater compartment by opening<br />
the two locking pins with the locking key, so that the slots<br />
are in a vertical position.<br />
Remove the wet/dry floater compartment <strong>and</strong> clean the inlet<br />
aperture <strong>and</strong> both o-rings.<br />
Place the first media container back into the canister in such<br />
a manner that the flow-through opening sits above the connection<br />
outlet which communicates with the wet/dry floater<br />
compartment. Press the container down to the support frame<br />
in order to guarantee a good seal with the filter canister.<br />
Then push in the second (<strong>and</strong> third) media container. The<br />
flow-through openings must lie on top of each other. Be sure<br />
that the media containers have a flush fit. Place the lattice<br />
screen.<br />
Open the locking ring of the<br />
wet/dry floater compartment<br />
in the direction indicated,<br />
remove floating control valve<br />
<strong>and</strong> carefully clean with a soft<br />
sponge.<br />
Clean <strong>all</strong> parts <strong>and</strong> wash out<br />
the filter canister.<br />
22
Make sure that the output<br />
pipe is inserted into the intake<br />
of the impeller lid, <strong>and</strong><br />
that the o-ring is clean <strong>and</strong><br />
correctly fitted.<br />
Note: All hose connections must be checked at regular<br />
intervals for correct fitting.<br />
Lightly lubricate the sealing<br />
gasket on the pump head<br />
of the filter <strong>and</strong> the o-ring<br />
of the double tap with vase<strong>line</strong><br />
- then place the pump<br />
head on the filter canister,<br />
close the clips <strong>and</strong> put the<br />
filter into the cabinet.<br />
Examine <strong>all</strong> three o-rings on<br />
the double tap connector for<br />
damage <strong>and</strong> correct fitting<br />
<strong>and</strong> lightly grease them with<br />
Vase<strong>line</strong>; insert <strong>and</strong> lock in<br />
place. After both levers of the<br />
integrated double tap connector<br />
have been placed in<br />
the open position (ON position)<br />
the filter will automatic<strong>all</strong>y<br />
fill up with water <strong>and</strong><br />
be <strong>read</strong>y for operation.<br />
Set the filter into operation<br />
by connecting the mains<br />
plug of the pump head<br />
to the w<strong>all</strong> socket.<br />
C°<br />
Thermofilter<br />
Only for indoor use.<br />
ATTENTION:<br />
Only plug in the heater’s<br />
mains plug when the filter<br />
is working smoothly.<br />
Never operate the heater<br />
when dry.<br />
Filter must always be operated in an upright position only.<br />
23<br />
Before placing your h<strong>and</strong>s in the <strong>aquarium</strong>, ensure that<br />
<strong>all</strong> electrical appliances have been switched off at the<br />
mains. By thermofilters always disconnect the heater plug<br />
first.<br />
2227/2229: The mains cable cannot be replaced; if the cable<br />
is damaged, the device should no longer be used.<br />
2327/2329: The device can only be serviced by authorized<br />
personnel. Contact your nearest pet shop or EHEIM service<br />
centre. Use only permitted with an earthed socket outlet.
What to do when …<br />
Problem<br />
Cause<br />
Remedy<br />
Filter cannot be closed<br />
Improper inst<strong>all</strong>ation of<br />
media containers.<br />
Slide in media containers<br />
so that the flow-through<br />
openings are positioned<br />
on top of each other.<br />
Media containers overfilled.<br />
Use only SUBSTRATpro or<br />
EHFISUBSTRAT as filter<br />
media <strong>and</strong> do not overfill<br />
media containers.<br />
Check the adjoining surfaces<br />
of the containers<br />
for soiling.<br />
Flow-through pipe in filter<br />
canister soiled.<br />
Clean flow-through pipe.<br />
Sealing gasket not properly<br />
inst<strong>all</strong>ed.<br />
Insert sealing gasket into<br />
the groove provided.<br />
Filter does not fill up, no<br />
wet/dry function<br />
Intake tap on integrated<br />
double tap connector is still<br />
closed or not completely<br />
open.<br />
Open intake tap as fas as it<br />
will go.<br />
on<br />
off<br />
off<br />
on<br />
Intake tube bent or dirty.<br />
Lay out tube without kinks.<br />
Clean tubes.<br />
24
What to do when …<br />
Problem<br />
Cause<br />
Remedy<br />
Filter does not fill up, no<br />
wet/dry function<br />
Inst<strong>all</strong>ation height<br />
insufficient.<br />
Inst<strong>all</strong>ation height must be<br />
between 100 <strong>and</strong> 120 cm<br />
(3' 3" <strong>and</strong> 3' 11").<br />
100-120 cm<br />
Intake strainer soiled.<br />
Foam prefilter soiled.<br />
Clean intake strainer.<br />
Clean foam prefilter. Remove<br />
after filter running-in<br />
period (6 - 8 weeks).<br />
Wrong hoses length, wrong<br />
accessories attached.<br />
Only use original EHEIM<br />
hoses in even lengths!<br />
Do not attach any<br />
additional accessories<br />
to the provided hoses.<br />
Wrong filter media.<br />
25<br />
Only use SUBSTRATpro<br />
or EHFISUBSTRAT as filter<br />
media.<br />
Do not overfill media<br />
containers.<br />
Do not use filter cotton<br />
wadding, filter pads, plastic<br />
media, ceramic, lava, or peat<br />
only use carbon for shortterm<br />
specific filtration.
What to do when …<br />
Problem<br />
Cause<br />
Remedy<br />
Filter does not fill up, no<br />
wet/dry function<br />
Worn out or wrongly inst<strong>all</strong>ed<br />
o-ring on floating control<br />
valve.<br />
Collar <strong>and</strong> disk on floating<br />
control valve soiled.<br />
Properly inst<strong>all</strong> o-ring,<br />
replace if necessary.<br />
Clean collar <strong>and</strong> disk.<br />
Bypass aperture in wet/dry<br />
control mechanism soiled.<br />
Clean bypass.<br />
O-ring on sm<strong>all</strong> support<br />
worn out, not inst<strong>all</strong>ed or<br />
improperly inst<strong>all</strong>ed.<br />
Properly inst<strong>all</strong> o-ring,<br />
replace if necessary.<br />
Filter in slanted position.<br />
Place filter in vertical<br />
position.<br />
Filter does not empty, no<br />
wet/dry function<br />
Output tap on integrated<br />
double tap connector is<br />
closed or not completely<br />
open.<br />
Open output tap completely.<br />
Outlet tube is bent or<br />
soiled.<br />
Lay out tube without kinks.<br />
Clean tubing.<br />
on<br />
off<br />
on<br />
off<br />
26
What to do when …<br />
Problem<br />
Cause<br />
Remedy<br />
Filter does not empty, no<br />
wet/dry function<br />
Wrong hose length, wrong<br />
accessories attached.<br />
Only use original EHEIM<br />
hoses in even lengths!<br />
Do not attach any<br />
additional accessories to<br />
the provided hoses.<br />
Wrong filter media filled.<br />
Inst<strong>all</strong>ation height<br />
excessive.<br />
Air in the pump chamber.<br />
Only use SUBSTRATpro<br />
or EHFISUBSTRAT as filter<br />
media. Do not overfill media<br />
containers. Do not use filter<br />
cotton wadding, filter pads,<br />
plastic media, ceramic, lava,<br />
or peat only use carbon for<br />
short-term specific filtration.<br />
Inst<strong>all</strong>ation height must be<br />
between 100 <strong>and</strong> 120 cm<br />
(3' 3" <strong>and</strong> 3' 11").<br />
Open intake <strong>and</strong> output<br />
taps, pull out mains plug<br />
<strong>and</strong> wait approx.1 min.,<br />
until the pump chamber has<br />
filled with water. Plug in<br />
mains plug again.<br />
100-120 cm<br />
Aeration <strong>and</strong> breather tube<br />
bent or soiled.<br />
Opening of breather pipe<br />
is too near or below water<br />
surface.<br />
Lay out hoses without<br />
kinks or clean them.<br />
Place well above water<br />
level.<br />
Hole <strong>and</strong>/or rising pipe on<br />
the floating control valve<br />
soiled.<br />
Clean hole <strong>and</strong>/or rising<br />
pipe.<br />
27
What to do when …<br />
Problem<br />
Cause<br />
Remedy<br />
Filter does not empty, no<br />
wet/dry function<br />
Bypass hole in wet/dry control<br />
mechanism soiled.<br />
Filter in slanted position.<br />
Clean bypass.<br />
Place filter in vertical<br />
position.<br />
Spray bar soiled.<br />
End cap on spray bar<br />
missing.<br />
Clean spray bar.<br />
Insert end cap.<br />
Filter leaks at adaptor<br />
Outlet pipe in pump lid<br />
does not fit correctly.<br />
O-ring on outlet tube is<br />
broken.<br />
Cleaning plug in pump<br />
head is missing.<br />
Sealing surface or o-rings<br />
soiled.<br />
O-rings not inst<strong>all</strong>ed or<br />
damaged.<br />
Locking lever not completely<br />
closed.<br />
Properly inst<strong>all</strong> outlet pipe.<br />
Replace with new o-ring<br />
(order no. 7342238).<br />
If misplaced, fit a new one<br />
(order no. 7343400).<br />
Clean sealing surface<br />
<strong>and</strong>/or o-rings.<br />
Correctly inst<strong>all</strong> or replace<br />
o-rings.<br />
Close locking lever as far as<br />
it will go.<br />
Hoses not correctly<br />
connected.<br />
Push connection hoses as<br />
far as they will go <strong>and</strong><br />
secure with hose clamp.<br />
28
What to do when …<br />
Problem<br />
Cause<br />
Remedy<br />
Filter leaks at pump head<br />
of filter<br />
Not <strong>all</strong> EZ clips are closed.<br />
Properly close <strong>all</strong> EZ clips.<br />
Sealing surfaces or sealing<br />
gasket is soiled.<br />
Clean sealing surfaces.<br />
Filter leaks at wet/dry<br />
control<br />
Sealing surfaces of o-rings<br />
soiled.<br />
O-rings not inst<strong>all</strong>ed or<br />
improperly inst<strong>all</strong>ed.<br />
Clean sealing surfaces.<br />
Properly inst<strong>all</strong> o-rings.<br />
O-rings of wet/dry floater<br />
compartment missing,<br />
damaged or soiled.<br />
Locking pin not closed.<br />
Clean or replace o-rings.<br />
Close locking pin with<br />
locking key so that the slots<br />
are in a horizontal position.<br />
29