Glue Install - Summit International Flooring
Glue Install - Summit International Flooring
Glue Install - Summit International Flooring

You also want an ePaper? Increase the reach of your titles
YUMPU automatically turns print PDFs into web optimized ePapers that Google loves.
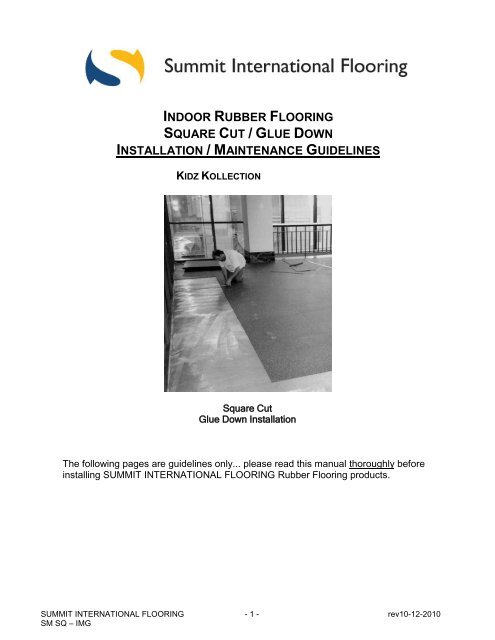
INDOOR RUBBER FLOORING<br />
SQUARE CUT / GLUE DOWN<br />
INSTALLATION / MAINTENANCE GUIDELINES<br />
KIDZ KOLLECTION<br />
Square Cut<br />
<strong>Glue</strong> Down <strong>Install</strong>ation<br />
The following pages are guidelines only... please read this manual thoroughly before<br />
installing SUMMIT INTERNATIONAL FLOORING Rubber <strong>Flooring</strong> products.<br />
SUMMIT INTERNATIONAL FLOORING - 1 - rev10-12-2010<br />
SM SQ – IMG
TABLE OF CONTENTS<br />
SECTION<br />
PAGE<br />
PRODUCT<br />
I MATERIAL STORAGE & HANDLING 3<br />
II TOOLS & ACCESSORIES 4<br />
INSTALLATION<br />
III BEFORE STARTING INSTALLATION 5<br />
IV PREPARATION OF SUB-SURFACE 5<br />
V INSTALLATION OF SQUARE CUT TILES 5-7<br />
MAINTENANCE<br />
VI CLEANING & MAINTENANCE 7-8<br />
GENERAL<br />
VII LOGO INFORMATION 9<br />
VIII WEIGHTS & MEASURES 10<br />
SUMMIT INTERNATIONAL FLOORING - 2 - rev10-12-2010<br />
SM SQ – IMG
SECTION I<br />
MATERIAL STORAGE & HANDLING<br />
General packaging information<br />
All SUMMIT INTERNATIONAL FLOORING<br />
products are packaged on wooden pallets,<br />
covered with a plastic hood, and secured by<br />
steel strapping.<br />
On receipt of merchandise:<br />
A) The product in front of you has gone<br />
through several quality assurance checks.<br />
However, we recommend that you doublecheck<br />
that your order is correct, that no<br />
damage occurred during transport, and for any<br />
other possible shortcomings. For your own<br />
protection, ensure that defective product is<br />
identified prior to the start of the installation.<br />
Please note that we are not responsible for<br />
any installation costs that occur as a result of<br />
defective product being installed.<br />
B) If adhesives were exposed to freezing<br />
temperatures, place indoors and bring to room<br />
temperature before using. Read technical data<br />
sheets and material safety data sheets for<br />
adhesive. Check adhesive cans for damage<br />
that may have occurred during transit.<br />
C) Storage: Store tiles in a dry and clean<br />
area. Temperature and humidity changes will<br />
cause the rubber to expand or contract.<br />
D) <strong>Install</strong>ation after short term storage: At<br />
least 24 hours before starting the installation<br />
lay out all tiles on the sub-surface to allow<br />
them to acclimate. A tile laid in the morning<br />
hours at 32°F (0°C) would be a different size<br />
than a tile laid at 68°F (20°C) later in the day.<br />
Acclimation is complete when the products<br />
have reached their specified dimensions.<br />
Refer to the Weights and Measures chart at<br />
the back of these guidelines. Short term<br />
storage should be considered as two weeks or<br />
less.<br />
E) <strong>Install</strong>ation after prolonged storage:<br />
During prolonged storage, the tiles in the<br />
lower portion of the stack will compress to a<br />
greater degree than those in the upper<br />
portion. This will show as thickness variations<br />
in the products taken from the top of the pallet<br />
as compared to those on the bottom. Product<br />
dimensions (length and width) may also be<br />
affected. A longer acclimation time will be<br />
required for product that has had a longer<br />
storage time. Exactly how long is very difficult<br />
to predict but can take upwards of 48 – 72<br />
hours. The product should be taken off the<br />
pallet and distributed throughout the<br />
installation area in small piles consisting of<br />
three or less tiles. Acclimation is complete<br />
when the products have reached their<br />
specified dimensions; check length, width, and<br />
thickness periodically until the right<br />
dimensions have been reached (see the<br />
Weights & Measures chart at the back of<br />
these guidelines). Do not install the tiles if<br />
they are not square and the appropriate<br />
thickness has not been reached.<br />
F) It is important to keep a clean working<br />
surface at all times. Protect tiles from dust and<br />
dirt.<br />
G) Keep SUMMIT INTERNATIONAL<br />
FLOORING rubber surfacing dry. Moisture will<br />
cause adhesion problems.<br />
H) Petroleum distillants (e.g. solvents) as well<br />
as liquid animal fats may cause the surface<br />
bonding to fail. Test results for other harmful<br />
chemicals and compounds are available on<br />
request.<br />
I) <strong>Install</strong> rubber tile flooring same side up as<br />
received. Reversing tiles may result in visible<br />
shade differences in finished surface.<br />
There is a sticker on the back of each tile<br />
stating: THIS SIDE DOWN . These stickers<br />
are always placed in the same corner of each<br />
tile.<br />
DO NOT REMOVE THESE STICKERS<br />
DURING THE ACCLIMATION PROCESS.<br />
THEY SHOULD NOT BE REMOVED UNTIL<br />
ACTUAL GLUING COMMENCES.<br />
SUMMIT INTERNATIONAL FLOORING - 3 - rev10-12-2010<br />
SM SQ – IMG
SECTION II<br />
TOOLS & ACCESSORIES<br />
A) Tools and safety equipment required:<br />
SUMMIT INTERNATIONAL FLOORING<br />
<strong>Install</strong>ation Guidelines<br />
<br />
<br />
<br />
<br />
<br />
<br />
<br />
<br />
<br />
<br />
Safety glasses<br />
Heavy duty utility knife - Suggested<br />
product: CH Hanson Speed Rocker SS,<br />
3 position, fixed blade knife<br />
(www.chhanson.com)<br />
Measuring tape<br />
Transit level and Straight edge<br />
Caulking gun, if needed to adhere<br />
reducer strip<br />
Chalk snap-line<br />
Drill and mixer for adhesive<br />
V-notched trowel 1/16” (1.6 mm)<br />
Carpenter’s square<br />
Rubber boots & gloves<br />
B) Reducer strips<br />
Sizes:<br />
5/16" – 3/8” (8 mm – 10 mm)<br />
1/2" (12 mm)<br />
All are available in black solid core and 12ft<br />
lengths.<br />
5 / 16 ” – 3 / 8 ” side view ½” side view<br />
(8mm – 10 mm) (12 mm)<br />
Attach reducer strip to tiles with compatible,<br />
non-solvent based adhesive or caulking, e.g.<br />
Bull Dog Adhesive PL400.<br />
C) Adhesive<br />
SUMMIT INTERNATIONAL FLOORING<br />
recommended adhesive:<br />
1) Chemrex Urethane 941 (V.O.C. compliant)<br />
• One component polyurethane adhesive<br />
• 2 gallon pail: 26 lbs (12 kg)<br />
• approximate coverage: 150 sq.ft. (14 m²)<br />
per pail<br />
• One component polyurethane adhesive<br />
• 5 gallon pail: 57 lbs (26 kg)<br />
• approximate coverage: 375 sq.ft. (35 m²)<br />
per pail<br />
3) Chemrex Urethane 948 (V.O.C. compliant)<br />
• One component polyurethane adhesive<br />
• 313 ml gun grade: 2 lbs (10 oz tube)<br />
• approximate coverage:<br />
- 1/8” (3mm) bead = 90 lineal feet<br />
- 5/16” (8mm) bead = 11 lineal feet<br />
It is not uncommon for a moisture cured<br />
urethane product, such as Chemrex CX941,<br />
to develop a slight skin on the top surface of<br />
the product. The slight skinning can be the<br />
result of product getting older, or in the case<br />
of newer product, perhaps a poor seal in the<br />
lid. Regardless, the product is still good;<br />
simply trim the skin and discard. In the case<br />
of older product, a thicker skin may have<br />
developed, and the viscosity of the overall<br />
product may have thickened, also making<br />
the application a bit more difficult, but in<br />
most cases will still perform.<br />
BASF Technical Support<br />
For detailed information and product use,<br />
refer to BASF Product Data Guide, included<br />
with adhesive.<br />
D) Sealer<br />
For most installations, it is not necessary to<br />
seal or coat <strong>Summit</strong> <strong>International</strong> <strong>Flooring</strong><br />
tiles. However, in certain installations, sealer<br />
may be appropriate. Please contact your<br />
sales representative for suitability. When<br />
applicable, <strong>Summit</strong> <strong>International</strong> <strong>Flooring</strong><br />
recommends Diversey Carefree Matte<br />
sealer.<br />
2) Chemrex Urethane 941 (V.O.C. compliant)<br />
SUMMIT INTERNATIONAL FLOORING - 4 - rev10-12-2010<br />
SM SQ – IMG
SECTION III<br />
BEFORE STARTING THE INSTALLATION<br />
The sub-surface must be smooth, clean, and<br />
dry.<br />
A) During storage, rubber tiles must be kept<br />
dry and adhesive must be stored above<br />
50°F (10°C) in a dry, heated space.<br />
B) Check the ambient temperature:<br />
Temperature range for adhesive use:<br />
between 50°F (10°C) and 104°F (40°C).<br />
<br />
<br />
In-floor radiant heat should be shut off.<br />
In all situations, working at the extreme<br />
ends of the temperature range will affect<br />
curing times, viscosity and pot life of<br />
adhesive, possibly resulting in adhesion<br />
problems.<br />
For detailed information and product use,<br />
refer to BASF Product Data Guide,<br />
included with adhesive.<br />
SECTION IV<br />
PREPARATION OF THE SUB-SURFACE<br />
The sub-surface must be level, clean, and<br />
dry. Remove all old adhesive. A rough or<br />
uneven sub-surface will result in an uneven<br />
installation.<br />
A) Concrete sub-surfaces<br />
New concrete sub-floors must be thoroughly<br />
cured and free from hydrostatic pressure<br />
before rubber tiles are installed (a minimum<br />
of 28 days after pour). Consult adhesive<br />
specifications for allowable moisture<br />
tolerance.<br />
If existing concrete is too rough, it can be<br />
leveled by sanding or applying a cement<br />
based leveling compound (patch), allowing a<br />
curing time as recommended by the patch<br />
manufacturer. Follow manufacturer’s<br />
installation guidelines. Do not use gypsum<br />
based levelers.<br />
It is vital that a moisture test be<br />
completed prior to floor installation, and<br />
that sub floors are cured and dry to<br />
acceptable levels. Moisture is the single<br />
most significant factor that causes bonding<br />
failure to the sub floor.<br />
B) Wooden sub-surfaces<br />
New plywood should be acclimatized for<br />
a 48-hour period prior to installation of<br />
the rubber flooring.<br />
CDX exterior smooth one side suggested<br />
for new wood substrates.<br />
Secure all nails to prevent future<br />
protrusion.<br />
Any cracks, holes, and rough or uneven<br />
areas should be patched with good<br />
quality cement based leveling<br />
compound.<br />
SECTION V<br />
INSTALLATION OF SQUARE CUT TILES<br />
Important: See Section I, (D) and (E)<br />
regarding acclimation of tiles.<br />
Visually inspect all tiles for visible defects.<br />
Ensure that defective product is identified<br />
prior to the start of the installation, set these<br />
aside and notify dealer immediately with<br />
information of any defects found.<br />
<strong>Glue</strong> down installation is required for all<br />
square edge tiles. This installation method<br />
and tile format is a must for areas of<br />
extreme temperature and humidity change,<br />
or where surface moisture may be present<br />
after installation, i.e. ice arenas, locker<br />
rooms and entry ways.<br />
1. ARRANGING THE TILES<br />
The installer should have all relevant<br />
information about the tile arrangement from<br />
the owner.<br />
Note: If installing a logo, see Section VII<br />
now.<br />
Each tile is marked with a label stating:<br />
THIS SIDE DOWN, DO NOT remove these<br />
labels until final glue down commences.<br />
Make sure that all tiles are laid down with<br />
the “label” pointing in the same direction.<br />
Occasionally uneven distribution of color<br />
granules may appear in a tile. This can be<br />
minimized by rotating the tile ¼ turn or<br />
installing it in a less visible area. <strong>Install</strong> tiles<br />
SUMMIT INTERNATIONAL FLOORING - 5 - rev10-12-2010<br />
SM SQ – IMG
same side up as received, DO NOT FLIP<br />
OVER.<br />
Locate the mid point of the room, and chalk<br />
a start line down the centre. Chalk another<br />
similar start line 90 degrees and square to<br />
the first one. Begin tile installation from the<br />
point where the two chalk lines intersect.<br />
Work outwards in both directions. (see<br />
figure 1).<br />
Start second row on either side of the center<br />
line towards the chalk line. Make sure that<br />
second row is installed by staggering the<br />
tiles. This will avoid any four corners from<br />
meeting at one spot (see figure 2).<br />
figure 2<br />
2. MEASURING & CUTTING<br />
Lay tile on a flat surface, hold the metal<br />
straight edge on the cut line, and cut with<br />
sharp utility knife. Keep scoring the cut until<br />
separated. Change or snap off blades<br />
frequently to ensure clean cuts. For odd<br />
angles, circular patterns, etc. a cardboard<br />
template is suggested. Join water cut edges<br />
together. Hand cut edges should be used<br />
against walls wherever possible.<br />
Make sure that you measure carefully so<br />
that the tile will fit properly and does not<br />
leave gaps, resulting in the installation being<br />
out of alignment.<br />
3. ADHESIVE<br />
A) General<br />
Please read label on adhesive packaging<br />
thoroughly before starting with the<br />
installation.<br />
Moisture is the single greatest cause of<br />
bonding failure. Ensure levels are at or<br />
below those accepted by adhesive<br />
manufacturer.<br />
Higher temperatures and humidity cause<br />
the adhesive to cure faster.<br />
Use safety glasses, rubber boots, and<br />
rubber gloves when applying adhesive.<br />
<br />
<br />
Room must be well ventilated.<br />
For first aid and safety instructions see<br />
labels on can, technical data sheets, and<br />
MSDS.<br />
B) Applying Adhesive<br />
DO NOT GET ADHESIVE ON THE TOP<br />
SURFACE OF THE RUBBER FLOORING<br />
AS IT IS VIRTUALLY IMPOSSIBLE TO<br />
REMOVE.<br />
CONTACT YOUR SUMMIT<br />
INTERNATIONAL FLOORING SUPPLIER<br />
IMMEDIATELY FOR SUGGESTED<br />
CLEANING METHODS IF THIS HAPPENS.<br />
All substrates must be structurally sound,<br />
smooth, clean, dry, and free from dust, loose<br />
material, grease, oil, wax, sealers, curing<br />
agents, and other foreign materials. Apply<br />
adhesive with 1/16” (1.6 mm) V-notch<br />
trowel. (Available from SUMMIT<br />
INTERNATIONAL FLOORING) Using a<br />
larger trowel will result in excess adhesive<br />
coming up between seams. Wear gloves at<br />
all times when applying adhesive. Do not<br />
allow adhesive to cure on your hands.<br />
Put the tile that you are installing on top of<br />
the tile already glued down and pull towards<br />
the area you want to fill until the tile falls into<br />
place, then firmly press tile up to edge of<br />
existing tile. This will keep excess adhesive<br />
from protruding between the seams (see<br />
figure 3).<br />
SUMMIT INTERNATIONAL FLOORING - 6 - rev10-12-2010<br />
SM SQ – IMG
tiles as a result of adhesive removal is solely<br />
the responsibility of the installer.<br />
Follow adhesive manufacturers instructions<br />
for clean up of tools.<br />
DO NOT use tape of any kind during glue<br />
down installation. Tape residue cannot<br />
be removed from the top surface.<br />
When applying adhesive, glue must be<br />
spread evenly on the sub-surface to avoid<br />
differences in tile height. Allow 48 hours<br />
setting time. Avoid heavy traffic during<br />
curing. See section C – Rolling<br />
C) Rolling<br />
Roll each row as completed. Roll the entire<br />
floor when project is completed. Work in<br />
both directions. Note that adhesive is<br />
slippery when first spread and tiles will shift<br />
position even if only disturbed slightly.<br />
No foot traffic of any kind should be allowed<br />
for the next 12 hours (24 hours for ice skate<br />
blades and cleats), allow 72 hours for<br />
maximum strength.<br />
A 50 to 70 pound roller should be used to<br />
ensure the underside tile surface is fully<br />
bonded to the glue and sub-floor. Too much<br />
rolling or too heavy a roller could cause the<br />
tiles to buckle and adhesive to move<br />
upwards through the seams. Furthermore,<br />
stretching of the rubber flooring can<br />
eventually lead to gaps between the tiles.<br />
Guideline:<br />
5/32” (4mm) thick floor - use a 50 lb. roller<br />
1/4” (6mm) thick floor - use a 50 lb. roller<br />
1/2” (12mm) thick floor - use a 70 lb. roller<br />
D) Clean Up Adhesive<br />
Do not allow excess adhesive to come in<br />
contact with top surface of rubber flooring as<br />
it is virtually impossible to remove. Contact<br />
your SUMMIT INTERNATIONAL<br />
FLOORING supplier immediately for<br />
suggested cleaning methods if this happens.<br />
Using mineral spirits or similar products to<br />
remove adhesive will alter the surface<br />
appearance of the tiles. Any damage to the<br />
4. SEALER<br />
Please note that sealer is not required for all<br />
applications. However products with a<br />
predominance of light colored EPDM will be<br />
easier to maintain if sealer is applied. Please<br />
contact your sales representative for<br />
suitability.<br />
Recommended Products:<br />
Diversey Carefree Matte (sealant)<br />
Diversey Profi, Taski Combi Plus or<br />
Diversey Wi-wax cleaners<br />
Diversey Pro Strip (amine floor stripper)<br />
A) Post construction<br />
Sweep the floor. Dry vacuum to ensure<br />
any dirt is removed.<br />
Wet scrub floor with Diversey Profi<br />
cleaner (6 - 8 oz/gal of water) using<br />
buffer or auto scrubber with Diversey<br />
contact pad (purple) or soft nylon brush.<br />
Wet vacuum soiled solution, rinse, and<br />
allow to dry thoroughly (6 – 8 hours).<br />
B) Initial application of sealer<br />
Apply 3 thin coats of Carefree Matte.<br />
Allow to dry between each coat.<br />
Note: Apply floor finish with synthetic<br />
wax mop. While the finish is wet, buff the<br />
floor with floor buffer (150 – 300 rpm)<br />
and soft nylon brush. This application<br />
drives the finish into the floor and causes<br />
proper sealing and coating of the floor.<br />
SECTION VI<br />
CLEANING & MAINTENANCE<br />
A) INITIAL CLEANING AFTER<br />
INSTALLATION<br />
When installation is complete and adhesive<br />
is fully cured (at least 72 hours), sweep floor<br />
to remove any debris, then dry vacuum<br />
thoroughly to remove all dust and dirt. Damp<br />
mop the entire floor using a sponge mop<br />
and very little water. A solution of warm<br />
SUMMIT INTERNATIONAL FLOORING - 7 - rev10-12-2010<br />
SM SQ – IMG
water with a small amount of mild lemon or<br />
orange cleaner added is recommended.<br />
Change water frequently.<br />
B) GENERAL MAINTENANCE<br />
Typically, SUMMIT INTERNATIONAL<br />
FLOORING Rubber <strong>Flooring</strong> requires less<br />
maintenance than other types of flooring.<br />
Vacuuming then damp mopping is the<br />
preferred method; very little or no detergent<br />
is necessary. Change water frequently. Use<br />
a mild detergent. Products containing<br />
solvents and acids will attack the composite<br />
structure of the rubber flooring and cause<br />
deterioration. Sealants, waxes, etc. can alter<br />
the surface characteristics and appearance.<br />
SUMMIT INTERNATIONAL FLOORING<br />
does not assume any responsibility for<br />
damages caused by chemical additives.<br />
1. NON-SEALED FLOORS<br />
Daily/Weekly Cleaning:<br />
Dry vacuum floor thoroughly.<br />
Damp mop with mild detergent.<br />
When cleaning equipment/furnishings<br />
with disinfectant, or other strong<br />
cleaners, be careful that overspray or<br />
excess cleaner does not drip onto the<br />
rubber flooring. Strong chemicals may<br />
cause the surface to deteriorate.<br />
Periodic Cleaning:<br />
The ideal machine to use is one that<br />
combines vacuuming, washing, rinsing, and<br />
drying, e.g. Rotowash by Whittaker, or Taski<br />
Combi Plus.<br />
If a one step machine is used, these steps<br />
should be taken:<br />
Mix mild detergent with water.<br />
Use string mop to dampen floor.<br />
Let solution act for approximately 10<br />
minutes.<br />
Use scrubber machine with soft brush.<br />
Use clear water to rinse; change rinse<br />
water frequently.<br />
Remove excess water for quicker drying.<br />
2. SEALED FLOORS<br />
Dry vacuum floor thoroughly; or<br />
Auto scrub or wet mop floor using Taski<br />
Combi Plus or Diversey Wi-wax.<br />
Periodic cleaning:<br />
Dry vacuum floor thoroughly.<br />
Wet scrub floor with Diversey Profi (4<br />
oz/gal). This application is done with an<br />
auto scrubber or buffer and wet<br />
vacuums. Use Diversey purple pad for<br />
scrubbing the floor. Allow solution to<br />
remain on the floor for 5 minutes.<br />
Wet vacuum soiled solution. Rinse and<br />
allow to dry (1-2 hours).<br />
Apply 1-2 thin coats of Diversey Carefree<br />
Matte using wet buffing with soft nylon<br />
brush.<br />
In certain environments, the floor may<br />
become scuffed due to heavy foot traffic<br />
and may require more frequent spray or<br />
dry buffing with a mint or white pad.<br />
When spray buffing use Diversey Wi-wax<br />
diluted 50/50 with water.<br />
Tips about sealers<br />
Use high suction CFM vacuum to pick up<br />
dust.<br />
Wait for floor to dry between applications<br />
of floor finish or sealer.<br />
Apply thin coats of floor finish with wax<br />
mop and follow with floor buffer using a<br />
soft nylon brush.<br />
For large areas, use an auto scrubber<br />
with a soft nylon brush to clean the floor<br />
daily.<br />
For stripping a rubber floor, use Diversey<br />
Pro Strip and nylon brush.<br />
For poorly maintained floors, it may be<br />
necessary to continue cleaning with Ice-It<br />
for an extended period.<br />
For food areas, cleaning should be done<br />
with Profi (2 – 4 oz/gal water).<br />
To remove gum, use a generic gum<br />
remover.<br />
For high traffic areas, floors may be top<br />
scrubbed and recoated as needed.<br />
SUMMIT INTERNATIONAL FLOORING - 8 - rev10-12-2010<br />
SM SQ – IMG
SECTION VII<br />
LOGO INFORMATION<br />
All logos are assembled at the factory prior to being shipped to insure a precise fit has been<br />
achieved. Use care when handling logo pieces to protect from damage or loss.<br />
<br />
<br />
<br />
Custom logos are packaged depending on logo size.<br />
a) One tile logos are usually packaged in a separate box<br />
b) Larger logos are packaged on top of the pallet<br />
c) Smaller pieces are always packaged separately in either a plastic bag or small box<br />
Use care when opening the packaging of small logo pieces as they may fall out.<br />
Refer to Section I, Material Storage & Handling.<br />
LOGO INSTALLATION<br />
1. Confirm required logo location from site drawings or by confirming with building owner.<br />
2. Dry lay logo complete with background tile in desired location. Confirm edges of background<br />
tile are squared to ensure a tight fit of all pieces.<br />
3. Mark location on all sides to ensure correct placement during glue down.<br />
4. Carefully remove logo and place to the side (Low tack painters tape may be used to hold<br />
pieces in place during this step, but tape must be removed immediately after logo is<br />
installed).<br />
5. Spread adhesive in area of logo placement following installation instructions. Be extremely<br />
careful not to use too much adhesive, as it could seep through small pieces onto surface of<br />
the logo tile.<br />
6. Carefully place background tile and logo pieces into place, starting with larger pieces.<br />
7. Gently adjust pieces if necessary to ensure a good fit.<br />
8. Extreme care should be taken when rolling logo tiles. Roll carefully and use a roller weight<br />
that is suitable for tile thickness. 4mm and 6mm tiles should be rolled with caution.<br />
9. Continue to install surrounding floor, being careful to protect logo from all traffic. Cover with<br />
clean drop cloth if possible until installation is complete.<br />
These steps are given as a guideline only. <strong>Install</strong>ations with multiple logos may require<br />
alternate methods. Please consult your SUMMIT INTERNATIONAL FLOORING<br />
representative if additional information is required.<br />
One Tile Logo<br />
Two Tile Logo<br />
SUMMIT INTERNATIONAL FLOORING - 9 - rev10-12-2010<br />
SM SQ – IMG
SECTION VIII<br />
WEIGHTS & MEASURES<br />
GENERAL PACKAGING INFORMATION<br />
All SUMMIT INTERNATIONAL FLOORING products are packaged on wooden pallets, covered<br />
with a plastic hood, and secured by steel strapping.<br />
Product Information - Rubber <strong>Flooring</strong> Tiles:<br />
Thickness tolerance of ± 0.5 mm<br />
Dimensions: 38” x 38” = 10.02 ft² (96.5 cm x 96.5 cm = 0.93 m²)<br />
Thickness<br />
0-29% Color 30-70% Color 51-70% Color 71-100% Color<br />
lbs (kg) # per lbs (kg) # per lbs (kg) # per lbs (kg) # per<br />
each pallet each pallet each pallet each pallet<br />
5/32" (4mm) 10 (4.5) 200 10.5 (4.8) 200 11 (5) 200 12 (5.4) 200<br />
1/4" (6mm) 16 (7.3) 150 16.5 (7.5) 150 17 (7.7) 140 18 (8.2) 130<br />
5/16" (8mm) 20 (9) 120 21 (9.5) 110 22 (10) 110 24 (10.9) 100<br />
3/8" (10mm) 23 (10.5) 100 25 (11.3) 100 27 (12) 90 30 (13.6) 80<br />
1/2" (12mm) 27 (12) 80 29 (13.2) 80 32 (14.5) 75 36 (16.3) 65<br />
Pallet (net weight)<br />
65 lbs (29.5 kg)<br />
Conversion Chart:<br />
1 in = 2.54<br />
cm<br />
1ft = 30.5 cm<br />
39.4 in = 1.00 m<br />
2.2 lbs = 1.0 kg<br />
Weights and measures may change without notice. All measurements are nominal and subject to variation.<br />
P.O. Box 90<br />
Livingston, NJ 07039<br />
Toll Free: 1-877-496-3566<br />
Fax: (973) 740-2009<br />
E-mail: info@summit-flooring.com<br />
http://www.summit-flooring.com<br />
SUMMIT INTERNATIONAL FLOORING - 10 - rev10-12-2010<br />
SM SQ – IMG