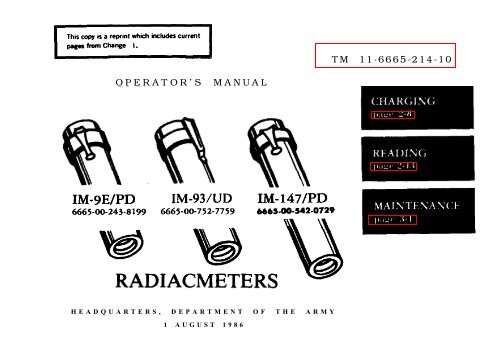
TM 11-6665-214-10 OPERATOR'S MANUAL
TM 11-6665-214-10 OPERATOR'S MANUAL
TM 11-6665-214-10 OPERATOR'S MANUAL

You also want an ePaper? Increase the reach of your titles
YUMPU automatically turns print PDFs into web optimized ePapers that Google loves.
<strong>TM</strong> <strong>11</strong>-<strong>6665</strong>-<strong>214</strong>-<strong>10</strong><br />
OPERATOR’S <strong>MANUAL</strong><br />
HEADQUARTERS, DEPAR<strong>TM</strong>ENT OF THE ARMY<br />
1 AUGUST 1986
This publication is required for official use or for<br />
administrative or operational purposes only. Distribution is<br />
limited to US Government Agencies. Other requests for this<br />
document must be referred to Commander, US Army<br />
Communications-Electronics Commend and Fort Monmouth,<br />
ATTN: AMSEL-ME-P, Fort Monmouth, NJ 07703-5007.
<strong>TM</strong> <strong>11</strong>-<strong>6665</strong>-<strong>214</strong>-<strong>10</strong><br />
C1<br />
Change<br />
No. 1<br />
HEADQUARTERS<br />
DEPAR<strong>TM</strong>ENT OF THE ARMY<br />
Washington, DC, 15 May 1988<br />
OPERATOR’S <strong>MANUAL</strong><br />
RADIACMETERS lM-9E/PD (NSN <strong>6665</strong>-00-243-8199)<br />
IM-93/UD (NSN <strong>6665</strong>-00-752-7759) AND<br />
IM-147/PD (NSN <strong>6665</strong>-00-542-0729)<br />
<strong>TM</strong> <strong>11</strong>-<strong>6665</strong>-<strong>214</strong>-<strong>10</strong>, 1 August 1986, is changed as follows:<br />
1. Remove old pages and insert new pages as indicated below. New or<br />
changed material is indicated by a vertical bar in the margin of the page.<br />
Added or revised illustrations are indicated by a vertical bar adjacent to the<br />
identification number.
Remove pages<br />
Insert pages<br />
i and ii . . . . . . . . . . . . . . . . . . . . . . . . . . . . . . . . ..i and ii<br />
2-3 through 2-6 . . . . . . . . . . . . . . . . . . . . . . . . . ..2-3 through 2-6<br />
2-21 and 2-22 . . . . . . . . . . . . . . . . . . . . . . . . . . . ..2-21 and 2-22<br />
3-1 through 3-4 . . . . . . . . . . . . . . . . . . . . . . . . . . . 3-1 through 3-4<br />
A-1/(A-2 blank) . . . . . . . . . . . . . . . . . . . . . . . . . . A-1/(A-2 blank)<br />
B-1 through B-2 . . . . . . . . . . . . . . . . . . . . . . . . . . . B-1 through B-4<br />
2. File this change in front of the publication for reference purposes.<br />
Distribution authorized to the Department of Defense and DOD contractors only<br />
for official use or for administration or operational purposes. This determination<br />
was made on 4 February 1988. Other requests for this document will be<br />
referred to Commander, US Army Communications-Electronics Command and<br />
Fort Monmouth, ATTN: AMSEL-ME-P, Fort Monmouth, NJ 07703-5000.<br />
DESTRUCTION NOTICE – Destroy by any method that will prevent disclosure of<br />
contents or reconstruction of the document.
SEVERE ILLNESS or DEATH may result if you fail to observe the<br />
following safety precautions. Both denatured and isopropyl<br />
alcohols are toxic, volatile, and flammable. Use only in well ventilated<br />
areas away from heat or open flame. Avoid ingestion, prolonged<br />
breathing of vapor, and contact with skin.<br />
DO NOT insert sharp objects into the charging end of the<br />
dosimeter. This will damage the interior of the socket and the<br />
charging contact.<br />
DO NOT blow on the dosimeter. DO NOT use a drying cloth.<br />
The charging end must be moisture- and lint-free.<br />
A/(B blank)
*<strong>TM</strong> <strong>11</strong>-<strong>6665</strong>-<strong>214</strong>-<strong>10</strong><br />
TECHNICAL <strong>MANUAL</strong><br />
HEADQUARTERS<br />
DEPAR<strong>TM</strong>ENT OF THE ARMY<br />
No. <strong>11</strong>-<strong>6665</strong>-<strong>214</strong>-<strong>10</strong> Washington, DC, 1 August 1986<br />
OPERATOR’S <strong>MANUAL</strong><br />
RADIACMETERS lM-9E/PD (NSN <strong>6665</strong>-00-243-8199)<br />
lM-93/UD (<strong>6665</strong>-00-752-7759) AND<br />
lM-147/PD (<strong>6665</strong>-00-542-0729)<br />
REPORTING ERRORS AND RECOMMENDING IMPROVEMENTS<br />
You can help improve this manual. If you find any mistakes or if<br />
you know of a way to improve the procedures, please let us know.<br />
Mail your letter or DA Form 2028 (Recommended Changes to<br />
Publications and Blank Forms), direct to: Commander, US Army<br />
Communications-Electronics Command and Fort Monmouth,<br />
ATTN: AMSEL-ME-MP, Fort Monmouth, New Jersey<br />
07703-5000.<br />
In either case, a reply will be furnished direct to you.<br />
*This manual supersedes <strong>TM</strong> <strong>11</strong>-<strong>6665</strong>-<strong>214</strong>-<strong>10</strong>, 27 November 1962, including all changes.<br />
Change 1<br />
i
TABLE OF CONTENTS<br />
CHAPTER 1. INTRODUCTION<br />
Section I. General Information . . . . . . . . . . . . . . . . . . . . . . . . . . .<br />
II. Equipment Description and Data . . . . . . . . . . . . . . .<br />
III. Technical Principles of Operation . . . . . . . . . . . . . . .<br />
CHAPTER 2. OPERATING INSTRUCTIONS<br />
Section I. Description and Use of Operator’s Controls<br />
and Indicators . . . . . . . . . . . . . . . . . . . . . . . . . . . . . . .<br />
II. Preventive Maintenance Checks and Services<br />
(PMCS) . . . . . . . . . . . . . . . . . . . . . . . . . . . . . . . . . . . . .<br />
III. Operation Under Usual Conditions . . . . . . . . . . . . . .<br />
IV. Operation Under Unusual Conditions . . . . . . . . . . . .<br />
CHAPTER 3. MAINTENANCE INSTRUCTIONS<br />
Section I. Troubleshooting . . . . . . . . . . . . . . . . . . . . . . . . . . . . . . .<br />
II. Maintenance Procedures . . . . . . . . . . . . . . . . . . . . . . .<br />
APPENDIX A. REFERENCES . . . . . . . . . . . . . . . . . . . . . . . . . . . . . . . .<br />
B. EXPENDABLE/DURABLE SUPPLIES AND<br />
MATERIALS LISTS . . . . . . . . . . . . . . . . . . . . . . . . . .<br />
ii<br />
Page<br />
1-1<br />
1-4<br />
1-8<br />
2-1<br />
2-3<br />
2-8<br />
2-22<br />
3-1<br />
3-2<br />
A-1<br />
B-1
1-1. SCOPE<br />
CHAPTER 1<br />
INTRODUCTION<br />
Section I. GENERAL INFORMATION<br />
a. This manual describes Radiacmeters IM-9E/PD, IM-93/UD and<br />
IM-147/PD. It guides you, the operator, as you operate and maintain this<br />
equipment.<br />
b. Throughout this manual, Radiacmeters IM-9E/PD, IM-93/UD, and<br />
IM-147/PD are also called dosimeters. Don’t be confused by these terms,<br />
a dosimeter is a radiacmeter.<br />
c. The IM-93/UD and IM-147/PD Radiacmeters are used to detect and<br />
measure large-scale radiation, e.g., a nuclear contaminated area. The<br />
IM-9E/PD Radiacmeter is used to detect and measure small-scale radiation,<br />
e.g., a laboratory environment.<br />
1-1
1-2. MAINTENANCE FORMS, RECORDS AND REPORTS<br />
a. Reports of Maintenance and Unsatisfactory Equipment. Department of the<br />
Army forms and procedures used for equipment maintenance will be those prescribed<br />
by DA Pam 738-750 as contained in Maintenance Management Update.<br />
b. Report of Packaging and Handling Deficiencies. Fill out and forward SF 364<br />
(Report of Discrepancy (ROD)) as prescribed in AR 735-<strong>11</strong>-2/DLAR 4140.55/<br />
NAVMATINST 4355.73B/AFR 400-54/MCO 4430.3H.<br />
c. Discrepancy in Shipment Report (DISREP) (SF 361). Fill out and forward<br />
Discrepancy in Shipment Report (DISREP) (SF 361) as prescribed in AR 55-38/<br />
NAVSUPINST 46<strong>10</strong>.33C/AFR 75-18/MCO P46<strong>10</strong> .19D/DLAR 4500.15.<br />
1-3. Reporting Equipment Improvement Recommendations (EIR)<br />
If your radiacmeter needs improvement, let us know. Send us an EIR. You, the user,<br />
are the only one who can tell us what you don’t like about the design. Put it on an SF<br />
368 (Quality Deficiency Report). Mail it to: Commander, US Army<br />
Communications-Electronics Command and Fort Monmouth, ATTN: AMSEL-<br />
PA-MA-D, Fort Monmouth, New Jersey 07703-5023. We’ll send you a reply.<br />
1-2
1-4. DESTRUCTION OF ARMY ELECTRONIC MATERIEL TO PREVENT ENEMY<br />
USE<br />
Evacuation, rather than destruction, is first priority, whenever possible. Destruction,<br />
when necessary, will be accomplished only upon the order of the<br />
Commander.<br />
Each using organization and/or installation having custody of radiacmeters<br />
should have a Standard operating procedure (SOP) for radiacmeter destruction.<br />
This demolition plan should be suitably flexible to cover any situation.<br />
Destruction method should consider troop availability, materials required,<br />
time needed, etc. Some of the methods used for destruction are smashing,<br />
exploding, and burning (with manual) after demolition.<br />
1-3
Section II. EQUIPMENT DESCRIPTION AND DATA<br />
1-5. EQUIPMENT CHARACTERISTICS, CAPABILITIES, AND FEATURES<br />
The dosimeter:<br />
● detects and<br />
measures cumulative<br />
exposure to shortduration<br />
high or low intensity X-ray and gamma-ray radiation.<br />
● can be clipped to the<br />
user’s pocket or,<br />
can be attached to some<br />
object in the area that is<br />
to be measured for total<br />
radiation exposure.<br />
1-4
1-6. DIFFERENCES BETWEEN MODELS<br />
a. Physical characteristics<br />
IM-9E/PD<br />
IM-93/UD<br />
IM-147/PD<br />
1-5
1-6. DIFFERENCES BETWEEN MODELS - Continued<br />
b. Technical characteristics<br />
NOTE<br />
The terms RAD/millirad and<br />
ROENTGEN/milliroentgen are being<br />
phased out and replaced by the new term,<br />
GRAY/centigray. One centigray equals<br />
one RAD/ROENTGEN.<br />
Dosimeter<br />
Total dosage and scale range<br />
IM-9E/PD . . . . . . . . . . . . . . . . . . . . . . . . . . . 0-200 millirads, in increments of <strong>10</strong><br />
IM-93/UD . . . . . . . . . . . . . . . . . . . . . . . . . . . . .0-600 RADS, in increments of 20<br />
IM-147/PD . . . . . . . . . . . . . . . . . . . . . . . . . . . . . .. 0-50 RADS, in increments of 2<br />
1-6<br />
NOTE<br />
The IM-9E/PD is used only in a<br />
laboratory environment. The IM-93/UD<br />
and IM-147/PD are used in the field.
1-6. DIFFERENCES BETWEEN MODELS - Continued<br />
Maximum acceptable leakage (in radiation-free area)<br />
IM-9E/PD . . . . . . . . . . . . . . . . . . . . . . . . . . . . . . . . . . . 4 millirads/day (24-hours)<br />
IM-93/UD . . . . . . . . . . . . . . . . . . . . . . . . . . . . . . . . . . . 12 RADS/day (24-hours)<br />
IM-147/PD . . . . . . . . . . . . . . . . . . . . . . . . . . . . . . . . . . . . . 1 RAD/day (24-hours)<br />
NOTE<br />
All leakage is cumulative. If you wait two days, for example, you<br />
may double the maximum. (Example: IM-9E/PD, 2 days = 8<br />
millirads.)<br />
Temperature range<br />
IM-9E/PD . . . . . . . . . . . . . . . . . . . . . . . . . . . . . . . . . . . . . . . . . . . . –65ºto+132ºF<br />
IM-93/UD . . . . . . . . . . . . . . . . . . . . . . . . . . . . . . . . . . . . . . . . . . . . –40ºto+150ºF<br />
IM-147/PD . . . . . . . . . . . . . . . . . . . . . . . . . . . . . . . . . . . . . . . . . . . –40ºto+150ºF<br />
1-7. EQUIPMENT DATA<br />
Type of radiation detected . . . . . . . . . . . . . . . . . . . . . . . . . . . . X- and gamma-ray<br />
Type of detector . . . . . . . . . . . . . . . . . . . . . . . . . . . . . . . . . . . .. ionization chamber<br />
Type of indicator . . . . . . . . . . . . . . . . . . . . . . . image (shadow) of electrometer<br />
fiber (quartz) on calibrated scale<br />
1-7
1-7. EQUIPMENT DATA - Continued<br />
Calibration accuracy . . . . . . . . . . . . . . . . . . . . . . . . . . . . . . . . . . ±<strong>10</strong>% of true dose<br />
Charging voltage (for zero reference) . . . . . . . . . . . . . . . . . 180 volts maximum<br />
Section Ill. TECHNICAL PRINCIPLES OF OPERATION<br />
CAP (WITH WINDOW) . . . . . . . . Keeps out dirt and moisture. Dosimeter<br />
will operate with or without cap.<br />
WIRE ELEMENT . . . . . . . . . . . . . . . Voltage applied from charger attracts<br />
quartz fiber, moving fiber toward zero<br />
on calibrated scale.<br />
QUARTZ FIBER . . . . . . . . . . . . . . . . Indicates charge. Light entering charging<br />
end causes fiber to cast hairline<br />
shadow onto calibrated reticle scale.<br />
EYEPIECE . . . . . . . . . . . . . . . . . . . . . . Operator views dosage scale through<br />
here.<br />
DOSAGE SCALE . . . . . . . . . . . . . . . Operator views hairline on scale and<br />
(Calibrated Reticle)<br />
reads dosage.<br />
LENSES . . . . . . . . . . . . . . . . . . . . . . . . Magnify image of quartz fiber.<br />
ELECTRODE . . . . . . . . . . . . . . . . . . . Connects dosimeter to charger, which<br />
supplies voltage to wire element.<br />
1-8<br />
NOTE<br />
If cap is lost or defective, you can use<br />
cellophane tape or any clear material.
1-9/(1-<strong>10</strong> blank)
CHAPTER 2<br />
OPERATING INSTRUCTIONS<br />
Section I. DESCRIPTION AND USE OF OPERATOR’S CONTROLS AND INDICATORS<br />
CALIBRATED RETICLE SCALE - Indicates accumulated radiation dose when<br />
viewed through eyepiece.<br />
NOTE<br />
Scale MUST be held HORIZONTAL to<br />
obtain accurate readings.<br />
2-1
2-2<br />
1. Airtight, sealed assembly<br />
2. Aluminum barrel<br />
3. Pocket clip, steel<br />
4. Plastic protective cap
Section II. PREVENTIVE MAINTENANCE CHECKS AND SERVICES (PMCS)<br />
2-1. GENERAL<br />
a. ALWAYS<br />
● keep in mind the CAUTIONS and WARNINGS.<br />
b. BEFORE you operate<br />
● perform your before (B) PMCS.<br />
c. WHILE you operate<br />
● perform your during (D) PMCS.<br />
d. AFTER you operate<br />
● perform your after (A) PMCS.<br />
2-3
e. PERIODICALLY<br />
● check the last date entered on the DA label 80 located on your dosimeter.<br />
Your dosimeter must be sent to the nearest US Army Area<br />
Calibration and Repair Center (ACRC) nucleonic laboratory for<br />
inspection and certification (I&C) service - once a year for active (in<br />
use) dosimeters; once every 5 years for contingency (standby) dosimeters.<br />
2-2. PMCS TABLE<br />
Your Preventive Maintenance Checks and Services table lists the inspections<br />
and care of your dosimeter required to keep it in good operating condition.<br />
2-4 Change 1
Item<br />
No.<br />
Table 2-1. Operator Preventive Maintenance Checks and Services<br />
1 ●<br />
Interval<br />
●<br />
NOTE: Perform checks in order listed -<br />
B-before D-during A-after M-monthly<br />
Item to be<br />
Inspected<br />
Excessive<br />
standby<br />
leakage<br />
Procedure<br />
Check for and have<br />
repaired or adjusted,<br />
as necessary.<br />
NOTE<br />
Dosimeters should normally<br />
be held in a charged<br />
(standby) condition prior<br />
to use/mission. If dosimeters<br />
are not held in<br />
standby, perform leakage<br />
test (para 3-2) prior to use.<br />
Read the dosimeter after<br />
removing it from standby.<br />
Compare its reading to<br />
dosimeters in standby. If<br />
reading is much higher<br />
than other dosimeter readings,<br />
perform leakage test<br />
(para 3-2).<br />
Equipment<br />
is Not<br />
Ready/<br />
Available If:<br />
Dosimeter is<br />
unable to pass<br />
leakage test.<br />
Change 1 2-5
Table 2-1. Operator Preventive Maintenance<br />
Checks and Services - Continued<br />
NOTE: Perform checks in order listed -<br />
B-before D-during A-after M-monthly<br />
Item<br />
No.<br />
2<br />
Interval<br />
Item to be<br />
Inspected<br />
Ability to<br />
charge.<br />
Procedure<br />
Check for and have<br />
repaired or adjusted,<br />
as necessary.<br />
Charge dosimeter to 0.<br />
Equipment<br />
is Not<br />
Ready/<br />
Available If:<br />
Unable to<br />
charge<br />
dosimeter<br />
to 0.<br />
NOTE<br />
For dosimeters held in<br />
standby, perform steps 1<br />
and 2 only, and return to<br />
standby.<br />
2-6 Change 1
Table 2-1. Operator Preventive Maintenance<br />
Checks and Services -Continued<br />
NOTE: Perform checks in order listed -<br />
B-before D-during A-after M-monthly<br />
Procedure<br />
Equipment<br />
Interval Check for and have is Not<br />
Item Item to be repaired or adjusted, Ready/<br />
No. B D A M Inspected as necessary.<br />
Available If:<br />
3 ●<br />
Excessive Read dosimeter during use<br />
leakage to record exposure. When<br />
large, unexplained readings<br />
are recorded, perform<br />
leakage test (para 3-2) to<br />
verify dosimeter operation.<br />
4 ● Recharge After use, recharge dosimfor<br />
standby eter to 0 and place in<br />
standby.<br />
2-7
Section III. OPERATION UNDER USUAL CONDITIONS<br />
2-3. CHARGING THE DOSIMETER<br />
NOTE<br />
The radiacmeter detector charger, PP-1578A/PD, is not supplied<br />
with the dosimeter but is needed for use with it. If a radiacmeter<br />
detector charger is not available, a field emergency dosimeter<br />
charger should be used.<br />
2-8
2-3. CHARGING THE DOSIMETER - Continued<br />
a. Charge the dosimeter:<br />
● before use.<br />
● if it becomes discharged because of leakage or exposure to radiation.<br />
● only in a dust- and radiation-free environment.<br />
b. After charging, DO NOT subject the dosimeter to:<br />
● severe shock.<br />
● excessive dampness.<br />
● high temperatures.<br />
c. Charging procedure using the PP-1578A/UD. (See TB SIG 226-8 for<br />
detailed instructions.)<br />
(1) Prepare charger for use.<br />
● remove from carrying case.<br />
● unscrew dust cap and lift it off the charging pedestal.<br />
● check to see that charging pedestal is clean and dry and, if necessary,<br />
clean it. Use detergent and distilled water, and AIR DRY only.<br />
2-9
2-3. CHARGING THE DOSIMETER - Continued<br />
(2) Remove protective cap from charging end of dosimeter.<br />
(3) Place dosimeter in position on charger and press straight down.<br />
(4) Charge dosimeter to zero by rotating charging knob while looking<br />
through dosimeter eyepiece. To bring the hairline to zero, turn clockwise/<br />
increasing the charge. If hairline drops below “0”, then turn counterclockwise/decreasing<br />
the charge to zero.<br />
(5) Remove dosimeter from charger and reinstall protective cap on<br />
charging end.<br />
(6) Reinstall dust cap on charging pedestal of charger.<br />
(7) Return charger to carrying case, and fasten flap.<br />
2-<strong>10</strong>
2-3. CHARGING THE DOSIMETER - Continued<br />
NOTE<br />
For detailed charger<br />
operation and maintenance,<br />
see TB SIG 226-8.<br />
PP-1578A/UD<br />
2-<strong>11</strong>
2-3. CHARGING THE DOSIMETER - Continued<br />
d. Charging procedure using field emergency charger.<br />
(1) Remove protective cap from charging end of dosimeter.<br />
(2) Push plug (PL-55) into charging end of dosimeter.<br />
(3) Look through dosimeter eyepiece<br />
and charge dosimeter to 0.<br />
(4)<br />
(5)<br />
Remove plug from charging<br />
end of dosimeter.<br />
Reinstall protective cap on<br />
charging end of dosimeter.<br />
2-12
2-4. USING THE DOSIMETER<br />
Either:<br />
● clip your dosimeter to<br />
your clothing (shirt<br />
pocket is ideal).<br />
or<br />
● attach your dosimeter<br />
to any object (tree,<br />
tent, rock, etc.) in<br />
the area you wish to<br />
check.<br />
2-5. READING YOUR DOSIMETER<br />
NOTE<br />
Always hold dosimeter level to ground. If<br />
you lie down, tilt your head to read the<br />
dosimeter, or hold the dosimeter at an<br />
angle, you’ll get inaccurate readings.<br />
2-13
2-5. READING YOUR DOSIMETER - Continued<br />
● look towards a light<br />
source through the<br />
eyepiece lens of the<br />
dosimeter.<br />
2-14
2-5. READING YOUR DOSIMETER - Continued<br />
● rotate the dosimeter until the calibrated scale is horizontal.<br />
NOTE<br />
Always hold dosimeter level to ground. If you lie down, tilt your<br />
head to read the dosimeter, or hold the dosimeter at an angle,<br />
you’ll get inaccurate readings.<br />
2-15
● note the position of the shadow<br />
(hairline) on the calibrated<br />
(reticle) scale.<br />
● determine the amount of radiation<br />
detected.<br />
2-6. DETERMINING THE RADIATION DOSAGE<br />
To figure out how much radiation you were exposed to, just subtract your<br />
initial reading (taken before you use the dosimeter) from your final reading<br />
(taken after a certain exposure time, i.e., month, day, hour, etc.).<br />
2-16
234-544 - 89 - 2<br />
2-6. DETERMINING THE RADIATION DOSAGE - Continued<br />
NOTE<br />
In some instances, you will have to estimate your readings, as in<br />
the previous example where the shadow (hairline) fell between<br />
two markings. Since each marking equals 20 RADs, the values<br />
between the <strong>10</strong>0 RAD mark and the first mark following has a<br />
range from <strong>10</strong>1 to <strong>11</strong>9. Because the shadow falls approximately in<br />
the middle, the value is about <strong>11</strong>0 RADs.<br />
2-17
Example readings for each model:<br />
2-18
. IM-147/PD<br />
INITIAL<br />
FINAL<br />
2-19
c. IM-9E/PD<br />
INITIAL<br />
FINAL<br />
2-20
2-7. ADMINISTRATIVE STORAGE<br />
a. Check <strong>TM</strong> 740-90-1 for general information about the requirements<br />
and procedures for administrative storage.<br />
b. Although this general information does apply to dosimeters, you must<br />
also follow some additional procedures for proper storage of dosimeters.<br />
Before storing, charge dosimeters to zero. After removing from storage,<br />
check to see that the dosimeters are fully charged at zero; if not, charge to<br />
zero.<br />
c. Before the dosimeter is placed into administrative storage (1 to 45<br />
days), it should be cleaned, charged, and packed in a paperboard carton.<br />
Place the packaged dosimeter in a sheltered area away from any known<br />
radiation source.<br />
2-8. PACKAGING-PACKING REQUIREMENTS<br />
Inspect the dosimeter for damage that may have occurred during shipment.<br />
Change 1 2-21
Section IV. OPERATION UNDER UNUSUAL CONDITIONS<br />
2-9. NUCLEAR, BIOLOGICAL, AND CHEMICAL (NBC) DECONTAMINATION<br />
PROCEDURES<br />
See paragraph 3-4c for decontamination instructions.<br />
2-22
CHAPTER 3<br />
MAINTENANCE INSTRUCTIONS<br />
Section I. TROUBLESHOOTING<br />
This manual does not list all possible malfunctions that may occur, or all<br />
tests or inspections, and corrective actions. If a malfunction is not listed,<br />
notify your supervisor.<br />
Malfunction, Test or Inspection, Corrective Action<br />
Leakage rate exceeds acceptable values (para 1-6b).<br />
Check electrical leakage rate, recharge, and clean.<br />
If the leakage rate exceeds the acceptable standards, clean the<br />
charging end of the dosimeter. Recheck the leakage rate. If the<br />
leakage is still higher than the values in paragraph 1-6b, the dosimeter is<br />
defective and should be turned in for a replacement. Perform leakage<br />
test according to steps in paragraph 3-2.<br />
Change 1 3-1
Section II. MAINTENANCE PROCEDURES<br />
3-1. INTRODUCTION<br />
Maintenance on your dosimeter consists of cleaning, decontaminating, testing,<br />
and troubleshooting. You will extend the useful life of your dosimeter<br />
by carefully following these procedures.<br />
3-2. LEAKAGE TEST<br />
Your dosimeter’s charge will gradually leak off, even though the dosimeter<br />
is not exposed to X- or gamma-rays. This leakage, if excessive, will cause an<br />
improper reading on the dosimeter.<br />
3-2<br />
NOTE<br />
If your dosimeter has not been charged for more than one month<br />
(or has been stored uncharged) or for an unknown length of time<br />
and is then fully charged, excessive leakage may occur due to<br />
INSULATION SOAK-IN (penetration of part of the charge into<br />
the insulation). Do not perform a leakage rate check on the dosimeter<br />
until it has been charged-to-zero each day for five consecutive<br />
days. Ignore the daily leakage.
3-2. LEAKAGE TEST - Continued<br />
The leakage rate should not exceed 2% of full-scale reading per day (see para<br />
1-6b for maximum acceptable leakage specs). Check the leakage rate as<br />
follows:<br />
a. Charge the dosimeter using Radiacmeter Charger PP-1578A/PD to read<br />
0 on the calibrated scale.<br />
b. Store the dosimeter in a radiation-free area for a 24-hour period.<br />
c. Note the reading on the calibrated scale of the dosimeter. This reading<br />
represents the leakage rate in either RADS/ROENTGENS or millirads/<br />
milliroentgens per day.<br />
NOTE<br />
If one day’s leakage rate is difficult to determine, the charged<br />
dosimeter may be allowed to sit for several days until a readable<br />
value is obtained. To determine the average daily leakage rate,<br />
divide this value by the number of days the charged dosimeter sat.<br />
Change 1 3-3
3-2. LEAKAGE TEST - Continued<br />
d. If the leakage rate exceeds the maximum acceptable rate (para l-6b),<br />
clean the charging end of the dosimeter.<br />
e. Recheck the leakage rate. If it is still greater than the values in paragraph 1-6b,<br />
the dosimeter is defective and must be turned in for a replacement.<br />
3-3. REPAIR<br />
There is no repair authorized at operator level. If your radiacmeter is defective,<br />
refer it to your unit commander for possible evacuation to higher level<br />
of maintenance.<br />
3-4. CLEANING AND DECONTAMINATING<br />
a. Materials required<br />
The following materials are required for maintenance of the dosimeter:<br />
(1) Denatured alcohol (NSN 68<strong>10</strong>-00-201-0906)<br />
or<br />
isopropyl alcohol (NSN 68<strong>10</strong>-00-753-4993).<br />
3-4 Change 1
3-4. CLEANING AND DECONTAMINATING - Continued<br />
WARNING<br />
SEVERE ILLNESS or DEATH may result if you fail to observe the<br />
following safety precautions. Both denatured and isopropyl<br />
alcohols are toxic, volatile, and flammable. Use only in well ventilated<br />
areas away from heat or open flame. Avoid ingestion, prolonged<br />
breathing of vapor, and contact with skin.<br />
(2) Detergent (commercial type).<br />
b. Cleaning<br />
CAUTION<br />
DO NOT insert sharp objects into the charging end of the<br />
dosimeter. This will damage the interior of the socket and the<br />
charging contact.<br />
3-5
3-4. CLEANING AND DECONTAMINATING - Continued<br />
To clean the socket in the charging end of the dosimeter, proceed as follows:<br />
● remove the protective cap from charging end.<br />
3-6<br />
● carefully wash<br />
the open end<br />
of the dosimeter<br />
with a<br />
few drops of<br />
alcohol.
3-4. CLEANING AND DECONTAMINATING - Continued<br />
● thoroughly dry the dosimeter by<br />
waving it in the air.<br />
CAUTION<br />
DO NOT blow on the dosimeter. DO NOT use a drying cloth.<br />
The charging end must be moisture- and lint-free.<br />
234-544 0 - 89 - 3<br />
3-7
3-4. CLEANING AND DECONTAMINATING - Continued<br />
● reinstall the protective cap on<br />
charging end.<br />
NOTE<br />
If the protective cap<br />
any similar material.<br />
is lost or defective, use cellophane tape or<br />
3-8
3-4. CLEANING AND DECONTAMINATING - Continued<br />
c. Decontaminating<br />
To decontaminate the dosimeter, proceed as follows:<br />
● prepare a solution of detergent<br />
and clean water.<br />
● wash the dosimeter<br />
in the solution.<br />
thoroughly in<br />
3-9
3-4. CLEANING AND DECONTAMINATING - Continued<br />
● rinse the dosimeter<br />
in clear water.<br />
3-<strong>10</strong>
3-4. CLEANING AND DECONTAMINATING - Continued<br />
● remove protective cap (1), wash both ends of dosimeter with alcohol<br />
(2), AIR DRY (3), then reinstall protective cap (4).<br />
3-<strong>11</strong>
3-5. TESTING<br />
Perform leakage testing (para 3-2) to ensure dosimeter is operational after<br />
cleaning or decontaminating.<br />
3-12
APPENDIX A<br />
REFERENCES<br />
The following is a list of all the references you will need as an operator of<br />
Radiacmeters IM-9E/PD, IM-93/UD, and IM-147/PD:<br />
Consolidated Index of Army Publications<br />
and Blank Forms . . . . . . . . . . . . . . . . . . . . . . . . . . . . . . . . . . . . DA Pam 25-30<br />
The Army Maintenance Management<br />
System (TAMMS) . . . . . . . . . . . . . . . . . . . . . . . . . . . . . . . . . . . DA Pam 738-750<br />
Chargers, Radiac Detector PP-1578/PD and<br />
PP-1578A/PD (NSN 6625-00-542-<strong>11</strong>77) . . . . . . . . . . . . . . TB SIG 226-8<br />
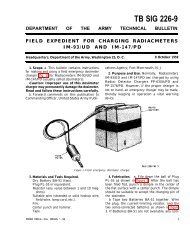
Field Expedient for charging Radiacmeters<br />
IM-93/UD and IM-147/PD . . . . . . . . . . . . . . . . . . . . . . . . . . . TB SIG 226-9<br />
Change 1 A-1/(A-2 blank)
APPENDIX B<br />
EXPENDABLE/DURABLE SUPPLIES AND MATERIALS LIST<br />
Section I. INTRODUCTION<br />
B-1. Scope<br />
This appendix lists expendable supplies and materials you will need to operate<br />
and maintain Radiacmeters IM-9E/PD, IM93/UD and lM-147/PD. These items are<br />
authorized to you by CTA 50-970, Expendable Items (Except Medical, Class V,<br />
Repair Parts, and Heraldic Items).<br />
B-2. Explanation of Columns<br />
a. Column 1 — Item Number. This number is assigned to the entry in the<br />
Change 1 B-1
listing and is referenced in the narrative instructions to identify the material (e.g.,<br />
“Use cleaning compound, item 5, App. D").<br />
b. Column 2 — Level. This column identifies the lowest level of maintenance<br />
that requires the listed item.<br />
C - Operator/Crew<br />
O - Organizational Maintenance<br />
F - Direct Support Maintenance<br />
H - General Support Maintenance<br />
c. Column 3 — National Stock Number. This is the National stock number<br />
assigned to the item; use it to request or requisition the item.<br />
d. Column 4 — Description. Indicates the Federal item name and, if required, a<br />
description to identify the item. The last line for each item indicates the part<br />
number followed by the Federal Supply Code for Manufacturer (FSCM) in parentheses,<br />
if applicable.<br />
B-2
e. Column 5 — Unit of Measure (U/M). Indicates the measure used in performing<br />
the actual maintenance function. This measure is expressed by a twocharacter<br />
alphabetical abbreviation (e.g., ea, in, pr). If the unit of measure differs<br />
from the unit of issue, requisition the lowest unit of issue that will satisfy your<br />
requirements.<br />
B-3
SECTION II<br />
EXPENDABLE/DURABLE SUPPLIES AND MATERIALS LIST<br />
This appendix lists expendable supplies and materials you will need to<br />
operate and maintain your dosimeter.<br />
Item Maintenance<br />
Number Level<br />
1 C<br />
2 C<br />
3 C<br />
NSN Description U/M<br />
68<strong>10</strong>-00-201-0906 Alcohol, denatured QT<br />
68<strong>10</strong>-00-753-4993 Alcohol, isopropyl QT<br />
— Detergent, commercial —<br />
B-4 Change 1
By Order of the Secretary of the Army:<br />
Official:<br />
CARL E. VUONO<br />
General, United States Army<br />
Chief of Staff<br />
R.L. DILWORTH<br />
Brigadier General, United States Army<br />
The Adjutant General<br />
DISTRIBUTION •<br />
To be distributed in accordance with DA Form<br />
12-36 literature requirements for IM-147/PD.<br />
U.S. GOVERNMENT PRINTING OFFICE : 1989 - 234-544
THE METRIC SYSTEM AND EQUIVALENTS
PIN: 019508-001