Instruction Handbook - Triumph Adler
Instruction Handbook - Triumph Adler
Instruction Handbook - Triumph Adler

Create successful ePaper yourself
Turn your PDF publications into a flip-book with our unique Google optimized e-Paper software.
<strong>Instruction</strong> <strong>Handbook</strong><br />
CLP 4550<br />
Colour Printer
Introduction<br />
Thank you for your purchase of CLP 3550.<br />
This Operation Guide is intended to help you operate the machine correctly,<br />
perform routine maintenance and take a simple troubleshooting action as<br />
necessary, so that you can always use the machine in good condition.<br />
Please read this Operation Guide before you start using the machine, and<br />
keep it close to the machine for easy reference.<br />
We recommend the use of our own brand supplies. We will not be liable for<br />
any damage caused by the use of third party supplies in this machine.
Contents<br />
Legal and Safety Information<br />
1 Machine Parts<br />
Components at the Front of the Printer ................................... 1-2<br />
Components at the Left of the Printer ...................................... 1-2<br />
Components at the Right of the Printer ................................... 1-3<br />
Internal Components .................................................................. 1-4<br />
Operation Panel .......................................................................... 1-5<br />
2 Printing Operation<br />
Changing Network Interface Parameters ................................. 2-2<br />
Printing a Status Page ............................................................... 2-3<br />
Installing the Printer Driver ....................................................... 2-4<br />
Printing from Application Software .......................................... 2-9<br />
Status Monitor .......................................................................... 2-10<br />
Uninstalling Software (Windows PC) ...................................... 2-13<br />
3 Handling Paper<br />
General Guidelines ..................................................................... 3-2<br />
Selecting the Right Paper .......................................................... 3-4<br />
Special Paper .............................................................................. 3-7<br />
Paper Type ................................................................................ 3-12<br />
Loading Paper ........................................................................... 3-13<br />
4 Using the Operation Panel<br />
General Information ................................................................... 4-2<br />
Understanding the Operation Panel ......................................... 4-3<br />
Keys ............................................................................................. 4-6<br />
Using the Menu Selection System ............................................ 4-8<br />
Setting a Mode Selection Menu ............................................... 4-10<br />
Report Print ............................................................................... 4-11<br />
USB Memory (USB memory selection) ................................... 4-16<br />
Custom Box .............................................................................. 4-22<br />
Job Box ..................................................................................... 4-28<br />
Job Log ...................................................................................... 4-42<br />
Counter (Viewing the counter value) ...................................... 4-44<br />
Paper Settings .......................................................................... 4-46<br />
Print Settings ............................................................................ 4-55<br />
Network (Network settings) ..................................................... 4-65<br />
Device Common (Selecting/Setting the common device) .... 4-72<br />
Security (Security function setting) ........................................ 4-85<br />
Job Account.Set. (Job Account setting) ................................ 4-94<br />
Administrator (Administrator settings) ................................ 4-102<br />
Adjust/Maint. (Adjust/Maintenance selection/setting) ........ 4-105<br />
5 Maintenance<br />
General Information ................................................................... 5-2<br />
Toner Container Replacement .................................................. 5-2<br />
Replacing the Waste Toner Box ................................................ 5-6<br />
Cleaning the Printer ................................................................... 5-8<br />
6 Troubleshooting<br />
General Guidelines ..................................................................... 6-2<br />
Print Quality Problems ............................................................... 6-3<br />
Error Messages ........................................................................... 6-5<br />
Clearing Paper Jams ................................................................ 6-15<br />
iii
Appendix<br />
Interface .......................................................................................A-2<br />
USB Interface ..............................................................................A-2<br />
Network Interface ........................................................................A-3<br />
About the Options ......................................................................A-5<br />
Expansion Memory Modules .....................................................A-6<br />
General Description of Options .................................................A-9<br />
Specifications ...........................................................................A-10<br />
Glossary<br />
Index<br />
iv
Legal and Safety Information<br />
CAUTION NO LIABILITY IS ASSUMED FOR ANY<br />
DAMAGE CAUSED BY IMPROPER INSTALLATION.<br />
Notice on Software<br />
SOFTWARE USED WITH THIS PRINTER MUST SUPPORT THE<br />
PRINTER'S EMULATION MODE. The printer is factory-set to emulate the<br />
PCL.<br />
Notice<br />
The information in this guide is subject to change without notification.<br />
Additional pages may be inserted in future editions. The user is asked to<br />
excuse any technical inaccuracies or typographical errors in the present<br />
edition.<br />
No responsibility is assumed if accidents occur while the user is following<br />
the instructions in this guide. No responsibility is assumed for defects in<br />
the printer's firmware (contents of its read-only memory).<br />
This guide, any copyrightable subject matter sold or provided with or in<br />
connection with the sale of the page printer, are protected by copyright.<br />
All rights are reserved. Copying or other reproduction of all or part of this<br />
guide, any copyrightable subject matter without the prior written consent<br />
of the Copyright owner is prohibited. Any copies made of all or part<br />
of this guide, any copyrightable subject must contain the same copyright<br />
notice as the material from which the copying is done.<br />
Regarding Tradenames<br />
PRESCRIBE is a registered trademark of Kyocera Corporation. KPDL is<br />
trademark of Kyocera Corporation.<br />
Hewlett-Packard, PCL, and PJL are registered trademarks of Hewlett-<br />
Packard Company. Centronics is a trade name of Centronics Data<br />
Computer Inc. PostScript is a registered trademark of Adobe Systems<br />
Incorporated. Macintosh, Bonjour are registered trademarks of Apple<br />
Computer, Inc. Microsoft, Windows, and Windows NT are registered<br />
trademarks of Microsoft Corporation. PowerPC and Microdrive are<br />
trademarks of International Business Machines Corporation.<br />
CompactFlash is a trademark of SanDisk Corporation. ENERGY STAR is<br />
a U.S. registered mark. All other brand and product names are registered<br />
trademarks or trademarks of their respective companies.<br />
This product contains UFST and MicroType ® from Monotype Imaging<br />
Inc.<br />
v
License Agreements<br />
Typeface Trademark Acknowledgement<br />
All resident fonts in this printer are licensed from Monotype Imaging Inc.<br />
Helvetica, Palatino and Times are registered trademarks of Linotype-Hell<br />
AG. ITC Avant Garde Gothic, ITC Bookman, ITC ZapfChancery and ITC<br />
Zapf Dingbats are registered trademarks of International Typeface<br />
Corporation.<br />
Monotype Imaging License Agreement<br />
1 “Software” shall mean the digitally encoded, machine readable,<br />
scalable outline data as encoded in a special format as well as the<br />
UFST Software.<br />
2 You agree to accept a non-exclusive license to use the Software to<br />
reproduce and display weights, styles and versions of letters,<br />
numerals, characters and symbols (“Typefaces”) solely for your own<br />
customary business or personal purposes at the address stated on<br />
the registration card you return to Monotype Imaging. Under the<br />
terms of this License Agreement, you have the right to use the Fonts<br />
on up to three printers. If you need to have access to the fonts on<br />
more than three printers, you need to acquire a multi-user license<br />
agreement which can be obtained from Monotype Imaging.<br />
Monotype Imaging retains all rights, title and interest to the Software<br />
and Typefaces and no rights are granted to you other than a License<br />
to use the Software on the terms expressly set forth in this<br />
Agreement.<br />
3 To protect proprietary rights of Monotype Imaging, you agree to<br />
maintain the Software and other proprietary information concerning<br />
the Typefaces in strict confidence and to establish reasonable<br />
procedures regulating access to and use of the Software and<br />
Typefaces.<br />
4 You agree not to duplicate or copy the Software or Typefaces,<br />
except that you may make one backup copy. You agree that any<br />
such copy shall contain the same proprietary notices as those<br />
appearing on the original.<br />
5 This License shall continue until the last use of the Software and<br />
Typefaces, unless sooner terminated. This License may be<br />
terminated by Monotype Imaging if you fail to comply with the terms<br />
of this License and such failure is not remedied within thirty (30)<br />
days after notice from Monotype Imaging. When this License expires<br />
or is terminated, you shall either return to Monotype Imaging or<br />
destroy all copies of the Software and Typefaces and documentation<br />
as requested.<br />
6 You agree that you will not modify, alter, disassemble, decrypt,<br />
reverse engineer or decompile the Software.<br />
7 Monotype Imaging warrants that for ninety (90) days after delivery,<br />
the Software will perform in accordance with Monotype Imagingpublished<br />
specifications, and the diskette will be free from defects in<br />
material and workmanship. Monotype Imaging does not warrant that<br />
the Software is free from all bugs, errors and omissions.<br />
8 THE PARTIES AGREE THAT ALL OTHER WARRANTIES,<br />
EXPRESSED OR IMPLIED, INCLUDING WARRANTIES OF<br />
FITNESS FOR A PARTICULAR PURPOSE AND<br />
MERCHANTABILITY, ARE EXCLUDED.<br />
vi
9 Your exclusive remedy and the sole liability of Monotype Imaging in<br />
connection with the Software and Typefaces is repair or replacement<br />
of defective parts, upon their return to Monotype Imaging.<br />
10 IN NO EVENT WILL MONOTYPE IMAGING BE LIABLE FOR LOST<br />
PROFITS, LOST DATA, OR ANY OTHER INCIDENTAL OR<br />
CONSEQUENTIAL DAMAGES, OR ANY DAMAGES CAUSED BY<br />
ABUSE OR MISAPPLICATION OF THE SOFTWARE AND<br />
TYPEFACES.<br />
11 Massachusetts U.S.A. law governs this Agreement.<br />
12 You shall not sublicense, sell, lease, or otherwise transfer the<br />
Software and/or Typefaces without the prior written consent of<br />
Monotype Imaging.<br />
13 Use, duplication or disclosure by the Government is subject to<br />
restrictions as set forth in the Rights in Technical Data and Computer<br />
Software clause at FAR 252-227-7013, subdivision (b)(3)(ii) or<br />
subparagraph (c)(1)(ii), as appropriate. Further use, duplication or<br />
disclosure is subject to restrictions applicable to restricted rights<br />
software as set forth in FAR 52.227-19 (c)(2).<br />
14 YOU ACKNOWLEDGE THAT YOU HAVE READ THIS<br />
AGREEMENT, UNDERSTAND IT, AND AGREE TO BE BOUND BY<br />
ITS TERMS AND CONDITIONS. NEITHER PARTY SHALL BE<br />
BOUND BY ANY STATEMENT OR REPRESENTATION NOT<br />
CONTAINED IN THIS AGREEMENT. NO CHANGE IN THIS<br />
AGREEMENT IS EFFECTIVE UNLESS WRITTEN AND SIGNED<br />
BY PROPERLY AUTHORIZED REPRESENTATIVES OF EACH<br />
PARTY. BY OPENING THIS DISKETTE PACKAGE, YOU AGREE<br />
TO ACCEPT THE TERMS AND CONDITIONS OF THIS<br />
AGREEMENT.<br />
GPL<br />
Firmware of this machine is using in part the GPL applied codes<br />
(www.fsf.org/copyleft/gpl.html).<br />
Open SSLeay License<br />
Copyright © 1998-2006 The OpenSSL Project. All rights reserved.<br />
Redistribution and use in source and binary forms, with or without<br />
modification, are permitted provided that the following conditions are met:<br />
1 Redistributions of source code must retain the above copyright<br />
notice, this list of conditions and the following disclaimer.<br />
2 Redistributions in binary form must reproduce the above copyright<br />
notice, this list of conditions and the following disclaimer in the<br />
documentation and/or other materials provided with the distribution.<br />
3 All advertising materials mentioning features or use of this software<br />
must display the following acknowledgment:<br />
"This product includes software developed by the OpenSSL Project<br />
for use in the OpenSSL Toolkit. (http://www.openssl.org/)"<br />
4 The names "OpenSSL Toolkit" and "OpenSSL Project" must not be<br />
used to endorse or promote products derived from this software<br />
without prior written permission.<br />
For written permission, please contact openssl-core@openssl.org.<br />
5 Products derived from this software may not be called "OpenSSL"<br />
nor may "OpenSSL" appear in their names without prior written<br />
permission of the OpenSSL Project.<br />
vii
6 Redistributions of any form whatsoever must retain the following<br />
acknowledgment: "This product includes software developed by the<br />
OpenSSL Project for use in the OpenSSL Toolkit (http://<br />
www.openssl.org/)"<br />
THIS SOFTWARE IS PROVIDED BY THE OpenSSL PROJECT "AS IS"<br />
AND ANY EXPRESSED OR IMPLIED WARRANTIES, INCLUDING, BUT<br />
NOT LIMITED TO, THE IMPLIED WARRANTIES OF<br />
MERCHANTABILITY AND FITNESS FOR A PARTICULAR PURPOSE<br />
ARE DISCLAIMED. IN NO EVENT SHALL THE OpenSSL PROJECT OR<br />
ITS CONTRIBUTORS BE LIABLE FOR ANY DIRECT, INDIRECT,<br />
INCIDENTAL, SPECIAL, EXEMPLARY, OR CONSEQUENTIAL<br />
DAMAGES (INCLUDING, BUT NOT LIMITED TO, PROCUREMENT OF<br />
SUBSTITUTE GOODS OR SERVICES; LOSS OF USE, DATA, OR<br />
PROFITS; OR BUSINESS INTERRUPTION) HOWEVER CAUSED AND<br />
ON ANY THEORY OF LIABILITY, WHETHER IN CONTRACT, STRICT<br />
LIABILITY, OR TORT (INCLUDING NEGLIGENCE OR OTHERWISE)<br />
ARISING IN ANY WAY OUT OF THE USE OF THIS SOFTWARE, EVEN<br />
IF ADVISED OF THE POSSIBILITY OF SUCH DAMAGE.<br />
Original SSLeay License<br />
Copyright © 1995-1998 Eric Young (eay@cryptsoft.com) All rights<br />
reserved.<br />
This package is an SSL implementation written by Eric Young<br />
(eay@cryptsoft.com). The implementation was written so as to conform<br />
with Netscapes SSL.<br />
This library is free for commercial and non-commercial use as long as the<br />
following conditions are aheared to. The following conditions apply to all<br />
code found in this distribution, be it the RC4, RSA, lhash, DES, etc., code;<br />
not just the SSL code. The SSL documentation included with this<br />
distribution is covered by the same copyright terms except that the holder<br />
is Tim Hudson (tjh@cryptsoft.com).<br />
Copyright remains Eric Young's, and as such any Copyright notices in the<br />
code are not to be removed.<br />
If this package is used in a product, Eric Young should be given attribution<br />
as the author of the parts of the library used.<br />
This can be in the form of a textual message at program startup or in<br />
documentation (online or textual) provided with the package.<br />
Redistribution and use in source and binary forms, with or without<br />
modification, are permitted provided that the following conditions are met:<br />
1 Redistributions of source code must retain the copyright notice, this<br />
list of conditions and the following disclaimer.<br />
2 Redistributions in binary form must reproduce the above copyright<br />
notice, this list of conditions and the following disclaimer in the<br />
documentation and/or other materials provided with the distribution.<br />
3 All advertising materials mentioning features or use of this software<br />
must display the following acknowledgement:<br />
"This product includes cryptographic software written by Eric Young<br />
(eay@cryptsoft.com)"<br />
The word 'cryptographic' can be left out if the rouines from the library<br />
being used are not cryptographic related :-).<br />
viii
4 If you include any Windows specific code (or a derivative thereof)<br />
from the apps directory (application code) you must include an<br />
acknowledgement:<br />
"This product includes software written by Tim Hudson<br />
(tjh@cryptsoft.com)"<br />
THIS SOFTWARE IS PROVIDED BY ERIC YOUNG "AS IS" AND ANY<br />
EXPRESS OR IMPLIED WARRANTIES, INCLUDING, BUT NOT<br />
LIMITED TO, THE IMPLIED WARRANTIES OF MERCHANTABILITY<br />
AND FITNESS FOR A PARTICULAR PURPOSE ARE DISCLAIMED. IN<br />
NO EVENT SHALL THE AUTHOR OR CONTRIBUTORS BE LIABLE<br />
FOR ANY DIRECT, INDIRECT, INCIDENTAL, SPECIAL, EXEMPLARY,<br />
OR CONSEQUENTIAL DAMAGES (INCLUDING, BUT NOT LIMITED<br />
TO, PROCUREMENT OF SUBSTITUTE GOODS OR SERVICES; LOSS<br />
OF USE, DATA, OR PROFITS; OR BUSINESS INTERRUPTION)<br />
HOWEVER CAUSED AND ON ANY THEORY OF LIABILITY,<br />
WHETHER IN CONTRACT, STRICT LIABILITY, OR TORT (INCLUDING<br />
NEGLIGENCE OR OTHERWISE) ARISING IN ANY WAY OUT OF THE<br />
USE OF THIS SOFTWARE, EVEN IF ADVISED OF THE POSSIBILITY<br />
OF SUCH DAMAGE.<br />
The licence and distribution terms for any publically available version or<br />
derivative of this code cannot be changed. i.e. this code cannot simply be<br />
copied and put under another distribution licence [including the GNU<br />
Public Licence.]<br />
ix
Compliance and Conformity<br />
This equipment has been tested and found to comply with the limits for a<br />
Class B digital device, pursuant to Part 15 of the FCC Rules. These limits<br />
are designed to provide reasonable protection against harmful<br />
interference in a residential installation. This equipment generates, uses<br />
and can radiate radio frequency energy and, if not installed and used in<br />
accordance with the instructions, may cause harmful interference to radio<br />
communications. However, there is no guarantee that interference will not<br />
occur in a particular installation. If this equipment does cause harmful<br />
interference to radio or television reception, which can be determined by<br />
turning the equipment off and on, the user is encouraged to try to correct<br />
the interference by one or more of the following measures:<br />
• Reorient or relocate the receiving antenna.<br />
• Increase the separation between the equipment and receiver.<br />
• Connect the equipment into an outlet on a circuit different from that to<br />
which the receiver is connected.<br />
• Consult the dealer or an experienced radio/TV technician for help.<br />
• The use of a non-shielded interface cable with the referenced device<br />
is prohibited.<br />
CAUTION — The changes or modifications not expressly approved by<br />
the party responsible for compliance could void the user’s authority to<br />
operate the equipment.<br />
This device complies with Part 15 of FCC Rules and RSS-Gen of IC<br />
Rules.<br />
Operation is subject to the following two conditions; (1) this device may<br />
not cause interference, and (2) this device must accept any interference,<br />
including interference that may cause undesired operation of the device.<br />
* The above warning is valid only in the United States of America.<br />
Interface connectors<br />
IMPORTANT Be sure to power off the printer before connecting or<br />
disconnecting an interface cable. For protection against static<br />
electricity discharge to the printer's internal electronics through the<br />
interface connector(s), cover any interface connector that is not in use<br />
with the protective cap supplied.<br />
Note Use shielded interface cables.<br />
x
Safety Information<br />
Laser Safety<br />
This printer is certified as a Class I laser product under the U.S.<br />
Department of Health and Human Services (DHHS) Radiation<br />
Performance Standard according to Radiation Control for Health and<br />
Safety Act of 1968. This means that the printer does not produce<br />
hazardous laser radiation. Since radiation emitted inside the printer is<br />
completely confined within protective housings and external covers, the<br />
laser beam cannot escape from the printer during any phase of user<br />
operation.<br />
Laser Notice<br />
This printer is certified in the U.S. to conform to the requirements of DHHS<br />
21 CFR Subchapter for Class 1 laser products, and elsewhere is certified<br />
as a Class 1 laser product conforming to the requirements of IEC 60825-<br />
1.<br />
DANGER CLASS 3B LASER RADIATION WHEN OPEN.<br />
AVOID DIRECT EXPOSURE TO BEAM.<br />
CAUTION Use of controls or adjustments or performance<br />
of procedures other than those specified herein may result<br />
in hazardous radiation exposure.<br />
Radio Frequency Transmitter<br />
This machine contains a transmitter module. We, the manufacturer<br />
(UTAX GmbH) hereby declare that this equipment (page<br />
printer), model CLP 4550 is in compliance with the essential<br />
requirements and other relevant provisions of Directive 1999/5/EC.<br />
Radio Tag Technology<br />
In some countries, the radio tag technology used in this equipment to<br />
identify the toner container may be subject to authorization, and the use<br />
of this equipment may consequently be restricted.<br />
xi
Cautionary Labels<br />
The printer bears any of the following labels.<br />
High temperature inside.<br />
Do not touch parts in this<br />
area, because there is a<br />
danger of getting burned.<br />
High temperature inside.<br />
Do not touch parts in this<br />
area, because there is a<br />
danger of getting burned.<br />
High temperature inside.<br />
Do not touch parts in this<br />
area, because there is a<br />
danger of getting burned.<br />
Label inside the printer (Laser radiation warning)<br />
Do not incinerate toner and<br />
toner container. Dangerous<br />
sparks may cause burn.<br />
High temperature inside. Do not touch<br />
parts in this area, because there is a<br />
danger of getting burned.<br />
For U.S.A. and<br />
Canada<br />
For Europe, Asia,<br />
and other countries<br />
NOTE: Do not remove these labels.<br />
xii
CDRH Regulations<br />
The Center for Devices and Radiological Health (CDRH) of the U.S. Food<br />
and Drug Administration implemented regulations for laser products on<br />
August 2, 1976. These regulations apply to laser products manufactured<br />
after August 1, 1976. Compliance is mandatory for products marketed in<br />
the United States. A label indicating compliance with the CDRH<br />
regulations must be attached to laser products marketed in the United<br />
States.<br />
Ozone concentration<br />
The printers generate ozone gas (O 3 ) which may concentrate in the place<br />
of installation and cause an unpleasant smell. To minimize the<br />
concentration of ozone gas to less than 0.1 ppm, we recommend you not<br />
to install the printer in a confined area where ventilation is blocked.<br />
Safety <strong>Instruction</strong>s Regarding the Disconnection of Power<br />
Caution: The power plug is the main isolation device! Other switches on<br />
the equipment are only functional switches and are not suitable for<br />
isolating the equipment from the power source.<br />
VORSICHT: Der Netzstecker ist die Hauptisoliervorrichtung! Die anderen<br />
Schalter auf dem Gerät sind nur Funktionsschalter und können nicht<br />
verwendet werden, um den Stromfluß im Gerät zu unterbrechen.<br />
DECLARATION OF CONFORMITY<br />
TO<br />
2004/108/EC, 2006/95/EEC, 93/68/EEC, 1999/5/EC and 2005/32/EC<br />
We declare under our sole responsibility that the product to which this<br />
declaration relates is in conformity with the following specifications.<br />
EN55024<br />
EN55022 Class B<br />
EN61000-3-2<br />
EN61000-3-3<br />
EN60950-1<br />
EN60825-1<br />
EN300 330-1<br />
EN300 330-2<br />
EN62301<br />
Note Product marked with the Crossed-out Wheeled Bin Symbol<br />
includes the battery that complies with the European Parliament<br />
and Council Directive 2006/66/EC (the "Battery Directive") in<br />
European Union.<br />
Do not remove and dispose of the batteries included in this<br />
machine.<br />
xiii
Canadian Department of Communications Compliance<br />
Statement<br />
This Class B digital apparatus complies with Canadian ICES-003.<br />
Avis de conformité aux normes du ministère des<br />
Communications du Canada<br />
Cet appareil numérique de la classe B est conforme à la norme NMB-003<br />
du Canada.<br />
EN ISO 7779<br />
Maschinenlärminformations-Verordnung 3. GPSGV, 06.01.2004: Der<br />
höchste Schalldruckpegel beträgt 70 dB (A) oder weniger gemäß EN ISO<br />
7779.<br />
Ergonomics<br />
Das Gerät ist nicht für die Benutzung am Bildschirmarbeitsplatz gemäß<br />
BildscharbV vorgesehen.<br />
Disclaimer<br />
TA <strong>Triumph</strong>-<strong>Adler</strong>/UTAX GmbH will not be liable to customers or any other<br />
person or entity for any loss or damage caused or alleged to be caused directly or<br />
indirectly by equipment sold or furnished by us, including but not limited<br />
to, any interruption of service, loss of business or anticipatory profits, or<br />
consequential damages resulting from the use or operation of the<br />
equipment or software.<br />
Laser Safety<br />
Laser radiation could be hazardous to the human body. For this reason,<br />
laser radiation emitted inside this machine is hermetically sealed within<br />
the protective housing and external cover. In the normal operation of the<br />
product by user, no radiation can leak from the machine.<br />
This machine is classified as Class 1 laser product under IEC 60825.<br />
Caution: Performance of procedures other than those specified in this<br />
manual may result in hazardous radiation exposure.<br />
These labels are attached to the laser scanner unit inside the machine<br />
and are not in a user access area.<br />
The label shown below is attached on the right side of the machine.<br />
xiv
Energy Saving Control Function<br />
To reduce energy consumption while in a waiting state, the device comes<br />
equipped with an energy saving control function for switching to a Sleep<br />
Mode where power consumption is automatically reduced to a minimum<br />
after a certain amount of time elapses since the device was last used.<br />
Sleep<br />
The device automatically enters Sleep when 15 minutes have passed<br />
since the device was last used. The amount of time of no activity that must<br />
pass before Sleep is activated may be lengthened. For more information,<br />
refer to Sleep Timer (Sleep timer timeout setting) section.<br />
Automatic 2-Sided Print Function<br />
This device includes 2-sided printing as a standard function. For example,<br />
by printing two 1-sided originals onto a single sheet of paper as a 2-sided<br />
print, it is possible to lower the amount of paper used. For more<br />
information, refer to Duplex (Duplex Printing) section.<br />
Paper Recycling<br />
This device supports the recycled paper which reduces the load on the<br />
environment. Your sales or service representative can provide<br />
information about recommended paper types.<br />
Energy Star (ENERGY STAR ® ) Program<br />
We have determined as a participating company in the International<br />
Energy Star Program that this product is compliant with the standards laid<br />
out in the International Energy Star Program.<br />
xv
Installation Precautions<br />
Environment<br />
CAUTION Avoid placing the printer on or in locations which<br />
are unstable or not level. Such locations may cause the<br />
printer to fall. This type of situation presents a danger of<br />
personal injury or damage to the printer.<br />
Avoid locations with humidity or dust and dirt. If dust or dirt<br />
becomes attached to the power plug, clean the plug to avoid<br />
the danger of fire or electrical shock.<br />
Avoid locations near radiators, heaters, or other heat<br />
sources, or locations near flammable items, to avoid the<br />
danger of fire.<br />
To keep the printer cool and facilitate changing of parts and<br />
maintenance, allow access space as shown below. Leave<br />
adequate space, especially around the side cover, to allow<br />
air to be properly ventilated from the printer.<br />
Top: 400 mm<br />
(16 inches)<br />
Left: 300 mm<br />
(11-13/16 inches)<br />
Right: 300 mm<br />
(11-13/16 inches)<br />
Rear: 100 mm<br />
(3-15/16 inches)<br />
Front: 1,000 mm<br />
(39-3/8 inches)<br />
Other Precautions<br />
The service environmental conditions are as follows:<br />
- Temperature: 50 to 90.5 °F (10 to 32.5 °C), but humidity should be<br />
70% or less when temperature is 90.5 °F (32.5 °C)<br />
- Humidity: 15 to 80%, but temperature should be 86 °F or less (30 °C<br />
or less) when humidity is 80%<br />
However, adverse environmental conditions may affect the image quality.<br />
It is recommended to use the printer at a temperature: around 60.8 to<br />
80.6 °F or less (16 to 27 °C), humidity: around 36 to 65%. In addition,<br />
Avoid the following locations when selecting a site for the printer.<br />
- The printer automatically detects and displays the following message<br />
when the environmental temperature is too high or too low.<br />
Message: High temperature. / Adjust room temp. or Low<br />
temperature. / Adjust room temp..<br />
To use the printer under optimum conditions, adjust the temperature and<br />
the humidity of your room if the message is displayed.<br />
- Avoid locations near a window or with exposure to direct sunlight.<br />
- Avoid locations with vibrations.<br />
- Avoid locations with drastic temperature fluctuations.<br />
xvi
- Avoid locations with direct exposure to hot or cold air.<br />
- Avoid poorly ventilated locations.<br />
If the floor is delicate against casters, when this printer is moved after<br />
installation, the floor material may be damaged.<br />
During printing, small amounts of ozone and other chemicals are<br />
released, but the amount does not cause any ill effect to one's health. If,<br />
however, the printer is used over a long period of time in a poorly<br />
ventilated room or when printing an extremely large number of copies, the<br />
smell may become unpleasant. To maintain the appropriate environment<br />
for print work, it is suggested that the room be properly ventilated.<br />
Power Supply/Grounding the Printer<br />
WARNING Do not use a power supply with a voltage other<br />
than that specified. Avoid multiple connections in the same<br />
outlet. These types of situations present a danger of fire or<br />
electrical shock.<br />
Plug the power cord securely into the outlet. If metallic objects<br />
come in contact with the prongs on the plug, it may cause a fire<br />
or electric shock.<br />
Always connect the printer to an outlet with a ground<br />
connection to avoid the danger of fire or electrical shock in<br />
case of an electric short. If an earth connection is not possible,<br />
contact your service representative.<br />
Other Precautions<br />
Connect the power plug to the closest outlet possible to the printer.<br />
Handling of Plastic Bags<br />
WARNING Keep the plastic bags that are used with the<br />
printer away from children. The plastic may cling to their<br />
nose and mouth causing suffocation.<br />
xvii
Precautions for Use<br />
Cautions when Using the Printer<br />
• Do not place metallic objects or containers with water (flower vases,<br />
flower pots, cups, etc.) on or near the printer. This type of situation<br />
presents a danger of fire or electrical shock should they fall inside.<br />
• Do not remove any of the covers from the printer as there is a danger<br />
of electrical shock from high voltage parts inside the printer.<br />
• Do not damage, break or attempt to repair the power cord. Do not<br />
place heavy objects on the cord, pull it, bend it unnecessarily or cause<br />
any other type of damage.These types of situations present a danger<br />
of fire or electrical shock.<br />
• Never attempt to repair or disassemble the printer or its parts as there<br />
is a danger of fire, electrical shock or damage to the laser. If the laser<br />
beam escapes, there is a danger of it causing blindness.<br />
• If the printer becomes excessively hot, smoke appears from the<br />
printer, there is an odd smell, or any other abnormal situation occurs,<br />
there is a danger of fire or electrical shock. Turn the power switch<br />
OFF (◦) immediately, remove the power plug from the outlet and<br />
contact your service representative.<br />
• If anything harmful (paper clips, water, other fluids, etc.) falls into the<br />
printer, turn the power switch OFF (◦) immediately. Next, remove the<br />
power plug from the outlet to avoid the danger of fire or electrical<br />
shock. Then contact your service representative.<br />
• Do not remove or connect the power plug with wet hands, as there is<br />
a danger of electrical shock.<br />
• Always contact your service representative for maintenance or repair<br />
of internal parts.<br />
• Do not pull the power cord when removing it from the outlet. If the<br />
power cord is pulled, the wires may become broken and there is a<br />
danger of fire or electrical shock. (Always grasp the power plug when<br />
removing the power cord from the outlet.)<br />
• Always remove the power plug from the outlet when moving the<br />
printer. If the power cord is damaged, there is a danger of fire or<br />
electrical shock.<br />
• If the printer will not be used for a short period of time (overnight, etc.),<br />
turn the power switch OFF (◦). If it will not be used for an extended<br />
period of time (vacations, etc.), remove the power plug from the outlet<br />
for safety purposes during the time the printer is not in use.<br />
• When moving the machine, pull out two carrying handles on the left<br />
side, and move with carrying handles and the having hand two place<br />
of the right side.<br />
xviii
• For safety purposes, always remove the power plug from the outlet<br />
when performing cleaning operations.<br />
• If dust accumulates within the printer, there is a danger of fire or other<br />
trouble. It is therefore recommended that you consult with your<br />
service representative in regard to cleaning of internal parts. This is<br />
particularly effective if accomplished prior to seasons of high humidity.<br />
Consult with your service representative in regard to the cost of<br />
cleaning the internal parts of the printer.<br />
Other Precautions<br />
• Do not place heavy objects on the printer or cause other damage to<br />
the printer.<br />
• Do not open the top/left/rear cover, turn off the main switch, or pull out<br />
the power plug during printing.<br />
• During printing, some ozone is released, but the amount does not<br />
cause any ill effect to one's health. If, however, the printer is used over<br />
a long period of time in a poorly ventilated room or when printing an<br />
extremely large number of copies, the smell may become unpleasant.<br />
To maintain the appropriate environment for print work, it is suggested<br />
that the room be properly ventilated.<br />
• Do not touch electrical parts, such as connectors or printed circuit<br />
boards. They could be damaged by static electricity.<br />
• Do not attempt to perform any operations not explained in this<br />
handbook.<br />
• If the printer will not be used for an extended period of time, remove<br />
the paper from the cassette, return it to its original package and reseal<br />
it.<br />
CAUTION Use of controls or adjustments or performance<br />
of procedures other than those specified herein may result<br />
in hazardous radiation exposure.<br />
Cautions for Toner Handling<br />
• Do not incinerate toner and toner containers. Dangerous sparks may<br />
cause burn.<br />
• Never open the toner container.<br />
• Do not inhale the toner.<br />
• If you get toner on your hands, do not rub your eyes or touch your<br />
mouth. Wash the toner from your hands.<br />
• For the disposal of the old toner container, consult your service<br />
technician or dispose of the toner or toner containers in accordance<br />
with Federal, State and Local rules and regulations.<br />
xix
About the Operation Guide<br />
This Operation Guide has the following chapters:<br />
Chapter 1 - Machine Parts<br />
This chapter explains the names of parts.<br />
Chapter 2 - Printing Operation<br />
This chapter explains how to print from your workstation.<br />
Chapter 3 - Handling Paper<br />
This chapter explains how to replace the toner container and how to care<br />
for your printer.<br />
Chapter 4 - Using the Operation Panel<br />
This chapter explains how to handle printer problems that may occur,<br />
such as paper jams.<br />
Chapter 5 - Maintenance<br />
This chapter lists the printer’s specifications.<br />
Chapter 6 - Troubleshooting<br />
This chapter explains how to handle error messages, paper jams and<br />
other problems.<br />
Appendix<br />
Lists the fonts installed on the printer and explains the available printer<br />
interfaces, the environmental setting commands, the optional products<br />
and the printer's specifications.<br />
Conventions<br />
This manual uses the following conventions.<br />
Convention Description Example<br />
Italic Typeface<br />
Bold<br />
Braket Bold<br />
Note<br />
Important<br />
Caution<br />
Warning<br />
Used to emphasize a key word,<br />
phrase or reference to additional<br />
information.<br />
Used to denote buttons on the<br />
software.<br />
Used to denote operation panel<br />
keys.<br />
Used to provide additional or useful<br />
information about a function or<br />
feature.<br />
Used to provide important<br />
information.<br />
Indicates what must be observed to<br />
prevent injury or machine<br />
breakdown and how to deal with it.<br />
Used to alert users to the possibility<br />
of personal injury.<br />
To replace the toner container, refer to Toner<br />
Container Replacement on page 3-2.<br />
To start printing, click OK.<br />
Press [OK] Key to resume printing.<br />
Note Check with your network<br />
administrator for the network address<br />
settings.<br />
IMPORTANT Ensure paper is not folded,<br />
curled, or damaged.<br />
CAUTION The fuser unit inside the<br />
printer is hot. Do not touch it with your<br />
hands as it may result in burn injury.<br />
Remove jammed paper carefully.<br />
WARNING High voltage is present in the<br />
charger section.<br />
xx
1 Machine Parts<br />
This chapter provides explanations and illustrations for you to<br />
determine the parts and their functions. Try to be familiar with<br />
the names and functions of these parts for correct use and<br />
optimal performance.<br />
This chapter contains explanations on the following topics:<br />
Components at the Front of the Printer 1-2<br />
Components at the Left of the Printer 1-2<br />
Components at the Right of the Printer 1-3<br />
Internal Components 1-4<br />
Operation Panel 1-5<br />
Machine Parts 1-1
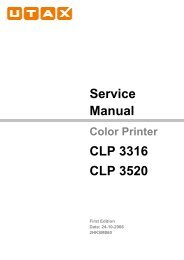
Components at the Front of the Printer<br />
6<br />
7<br />
1<br />
2<br />
8<br />
3<br />
4<br />
5<br />
1 Operation Panel<br />
2 USB Memory Slot<br />
3 Front Cover<br />
4 Paper Cassette 1<br />
5 Paper Cassette 2<br />
6 Top Cover<br />
7 Top Tray<br />
8 Paper Stopper<br />
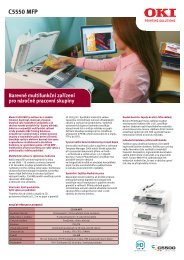
Components at the Left of the Printer<br />
9<br />
10<br />
11<br />
12<br />
13<br />
14<br />
15<br />
9 Left Cover 1<br />
10 Left Cover 1 Indicator<br />
11 Left Cover 1 Lever<br />
12 Left Cover 2 Indicator<br />
13 Left Cover 2<br />
14 Left Cover 3<br />
15 Handles<br />
1-2 Machine Parts
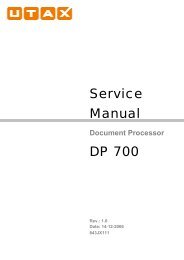
Components at the Right of the Printer<br />
16<br />
17<br />
18<br />
21<br />
19<br />
20<br />
22<br />
16 USB Port (A2)<br />
17 Network Interface Connector<br />
18 USB Interface Connector (B1)<br />
19 Power Switch<br />
20 Multi Purpose Tray<br />
21 Paper Width Guide<br />
22 Handles<br />
Machine Parts 1-3
Internal Components<br />
23 24 25 26 27 28 29 30<br />
31<br />
32<br />
33 34<br />
23 Black Toner Container (K)<br />
24 Black Toner Container (K) Release Lever<br />
25 Yellow Toner Container (Y)<br />
26 Yellow Toner Container (Y) Release Lever<br />
27 Cyan Toner Container (C)<br />
28 Cyan Toner Container (C) Release Lever<br />
29 Magenta Toner Container (M)<br />
30 Magenta Toner Container (M) Release Lever<br />
31 Cleaning Brush<br />
32 Waste Toner Box<br />
33 Waste Toner Tray<br />
34 Release button<br />
36 35<br />
37<br />
38<br />
39<br />
35 Paper Feed Unit Cover<br />
36 Paper Feed Unit<br />
37 Green Knob<br />
38 Paper Width Adjusting Tab<br />
39 Paper Length Guide<br />
1-4 Machine Parts
Operation Panel<br />
40 41 42<br />
43<br />
44<br />
45<br />
46<br />
47<br />
48<br />
49<br />
50<br />
51<br />
40 Ready Indicator<br />
41 Data Indicator<br />
42 Attention Indicator<br />
43 Message Display<br />
44 [Left Select] Key<br />
45 [Right Select] Key<br />
46 [MENU] Key<br />
47 [Back] Key<br />
48 [Stop] Key<br />
49 [OK] Key<br />
50 USB Memory Slot<br />
51 Arrow Keys<br />
Machine Parts 1-5
1-6 Machine Parts
2 Printing Operation<br />
This chapter contains explanations on the following topics:<br />
Changing Network Interface Parameters 2-2<br />
Printing a Status Page 2-3<br />
Installing the Printer Driver 2-4<br />
Printing from Application Software 2-9<br />
Status Monitor 2-10<br />
Uninstalling Software (Windows PC) 2-13<br />
Printing Operation 2-1
Changing Network Interface Parameters<br />
This printer supports TCP/IP, TCP/IP (IPv6), NetWare, AppleTalk, IPP,<br />
SSL Server and the IPSec protocols and Security Level.<br />
The table below shows the items required for each of the settings.<br />
Configure the printer's network parameters as appropriate for your PC<br />
and your network environment.<br />
For details of the procedure, refer to the Using the Operation Panel on<br />
page 4-1.<br />
Menu Submenu Setting<br />
Network TCP/IP Set. TCP/IP On/Off<br />
IPv4<br />
Setting<br />
IPv6<br />
Setting<br />
DHCP<br />
Auto-IP<br />
IP Address<br />
Subnet Mask<br />
Default<br />
Gateway<br />
Bonjour<br />
TCP/IP(IPv6)<br />
RA(Sateless)<br />
DHCPv6<br />
On/Off<br />
On/Off<br />
IP address<br />
IP address<br />
IP address<br />
On/Off<br />
On/Off<br />
On/Off<br />
On/Off<br />
Security Network Security Netware Off/On<br />
Frame type<br />
AppleTalk<br />
IPP<br />
SSL<br />
Setting<br />
IPSec<br />
SSL<br />
IPP over SSL<br />
HTTPS<br />
On/Off<br />
On/Off<br />
On/Off<br />
On/Off<br />
On/Off<br />
On/Off<br />
Note After all network related settings have been done, turn the<br />
machine OFF and ON again. This is mandatory to make the<br />
settings effective!<br />
2-2 Printing Operation
Printing a Status Page<br />
After completing the network settings, print a status page. The status<br />
page allows you to confirm a range of information, including network<br />
addresses and network protocols.<br />
To print a status page, select Status Page from the Report Print menu.<br />
Refer to Report Print on page 4-11 for detailed information.<br />
Printing Operation 2-3
Installing the Printer Driver<br />
Ensure the printer is plugged in and connected to the PC before installing<br />
the printer driver from the CD-ROM.<br />
Installing the Software in Windows<br />
If you are connecting this printer to a Windows PC, follow the next steps<br />
to install the printer driver. The example shows you how to connect your<br />
printer to a Windows Vista PC.<br />
Note In Windows 7, Windows Server 2008, Windows Vista,<br />
Windows Server 2003, Windows XP and Windows 2000, you<br />
must be logged on with administrator privileges.<br />
You can use either Express Mode or Custom Mode to install the software.<br />
Express Mode automatically detects connected printers and installs the<br />
required software. Use Custom Mode if you want to specify the printer<br />
port and select the software to be installed.<br />
1 Turn on the computer and start up Windows.<br />
If the Welcome to the Found New Hardware Wizard dialog box<br />
displays, select Cancel.<br />
2 Insert the CD-ROM supplied with the printer into the optical drive of<br />
the PC. In Windows 7, Windows Server 2008 and Windows Vista, the<br />
user account management window appears. Click Allow.<br />
The installation program launches.<br />
Note If the software install wizard does not launch<br />
automatically, open the CD-ROM window in Windows<br />
Explorer and double-click Setup.exe.<br />
3 Click View License Agreement and read the License Agreement.<br />
Click Accept.<br />
4 Click Install software.<br />
The software install wizard starts up.<br />
From this point, the procedure differs depending on your version of<br />
Windows and your connection method. Proceed to the correct<br />
procedure for your connection type.<br />
• Express Mode<br />
• Custom Mode<br />
2-4 Printing Operation
Express Mode<br />
In Express Mode, the installer automatically detects the printer when it is<br />
turned on. Use Express Mode for standard connection methods.<br />
1 In the installation method selection window, select Express Mode.<br />
The print system detection window appears and the installer detects<br />
the connected printers. If the installer does not detect a print system,<br />
check that the print system is connected via USB or a network and<br />
that it is turned on. Then return to the print system detection window.<br />
Note While the information shown in Windows Vista and<br />
Windows 7/Windows XP installation dialog boxes differs<br />
slightly, the installation procedure is the same.<br />
2 Select the print system to be installed and click Next.<br />
Note If the Found New Hardware Wizard appears, click<br />
Cancel. If a hardware installation warning message appear,<br />
click Continue.<br />
3 You can customize the print system name in the installation settings<br />
window. This will be the name displayed in the Printer window and in<br />
the printer lists displayed in applications. Specify whether to share the<br />
print system name or set the print system as an existing printer and<br />
then click Next.<br />
IMPORTANT Step 3 only appears if the print system is connected<br />
via a network. It does not appear if the print system is connected<br />
via a USB.<br />
4 A window appears in which you can check the settings. Check the<br />
settings carefully and then click Install.<br />
Note If the Windows security window appears, click Install<br />
this driver software anyway.<br />
5 A message appears saying that the printer has been installed<br />
successfully. Click Finish to exit the printer installation wizard and<br />
return the CD-ROM main menu.<br />
If the device setup dialog box appears after you click Finish, you can<br />
specify the settings for items such as optional features installed in the<br />
print system. You can also specify the device settings after you exit<br />
the installation. For details, refer to Device Settings in the printer<br />
driver operation manual on the CD-ROM.<br />
This completes the printer driver installation procedure. Follow the<br />
on-screen instructions to restart the system, if required.<br />
Printing Operation 2-5
Custom Mode<br />
Use Custom Mode if you want to specify the printer port and select the<br />
software to be installed.<br />
For example, if you do not want fonts installed on your computer to be<br />
replaced, select Custom Mode and deselect the Fonts checkbox in the<br />
utility tab.<br />
1 Select Custom Mode.<br />
2 Following the instructions in the install wizard window, select the<br />
software packages to be installed and the specify the port, etc.<br />
For details, refer to Custom Installation in the printer driver operation<br />
manual on the CD-ROM.<br />
Installation on a Macintosh<br />
Note Before installing the software, check the following<br />
settings on the printer:<br />
• Emulation Set. (Setting the emulation) on page 4-59 is set<br />
to KPDL or KPDL(Auto).<br />
• Bonjour (Bonjour setting) on page 4-69 is set to On.<br />
1 Turn on the printer and the Macintosh.<br />
2 Insert the included CD-ROM (Product Library) into the CD-ROM<br />
drive.<br />
3 Double-click the CD-ROM icon.<br />
4 Double-click either OS X 10.2 and 10.3 Only or OS X 10.4 or higher<br />
depending on your Mac OS version.<br />
5 Double-click OS X vx.x.<br />
2-6 Printing Operation
6 The printer driver installation program starts up.<br />
7 Choose Select Destination, Installation Type and then install the<br />
printer driver as directed by the instructions in the installation<br />
software.<br />
Note In addition to Easy Install, the Installation Type<br />
options include Custom Install, which allows you to specify<br />
the components to be installed.<br />
IMPORTANT In the Authenticate screen, enter the name and<br />
password used to log in to the operating system.<br />
This completes the printer driver installation. Next, specify the print<br />
settings.<br />
If an IP or AppleTalk connection is used, the settings below are<br />
required. If a USB connection is used, the printer is automatically<br />
recognized and connected.<br />
8 Open System Preferences and click Print & Fax.<br />
9 Click the plus symbol (+) to add the installed printer driver.<br />
Printing Operation 2-7
10Click the IP icon for an IP connection or the AppleTalk icon for an<br />
AppleTalk connection and then enter the IP address and printer<br />
name.<br />
11Select the installed printer driver and click Add.<br />
12Select the options available for the printer and click Continue.<br />
13The selected printer is added. This completes the printer setup<br />
procedure.<br />
2-8 Printing Operation
Printing from Application Software<br />
The steps required to print a document created with an application are<br />
explained below. You can select the printing Paper Size and Output<br />
Destination.<br />
1 Load the paper required into the paper cassette.<br />
2 From the application File menu, select Print. The Print dialog box<br />
displays.<br />
3 Click the drop down list of printer names. All the printers installed in<br />
Windows are listed. Click the name of the machine.<br />
4 Use Number of copies to enter the number of prints required. Up to<br />
999 copies can be entered.<br />
For Microsoft Word, we recommend that you click Options and<br />
specify Use printer settings for the Default tray.<br />
3<br />
4<br />
5 To start printing, click OK.<br />
Note For information on how to use the printer driver software,<br />
refer to Printer Driver User Guide.<br />
Printing Operation 2-9
Status Monitor<br />
The Status Monitor monitors the printer status and provides an ongoing<br />
reporting function. It also allows you to specify and modify settings for<br />
printers not included in the KX driver.<br />
The Status Monitor is installed automatically during KX driver installation.<br />
Accessing the Status Monitor<br />
Use either of the methods listed below to launch the Status Monitor.<br />
• Launch when printing starts:<br />
When you specify a printer and start a print job, one Status Monitor is<br />
launched for each printer name. If Status Monitor startup is requested<br />
from multiple printers, Status Monitors are launched for each printer<br />
that issues the request.<br />
• Launch from the KX driver properties:<br />
Click the Status Monitor button in the Advanced tab. Then click<br />
Open Status Monitor button in the Status Monitor dialog box to<br />
launch the Status Monitor.<br />
Exiting the Status Monitor<br />
Use either of the methods listed below to exit the Status Monitor.<br />
• Exit manually:<br />
Right-click the Status Monitor icon in the taskbar and select Exit in the<br />
menu to exit the Status Monitor.<br />
• Exit automatically:<br />
The Status Monitor automatically shuts down after 5 minutes if it is not<br />
being used.<br />
Screen Overview<br />
The screen overview of the Status Monitor is as follows.<br />
Pop-up window<br />
3D View<br />
Status Monitor icon<br />
Pop-up window<br />
If an information notification event occurs, a pop-up window appears. This<br />
window only appears when the 3D View is open on the desktop.<br />
2-10 Printing Operation
3D View<br />
This shows the status of the monitored printer as a 3D image. You can<br />
choose whether to show or hide the 3D view from the menu displayed<br />
when you right-click the Status Monitor icon.<br />
If an information notification event occurs, the 3D view and an alert sound<br />
are used to notify you. For information on the sound notification settings,<br />
refer to Status Monitor Settings on page 2-12.<br />
Status Monitor icon<br />
While the Status Monitor is running, its icon is displayed in the taskbar<br />
notification area. When you position the cursor over the icon, the printer<br />
name appears. Right-clicking the Status Monitor icon allows you to set<br />
the options below.<br />
Show/Hide the status monitor<br />
Displays or hides the Status Monitor icon.<br />
Configure...<br />
If the printer is connected to a TCP/IP network and has its own IP<br />
address, use a web browser to access the Embedded Web Server to<br />
modify or confirm the network settings. For more information, refer to the<br />
Embedded Web Server Operation Guide.<br />
Preferences...<br />
Specify the Sound Notification and Appearance settings for the Status<br />
Monitor. For details, refer to Status Monitor Settings on page 2-12.<br />
www.triumph-adler.com<br />
Accesses the TA <strong>Triumph</strong>-<strong>Adler</strong> website.<br />
Exit<br />
Exits the Status Monitor.<br />
Printing Operation 2-11
Status Monitor Settings<br />
Use the Preference option to set up the Status Monitor. The Status<br />
Monitor has two tabs to configure its settings.<br />
Sound Notification Tab<br />
The Sound Notification tab contains the following items.<br />
IMPORTANT To confirm the settings on Sound Notification tab, the<br />
computer requires the sound capabilities such as sound card and<br />
speaker.<br />
Enables Event Notification<br />
Select to enable or disable monitoring the events in Available events.<br />
Sound file<br />
A sound file can be selected if you require an audible notification. Click<br />
Browse to search for the sound file.<br />
Use Text to speech<br />
Select this check box to enter text you would like to hear played for<br />
events. Although a sound file is unnecessary, this function is applicable<br />
for Windows XP or later.<br />
To use this function, follow these steps.<br />
1 Select Enables Event Notification.<br />
2 Select an event to use with the text to speech function in Available<br />
events.<br />
3 Click Browse to notify the event by sound file.<br />
Note The available file format is WAV.<br />
Select Use Text to speech to speech the text entered in Text to<br />
speech box when an event occurred.<br />
4 Click Play to confirm the sound or text is played correctly.<br />
2-12 Printing Operation
Appearance Tab<br />
The Appearance tab is contains the following items.<br />
Enlarge window<br />
Doubles the size of the Status Monitor window.<br />
Always on top<br />
Positions the Status Monitor in front of other active windows.<br />
Transparency<br />
Displays the Status Monitor as a transparent window.<br />
Uninstalling Software (Windows PC)<br />
The software can be uninstalled (removed) using the CD-ROM (Product<br />
Library) supplied with the printer.<br />
IMPORTANT On Macintosh computers, because the printer settings<br />
are specified using a PPD (PostScript Printer Description) file, the<br />
software cannot be uninstalled using the CD-ROM (Product Library).<br />
1 Exit all active software applications.<br />
2 Insert the enclosed CD-ROM (Product Library) into the CD-ROM<br />
drive.<br />
3 Following the procedure used to install the printer driver, click<br />
Remove Software. The Software Remove wizard appears.<br />
4 Select the software package to remove.<br />
5 Click Uninstall.<br />
Note In Windows 7, Windows Server 2008 and Windows<br />
Vista, the Remove Driver and Package screen appears.<br />
Select Remove driver and driver package, and click OK.<br />
When Print Monitor or Direct Printing is<br />
installed, separate uninstallers are launched for each<br />
application. Proceed with the uninstallation steps for each<br />
application as directed by the on-screen instructions.<br />
The uninstaller starts.<br />
6 When Uninstall complete screen appears, click Next.<br />
7 Select whether you restart your computer or not, click Finish.<br />
Note The software can be uninstalled from the Program<br />
menu.<br />
(In the case of Windows XP)<br />
Start the uninstaller by clicking start > All Programs > <strong>Triumph</strong>-<br />
<strong>Adler</strong> > <strong>Triumph</strong>-<strong>Adler</strong> Uninstaller, and uninstall the software.<br />
Printing Operation 2-13
2-14 Printing Operation
3 Handling Paper<br />
This chapter contains explanations on the following topics:<br />
General Guidelines 3-2<br />
Selecting the Right Paper 3-4<br />
Special Paper 3-7<br />
Paper Type 3-12<br />
Loading Paper 3-13<br />
Handling Paper 3-1
General Guidelines<br />
The machine is designed to print on standard copier paper (the type used<br />
in ordinary dry copier machines), but it can also accept a variety of other<br />
types of paper within the limits specified below.<br />
Note The manufacturer assumes no liability for problems that<br />
occur when paper not satisfying these requirements is used.<br />
Selection of the right paper is important. Using the wrong paper can result<br />
in paper jams, curling, poor print quality, and paper waste, and in extreme<br />
cases can damage the machine. The guidelines given below will increase<br />
the productivity of your office by ensuring efficient, trouble-free printing<br />
and reducing wear and tear on the machine.<br />
Paper Availability<br />
Most types of paper are compatible with a variety of machines. Paper<br />
intended for xerographic copiers can also be used with the machine.<br />
There are three general grades of paper: economy, standard, and<br />
premium. The most significant difference between grades is the ease with<br />
which they pass through the machine. This is affected by the smoothness,<br />
size, and moisture content of the paper, and the way in which the paper<br />
is cut. The higher the grade of paper you use, the less risk there will be of<br />
paper jams and other problems, and the higher the level of quality your<br />
printed output will reflect.<br />
Differences between paper from different suppliers can also affect the<br />
machine’s performance. A high-quality printer cannot produce highquality<br />
results when the wrong paper is used. Low-priced paper is not<br />
economical in the long run if it causes printing problems.<br />
Paper in each grade is available in a range of basis weights (defined<br />
later). The traditional standard weights are 60 to 163 g/m² (16 to 44<br />
pounds).<br />
Paper Specifications<br />
The following table summarizes the basic paper specifications. Details<br />
are given on the following pages.<br />
Item<br />
Weight<br />
Thickness<br />
Specification<br />
Cassette: 60 to 163 g/m² (16 to 44 lb/ream)<br />
MP Tray: 60 to 220 g/m² (16 to 59 lb/ream)<br />
0.086 to 0.110 mm (3.4 to 4.3 mils)<br />
Dimensions Refer to Paper Sizes on page 3-4<br />
Dimensional accuracy<br />
±0.7 mm (±0.0276 inches)<br />
Squareness of corners 90° ±0.2°<br />
Moisture content 4 % to 6 %<br />
Direction of grain<br />
Pulp content<br />
Long grain<br />
80 % or more<br />
3-2 Handling Paper
Minimum and Maximum Paper Sizes<br />
The minimum and maximum paper sizes are as follows. For non standard<br />
paper such as transparency, labels, vellum, cardstock, envelope, coated<br />
and thick, the MP (Multi-Purpose) tray must be used. For information on<br />
how to set paper sizes, refer to Media Type Set. (Paper type settings) on<br />
page 4-50.<br />
Paper Cassette<br />
MP Tray<br />
210 mm 8-1/4 inches<br />
Minimum<br />
Paper Size<br />
148 mm<br />
5-13/16 inches<br />
Minimum<br />
Paper Size<br />
432 mm<br />
17 inches<br />
148 mm<br />
5-1/2 inches<br />
432 mm<br />
17 inches<br />
98 mm<br />
3-3/8 inches<br />
Maximum<br />
Paper Size<br />
Maximum<br />
Paper Size<br />
297 mm<br />
11-11/16 inches<br />
297 mm<br />
11-11/16 inches<br />
Recommended Paper<br />
The following products are recommended for use with the printer for<br />
optimum performance.<br />
Size Product Weight<br />
Letter, Legal Hammermill LASER PRINT 90 g/m² (24 lb)<br />
A4 NEUSIEDLER COLOR COPY 90 g/m²<br />
Handling Paper 3-3
Selecting the Right Paper<br />
This section describes the guidelines for selecting paper.<br />
Condition<br />
Avoid using paper that is bent at the edges, curled, dirty, torn, embossed,<br />
or contaminated with lint, clay, or paper shreds.<br />
Use of paper in these conditions can lead to illegible printing and paper<br />
jams, and can shorten the life of the machine. In particular, avoid using<br />
paper with a surface coating or other surface treatment. Paper should<br />
have as smooth and even a surface as possible.<br />
Composition<br />
Do not use paper that has been coated or surface-treated and contains<br />
plastic or carbon. The heat of fusing can cause such paper to give off<br />
harmful fumes.<br />
Bond paper should contain at least 80 % pulp. Not more than 20 % of the<br />
total paper content should consist of cotton or other fibers.<br />
Paper Sizes<br />
Cassettes and the MP tray are available for the paper sizes listed in the<br />
table below. For details, including the paper sizes for the paper feeder<br />
(Option) refer to Cassette (1 to 4) Size (Setting the cassette paper<br />
size) on page 4-49.<br />
The dimensional tolerances are ±0.7 mm (±0.0276 inches) for the length<br />
and width. The angle at the corners must be 90° ±0.2°.<br />
MP Tray Only<br />
Size<br />
Cassette or<br />
MP Tray<br />
Size<br />
Envelope C4 229 × 324 mm Ledger 11 × 17 inches<br />
Envelope C5 162 × 229 mm Legal 8-1/2 × 14 inches<br />
Envelope Monarch 3-7/8 × 7-1/2 inches Letter 8-1/2 × 11 inches<br />
Executive 7-1/4 × 10-1/2 inches ISO A3 297 × 420 mm<br />
Envelope #10 4-1/8 × 9-1/2 inches ISO A4 210 × 297 mm<br />
Envelope DL 110 × 220 mm ISO A5 148 × 210 mm<br />
Envelope #9 3-7/8 × 8-7/8 inches JIS B4 257 × 364 mm<br />
Envelope #6 3-5/8 × 6-1/2 inches JIS B5 182 × 257 mm<br />
ISO B5 176 × 250 mm Statement 5-1/2 × 8-1/2 inches<br />
ISO A6 105 × 148 mm Folio 210 × 330 mm<br />
JIS B6 128 × 182 mm Oficio II 8-1/2 × 13 inches<br />
Hagaki 100 × 148 mm 8.5 × 13.5 8-1/2 × 13-1/2 inches<br />
Ofuku-Hagaki 148 × 200 mm 8 kai 273 × 394 mm<br />
Youkei 2 114 × 162 mm 16 kai 197 × 273 mm<br />
Youkei 4<br />
105 × 235 mm<br />
3-4 Handling Paper
MP Tray Only<br />
Size<br />
Cassette or<br />
MP Tray<br />
Size<br />
Custom 98 × 148 to 297 ×<br />
432 mm (3-3/8 × 5-13/16<br />
to 11-11/16 × 17 inches)<br />
Smoothness<br />
The paper should have a smooth, uncoated surface. Paper with a rough<br />
or sandy surface can cause voids in the printed output. Paper that is too<br />
smooth can cause multiple feeding and fogging problems. (Fogging is a<br />
gray background effect.)<br />
Basis Weight<br />
Basis weight is the weight of paper expressed in grams per square meter<br />
(g/m²). Paper that is too heavy or too light may cause feed errors or paper<br />
jams as well as premature wear of the product. Uneven weight of paper,<br />
namely uneven paper thickness may cause multiple-sheet feeding or<br />
print quality problems such as blurring because of poor toner fusing.<br />
The recommended basis weight is between 60 and 163 g/m² (16 and 44<br />
lb/ream) for the cassette and between 60 and 220 g/m² (16 and 59 lb/<br />
ream) for the MP tray.<br />
Paper Weight Equivalence Table<br />
The paper weight is listed in pounds (lb) and metric grams per square<br />
meter (g/m²). The shaded part indicates the standard weight.<br />
U. S. Bond Weight (lb) Europe Metric Weight (g/m²)<br />
16 60<br />
17 64<br />
20 75<br />
21 80<br />
22 81<br />
24 90<br />
27 100<br />
28 105<br />
32 120<br />
34 128<br />
36 135<br />
39 148<br />
42 157<br />
43 163<br />
47 176<br />
53 199<br />
Handling Paper 3-5
Thickness<br />
The paper used with the machine should be neither extremely thick nor<br />
extremely thin. If you are having problems with paper jams, multiple<br />
feeds, and faint printing, the paper you are using may be too thin. If you<br />
are having problems with paper jams and blurred printing the paper may<br />
be too thick. The correct thickness is 0.086 to 0.110 mm (3.4 to 4.3 mils).<br />
Moisture Content<br />
Moisture content is defined as the percent ratio of moisture to the dry<br />
mass of the paper. Moisture can affect the paper’s appearance, feed<br />
ability, curl, electrostatic properties, and toner fusing characteristics.<br />
The moisture content of the paper varies with the relative humidity in the<br />
room. When the relative humidity is high and the paper absorbs moisture,<br />
the paper edges expand, becoming wavy in appearance. When the<br />
relative humidity is low and the paper loses moisture, the edges shrink<br />
and tighten, and print contrast may suffer.<br />
Wavy or tight edges can cause jams and alignment anomalies. The<br />
moisture content of the paper should be 4 to 6 %.<br />
To ensure correct moisture content, it is important to store the paper in a<br />
controlled environment. Some tips on moisture control are:<br />
• Store paper in a cool, dry location.<br />
• Keep the paper in its wrapping as long as possible. Re-wrap paper<br />
that is not in use.<br />
• Store paper in its original carton. Place a pallet etc. under the carton<br />
to separate it from the floor.<br />
• After removing paper from storage, let it stand in the same room as<br />
the machine for 48 hours before use.<br />
• Avoid leaving paper where it is exposed to heat, sunlight, or damp.<br />
Note When using coated paper, be aware that the sheets will<br />
stick together in a very humid environment.<br />
Paper Grain<br />
When paper is manufactured, it is cut into sheets with the grain running<br />
parallel to the length (long grain) or parallel to the width (short grain).<br />
Short grain paper can cause feeding problems in the machine. All paper<br />
used in the machine should be long grain.<br />
Other Paper Properties<br />
Porosity: Indicates the density of paper fiber.<br />
Stiffness: Limp paper may buckle in the machine, resulting in paper<br />
jams.<br />
Curl: Most paper naturally tends to curl one way if left unpacked.<br />
Electrostatic discharge: During the printing process the paper is<br />
electrostatically charged to attract the toner. The paper must be able to<br />
release this charge so that printed sheets do not cling together in the<br />
Output Tray.<br />
3-6 Handling Paper
Whiteness: The contrast of the printed page depends on the whiteness<br />
of the paper. Whiter paper provides a sharper, brighter appearance.<br />
Quality control: Uneven sheet size, corners that are not square, ragged<br />
edges, welded (uncut) sheets, and crushed edges and corners can cause<br />
the machine to malfunction in various ways. A quality paper supplier<br />
should take considerable care to ensure that these problems do not<br />
occur.<br />
Packaging: Paper should be packed in a sturdy carton to protect it from<br />
damage during transport. Quality paper obtained from a reputable<br />
supplier is usually correctly packaged.<br />
Note You might see the printer emitting steam in the area around<br />
the top tray if you use damp paper, but it is safe to continue<br />
printing.<br />
Special Paper<br />
The following types of special paper can be used:<br />
Paper Type to be Used<br />
Overhead projector transparencies<br />
Rough paper<br />
Thin paper (60 to 64 g/m²)<br />
Label<br />
Recycled paper<br />
Preprinted paper<br />
Bond paper<br />
Postcards<br />
Colored paper<br />
Prepunched paper<br />
Letterhead<br />
Envelopes<br />
Coated paper<br />
Thick paper (120 to 220 g/m²)<br />
High-quality paper<br />
Paper Type to be Selected<br />
TRANSPARENCY<br />
ROUGH<br />
VELLUM<br />
LABELS<br />
RECYCLED<br />
PREPRINTED<br />
BOND<br />
CARDSTOCK<br />
COLOR<br />
PREPUNCHED<br />
LETTERHEAD<br />
ENVELOPE<br />
COATED<br />
THICK<br />
HIGH QUALITY<br />
Custom CUSTOM 1~8<br />
Use paper that is sold specifically for use with copiers or printers (heatfusing<br />
type). When using transparencies, labels, thin paper, envelopes,<br />
postcards, or thick paper, feed the paper from the MP tray. For details,<br />
refer to Paper Settings on page 4-46.<br />
Since the composition and quality of special paper vary considerably,<br />
special paper is more likely than white bond paper to give trouble during<br />
Handling Paper 3-7
printing. No liability will be assumed if moisture and so forth given off<br />
during printing on special paper causes harm to the machine or operator.<br />
Note Before purchasing any type of special paper, test a sample<br />
on the machine and check that printing quality is satisfactory.<br />
Transparency<br />
Transparencies must be able to withstand the heat of fusing during the<br />
printing process. The recommended transparency product is 3M CG3700<br />
(Letter, A4).<br />
The table below lists the specifications for transparency:<br />
Item<br />
Tolerance of heat<br />
Thickness<br />
Material<br />
Dimensional accuracy<br />
Specification<br />
Must tolerate at least 190 °C (374 °F)<br />
0.100 to 0.110 mm (3.9 to 4.3 mils)<br />
Polyester<br />
±0.7 mm (±0.0276 inches)<br />
Squareness of corners 90° ±0.2°<br />
To prevent printing problems, feed transparencies into the printer one<br />
sheet at a time from the MP tray. Always load the transparencies vertically<br />
(with the long edge towards the printer).<br />
If the transparencies have rough edges on the back, it may cause a paper<br />
jam. Remove the rough edges, reverse the sides or feed the sheet from<br />
the opposite edge.<br />
When unloading transparencies (e.g., for clearing jams), hold them<br />
carefully by the edges to avoid leaving fingerprints on them.<br />
3-8 Handling Paper
Labels<br />
Labels must be fed from the MP tray.<br />
The basic rule for printing on adhesive labels is that the adhesive must<br />
never come into contact with any part of the machine. Adhesive paper<br />
sticking to the drum or rollers will damage the machine.<br />
Top sheet (white<br />
bond paper)<br />
Adhesive<br />
Carrier sheet<br />
Label paper has a structure comprising of three layers, as shown in the<br />
diagram. The top sheet is printed on. The adhesive layer consists of<br />
pressure-sensitive adhesives. The carrier sheet (also called the linear or<br />
backing sheet) holds the labels until used. Due to the complexity of its<br />
composition, adhesive-backed label paper is particularly likely to give<br />
printing problems.<br />
Adhesive label paper must be entirely covered by its top sheet, with no<br />
spaces between the individual labels. Labels with spaces in between are<br />
liable to peel off, causing serious paper jam problems.<br />
Some label paper is manufactured with an extra margin of top sheet<br />
around the edge. Do not remove the extra top sheet from the carrier sheet<br />
until after printing is finished.<br />
Acceptable<br />
Unacceptable<br />
Top sheet<br />
Carrier sheet<br />
The table below lists the specifications for adhesive label paper.<br />
Item<br />
Weight of top sheet<br />
Composite weight<br />
Thickness of top sheet<br />
Composite thickness<br />
Moisture content<br />
Specification<br />
44 to 74 g/m² (12 to 20 lb/ream)<br />
104 to 151 g/m² (28 to 40 lb/ream)<br />
0.086 to 0.107 mm (3.9 to 4.2 mils)<br />
0.115 to 0.145 mm (4.5 to 5.7 mils)<br />
4 to 6 % (composite)<br />
Handling Paper 3-9
Postcards<br />
Fan the stack of postcards and align the edges before loading them in the<br />
MP tray. Make sure the postcards you are going to set are not curled.<br />
Feeding curled postcards may cause paper jams.<br />
Rough<br />
Edge<br />
Some postcards have rough edges on the back (those are created when<br />
the paper is cut). In this case, put the postcards on a flat place and rub<br />
the edges with, for example, a ruler to smooth them.<br />
Rough<br />
Edge<br />
Envelopes<br />
Envelopes should always be fed from the MP tray, with the print-side up.<br />
Since the composition of an envelope is more complex than that of<br />
ordinary paper, it is not always possible to ensure consistent printing<br />
quality over the entire envelope surface.<br />
Normally, envelopes have a diagonal grain direction. Refer to Paper<br />
Grain on page 3-6. This direction can easily cause wrinkles and creases<br />
when envelopes pass through the printer. Before purchasing envelopes,<br />
make a test print to check whether the printer accepts the envelope.<br />
• Do not use envelopes that have an encapsulated liquid adhesive.<br />
• Avoid a long printing session for envelopes only. Extended envelope<br />
printing can cause premature printer wear.<br />
• If jams occur, try setting a lesser number of envelopes on the MP tray.<br />
• To avoid jams caused by curled envelopes, stack no more than 10<br />
printed envelopes on the top tray.<br />
3-10 Handling Paper
Thick Paper<br />
Fan the stack of paper and align the edges before loading them in the MP<br />
tray. Some types of paper have rough edges on the back (those are<br />
created when the paper is cut). In this case, put the paper on a flat place<br />
and rub the edges once or twice with, for example, a ruler to smooth them.<br />
Feeding rough edged paper may cause paper jams.<br />
Note If the paper jams even after you smooth it out, load the<br />
paper in the MP tray with the leading edge raised up a few<br />
millimeters as shown in the illustration.<br />
Colored Paper<br />
Colored paper should satisfy the same conditions as white bond paper,<br />
refer to Paper Specifications on page 3-2. In addition, the pigments used<br />
in the paper must be able to withstand the heat of fusing during the<br />
printing process (up to 200 °C or 392 °F).<br />
Preprinted Paper<br />
Preprinted paper should satisfy the same conditions as white bond paper,<br />
refer to Paper Specifications on page 3-2. The preprinted ink must be<br />
able to withstand the heat of fusing during the printing process, and must<br />
not be affected by silicone oil. Do not use paper with any kind of surface<br />
treatment, such as the type of paper commonly used for calendars.<br />
Recycled Paper<br />
Select recycled paper that meets the same specifications as the white<br />
bond paper except for whiteness, refer to Paper Specifications on page<br />
3-2.<br />
Note Before purchasing recycled paper, test a sample on the<br />
machine and check that the printing quality is satisfactory.<br />
Coated Paper<br />
Coated paper is created by treating the surface of the base paper with a<br />
coating that provides higher printing quality than plain paper. Coated<br />
paper is used for particularly high quality printing.<br />
The surface of high-quality or medium-quality paper is coated with special<br />
agents that improve ink coverage by making the paper surface smoother.<br />
These agents are used either to coat both sides of the paper or just one<br />
side. The coated side appears slightly glossy.<br />
IMPORTANT When printing on coated paper in very humid<br />
environments, ensure that the paper is kept dry as moisture may<br />
cause sheets to stick together when they are fed into the printer.<br />
Handling Paper 3-11
Paper Type<br />
The printer is capable of printing under the optimum setting for the type of<br />
paper being used.<br />
Setting the paper type for the paper source from the printer’s operation<br />
panel will cause the printer to automatically select the paper source and<br />
print in the mode best suited to that type of paper.<br />
A different paper type setting can be made for each paper source<br />
including the MP tray. Not only can preset paper types be selected, but it<br />
is also possible for you to define and select customized paper types.<br />
Refer to Media Type Set. (Paper type settings) on page 4-50. The<br />
following types of paper can be used.<br />
Paper Source<br />
Paper Type<br />
MP Tray<br />
Paper Cassette<br />
Optional Paper Feeder<br />
Paper Weight<br />
Duplex Path<br />
PLAIN Yes Yes Normal 2 Yes<br />
TRANSPARENCY Yes No Extra Heavy No<br />
ROUGH Yes Yes Normal 3 Yes<br />
VELLUM Yes Yes Light No<br />
LABELS Yes No Heavy 1 No<br />
RECYCLED Yes Yes Normal 2 Yes<br />
PREPRINTED Yes Yes Normal 2 Yes<br />
BOND Yes Yes Normal 3 Yes<br />
CARDSTOCK Yes No Heavy 2 No<br />
COLOR Yes Yes Normal 2 Yes<br />
PREPUNCHED Yes Yes Normal 2 Yes<br />
LETTERHEAD Yes Yes Normal 2 Yes<br />
ENVELOPE Yes No Heavy 2 No<br />
COATED Yes No Normal 3 No<br />
THICK Yes Yes Heavy 2 Yes<br />
HIGH QUALITY Yes Yes Normal 2 Yes<br />
CUSTOM 1 (to 8) † Yes Yes Normal 2 Yes<br />
Yes: Can be stored<br />
No: Cannot be stored<br />
†. This is a paper type defined and registered by the user. Up to eight types of user settings may be defined. For<br />
details, refer to Media Type Set. (Paper type settings) on page 4-50.<br />
3-12 Handling Paper
Loading Paper<br />
The following explains the procedure for loading paper in the cassette<br />
and the MP tray.<br />
Loading Paper into the Cassette<br />
1 Fan the media (paper/transparencies), then tap it on a level surface<br />
to avoid media jams or skewed printing.<br />
2 Pull the paper cassette out toward you until it stops.<br />
Note Do not pull out more than one paper cassette at a time.<br />
3 Adjust the paper length guide to the length of the paper.<br />
When loading A4 or smaller paper into paper cassette 1, raise the<br />
paper length guide. For B4 or larger paper, lower the paper length<br />
guide.<br />
4 Grasp the paper width adjustment knob and adjust the paper width<br />
guides to the width of the paper.<br />
Handling Paper 3-13
Note Paper sizes are indicated on the paper cassettes as<br />
shown.<br />
To change between inch sizes and metric sizes (A, B sizes), follow<br />
the steps below to change the setting of the size switch.<br />
1 Grasp the paper width adjustment knob and move the paper<br />
width guides to a position other than that of the size of the<br />
paper.<br />
2 Turn size switch A 90°.<br />
3 Move size lever B up (C) or down (I).<br />
C: Metric sizes (centimeters) (A, B sizes)<br />
I: Inch sizes<br />
4 Turn the size switch 90° to lock it.<br />
5 Align the paper against the left side of the paper cassette.<br />
IMPORTANT Before loading the paper, be sure that it is not curled or<br />
folded. Paper that is curled or folded may cause paper jams.<br />
Ensure that the loaded paper is not higher than the level indicator (see<br />
illustration below).<br />
When loading the paper, make sure that the side that was closest to<br />
the package seal is facing up.<br />
The paper length and width guides must be adjusted to the paper<br />
size. Loading the paper without adjusting these guides may cause<br />
skewed feeding and paper jams.<br />
Make sure that the paper length and width guides are in contact with<br />
the paper. If there is a gap, readjust the guides.<br />
6 Insert the appropriate paper size card in the slot to indicate the size<br />
of the paper.<br />
7 Gently push the paper cassette back in.<br />
Note If the machine will not be used for a prolonged period,<br />
protect the paper from humidity by removing it from the paper<br />
cassettes and sealing it in its original packaging.<br />
8 On the operation panel, set the type of paper (plain, recycled, etc.)<br />
that is loaded in the paper cassette. Refer to Paper Settings on page<br />
4-46.<br />
3-14 Handling Paper
Loading Paper into the MP (Multi-Purpose) Tray<br />
1 Fan the media (paper/transparencies), then tap it on a level surface<br />
to avoid media jams or skewed printing.<br />
2 Open the MP tray.<br />
3 When loading paper sizes from A3 to B4 or Ledger to Legal, pull out<br />
the MP extension.<br />
4 Adjust the paper width guides to the width of the paper.<br />
Paper sizes are indicated on the MP tray.<br />
Handling Paper 3-15
5 Insert the paper along the paper width guides into the tray until it<br />
stops.<br />
IMPORTANT Make sure that the side that was closest to the package<br />
seal is facing up.<br />
Curled paper must be straightened before use.<br />
Straighten the top edge if it is curled.<br />
Before loading paper in the MP tray, make sure no paper remains in<br />
the tray from a previous job. If a small amount of paper remains in the<br />
MP tray and you want to add more, remove the remaining paper from<br />
the tray, combine it with the new paper, fan the paper, and then load<br />
in the tray.<br />
Correct<br />
Incorrect<br />
6 Set the MP tray paper size on the printer’s operation panel. Refer to<br />
Paper Settings on page 4-46.<br />
Paper stopper<br />
When using A3 or Ledger paper, open the paper stopper.<br />
3-16 Handling Paper
4 Using the Operation Panel<br />
This chapter contains explanations on the following topics:<br />
General Information 4-2<br />
Understanding the Operation Panel 4-3<br />
Keys 4-6<br />
Using the Menu Selection System 4-8<br />
Setting a Mode Selection Menu 4-10<br />
Report Print 4-11<br />
USB Memory (USB memory selection) 4-16<br />
Custom Box 4-22<br />
Job Box 4-28<br />
Job Log 4-42<br />
Counter (Viewing the counter value) 4-44<br />
Paper Settings 4-46<br />
Print Settings 4-55<br />
Network (Network settings) 4-65<br />
Device Common (Selecting/Setting the common device)<br />
4-72<br />
Security (Security function setting) 4-85<br />
Job Account.Set. (Job Account setting) 4-94<br />
Administrator (Administrator settings) 4-102<br />
Adjust/Maint. (Adjust/Maintenance selection/setting) 4-105<br />
Using the Operation Panel 4-1
General Information<br />
This chapter provides the information you need to configure the Ecosys<br />
Color printer. In general you need to use the operation panel only to make<br />
default settings. You can make most changes to the printer settings using<br />
the printer driver through the application software.<br />
Note Changes to printer settings made using a software<br />
application override changes made using the operation panel.<br />
You can also access the printer's various settings from a remote location,<br />
by using the control panel, the printer driver or other utilities such as the<br />
Status Monitor Utility. Other printer utilities can be installed using the CD-<br />
ROM supplied with the printer.<br />
The chapter describes the operation panel in detail, including its menus<br />
and the procedures for changing various printer settings.<br />
4-2 Using the Operation Panel
Understanding the Operation Panel<br />
The operation panel on the top of the printer has a 4-line by 21-character<br />
liquid crystal display (LCD), ten keys, and three indicators (LED).<br />
Messages that appear on the display and functions of indicators and keys<br />
are explained in this chapter.<br />
Message Display<br />
The message display on the operation panel shows:<br />
• Status information, the ten messages listed below which are displayed<br />
during normal operation.<br />
• For information on error code and errors where the printer requires<br />
the operator's attention, refer to Troubleshooting on page 6-1.<br />
Using the Operation Panel 4-3
Status Information<br />
Message<br />
Please wait.<br />
Please wait.<br />
Loading paper...<br />
Please wait.<br />
Adding toner...<br />
Please wait.<br />
Performing<br />
Color Calibration...<br />
Ready to print.<br />
Processing.<br />
Sleeping.<br />
Canceling...<br />
Waiting data.<br />
Meaning<br />
The printer is warming up and is not ready.<br />
When the printer is switched on for the first time, this message will take several minutes.<br />
Appears while paper is being loaded.<br />
Toner is currently being replenished. This message may be displayed during continuous<br />
printing of a large volume of pages which require a large amount of toner such as with<br />
photographs, etc.<br />
The color calibration function is being performed automatically as you powered on the<br />
printer. You can also execute this function manually on the operation panel.<br />
For details, refer to ColorCalibration on page 4-106.<br />
The printer is ready to print.<br />
The printer is receiving data to print. This is also shown when the printer is reading a USB<br />
memory or hard disk.<br />
The printer is in Auto Sleep. The printer wakes from Auto Sleep whenever a print job is<br />
received. The printer then warms up and goes on-line.<br />
For details on Auto Sleep, refer to Sleep Timer (Sleep timer timeout time) on page 4-82.<br />
Jobs inside the printer are being canceled. To cancel a job, refer to Canceling a Printing<br />
Job on page 4-6.<br />
The printer is waiting to receive the data.<br />
Error Codes<br />
Refer to the Troubleshooting on page 6-1.<br />
4-4 Using the Operation Panel
Indicators in Message Display<br />
Ready to print.<br />
UW A4 VX A4 ZX A3<br />
[ Toner ]<br />
Ready, Data, and Attention Indicators<br />
The following indicators light during normal operation and whenever the<br />
printer needs attention. Depending on the status of lighting, each<br />
indicator has the following meaning:<br />
Indicator<br />
Description<br />
Flashing. Indicates an error that you can resolve. For<br />
details, refer to Troubleshooting on page 6-1.<br />
On. Indicates that the printer is ready and on-line. The<br />
printer prints the data it receives.<br />
Off. Indicates that the printer is off-line because printing is<br />
manually stopped or automatically stopped due to an error<br />
condition. Data can be received but will not be printed. For<br />
details, refer to Error Messages on page 6-5 if printing is<br />
automatically stopped when an error condition has<br />
occurred.<br />
Flashing. Indicates that a data is being received.<br />
On. Indicates either that data received is being processed<br />
before printing starts, or that the hard disk is being<br />
accessed.<br />
Flashing. If Please wait is displayed, the printer is<br />
warming up.<br />
Or, the printer cannot print for some reason (e.g. there is no<br />
paper in the cassette). Check the message display and<br />
carry out the required action. For details, refer to Error<br />
Messages on page 6-5.<br />
On. The printer cannot print due to an error. Check the<br />
message display and carry out the required action. For<br />
details, refer to Error Messages on page 6-5.<br />
Using the Operation Panel 4-5
Keys<br />
The operation panel keys are used to configure the printer operation.<br />
Note that certain keys have a secondary function.<br />
Stop Key<br />
This key is used to:<br />
• Cancel a printing job.<br />
• Stop the alarm sound.<br />
Canceling a Printing Job<br />
1 While the printer displays Processing., press [Stop].<br />
The Job Cancel List appears, showing the list of current print<br />
jobs.<br />
2 Press or to display the desired job and then press [OK].<br />
When the Job will be canceled. Are you sure? message<br />
appears, press [Yes] ([Left Select]) to cancel the job or [No]<br />
([Right Select]) to cancel this operation and continue printing.<br />
When you cancel a job, Canceling... appears on the message<br />
display and printing stops after the page currently printing has been<br />
fed out.<br />
MENU Key<br />
• [MENU] lets you enter the menu system to change the setup and<br />
printing environment of the printer.<br />
Arrow Keys<br />
• The four arrow keys are used in the menu system to access an item<br />
or enter numeric values.<br />
4-6 Using the Operation Panel
OK Key<br />
This key is used to:<br />
• Finalize settings of numeric values and other selections.<br />
Back Key<br />
• Cancels the menu setting currently displayed and returns to the menu<br />
for the previous step.<br />
Left Select Key / Right Select Key<br />
• These keys only function when the respective key tabs are shown in<br />
the message display. Pressing the key executes the function shown in<br />
the message display.<br />
Pressing the key executes the function shown in the message display.<br />
E.g.:<br />
When the menu shown below is displayed, pressing [Left Select]<br />
([Yes]) prints the file selected. Pressing [Right Select] ([No]) stop<br />
printing and returns to the menu for the previous step.<br />
Print.<br />
Are you sure?<br />
z Q Data01<br />
[ Yes ] [ No ]<br />
• These keys only function when the paper jam message has appeared<br />
on the message display. A help message will then appear to facilitate<br />
jam clearing in the location.<br />
Using the Operation Panel 4-7
Using the Menu Selection System<br />
Menu Selection System<br />
This section explains how to use the menu selection system.<br />
[MENU] on the operation panel allows you to use the menu to configure<br />
the printer settings to your specific needs. Settings can be made when<br />
Ready to print., Sleeping., Please wait. or Processing. is<br />
indicated on the printer message display.<br />
Note Settings that are received from application software and<br />
the printer driver will take priority over settings made in the<br />
operation panel.<br />
Entering the Mode Selection Menu<br />
Press [MENU] when Ready to print. is indicated on the printer<br />
message display.<br />
The mode selection menu is displayed.<br />
Ready to print.<br />
UW A4 VX A4 ZX A3<br />
[ Toner ]<br />
Scroll line<br />
Menu:<br />
a b<br />
1 Report Print<br />
2 USB Memory<br />
3 Custom Box<br />
[ Exit ]<br />
The directions of usable<br />
arrow keys are shown on<br />
the screen displayed.<br />
An asterisk (*) is displayed<br />
to the left of the currently<br />
selected setting.<br />
Scroll page<br />
Menu:<br />
a b<br />
5 Job Log<br />
6 Counter<br />
*********************<br />
7 Paper Settings<br />
[ Exit ]<br />
Paper Settings: a b<br />
1 MP Tray Set.<br />
*********************<br />
2 Cassette 1 Set.<br />
3 Cassette 2 Set.<br />
[ Exit ]<br />
Media Type: a b<br />
*********************<br />
1 *Plain<br />
2 Preprinted<br />
3 Bond<br />
4-8 Using the Operation Panel
Menu:<br />
a b<br />
1 Report Print<br />
2 USB Memory<br />
3 Custom Box<br />
[ Exit ]<br />
Detail:<br />
P b<br />
File Name: 1/ 4<br />
ABCDEFGHIJKLMNOPQRSTN<br />
Selecting a Menu<br />
The mode selection menu is hierarchical. Press , , or to display<br />
the desired menu.<br />
• If [a ] appears in the top-right of the screen, you can use the and<br />
to scroll up and down through the menu options one line at a time,<br />
and the and to move between menu options one page at a time.<br />
• If [P ] appears in the top-right of the screen, you can use the and<br />
to switch between pages.<br />
[ Detail ]<br />
To return to the menu one level up, press [Back].<br />
Setting a Menu<br />
Media Type: a b<br />
*********************<br />
1 *Plain<br />
2 Preprinted<br />
3 Bond<br />
Select the desired menu and press [OK]. You can now select options in<br />
the menu. press , , or to select or enter the desired setting and<br />
then press [OK] to confirm your selection.<br />
If you are choosing from a list of settings, an asterisk (*) is displayed to<br />
the left of the currently selected setting.<br />
Canceling Menu Selection<br />
If you press [MENU] when a menu is selected, the message display<br />
returns to Ready to print. or Sleeping..<br />
Using the Operation Panel 4-9
Setting a Mode Selection Menu<br />
This section explains the setting procedures used for each menu item in<br />
the mode selection menu.<br />
Menu:<br />
a b<br />
1 Report Print<br />
2 USB Memory<br />
3 Custom Box<br />
[ Exit ]<br />
1 While the printer displays Ready to print., Please wait.,<br />
Sleeping. and Processing., press [MENU]. The Mode Selection<br />
Menu is displayed.<br />
2 Each time you press or , the selection changes.<br />
• Report Print<br />
• USB Memory<br />
• Custom Box<br />
• Job Box<br />
• Job Log<br />
• Counter<br />
• Paper Settings<br />
• Print Settings<br />
• Network<br />
• Device Common<br />
• Security<br />
• Job Account.Set.<br />
• Administrator<br />
• Adjust/Maint.<br />
• Op Function<br />
Note The Op Functions menu is used with the optional Data<br />
Security Kit (E). For details, refer to Data Security Kit (E)<br />
Operation Manual.<br />
4-10 Using the Operation Panel
Report Print<br />
Report Print: a b<br />
1 Menu Map<br />
2 Status Page<br />
3 Font List<br />
[ Exit ]<br />
Print.<br />
Are you sure?<br />
z Menu Map<br />
Prints a report. The options available in the Report Print menu are as<br />
follows:<br />
• Menu Map (Printing a menu map)<br />
• Status Page (Printing a printer's status page)<br />
• Font List (Printing a list of the printer's fonts)<br />
• HDD File List (Printing a list of the files on the hard disk)<br />
• MemCard FileList (Printing a list of the files on a memory card)<br />
1 Press [MENU].<br />
2 Press or to select Report Print.<br />
3 Press [OK]. The Report Print menu appears showing a list of the<br />
types of report that can be printed. Note that report types shown may<br />
vary depending on which optional units are installed in the printer.<br />
Menu Map (Printing a menu map)<br />
The printer prints a full list of the menu selection system menu map.<br />
1 In the Report Print menu, press or to select Menu Map.<br />
2 Press [OK]. A confirmation message is displayed.<br />
3 Press [Yes] ([Left Select]). The message Accepted. appears and<br />
the printer prints the menu map.<br />
Pressing [No] ([Right Select]) returns you to the Report Print menu<br />
without printing the menu map.<br />
[ Yes ] [ No ]<br />
Using the Operation Panel 4-11
Menu Map Sample<br />
Menu Map<br />
Printer<br />
Firmware version<br />
4-12 Using the Operation Panel
Status Page (Printing a printer's status page)<br />
You can check the printer's current status and option settings by printing<br />
a status page.<br />
1 In the Report Print menu, press or to select Status Page.<br />
2 Press [OK]. A confirmation message is displayed.<br />
Print.<br />
Are you sure?<br />
z Status Page<br />
3 Press [Yes] ([Left Select]). The message Accepted. appears and<br />
the printer prints the status page.<br />
Pressing [No] ([Right Select]) returns you to the Report Print menu<br />
without printing the status page.<br />
[ Yes ] [ No ]<br />
Understanding the Status Page<br />
The numbers in the following diagram refer the items explained below the<br />
diagram. The items and values on the status page may vary depending<br />
on the printer’s firmware version.<br />
Status Page<br />
Printer<br />
Firmware version<br />
1<br />
Paper Settings<br />
Interface Block<br />
5<br />
2<br />
Group Settings<br />
Memory<br />
6<br />
Print Settings<br />
Emulation<br />
7<br />
Device Common Settings<br />
Counters<br />
3<br />
Option Status<br />
8<br />
Network<br />
4<br />
Toner Gauges<br />
9<br />
Using the Operation Panel 4-13
1 Firmware Version<br />
This item shows the version and release date of the printer<br />
firmware.<br />
2 Printer Settings Information<br />
This item shows various printer settings for hardware-related<br />
items:<br />
- MP tray paper size and type<br />
- Paper cassette size and type<br />
- Copies<br />
- EcoPrint<br />
- Default Media Type<br />
- Sleep time<br />
- Formfeed timeout time<br />
3 Installed Options<br />
This item shows the options installed in the printer:<br />
- Paper Feeder<br />
- Finisher<br />
- Mail Box<br />
4 Network Status<br />
This item shows the IP address, subnet mask address, and<br />
default gateway address for the network interface card in the<br />
printer.<br />
5 Interface Information<br />
This information shows the block status for items including the<br />
USB memory slot and USB interface.<br />
6 Memory<br />
This item shows:<br />
- Total memory in the printer<br />
7 Emulation<br />
This item shows all available emulations of the printer. The<br />
KPDL (AUTO) emulation is set as default when the printer is<br />
shipped from the factory. The emulations are:<br />
- PCL 6<br />
- KPDL<br />
8 Page Information<br />
This shows counter information. Total printed page count and<br />
total page count of each paper size are shown, and are itemized<br />
by color/monochrome/total for each counter.<br />
9 Consumable Status<br />
This item shows the approximate level of remaining toner. When<br />
the value is 100, the toner container is full. The closer to 0, the<br />
smaller the amount of remaining toner.<br />
4-14 Using the Operation Panel
Font List (Printing a list of the printer's fonts)<br />
To help you decide in selecting a font, you can printout lists of the internal<br />
fonts and the optional fonts.<br />
1 In the Report Print menu, press or to select Font List.<br />
2 Press [OK]. A confirmation message is displayed.<br />
Print.<br />
Are you sure?<br />
z Font List<br />
3 Press [Yes] ([Left Select]). The message Accepted. appears and<br />
the printer prints the font list.<br />
Pressing [No] ([Right Select]) returns you to the Report Print menu<br />
without printing the font list.<br />
[ Yes ] [ No ]<br />
HDD File List (Printing a list of the files on the hard disk)<br />
This allows you to print a list of the files on the hard disk.<br />
1 In the Report Print menu, press or to select HDD File List.<br />
2 Press [OK]. A confirmation message is displayed.<br />
Print.<br />
Are you sure?<br />
z Hard Disk File List<br />
3 Press [Yes] ([Left Select]). The message Accepted. appears and<br />
the printer prints a list of the files held on the hard disk.<br />
Pressing [No] ([Right Select]) returns you to the Report Print menu<br />
without printing the hard disk file list.<br />
[ Yes ] [ No ]<br />
MemCard FileList (Printing a list of the files on a memory<br />
card)<br />
This allows you to print a list of the files on a memory card.<br />
IMPORTANT This message will be displayed only when the memory<br />
card is installed in the printer and properly formatted.<br />
1 In the Report Print menu, press or to select MemCard<br />
FileList.<br />
2 Press [OK]. A confirmation message is displayed.<br />
Print.<br />
Are you sure?<br />
z Mem. Card File List<br />
3 Press [Yes] ([Left Select]). Accepted. appears and the printer<br />
prints a list of the files held on the memory card.<br />
Pressing [No] ([Right Select]) returns you to the Report Print menu<br />
without printing the memory card file list.<br />
[ Yes ] [ No ]<br />
Using the Operation Panel 4-15
USB Memory:<br />
1 Print File<br />
2 Remove Memory<br />
a b<br />
USB Memory (USB memory selection)<br />
This specifies the settings for removing the USB memory and printing<br />
USB memory content.<br />
IMPORTANT This menu only appears when the block setting of the<br />
USB memory slot is set to Unblock. For details, refer to I/F Block Set.<br />
(External interface block setting) on page 4-92.<br />
The options available in the USB Memory menu are as follows:<br />
• Print File List (Printing and checking the files in the USB memory)<br />
Print File (Prints the selected file)<br />
Detail (Shows the details of the selected file)<br />
• Remove Memory (Removing the USB memory)<br />
1 Press [MENU].<br />
2 Press or to select USB Memory.<br />
3 Press [OK]. The USB Memory menu appears showing a list of<br />
available actions.<br />
[ Exit ]<br />
Print File: O b<br />
i 00 Folder-1<br />
i 01 Folder-2<br />
j 02 File-1.jpg<br />
[ Detail ]<br />
i Folder-1: O b<br />
i 00 Folder-11<br />
j 01 File3.tif<br />
j 02 File4.pdf<br />
[ Detail ]<br />
Print File List (Printing and checking the files in the USB<br />
memory)<br />
This displays a list of the files and folders in the USB memory so that you<br />
can select and print one of the displayed files. You can also view the<br />
details of the selected file or folder.<br />
1 In the USB Memory menu, press or to select Print File.<br />
2 Press [OK]. File List appears showing a list of the files and folders in<br />
the USB memory.<br />
If there are 3 or more files and folders, pressing or repeatedly<br />
scrolls up or down through the list.<br />
Press or to select a folder and then press [OK].<br />
The folders and files in the selected folder are displayed.<br />
IMPORTANT Print File only shows the PDF, TIFF, JPEG and XPS<br />
files in the USB memory. Up to 3 folder levels can be displayed.<br />
Depending on the USB memory capacity and the number of files, the<br />
list may take some time to appear.<br />
4-16 Using the Operation Panel
Copies:<br />
a b<br />
(1 - 999)<br />
/**1-copies<br />
M<br />
[ Function]<br />
Paper Selection: a b<br />
F Letter Labels<br />
A A4 Plain<br />
B A5 Bond<br />
[ Function]<br />
Print File (Prints the selected file)<br />
You can use this to specify printing for files in the USB memory.<br />
1 Use the procedure described in Print File List (Printing and checking<br />
the files in the USB memory) on page 4-16 to display a list of the files<br />
in the folder containing the file you want to print.<br />
2 Press or to select the file you want to print.<br />
3 Press [OK]. The Copies menu screen appears.<br />
4 To print 2 or more copies, use the arrow keys to set the number of<br />
copies to be printed.<br />
Press or to increase or decrease, respectively, the value at the<br />
blinking cursor.<br />
Use and to move the cursor right and left.<br />
Note [Function] ([Right Select]) can be pressed to change<br />
the print settings. For details, refer to Print Function Settings on<br />
page 4-17.<br />
5 Press [OK]. The Paper Selection menu screen appears.<br />
6 Press or to select the tray containing the paper you want to use.<br />
Accepted.<br />
7 Press [OK]. A confirmation screen appears.<br />
Press [Yes] ([Left Select]). The message Accepted. appears<br />
and printing begins.<br />
Press [No] ([Right Select]) to return to the file list selection screen.<br />
Print Function Settings<br />
When printing, the print settings can be changed.<br />
Options available in Print Function Settings are as follows:<br />
• Paper Output (Output location selection)<br />
• Duplex (Setting the duplex printing)<br />
• Encrypted PDF (PDF password entry)<br />
• TIFF/JPEG Size (Adjusting the TIFF/JPEG file print out size)<br />
• XPS FitTo Page (Adjusting the XPS file print out size)<br />
Paper Output (Output location selection)<br />
Select the output location. For details, refer to Paper Output (Selecting<br />
the Paper Output Location) on page 4-58.<br />
Note The screen varies depending on the installed options.<br />
Using the Operation Panel 4-17
Function:<br />
1 Paper Output<br />
2 Duplex<br />
3 Encrypted PDF<br />
a b<br />
1 In the Copies menu or the Paper Selection menu, press<br />
[Function] ([Right Select]). The Function menu appears.<br />
2 Press or to select Paper Output.<br />
Paper Output: a b<br />
1 *TopTray FaceDown<br />
2 Tray A Face Down<br />
3 Tray B Face UP<br />
3 Press [OK]. The Paper Output menu appears showing the<br />
available output locations.<br />
Note The screen shown appears when a 3,000 Sheet Document<br />
Finisher is installed.<br />
Function:<br />
1 Paper Output<br />
2 Duplex<br />
3 Encrypted PDF<br />
a b<br />
4 Press or to select the desired output location.<br />
5 Press [OK]. The selected output location is stored and the Function<br />
menu reappears.<br />
Duplex (Setting the duplex printing)<br />
Set duplex printing. For details, refer to Duplex (Setting the duplex<br />
printing) on page 4-57.<br />
1 In the Copies menu or the Paper Selection menu, press<br />
[Function] ([Right Select]). The Function menu appears.<br />
2 Press or to select Duplex.<br />
Duplex:<br />
a b<br />
1 *Off<br />
2 Bind Long Edge<br />
3 Bind Short Edge<br />
3 Press [OK]. The Duplex screen appears showing the list of<br />
available duplex printing modes.<br />
4 Press or to select the desired duplex printing mode.<br />
The message display toggles through the following:<br />
Off (default)<br />
Bind Long Edge<br />
Bind Short Edge<br />
Selecting Off disables duplex printing.<br />
5 Press [OK]. The duplex printing mode is set and the Function menu<br />
reappears.<br />
4-18 Using the Operation Panel
Function:<br />
1 Paper Output<br />
2 Duplex<br />
3 Encrypted PDF<br />
a b<br />
Encrypted PDF (PDF password entry)<br />
The password of a PDF file can be entered.<br />
1 In the Copies menu or the Paper Selection menu, press<br />
[Function] ([Right Select]). The Function menu appears.<br />
2 Press or to select Encrypted PDF.<br />
Password:<br />
a b<br />
•••••••••• S<br />
*abcdefghijklmnopqrst<br />
uvwxyzABCDEFGHIJKLMNO<br />
[Bckspace] [ Enter ]<br />
3 Press [OK]. The Password input menu screen appears.<br />
Function:<br />
1 Paper Output<br />
2 Duplex<br />
3 Encrypted PDF<br />
a b<br />
4 Move the cursor up and down with and , and right and left with<br />
and , and input the set password by pressing the [OK] key.<br />
You can go back one character by pressing [Bckspace] ([Left<br />
Select]).<br />
5 Press [Enter] ([Right Select]) to enter the password and the<br />
Function menu reappears.<br />
TIFF/JPEG Size (Adjusting the TIFF/JPEG file print out size)<br />
Use this setting to select the printing method used when TIFF or JPEG<br />
files are printed directly.<br />
1 In the Copies menu or the Paper Selection menu, press<br />
[Function] ([Right Select]). The Function menu appears.<br />
2 Press or to select TIFF/JPEG Size.<br />
TIFF/JPEG Size: a b<br />
1 *Paper Size<br />
2 Image Resolution<br />
3 Print Resolution<br />
3 Press [OK]. The TIFF/JPEG Size screen appears.<br />
The options available in TIFF/JPEG Size are as follows:<br />
Paper Size (default)<br />
Images are resized so that they fill the paper size when printed.<br />
Image Resolution<br />
Image files are printed at the resolution specified in the resolution<br />
information. Images with no resolution information are printed using<br />
the Paper Size setting.<br />
Print Resolution<br />
Images are printed using a 1-to-1 correspondence between the<br />
image file pixels and printed dots. For example, the printed size of a<br />
600 x 300-pixel image file is 1 inch x 1/2 inch.<br />
4 Press or to select whether TIFF/JPEG Size mode is enabled.<br />
Using the Operation Panel 4-19
5 Press [OK]. The TIFF/JPEG Size setting is set and the Function<br />
menu reappears.<br />
Note Images are automatically rotated during printing to provide<br />
a closer match between the aspect ratios of the image file and the<br />
paper used for printing.<br />
Function:<br />
1 Paper Output<br />
2 Duplex<br />
3 Encrypted PDF<br />
a b<br />
XPS FitTo Page (Adjusting the XPS file print out size)<br />
Select On in this setting to enlarge or reduce XPS files to fit the printable<br />
area during printing.<br />
1 In the Copies menu or the Paper Selection menu, press<br />
[Function] ([Right Select]). The Function menu appears.<br />
XPS FitTo Page:<br />
1 *Off<br />
2 On<br />
a b<br />
2 Press or to select XPS FitTo Page.<br />
3 Press [OK]. The XPS FitTo Page screen appears.<br />
4 Press or to select whether XPS FitTo Page mode is enabled.<br />
5 Press [OK]. The XPS FitTo Page setting is set and the Function<br />
menu reappears.<br />
Detail:<br />
P b<br />
File Name: 1/ 4<br />
ABCDEFGHIJKLMNOPQRSTN<br />
Detail (Shows the details of the selected file)<br />
Use this to view detailed information on the files and folders in the USB<br />
memory.<br />
1 Use the procedure described in Print File List (Printing and checking<br />
the files in the USB memory) on page 4-16 to display a list of the files<br />
or folders you want to check.<br />
2 Press or to select the folder or file you want to check.<br />
3 Press [Detail] ([Right Select]). The Detail screen appears.<br />
[ Detail ]<br />
Detail:<br />
P b<br />
Folder Name: 1/ 2<br />
ABCDEFGHIJKLMNOPQRSTN<br />
If you selected a folder, there are 2 Detail screens. Press or to<br />
move between the screens.<br />
[ Detail ]<br />
4-20 Using the Operation Panel
Detail:<br />
P b<br />
File Name: 1/ 4<br />
ABCDEFGHIJKLMNOPQRSTN<br />
[ Detail ]<br />
Detail:<br />
O b<br />
ABCDEFGHIJKLMNOPQRSTU<br />
VWXYZabcdefghijklmnop<br />
qrstuvwxyz1234567890<br />
If you selected a file, there are 4 Detail screens. Press or to<br />
move between the screens.<br />
If the entire name shown as the File Name or Folder Name will<br />
not fit on one line, pressing [Detail] ([Right Select]) changes to a<br />
3-line name display. If the name is 3 or more lines long, you can scroll<br />
up or down by pressing or .<br />
Pressing [OK] while file or folder details are displayed returns you to<br />
the USB Memory menu.<br />
Remove Memory (Removing the USB memory)<br />
Allows you to remove a USB memory device.<br />
Cannot remove the<br />
memory while in use.<br />
IMPORTANT If the correct procedure is not followed to remove a<br />
USB memory device, the data may be corrupted or the device may be<br />
damaged.<br />
1 In the USB Memory menu, press or to select Remove Memory.<br />
2 Press [OK]. The printer is now ready for the USB memory to be<br />
removed and the Mode Selection menu screen appears.<br />
IMPORTANT If the screen on the left appears, the USB memory is<br />
still being used. Wait until the relevant job (e.g. printing from the USB<br />
memory) has ended and then repeat the Remove Memory procedure.<br />
Using the Operation Panel 4-21
Custom Box<br />
A Custom Box is a general-purpose box that allows users to store print<br />
data on the printer's hard disk so that it can be reused as required.<br />
Use the Embedded Web Server to create or delete a Custom Box, or to set<br />
a Box Password. For more information, refer to the Embedded Web Server<br />
Operation Guide and Printer Driver User Guide.<br />
Use the printer's operation panel to print the print data stored in a Custom<br />
Box.<br />
The options available in Custom Box are as follows:<br />
• Box Password (input of the password)<br />
• Box number/Box name (Select a File)<br />
• Select/Deselect All Files<br />
• Print a File<br />
• Delete a File<br />
• Check Custom Box Details<br />
• Check File Details<br />
Custom Box:<br />
i 0001 ABC box<br />
i 0002 XYZ box<br />
i 0003 Common<br />
a b<br />
1 Press [MENU].<br />
2 Press or to select Custom Box.<br />
3 Press [OK]. The Custom Box menu appears, showing a list of the<br />
box names.<br />
4 Press or to select a Custom Box.<br />
i 0001 ABC box: a b<br />
All Files<br />
j AAAA<br />
T<br />
j BBBB<br />
T<br />
[ Menu ] [ Select ]<br />
5 Press [OK]. The printer displays a list of files stored in the Custom<br />
Box.<br />
Note Please do the following procedure Box Password (input of<br />
the password) when you set the password to the Custom Box.<br />
4-22 Using the Operation Panel
Box Password: a b<br />
••••••••••••••* S<br />
*abcdefghijklmnopqrst<br />
uvwxyzABCDEFGHIJKLMNO<br />
[Bckspace] [ Enter ]<br />
i 0001 ABC box: a b<br />
All Files<br />
j AAAA<br />
g<br />
j BBBB<br />
T<br />
[ Menu ] [ Select ]<br />
i 0001 ABC box: a b<br />
All Files<br />
j AAAA<br />
T<br />
j BBBB<br />
T<br />
[ Menu ] [ Select ]<br />
i 0001 ABC box: a b<br />
All Files<br />
j AAAA<br />
g<br />
j BBBB<br />
g<br />
[ Menu ] [ Select ]<br />
i 0001 ABC box: a b<br />
All Files<br />
j AAAA<br />
T<br />
j BBBB<br />
T<br />
[ Menu ] [ Select ]<br />
Box Password (input of the password)<br />
The user who can access it can be limited by putting the password on the<br />
Custom Box. The password is set from Embedded Web Server.<br />
1 If you have set a password for the selected Custom Box, a password<br />
input screen appears.<br />
Press , , , or to select characters, and then press [OK] to<br />
enter the password.<br />
You can go back one character by pressing [Bckspace] ([Left<br />
Select]).<br />
2 When the password has been entered, press [Enter] ([Right<br />
Select]).<br />
Note After the password is input, collation is done. Password<br />
error is displayed for the incorrect password, and it returns to the<br />
input screen. Try to input be a correct password.<br />
Box number/Box name (Select a File)<br />
To print/delete a file in the Custom Box, first select the file to be printed or<br />
deleted.<br />
1 Press or to select the file to be printed/deleted.<br />
2 When [Select] ([Right Select]) is pressed, the file is selected. A<br />
checkmark will be placed on the right of the selected file.<br />
Select the checkmarked file and press [Select] ([Right Select])<br />
again to cancel the selection.<br />
Note When All Files is selected, [Select] ([Right Select])<br />
cannot be pressed. To select all files, follow the steps described<br />
below.<br />
Select/Deselect All Files<br />
All files in the Custom Box are selected.<br />
1 In the file list screen, press or to select All Files.<br />
2 Press [Check] ([Right Select]).<br />
When there is a file not checked in the Custom Box, all files will be<br />
checkmarked.<br />
When all files in the Custom Box are checked, all checkmarked files<br />
are deselected.<br />
Using the Operation Panel 4-23
i 0001 ABC box:<br />
1 Print<br />
2 Delete<br />
a b<br />
Print a File<br />
Print the file(s) selected in the Custom Box.<br />
1 In the file list screen, select an item other than All Files and press<br />
[OK]. The Print/Delete menu screen appears.<br />
2 Press or to select Print.<br />
Copies:<br />
a b<br />
(1 - 999)<br />
/**1-copies<br />
M<br />
[ Function]<br />
Paper Selection: a b<br />
F Letter Labels<br />
A A4 Plain<br />
B A5 Bond<br />
[ Function]<br />
3 Press [OK]. The Copies menu screen appears.<br />
If you want to change the number of remaining copies to be printed,<br />
use the arrow keys to set the number of copies to be printed.<br />
Press or to increase or decrease, respectively, the value at the<br />
blinking cursor.<br />
Use and to move the cursor right and left.<br />
Note [Function] ([Right Select]) can be pressed to change<br />
the print settings. For details, refer to Print Function Settings on<br />
page 4-24.<br />
4 Press [OK]. The Paper Selection menu screen appears.<br />
5 Press or to select the tray containing the paper you want to use.<br />
Print.<br />
Are you sure?<br />
z j AAAA<br />
6 Press [OK]. A confirmation screen appears.<br />
[ Yes ] [ No ]<br />
Accepted.<br />
7 Press [Yes] ([Left Select]). The message Accepted. appears and<br />
printing begins.<br />
Press [No] ([Right Select]) to return to the previous screen.<br />
Print Function Settings<br />
When printing, the print settings can be changed.<br />
Options available in Print Function Settings are as follows:<br />
• Paper Output (Output location selection)<br />
• Duplex (Setting the duplex printing)<br />
• Del. after Print (Delete data after printing setting)<br />
4-24 Using the Operation Panel
Paper Output (Output location selection)<br />
Select the output location. For details, refer to Paper Output (Selecting<br />
the Paper Output Location) on page 4-58.<br />
Note The screen varies depending on the installed options.<br />
Function:<br />
a b<br />
1 Paper Output<br />
2 Duplex<br />
3 Del. after Print<br />
1 In the Copies menu or the Paper Selection menu, press<br />
[Function] ([Right Select]). The Function menu appears.<br />
2 Press or to select Paper Output.<br />
Paper Output: a b<br />
1 *TopTray FaceDown<br />
2 Tray A Face Down<br />
3 Tray B Face UP<br />
3 Press [OK]. The Paper Output menu appears showing the<br />
available output locations.<br />
Note The screen shown appears when a 3,000 Sheet Document<br />
Finisher is installed.<br />
4 Press or to select the desired output location.<br />
5 Press [OK]. The selected output location is stored and the Function<br />
menu reappears.<br />
Function:<br />
a b<br />
1 Paper Output<br />
2 Duplex<br />
3 Del. after Print<br />
Duplex (Setting the duplex printing)<br />
Set duplex printing. For details, refer to Duplex (Setting the duplex<br />
printing) on page 4-57.<br />
1 In the Copies menu or the Paper Selection menu, press<br />
[Function] ([Right Select]). The Function menu appears.<br />
2 Press or to select Duplex.<br />
Duplex:<br />
a b<br />
1 *Off<br />
2 Bind Long Edge<br />
3 Bind Short Edge<br />
3 Press [OK]. The Duplex screen appears showing the list of<br />
available duplex printing modes.<br />
4 Press or to select the desired duplex printing mode.<br />
The message display toggles through the following:<br />
Off (default)<br />
Bind Long Edge<br />
Bind Short Edge<br />
Selecting Off disables duplex printing.<br />
Using the Operation Panel 4-25
5 Press [OK]. The duplex printing mode is set and the Function menu<br />
reappears.<br />
Function:<br />
a b<br />
1 Paper Output<br />
2 Duplex<br />
3 Del. after Print<br />
Del. after Print (Delete data after printing setting)<br />
Use this setting to specify whether or not the file data is deleted after<br />
printing.<br />
1 In the Copies menu or the Paper Selection menu, press<br />
[Function] ([Right Select]). The Function menu appears.<br />
2 Press or to select Del. after Print.<br />
Del. after Print: a b<br />
1 *Off<br />
2 On<br />
3 Press [OK]. The Del. after Print screen appears.<br />
i 0001 ABC box:<br />
1 Print<br />
2 Delete<br />
a b<br />
4 Press or to select the Del. after Print setting.<br />
5 Press [OK]. The Del. after Print setting is set and the Function<br />
menu reappears.<br />
Delete a File<br />
Delete the file(s) selected in the Custom Box.<br />
1 In the file list screen, select an item other than All Files and press<br />
[OK]. The Print/Delete menu screen appears.<br />
Delete.<br />
Are you sure?<br />
z j AAAA<br />
2 Press or to select Delete.<br />
3 Press [OK]. A confirmation screen appears.<br />
[ Yes ] [ No ]<br />
Completed.<br />
4 Press [Yes] ([Left Select]). The message Completed. appears<br />
and the selected file(s) are deleted.<br />
Pressing [No] ([Right Select]) returns you to the Print/Delete<br />
menu screen without deleting the file.<br />
4-26 Using the Operation Panel
Menu: b<br />
1 Box Detail<br />
2 File Detail<br />
Check Custom Box Details<br />
Details for the Custom Box that is currently displayed will appear.<br />
1 In the file list screen, press [Menu] ([Left Select]).<br />
2 Press or to select Box Detail.<br />
Detail: b<br />
ABC box<br />
3 Press [OK]. Details for the displayed Custom Box appear.<br />
4 Pressing [OK] returns you to the file list screen.<br />
Menu: b<br />
1 Box Detail<br />
2 File Detail<br />
Check File Details<br />
Details for the file that is selected with the cursor will appear.<br />
1 In the file list screen, press [Menu] ([Left Select]).<br />
2 Press or to select File Detail.<br />
Detail:<br />
P b<br />
File Name: 1/ 6<br />
ABCDEFGHIJKLMNOPQR...<br />
3 Press [OK]. Details for the file that is selected with the cursor<br />
appears.<br />
The details for the file covers 6 pages in all. Press to view to the<br />
next page or to return to the previous page.<br />
[ Detail ]<br />
Detail:<br />
O b<br />
ABCDEFGHIJKLMNOPQRSTU<br />
VWXYZ.txt<br />
[ Detail ]<br />
In the File Name screen, if the file name is abbreviated because it<br />
cannot be displayed on one line, press [Detail] ([Right Select]) to<br />
change the display to three lines. If the file name cannot be displayed<br />
in three lines, use or to scroll up and down the display.<br />
Pressing [OK] in three lines display returns you to one line display.<br />
4 Pressing [OK] while the file details are displayed returns you to the<br />
file list screen.<br />
Using the Operation Panel 4-27
Job Box<br />
Job Box is a print function that makes the Job Retention function possible.<br />
The settings are specified from the printer driver. Refer to Printer Driver<br />
User Guide for the driver settings.<br />
Job Retention<br />
Job Retention has four modes as summarized below. These modes are<br />
selected from the printer driver through the application software:<br />
Primary function<br />
Quick Copy Proof-and-Hold Private Print Stored Job<br />
To later print<br />
additional copies<br />
To proof the first copy<br />
before printing<br />
multiple copies<br />
To hold the document<br />
in printer to prevent<br />
unauthorized access<br />
To electronically store<br />
documents such as<br />
fax cover pages<br />
Start storing by Printer driver Printer driver Printer driver Printer driver<br />
On terminating print<br />
setting from<br />
application software<br />
Prints simultaneously<br />
Prints one copy<br />
simultaneously<br />
Does not print<br />
Does not print<br />
Retrieved by Operation panel Operation panel Operation panel Operation panel<br />
Default number of<br />
copies printed at<br />
retrieval<br />
Same as storing<br />
(can be changed)<br />
One less<br />
(can be changed)<br />
Same as storing<br />
(can be changed)<br />
Maximum number of<br />
jobs stored † 32, expandable to 50 32, expandable to 50 Depends on the hard<br />
disk capacity (the job<br />
is automatically<br />
deleted after printing)<br />
One<br />
(can be changed)<br />
Depends on the hard<br />
disk capacity<br />
PIN security No No Yes Yes (if necessary)<br />
Data after printing Stored Stored Deleted Stored<br />
Data at power off Deleted Deleted Deleted Stored<br />
†. Jobs in excess will cause the earlier ones to be deleted.<br />
Note Refer to the Printer Driver User Guide for the driver<br />
settings and print (save) procedures.<br />
Job Box:<br />
a b<br />
1 Quick Copy<br />
2 Private/Stored<br />
3 Job Box Settings<br />
[ Exit ]<br />
The options available in Job Box are as follows:<br />
• Quick Copy (Using Quick Copy/Proof-and-Hold)<br />
• Private/Stored (Printing a Private Print/Stored Job)<br />
• Job Box Settings (Job Box Configuration)<br />
1 Press [MENU].<br />
2 Press or to select Job Box.<br />
3 Press [OK]. The Job Box menu appears showing a list of available<br />
actions.<br />
Quick Copy is only displayed if there are any jobs that were saved<br />
to the hard disk in Quick Copy mode.<br />
Private/Stored is only displayed if there are any jobs that were<br />
saved to the hard disk.<br />
4-28 Using the Operation Panel
Quick Copy (Using Quick Copy)<br />
This mode enables you to print the requested number of copies of a job,<br />
simultaneously storing the job on the hard disk. When additional copies<br />
are required, you can reprint the required number of copies from the<br />
printer operation panel. To print a job as a quick copy job, refer to Printer<br />
Driver User Guide.<br />
The default number of print jobs that can be stored on the hard disk is 32.<br />
This value can be increased to up to 50. For details, refer to Job Box<br />
Settings (Job Box Configuration) on page 4-40. When the number of jobs<br />
reaches the limit, the oldest job will be overwritten by the new one.<br />
When the printer is turned off, all stored jobs will be deleted.<br />
Note Refer to the Printer Driver User Guide for the driver<br />
settings.<br />
Quick Copy:<br />
l User01<br />
l User02<br />
l User03<br />
a b<br />
Printing Additional Copies using Quick Copy<br />
1 In the Job Box menu, press or to select Quick Copy.<br />
2 Press [OK]. The Quick Copy screen appears listing the user names<br />
for stored jobs.<br />
3 Press or to select the user name you entered in the printer<br />
driver.<br />
l User01:<br />
a b<br />
All Files<br />
Q Data01<br />
T<br />
Data02<br />
T<br />
[ Select ]<br />
4 Press [OK]. The printer displays a list of the jobs stored under the<br />
selected user name.<br />
5 Press or to scroll to the desired job title.<br />
When [Select] ([Right Select]) is pressed, the file is selected. A<br />
checkmark will be placed on the right of the selected file.<br />
Select the checkmarked file and press [Select] ([Right Select])<br />
again to cancel the selection.<br />
Note To select all files, follow the steps of Select/Deselect All<br />
Files on page 4-30.<br />
Using the Operation Panel 4-29
l User01:<br />
a b<br />
All Files<br />
Q Data01<br />
g<br />
Q Data02<br />
T<br />
[ Select ]<br />
l User01:<br />
a b<br />
All Files<br />
Q Data01<br />
g<br />
Q Data02<br />
g<br />
[ Select ]<br />
l User01:<br />
a b<br />
All Files<br />
Q Data01<br />
T<br />
Q Data02<br />
T<br />
[ Select ]<br />
Select/Deselect All Files<br />
All files in the Job Box are selected.<br />
1 In the file list screen, press or to select All Files.<br />
2 Press [Check] ([Right Select]).<br />
When there is a file not checked in the Custom Box, all files will be<br />
checkmarked.<br />
When all files in the Custom Box are checked, all checkmarked files<br />
are deselected.<br />
l User01:<br />
1 Print<br />
2 Delete<br />
a b<br />
Print a File<br />
Print the file(s) selected in the Job Box.<br />
1 In the file list screen, select an item other than All Files and press<br />
[OK]. The Print/Delete menu screen appears.<br />
2 Press or to select Print.<br />
Copies:<br />
a b<br />
(1 - 999, ---)<br />
/**1-copies<br />
M<br />
Print.<br />
Are you sure?<br />
z Q Data01<br />
3 Press [OK]. The Copies menu screen appears.<br />
To print 2 or more copies, use the arrow keys to set the number of<br />
copies to be printed.<br />
Press or to increase or decrease, respectively, the value at the<br />
blinking cursor.<br />
Use and to move the cursor right and left.<br />
Note --- is displayed first, and it means it according to the set<br />
number of copies when the data of each file is preserved. In this<br />
setting, each set number of copies is printed.<br />
4 Press [OK]. A confirmation message is displayed.<br />
[ Yes ] [ No ]<br />
4-30 Using the Operation Panel
Accepted.<br />
5 Press [Yes] ([Left Select]). The message Accepted. appears and<br />
the printer prints the selected job.<br />
Pressing [No] ([Right Select]) returns you to return to the previous<br />
screen.<br />
Quick Copy:<br />
l User01<br />
l User02<br />
l User03<br />
a b<br />
Deleting a Quick Copy Job<br />
Jobs saved using Quick Copy are automatically deleted when you turn<br />
the printer off, but you can also use this procedure to delete jobs<br />
individually.<br />
1 In the Job Box menu, press or to select Quick Copy.<br />
2 Press [OK]. The Quick Copy screen appears listing the user names<br />
for stored jobs.<br />
3 Press or to select the user name you entered in the printer<br />
driver.<br />
l User01:<br />
a b<br />
All Files<br />
Q Data01<br />
T<br />
Q Data02<br />
T<br />
[ Select ]<br />
4 Press [OK]. The printer displays a list of the jobs stored under the<br />
selected user name.<br />
5 Press or to select the name of the job to be deleted.<br />
When [Select] ([Right Select]) is pressed, the file is selected. A<br />
checkmark will be placed on the right of the selected file.<br />
Select the checkmarked file and press [Select] ([Right Select])<br />
again to cancel the selection.<br />
Note To select all files, follow the steps of Select/Deselect All<br />
Files on page 4-30.<br />
Using the Operation Panel 4-31
l User01:<br />
1 Print<br />
2 Delete<br />
a b<br />
Delete a File<br />
Delete the file(s) selected in the Job Box.<br />
1 In the file list screen, select an item other than All Files and press<br />
[OK]. The Print/Delete menu screen appears.<br />
Delete.<br />
Are you sure?<br />
z Q Data01<br />
2 Press or to select Delete.<br />
3 Press [OK]. A confirmation message appears.<br />
[ Yes ] [ No ]<br />
Completed.<br />
4 Press [Yes] ([Left Select]). The message Completed. appears<br />
and the printer deletes the selected job.<br />
Pressing [No] ([Right Select]) returns you to the Job Box menu<br />
without deleting the job.<br />
4-32 Using the Operation Panel
Using Proof-and-Hold<br />
When you print multiple copies, this mode first prints one copy so that you<br />
can proof it before continuing to print the remaining copies. Since you can<br />
proof the printouts before printing the remaining copies, wastage of paper<br />
can be reduced.<br />
The printer prints one copy and, at the same time, saves the print job on<br />
the hard disk. You can also change the number of copies when resuming<br />
printing from the operation panel.<br />
When the printer is turned off, all stored jobs will be deleted.<br />
Note Refer to Printer Driver User Guide for the driver settings.<br />
Quick Copy:<br />
l User01<br />
l User02<br />
l User03<br />
a b<br />
Printing Remaining Copies of a Proof-and-Hold Job<br />
1 In the Job Box menu, press or to select Quick Copy.<br />
2 Press [OK]. The Quick Copy screen appears listing the user names<br />
for stored jobs.<br />
3 Press or to select the user name you entered in the printer<br />
driver.<br />
l User01:<br />
a b<br />
All Files<br />
Q Data01<br />
T<br />
Q Data02<br />
T<br />
[ Select ]<br />
4 Press [OK]. The printer displays a list of the jobs stored under the<br />
selected user name.<br />
5 Press or to select the name of the job to be printed.<br />
When [Select] ([Right Select]) is pressed, the file is selected. A<br />
checkmark will be placed on the right of the selected file.<br />
Select the checkmarked file and press [Select] ([Right Select])<br />
again to cancel the selection.<br />
Note To select all files, follow the steps of Select/Deselect All<br />
Files on page 4-30.<br />
l User01:<br />
1 Print<br />
2 Delete<br />
a b<br />
Print a File<br />
Print the file(s) selected in the Job Box.<br />
1 In the file list screen, select an item other than All Files and press<br />
[OK]. The Print/Delete menu screen appears.<br />
2 Press or to select Print.<br />
Using the Operation Panel 4-33
Copies:<br />
a b<br />
(1 - 999, ---)<br />
/**1-copies<br />
M<br />
3 Press [OK]. The Copies menu screen appears.<br />
If you want to change the number of remaining copies to be printed,<br />
use the arrow keys to set the number of copies to be printed.<br />
Press or to increase or decrease, respectively, the value at the<br />
blinking cursor.<br />
Use and to move the cursor right and left.<br />
Note --- is displayed first, and it means it according to the set<br />
number of copies when the data of each file is preserved. In this<br />
setting, each set number of copies is printed.<br />
If Job Accounting is enabled, enter the account ID in the login screen<br />
that appears. The Copies menu screen appears after login.<br />
Note When the access code is set to the document selected in<br />
the check box, ID error is displayed for the disagreement.<br />
Print.<br />
Are you sure?<br />
z Q Data01<br />
4 Press [OK]. A confirmation message is displayed.<br />
[ Yes ] [ No ]<br />
Accepted.<br />
5 Press [Yes] ([Left Select]). The message Accepted. appears and<br />
the printer prints the selected job.<br />
Pressing [No] ([Right Select]) returns you to return to the previous<br />
screen.<br />
Quick Copy:<br />
l User01<br />
l User02<br />
l User03<br />
a b<br />
Deleting a Proof-and-Hold Job<br />
Saved jobs are automatically deleted when you turn the printer off, but<br />
you can also use this procedure to delete jobs individually.<br />
1 In the Job Box menu, press or to select Quick Copy.<br />
2 Press [OK]. The Quick Copy screen appears listing the user names<br />
for stored jobs.<br />
3 Press or to select the user name you entered in the printer<br />
driver.<br />
l User01:<br />
a b<br />
All Files<br />
Q Data01<br />
T<br />
Q Data02<br />
T<br />
[ Select ]<br />
4 Press [OK]. The printer displays a list of the jobs stored under the<br />
selected user name.<br />
4-34 Using the Operation Panel
5 Press or to select the name of the job to be deleted.<br />
When [Select] ([Right Select]) is pressed, the file is selected. A<br />
checkmark will be placed on the right of the selected file.<br />
Select the checkmarked file and press [Select] ([Right Select])<br />
again to cancel the selection.<br />
Note To select all files, follow the steps of Select/Deselect All<br />
Files on page 4-30.<br />
l User01:<br />
1 Print<br />
2 Delete<br />
a b<br />
Delete a File<br />
Delete the file(s) selected in the Job Box.<br />
1 In the file list screen, select an item other than All Files and press<br />
[OK]. The Print/Delete menu screen appears.<br />
Delete.<br />
Are you sure?<br />
z Q Data01<br />
2 Press or to select Delete.<br />
3 Press [OK]. A confirmation message appears.<br />
[ Yes ] [ No ]<br />
Completed.<br />
4 Press [Yes] ([Left Select]). The message Completed. appears<br />
and the printer deletes the selected job.<br />
Pressing [No] ([Right Select]) returns you to the Job Box menu<br />
without deleting the job.<br />
Using the Operation Panel 4-35
Private/Stored (Printing a Private Print/Stored Job)<br />
In private printing, you can specify that a job is not printed until you<br />
release the job from the operation panel. When sending the job from the<br />
application software, specify a 4-digit access code in the printer driver.<br />
The job is released for printing by entering the access code on the<br />
operation panel ensuring confidentiality of the print job.<br />
In the stored job mode, access codes are not mandatory, but can be set<br />
on the printer driver if printing with PIN security is required. Then, the<br />
access code must be entered on the operation panel to print a stored job.<br />
Print data will be stored in the hard disk after printing.<br />
Note Refer to Printer Driver User Guide for the driver settings.<br />
Private/Stored:<br />
l User01<br />
l User02<br />
l User03<br />
a b<br />
Printing a Private/Stored Job<br />
1 In the Job Box menu, press or to select Private/Stored.<br />
2 Press [OK]. The Private/Stored screen appears listing the user<br />
names for stored jobs.<br />
3 Press or to select the user name you entered in the printer<br />
driver.<br />
l User01:<br />
a b<br />
All Files<br />
Q Data01<br />
T<br />
Q Data02<br />
T<br />
[ Select ]<br />
4 Press [OK]. The printer displays a list of the jobs stored under the<br />
selected user name.<br />
5 Press or to select the name of the job to be printed.<br />
When [Select] ([Right Select]) is pressed, the file is selected. A<br />
checkmark will be placed on the right of the selected file.<br />
Select the checkmarked file and press [Select] ([Right Select])<br />
again to cancel the selection.<br />
Note To select all files, follow the steps of Select/Deselect All<br />
Files on page 4-30.<br />
l User01:<br />
1 Print<br />
2 Delete<br />
a b<br />
Print a File<br />
Print the file(s) selected in the Job Box.<br />
1 In the file list screen, select an item other than All Files and press<br />
[OK]. The Print/Delete menu screen appears.<br />
2 Press or to select Print.<br />
4-36 Using the Operation Panel
ID:<br />
P b<br />
(0000-9999)<br />
S<br />
0123456789<br />
[Bckspace] [ Enter ]<br />
3 Press [OK]. If the selected job was saved as a Private Print job, its<br />
ID is displayed. If the job was saved in stored job mode, the number<br />
of direct copies is displayed.<br />
4 Enter the access code entered in the printer driver.<br />
Use the or to select a number and then press [OK] to enter the<br />
number.<br />
You can go back one character by pressing [Bckspace] ([Left<br />
Select]).<br />
Press [Enter] ([Right Select]). If the entered access code is<br />
correct, the Copies menu screen appears.<br />
If the entered access code is incorrect, the ID menu screen<br />
reappears.<br />
Note When the access code is set to the document selected in<br />
the check box, ID error is displayed for the disagreement.<br />
Copies:<br />
a b<br />
(1 - 999, ---)<br />
/**1-copies<br />
M<br />
Print.<br />
Are you sure?<br />
z Q Data01<br />
5 To print 2 or more copies, use the arrow keys to set the number of<br />
copies to be printed.<br />
Press or to increase or decrease, respectively, the value at the<br />
blinking cursor.<br />
Use and to move the cursor right and left.<br />
Note --- is displayed first, and it means it according to the set<br />
number of copies when the data of each file is preserved. In this<br />
setting, each set number of copies is printed.<br />
6 Press [OK]. A confirmation message is displayed.<br />
[ Yes ] [ No ]<br />
Accepted.<br />
7 Press [Yes] ([Left Select]). The message Accepted. appears and<br />
the printer prints the selected job.<br />
Pressing [No] ([Right Select]) returns you to return to the previous<br />
screen.<br />
Using the Operation Panel 4-37
Private/Stored:<br />
l User01<br />
l User02<br />
l User03<br />
a b<br />
Deleting a Private/Stored Job<br />
You can individually delete stored jobs by performing the following<br />
procedure. Jobs saved using Private Print will be automatically deleted if<br />
you turn the power off after printing, but jobs saved using Stored Job will<br />
not be deleted automatically.<br />
1 In the Job Box menu, press or to select Private/Stored.<br />
2 Press [OK]. The Private/Stored screen appears listing the user<br />
names for stored jobs.<br />
3 Press or to select the user name you entered in the printer<br />
driver.<br />
l User01:<br />
a b<br />
All Files<br />
Q Data01<br />
T<br />
Q Data02<br />
T<br />
[ Select ]<br />
4 Press [OK]. The printer displays a list of the jobs stored under the<br />
selected user name.<br />
5 Press or to select the name of the job to be printed.<br />
When [Check] ([Right Select]) is pressed, the file is selected. A<br />
checkmark will be placed on the right of the selected file.<br />
Select the checkmarked file and press [Check] ([Right Select]) again<br />
to cancel the selection.<br />
Note To select all files, follow the steps of Select/Deselect All<br />
Files on page 4-30.<br />
l User01:<br />
1 Print<br />
2 Delete<br />
a b<br />
Delete a File<br />
Delete the file(s) selected in the Job Box.<br />
1 In the file list screen, select an item other than All Files and press<br />
[OK]. The Print/Delete menu screen appears.<br />
2 Press or to select Delete.<br />
ID:<br />
P b<br />
(0000-9999)<br />
S<br />
0123456789<br />
[Bckspace] [ Enter ]<br />
3 Press [OK]. The ID is displayed.<br />
4-38 Using the Operation Panel
Delete.<br />
Are you sure?<br />
z Q Data01<br />
[ Yes ] [ No ]<br />
Completed.<br />
4 Enter the access code entered in the printer driver.<br />
Use the and to select a number and then press [OK] to enter the<br />
number.<br />
You can go back one character by pressing [Bckspace] ([Left<br />
Select]).<br />
5 Press [Enter] ([Right Select]). If the entered access code is<br />
correct, the Delete menu screen appears. If the entered access code<br />
is incorrect, the ID menu screen reappears.<br />
Note When the access code is set to the document selected in<br />
the check box, ID error is displayed for the disagreement.<br />
6 Press [Yes] ([Left Select]). Complete. appears and the printer<br />
deletes the selected job.<br />
Pressing [No] ([Right Select]) returns you to return to the previous<br />
screen.<br />
Using the Operation Panel 4-39
Job Box Settings (Job Box Configuration)<br />
Change Job Box settings, such as the maximum number of storable<br />
documents in the hard disk, and automatic delete settings.<br />
The following items are available in the Job Box detail settings.<br />
• Changing the Maximum Number of Quick Copy jobs<br />
• Set Automatic Delete times for Temporary Jobs<br />
Job Box Settings: a b<br />
1 Quick Copy Jobs<br />
2 JobRet. Deletion<br />
Changing the Maximum Number of Quick Copy jobs<br />
This changes maximum number of Quick Copy jobs to a value between<br />
0 and 50. The default is 32.<br />
1 In the Job Box menu, press or to select Job Box Settings.<br />
2 Press [OK]. The Job Box Settings screen appears.<br />
[ Exit ]<br />
3 Select Quick Copy Jobs and press [OK]. The Quick Copy Jobs<br />
menu screen appears.<br />
Quick Copy Jobs: a b<br />
(0 - 50)<br />
/*0-job(s)<br />
M<br />
4 Use the arrow keys to set the maximum number of Quick Copy jobs.<br />
Press or to increase or decrease, respectively, the value at the<br />
blinking cursor.<br />
Use and to move the cursor right and left.<br />
5 Press [OK]. The setting is stored and the Job Box Settings menu<br />
reappears.<br />
Job Box Settings: a b<br />
1 Quick Copy Jobs<br />
2 JobRet. Deletion<br />
Set Automatic Delete times for Temporary Jobs<br />
When the set period passes, the temporary jobs are automatically<br />
deleted.<br />
1 In the Job Box menu, press or to select Job Box Settings.<br />
2 Press [OK]. The Job Box Settings screen appears.<br />
[ Exit ]<br />
JobRet. Deletion: a b<br />
1 Off<br />
2 1 hour<br />
3 4 hours<br />
3 Select JobRet. Deletion and press [OK]. The JobRet.<br />
Deletion menu screen appears.<br />
4-40 Using the Operation Panel
4 Press or to select the desired Automatic Delete time. The list<br />
shows the following times:<br />
Off (automatic delete is not performed)<br />
1 hour (deleted in 1 hour)<br />
4 hours (deleted in 4 hours)<br />
1 day (deleted on the next day)<br />
1 week (deleted after one week)<br />
5 Press [OK]. The setting is stored and the Job Box Settings menu<br />
reappears.<br />
Using the Operation Panel 4-41
Job Log<br />
Item Content Results Displayed<br />
You can use the Job Log to check the history of jobs that have already<br />
finished printing.<br />
As well as jobs printed from PCs, this log shows the outcomes for jobs<br />
printed directly from USB memory and reports such as status pages.<br />
The information available in the Job Log is listed below.<br />
Display Icon Description<br />
Job Name Job name Job name Job name<br />
Result Job status OK u Completed normally<br />
Error v Error occurred.<br />
Cancel t Job canceled.<br />
Job Type Job type Printer n Printed from a PC<br />
User Name Printed user name User name<br />
Accepted Time Job reception time Year/Month/Day<br />
Hour: Minute<br />
End Time Job completion time Year/Month/Day<br />
Hour: Minute<br />
Report j Report<br />
USB Y Printed from USB memory<br />
E-mail p Printed from E-mail<br />
Box i Printed from Custom Box or<br />
Job Box<br />
Printed Pages Pages printed ***Page(s) No. of pages<br />
***/*** Pages completed/Pages<br />
specified<br />
Color/B & W Printing type Color Color printing<br />
Black & White<br />
Black & White printing<br />
1 Press [MENU].<br />
2 Press or to select Job Log.<br />
Job Log:<br />
a b<br />
0006 n ABCDEFGHIJN v<br />
3 Press [OK]. Job Log is displayed, along with the job numbers of<br />
completed jobs and a list of the job names. The job type and result for<br />
each job are also shown as icons.<br />
[ Detail ]<br />
4 Press or to select the name of the job whose details you want<br />
to view.<br />
4-42 Using the Operation Panel
0006 Detail: a b<br />
Job Name: 1/6<br />
ABCDEFGHIJKLMNOPQRSTN<br />
5 Press [Detail] ([Right Select]). The Job Log details screen<br />
appears.<br />
The detailed job log covers 6 pages in all. Press to view to the next<br />
page or to return to the previous page.<br />
[ Detail ]<br />
Pressing [OK] while file or folder details are displayed returns you to the<br />
Job Log menu.<br />
0006 Detail: a b<br />
Job Name: 1/6<br />
ABCDEFGHIJKLMNOPQRSTN<br />
If the entire name shown as the Job Name will not fit on one line, pressing<br />
[Detail] ([Right Select]) changes to a 3-line name display. If the name<br />
is 3 or more lines long, you can scroll up or down by pressing or .<br />
[ Detail ]<br />
Detail:<br />
a b<br />
ABCDEFGHIJKLMNOPQRSTU<br />
VWXYZabcdefghijklmnop<br />
qrstuvwxyz1234567890<br />
Pressing [OK] during 3-line name display returns you to single-line name<br />
display.<br />
Using the Operation Panel 4-43
Counter (Viewing the counter value)<br />
Counter:<br />
a b<br />
1 Total<br />
2 Color<br />
3 Black & White<br />
[ Exit ]<br />
Total:<br />
O b<br />
Total 17000<br />
Displays the number of pages printed.<br />
The options available in Counter are as follows:<br />
• Total (Displaying the total printed pages)<br />
• Color (Displaying the color printed pages)<br />
• Black & White (Displaying the monochrome printed pages)<br />
1 Press [MENU].<br />
2 Press or to select Counter.<br />
3 Press [OK]. The Counter menu appears showing a list of available<br />
options.<br />
Total (Displaying the total printed pages)<br />
This only displays the total number of pages printed. You cannot change<br />
the displayed number.<br />
1 In the Counter menu screen, press or to select Total.<br />
2 Press [OK]. The Total screen appears showing the total number of<br />
pages printed.<br />
Color:<br />
O b<br />
Total 17000<br />
A3 2000<br />
A4 1000<br />
Color (Displaying the color printed pages)<br />
This allows you to check the total number of color pages printed and the<br />
number of color pages printed in each of the 12 paper sizes.<br />
You cannot change the displayed number.<br />
1 In the Counter menu screen, press or to select Color.<br />
2 Press [OK]. The Color screen appears showing the total number of<br />
color pages printed and the number of color pages printed in 2 paper<br />
sizes.<br />
Press or to view the number of color pages printed in other<br />
paper sizes.<br />
Pressing [OK] returns you to the Counter menu.<br />
4-44 Using the Operation Panel
Black & White: O b<br />
Total 17000<br />
A3 2000<br />
A4 1000<br />
Black & White (Displaying the monochrome printed<br />
pages)<br />
This allows you to check the total number of monochrome pages printed<br />
and the number of monochrome pages printed in each of the 12 paper<br />
sizes.<br />
You cannot change the displayed number.<br />
1 In the Counter menu screen, press or to select Black &<br />
White.<br />
2 Press [OK]. The Black & White screen appears showing the total<br />
number of monochrome pages printed and the number of<br />
monochrome pages printed in 2 paper sizes.<br />
Press or to view the number of monochrome pages printed in<br />
other paper sizes.<br />
Pressing [OK] returns you to the Counter menu.<br />
Using the Operation Panel 4-45
Paper Settings<br />
This sets the paper size and type for the MP tray and cassettes from<br />
which paper is supplied.<br />
The options available in Paper Settings are as follows:<br />
• MP Tray Set. (MP tray settings)<br />
Paper Size (Paper size setting for MP tray)<br />
Media Type (Paper type setting for MP tray)<br />
• Cassette (1 to 4) Set. (Settings for the cassettes)<br />
Cassette (1 to 4) Size (Setting the cassette paper size)<br />
Cassette (1 to 4) Type (Setting the cassette paper type)<br />
• Media Type Set. (Paper type settings)<br />
• Reset Type Adj. (Resets customized settings)<br />
1 Press [MENU].<br />
Paper Settings: a b<br />
1 MP Tray Set.<br />
2 Cassette 1 Set.<br />
3 Cassette 2 Set.<br />
[ Exit ]<br />
2 Press or to select Paper Settings.<br />
3 Press [OK]. The Paper Settings menu appears showing a list of<br />
available options.<br />
MP Tray Set. (MP tray settings)<br />
To print correctly on paper supplied from the MP tray, use the procedure<br />
below to set the paper size and media type.<br />
Note Feeding the paper having a paper size which does not<br />
match the current paper size from the MP tray can cause paper<br />
jam.<br />
MP Tray Set.:<br />
1 Paper Size<br />
2 Media Type<br />
a b<br />
Paper Size (Paper size setting for MP tray)<br />
You can use this to set the paper size that can be supplied from the MP<br />
tray. The default setting is Letter size for the U.S. and Canada and A4 for<br />
other countries.<br />
For more information about the paper sizes that you can feed from the MP<br />
tray, refer to Paper Specifications on page 3-2.<br />
1 In the Paper Settings menu, press or to select MP Tray Set..<br />
2 Press [OK]. The MP Tray Set. menu screen appears.<br />
[ Exit ]<br />
3 Press or to select Paper Size.<br />
4-46 Using the Operation Panel
Paper Size: a b<br />
1 *Auto(Metric)<br />
2 Auto(Inch)<br />
3 Envelope Monarch<br />
4 Press [OK]. The Paper Size screen appears listing the paper sizes<br />
that can be supplied from the MP tray.<br />
The available paper sizes are as follows:<br />
Auto(Metric)<br />
Auto(Inch)<br />
Envelope Monarch<br />
Envelope #10<br />
Envelope DL<br />
Envelope C5<br />
Executive<br />
Letter R<br />
Letter<br />
Legal<br />
A4 R<br />
A4<br />
B5 R<br />
B5<br />
A3<br />
B4<br />
Ledger<br />
A5<br />
A6<br />
B6<br />
Envelope #9<br />
Envelope #6<br />
ISO B5<br />
Custom<br />
Envelope C4<br />
Hagaki<br />
Oufuku Hagaki<br />
Oficio II<br />
8.5 x 13.5<br />
8K<br />
16K R<br />
16K<br />
Statement<br />
Folio<br />
Youkei 2<br />
Youkei 4<br />
Note To have the paper size automatically selected from metric<br />
sizes or inch sizes, select Auto (Metric) or Auto (Inch).<br />
5 Press or to select the desired paper size.<br />
6 Press [OK]. The paper size for the MP tray is set and the Paper<br />
Settings menu screen reappears.<br />
Using the Operation Panel 4-47
MP Tray Set.:<br />
1 Paper Size<br />
2 Media Type<br />
a b<br />
Media Type (Paper type setting for MP tray)<br />
You can use this to set the paper type that can be supplied from the MP<br />
tray. The default setting is PLAIN.<br />
For more information about paper types that you can feed from the MP<br />
tray, refer to Paper Specifications on page 3-2.<br />
1 In the Paper Settings menu, press or to select MP Tray Set..<br />
2 Press [OK]. The MP Tray Set. menu screen appears.<br />
[ Exit ]<br />
3 Press or to select Media Type.<br />
Media Type: a b<br />
1 *Plain<br />
2 Transparency<br />
3 Preprinted<br />
[ Exit ]<br />
4 Press [OK]. The Media Type screen appears listing the media types<br />
that can be supplied from the MP tray.<br />
The available paper types are as follows:<br />
Plain<br />
Transparency<br />
Preprinted<br />
Labels<br />
Bond<br />
Recycled<br />
Vellum<br />
Rough<br />
Letterhead<br />
Color<br />
Prepunched<br />
Envelope<br />
Cardstock<br />
Coated<br />
Thick<br />
HighQuality<br />
CUSTOM1 to 8<br />
5 Press or to select the desired media type.<br />
6 Press [OK]. The media type for the MP tray is set and the Paper<br />
Settings menu screen reappears.<br />
4-48 Using the Operation Panel
Cassette 1 Set.:<br />
1 Paper Size<br />
2 Media Type<br />
a b<br />
Cassette (1 to 4) Set. (Settings for the cassettes)<br />
When loading paper in the printer’s paper cassette, follow the steps below<br />
to set the paper size and paper type.<br />
If the optional paper feeder is installed, use the same procedure to set the<br />
cassette paper size and paper type.<br />
Cassette (1 to 4) Size (Setting the cassette paper size)<br />
1 In the Paper Settings menu, press or to select the paper<br />
cassette you want to set.<br />
2 Press [OK]. The Cassette # Set. menu screen appears.<br />
[ Exit ]<br />
Paper Size:<br />
1 *Auto(Metric)<br />
2 Auto(Inch)<br />
3 Letter R<br />
a b<br />
3 Press or to select Paper Size.<br />
4 Press [OK]. The Paper Size screen appears listing the paper sizes<br />
that can be used with the selected cassette.<br />
The available paper sizes are as follows:<br />
Auto(Metric)<br />
Auto(Inch)<br />
Letter R<br />
Letter<br />
Legal<br />
A4 R<br />
A4<br />
B5 R<br />
B5<br />
A3<br />
B4<br />
Ledger<br />
A5<br />
Oficio II<br />
8.5 x 13.5<br />
8K<br />
16K R<br />
16K<br />
Statement<br />
Folio<br />
Note To have the paper size automatically selected from metric<br />
sizes or inch sizes, select Auto (Metric) or Auto (Inch).<br />
5 Press or to select the desired paper size.<br />
Using the Operation Panel 4-49
Cassette 1 Set.:<br />
1 Paper Size<br />
2 Media Type<br />
a b<br />
6 Press [OK]. The paper size for the cassette is set and the Paper<br />
Settings menu screen reappears.<br />
Cassette (1 to 4) Type (Setting the cassette paper type)<br />
By setting a paper type (plain, recycled, etc.) for the paper cassette, you<br />
can automatically select the paper in the paper cassette according to the<br />
paper type you command on the printer driver. The default setting is plain<br />
paper for all paper cassettes.<br />
For more information about paper types that you can feed from the paper<br />
cassette, refer to Paper Specifications on page 3-2.<br />
1 In the Paper Settings menu, press or to select the cassette you<br />
want to set.<br />
2 Press [OK]. The Cassette # Set. menu screen appears.<br />
# shows the number of the cassette installed in the printer (1 to 4).<br />
[ Exit ]<br />
Media Type:<br />
1 *Plain<br />
2 Preprinted<br />
3 Bond<br />
a b<br />
3 Press or to select Media Type.<br />
4 Press [OK]. The Media Type screen appears listing the media types<br />
that can be used with the selected cassette.<br />
The available Media Types are as follows:<br />
Plain<br />
Preprinted<br />
Bond<br />
Recycled<br />
Rough<br />
Vellum<br />
Letterhead<br />
Color<br />
Prepunched<br />
Thick<br />
HighQuality<br />
CUSTOM1 to 8<br />
5 Press or to select the desired media type.<br />
6 Press [OK]. The media type for the cassette is set and the Paper<br />
Settings menu screen reappears.<br />
Media Type Set. (Paper type settings)<br />
You set the paper thickness by selecting a paper weight. This allows you<br />
to set the paper thickness for each of the media types that can be used<br />
on the printer. And for custom paper registered in the printer (up to 8), you<br />
can specify paper thickness and whether duplex printing is permitted.<br />
For normal settings, refer to Setting the Paper Thickness on page 4-51.<br />
For custom paper settings, refer to Custom Paper Settings on page 4-52.<br />
4-50 Using the Operation Panel
Setting the Paper Thickness<br />
You set the paper thickness by selecting a paper weight.<br />
The available paper weights are as follows (grammages are provided as<br />
a guide)<br />
Extra Heavy (OHP)<br />
Heavy 3 (163 to 220 g/m²)<br />
Heavy 2 (128 to 163 g/m²)<br />
Heavy 1 (105 to 128 g/m²)<br />
Normal 3 (90 to 105 g/m²)<br />
Normal 2 (75 to 90 g/m²)<br />
Normal 1 (60 to 75 g/m²)<br />
Light (60 to 64 g/m²)<br />
Change the weight of each media type so that the optimum print result is<br />
obtained. The default setting for each media type is shown below.<br />
Media Type<br />
Paper Weight<br />
Plain Normal 2<br />
Transparency<br />
Extra Heavy<br />
Preprinted Normal 2<br />
Labels Heavy 1<br />
Bond Normal 3<br />
Recycled Normal 2<br />
Rough Normal 3<br />
Vellum<br />
Light<br />
Letterhead Normal 2<br />
Color Normal 2<br />
Prepunched Normal 2<br />
Envelope Heavy 2<br />
Cardstock Heavy 2<br />
Coated Normal 3<br />
Thick Heavy 2<br />
HighQuality Normal 2<br />
CUSTOM1 to 8 Normal 2<br />
Use the procedure below to set the paper weight.<br />
(For the procedure for setting weights for custom paper (CUSTOM 1 to<br />
8), refer to Custom Paper Settings on page 4-52.)<br />
Using the Operation Panel 4-51
1 In the Paper Settings menu, press or to select Media Type<br />
Set..<br />
Media Type Set.: a b<br />
1 Plain<br />
2 Transparency<br />
3 Preprinted<br />
[ Exit ]<br />
2 Press [OK]. The Media Type Set. screen appears listing the<br />
media types that can used with the printer.<br />
Plain:<br />
1 Paper Weight<br />
a b<br />
3 Press or to select the media type for which you want to set the<br />
paper weight.<br />
4 Press [OK]. A menu for the selected media is displayed.<br />
[ Exit ]<br />
Paper Weight:<br />
1 Normal 3<br />
2 *Normal 2<br />
3 Normal 1<br />
a b<br />
5 Press or to select Paper Weight.<br />
6 Press [OK]. The Paper Weight screen appears listing the paper<br />
weights that can used with the printer.<br />
7 Press or to select the desired paper weight.<br />
8 Press [OK]. The paper weight is set and the Media Type Set.<br />
screen reappears.<br />
Custom Paper Settings<br />
This setting specifies the paper weight of the selected custom paper and<br />
whether duplex printing is permitted.<br />
Media Type Set.: a b<br />
1 Plain<br />
2 Transparency<br />
3 Preprinted<br />
[ Exit ]<br />
Use the procedure below to set the custom paper weight.<br />
1 In the Paper Settings menu, press or to select Media Type<br />
Set..<br />
2 Press [OK]. The Media Type Set. screen appears listing the<br />
media types that can used with the printer.<br />
3 Press or to select the custom paper (CUSTOM 1 to 8) for which<br />
you want to set the paper weight.<br />
4-52 Using the Operation Panel
CUSTOM 1:<br />
1 Paper Weight<br />
2 Duplex<br />
a b<br />
4 Press [OK]. A menu for the selected media is displayed.<br />
[ Exit ]<br />
Paper Weight:<br />
1 Extra Heavy<br />
2 *Heavy 3<br />
3 Heavy 2<br />
a b<br />
5 Press or to select Paper Weight.<br />
6 Press [OK]. The Paper Weight screen appears listing the paper<br />
weights that can used with the printer.<br />
7 Press or to select the desired paper weight.<br />
8 Press [OK]. The paper weight is set and the Media Type Set.<br />
screen reappears.<br />
Media Type Set.: a b<br />
1 Plain<br />
2 Transparency<br />
3 Preprinted<br />
[ Exit ]<br />
Use the procedure below to specify whether duplex printing is<br />
permitted with custom paper.<br />
1 In the Paper Settings menu, press or to select Media Type<br />
Set..<br />
2 Press [OK]. The Media Type Set. screen appears listing the<br />
media types that can used with the printer.<br />
CUSTOM 1:<br />
1 Paper Weight<br />
2 Duplex<br />
a b<br />
3 Press or to select the custom paper (CUSTOM 1 to 8) for which<br />
you want to set the duplex printing permission.<br />
4 Press [OK]. A menu for the selected media is displayed.<br />
[ Exit ]<br />
Duplex:<br />
1 *Permit<br />
2 Prohibit<br />
a b<br />
5 Press or to select Duplex.<br />
6 Press [OK]. The Duplex screen appears listing the paper weights<br />
that can used with the printer.<br />
7 Press or to specify whether duplex printing is permitted.<br />
8 Press [OK]. The duplex printing permission is set and the Media<br />
Type Set. screen reappears.<br />
Using the Operation Panel 4-53
Reset Type Adj. (Resets customized settings)<br />
This resets all the settings specified in Media Type Set. (Paper type<br />
settings) on page 4-50.<br />
1 In the Paper Settings menu, press or to select Reset Type<br />
Adj..<br />
Reset Type Adjust.<br />
Are you sure?<br />
2 Press [OK]. A confirmation screen appears.<br />
[ Yes ] [ No ]<br />
3 Press [Yes] ([Left Select]). The mesage Completed. appears and<br />
the Paper Settings menu reappears.<br />
Pressing [No] ([Right Select]) returns you to the Paper Settings<br />
menu without resetting the customized settings.<br />
4-54 Using the Operation Panel
Print Settings<br />
These settings specify the following printing parameters: paper feed<br />
source, paper feed mode, duplex printing, override A4/LTR, emulation<br />
mode, color mode, print quality, and setting pagination.<br />
• Paper Source (Selecting the paper feed source)<br />
• Paper Feed Mode (Setting the paper feed source)<br />
• Duplex (Setting the duplex printing)<br />
• Paper Output (Selecting the Paper Output Location)<br />
• Override A4/LTR (Overriding difference between A4 and Letter)<br />
• Emulation Set. (Setting the emulation)<br />
• Color Mode (Selecting color or black & white printing)<br />
• Print Quality (Selecting the EcoPrint mode)<br />
• Page Setting (Setting pagination)<br />
1 Press [MENU].<br />
Print Settings: a b<br />
1 Paper Source<br />
2 Paper Feed Mode<br />
3 Duplex<br />
[ Exit ]<br />
2 Press or to select Print Settings.<br />
Paper Source:<br />
1 *MP Tray<br />
2 Cassette 1<br />
3 Cassette 2<br />
a b<br />
3 Press [OK]. The Print Settings menu appears showing a list of<br />
available options.<br />
Paper Source (Selecting the paper feed source)<br />
You can select the paper source from which the printer feeds paper as the<br />
default. If an optional paper feeder(s) is installed, it can also be set the<br />
default paper source.<br />
1 In the Print Settings menu, press or to select Paper Source.<br />
2 Press [OK]. The Paper Source screen appears showing a list of<br />
the available paper sources.<br />
The available paper sources are as follows:<br />
MP Tray<br />
Cassette 1,2 (printer's standard paper cassette)<br />
Cassette 3,4 (optional paper feeders (only installed paper feeders<br />
are shown))<br />
3 Press or to select the desired paper source.<br />
4 Press [OK]. The paper source is set and the Print Settings menu<br />
reappears.<br />
Using the Operation Panel 4-55
Paper Feed Mode:<br />
1 *Auto<br />
2 Fixed<br />
a b<br />
Paper Feed Mode (Setting the paper feed source)<br />
This mode specifies how the paper should be fed once the paper feed<br />
source and paper type have been chosen. If Auto is selected, the printer<br />
searches for a paper feed source that matches the paper size and type,<br />
and paper is then delivered from that source. If Fixed is selected and<br />
there is no matching paper feed source, handling proceeds as specified<br />
by Paper Mismatch for Error Handling. For details on paper<br />
feeding when Fixed is selected, refer to Paper Mismatch (Detection<br />
settings for paper size/type errors when the paper source is fixed) on<br />
page 4-80. The default setting is Auto. To change the settings, follow the<br />
steps described below.<br />
1 In the Print Settings menu, press or to select Paper Feed<br />
Mode.<br />
2 Press [OK]. The Paper Feed Mode screen appears showing the<br />
available paper feed options.<br />
3 Press or to select the desired paper feed mode.<br />
4 Press [OK]. The paper feed mode is set and the Print Settings menu<br />
reappears.<br />
Alternative: a b<br />
B A5 Plain<br />
C A4 Recycled<br />
D B4 Plain<br />
When the Paper Runs Out During Printing<br />
When Paper Feed Mode is set to Fixed, if the paper in the cassette runs<br />
out during printing, Add paper in cassette 1. is displayed and the<br />
printer stands by. In this event, either replenish the paper in the empty<br />
cassette or use the procedure below to print from another paper source.<br />
1 While Add paper in cassette 1. is displayed, press [Alt.]<br />
([Left Select]). The Alternative menu screen appears.<br />
2 Press or to select the desired paper feed source and paper size.<br />
Each time you press or , another optional cassette or the paper<br />
size that can currently be fed from the MP tray appears.<br />
3 Press [OK]. Printing continues.<br />
4-56 Using the Operation Panel
Duplex (Setting the duplex printing)<br />
Using the duplexer, you can automatically print on both sides of the paper.<br />
The duplexer is mounted underneath the printer.<br />
Duplex printing is only available for those media types that can be fed<br />
from one of the cassettes.<br />
Duplex printing is available for the following paper(media) types:<br />
PLAIN<br />
PREPRINTED<br />
BOND<br />
RECYCLED<br />
ROUGH<br />
LETTERHEAD<br />
COLOR<br />
COATED<br />
PREPUNCHED<br />
HIGH QUALITY<br />
Note Duplex printing can be also performed from the MP tray. If<br />
the paper to be fed from the MP tray does not match the paper<br />
size and paper type of the current paper feed source cassette, a<br />
paper jam may occur.<br />
Binding Modes<br />
Binding refers to the manner in which printed pages of paper are joined<br />
together (by gluing, stitching, etc.) in book form. The two possible types<br />
of binding are: Bind Long Edge, in which pages are joined together along<br />
their long edge; and Bind Short Edge, in which they are joined together<br />
along their short edge. In selecting a binding type, you must also consider<br />
the orientation of the printed page. You can use Bind Long Edge or Bind<br />
Short Edge with either landscape or portrait printing.<br />
Depending on the binding type and print orientation, the duplexer<br />
provides four types of binding. These are: (1) portrait, Bind Long Edge,<br />
(2) portrait, Bind Short Edge, (3) landscape, Bind Long Edge, and (4)<br />
landscape, Bind Short Edge. The figure below shows these binding<br />
methods.<br />
Portrait,<br />
Bind Long Edge<br />
(1)<br />
(2)<br />
Portrait,<br />
Bind Short Edge<br />
Landscape,<br />
Bind Long Edge<br />
(3)<br />
(4)<br />
Landscape,<br />
Bind Short Edge<br />
1 In the Print Settings menu, press or to select Duplex.<br />
Using the Operation Panel 4-57
Duplex:<br />
a b<br />
1 *Off<br />
2 Bind Long Edge<br />
3 Bind Short Edge<br />
2 Press [OK]. The Duplex screen appears showing the list of<br />
available duplex printing modes.<br />
3 Press or to select the desired duplex printing mode.<br />
The message display toggles through the following:<br />
Off (default)<br />
Bind Long Edge<br />
Bind Short Edge<br />
Selecting Off disables duplex printing.<br />
4 Press [OK]. The duplex printing mode is set and the Print Settings<br />
menu reappears.<br />
Paper Output (Selecting the Paper Output Location)<br />
This setting can be specified when an optional document finisher is<br />
installed.<br />
You can select whether print jobs are output to the top tray of the printer,<br />
or to the optional document finisher or mail box.<br />
Note The screen varies depending on the installed options.<br />
1 In the Print Settings menu, press or to select Paper Output.<br />
Paper Output: a b<br />
1 *TopTray FaceDown<br />
2 Tray A Face Down<br />
3 Tray B Face UP<br />
2 Press [OK]. The Paper Output screen appears showing the<br />
available output locations.<br />
Note The screen shown appears when a 3,000 Sheet Document<br />
Finisher is installed.<br />
3 Press or to select the desired output location.<br />
The available output locations are as follows:<br />
3,000 Sheet Document Finisher installed<br />
TopTray FaceDown (default)<br />
Tray A Face Down<br />
Tray B Face UP<br />
Tray B Face Down<br />
Tray C Face UP<br />
Tray C Face Down<br />
Tray 1 Face UP*<br />
Tray 1 Face Down*<br />
Tray 2 Face UP*<br />
Tray 2 Face Down*<br />
4-58 Using the Operation Panel
Tray 3 Face UP*<br />
Tray 3 Face Down*<br />
Tray 4 Face UP*<br />
Tray 4 Face Down*<br />
Tray 5 Face UP*<br />
Tray 5 Face Down*<br />
Tray 6 Face UP*<br />
Tray 6 Face Down*<br />
Tray 7 Face UP*<br />
Tray 7 Face Down*<br />
*Tray of optional mail box<br />
Override A4/LTR:<br />
1 *Off<br />
2 On<br />
a b<br />
Document Finisher installed<br />
TopTray FaceDown<br />
Finisher FaceUP<br />
FinisherFaceDown<br />
4 Press [OK]. The selected output location is stored and the Print<br />
Settings menu reappears.<br />
Override A4/LTR (Overriding difference between A4 and<br />
Letter)<br />
When the Override A4/LTR is turned On using the operation panel, the<br />
printer ignores the difference between A4 and Letter paper sizes. Printing<br />
is performed without an error message even if the actual paper size in the<br />
current cassette differs from the paper size formatting the job.<br />
By default, this feature is On.<br />
1 In the Print Settings menu, press or to select Override A4/<br />
LTR.<br />
2 Press [OK]. The Override A4/LTR screen appears showing the<br />
shared paper feed mode settings.<br />
3 Press or to select the desired shared paper feed mode.<br />
4 Press [OK]. The shared paper feed mode is set and the Print Settings<br />
menu reappears.<br />
Emulation Set. (Setting the emulation)<br />
You can change the emulation mode for the current interface. Use the<br />
procedure below to select the mode.<br />
1 In the Print Settings menu, press or to select Emulation<br />
Set..<br />
Using the Operation Panel 4-59
Emulation Set.: a b<br />
1 Emulation<br />
2 KPDL Error Rpt.<br />
2 Press [OK]. The Emulation Set. menu screen appears.<br />
[ Exit ]<br />
Emulation:<br />
1 *PCL6<br />
2 KPDL<br />
3 KPDL(Auto)<br />
a b<br />
3 Press or to select Emulation.<br />
4 Press [OK]. The Emulation screen appears showing a list of the<br />
available emulations.<br />
The available emulations are as follows:<br />
PCL6<br />
KPDL<br />
KPDL(Auto)<br />
5 Press or to select the desired emulation.<br />
6 Press [OK]. The emulation is set and the Print Settings menu<br />
reappears.<br />
Error Report (Printing KPDL errors)<br />
The printer can print error descriptions when printing error occurs during<br />
KPDL emulation. The default is On — the printer does not print KPDL<br />
errors.<br />
Emulation Set.: a b<br />
1 Emulation<br />
2 KPDL Error Rpt.<br />
IMPORTANT This setting only appears when KPDL or KPDL(Auto)<br />
is selected for the emulation.<br />
1 In the Print Settings menu, press or to select Emulation<br />
Set..<br />
2 Press [OK]. The Emulation Set. menu screen appears.<br />
[ Exit ]<br />
KPDL Error Rpt.:<br />
1 *Off<br />
2 On<br />
a b<br />
3 Press or to select KPDL Error Rpt..<br />
4 Press [OK]. The KPDL Error Rpt. screen appears.<br />
5 Press or to select whether error reports are printed.<br />
6 Press [OK]. The error report print setting is set and the Print Settings<br />
menu reappears.<br />
4-60 Using the Operation Panel
Color Mode:<br />
1 *Color<br />
2 Black & White<br />
a b<br />
Color Mode (Selecting color or black & white printing)<br />
When executing printing at the printer, you can select Color mode or<br />
Black & White mode. By default, the printer is set to print in color mode.<br />
1 In the Print Settings menu, press or to select Color Mode.<br />
2 Press [OK]. The Color Mode screen appears.<br />
Print Quality:<br />
1 EcoPrint<br />
a b<br />
3 Press or to select the desired color mode.<br />
4 Press [OK]. The color mode is set and the Print Settings menu<br />
reappears.<br />
Print Quality (Selecting the EcoPrint mode)<br />
By enabling EcoPrint mode, you can minimize the amount of toner used<br />
during printing. Because images printed in this mode may be slightly<br />
coarser than those printed in standard resolution, you should use<br />
EcoPrint for test prints or other situations where high-quality prints are not<br />
required.<br />
Use the procedure below to select EcoPrint mode. The default setting is<br />
Off.<br />
1 In the Print Settings menu, press or to select Print Quality.<br />
2 Press [OK]. The Print Quality menu screen appears.<br />
[ Exit ]<br />
EcoPrint:<br />
1 *Off<br />
2 On<br />
a b<br />
3 Press or to select EcoPrint.<br />
4 Press [OK]. The EcoPrint screen appears.<br />
5 Press or to select the EcoPrint mode.<br />
6 Press [OK]. The EcoPrint mode is set and the Print Quality<br />
menu screen reappears.<br />
Using the Operation Panel 4-61
Page Setting: a b<br />
1 Copies<br />
2 Orientation<br />
3 Wide A4<br />
[ Exit ]<br />
Copies:<br />
a b<br />
(1 - 999)<br />
/255-copies<br />
M<br />
Page Setting (Setting pagination)<br />
You can use the Page Setting menu to set the number of copies, the page<br />
orientation and other pagination settings.<br />
The options available in Page Setting are as follows:<br />
• Copies (Number of copies)<br />
• Orientation (Print orientation)<br />
• Wide A4 (Wide A4 pitch)<br />
• XPS FitTo Page (Adjusting the XPS file print out size)<br />
• TIFF/JPEG Size (Adjusting the TIFF/JPEG file print out size)<br />
1 In the Print Settings menu, press or to select Page Setting.<br />
2 Press [OK]. The Page Setting menu screen appears.<br />
Copies (Number of copies)<br />
You can set the number of copies of each page to be printed for the<br />
current interface.<br />
1 In the Page Setting menu, press or to select Copies.<br />
2 Press [OK]. The Copies screen appears.<br />
3 Use the arrow keys to set the number of copies.<br />
Press or to increase or decrease, respectively, the value at the<br />
blinking cursor.<br />
Use and to move the cursor right and left.<br />
4 Press [OK]. The setting is stored and the Page Setting menu<br />
reappears.<br />
Orientation (Print orientation)<br />
You can select portrait (upright) or landscape (sideways) page<br />
orientation.<br />
Portrait Orientation<br />
Landscape Orientation<br />
A<br />
A<br />
4-62 Using the Operation Panel
Orientation:<br />
1 *Portrait<br />
2 Landscape<br />
a b<br />
1 In the Page Setting menu, press or to select Orientation.<br />
2 Press [OK]. The Orientation screen appears.<br />
Wide A4:<br />
1 *Off<br />
2 On<br />
a b<br />
3 Press or to select the desired Orientation.<br />
4 Press [OK]. The orientation is set and the Page Setting menu<br />
reappears.<br />
Wide A4 (Wide A4 pitch)<br />
Turn this to On to increase the maximum number of characters that can<br />
be printed in a line for an A4 page (78 characters at 10 pitch) and Letter<br />
size page (80 characters at 10 pitch). This setting is only effective in PCL<br />
6 emulation.<br />
1 In the Page Setting menu, press or to select Wide A4.<br />
2 Press [OK]. The Wide A4 screen appears.<br />
XPS FitTo Page:<br />
1 *Off<br />
2 On<br />
a b<br />
3 Press or to select whether Wide A4 mode is enabled.<br />
4 Press [OK]. The wide mode setting is set and the Page Setting menu<br />
reappears.<br />
XPS FitTo Page (Adjusting the XPS file print out size)<br />
Select On in this setting to enlarge or reduce XPS files to fit the printable<br />
area during printing.<br />
1 In the Page Setting menu, press or to select XPS FitTo Page.<br />
2 Press [OK]. The XPS FitTo Page screen appears.<br />
3 Press or to select whether XPS FitTo Page mode is enabled.<br />
4 Press [OK]. The XPS FitTo Page setting is set and the Page Setting<br />
menu reappears.<br />
Using the Operation Panel 4-63
TIFF/JPEG Size: a b<br />
1 *Paper Size<br />
2 Image Resolution<br />
3 Print Resolution<br />
TIFF/JPEG Size (Adjusting the TIFF/JPEG file print out size)<br />
Use this setting to select the printing method used when TIFF or JPEG<br />
files are printed directly.<br />
1 In the Page Setting menu, press or to select TIFF/JPEG Size.<br />
2 Press [OK]. The TIFF/JPEG Size screen appears.<br />
The options available in TIFF/JPEG Size are as follows:<br />
Paper Size (default)<br />
Images are resized so that they fill the paper size when printed.<br />
Image Resolution<br />
Image files are printed at the resolution specified in the resolution<br />
information. Images with no resolution information are printed using<br />
the Paper Size setting.<br />
Print Resolution<br />
Images are printed using a 1-to-1 correspondence between the<br />
image file pixels and printed dots. For example, the printed size of a<br />
600 x 300-pixel image file is 1 inch x 1/2 inch.<br />
3 Press or to select whether TIFF/JPEG Size mode is enabled.<br />
4 Press [OK]. The TIFF/JPEG Size setting is set and the Page Setting<br />
menu reappears.<br />
Note Images are automatically rotated during printing to provide<br />
a closer match between the aspect ratios of the image file and the<br />
paper used for printing.<br />
4-64 Using the Operation Panel
Network (Network settings)<br />
This printer supports TCP/IP and TCP/IP (IPv6) protocols.<br />
IP is an abbreviation for Internet Protocol. This printer routinely uses the<br />
TCP/IP (IPv4) protocol, but provides a separate setting for the nextgeneration<br />
IP, IPv6.<br />
TCP/IP (IPv4) uses 32-bit IP addresses, but the rapid growth in the<br />
number of Internet users has resulted in a shortage of IP addresses. IPv6<br />
was developed to expand the range of available IP addresses by using<br />
128-bit IP addresses.<br />
The options available in the Network settings are as follows:<br />
• TCP/IP (Enable/Disable TCP/IP)<br />
• IPv4 Setting (TCP/IP IPv4 settings)<br />
• IPv6 Setting (TCP/IP IPv6 settings)<br />
Note Check with your network administrator when selecting the<br />
network setting. After all network related settings have been<br />
done, turn the machine OFF and ON again. This is mandatory to<br />
make the settings effective!<br />
1 In the Print Settings menu, press or to select Network.<br />
Network:<br />
a b<br />
1 TCP/IP Settings<br />
2 Press [OK]. The Network menu screen appears.<br />
[ Exit ]<br />
TCP/IP Settings: a b<br />
1 TCP/IP<br />
2 IPv4 Setting<br />
3 IPv6 Setting<br />
[ Exit ]<br />
3 Select TCP/IP Settings and press [OK]. The TCP/IP Settings<br />
menu screen appears.<br />
Using the Operation Panel 4-65
TCP/IP:<br />
1 Off<br />
2 *On<br />
a b<br />
TCP/IP (Enable/Disable TCP/IP)<br />
The TCP/IP system refers to the Internet system, which has a 5-layer<br />
structure consisting of the interface layer, link layer, network (IP) layer,<br />
transport (TCP/UDP) layer and application layer.<br />
The interface layer is a key layer in the TCP/IP system that provides an<br />
abstracted interface that is not dependent on the link (communication<br />
line: frame relay or Ethernet, etc.) to the IP module (IP layer). This means<br />
that the IP module can use this abstracted interface (which is not<br />
dependent on the link type) to exchange IP packets back and forth with<br />
the link layer.<br />
1 In the TCP/IP Settings menu, press or to select TCP/IP.<br />
2 Press [OK]. The TCP/IP screen appears.<br />
3 Press or to select whether TCP/IP is enabled.<br />
4 Press [OK]. The TCP/IP setting is set and the TCP/IP Set. menu<br />
reappears.<br />
IPv4 Setting: a b<br />
1 DHCP<br />
2 Auto-IP<br />
3 IP Address<br />
[ Exit ]<br />
IPv4 Setting (TCP/IP IPv4 settings)<br />
This selects the settings for TCP/IP (IPv4).<br />
1 In the TCP/IP Settings menu, press or to select IPv4<br />
Setting.<br />
2 Press [OK]. The IPv4 Setting menu screen appears.<br />
The options available in the TCP/IP (IPv4) settings are as follows:<br />
• DHCP (DHCP setting)<br />
• Auto-IP (Auto-IP setting)<br />
• IP Address (IP address setting)<br />
• Subnet Mask (Subnet mask setting)<br />
• Default Gateway (Gateway setting)<br />
• Bonjour (Bonjour setting)<br />
IMPORTANT The DHCP, IP address, subnet mask, gateway and<br />
Bonjour menu options for TCP/IP (IPv4 settings) are displayed when<br />
TCP/IP is enabled.<br />
4-66 Using the Operation Panel
DHCP:<br />
1 Off<br />
2 *On<br />
a b<br />
DHCP (DHCP setting)<br />
DHCP (Dynamic Host Configuration Protocol) is the protocol that assigns<br />
the information required to establish a network connection when a host<br />
attempts to connect to the network (Internet). This information includes<br />
the IP address of the local node and the default router (the router in the<br />
host's own network system) and the DNS (Domain Name System) server.<br />
DHCP is an extension of the BOOTP (Bootstrap) startup protocol.<br />
1 In the IPv4 Setting menu, press or to select DHCP.<br />
2 Press [OK]. The DHCP screen appears.<br />
Auto-IP:<br />
1 Off<br />
2 *On<br />
a b<br />
3 Press or to select whether DHCP is enabled.<br />
4 Press [OK]. The DHCP setting is set and the IPv4 Setting menu<br />
reappears.<br />
Auto-IP (Auto-IP setting)<br />
This protocol is used for automatic assignment of an IP address when you<br />
connect to a small network that does not have a DHCP server. Select an<br />
address from the range 169.254.0.1 to 169.254.255.254, and if no other<br />
device on the network is using that address, it is used as your address.<br />
1 In the IPv4 Setting menu, press or to select Auto-IP.<br />
2 Press [OK]. The Auto-IP screen appears.<br />
3 Press or to select whether Auto-IP is enabled.<br />
4 Press [OK]. The Auto-IP setting is set and the IPv4 Setting menu<br />
reappears.<br />
IP Address (IP address setting)<br />
An IP address is the address of a network device such as a computer and<br />
is included in IP packets as needed for the sending and receiving of<br />
Internet data (IP packets). (IP addresses can be either destination<br />
addresses or source addresses.)<br />
Specifically, an IP address is a bit string consisting of a host address (or<br />
host section) that identifies a computer (host) connected to the Internet<br />
and a network address (or network section) that identifies the network to<br />
which that computer belongs (or more specifically, the computer's<br />
network interface). Bit strings (IP addresses) that are unique throughout<br />
the entire Internet system are allocated to each computer or interface.<br />
Using the Operation Panel 4-67
The IP addresses currently used on the Internet (IPv4) have a fixed length<br />
of 32 bits.<br />
Note When you enter the IP address, be sure to set the DHCP<br />
setting to Off.<br />
IP Address:<br />
a b<br />
1 In the IPv4 Setting menu, press or to select IP Address.<br />
2 Press [OK]. The IP Address screen appears.<br />
/123.145.167.123-<br />
M<br />
3 Use the arrow keys to set the IP address.<br />
Press or to increase or decrease, respectively, the value at the<br />
blinking cursor. You can set any value between 000 and 255.<br />
Use and to move the cursor right and left.<br />
4 Press [OK]. The IP address is stored and the IPv4 Setting menu<br />
reappears.<br />
Subnet Mask (Subnet mask setting)<br />
The subnet mask is a way of augmenting the network address section of<br />
an IP address.<br />
A subnet mask represents all network address sections as 1 and all host<br />
address sections as 0. The number of bits in the prefix indicates the<br />
length of the network address. The term "prefix" refers to something<br />
added to the beginning and, in this context, indicates the first section of<br />
the IP address.<br />
When an IP address is written, the length of the network address can<br />
indicated by the prefix length after a forward slash (/). For example, "24"<br />
in the address "133.210.2.0/24". In this way, "133.210.2.0/24" denotes<br />
the IP address "133.210.2.0" with a 24-bit prefix (network section).<br />
This new network address section (originally part of the host address)<br />
made possible by the subnet mask is referred to as the subnet address.<br />
Note When you enter the subnet mask, be sure to set the DHCP<br />
setting to Off.<br />
Subnet Mask:<br />
a b<br />
1 In the IPv4 Setting menu, press or to select Subnet Mask.<br />
2 Press [OK]. The Subnet Mask screen appears.<br />
/123.145.167.123-<br />
M<br />
3 Use the arrow keys to set the subnet mask.<br />
Press or to increase or decrease, respectively, the value at the<br />
blinking cursor. You can set any value between 000 and 255.<br />
Use and to move the cursor right and left.<br />
4-68 Using the Operation Panel
4 Press [OK]. The subnet mask setting is stored and the IPv4 Setting<br />
menu reappears.<br />
Default Gateway (Gateway setting)<br />
Gateway generally refers to a protocol conversion device used to allow<br />
networks with differing protocol systems to interconnect.<br />
For example, a "Gateway" device is required to connect a different closed<br />
network (using its own protocols) to the open Internet (using TCP/IP).<br />
By installing a gateway, the communications protocols and data display<br />
modes on different networks can be made compatible.<br />
On TCP/IP networks, the term gateway is used to refer to routers.<br />
Note Before you input the gateway, be sure to set the DHCP<br />
setting to Off.<br />
Default Gateway:<br />
a b<br />
1 In the IPv4 Setting menu, press or to select Default<br />
Gateway.<br />
2 Press [OK]. The Default Gateway screen appears.<br />
/123.145.167.123-<br />
M<br />
3 Use the arrow keys to set the default gateway.<br />
Press or to increase or decrease, respectively, the value at the<br />
blinking cursor. You can set any value between 000 and 255.<br />
Use and to move the cursor right and left.<br />
4 Press [OK]. The default gateway is stored and the IPv4 Setting menu<br />
reappears.<br />
Bonjour (Bonjour setting)<br />
Bonjour, also known as zero-configuration networking, is a service that<br />
automatically detects computers, devices and services on an IP network.<br />
Bonjour, because an industry-standard IP protocol is used, allows<br />
devices to automatically recognize each other without an IP address<br />
being specified or DNS server being set.<br />
Bonjour also sends and receives network packets by UDP port 5353. If a<br />
firewall is enabled, the user must check that UDP port 5353 is left open<br />
so that Bonjour will run correctly. Some firewalls are set up so as to reject<br />
only certain Bonjour packets. If Bonjour does not run stably, check the<br />
firewall settings and ensure that Bonjour is registered on the exceptions<br />
list and that Bonjour packets are accepted. If you install Bonjour on<br />
Windows XP Service Pack 2 or later, the Windows firewall will be set up<br />
correctly for Bonjour.<br />
1 In the IPv4 Setting menu, press or to select Bonjour.<br />
Using the Operation Panel 4-69
Bonjour:<br />
1 Off<br />
2 *On<br />
a b<br />
2 Press [OK]. The Bonjour screen appears.<br />
3 Press or to select whether automatic detection is enabled.<br />
4 Press [OK]. The automatic detection setting is set and the IPv4<br />
Setting menu reappears.<br />
IPv6 Setting: a b<br />
1 TCP/IP(IPv6)<br />
2 RA(Stateless)<br />
3 DHCPv6<br />
[ Exit ]<br />
IPv6 Setting (TCP/IP IPv6 settings)<br />
This selects the settings for TCP/IP (IPv6).<br />
TCP/IP (IPv6) is based on the current Internet protocol, TCP/IP (IPv4).<br />
IPv6 is the next-generation Internet protocol and expands the available<br />
address space, which resolves the problem of the lack of addresses<br />
under IPv4, while also introducing other improvements such as additional<br />
security functionality and the capacity to prioritize data transmission.<br />
1 In the TCP/IP Settings menu, press or to select IPv6<br />
Setting.<br />
2 Press [OK]. The IPv6 Setting menu screen appears.<br />
TCP/IP(IPv6):<br />
1 Off<br />
2 *On<br />
a b<br />
The options available in the TCP/IP (IPv6) settings are as follows:<br />
• TCP/IP(IPv6) (Enable/disable TCP/IP (IPv6))<br />
• RA(Stateless) (RA (Stateless) setting)<br />
• DHCPv6 (DHCPv6 setting)<br />
IMPORTANT The RA (Stateless) and DHCPv6 menu options for TCP/<br />
IP (IPv6) are displayed when TCP/IP (IPv6) is enabled.<br />
TCP/IP(IPv6) (Enable/disable TCP/IP (IPv6))<br />
This specified whether TCP/IP (IPv6) is used.<br />
1 In the IPv6 Setting menu, press or to select TCP/IP(IPv6).<br />
2 Press [OK]. The TCP/IP(IPv6) screen appears.<br />
3 Press or to select whether TCP/IP (IPv6) is enabled.<br />
4 Press [OK]. The TCP/IP (IPv6) setting is set and the IPv6 Setting<br />
menu reappears.<br />
4-70 Using the Operation Panel
RA(Stateless):<br />
1 Off<br />
2 *On<br />
a b<br />
RA(Stateless) (RA (Stateless) setting)<br />
The IPv6 router communicates (transmits) information such as the global<br />
address prefix using ICMPv6. This information is the Router<br />
Advertisement (RA).<br />
ICMPv6 stands for Internet Control Message Protocol, and is a IPv6<br />
standard defined in the RFC 2463 "Internet Control Message Protocol<br />
(ICMPv6) for the Internet Protocol Version 6 (IPv6) Specification".<br />
1 In the IPv6 Setting menu, press or to select RA(Stateless).<br />
2 Press [OK]. The RA(Stateless) screen appears.<br />
DHCPv6:<br />
1 Off<br />
2 *On<br />
a b<br />
3 Press or to select whether RA (Stateless) is enabled.<br />
4 Press [OK]. The RA (Stateless) setting is set and the IPv6 Setting<br />
menu reappears.<br />
DHCPv6 (DHCPv6 setting)<br />
DHCPv6 is the next-generation of the Internet's Dynamic Host<br />
Configuration Protocol and supports IPv6. It extends the BOOTP startup<br />
protocol that defines the protocols used for transferring configuration<br />
information to hosts on the network.<br />
DHCPv6 permits the DHCP server to use its expanded functionality to<br />
send configuration parameters to an IPv6 node. Because the network<br />
addresses that can be used are allocated automatically, the IPv6 node<br />
management workload is reduced in systems where the administrator<br />
has to exercise close control over IP address allocation.<br />
1 In the IPv6 Setting menu, press or to select DHCPv6.<br />
2 Press [OK]. The DHCPv6 screen appears.<br />
3 Press or to select whether DHCPv6 is enabled.<br />
4 Press [OK]. The DHCPv6 setting is set and the IPv6 Setting menu<br />
reappears.<br />
Using the Operation Panel 4-71
Device Common (Selecting/Setting the common<br />
device)<br />
Device Common: a b<br />
1 Language<br />
2 Date Setting<br />
3 Buzzer<br />
[ Exit ]<br />
Selects/sets all the functions in this printer.<br />
The options available in Device Common are as follows:<br />
• Language (Selecting the message language)<br />
• Date Setting (Date and time settings)<br />
• Buzzer (Alarm (Buzzer) setting)<br />
• Display Bright. (Display brightness setting)<br />
• Error Handling (Error detection setting)<br />
• ColorToner Empty (Setting when color toner runs out)<br />
• Timer Setting<br />
1 Press [MENU].<br />
2 Press or to select Device Common.<br />
3 Press [OK]. The Device Common menu appears showing a list of<br />
available options.<br />
Language:<br />
1 *English<br />
2 Deutsch<br />
3 Français<br />
a b<br />
Language (Selecting the message language)<br />
You can select the language of the message display by following the<br />
procedure given below. You can optionally download messages in other<br />
languages. Contact your service technician for information.<br />
1 In the Device Common menu, press or to select Language.<br />
2 Press [OK]. The Language screen appears showing the list of<br />
languages.<br />
The available languages are as follows:<br />
English<br />
Deutsch<br />
Français<br />
Español<br />
Italiano<br />
Nederlands<br />
Русский<br />
Português<br />
The optional languages are as follows:<br />
Optional language<br />
Turkish<br />
Greek<br />
Polish<br />
Message display<br />
Türkçe<br />
Ελληνικά<br />
Polski<br />
4-72 Using the Operation Panel
Optional language<br />
Message display<br />
Czech<br />
Hungarian<br />
Finnish<br />
Magyar<br />
Suomi<br />
Hebrew<br />
Arabic<br />
Swedish<br />
Danish<br />
Norwegian<br />
Svenska<br />
Dansk<br />
Norsk<br />
Romanian<br />
Portuguese (Portugal)<br />
Português<br />
If you are using one of the optional languages, it is displayed in place<br />
of Português.<br />
3 Press or to select the desired language.<br />
4 Press [OK]. The language is set and the Device Common menu<br />
reappears.<br />
Date Setting: a b<br />
1 Date<br />
2 Time<br />
3 Date Format<br />
[ Exit ]<br />
Date:<br />
a b<br />
Year Month Day<br />
/2009- / 01 / 01<br />
M<br />
[ Exit ]<br />
Date Setting (Date and time settings)<br />
Set the date and time.<br />
The date and time settings consist of the following items:<br />
• Date (date setting)<br />
• Time (time setting)<br />
• Date Format (date format selection)<br />
1 In the Device Common menu, press or to select Date<br />
Setting.<br />
2 Press [OK]. The Date Setting screen appears.<br />
Date (date setting)<br />
1 In the Date Setting menu, press or to select Date.<br />
2 Press [OK]. The Date screen appears.<br />
3 Use the arrow keys to set the year, month, and day.<br />
Use and to move the cursor right and left.<br />
Using the Operation Panel 4-73
Press or to increase or decrease, respectively, the value at the<br />
blinking cursor.<br />
4 Press [OK]. The date is set and the Date Setting menu reappears.<br />
Time:<br />
a b<br />
Hour Min. Second<br />
/11- : 45 : 50<br />
M<br />
[ Exit ]<br />
Time (time setting)<br />
1 In the Date Setting menu, press or to select Time.<br />
2 Press [OK]. The Time screen appears.<br />
3 Use the arrow keys to set the hour, minute, and second.<br />
Use and to move the cursor right and left.<br />
Press or to increase or decrease, respectively, the value at the<br />
blinking cursor.<br />
4 Press [OK]. The time is set and the Date Setting menu reappears.<br />
Date Format: a b<br />
1 *Month/Day/Year<br />
2 Day/Month/Year<br />
3 Year/Month/Day<br />
[ Exit ]<br />
Date Format (date format selection)<br />
One of three formats can be selected for the date format.<br />
1 In the Date Setting menu, press or to select Date Format.<br />
2 Press [OK]. The Date Format screen appears.<br />
3 Press or to select the desired date format.<br />
The following date formats can be selected:<br />
Month/Day/Year<br />
Day/Month/Year<br />
Year/Month/Day<br />
4 Press [OK]. The date format is set and the Date Setting menu<br />
reappears.<br />
4-74 Using the Operation Panel
Buzzer:<br />
a b<br />
1 Key Confirmation<br />
2 Job Finish<br />
3 Ready<br />
[ Exit ]<br />
Key Confirmation: a b<br />
1 Off<br />
2 *On<br />
Buzzer (Alarm (Buzzer) setting)<br />
This function uses tones to notify the user of printer operations and the<br />
printer status. This setting is useful, for example, when the printer is<br />
located some distance from the user.<br />
The options available in Buzzer are as follows:<br />
• Key Confirmation (Key confirmation tone setting)<br />
• Job Finish (Job completed tone setting)<br />
• Ready (Preparation completed tone setting)<br />
• Error (Error tone setting)<br />
1 In the Device Common menu, press or to select Buzzer.<br />
2 Press [OK]. The Buzzer screen appears.<br />
Key Confirmation (Key confirmation tone setting)<br />
When On is selected in this setting, a tone sounds each time a key is<br />
used. The default setting is On.<br />
1 In the Buzzer menu screen, press or to select Key<br />
Confirmation.<br />
2 Press [OK]. The Key Confirmation screen appears.<br />
Job Finish:<br />
1 *Off<br />
2 On<br />
a b<br />
3 Press or to select whether the key confirmation tone is enabled.<br />
4 Press [OK]. The key confirmation tone setting is set and the Buzzer<br />
menu reappears.<br />
Job Finish (Job completed tone setting)<br />
When On is selected in this setting, a tone sounds when printing ends.<br />
The default setting is Off.<br />
1 In the Buzzer menu screen, press or to select Job Finish.<br />
2 Press [OK]. The Job Finish screen appears.<br />
3 Press or to select whether the printing completed tone is<br />
enabled.<br />
4 Press [OK]. The printing completed tone setting is set and the Buzzer<br />
menu reappears.<br />
Using the Operation Panel 4-75
Ready:<br />
1 *Off<br />
2 On<br />
a b<br />
Ready (Preparation completed tone setting)<br />
When On is selected in this setting, a tone sounds when print preparation<br />
has been completed. The default setting is Off.<br />
1 In the Buzzer menu screen, press or to select Ready.<br />
2 Press [OK]. The Ready screen appears.<br />
Error:<br />
1 Off<br />
2 *On<br />
a b<br />
3 Press or to select whether the preparation completed tone is<br />
enabled.<br />
4 Press [OK]. The preparation completed tone setting is set and the<br />
Buzzer menu reappears.<br />
Error (Error tone setting)<br />
When On is selected in this setting, a tone sounds when a problem such<br />
as running out of paper or a paper jam occurs during printing. The default<br />
setting is On.<br />
1 In the Buzzer menu screen, press or to select Error.<br />
2 Press [OK]. The Error screen appears.<br />
Display Bright.:<br />
1 Darker -2<br />
2 Darker -1<br />
3 *Normal 0<br />
a b<br />
3 Press or to select whether the warning tone is enabled.<br />
4 Press [OK]. The warning tone setting is set and the Buzzer menu<br />
reappears.<br />
Display Bright. (Display brightness setting)<br />
Sets the brightness of the message display.<br />
1 In the Device Common menu, press or to select Display<br />
Bright..<br />
2 Press [OK]. The Display Bright. screen appears showing the<br />
available brightness settings.<br />
The list shows the following brightness settings:<br />
Darker -2<br />
Darker -1<br />
Normal 0<br />
Lighter +1<br />
Lighter +2<br />
3 Press or to select the desired brightness.<br />
4-76 Using the Operation Panel
4 Press [OK]. The brightness is set and the Device Common menu<br />
reappears.<br />
Error Handling: a b<br />
1 DuplexPaperError<br />
2 Finishing Error<br />
3 No Staple Error<br />
[ Exit ]<br />
Error Handling (Error detection setting)<br />
The detection methods for duplex printing errors, paper size and paper<br />
type errors when the paper source is fixed, and other errors can be set.<br />
The options available in Error Handling are as follows:<br />
• DuplexPaperError (Duplex printing error detection setting)<br />
• Finishing Error (Setting when a finishing error occurs)<br />
• No Staple Error (Setting when the staples run out)<br />
• Stapling Limit (Setting when the number of sheets exceeds the<br />
stapling limit)<br />
• Punch Waste Full (Setting when the punch waste box is full)<br />
• Paper Mismatch (Detection settings for paper size/type errors when<br />
the paper source is fixed)<br />
• MP Tray Empty (Warning when the MP tray is empty)<br />
1 In the Device Common menu, press or to select Error<br />
Handling.<br />
2 Press [OK]. The Error Handling menu screen appears.<br />
DuplexPaperError (Duplex printing error detection setting)<br />
If the error detection setting for duplex printing has been turned Display<br />
Error, and you attempt to print onto a paper size and paper type that<br />
cannot be used for duplex printing, the Duplex disabled error<br />
message will be displayed and printing will stop.<br />
Display<br />
Error<br />
• To print onto one-side of the paper only when this<br />
message is displayed, press [OK].<br />
• Press [Stop] to cancel the printing itself.<br />
1-sided • To print onto one-side of the paper.<br />
1 In the Error Handling menu, press or to select<br />
DuplexPaperError.<br />
DuplexPaperError: a b<br />
1 *1-sided<br />
2 Display Error<br />
2 Press [OK]. The DuplexPaperError screen appears.<br />
3 Press or to select the setting for handling duplex paper errors.<br />
4 Press [OK]. The handling of duplex paper errors is set and the Error<br />
Handling menu screen reappears.<br />
Using the Operation Panel 4-77
Finishing Error (Setting when a finishing error occurs)<br />
Select the setting when finishing (stapling, punching, sorting, or auto<br />
image rotation) is not possible for the selected paper size or type.<br />
Display<br />
Error<br />
• A message is displayed and printing stops.<br />
Ignore • A message is not displayed and printing continues without<br />
finishing.<br />
Finishing Error:<br />
1 *Ignore<br />
2 Display Error<br />
a b<br />
1 In the Error Handling menu, press or to select Finishing<br />
Error.<br />
2 Press [OK]. The Finishing Error screen appears.<br />
3 Press or to select the setting for handling finishing error.<br />
4 Press [OK]. The handling of finishing error is set and the Error<br />
Handling menu screen reappears.<br />
No Staple Error (Setting when the staples run out)<br />
This setting can be specified when an optional document finisher is<br />
installed.<br />
Select the setting when the staples run out and the Add staples.<br />
message is displayed during stapling.<br />
Display<br />
Error<br />
• A message is displayed and printing stops. Printing<br />
automatically resumes when staples are added.<br />
Ignore • A message is displayed, however, printing continues<br />
without stapling.<br />
No Staple Error:<br />
1 *Ignore<br />
2 Display Error<br />
a b<br />
1 In the Error Handling menu, press or to select No Staple<br />
Error.<br />
2 Press [OK]. The No Staple Error screen appears.<br />
3 Press or to select the setting for handling no staple error.<br />
4 Press [OK]. The handling of no staple error is set and the Error<br />
Handling menu screen reappears.<br />
4-78 Using the Operation Panel
Stapling Limit (Setting when the number of sheets exceeds the<br />
stapling limit)<br />
Select the setting when the number of printed sheets exceeds the number<br />
of sheets that can be stapled.<br />
Display<br />
Error<br />
• A message is displayed and printing stops.<br />
Ignore • A message is not displayed and printing continues without<br />
stapling.<br />
Stapling Limit:<br />
1 *Ignore<br />
2 Display Error<br />
a b<br />
1 In the Error Handling menu, press or to select Stapling<br />
Limit.<br />
2 Press [OK]. The Stapling Limit screen appears.<br />
3 Press or to select the setting for handling staple limit errors.<br />
4 Press [OK]. The handling of staple limit errors is set and the Error<br />
Handling menu screen reappears.<br />
Punch Waste Full (Setting when the punch waste box is full)<br />
This setting can be specified when a punch unit is installed on the optional<br />
3,000 Sheet Document Finisher. Select the setting when the punch waste<br />
box becomes full and the message Empty the punch waste box. is<br />
displayed during punching.<br />
Display<br />
Error<br />
• A message is displayed and printing stops. Printing<br />
automatically resumes when the punch waste is discarded<br />
and the punch waste box is replaced in the punch unit.<br />
Ignore • A message is displayed, however, printing continues<br />
without punching.<br />
Punch Waste Full: a b<br />
1 *Ignore<br />
2 Display Error<br />
1 In the Error Handling menu, press or to select Punch Waste<br />
Full.<br />
2 Press [OK]. The Punch Waste Full screen appears.<br />
3 Press or to select the setting for handling punch waste full.<br />
4 Press [OK]. The handling of punch waste full is set and the Error<br />
Handling menu screen reappears.<br />
Using the Operation Panel 4-79
Paper Mismatch:<br />
1 *Continue<br />
2 Display Error<br />
a b<br />
Paper Mismatch (Detection settings for paper size/type errors<br />
when the paper source is fixed)<br />
Select Continue in this setting if you want to continue printing even if the<br />
paper size or type you specified is different from the fixed paper source,<br />
or select Display Error to have the paper feed error displayed.<br />
1 In the Error Handling menu, press or to select Paper<br />
Mismatch.<br />
2 Press [OK]. The Paper Mismatch screen appears.<br />
MP Tray Empty:<br />
1 *Off<br />
2 On<br />
a b<br />
3 Press or to select the setting for handling paper mismatch<br />
errors.<br />
4 Press [OK]. The handling of paper mismatch errors is set and the<br />
Error Handling menu screen reappears.<br />
MP Tray Empty (Warning when the MP tray is empty)<br />
Turn this setting to On if you want the error displayed when the MP tray is<br />
configured as the default paper source, and there is no paper in the MP<br />
tray, or turn it to Off not to have the error displayed.<br />
The setting On enables the paper-empty message to display when the MP<br />
tray is empty.<br />
1 In the Error Handling menu, press or to select MP Tray Empty.<br />
2 Press [OK]. The MP Tray Empty screen appears.<br />
3 Press or to select the setting for the paper-empty message to<br />
display.<br />
4 Press [OK]. The display of MP Tray Empty is set and the Error<br />
Handling menu screen reappears.<br />
ColorToner Empty (Setting when color toner runs out)<br />
You can select whether or not the message Replace the toner.<br />
Newly added jobs are printed in B & W. appears when cyan,<br />
magenta, or yellow color toner runs out.<br />
Stop<br />
Printing<br />
Print in B<br />
& W<br />
When a color toner runs out, Replace the toner.<br />
appears and printing stops. Replace the indicated toner.<br />
When a color toner runs out, the message Replace the<br />
toner. Newly added jobs are printed in B &<br />
W. is displayed.<br />
• To print in black and white mode, press [OK].<br />
4-80 Using the Operation Panel
1 In the Device Common menu, press or to select ColorToner<br />
Empty.<br />
ColorToner Empty: a b<br />
1 Stop Printing<br />
2 *Print in B & W<br />
2 Press [OK]. The ColorToner Empty screen appears.<br />
3 Press or to select the setting for handling when a color toner<br />
runs out.<br />
4 Press [OK]. The handling when color toner runs out is set and the<br />
Device Common menu reappears.<br />
Timer Setting: a b<br />
1 Err. Clear Timer<br />
2 Sleep Timer<br />
3 PanelReset Timer<br />
[ Exit ]<br />
Err. Clear Timer: a b<br />
(5 - 495)<br />
/**30-sec.<br />
M<br />
Timer Setting<br />
This specifies timer-related settings such as the automatic form-feed<br />
timeout and the timeout settings for Auto Sleep.<br />
The options available in Timer Setting are as follows:<br />
• Err. Clear Timer (Setting the error clear time)<br />
• Sleep Timer (Sleep timer timeout time)<br />
• PanelReset Timer (Setting the panel reset timer)<br />
• FormFeed TimeOut (Automatic form feed timeout setting)<br />
• Auto Err. Clear (Auto error clear setting)<br />
• Auto Sleep (Setting the sleep timer)<br />
• Auto Panel Reset (Auto panel reset setting)<br />
1 In the Device Common menu, press or to select Timer<br />
Setting.<br />
2 Press [OK]. The Timer Setting menu screen appears.<br />
Err. Clear Timer (Setting the error clear time)<br />
If Auto Err. Clear is set to On and a non-fatal error (an error that<br />
allows printing to continue) occurs, this setting specifies the time until the<br />
error is recovered and printing resumes. The default setting is 30<br />
seconds.<br />
1 In the Timer Setting menu, press or to select Err. Clear<br />
Timer.<br />
2 Press [OK]. The Err. Clear Timer screen appears.<br />
Using the Operation Panel 4-81
3 Use the arrow keys to set the recovery time.<br />
Press or to increase or decrease, respectively, the value at the<br />
blinking cursor.<br />
Use and to move the cursor right and left.<br />
4 Press [OK]. The recovery time setting is stored and the Timer Setting<br />
menu reappears.<br />
Sleep Timer (Sleep timer timeout time)<br />
If Auto Sleep is set to On, you can adjust the length of time the printer<br />
waits before entering Auto Sleep in the absence of data. The printer<br />
reverts to normal operation mode when the printer receives a print job,<br />
[OK] is pressed or one of the exterior covers is opened. The default time<br />
is 15 minutes.<br />
Note Color calibration is automatically executed before the<br />
printer reverts to normal operation mode.<br />
Sleep Timer:<br />
(1 - 240)<br />
/15-min.<br />
M<br />
a b<br />
1 In the Timer Setting menu, press or to select Sleep Timer.<br />
2 Press [OK]. The Sleep Timer screen appears.<br />
3 Use the arrow keys to set the sleep time.<br />
Press or to increase or decrease, respectively, the value at the<br />
blinking cursor.<br />
Use and to move the cursor right and left.<br />
4 Press [OK]. The sleep time setting is stored and the Timer Setting<br />
menu reappears.<br />
PanelReset Timer: a b<br />
(5 - 495)<br />
/90-sec.<br />
M<br />
PanelReset Timer (Setting the panel reset timer)<br />
When Auto Panel Reset is set to On, this sets the time until the panel<br />
is automatically reset after the user stops using the panel.<br />
The default setting is 90 seconds.<br />
1 In the Timer Setting menu, press or to select PanelReset<br />
Timer.<br />
2 Press [OK]. The PanelReset Timer screen appears.<br />
3 Use the arrow keys to set the panel reset time.<br />
Press or to increase or decrease, respectively, the value at the<br />
blinking cursor.<br />
Use and to move the cursor right and left.<br />
4-82 Using the Operation Panel
4 Press [OK]. The panel reset time setting is stored and the Timer<br />
Setting menu reappears.<br />
FormFeed TimeOut (Automatic form feed timeout setting)<br />
If the printer receives no data for a set period, it times out and releases<br />
the current interface. It then prints whatever data it has in its buffer and<br />
feeds out the printed page.<br />
The default setting is 30 seconds.<br />
1 In the Timer Setting menu, press or to select FormFeed<br />
TimeOut.<br />
FormFeed TimeOut:a b<br />
(5 - 495)<br />
/30-sec.<br />
M<br />
2 Press [OK]. The FormFeed TimeOut screen appears.<br />
3 Use the arrow keys to set the form feed timeout delay.<br />
Press or to increase or decrease, respectively, the value at the<br />
blinking cursor.<br />
Use and to move the cursor right and left.<br />
4 Press [OK]. The form feed timeout setting is stored and the Timer<br />
Setting menu reappears.<br />
Auto Err. Clear (Auto error clear setting)<br />
If an error that still allows you to continue printing occurs, the next<br />
received data is automatically printed after a set period of time elapses.<br />
For example, if the printer is shared over a network as a network printer<br />
and one person causes one of the above errors, after the set period of<br />
time elapses, the data sent from the next person is printed. The default<br />
setting is Off (Auto Error Clear disabled).<br />
The auto clear errors are:<br />
• Memory is full.<br />
• Print overrun.<br />
• KPDL error.<br />
• Incorrect account ID.<br />
• Account error.<br />
• Restricted by Job Accounting.<br />
• Cannot duplex print on this paper.<br />
• Job Accounting restriction exceeded.<br />
• No multi copies.<br />
• Job not stored.<br />
For the procedure for setting the automatic error recovery time, refer to<br />
Err. Clear Timer (Setting the error clear time) on page 4-81.<br />
1 In the Timer Setting menu, press or to select Auto Err.<br />
Clear.<br />
Using the Operation Panel 4-83
Auto Err. Clear:<br />
1 *Off<br />
2 On<br />
a b<br />
2 Press [OK]. The Auto Err. Clear screen appears.<br />
Auto Sleep:<br />
1 Off<br />
2 *On<br />
a b<br />
3 Press or to select whether automatic error recovery is enabled.<br />
4 Press [OK]. The automatic error recovery setting is set and the Timer<br />
Setting menu reappears.<br />
Auto Sleep (Setting the sleep timer)<br />
The printer has a sleep timer that is used to conserve power when the<br />
printer is not printing, processing, or receiving data. The default setting is<br />
On.<br />
Refer to Sleep Timer (sleep timer setting) above to set the time until the<br />
printer switches to Auto Sleep mode.<br />
1 In the Timer Setting menu, press or to select Auto Sleep.<br />
2 Press [OK]. The Auto Sleep screen appears.<br />
3 Press or to select whether Auto Sleep is enabled.<br />
4 Press [OK]. The Auto Sleep setting is set and the Timer Setting menu<br />
reappears.<br />
Auto Panel Reset: a b<br />
1 Off<br />
2 *On<br />
Auto Panel Reset (Auto panel reset setting)<br />
The Auto Panel Reset function automatically restores the default settings<br />
if the panel is not used for a set time. The default setting is On.<br />
For setting the time until the panel is automatically reset, refer to<br />
PanelReset Timer (Setting the panel reset timer) on page 4-82.<br />
1 In the Timer Setting menu, press or to select Auto Panel<br />
Reset.<br />
2 Press [OK]. The Auto Panel Reset screen appears.<br />
3 Press or to select whether Auto Panel Reset is enabled.<br />
4 Press [OK]. The Auto Panel Reset setting is set and the Timer Setting<br />
menu reappears.<br />
4-84 Using the Operation Panel
Security (Security function setting)<br />
The security functions can be set up to protect printer operation and the<br />
print data.<br />
IMPORTANT To specify the Security function settings, you must<br />
enter an administrator ID and password. For information on how to set<br />
the administrator ID and password, refer to Administrator<br />
(Administrator settings) on page 4-102.<br />
The options available in Security are as follows:<br />
• Network Security (Network security setting)<br />
• I/F Block Set. (External interface block setting)<br />
• Data Security (Data Security setting)<br />
Note The Data Security menu is used with the optional Data<br />
Security Kit (E). For details, refer to Data Security Kit (E)<br />
Operation Guide.<br />
1 Press [MENU].<br />
2 Press or to select Security.<br />
Admin. ID: P b<br />
(1 - 16 digit)<br />
S<br />
0123456789<br />
[Bckspace] [ Next ]<br />
Admin. Password: P b<br />
(0 - 16 digit)<br />
S<br />
0123456789<br />
[Bckspace] [ Login ]<br />
Security:<br />
a b<br />
1 Network Security<br />
2 I/F Block Set.<br />
3 Security Level<br />
[ Exit ]<br />
3 Press [OK]. The Admin. ID screen appears.<br />
4 Enter the administrator ID. Use the or to select a number and<br />
then press [OK] to enter the number.<br />
You can go back one character by pressing [Bckspace] ([Left<br />
Select]).<br />
5 Press [Next] ([Right Select]). The Admin. Password screen<br />
appears.<br />
6 Enter the administrator password. Use the or to select a number<br />
and then press [OK] to enter the number.<br />
You can go back one character by pressing [Bckspace] ([Left<br />
Select]).<br />
7 Press [Login] ([Right Select]). If the entered ID and password are<br />
correct, the Security menu screen appears. If the entered ID and<br />
password are incorrect, the Admin. ID menu screen reappears.<br />
(You are returned to step 3.)<br />
Using the Operation Panel 4-85
Network Security (Network security setting)<br />
Use this procedure to specify the security settings for each of the network<br />
protocols used.<br />
Network Security: a b<br />
1 Netware<br />
2 AppleTalk<br />
3 IPP<br />
[ Exit ]<br />
IMPORTANT Check with your network administrator when selecting<br />
network settings.<br />
The options available in Network Security are as follows:<br />
• Netware (NetWare setting)<br />
• AppleTalk (AppleTalk setting)<br />
• IPP (IPP setting)<br />
• SSL Setting (SSL Server setting)<br />
• IPSec (IPSec setting)<br />
1 In the Security menu, press or to select Network Security.<br />
2 Press [OK]. The Network Security menu screen appears.<br />
Netware:<br />
1 Off/On<br />
2 Frame Type<br />
a b<br />
Netware (NetWare setting)<br />
NetWare is a PC-based network operating system specifically for servers.<br />
NetWare is a client-server system that operates by installing the NetWare<br />
OS on the server and dedicated client modules (NetWare clients) on the<br />
client machines (running MS-DOS, OS/2, Windows, etc.). The basic<br />
network layer protocol used is NetWare's own IPX (Internetwork Packet<br />
eXchange)/SPX (Sequenced Packet eXchange), but the system also<br />
supports TCP/IP.<br />
The feature of the NetWare OS is that it is specifically for servers, unlike<br />
general-purpose operating systems such as Windows NT and UNIX. Only<br />
the minimum required for server operation can be performed from the<br />
NetWare OS console on the server. Server and file management is<br />
basically carried out using management tools from the clients. Also, all<br />
drivers and protocol stacks are in the form of modules called NetWare<br />
Loadable Modules (NLMs), and the ability of NLMs to load and unload<br />
flexibly and dynamically is a major advantage of this system.<br />
The options available in NetWare are as follows:<br />
• Off/On (NetWare operation setting)<br />
• Frame Type (Frame Type setting)<br />
1 In the Network Security menu, press or to select Netware.<br />
2 Press [OK]. The NetWare menu screen appears.<br />
[ Exit ]<br />
4-86 Using the Operation Panel
Off/On:<br />
1 *Off<br />
2 On<br />
a b<br />
Off/On (NetWare operation setting)<br />
Select whether or not to use NetWare. The default setting is Off.<br />
1 In the NetWare menu, press or to select Off/On.<br />
2 Press [OK]. The Off/On screen reappears.<br />
3 Press or to select whether NetWare is enabled.<br />
4 Press [OK]. The NetWare setting is set and the NetWare menu<br />
reappears.<br />
Frame Type:<br />
1 *Auto<br />
2 802.3<br />
3 Ether-II<br />
a b<br />
Frame Type (Frame Type setting)<br />
Sets the NetWare frame type. Frame is a term referring to a set of data<br />
that flows through the network. The default setting is Auto.<br />
IMPORTANT This setting only appears when On is selected for the<br />
NetWare operation setting.<br />
1 In the NetWare menu, press or to select Frame Type.<br />
2 Press [OK]. The Frame Type screen appears.<br />
The available frame types are as follows:<br />
Auto<br />
802.3<br />
Ether-II<br />
802.2<br />
SNAP<br />
3 Press or to select Frame Type.<br />
4 Press [OK]. The Frame Type setting is set and the NetWare menu<br />
reappears.<br />
Using the Operation Panel 4-87
AppleTalk:<br />
1 Off<br />
2 *On<br />
a b<br />
AppleTalk (AppleTalk setting)<br />
AppleTalk is a communications protocol used primarily on Macintosh<br />
computers and also refers to the Mac OS network functions.<br />
AppleTalk assigns 24-bit network addresses (a 16-bit network section and<br />
an 8-bit node address) that are used to identify devices (computers,<br />
printers, etc.) on the network.<br />
When the power is turned on, a broadcast signal is sent out onto the<br />
network and the addresses and machine names are automatically<br />
assigned. The default setting is On.<br />
1 In the Network Security menu, press or to select AppleTalk.<br />
2 Press [OK]. The AppleTalk screen appears.<br />
IPP:<br />
1 *Off<br />
2 On<br />
a b<br />
3 Press or to select whether AppleTalk is enabled.<br />
4 Press [OK]. The AppleTalk setting is set and the Network Security<br />
menu reappears.<br />
IPP (IPP setting)<br />
IPP (Internet Printing Protocol) is a standard that uses TCP/IP networks<br />
such as the Internet to enable print jobs to be sent between remote<br />
computers and printers.<br />
IPP is an extension of the HTTP protocol used to view websites and<br />
enables printing to be carried out via routers on printers in remote<br />
locations. It also supports the HTTP authentication mechanisms along<br />
with SSL server and client authentication as well as encryption. The<br />
default setting is Off.<br />
1 In the Network Security menu, press or to select IPP.<br />
2 Press [OK]. The IPP screen appears.<br />
3 Press or to select whether IPP is enabled.<br />
4 Press [OK]. The IPP setting is set and the Network Security menu<br />
reappears.<br />
4-88 Using the Operation Panel
SSL Setting: a b<br />
1 SSL<br />
2 IPP over SSL<br />
3 HTTPS<br />
[ Exit ]<br />
SSL Setting (SSL Server setting)<br />
SSL (Secure Sockets Layer) refers to a protocol used to encrypt<br />
information sent and received over a network. SSL can currently be used<br />
to encrypt data such as the WWW or FTP files widely used on the Internet<br />
so that privacy-related information, credit card numbers, corporate<br />
secrets and other confidential information can be sent and received<br />
safely.<br />
SSL servers use this protocol to authenticate servers and clients.<br />
The options available in SSL Setting are as follows:<br />
• SSL (SSL Server setting)<br />
• IPP over SSL (SSL Server IPP over SSL setting)<br />
• HTTPS (SSL Server HTTPS setting)<br />
1 In the Network Security menu, press or to select SSL Setting.<br />
2 Press [OK]. The SSL Setting menu screen appears.<br />
SSL (SSL Server setting)<br />
Select the SSL server settings.<br />
The options available in SSL are as follows:<br />
• Off/On (SSL operation setting)<br />
• Encryption (Encryption setting)<br />
SSL:<br />
1 Off/On<br />
2 *Encryption<br />
a b<br />
1 In the SSL Setting menu, press or to select SSL.<br />
2 Press [OK]. The SSL menu screen appears.<br />
[ Exit ]<br />
Off/On:<br />
1 *Off<br />
2 On<br />
a b<br />
Off/On (SSL operation setting)<br />
Select whether or not to use the SSL server. The default setting is Off.<br />
1 In the SSL menu, press or to select Off/On.<br />
2 Press [OK]. The Off/On screen appears.<br />
3 Press or to select whether to use the SSL server.<br />
4 Press [OK]. The SSL server setting is set and the SSL menu<br />
reappears.<br />
Using the Operation Panel 4-89
Encryption: a b<br />
1 AES g<br />
2 DES T<br />
3 3DES T<br />
[ Complete]<br />
Encryption (Encryption setting)<br />
Select the encryption method used on the SSL server.<br />
1 In the SSL menu, press or to select Encryption.<br />
2 Press [OK]. The Encryption screen appears.<br />
3 Press or to move the cursor to the encryption method to be used<br />
and then press [OK].<br />
The options available in Encryption are as follows:<br />
AES (SSL Server AES setting)<br />
AES (Advanced Encryption Standard) was developed to replace<br />
DES as the standard encryption as the safety of DES has<br />
declined. AES is a block encryption system that uses 128-bit<br />
blocks and an SPN structure (a typical structure for repeated<br />
encryption) with three selectable key lengths of 128, 192 and<br />
256 bits.<br />
DES<br />
DES (Data Encryption Standard) is a typical symmetric-key<br />
cryptographic algorithm that divides data in to 64-bit blocks and<br />
then encrypts each block using a 56-bit key.<br />
IMPORTANT Symmetric-key cryptography, because it uses the<br />
same key for both encryption and decryption, uses the same key<br />
in both directions when encrypted data is exchanged.<br />
Accordingly, to prevent the key from being divulged, key transfer<br />
and storage must be very strictly managed.<br />
3DES<br />
3DES (Triple Data Encryption Standard) is a high level of<br />
encryption in which DES encryption is repeated threefold.<br />
SSL:<br />
1 Off/On<br />
2 *Encryption<br />
a b<br />
A hash symbol (g ) appears to the right of the selected encryption<br />
method.<br />
4 After completing the selection, press [Complete] ([Right Select]).<br />
The selected encryption method is set and the SSL menu reappears.<br />
Once you have set an encryption method, and asterisk (*) appears in<br />
front of this menu option.<br />
[ Exit ]<br />
4-90 Using the Operation Panel
IPP over SSL:<br />
1 *Off<br />
2 On<br />
a b<br />
IPP over SSL (SSL Server IPP over SSL setting)<br />
IPP over SSL is an encryption function that uses SSL for communications<br />
between users and servers in network printing. To use IPP over SSL, both<br />
server and client must support the protocol. The default setting is Off.<br />
1 In the SSL Setting menu, press or to select IPP over SSL.<br />
2 Press [OK]. The IPP over SSL screen appears.<br />
3 Press or to select whether IPP over SSL is enabled.<br />
4 Press [OK]. The IPP over SSL setting is set and the SSL Setting<br />
menu reappears.<br />
HTTPS:<br />
1 Off<br />
2 *On<br />
a b<br />
HTTPS (SSL Server HTTPS setting)<br />
HTTPS (HyperText Transfer Protocol Secure) is a protocol that adds SSL<br />
data encryption, message authentication and a digital signature function<br />
to the HTTP protocol used for data transfer between WWW servers and<br />
clients.<br />
S-HTTP is a similar protocol, but HTTPS differs in that it uses SSL. The<br />
default setting is On.<br />
1 In the SSL Setting menu, press or to select HTTPS.<br />
2 Press [OK]. The HTTPS screen appears.<br />
3 Press or to select whether HTTPS is enabled.<br />
4 Press [OK]. The HTTPS setting is set and the SSL Setting menu<br />
reappears.<br />
IPSec (IPSec setting)<br />
IPSec (IP Security Protocol) is a security protocol adopted as the<br />
standard by the IETF for authentication and encryption in the third<br />
network layer (IP layer).<br />
It can be used with both IPv4 and IPv6.<br />
Note IPv4 uses 32-bit IP addresses and IPv6 uses 128-bit IP<br />
addresses.<br />
The default setting is On.<br />
1 In the Network Security menu, press or to select IPSec.<br />
Using the Operation Panel 4-91
IPSec:<br />
1 Off<br />
2 *On<br />
a b<br />
2 Press [OK]. The IPSec screen appears.<br />
3 Press or to select whether IPSec is enabled.<br />
4 Press [OK]. The IPSec setting is set and the Network Security menu<br />
reappears.<br />
I/F Block Set.: a b<br />
1 USB Host<br />
2 USB Device<br />
3 Option I/F<br />
[ Exit ]<br />
I/F Block Set. (External interface block setting)<br />
You can use this to lock and thereby protect the interface.<br />
The options available in I/F Block Set. are as follows:<br />
• USB Host (USB memory slot setting)<br />
• USB Device (USB interface setting)<br />
• Option I/F (Network interface card (NIC) setting)<br />
1 In the Security menu, press or to select I/F Block Set..<br />
2 Press [OK]. The I/F Block Set. menu screen appears.<br />
USB Host:<br />
1 *Unblock<br />
2 Block<br />
a b<br />
USB Host (USB memory slot setting)<br />
This locks and protects the USB memory slot (USB Host). The default<br />
setting is Unblock.<br />
1 In the I/F Block Set. menu, press or to select USB Host.<br />
2 Press [OK]. The USB Host screen appears.<br />
3 Press or to select whether a USB host is used.<br />
4 Press [OK]. The USB Host setting is set and the I/F Block Set. menu<br />
reappears.<br />
4-92 Using the Operation Panel
USB Device:<br />
1 *Unblock<br />
2 Block<br />
a b<br />
USB Device (USB interface setting)<br />
This locks and protects the USB interface. The default setting is<br />
Unblock.<br />
1 In the I/F Block Set. menu, press or to select USB Device.<br />
2 Press [OK]. The USB Device screen appears.<br />
3 Press or to select whether a USB device is used.<br />
4 Press [OK]. The USB Device setting is set and the I/F Block Set.<br />
menu reappears.<br />
Option I/F (Network interface card (NIC) setting)<br />
This locks and protects the network interface card (NIC). The default<br />
setting is Unblock.<br />
Note Optional I/F is displayed only when the optional network<br />
interface is installed on the printer.<br />
Option I/F:<br />
1 *Unblock<br />
2 Block<br />
a b<br />
1 In the I/F Block Set. menu, press or to select Option I/F.<br />
2 Press [OK]. The Option I/F screen appears.<br />
3 Press or to select whether an optional interface is used.<br />
4 Press [OK]. The Optional I/F setting is set and the I/F Block Set.<br />
menu reappears.<br />
Using the Operation Panel 4-93
Job Account.Set. (Job Account setting)<br />
Admin. ID: P b<br />
(1 - 16 digit)<br />
S<br />
0123456789<br />
[Bckspace] [ Next ]<br />
Job Accounting is a function that allows the number of pages used by<br />
each department to be managed through the use of entered account IDs.<br />
To specify the Job Accounting settings, you must enter an administrator<br />
ID and password.<br />
Refer to Administrator (administrator settings) for the procedure for<br />
setting the administrator ID and password.<br />
Job accounting on this machine offers the following features:<br />
• Support for up to 100 departments<br />
• Account IDs up to 8 digits long from 1 to 99999999<br />
• Collective print management for the same account ID<br />
• Totaling of the number of pages used for each department<br />
• Specifiable limits (1 to 9,999,999) on the number of pages used<br />
The options available in the Job Account.Set menu are as follows:<br />
• Job Accounting (Job Accounting settings)<br />
• Account. Report (Account report printing)<br />
• Each Job Account (Totals display by account)<br />
• Account. List (Account List operation)<br />
• Apply Limit (Operation settings when limits are exceeded)<br />
• Unknown ID Job (Operation settings for unknown account IDs)<br />
1 Press [MENU].<br />
2 Press or to select Job Account.Set. and press [OK]. The<br />
Admin. ID input menu screen appears.<br />
3 Enter the administrator ID. Use the or to select a number and<br />
then press [OK] to enter the number.<br />
Admin. Password: P b<br />
(0 - 16 digit)<br />
S<br />
0123456789<br />
[Bckspace] [ Login ]<br />
4 When you have finished, press [Next] ([Right Select]). The<br />
Admin. Password input menu screen appears.<br />
You can go back one character by pressing [Bckspace] ([Left<br />
Select]).<br />
5 Enter the administrator password. Use the or to select a number<br />
and then press [OK] to enter the number.<br />
Job Account.Set.:a b<br />
1 Job Accounting<br />
2 Account. Report<br />
3 Each Job Account<br />
[ Exit ]<br />
6 When you have finished, press [Login] ([Right Select]). If the<br />
entered ID and password are correct, the Job Account.Set. menu<br />
screen appears.<br />
If the entered ID and password are incorrect, the Admin. ID screen<br />
reappears. (You are returned to step 3.)<br />
You can go back one character by pressing [Bckspace] ([Left<br />
Select]).<br />
4-94 Using the Operation Panel
Job Accounting:<br />
1 *Off<br />
2 On<br />
a b<br />
Job Accounting (Job Accounting settings)<br />
This allows you to turn the Job Accounting function On and Off.<br />
1 In the Job Account.Set. selection menu, press or to select Job<br />
Accounting.<br />
2 Press [OK]. The Job Accounting screen appears.<br />
3 Press or to select On or Off and then press [OK]. The Job<br />
Account.Set. menu reappears.<br />
Print.<br />
Are you sure?<br />
z Account. Report<br />
[ Yes ] [ No ]<br />
Each Job Account: a b<br />
k 341736<br />
k 00923022<br />
k 12345678<br />
Account. Report (Account report printing)<br />
This enables you to print the total number of pages for all accounts as a<br />
Job Accounting list.<br />
1 In the Job Account.Set. selection menu, press or to select<br />
Account. Report.<br />
2 Press [OK]. A confirmation screen appears.<br />
Press [Yes] ([Left Select]). Accepted. appears and the printer<br />
prints the job accounting list.<br />
Pressing [No] ([Right Select]) returns you to the Job Account.Set.<br />
menu without printing the job accounting list.<br />
Each Job Account (Totals display by account)<br />
Displays the number of pages printed for each of the currently selected<br />
accounts.<br />
This enables you to check the following numbers for printed pages:<br />
• Total<br />
• Color<br />
• Black & White (Monochrome)<br />
• Combine(None) (Total (none))<br />
• Combine(2in1) (Total (2 in 1))<br />
• Combine(4in1) (Total (4 in 1))<br />
• Duplex(1Side)<br />
• Duplex(2Side)<br />
1 In the Job Account.Set. selection menu, press or to select Each<br />
Job Account.<br />
2 Press [OK]. The Each Job Account menu appears with the<br />
accounts with the highest numbers listed first.<br />
Using the Operation Panel 4-95
k 341736:<br />
1 Printed Pages<br />
2 Counter Reset<br />
a b<br />
3 Press or to select an account and then press [OK]. The<br />
Printed Pages/Counter Reset menu screen appears.<br />
4 Press or to select Printed Pages.<br />
Printed Pages: a b<br />
Total 300000<br />
Color 200000<br />
Black & White 100000<br />
5 Press [OK]. The Printed Pages menu list screen appears.<br />
6 Press or to check the required counter display.<br />
7 Press [OK]. The Printed Pages/Counter Reset menu screen<br />
reappears.<br />
Each Job Account: a b<br />
k 341736<br />
k 00923022<br />
k 12345678<br />
Each Job Account Counter Reset (Totals reset by account)<br />
Resets the number of pages printed for each of the accounts currently<br />
set.<br />
1 In the Job Account.Set. selection menu, press or to select Each<br />
Job Account.<br />
2 Press [OK]. The Each Job Account menu appears with the<br />
accounts with the highest numbers listed first.<br />
k 341736:<br />
1 Printed Pages<br />
2 Counter Reset<br />
a b<br />
3 Press or to select an account and then press [OK]. The<br />
Printed Pages/Counter Reset menu screen appears.<br />
4 Press or to select Counter Reset.<br />
Reset counter.<br />
Are you sure?<br />
z k 341736<br />
[ Yes ] [ No ]<br />
5 Press [OK]. The reset confirmation menu screen appears.<br />
To proceed with resetting the counter, press [Yes] ([Left Select]).<br />
Completed. appears, the counter is reset and the Printed<br />
Pages/Counter Reset menu reappears.<br />
Pressing [No] ([Right Select]) returns you to the Printed Pages/<br />
Counter Reset menu screen without resetting the counter.<br />
Account. List (Account List operation)<br />
This specifies the setting for the department to be used for setting Job<br />
Accounting.<br />
4-96 Using the Operation Panel
Add (Account registration)<br />
Use this procedure to add a new account.<br />
Note Because account IDs are managed as numeric strings, "1"<br />
and "001" are handled as different accounts. Also, once Job<br />
Accounting is enabled, no jobs are printed unless information is<br />
attached showing the accounts from which the jobs are being<br />
printed.<br />
1 In the Job Account.Set. selection menu, press or to select<br />
Account. List.<br />
Account. List: a b<br />
k 1228<br />
k 00122<br />
k 3485739<br />
[ Add ]<br />
Account ID: P b<br />
(1 - 8 digit)<br />
S<br />
0123456789<br />
[Bckspace] [ Enter ]<br />
2 Press [OK]. The Account. List menu appears showing a list of<br />
the registered accounts in ascending order.<br />
3 Press [Add] ([Right Select]). The Account ID menu screen<br />
appears.<br />
k 1228:<br />
1 Detail/Edit<br />
2 Delete<br />
3 Exit<br />
a b<br />
4 Enter the account ID to be added. Use or to select a number and<br />
then press [OK] to enter the number.<br />
You can go back one character by pressing [Bckspace] ([Left<br />
Select]).<br />
5 Press [Enter] ([Right Select]). Once the account has been added,<br />
a list of selection options appears.<br />
This account ID is<br />
already registered.<br />
This message appears if the account ID has already been registered.<br />
Detail/Edit (Checking/editing registered account ID settings)<br />
This procedure allows you to check or edit registered accounts.<br />
1 In the Job Account.Set. selection menu, press or to select<br />
Account. List.<br />
Using the Operation Panel 4-97
Account. List: a b<br />
k 1228<br />
k 00122<br />
k 3485739<br />
[ Add ]<br />
2 Press [OK]. The Account. List menu appears showing a list of<br />
the registered accounts in ascending order.<br />
k 1228:<br />
1 Detail/Edit<br />
2 Delete<br />
3 Exit<br />
a b<br />
3 Press or to select an account to check or edit and then press<br />
[OK]. A list of selection options appears.<br />
Detail/Edit: a b<br />
1 Account ID<br />
2 Restrict.(Total)<br />
3 Restrict.(Color)<br />
4 Press or to select Detail/Edit and then press [OK]. The<br />
Detail/Edit menu screen appears.<br />
Account ID: P b<br />
(1 - 8 digit)<br />
12345678S<br />
0123456789<br />
[Bckspace] [ Enter ]<br />
5 To edit an account ID, press or to select Account ID and then<br />
press [OK]. The Account ID menu screen appears.<br />
6 Enter the new account ID. Use or to select a number and then<br />
press [OK] to enter the number. You can go back one character by<br />
pressing [Bckspace] ([Left Select]).<br />
This account ID is<br />
already registered.<br />
This message appears if the account ID has already been registered.<br />
Detail/Edit: a b<br />
1 Account ID<br />
2 Restrict.(Total)<br />
3 Restrict.(Color)<br />
7 Press [Enter] ([Right Select]). When account ID editing ends, you<br />
are returned to the Detail/Edit menu.<br />
Restrict.(Total): a b<br />
1 *Off<br />
2 Counter Limit<br />
3 Reject Usage<br />
8 To place printing restrictions on this account, press or to select<br />
Restrict.(Total) and then press [OK].<br />
The Restrict.(Total) screen appears.<br />
• Off<br />
• Counter Limit<br />
• Reject Usage<br />
4-98 Using the Operation Panel
Detail/Edit: a b<br />
1 Account ID<br />
2 Restrict.(Total)<br />
3 Restrict.(Color)<br />
9 Press or to select a setting and then press [OK]. When the<br />
setting has been completed, the Detail/Edit menu screen<br />
appears.<br />
Limit(Total): a b<br />
(1 - 9999999)<br />
/1000000-pages<br />
M<br />
10 When Counter Limit is set for Restrict.(Total) in step 9, set<br />
the limit on the total number of pages that can be printed using this<br />
account. Press or to select Limit(Total) and then press<br />
[OK]. The Limit(Total) menu screen appears.<br />
IMPORTANT Limit(Total) is displayed when Counter Limit<br />
is set for Restrict.(Total).<br />
Detail/Edit: a b<br />
1 Account ID<br />
2 Restrict.(Total)<br />
3 Restrict.(Color)<br />
Restrict.(Color): a b<br />
1 *Off<br />
2 Counter Limit<br />
3 Reject Usage<br />
Detail/Edit: a b<br />
1 Account ID<br />
2 Restrict.(Total)<br />
3 Restrict.(Color)<br />
11 Enter the limit you want to set for this account. Use or to select<br />
a number and then press [OK] to enter the number. When you have<br />
finished, press [Enter] ([Right Select]). The Detail/Edit menu<br />
screen appears.<br />
Press or to increase or decrease, respectively, the value at the<br />
blinking cursor.<br />
Use and to move the cursor right and left.<br />
After you have entered the limit on the number of pages, press [OK].<br />
The setting is stored and the Detail/Edit menu reappears.<br />
12 To place color printing restrictions on this account, press or to<br />
select Restrict.(Color) and then press [OK]. The<br />
Restrict.(Color)screen appears.<br />
• Off<br />
• Counter Limit<br />
• Reject Usage<br />
13 Press or to select a setting and then press [OK]. When the<br />
setting has been completed, the Detail/Edit menu screen<br />
appears.<br />
Limit(Color): a b<br />
(1 - 9999999)<br />
/1000000-pages<br />
M<br />
14 When Counter Limit is set for Restrict.(Color) in step 13,<br />
set the limit on the total number of color pages that can be printed<br />
using this account. Press or to select Limit(Color) and then<br />
press [OK]. The Limit(Color)screen appears.<br />
IMPORTANT Limit(Color) is displayed when Counter Limit<br />
is set for Restrict.(Color).<br />
Detail/Edit: a b<br />
1 Account ID<br />
2 Restrict.(Total)<br />
3 Restrict.(Color)<br />
15 Enter the color printing limit you want to set for this account. Use <br />
or to select a number and then press [OK] to enter the number.<br />
When you have finished, press [Enter] ([Right Select]). The<br />
Detail/Edit menu screen appears.<br />
Using the Operation Panel 4-99
Account. List: a b<br />
k 1228<br />
k 00122<br />
k 3485739<br />
[ Add ]<br />
Delete (Deleting registered accounts)<br />
You can use this procedure to delete a registered account ID.<br />
1 In the Job Account.Set. selection menu, press or to select<br />
Account. List.<br />
2 Press [OK]. The Account. List menu appears showing a list of<br />
the registered accounts in ascending order.<br />
k 1228:<br />
1 Detail/Edit<br />
2 Delete<br />
3 Exit<br />
a b<br />
3 Press or to select the ID of the account to be deleted.<br />
4 Press [OK]. A list of selection options appears.<br />
Delete.<br />
Are you sure?<br />
z k 1228<br />
5 Press or to select Delete and then press [OK]. A confirmation<br />
screen appears.<br />
[ Yes ] [ No ]<br />
Account. List:<br />
k 00122<br />
k 3485739<br />
a b<br />
6 To proceed with deleting the account, press [Yes] ([Left Select]).<br />
Completed. appears and the account is deleted. The Once deleting<br />
of the account ends, the Account. List screen reappears.<br />
[ Add ]<br />
Apply Limit:<br />
1 Immediately<br />
2 *Subsequently<br />
a b<br />
7 Pressing [No] ([Right Select]) returns you to the Account. List<br />
menu screen without deleting the account.<br />
Apply Limit (Operation settings when limits are exceeded)<br />
Use this to specify the action taken when a department exceeds its<br />
printing limits.<br />
1 In the Job Account.Set. selection menu, press or to select<br />
Apply Limit.<br />
2 Press [OK]. The Apply Limit screen appears.<br />
• Immediately (prohibit printing from this job onwards)<br />
• Subsequently (prohibit printing from the next job onwards)<br />
4-100 Using the Operation Panel
Job Account.Set.:a b<br />
1 Job Accounting<br />
2 Account. Report<br />
3 Each Job Account<br />
[ Exit ]<br />
3 Press or to select a setting and then press [OK]. The Job<br />
Account.Set. selection menu list reappears.<br />
Unknown ID Job:<br />
1 *Reject<br />
2 Permit<br />
a b<br />
Unknown ID Job (Operation settings for unknown account<br />
IDs)<br />
Use this procedure to specify whether print jobs from departments with<br />
unknown account IDs are permitted.<br />
1 In the Job Account.Set. selection menu, press or to select<br />
Unknown ID Job.<br />
2 Press [OK]. The Unknown ID Job screen appears.<br />
• Reject (Not printed)<br />
• Permit (Printed)<br />
Job Account.Set.:a b<br />
1 Job Accounting<br />
2 Account. Report<br />
3 Each Job Account<br />
[ Exit ]<br />
3 Press or to select a setting and then press [OK]. The Job<br />
Account.Set. selection menu list reappears.<br />
Using the Operation Panel 4-101
Administrator (Administrator settings)<br />
Admin. ID: P b<br />
(1 - 16 digit)<br />
S<br />
0123456789<br />
[Bckspace] [ Next ]<br />
The Administrator setting is a function that identifies a user who can use<br />
the printer and manage other users.<br />
When using the Security and Job Accounting functions, the administrator<br />
ID and password set here are authenticated, and settings can be<br />
specified after they are properly authenticated.<br />
The options available to the administrator are as follows:<br />
• ID (Administrator ID setting)<br />
• Password (Administrator password setting)<br />
1 Press [MENU].<br />
2 Press or to select Administrator.<br />
3 Press [OK]. The Admin. ID screen appears.<br />
4 Enter the administrator ID. Use the or to select a number and<br />
then press [OK] to enter the number.<br />
You can go back one character by pressing [Bckspace] ([Left<br />
Select]).<br />
Note The default setting is "5500".<br />
Admin. Password: P b<br />
(0 - 16 digit)<br />
S<br />
0123456789<br />
[Bckspace] [ Login ]<br />
5 Press [Next] ([Right Select]). The Admin. Password screen<br />
appears.<br />
6 Enter the administrator password. Use the or to select a number<br />
and then press [OK] to enter the number.<br />
You can go back one character by pressing [Bckspace] ([Left<br />
Select]).<br />
Note The default setting is "5500".<br />
Administrator: a b<br />
1 Admin. ID<br />
2 Admin. Password<br />
7 Press [Login] ([Right Select]). If the entered ID and password are<br />
correct, the Administrator menu screen appears. If the entered ID and<br />
password are incorrect, the Admin. ID menu screen reappears.<br />
(You are returned to step 3.)<br />
[ Exit ]<br />
8 Press or to select Admin. ID.<br />
4-102 Using the Operation Panel
New ID:<br />
P b<br />
(1 - 16 digit)<br />
S<br />
0123456789<br />
[Bckspace] [ Enter ]<br />
Confirm ID: P b<br />
(1 - 16 digit)<br />
S<br />
0123456789<br />
[Bckspace] [ Enter ]<br />
Administrator: a b<br />
1 Admin. ID<br />
2 Admin. Password<br />
9 Press [OK]. The New ID screen appears.<br />
10 Enter the administrator ID to be registered. Use or to select a<br />
number and then press [OK] to enter the number.<br />
You can go back one character by pressing [Bckspace] ([Left<br />
Select]).<br />
11 When you have finished, press [Enter] ([Right Select]). The<br />
Confirm ID menu screen appears.<br />
12 To confirm, re-enter the administrator ID to be registered. Use or <br />
to select a number and then press [OK] to enter the number.<br />
You can go back one character by pressing [Bckspace] ([Left<br />
Select]).<br />
13 When you have finished, press [Enter] ([Right Select]). You return<br />
to the Administrator menu screen.<br />
[ Exit ]<br />
New ID:<br />
P b<br />
(1 - 16 digit)<br />
S<br />
0123456789<br />
[Bckspace] [ Enter ]<br />
If the administrator IDs do not match, the New ID reappears.<br />
Enter the administrator ID to be registered once more, starting again<br />
from the beginning.(You are returned to step 10.)<br />
14 In the Administrator menu, press or to select Admin.<br />
Password.<br />
New Password: P b<br />
(0 - 16 digit)<br />
S<br />
0123456789<br />
[Bckspace] [ Enter ]<br />
15 Press [OK]. The New Password screen appears.<br />
16 Enter the administrator password to be registered. Use or to<br />
select a number and then press [OK] to enter the number.<br />
You can go back one character by pressing [Bckspace] ([Left<br />
Select]).<br />
Using the Operation Panel 4-103
Confirm Password: P b<br />
(0 - 16 digit)<br />
S<br />
0123456789<br />
[Bckspace] [ Enter ]<br />
Administrator: a b<br />
1 Admin. ID<br />
2 Admin. Password<br />
17 When you have finished, press [Enter] ([Right Select]). The<br />
Confirm Password menu screen appears.<br />
18 To confirm, re-enter the administrator password to be registered. Use<br />
or to select a number and then press [OK] to enter the number.<br />
You can go back one character by pressing [Bckspace] ([Left<br />
Select]).<br />
19 When you have finished, press [Enter] ([Right Select]). The<br />
Administrator menu screen appears.<br />
[ Exit ]<br />
New Password: P b<br />
(0 - 16 digit)<br />
S<br />
0123456789<br />
[Bckspace] [ Enter ]<br />
If the administrator passwords do not match, the New Password<br />
screen reappears. Enter the administrator password to be registered<br />
once more, starting again from the beginning. (You are returned to<br />
step 16.)<br />
4-104 Using the Operation Panel
Adjust/Maint. (Adjust/Maintenance selection/<br />
setting)<br />
Adjust/Maintenance is used to adjust the print quality and to carry out<br />
printer maintenance.<br />
The options available in Adjust/Maintenance are as follows:<br />
• ColorCalib.Cycle (Automatic color adjustment cycle setting)<br />
• ColorCalibration<br />
• Color Regist. (Color registration [Standard])<br />
• Color Regist. (Color registration [Detailed])<br />
• Restart (Restart Printer)<br />
• Service Setting (for Maintenance)<br />
Adjust/Maint.: a b<br />
1 ColorCalib.Cycle<br />
2 ColorCalibration<br />
3 Color Regist.<br />
[ Exit ]<br />
IMPORTANT Service Setting is primarily a menu used by service<br />
personnel for maintenance work. There is no need for customers to<br />
use this menu.<br />
1 Press [MENU].<br />
2 Press or to select Adjust/Maint..<br />
3 Press [OK]. The Adjust/Maint. menu appears showing a list of<br />
available options.<br />
ColorCalib.Cycle (Automatic color adjustment cycle<br />
setting)<br />
The cycle for automatic execution of color calibration can be selected.<br />
The following cycles can be set:<br />
Auto<br />
Short<br />
Standard<br />
Long<br />
Automatic judging and adjustment.<br />
Gives priority to image quality. The color adjustment cycle<br />
is shorter than Standard.<br />
Gives equal priority to image quality and printing<br />
processing.<br />
Gives priority to printing processing. The color adjustment<br />
cycle is longer than Standard.<br />
1 In the Adjust/Maint. menu screen, press or to select<br />
ColorCalib.Cycle.<br />
ColorCalib.Cycle:a b<br />
1 *Auto<br />
2 Short<br />
3 Standard<br />
[ Exit ]<br />
2 Press [OK]. The ColorCalib.Cycle screen appears.<br />
3 Press or to select the color adjustment cycle.<br />
Using the Operation Panel 4-105
4 Press [OK]. The color adjustment cycle is set and the Adjust/<br />
Maint. menu screen reappears.<br />
Start the color<br />
calibration.<br />
Are you sure?<br />
[ Yes ] [ No ]<br />
ColorCalibration<br />
This printer contains a calibration function that automatically makes<br />
adjustments to compensate for changes that occur over time due to<br />
variations in the ambient temperature and humidity. So that the highest<br />
quality color printing can be maintained, this color calibration operation is<br />
carried out automatically each time the power to the printer is turned on.<br />
The color calibration operation may be carried out automatically during<br />
recovery from the Auto Sleep or during printing.<br />
1 In the Adjust/Maint. menu screen, press or to select<br />
ColorCalibration.<br />
2 Press [OK]. A confirmation screen appears.<br />
Press [Yes] ([Left Select]). Color calibration is carried out, after<br />
which you return to the standby screen.<br />
Pressing [No] ([Right Select]) returns you to the Adjust/Maint.<br />
menu without carrying out color calibration.<br />
Color Regist.:<br />
1 Normal<br />
2 Detail<br />
a b<br />
Color Regist. (Color registration [Standard])<br />
When using the printer for the first time after set-up or after having moved<br />
it, or if printout of any color (magenta, cyan or yellow) is skewed, use this<br />
mode to correct the color registration on the operation panel.<br />
The options available in Registration Normal (Color registration<br />
[standard]) are as follows:<br />
• Print Chart (Printing the color registration correction chart)<br />
• Adjust Magenta (Magenta correction)<br />
• Adjust Cyan (Cyan correction)<br />
• Adjust Yellow (Yellow correction)<br />
Print Chart (Printing the color registration correction chart)<br />
You can use this option to print a color registration correction chart for use<br />
in correcting the color registration.<br />
1 In the Adjust/Maint. menu screen, press or to select Color<br />
Regist..<br />
2 Press [OK]. The Color Regist. menu screen appears.<br />
Press [Exit] ([Right Select]) to return to the standby screen.<br />
[ Exit ]<br />
3 Press or to select Normal.<br />
Normal:<br />
a b<br />
1 Print Chart<br />
2 Adjust Magenta<br />
3 Adjust Cyan<br />
[ Exit ]<br />
4 Press [OK]. The Color Regist. Normal menu screen appears.<br />
Press [Exit] ([Right Select]) to return to the standby screen.<br />
4-106 Using the Operation Panel
5 Press or to select Print Chart.<br />
Print.<br />
Are you sure?<br />
z Registration chart<br />
[ Yes ] [ No ]<br />
6 Press [OK]. A confirmation screen appears.<br />
If Job Accounting is enabled, enter the account ID in the login screen<br />
that appears. A confirmation screen appears after login.<br />
Press [Yes] ([Left Select]). A confirmation screen appears.<br />
Pressing [No] ([Right Select]) returns you to the Color Regist.<br />
Normal menu screen without printing the registration chart.<br />
Sample Color Registration Correction Chart [Normal]<br />
The printed chart is the color registration correction chart shown on the<br />
next page.<br />
The printed color registration correction chart includes front (F), vertical<br />
(V) and rear (R) registration charts for each color (cyan, magenta and<br />
yellow).<br />
Color Registration Correction Chart<br />
MH-F<br />
I G E C A 1 3 5 7 9<br />
H F D B 0 2 4 6 8<br />
I<br />
H<br />
G<br />
F<br />
E<br />
D<br />
C<br />
B<br />
A<br />
0<br />
1<br />
2<br />
3<br />
4<br />
5<br />
6<br />
7<br />
9 8<br />
MV<br />
MH-R<br />
I G E C A 1 3 5 7 9<br />
H F D B 0 2 4 6 8<br />
CH-F<br />
I G E C A 1 3 5 7 9<br />
H F D B 0 2 4 6 8<br />
I<br />
H<br />
G<br />
F<br />
E<br />
D<br />
C<br />
B<br />
A<br />
0<br />
1<br />
2<br />
3<br />
4<br />
5<br />
6<br />
7<br />
9 8<br />
CV<br />
CH-R<br />
I G E C A 1 3 5 7 9<br />
H F D B 0 2 4 6 8<br />
YH-F<br />
I G E C A 1 3 5 7 9<br />
H F D B 0 2 4 6 8<br />
I<br />
H<br />
G<br />
F<br />
E<br />
D<br />
C<br />
B<br />
A<br />
0<br />
1<br />
2<br />
3<br />
4<br />
5<br />
6<br />
7<br />
9 8<br />
YV<br />
YH-R<br />
I G E C A 1 3 5 7 9<br />
H F D B 0 2 4 6 8<br />
Adjust Magenta (Magenta correction)<br />
Corrects the registration for magenta (red).<br />
1 In the Adjust/Maint. menu screen, press or to select Color<br />
Regist..<br />
Using the Operation Panel 4-107
Color Regist.:<br />
1 Normal<br />
2 Detail<br />
a b<br />
2 Press [OK]. The Color Regist. menu screen appears.<br />
Press [Exit] ([Right Select]) to return to the standby screen.<br />
[ Exit ]<br />
3 Press or to select Normal.<br />
Normal:<br />
a b<br />
1 Print Chart<br />
2 Adjust Magenta<br />
3 Adjust Cyan<br />
[ Exit ]<br />
4 Press [OK]. The Color Regist. Normal menu screen appears.<br />
Press [Exit] ([Right Select]) to return to the standby screen.<br />
Adjust Magenta:<br />
(I - A, 0 - 9)<br />
a b<br />
5 Press or to select Adjust Magenta.<br />
6 Press [OK]. The Adjust Magenta screen appears.<br />
0 is displayed for the H-F, V and H-R values and the cursor (_)<br />
flashes under the F value.<br />
H-F:/0- V: 0 H-R: 0<br />
7 In the F chart for magenta printed in Print Chart above, note the<br />
values where the lines are closest to forming a single straight line.<br />
This would be B in this figure.<br />
Adjust Magenta:<br />
(I - A, 0 - 9)<br />
a b<br />
8 Press or until that value is displayed.<br />
H-F:/*- B V: 0 H-R: 0<br />
9 Press or to move the cursor right or left.<br />
Using the same procedure as for the H-F value, display the V and H-<br />
R values identified in the color registration correction chart.<br />
When you have completed all the values, press [OK].<br />
The setting is saved and you are returned to the Color Regist.<br />
Normal menu screen.<br />
4-108 Using the Operation Panel
Adjust Cyan:<br />
(I - A, 0 - 9)<br />
a b<br />
Adjust Cyan (Cyan correction) and Adjust Yellow (Yellow<br />
correction)<br />
These options correct the registration for cyan (blue) and yellow.<br />
1 In the Color Regist. Normal menu screen, press or to select<br />
Adjust Cyan or Adjust Yellow.<br />
2 Press [OK]. The Adjust Cyan or Adjust Yellow screen appears.<br />
H-F:/0- V: 0 H-R: 0<br />
Adjust Yellow:<br />
(I - A, 0 - 9)<br />
a b<br />
H-F:/0- V: 0 H-R: 0<br />
Using the same procedure as for magenta, identify the cyan and yellow<br />
values in the color registration correction chart and set them in the printer.<br />
Note As confirmation, try printing the color registration correction<br />
chart again. If the section where the lines most closely coincide<br />
as a single straight line is not 0, redo the adjustment again from<br />
Magenta.<br />
Color Regist.:<br />
1 Normal<br />
2 Detail<br />
a b<br />
IMPORTANT If the problem of skewed-color printout still persists<br />
even after correcting the color registration, call for service.<br />
Color Regist. (Color registration [Detailed])<br />
This allows you to make fine horizontal and vertical adjustments to the<br />
color registration corrections.<br />
The options available in Color Regist. Details (Color registration<br />
[detailed]) are as follows:<br />
• Print Chart (Printing the color registration correction chart)<br />
• Adjust Magenta (Magenta correction)<br />
• Adjust cyan (Cyan correction)<br />
• Adjust yellow (Yellow correction)<br />
Print Chart (Printing the color registration correction chart)<br />
You can use this option to print a color registration correction chart for use<br />
in correcting the color registration.<br />
1 In the Adjust/Maint. menu screen, press or to select Color<br />
Regist..<br />
2 Press [OK]. The Color Regist. menu screen appears.<br />
Press [Exit] ([Right Select]) to return to the standby screen.<br />
[ Exit ]<br />
Using the Operation Panel 4-109
3 Press or to select Detail.<br />
Detail:<br />
a b<br />
1 Print Chart<br />
2 Adjust Magenta<br />
3 Adjust Cyan<br />
[ Exit ]<br />
4 Press [OK]. The Color Regist. Detail menu screen appears.<br />
Press [Exit] ([Right Select]) to return to the standby screen.<br />
5 Press or to select Print Chart.<br />
Print.<br />
Are you sure?<br />
z Registration chart<br />
[ Yes ] [ No ]<br />
6 Press [OK]. A confirmation screen appears.<br />
Press [Yes] ([Left Select]). Completed appears and printing<br />
begins.<br />
Pressing [No] ([Right Select]) returns you to the Color Regist.<br />
Detail menu screen without printing the registration chart.<br />
If Job Accounting is enabled, a confirmation screen appears after<br />
department login.<br />
If Job Accounting is enabled, also enter the account ID.<br />
The printed chart is the color registration correction chart shown on the<br />
next page.<br />
There are H-1 to H-7 (upper part) and V-1 to V-5 (lower part) registration<br />
charts for each color (cyan, magenta and yellow) included on the color<br />
registration correction chart.<br />
4-110 Using the Operation Panel
Sample Color Registration Correction Chart [Detail]<br />
Color Regist.:<br />
1 Normal<br />
2 Detail<br />
a b<br />
Adjust Magenta (Magenta correction)<br />
Makes detailed corrections to the registration for magenta (red).<br />
1 In the Adjust/Maint. menu screen, press or to select Color<br />
Regist..<br />
2 Press [OK]. The Color Regist. menu screen appears.<br />
Press [Exit] ([Right Select]) to return to the standby screen.<br />
[ Exit ]<br />
3 Press or to select Detail.<br />
Detail:<br />
a b<br />
1 Print Chart<br />
2 Adjust Magenta<br />
3 Adjust Cyan<br />
[ Exit ]<br />
4 Press [OK]. The Color Regist. Detail menu screen appears.<br />
Press [Exit] ([Right Select]) to return to the standby screen.<br />
5 Press or to select Adjust Magenta.<br />
Using the Operation Panel 4-111
Adjust Magenta: a b<br />
(I - A, 0 - 9)<br />
H-1:/0-H-2: 0 H-3: 0<br />
H-4: 0 H-5: 0 H-6: 0<br />
H-7: 0 V-3: 0<br />
6 Press [OK]. The Adjust Magenta screen appears.<br />
Values are displayed for H-1, H-2, H-3, H-4, H-5 and V-3.<br />
7 In the H and V charts for magenta printed in Print Chart above, note<br />
the values where the lines are closest to forming a single straight line.<br />
This would be B in this figure.<br />
Adjust Magenta: a b<br />
(I - A, 0 - 9)<br />
H-1:/*-H-2: B 0 H-3: 0<br />
H-4: 0 H-5: 0 H-6: 0<br />
H-7: 0 V-3: 0<br />
8 Press or until that value is displayed.<br />
9 Press or to move the cursor right or left.<br />
Using the same procedure as for the H-1 value, display the other<br />
values identified in the color registration correction chart. When you<br />
have completed all the values, press [OK]. The setting is saved and<br />
you are returned to the Color Regist. Detail menu screen.<br />
4-112 Using the Operation Panel
Adjust Cyan: a b<br />
(I - A, 0 - 9)<br />
H-1:/0-H-2: 0 H-3: 0<br />
H-4: 0 H-5: 0 H-6: 0<br />
H-7: 0 V-3: 0<br />
Adjust Cyan (Cyan correction) and Adjust Yellow (Yellow<br />
correction)<br />
These options make detailed corrections to the registration for cyan (blue)<br />
and yellow.<br />
1 In the Color Regist. Detail menu screen, press or to select<br />
Adjust Cyan or Adjust Yellow.<br />
2 Press [OK]. The Adjust Cyan or Adjust Yellow screen appears.<br />
Adjust Yellow: a b<br />
(I - A, 0 - 9)<br />
H-1:/0-H-2: 0 H-3: 0<br />
H-4: 0 H-5: 0 H-6: 0<br />
H-7: 0 V-3: 0<br />
Using the same procedure as for magenta above, identify the cyan and<br />
yellow values in the color registration correction chart and set them in the<br />
printer.<br />
Note As confirmation, try printing the color registration correction<br />
chart again. If the section where the lines most closely coincide<br />
as a single straight line is not 0, redo the adjustment again from<br />
Magenta.<br />
IMPORTANT If the problem of skewed-color printout still persists<br />
even after correcting the color registration, call for service.<br />
Restart.<br />
Are you sure?<br />
Restart (Restart Printer)<br />
The procedure described below resets the printer’s temporary conditions,<br />
such as the current page orientation, font, etc., set by commands to their<br />
default values. Downloaded fonts and macros are deleted from the<br />
printer’s memory.<br />
1 In the Adjust/Maint. menu screen, press or to select Restart..<br />
2 Press [OK]. A confirmation screen appears.<br />
Press [Yes] ([Left Select]). The printer is restarted.<br />
Pressing [No] ([Right Select]) returns you to the Adjust/Maint.<br />
menu screen without restarting the printer.<br />
[ Yes ] [ No ]<br />
Using the Operation Panel 4-113
Service Setting (for Maintenance)<br />
The options available in Service are as follows:<br />
• Service Status (Printing the service status page)<br />
• Network Status (Printing the network status page)<br />
• Test Page (Printing the test page)<br />
• DEV-CLN (Developer/Refresh mode setting)<br />
• Drum (Drum/Refresh mode setting)<br />
• LSU (LSU cleaning mode setting)<br />
• MP Tray Cleaning (MP Tray Cleaning mode setting)<br />
• Silent Mode (Silent Mode setting)<br />
• First Print Pos. (First Print Position setting)<br />
• Initialization (System initialization)<br />
Service Setting: a b<br />
1 Service Status<br />
2 Network Status<br />
3 Test Page<br />
[ Exit ]<br />
Print.<br />
Are you sure?<br />
z Service Status<br />
[ Yes ] [ No ]<br />
IMPORTANT Service is primarily a menu used by service personnel<br />
for maintenance work. There is no need for customers to use this<br />
menu.<br />
1 In the Adjust/Maint. menu screen, press or to select Service<br />
Setting.<br />
2 Press [OK]. The Service Setting menu screen appears.<br />
Service Status (Printing the service status page)<br />
The service status page contains printer settings information that is more<br />
detailed than the standard status page and is therefore mostly for service<br />
purposes. However, there is a great deal of information on the service<br />
status page that may be useful to you.<br />
1 In the Service Setting menu, press or to select Service<br />
Status.<br />
2 Press [OK]. A confirmation screen appears.<br />
If Job Accounting is enabled, a confirmation screen appears after<br />
department login.<br />
Press [Yes] ([Left Select]). Accepted. appears and printing<br />
begins.<br />
Pressing [No] ([Right Select]) returns you to the Service<br />
Setting menu screen without printing the service status page.<br />
4-114 Using the Operation Panel
Network Status (Printing the network status page)<br />
The network status page contains detailed information on the network<br />
settings. This is primarily used for maintenance by service personnel, but<br />
it contains information that may also be useful to you.<br />
1 In the Service Setting menu, press or to select Network<br />
Status.<br />
Print.<br />
Are you sure?<br />
z Network Status<br />
[ Yes ] [ No ]<br />
2 Press [OK]. A confirmation screen appears.<br />
If Job Accounting is enabled, a confirmation screen appears after<br />
department login.<br />
Press [Yes] ([Left Select]). Accepted. appears and printing<br />
begins.<br />
Pressing [No] ([Right Select]) returns you to the Service Setting<br />
menu screen without printing the service status page.<br />
Test Page (Printing the test page)<br />
The test page is printed to check the effectiveness of printer adjustments.<br />
This is primarily used for maintenance by service personnel, but it<br />
contains information that may also be useful to you.<br />
1 In the Service Setting menu, press or to select Test Page.<br />
Print.<br />
Are you sure?<br />
z Test Page<br />
[ Yes ] [ No ]<br />
2 Press [OK]. A confirmation screen appears.<br />
If Job Accounting is enabled, a confirmation screen appears after<br />
department login.<br />
Press [Yes] ([Left Select]). Accepted. appears and printing<br />
begins.<br />
Pressing [No] ([Right Select]) returns you to the Service Setting<br />
menu screen without printing the service status page.<br />
DEV-CLN (Developer/Refresh mode setting)<br />
This sets the refresh mode for the developer. When the printing quality<br />
declines, refreshing the developer can restore the printing quality. This is<br />
primarily used for maintenance by service personnel.<br />
1 In the Service Setting menu, press or to select DEV-CLN.<br />
DEV-CLN<br />
Are you sure?<br />
2 Press [OK]. A confirmation screen appears.<br />
Press [Yes] ([Left Select]). The developer is refreshed.<br />
Pressing [No] ([Right Select]) returns you to the Service Setting<br />
menu screen without refreshing the developer.<br />
[ Yes ] [ No ]<br />
Using the Operation Panel 4-115
Drum<br />
Are you sure?<br />
Drum (Drum/Refresh mode setting)<br />
This sets the refresh mode for the drum. When the printing quality<br />
declines, refreshing the drum can restore the printing quality. This is<br />
primarily used for maintenance by service personnel.<br />
1 In the Service Setting menu, press or to select Drum.<br />
2 Press [OK]. A confirmation screen appears.<br />
Press [Yes] ([Left Select]). Carry out drum refresh.<br />
Pressing [No] ([Right Select]) returns you to the Service Setting.<br />
menu screen without refreshing the drum.<br />
[ Yes ] [ No ]<br />
LSU<br />
Are you sure?<br />
LSU (LSU cleaning mode setting)<br />
This sets the cleaning mode for the LSU. When the printing quality<br />
declines, cleaning the LSU can restore the printing quality. This is<br />
primarily used for maintenance by service personnel.<br />
1 In the Service Setting menu, press or to select LSU.<br />
2 Press [OK]. A confirmation screen appears.<br />
Press [Yes] ([Left Select]). Carry out the LSU cleaning.<br />
Pressing [No] ([Right Select]) returns you to the Service Setting<br />
menu screen without cleaning the LSU.<br />
[ Yes ] [ No ]<br />
Start the MP tray<br />
cleaning.<br />
Are you sure?<br />
[ Yes ] [ No ]<br />
MP Tray Cleaning (MP Tray Cleaning mode setting)<br />
If dirt appears on images when using the MP tray, perform MP Tray<br />
Cleaning.<br />
1 In the Service Setting menu, press or to select MP Tray<br />
Cleaning.<br />
2 Press [OK]. A confirmation screen appears.<br />
3 Load two sheets of A4 or Letter paper in the MP tray.<br />
4 Press [Yes] ([Left Select]). MP Tray Cleaning starts.<br />
Pressing [No] ([Right Select]) returns you to the Service Setting<br />
menu screen without performing MP Tray Cleaning.<br />
Silent Mode<br />
1 *Off<br />
2 On<br />
a b<br />
Silent Mode (Silent Mode setting)<br />
Make the machine run more quietly. Select this mode when the running<br />
noise is uncomfortable. Use the procedure below to set Silent mode.<br />
1 In the Service Setting menu, press or to select Silent Mode.<br />
2 Press [OK]. The Silent Mode screen appears.<br />
3 Press or to select the Silent Mode.<br />
4 Press [OK]. The Service Setting menu reappears.<br />
4-116 Using the Operation Panel
First Print Pos. (First Print Position setting)<br />
Using this function speeds up either of the first print time of black and<br />
white printing or color printing by changing the default start position of the<br />
first print. In addition, the machine can automatically detect the<br />
appropriate position depending on your usage.<br />
Item<br />
Description<br />
Standard • Default of the first print time.<br />
Black & White<br />
Priority<br />
• Speed up the first print time of black and white<br />
printing.<br />
Color Priority • Speed up the first print time of color printing.<br />
Auto • Automatically detects the appropriate position<br />
depending on your usage.<br />
1 In the Service Setting menu, press or to select First Print<br />
Pos.<br />
First Print Pos.: a b<br />
1 *Standard<br />
2 B & W Priority<br />
3 Color Priority<br />
2 Press [OK]. The First Print Pos. screen appears.<br />
3 Press or to select the First Print Position mode.<br />
4 Press [OK]. The Service Setting menu reappears.<br />
Initialization (System initialization)<br />
Initialize the hard disk mounted on the machine to return to the default<br />
mode.<br />
IMPORTANT System initialization will erase all Custom Boxes and all<br />
data in the Job Box.<br />
Note If the optional security kit has been installed, this item will<br />
not appear. For information on the security kit, refer to Data<br />
Security Kit (E) Operation Guide.<br />
1 In the Service Setting menu, press or to select<br />
Initialization.<br />
System Initialization<br />
will start.<br />
Are you sure?<br />
[ Yes ] [ No ]<br />
2 Press [OK]. A confirmation screen appears.<br />
Press [Yes] ([Left Select]). Initialization starts.<br />
Pressing [No] ([Right Select]) returns you to the Service Setting<br />
menu screen without initializing the system.<br />
IMPORTANT During initialization, Formatting... Do not turn<br />
off the main power switch. appears. Wait until initialization is<br />
finished.<br />
3 When initialization is finished, Task is completed. Turn the<br />
main power switch off and on. appears. Turn the power<br />
switch off and on.<br />
Using the Operation Panel 4-117
4-118 Using the Operation Panel
5 Maintenance<br />
This chapter contains explanations on the following topics:<br />
General Information 5-2<br />
Toner Container Replacement 5-2<br />
Replacing the Waste Toner Box 5-6<br />
Cleaning the Printer 5-8<br />
Maintenance 5-1
General Information<br />
This chapter describes basic maintenance tasks you can perform on the<br />
printer. You can replace the following component according to the<br />
printer’s display:<br />
• Toner Kits<br />
• Waste Toner Box<br />
Also, the following parts need periodic cleaning:<br />
• Separator<br />
• Transfer Roller<br />
Note Information Collection on Memory Chips - The memory<br />
chip attached to the toner container is designed to improve<br />
convenience for the end user; to support the recycling operation<br />
of empty toner containers; and to gather information to support<br />
new product planning and development. The information<br />
gathered is anonymous - it cannot be associated to any specific<br />
individual and the data is intended to be used anonymously.<br />
Toner Container Replacement<br />
The toner container in the printer should be replaced as soon as the<br />
message display shows Toner is running out. or soon after. (The<br />
[C][M][Y][K] displayed alternately with the message indicates the<br />
toner color that needs replacing.) If you continue to use the printer,<br />
eventually the toner supply will be exhausted at which point the printer will<br />
stop printing and the Replace the toner. [Toner Color] Clean<br />
the Printer. message will be shown instructing you to install a new<br />
toner kit.<br />
Frequency of Toner Container Replacement<br />
The life of the toner containers depends on the amount of toner required<br />
to accomplish your printing jobs. According to ISO/IEC 19798 and<br />
EcoPrint switched off the toner container can print as follows (Color<br />
adjustment and other adjustments during A4 continuous printing are<br />
excluded.):<br />
Toner Color<br />
Black<br />
Cyan<br />
Magenta<br />
Yellow<br />
Life of the Toner Container (Printable pages)<br />
25,000 images<br />
18,000 images<br />
18,000 images<br />
18,000 images<br />
Note The toner container packed with the new printer has to fill<br />
up the system when operating the first time. Therefore only 50%<br />
of the first toner kits can be used for printing. For example:<br />
The toner container (black) supplied with the printer will print<br />
approximately 12,500 pages (images).<br />
5-2 Maintenance
Toner Kits<br />
For best results, we recommend that you only use genuine TA <strong>Triumph</strong>-<br />
<strong>Adler</strong> Parts and Supplies.<br />
The toner kits are supplied in 4 different colors: cyan, magenta, yellow<br />
and black.<br />
A new toner kit for each color contains the following items:<br />
• Toner Container<br />
• Waste Toner Box<br />
• Plastic waste bags for old toner container and old waste toner box<br />
• Installation Guide<br />
Note Do not remove the toner container from the carton until you<br />
are ready to install it in the printer.<br />
Replacing the Toner Container<br />
This section explains how to replace the toner containers. When<br />
replacing the toner container of any color, always replace the waste toner<br />
box at the same time. If this box is full, the printer may be damaged or<br />
contaminated by the waste toner that may spill over the box.<br />
CAUTION Do not attempt to incinerate the Toner<br />
Container. Dangerous sparks may cause burns.<br />
IMPORTANT During toner container replacement, temporarily move<br />
storage media and computer supplies (such as floppy disks and USB<br />
memories) away from the toner container. This is to avoid damaging<br />
media by the magnetism of toner.<br />
Always clean the inside of the printer after replacing the toner<br />
container. For details, refer to Cleaning the Printer on page 5-8.<br />
TA <strong>Triumph</strong>-<strong>Adler</strong>/UTAX GmbH is not liable against any damages or<br />
problems arising from the use of toner containers other than those<br />
designated as original TA <strong>Triumph</strong>-<strong>Adler</strong> toner containers. For optimum<br />
performance, it is also recommended to use only the TA <strong>Triumph</strong>-<strong>Adler</strong><br />
toner containers which are specifically intended for use in your<br />
country or region. If the toner container for another destinations is<br />
installed, the printer will stop printing.<br />
Note You do not have to turn printer power off before starting the<br />
replacement. Any data that may be processing in the printer will<br />
be deleted if you turn the printer power off.<br />
To replace the toner container, first make sure of the color of the toner<br />
container requiring replacement. In this example, it is assumed that you<br />
are replacing the black toner container.<br />
1 Open the front cover.<br />
Maintenance 5-3
2 Turn the black (K) toner container release lever to the vertical<br />
position.<br />
3 Open the provided plastic disposal bag and place it at the toner<br />
container slot.<br />
Pull out the old toner container in the bag as far as it will go.<br />
4 Remove the old toner container by holding the handle and place it in<br />
the provided plastic disposal bag.<br />
5 Take the new toner container out of the toner kit.<br />
6 Hold the new toner container with both hands and shake it from side<br />
to side several times so that the toner is uniformly distributed inside.<br />
5-4 Maintenance
7 Hold the new toner container with both hands and gently push it in.<br />
8 Turn the toner container release lever to the horizontal position.<br />
Use the same procedure to replace the toner containers of the other<br />
colors.<br />
9 Close the front cover.<br />
Note After use, always dispose of the toner container and<br />
the waste toner box in accordance with Federal, State and<br />
Local rules and regulations.<br />
Proceed to the next section.<br />
Maintenance 5-5
Replacing the Waste Toner Box<br />
Replace the waste toner box when the Check waste toner box.<br />
Message is displayed. A new waste toner box is included with the toner<br />
kit. The waste toner box needs to be replaced before the printer will<br />
operate.<br />
1 Open the front cover.<br />
2 Press the release button and pull out the waste toner tray.<br />
3 Cap the old waste toner box.<br />
4 Remove the old waste toner box diagonally.<br />
5 Place the old waste toner box in the provided plastic disposal bag.<br />
5-6 Maintenance
6 Open the cap of the new waste toner box.<br />
7 Install the new waste toner box.<br />
8 Press on the left edge of the new waste toner box to lock it.<br />
9 Press the specified position to set the waste toner tray. When the tray<br />
reaches the correct position, it locks into place with a "click" sound.<br />
10 Close the front cover.<br />
After replacing the toner containers and the waste toner box, clean the<br />
paper transfer unit. For instructions, refer to Cleaning the Printer on page<br />
5-8.<br />
Maintenance 5-7
Cleaning the Printer<br />
Clean the inside of the printer whenever the toner container or the waste<br />
toner box is replaced to maintain the best printing quality.<br />
To maintain optimum print quality, it is also recommended that the inside<br />
of the printer be cleaned once a month as well as when the toner<br />
container is replaced.<br />
It should also be cleaned if streaking or lines appear on printed copies, or<br />
if printouts appear faint or blurred.<br />
Cleaning the Separator<br />
Print problems such as soiling of printed pages may occur if the separator<br />
becomes dirty. Follow the steps below to clean the separator.<br />
1 Open the front cover.<br />
2 Remove the cleaning brush (blue).<br />
3 Pull up the left cover 1 lever and open left cover 1.<br />
4 Clean the separator by moving the brush from side to side along the<br />
separator as shown.<br />
5 Replace the cleaning brush in its original location and close the front<br />
cover.<br />
5-8 Maintenance
6 Press the specified position to close left cover 1.<br />
Cleaning the Transfer Roller<br />
Print problems such as soiling of printed pages may occur if the transfer<br />
roller becomes dirty. Follow the steps below to clean the transfer roller.<br />
1 Open the front cover.<br />
2 Remove the cleaning brush (blue).<br />
3 Pull up the left cover 1 lever and open left cover 1.<br />
4 Clean the transfer roller by moving the brush from side to side along<br />
the roller while rotating the roller by turning the gear at the left end of<br />
the roller as shown.<br />
5 Replace the cleaning brush in its original location and close the front<br />
cover.<br />
Maintenance 5-9
6 Press the specified position to close left cover 1.<br />
5-10 Maintenance
6 Troubleshooting<br />
This chapter contains explanations on the following topics:<br />
General Guidelines 6-2<br />
Print Quality Problems 6-3<br />
Error Messages 6-5<br />
Clearing Paper Jams 6-15<br />
If a problem cannot be corrected, contact your service<br />
technician.<br />
Troubleshooting 6-1
General Guidelines<br />
The table below provides basic solutions for problems you may encounter<br />
with the printer. We suggest you consult this table to troubleshoot the<br />
problems before calling for service.<br />
Symptom Check Items Corrective Action<br />
Print quality is not good. Refer to Print Quality Problems on page 6-3.<br />
Paper is jammed. Refer to Clearing Paper Jams on page 6-15.<br />
Nothing lights on the operation panel<br />
even when power is turned on and the<br />
fan makes no noise.<br />
The printer prints a status page, but<br />
does not print jobs from the computer.<br />
The printer is emitting steam in the<br />
area around the top tray.<br />
Check that the power cord is properly<br />
plugged into the power outlet.<br />
Check that the power switch is in the<br />
On (|) position.<br />
Check the printer cable or the interface<br />
cable.<br />
Check program files and application<br />
software.<br />
Check the room temperature to see if it<br />
is low, or if damp paper was used.<br />
Turn off the printer’s power, plug in the<br />
power cord securely, and try turning on<br />
the printer’s power again.<br />
Set the power switch to the On<br />
position.<br />
Connect both ends of the printer cable<br />
securely. Try replacing the printer cable<br />
or the interface cable.<br />
Try printing another file or using<br />
another print command. If the problem<br />
occurs only with a specific file or<br />
application, check the printer driver<br />
settings for that application.<br />
Depending on the printing environment<br />
and the paper's condition, the heat<br />
generated during printing will cause the<br />
moisture in the paper to evaporate, and<br />
the steam emitted may look like<br />
smoke. This is not a problem, and you<br />
can continue printing.<br />
If the steam concerns you, raise the<br />
room temperature, or replace the<br />
paper with a newer, dryer paper.<br />
Tips<br />
Printer problems may be solved easily by following the tips below. When<br />
you have encountered a problem that following the above guidelines will<br />
not solve, try the following:<br />
• Turn the printer power off and wait for several seconds. Then, turn on<br />
the printer.<br />
• Reboot the computer which sends the print jobs to the printer.<br />
• Obtain and use the latest version of the printer driver. The latest<br />
versions of printer drivers and utilities are available at:<br />
http://www.triumph-adler.com.<br />
• Make sure that the procedures for printing are correctly followed in the<br />
application software. Consult the documentation supplied with the<br />
application software.<br />
6-2 Troubleshooting
Print Quality Problems<br />
The tables and diagrams in the following sections define print quality<br />
problems and the corrective action you can conduct to solve the<br />
problems. Some solutions may require cleaning or replacing parts of the<br />
printer.<br />
If the suggested corrective action will not solve the problem, call for<br />
service.<br />
Printed Results<br />
Skewed-color printout<br />
Corrective Action<br />
Conduct color registration using the printer operation panel.<br />
For details, refer to Color Regist. (Color registration [Standard]) on page 4-<br />
106.<br />
Completely blank printout<br />
Clean the LSU.<br />
For details, refer to LSU (LSU cleaning mode setting) on page 4-116.<br />
Conduct color calibration either by switching the printer off then on or using<br />
the printer operation panel.<br />
For details, refer to ColorCalibration on page 4-106.<br />
Depending on the environmental conditions, correct printing may not be<br />
possible. Refer to page xvi for the temperature and humidity ranges in<br />
which the printer can be used.<br />
A problem may have occurred on your computer. Check if an error has<br />
occurred or the settings are correct in the application.<br />
Dropouts or stray dots<br />
Clean the LSU.<br />
For details, refer to LSU (LSU cleaning mode setting) on page 4-116.<br />
Clean the separator and transfer roller.<br />
Open the printer left cover 1 and clean the separator and transfer roller<br />
with a cleaning brush.<br />
Refer to Cleaning the Printer on page 5-8.<br />
Troubleshooting 6-3
Printed Results<br />
Black or white vertical streaks<br />
Corrective Action<br />
Check the operation panel for toner.<br />
If the Toner is running out. message is displayed, install a new<br />
toner kit. To replace the toner container, refer to Toner Container<br />
Replacement on page 5-2.<br />
Clean the LSU.<br />
For details, refer to LSU (LSU cleaning mode setting) on page 4-116.<br />
Direction<br />
of Paper<br />
Feed<br />
Refresh drum.<br />
For details, refer to Drum (Drum/Refresh mode setting) on page 4-116.<br />
Clean the separator and transfer roller.<br />
Open the printer left cover 1 and clean the separator and transfer roller<br />
with a cleaning brush.<br />
Refer to Cleaning the Printer on page 5-8.<br />
Faint or blurred printing<br />
Refresh drum.<br />
For details, refer to Drum (Drum/Refresh mode setting) on page 4-116.<br />
Make sure the paper type setting is correct the paper being used.<br />
For details, refer to Paper Settings on page 4-46.<br />
Conduct color calibration either by switching the printer off then on or using<br />
the printer operation panel.<br />
For details, refer to ColorCalibration on page 4-106.<br />
Try adjusting the color control settings using the printer driver.<br />
Check the operation panel. If the Toner is running out. message<br />
is displayed, install a new toner kit. To replace toner, refer to Toner<br />
Container Replacement on page 5-2.<br />
The paper you are using may be damp. Replace it with new paper.<br />
Grey background<br />
Refresh drum.<br />
For details, refer to Drum (Drum/Refresh mode setting) on page 4-116.<br />
Check the operation panel for toner.<br />
If the Toner is running out. message is displayed, install a new<br />
toner kit. To replace the toner container, refer to Toner Container<br />
Replacement on page 5-2.<br />
Conduct color calibration either by switching the printer off then on or using<br />
the printer operation panel.<br />
For details, refer to ColorCalibration on page 4-106.<br />
The paper you are using may be damp. Replace it with new paper.<br />
Dirt on the top edge or back of the paper<br />
Clean the inside of the printer.<br />
Open the left cover 1 and check if the inside is dirty. If dirty, clean the inside<br />
with the cleaning cloth included in the toner kit.<br />
Clean the LSU.<br />
For details, refer to LSU (LSU cleaning mode setting) on page 4-116.<br />
Change to a different type of paper.<br />
6-4 Troubleshooting
Error Messages<br />
The following table lists errors and maintenance messages that you can<br />
be dealt with by yourself. If Machine failure. Call service.<br />
appears, turn off the printer, disconnect the power cord, and contact your<br />
service technician.<br />
If Machine failure. Call service. or Error occurred. Turn<br />
the main power switch off and on. is displayed, turn off the<br />
printer then turn it back on to see if the printer has recovered. If the printer<br />
has not recovered, turn off the printer, disconnect the power cord, and<br />
contact your service representative or authorized service center.<br />
Some errors cause the alarm to sound. To stop the alarm, press [Stop].<br />
Message<br />
Account error.<br />
Press [OK].<br />
Corrective Action<br />
This message is displayed when the Job Accounting function is enabled and an<br />
attempt to specify job accounting settings or to register or delete an account fails.<br />
To return the printer to the print-ready status, press [OK].<br />
##<br />
Add paper in casset.#<br />
The paper has run out in the paper source displayed. Supply paper according to<br />
the paper source displayed (paper cassettes, MP tray, or optional paper feeders).<br />
This message is displayed alternately with messages indicating the printer status,<br />
such as, Ready to print., Please wait., and Processing..<br />
Add paper in MP tray.<br />
Machine failure.<br />
Call service.<br />
F### represents a controller error (#=0, 1, 2, ...). Call for service. The printer<br />
does not operate when this message is displayed.<br />
F###<br />
Machine failure.<br />
Call service.<br />
The printer controller and operation panel cannot exchange data. Turn the printer<br />
off and unplug it from the mains power supply. Then contact your service<br />
representative or authorized service center.<br />
F000<br />
Troubleshooting 6-5
Message<br />
Machine failure.<br />
Call service.<br />
Corrective Action<br />
#### represents a mechanical error (#=0, 1, 2, ...). Call for service. The printer<br />
does not operate when this message is displayed. The total number of pages<br />
printed is also indicated, e.g. 0123456.<br />
####<br />
Canceling...<br />
Displayed when data is being canceled.<br />
Cassette# not loaded.<br />
The corresponding paper cassette is not installed. Install the cassette. The<br />
cassette number can be 1 (topmost) to 4 (bottom).<br />
Close front cover.<br />
The front cover of the printer is open. Close the front cover.<br />
Close left cover #.<br />
The left cover of the printer is open. Close the left cover. If the left cover of the<br />
optional paper feeder is open, 4 is displayed.<br />
Close top cover.<br />
The top cover of the printer is open. Close the printer top cover.<br />
Cannot remove the<br />
memory while in use.<br />
This message is displayed when Remove Memory was selected while a USB<br />
memory was being used.<br />
The previous screen is displayed again 1 or 2 seconds.<br />
6-6 Troubleshooting
Message<br />
Cannot duplex print<br />
on this paper.<br />
Corrective Action<br />
You attempted to print with a paper size and paper type that cannot be used for<br />
duplex printing. Press [OK] to print onto one-side of the paper only.<br />
Error occurred.<br />
Turn the main power<br />
switch off and on.<br />
F###<br />
Turn off the printer then turn it back on to see if the printer has recovered. If the<br />
printer has not recovered, turn off the printer, disconnect the power cord, and<br />
contact your service representative or authorized service center.<br />
Error occurred.<br />
Turn the main power<br />
switch off and on.<br />
F000<br />
The printer controller and operation panel cannot exchange data. Turn off the<br />
printer then turn it back on to see if the printer has recovered. If the printer has not<br />
recovered, turn off the printer, disconnect the power cord, and contact your<br />
service representative or authorized service center.<br />
Job Accounting<br />
restriction exceeded.<br />
Press [OK].<br />
This message is displayed when the Job Accounting function is enabled and an<br />
attempt has been made to exceed the print limit set for each account. To return<br />
the printer to the print-ready status, press [OK].<br />
For more information, refer to Job Accounting (Job Accounting settings) on page<br />
4-95.<br />
Job not stored.<br />
Press [OK].<br />
Printing using the Job Box function failed because there was insufficient space<br />
available on the hard disk. To print an error report and return the printer to the<br />
print-ready status, press [OK].<br />
Restricted by<br />
Job Accounting.<br />
Press [OK].<br />
This message is displayed when printing was attempted, despite the Job Account<br />
function being on with Restriction applied as the job limit for each job account.<br />
To return the printer to the print-ready status, press [OK].<br />
For more information, refer to Job Accounting (Job Accounting settings) on page<br />
4-95.<br />
Troubleshooting 6-7
Message<br />
KPDL error.<br />
Press [OK].<br />
Corrective Action<br />
Current print processing cannot continue because of occurrence of KPDL error<br />
which is categorized by ##. To print out an error report, display KPDL Error<br />
Rpt. from the menu system, and select On. Press [OK] to resume printing. You<br />
can abandon printing by pressing [Stop].<br />
If Auto Error Clear is set to On, printing will be automatically resumed after a<br />
preset period of time.<br />
Low security<br />
This message is displayed when Low was selected in Security Level.<br />
Memory is full.<br />
Print job cannot be<br />
processed completely.<br />
The total amount of data received by the printer exceeds the printer’s internal<br />
memory.<br />
Try adding more memory. Press [OK] to resume printing. You can abandon<br />
printing by pressing [Stop].<br />
If Auto Error Clear is set to On, printing will be automatically resumed after a<br />
preset period of time.<br />
No multi copies.<br />
Press [OK].<br />
Multiple copies cannot be printed.<br />
To return the printer to the print-ready status, press [OK].<br />
Original toner<br />
installed.<br />
Displayed when the installed toner is the original TA <strong>Triumph</strong>-<strong>Adler</strong> product.<br />
Paper<br />
jammed in<br />
############<br />
A paper jam has occurred. The location of the paper jam is indicated in place of<br />
the #’s. For details, refer to Clearing Paper Jams on page 6-15.<br />
Loading paper.<br />
The selected cassette is being prepared.<br />
6-8 Troubleshooting
Message<br />
Print overrun.<br />
Corrective Action<br />
The data transferred to the printer was too complex to print on a page. Press<br />
[OK] to resume printing.<br />
Replace the toner.<br />
[C][M][Y][K]<br />
Clean the printer.<br />
Toner has run out in the toner container(s). Replace the toner container using a<br />
new toner kit for the particular color. The printer does not operate when this<br />
message is displayed.<br />
For example, if Replace the toner.[C][K] is displayed, replace the cyan<br />
and the black toner containers.<br />
For details, refer to Toner Container Replacement on page 5-2.<br />
Toner is running out.<br />
Two messages are displayed alternately. The toner in the displayed color (C:<br />
Cyan, M: Magenta, Y: Yellow or K:Black) has run low. Ensure that a new toner<br />
container is available without delay. For details, refer to Toner Container<br />
Replacement on page 5-2.<br />
[C][M][Y][K]<br />
Top tray is full of<br />
paper.<br />
Remove the paper.<br />
The top tray has become full (approx. 500 pages). You must remove all printed<br />
pages from the top tray. When the printer detects that the top tray is empty again,<br />
the printer will continues printing into the top tray.<br />
Unknown toner<br />
installed.<br />
Displayed when the installed toner is not the original TA <strong>Triumph</strong>-<strong>Adler</strong> product. Install<br />
original TA <strong>Triumph</strong>-<strong>Adler</strong> toner.<br />
Troubleshooting 6-9
Message<br />
Unknown toner<br />
installed. PC<br />
[C][M][Y][K]<br />
Corrective Action<br />
This message is displayed if the installed toner container’s regional specification<br />
does not match the printer’s. Install the specified toner container.<br />
Alternative:<br />
B A5 Plain<br />
C A4 Recycled<br />
D B4 Plain<br />
When the cassette does not contain any paper that matches the print data (paper<br />
size and type), this message allows you to specify an alternative cassette to use<br />
instead. To print from a different paper source, refer to Paper Feed Mode (Setting<br />
the paper feed source) on page 4-56.<br />
Incorrect account ID.<br />
Press [OK].<br />
This message is displayed when the Job Accounting function is enabled and no<br />
account is set for a transmitted print job or the specified account is not registered<br />
(the incorrect account is set).<br />
To return the printer to the print-ready status, press [OK].<br />
For more information, refer to Job Accounting (Job Accounting settings) on page<br />
4-95.<br />
This account ID is<br />
already registered.<br />
Displayed when an attempt is made to register an account in the Job Accounting<br />
menu by entering an account code that already exists.<br />
For more information, refer to Job Accounting (Job Accounting settings) on page<br />
4-95.<br />
Incorrect ID.<br />
The user ID entered for a private job, or a stored job is not correct. Check the<br />
user ID that you specified on the printer driver. For more information, refer to<br />
Custom Box on page 4-22.<br />
Incorrect account ID.<br />
The ID or Password entered for the Job Accounting function is not correct. Check<br />
the ID or Password. For more information, refer to Job Accounting (Job<br />
Accounting settings) on page 4-95.<br />
Incorrect password.<br />
The password does not match the password set. Enter the correct password. For<br />
more information, refer to Job Accounting (Job Accounting settings) on page 4-<br />
95.<br />
6-10 Troubleshooting
Message<br />
Close the finisher<br />
front cover.<br />
Corrective Action<br />
The front cover of the optional document finisher is open. Close the front cover.<br />
Close the finisher<br />
top cover.<br />
The top cover of the optional 3,000 Sheet Document Finisher or the reverse unit<br />
cover of the Document Finisher is open. Close the cover.<br />
Close Finisher<br />
tray C.<br />
Tray C of the optional 3,000 Sheet Document Finisher is open. Close tray C.<br />
Close the mailbox<br />
cover.<br />
The cover of the optional mail box is open. Close the cover.<br />
Close the Staple<br />
cover.<br />
The staple cover of the optional document finisher is open. Close the staple<br />
cover.<br />
Load paper in<br />
cassette #.<br />
The paper source is empty. Load the required paper in the indicated paper source<br />
(paper cassette, MP tray, or optional paper feeder).<br />
Load paper in<br />
MP tray.<br />
Troubleshooting 6-11
Message<br />
Cannot staple<br />
this Paper.<br />
Corrective Action<br />
Stapling is not possible because a paper size that cannot be stapled is selected.<br />
To print without stapling, press [OK].<br />
Cannot punch<br />
this Paper.<br />
Punching is not possible because a paper size that cannot be punched is<br />
selected. To print without punching, press [OK].<br />
Cannot offset<br />
this Paper.<br />
Offsetting is not possible because a paper size that cannot be offset is selected.<br />
To print without offsetting, press [OK].<br />
Set the paper<br />
feed unit.<br />
The paper feed unit is not correctly installed. Pull out paper cassette 1. Pull out<br />
the paper feed unit and then push it firmly back in.<br />
Replace the toner.<br />
Newly added jobs are<br />
printed in B & W.<br />
Replace the color (cyan, magenta, yellow) toner container. Until the container is<br />
replaced, printing will take place in black and white mode. For details, refer to<br />
ColorToner Empty (Setting when color toner runs out) on page 4-80.<br />
Check waste toner<br />
box.<br />
The waste toner box is almost full. Replace the waste toner box. For details, refer<br />
to Replacing the Waste Toner Box on page 5-6.<br />
The waste toner box is not installed. Install the waste toner box. For details, refer<br />
to Replacing the Waste Toner Box on page 5-6.<br />
Finisher tray #<br />
is full of Paper.<br />
Tray # of the optional 3,000 Sheet Document Finisher has become full. When the<br />
printer detects that tray # is empty again, the printer will continue printing into tray<br />
#.<br />
6-12 Troubleshooting
Message<br />
Mailbox tray # is<br />
full of Paper.<br />
Corrective Action<br />
Tray # of the optional mail box has become full. When the printer detects that tray<br />
# is empty again, the printer will continue printing into tray #.<br />
Remove paper under<br />
the folding tray of<br />
the finisher.<br />
The optional folding unit has become full. When the printer detects that the<br />
folding unit is empty again, the printer will continue printing into the folding unit.<br />
Remove paper from<br />
Inner tray of<br />
Finisher.<br />
The inner tray of the optional 3,000 Sheet Document Finisher is full. Printing will<br />
resume when all paper is removed from the inner tray.<br />
Empty the punch waste<br />
box.<br />
The punch waste box of the optional 3,000 Sheet Document Finisher is full.<br />
Discard the punch waste as explained in the 3,000 Sheet Document Finisher<br />
Operation Guide.<br />
Finisher<br />
path error.<br />
The optional document finisher is not correctly installed. Remove the document<br />
finisher from the printer and then correctly reinstall it.<br />
Set the punch waste<br />
box.<br />
The punch waste box of the optional 3,000 Sheet Document Finisher is not<br />
correctly installed. Correctly install the punch waste box as explained in the 3,000<br />
Sheet Document Finisher Operation Guide.<br />
Add staples.<br />
The optional document finisher is out of staples. Replace the staple case as<br />
explained in the 3,000 Sheet Document Finisher Operation Guide.<br />
Troubleshooting 6-13
Message<br />
Add staples to<br />
Unit B and C.<br />
Corrective Action<br />
The optional folding unit is out of staples. Replace the staple case as explained in<br />
the 3,000 Sheet Document Finisher Operation Guide.<br />
Acceptable staple<br />
count exceeded.<br />
Stapling is not possible because the number of sheets that can be stapled has<br />
been exceeded. To print without stapling, press [OK].<br />
Maintenance. (#)<br />
Replace the Maintenance Kit A or B which is displayed on the message display.<br />
Replacement of the maintenance kit is necessary at every 300,000 images of<br />
printing and requires professional servicing. # indicates A or B. Contact your<br />
service representative or authorized service center.<br />
Soon maint. (#)<br />
Failure occurred.<br />
The selected paper cassette or tray cannot be used. Check the paper cassette or<br />
tray, and contact your service representative or authorized service center.<br />
6-14 Troubleshooting
Clearing Paper Jams<br />
If the paper jammed in the paper transport system, or no paper sheets<br />
were fed at all, the Paper jam message appears and the location of the<br />
paper jam (the component where the paper jam has occurred) is also<br />
indicated. The printer automatically goes off-line when this message is<br />
displayed. Remove jammed paper. After removing jammed paper, the<br />
printer will re-start printing.<br />
Possible Paper Jam Locations<br />
The figure below explains the printer’s paper paths including the options.<br />
The locations where paper jams might occur are also shown here, with<br />
each location explained in the table below. Paper jams can occur in more<br />
than one component on the paper paths.<br />
K<br />
Mail Box<br />
J<br />
H<br />
G G<br />
G<br />
F<br />
E<br />
D<br />
A<br />
E<br />
B<br />
D<br />
D<br />
MP Tray<br />
Paper Cassette<br />
Folding<br />
Unit<br />
I<br />
E<br />
C<br />
C<br />
Paper Feeder<br />
Document Finisher<br />
3,000 Sheet Document Finisher<br />
Paper Jam Message<br />
Paper jam<br />
location<br />
Description<br />
Reference<br />
Page<br />
Paper<br />
jammed in<br />
cassette 1.<br />
A<br />
Paper is jammed at the paper<br />
cassette (1).<br />
page 6-18<br />
[ Help ]<br />
Paper<br />
jammed in<br />
cassette 2.<br />
B<br />
Paper is jammed at the paper<br />
cassette (2).<br />
page 6-19<br />
[ Help ]<br />
Troubleshooting 6-15
Paper Jam Message<br />
Paper jam<br />
location<br />
Description<br />
Reference<br />
Page<br />
Paper<br />
jammed in<br />
cassette 3.<br />
C<br />
Paper is jammed at the optional<br />
paper feeder cassette (3, 4).<br />
page 6-20<br />
[ Help ]<br />
Paper<br />
jammed in<br />
Feed Unit.<br />
D<br />
Paper is jammed at the MP tray or<br />
inside the printer.<br />
page 6-21<br />
[ Help ]<br />
Paper<br />
jammed in<br />
Left Cover #.<br />
E<br />
Paper is jammed in the left cover<br />
section.<br />
page 6-23<br />
[ Help ]<br />
Paper<br />
jammed in<br />
Duplex Unit.<br />
F<br />
Paper is jammed at the duplex<br />
unit.<br />
page 6-24<br />
[ Help ]<br />
Paper<br />
jammed in<br />
Duplex Unit.<br />
F<br />
Paper is jammed at the duplex unit<br />
or inside the printer.<br />
page 6-26<br />
[ Help ]<br />
Paper<br />
jammed in<br />
fuser cover.<br />
G Paper is jammed at the fixing unit. page 6-26<br />
[ Help ]<br />
6-16 Troubleshooting
Paper Jam Message<br />
Paper jam<br />
location<br />
Description<br />
Reference<br />
Page<br />
[ Help ]<br />
Paper<br />
jammed in<br />
Finisher.<br />
H<br />
Paper is jammed at the optional<br />
document finisher.<br />
3,000 Sheet<br />
Document<br />
Finisher or<br />
Document<br />
Finisher<br />
Operation<br />
Guide<br />
Paper<br />
jammed in<br />
Folding Unit.<br />
I<br />
Paper is jammed at the folding unit<br />
of the optional document finisher.<br />
3,000 Sheet<br />
Document<br />
Finisher<br />
Operation<br />
Guide<br />
[ Help ]<br />
Paper<br />
jammed in<br />
Mailbox.<br />
J<br />
Paper is jammed at the mailbox of<br />
the optional document finisher.<br />
3,000 Sheet<br />
Document<br />
Finisher<br />
Operation<br />
Guide<br />
[ Help ]<br />
Paper<br />
jammed in<br />
Reverse Unit.<br />
K<br />
Paper is jammed at the reverse<br />
unit of the optional document<br />
finisher.<br />
Document<br />
Finisher<br />
Operation<br />
Guide<br />
[ Help ]<br />
General Considerations for Clearing Jams<br />
Bear in mind the following considerations when attempting jam removal:<br />
CAUTION When pulling the paper, pull it gently so as not to<br />
tear it. Torn pieces of paper are difficult to remove and may<br />
be easily overlooked, deterring the jam recovery.<br />
• If paper jams occur frequently, try using a different type of paper,<br />
replace the paper with paper from another ream, flip the paper stack<br />
over, or rotate the paper stack 180 degrees. The printer may have<br />
problems if paper jams recur after the paper was replaced.<br />
• Whether or not the jammed pages are reproduced normally after<br />
printing is resumed depends on the location of the paper jam.<br />
Troubleshooting 6-17
Paper Jam at Cassette 1<br />
Follow the steps below to clear paper jams at paper cassette 1.<br />
1 Pull up the left cover 1 lever and open left cover 1.<br />
2 Remove the jammed paper.<br />
3 Pull out paper cassette 1.<br />
4 Remove the jammed paper.<br />
5 Push paper cassette 1 back in place securely.<br />
6 Press the specified position to close left cover 1.<br />
6-18 Troubleshooting
Paper Jam at Cassette 2<br />
Follow the steps below to clear paper jams at paper cassette 2.<br />
1 Open left cover 3.<br />
2 Remove the jammed paper.<br />
3 Pull out paper cassette 2.<br />
4 Remove the jammed paper.<br />
5 Push paper cassette 2 back in place securely.<br />
6 Close left cover 3.<br />
Troubleshooting 6-19
Paper Jam at Optional Cassette 3 or 4<br />
When using the optional paper feeder, follow the steps below to clear<br />
paper jams at paper cassette 3 or 4.<br />
1 Open left cover 4.<br />
2 Remove the jammed paper.<br />
3 Pull out the paper cassette that is being used.<br />
4 Remove the jammed paper.<br />
5 Push the paper cassette back in place securely.<br />
6 Close left cover 4.<br />
6-20 Troubleshooting
Paper Jam at MP Tray<br />
Follow the steps below to clear paper jams at the MP tray.<br />
1 Remove the paper from the MP tray.<br />
2 If paper is jammed inside, remove the jammed paper.<br />
3 Pull up the left cover 1 lever and open left cover 1.<br />
4 Remove the jammed paper.<br />
5 Open feed guide B1.<br />
Troubleshooting 6-21
6 Remove the jammed paper.<br />
7 Pull out paper cassette 1.<br />
8 Turn the lower green knob (B2) to the left at least 10 times.<br />
9 Remove the jammed paper.<br />
If you cannot remove the paper, continue with the following steps.<br />
10 Pull out the paper feed unit (B3).<br />
6-22 Troubleshooting
11 Open the paper feed unit cover (B4) and remove the jammed paper.<br />
12 Push the paper feed unit (B3) back in place, and push the paper<br />
cassette back in place securely.<br />
13 Press the specified position to close left cover 1.<br />
Paper Jams Inside Left Cover 1, 3, or 4<br />
When using the optional paper feeder, follow the steps below to clear<br />
paper jams from inside left cover 1, 3, or 4.<br />
1 Open the left cover where the paper is jammed inside.<br />
2 Remove the jammed paper.<br />
3 Close the left cover.<br />
Troubleshooting 6-23
Paper Jam at Duplex Unit<br />
Follow the steps below to clear paper jams at the duplex unit.<br />
1 Pull up the left cover 1 lever and open left cover 1.<br />
2 Remove the jammed paper.<br />
3 Press the specified position to close left cover 1.<br />
Paper Jam at Duplex Unit and Cassette 1<br />
Follow the steps below to clear paper jams at the duplex unit and paper<br />
cassette 1.<br />
1 Pull up the left cover 1 lever and open left cover 1.<br />
6-24 Troubleshooting
2 Remove the jammed paper.<br />
3 Press the specified position to close left cover 1.<br />
4 If the left cover 2 indicator is flashing, open left cover 2.<br />
5 Remove the jammed paper.<br />
6 Close left cover 2.<br />
7 Pull out paper cassette 1 and remove the jammed paper.<br />
8 Push paper cassette 1 back in place securely.<br />
Troubleshooting 6-25
Paper Jam at Fixing Unit<br />
Follow the steps below to clear paper jams at the fixing unit.<br />
1 Pull up the left cover 1 lever and open left cover 1.<br />
2 Remove the jammed paper.<br />
3 Open the fuser cover (A1).<br />
CAUTION When pulling the paper, pull it gently so as not to tear it.<br />
Torn pieces of paper are difficult to remove and may be easily<br />
overlooked, deterring the jam recovery.<br />
4 Remove the jammed paper.<br />
6-26 Troubleshooting
5 If jammed paper is visible in the paper ejection slot, pull the jammed<br />
paper toward you to remove it.<br />
6 Open the top cover, and remove the jammed paper.<br />
7 Close the top cover.<br />
8 Push the fuser cover back in place and press the specified position to<br />
close left cover 1.<br />
Troubleshooting 6-27
6-28 Troubleshooting
Appendix<br />
This chapter lists the provides details of the available interfaces<br />
and describes the optional hardware that can be installed on<br />
the printer and shows the printer's specifications.<br />
Interface A-2<br />
USB Interface A-2<br />
Network Interface A-3<br />
About the Options A-5<br />
Expansion Memory Modules A-6<br />
General Description of Options A-9<br />
Specifications A-10<br />
For availability of the options, consult your service technician.<br />
A-1
Interface<br />
This chapter explains the signals used in the printer's USB, and network<br />
interfaces. It also lists pin assignments, signal functions, timings,<br />
connector specifications, and voltage levels.<br />
• USB Interface<br />
• Network Interface<br />
USB Interface<br />
This printer supports the Hi-Speed USB. USB (Universal Serial Bus)<br />
interface specifications and interface signals are as follows.<br />
Specifications<br />
Basic Specification<br />
Complies with the Universal Serial Bus Specification Revision 2.0.<br />
Connectors<br />
Printer: B-type receptacle (female) with upstream port<br />
Cable: B-type plug (male)<br />
Cable<br />
Use a shielded cable that complies with USB 2.0 (Hi-Speed USB) and not<br />
longer than 5 meters (16 feet).<br />
Transfer Mode<br />
High speed (480 Mbps maximum)<br />
Full-Speed (12 Mbps maximum)<br />
Power Control<br />
Self-power device<br />
Interface Signals<br />
USB Connector Pin Assignment<br />
Pin Signal Description<br />
1 Vbus Power supply (+5 V)<br />
2 D- Data transmission<br />
3 D+ Data transmission<br />
4 GND Signal ground<br />
Shell — Shield<br />
A-2
Network Interface<br />
Features<br />
Automatic IP Address Resolution<br />
This feature is compatible with the DHCP/DHCPv6 protocol and allows<br />
the printer to automatically receive IP addresses from the DHCP/DHCPv6<br />
server.<br />
Management using Web Browsers<br />
HTTP pages are incorporated in to the interface, so that a web browser<br />
can be used to monitor and change a range of settings. The settings can<br />
be password-protected.<br />
Support for a Range of Protocols<br />
The SMTP, POP3, SSL, SNMP, IPv6 and NetBIOS over TCP/IP protocols<br />
are supported for easier printer management and more robust security.<br />
Support for IEEE 802.1x<br />
The interface supports EAP-TLS and PEAP authentication.<br />
Supports IPv6<br />
Supports IPv6, which is based on IPv4 with improvements, such as<br />
increased manageable address space, additional security functions and<br />
priority based data transmission.<br />
Supports IPSec<br />
Supports IPSec, the security protocol that authenticates and encrypts in<br />
the network layer (IP layer).<br />
Specifications<br />
Connector<br />
10 Base-T/100 Base-TX<br />
Operating Systems<br />
Windows 2000/XP/Vista/7/Server2003/Server2008, MacOS 10.x<br />
Network Protocols<br />
• IPv6: HTTP, LPD, FTP, IPP, RawPort, ICMPv6, LLTD, SNTP,<br />
DHCPv6, SMTP, POP3, DNS, SNMPv1/v2c/v3, WSD<br />
• IPv4: HTTP, HTTPS, LPD, FTP, IPP, RawPort, ICMP, DHCP, SMTP,<br />
POP3, SNTP, DNS, WINS, NetBIOS over TCP/IP, SNMPv1/v2c/v3,<br />
Apple Bonjour Compatible, IPPS, LLTD, WSD<br />
• Etc.: IPX/SPX, NetWare (NDS/Bindery), AppleTalk, NetBEUI<br />
Security Protocols<br />
SSL/TLS (HTTPS, IPPS), SNMPv3, EAP-TLS, PEAP, AH, ESP<br />
A-3
Operation Environment<br />
10 to 35 °C (50 to 95 °F), 20-80 % RH (condensation-free)<br />
EMI Countermeasures<br />
VCCI Class B, FCC Class B (U.S.), CE (Europe)<br />
IMPORTANT When IPv6 functions are used, the devices used on the<br />
network (routers, PCs, etc) must support IPv6.<br />
A-4
About the Options<br />
This printer has the following options available to satisfy your printing<br />
requirements. For instructions on installing individual options, refer to the<br />
documentation included with the option. Some options are explained in<br />
the following sections.<br />
Expansion Memory<br />
3,000 Sheet Document<br />
Finisher<br />
Document Finisher<br />
Paper Feeder<br />
3,000 Sheet Paper<br />
Feeder<br />
A-5
Expansion Memory Modules<br />
The printer's main controller board has a memory slot into which you can<br />
plug in optional memory modules (dual in line memory modules). An<br />
optional memory module can be installed to expand the printer’s memory<br />
to 2 GB. The printer initially has 1 GB of memory installed.<br />
Expansion Memory Modules<br />
The optional memory module is 1 GB.<br />
YES<br />
Precautions for Handling the Printer's Main Controller Board<br />
and Memory Modules<br />
To protect electronic parts, discharge static electricity from your body by<br />
touching a water pipe (faucet) or other large metal object before handling<br />
the memory modules. Or, wear an antistatic wrist strap, if possible, when<br />
you install the memory modules.<br />
Always hold the main controller board or a memory module by its edges<br />
as shown below to avoid damaging electronic parts.<br />
NO<br />
A-6
Installing the Memory Modules<br />
IMPORTANT Remove any USB memory that is attached to the<br />
printer's USB memory slot.<br />
1 Power off the printer and unplug the printer power cord.<br />
2 Remove the five screws (large) from the cover on the back of the<br />
printer.<br />
3 Remove the three screws (small) and then remove the cover.<br />
4 Remove the optional expansion memory module from its package.<br />
With the terminals on the memory module facing away from you, align<br />
the cutouts with the matching keys of the socket and insert the<br />
module straight in as far as it will go.<br />
5 Close the stopper to secure the installed expansion memory module.<br />
6 Replace the printer back cover and secure with the screws.<br />
Removing a Memory Module<br />
To remove a memory module, remove the back printer cover and then<br />
carefully open the two socket clamps. Ease the memory module out of the<br />
socket to remove.<br />
A-7
Checking Expansion Memory<br />
After installing expansion memory, use the following method to<br />
check that it is correctly installed.<br />
1 In the Report Print menu, press or to select Status Page.<br />
2 Press [OK]. A confirmation message is displayed.<br />
Print.<br />
Are you sure?<br />
z Status Page<br />
[ Yes ] [ No ]<br />
3 Press [Yes] ([Left Select]). Accepted. appears and the printer<br />
prints the status page.<br />
Check the amount of memory with the printed status page. If the<br />
memory addition has been done correctly, the total amount of<br />
memory will have increased. (The amount of memory when shipped<br />
from the factory is 1 GB.)<br />
A-8
General Description of Options<br />
Paper Feeder<br />
Two additional cassettes identical to the printer’s paper cassettes can be<br />
installed in the printer. The paper capacity and loading method are the<br />
same as for paper cassettes 1 and 2.<br />
Note Left cover 4 on the left side of the paper feeder can be used<br />
for clearing paper jams.<br />
3,000 Sheet Paper Feeder<br />
In addition to the printer's paper cassettes, you can install an optional<br />
paper feeder that can hold up to 3,000 sheets of A4 or B5 paper.<br />
Note Left cover 4 on the left side of the paper feeder can be used<br />
for clearing paper jams.<br />
Document Finisher<br />
This document finisher holds a large quantity of finished output and<br />
provides a convenient means of sorting multiple sets. Sorted output can<br />
also be stapled. For details, refer to Document Finisher Operation Guide.<br />
3,000 Sheet Document Finisher<br />
This document finisher holds a large quantity of finished output and<br />
provides a convenient means of sorting multiple sets. Sorted output can<br />
also be stapled or hole-punched (option). For details, refer to 3,000 Sheet<br />
Document Finisher Operation Guide. A mail box and folding unit are also<br />
available as options.<br />
Data Security Kit(E)<br />
The data security kit overwrites all unneeded data in the storage area of<br />
the hard disk so that it cannot be retrieved. The data security kit also<br />
encrypts data before storing it on the hard disk. The data security kit<br />
strengthens security because the data cannot be decoded by other than<br />
ordinary output or operations.<br />
A-9
Specifications<br />
Note Specifications are subject to change without notice.<br />
Machine<br />
Item<br />
Printing Method<br />
Printing<br />
Speeds<br />
Standard<br />
When the Document<br />
Finisher is installed:<br />
When the 3,000<br />
Sheet Document<br />
Finisher is installed:<br />
Description<br />
Dry-type electrostatic transfer (laser) printing, tandem/intermediate transfer<br />
printing<br />
- Color<br />
A4/Letter: 50 ppm<br />
- B/W<br />
A4/Letter: 55 ppm<br />
- Color<br />
A4/Letter: 50 ppm<br />
- B/W<br />
A4/Letter: 50 ppm<br />
- Color<br />
A4/Letter: 50 ppm<br />
- B/W<br />
A4/Letter: 55 ppm<br />
Duplex Printing Speed<br />
Resolution<br />
First Print Out Time<br />
- Color<br />
A4/Letter: 42 ppm<br />
- B/W<br />
A4/Letter: 42 ppm<br />
600 dpi<br />
B/W: 4.9 seconds or less / Color: 6.9 seconds or less<br />
Warm-up Time<br />
(23°C,<br />
60%RH)<br />
Controller<br />
Power On<br />
Sleep (within 3 hours)<br />
57.5 seconds or less<br />
57.5 seconds or less<br />
PowerPC750GL (750MHz)<br />
Memory Standard 1 GB<br />
Maximum<br />
2 GB<br />
Operating Systems Microsoft Windows 2000/XP/Vista/7, Windows Server 2003/2008<br />
Apple Macintosh OS X<br />
Interface USB Hi-Speed USB<br />
Network<br />
10 BASE-T/100 BASE-TX<br />
KUIO-LV slot<br />
Monthly Duty Average 9,000 pages<br />
Maximum<br />
150,000 pages<br />
A-10
Item<br />
Description<br />
Paper Sizes Cassette A3, B4, A4, B5, A5, Folio, 11 × 17"(Ledger), 8-1/2 × 14"(Legal), 8-1/2 ×<br />
11"(Letter), Statement, Oficio II, 8-1/2 × 13-1/2", 8K and 16K<br />
MP Tray A3, B4, A4, B5, A5, Folio, 11 × 17"(Ledger), 8-1/2 × 14"(Legal), 8-1/2 ×<br />
11"(Letter), Oficio II, 8-1/2 × 13-1/2", Statement, Executive, A6, B6, ISO B5, Env.<br />
Monarch, Envelope #10, Envelope #9, Envelope #6, Envelope DL, Envelope<br />
C5, Envelope C4, 8K, 16K, Hagaki, OufukuHagaki, Youkei 2, Youkei 4, and<br />
Custom<br />
Paper Types † Cassette Plain, Preprinted, Bond, Recycled, Vellum, Rough, Letterhead, Color,<br />
Prepunched, Thick, High quality, and CUSTOM 1 (to 8)<br />
MP Tray<br />
Plain, Transparency, Preprinted, Labels, Bond, Recycled, Vellum, Rough,<br />
Letterhead, Color, Prepunched, Envelope, Cardstock, Coated, Thick, High<br />
quality, and CUSTOM 1 (to 8)<br />
Paper Feed<br />
Source<br />
Capacity<br />
Margin<br />
Cassette 1<br />
Cassette 2<br />
500 sheets (80 g/m², A4/Letter or less), 250 sheets (80 g/m², B4/Legal or more)<br />
500 sheets (80 g/m²)<br />
MP Tray 100 sheets (80 g/m², A4/Letter or less), 50 sheets (80 g/m², more than A4/<br />
Letter)<br />
4 mm (left, right, top and bottom)<br />
Output Tray<br />
Capacity<br />
Top Tray<br />
500 sheets (80 g/m²)<br />
Operation<br />
Environment<br />
Temperature<br />
Relative Humidity 15 to 80 %<br />
10 to 32.5 °C (50 to 90.5 °F)<br />
Altitude<br />
Illumination<br />
2,500 m (8,202 feet) maximum<br />
1,500 lux maximum<br />
Power Source<br />
Power<br />
Consumption<br />
Maximum<br />
During Printing (B/W)<br />
During Printing<br />
(Color)<br />
During Standby<br />
During Sleep Mode<br />
Power Off<br />
120 V, 60 Hz, max. 12 A (U.S.A./Canada) 220-240 V, 50 Hz/60 Hz, max. 7.2 A<br />
(European countries)<br />
1,500 W<br />
1,110 W or less (U.S.A./Canada), 1,130 W or less (European countries)<br />
1,130 W or less (U.S.A./Canada), 1,150 W or less (European countries)<br />
210 W or less<br />
19 W or less<br />
1 W or less<br />
Operating During Printing LpA = 68.6 dB (A)<br />
Noise †† During Standby LpA = 57 dB (A)<br />
Dimensions (W × D × H)<br />
Weight<br />
During Sleep Mode<br />
immeasurably low<br />
775 × 825 × 1,006 mm<br />
30-1/2 × 32-1/2 × 39-5/8"<br />
Approx. 95 kg (209 lbs)<br />
†. The MP tray can be used with paper sizes over 98 × 148 mm (3-3/8 × 5-13/16 inches).<br />
††. Sound pressure level at bystander position [front] in accordance with EN ISO 7779.<br />
A-11
Paper Feeder (option)<br />
Item<br />
Paper Supply Method<br />
Description<br />
Friction Feed (No. Sheets: 500, 80 g/m 2 , 2 cassettes)<br />
Paper Size<br />
Supported Paper Paper weight: 60 - 163 g/m 2<br />
Ledger, Legal, Oficio II, 8-1/2 × 13-1/2", Letter, Letter-R, Executive, Executive-<br />
R, Statement-R, A3, B4, A4, A4-R, B5-R, A5-R, Folio, 8K, 16K, 16K-R<br />
Media types: standard, recycled, color<br />
Dimensions (W × D × H)<br />
Weight<br />
585 × 590 × 315 mm<br />
23-1/32 × 23-15/64 × 12-13/32"<br />
Approx. 26 kg (57 lbs)<br />
3,000 Sheet Paper Feeder (option)<br />
Item<br />
Description<br />
Paper Supply Method Friction Feed (No. Sheets: 3,000 (80 g/m 2 ))<br />
Paper Size<br />
A4, B5, Letter<br />
Supported Paper Paper weight: 60 - 105 g/m 2<br />
Media types: standard, recycled, color<br />
Dimensions (W × D × H)<br />
Weight<br />
585 × 600 × 314 mm<br />
23-5/16 × 23-5/8 × 12-23/64"<br />
Approx. 23 kg (50.71 lbs)<br />
Document Finisher (option)<br />
Item<br />
Number of Trays<br />
Paper Size (Non-stapling)<br />
Supported Paper Weight<br />
Maximum Sheets for Stapling<br />
Dimensions (W × D × H)<br />
Weight<br />
Description<br />
1 tray<br />
Ledger, Legal, Oficio II, 8-1/2 × 13-1/2", A3, B4, Folio, 8K: 500 sheets<br />
Letter, Letter-R, A4, A4-R, B5, B5-R, 16K: 1,000 sheets<br />
Stapling: 90 g/m 2 or less<br />
Ledger, Legal, Oficio II, 8-1/2 × 13-1/2", A3, B4, 8K: 25 sheets<br />
Letter, Letter-R, A4, A4-R, B5, B5-R, 16K: 50 sheets (Paper weight 90 g/m 2 or<br />
less)<br />
634.9 × 533 × 1013.5 mm<br />
25 × 20-63/64 × 40-5/16"<br />
Approx. 26.5 kg (58.42 lbs)<br />
A-12
3,000 Sheet Document Finisher (option)<br />
Item<br />
Number of Trays<br />
Description<br />
3 trays<br />
Paper Size Tray A (Non-Stapling) Ledger, Legal, A3, B4, 8K: 1,500 sheets<br />
Letter, Letter-R, A4, A4R, B5, 16K: 3,000 sheets<br />
Tray B<br />
Tray C<br />
Supported Paper Weight<br />
Maximum Sheets for Stapling<br />
Dimensions (W × D × H)<br />
Weight<br />
Folio, Ledger, Legal, 12 × 18", A3, B4, 8K: 100 sheets<br />
Letter, Letter-R, Statement-R, A4, A4R, B5, B5R, A5, A5R, 16K, 16KR: 200<br />
sheets<br />
Letter, Statement-R, A4, B5, A5, A5R, 16K: 50 sheets<br />
Stapling: 90 g/m 2 or less<br />
A3, B4, Ledger, Legal, Oficio II, 8-1/2 × 13-1/2", Folio, 8K: 30 sheets<br />
A4, A4-R, B5, Letter, Letter-R, 16K: 50 sheets<br />
(Paper weight 90 g/m 2 or less)<br />
687 × 573 × 1087 mm<br />
27-1/2 × 22-9/16 × 42-13/16"<br />
Approx. 55 kg (121.3 lbs)<br />
A-13
A-14
Glossary<br />
Additional memory<br />
An additional memory (optional) is used for increasing the memory<br />
capacity of this machine. For DIMM that can be used in this machine,<br />
contact your service technician.<br />
AppleTalk<br />
AppleTalk offers file sharing and printer sharing and it also enables you to<br />
utilize application software that is on another computer on the same<br />
AppleTalk network.<br />
Custom Box<br />
The Custom Box function stores print data for each individual user on the<br />
printer and allows the user to print single or multiple copies of the stored<br />
data later using the printer's operation panel.<br />
Default Gateway<br />
This indicates the device, such as a computer or router, that serves as the<br />
entrance/exit (gateway) for accessing computers outside of the network<br />
that you are on. When no specific gateway is designated for a destination<br />
IP address, data is sent to the host that is designated as the Default<br />
Gateway.<br />
DHCP (Dynamic Host Configuration Protocol)<br />
This is a protocol that automatically resolves the IP address, Subnet<br />
Mask and Gateway address on a TCP/IP network. Use of DHCP<br />
minimizes the load of network administration, especially on network<br />
environments with a large number of client computers where it is not<br />
specifically necessary to assign a separate IP address to each client,<br />
including printers.<br />
dpi (dots per inch)<br />
This indicates the number of dots printed per inch (25.4 mm) as a unit for<br />
expressing resolution.<br />
EcoPrint<br />
This is a printing mode that reduces toner consumption. Pages printed in<br />
the EcoPrint mode are lighter than pages printed in the normal mode.<br />
Emulation<br />
This refers to emulation of other manufacturers’ printers. The printer<br />
emulates operation of the following printers: PCL6 and KPDL.<br />
Form Feed Timeout<br />
While data is being sent to a printer, some pauses may occur. At this time,<br />
the printer waits for the next data without making a page break. Form feed<br />
timeout is a function to wait only a preset amount of time before it<br />
executes an automatic page break. After the waiting period begins, once<br />
the designated amount of time is exceeded, the printer will automatically<br />
process the currently received data and print it out. If the machine has<br />
Glossary-1
eceived no print data for the last page, the printer ends processing of that<br />
job without outputting paper.<br />
IP Address (Internet Protocol Address)<br />
The Internet Protocol address is a unique number that represents a<br />
specific computer in a network. The format of an IP Address is four<br />
numbers separated by dots, e.g. 192.168.110.171. Each number should<br />
be a decimal between 0 and 255.<br />
Job Box<br />
The Job Box function stores print data on the printer and allows users to<br />
print single or multiple copies of the stored data later using the printer’s<br />
operation panel.<br />
KPDL<br />
KPDL is Kyocera’s implementation of the PostScript page description<br />
language Level3.<br />
MP Tray<br />
This tray is used instead of the cassette when printing on envelopes,<br />
postcards, transparency sheets, and labels.<br />
NetBEUI (NetBIOS Extended User Interface)<br />
An enhanced version of the NetBIOS protocol, it enables the utilization of<br />
more advanced functions on small-scale networks than do other<br />
protocols such as TCP/IP, etc.<br />
Outline font<br />
With outline fonts, character outlines are represented with numerical<br />
expressions and fonts can be enlarged or reduced in different ways by<br />
changing the numeric values of those expressions. Printing remains clear<br />
even if you enlarge fonts, since the characters are defined with outlines<br />
represented with numerical expressions. You can specify the font size in<br />
steps of 0.25 points up to 999.75 points.<br />
PostScript<br />
This is a page description language developed by Adobe Systems, Inc. It<br />
enables flexible font functions and highly-functional graphics, allowing<br />
higher quality printing.<br />
PPM (Prints Per Minute)<br />
This indicates the number of printouts made in one minute.<br />
Printer driver<br />
The printer driver makes it possible for you to print data created using<br />
application software. The printer driver for the printer is contained on the<br />
CD-ROM supplied with the printer. Install the printer driver on the<br />
computer connected to the printer.<br />
Glossary-2
Sleep mode<br />
This mode is provided to save power. It is activated when the machine is<br />
not used for a preset period of time. In this mode, power is reduced to the<br />
minimum. The default setting can be changed.<br />
Status page<br />
This lists machine conditions, such as the machine’s memory, the total<br />
number of prints and paper source settings. You can print the status page<br />
from the operation panel.<br />
Subnet Mask<br />
This is a 32-bit numerical value that defines which bits of the IP address<br />
specify the network address and which specify the host address.<br />
TCP/IP (Transmission Control Protocol/Internet Protocol)<br />
TCP/IP is a suite of protocols designed to define the way computers and<br />
other devices communicate with each other over a network.<br />
USB (Universal Serial Bus)<br />
An interface standard for low to middle speed serial interfaces. This<br />
printer supports Hi-Speed USB. The maximum transfer rate is 480 Mbps<br />
and the maximum cable length is 5 meters (16 feet).<br />
Glossary-3
Glossary-4
Index<br />
A<br />
Administrator. . . . . . . . . . . . . . . . . . . . . . . . . . . . . . . . . 4-102<br />
Appendix. . . . . . . . . . . . . . . . . . . . . . . . . . . . . . . . . . . . . . A-1<br />
B<br />
Buzzer. . . . . . . . . . . . . . . . . . . . . . . . . . . . . . . . . . . . . . . 4-75<br />
C<br />
Canceling a Printing Job. . . . . . . . . . . . . . . . . . . . . . . . . . 4-6<br />
Cassette (1 to 4) Settings<br />
Media Type. . . . . . . . . . . . . . . . . . . . . . . . . . . . . . . . . . 4-50<br />
Paper Size . . . . . . . . . . . . . . . . . . . . . . . . . . . . . . . . . . 4-49<br />
Paper Weight . . . . . . . . . . . . . . . . . . . . . . . . . . . . . . . . 4-50<br />
Cautionary Labels. . . . . . . . . . . . . . . . . . . . . . . . . . . . . . . . xii<br />
Cleaning . . . . . . . . . . . . . . . . . . . . . . . . . . . . . . . . . . . . . . 5-8<br />
Cleaning Brush . . . . . . . . . . . . . . . . . . . . . . . . . . . . . . . . 1-4<br />
Separator . . . . . . . . . . . . . . . . . . . . . . . . . . . . . . . . . . . . 5-8<br />
Transfer Roller . . . . . . . . . . . . . . . . . . . . . . . . . . . . . . . . 5-9<br />
Coated Paper . . . . . . . . . . . . . . . . . . . . . . . . . . . . . . . . . 3-11<br />
Color Mode . . . . . . . . . . . . . . . . . . . . . . . . . . . . . . . . . . . 4-61<br />
Colored Paper. . . . . . . . . . . . . . . . . . . . . . . . . . . . . . . . . 3-11<br />
Counter . . . . . . . . . . . . . . . . . . . . . . . . . . . . . . . . . . . . . . 4-44<br />
Custom Paper Size<br />
Duplex Printing . . . . . . . . . . . . . . . . . . . . . . . . . . . . . . . 4-53<br />
Paper Weight . . . . . . . . . . . . . . . . . . . . . . . . . . . . . . . . 4-52<br />
D<br />
Data Security Kit . . . . . . . . . . . . . . . . . . . . . . . . . . . . . . . . A-9<br />
Date Setting . . . . . . . . . . . . . . . . . . . . . . . . . . . . . . . . . . 4-73<br />
Device Common . . . . . . . . . . . . . . . . . . . . . . . . . . . . . . . 4-72<br />
Display Bright . . . . . . . . . . . . . . . . . . . . . . . . . . . . . . . . . 4-76<br />
Document Finisher . . . . . . . . . . . . . . . . . . . . . . . . . . . . . . A-9<br />
Duplex Printing . . . . . . . . . . . . . . . . . . . . . . . . . . . . . . . . 4-57<br />
Binding Modes . . . . . . . . . . . . . . . . . . . . . . . . . . . . . . . 4-57<br />
Permitted with Custom Paper . . . . . . . . . . . . . . . . . . . . 4-53<br />
Duplex Unit<br />
Paper Jam . . . . . . . . . . . . . . . . . . . . . . . . . . . . . . . . . . 6-24<br />
E<br />
EcoPrint . . . . . . . . . . . . . . . . . . . . . . . . . . . . . . . . . . . . . 4-61<br />
Emulation<br />
Error Report . . . . . . . . . . . . . . . . . . . . . . . . . . . . . . . . . 4-60<br />
Setting the Emulation . . . . . . . . . . . . . . . . . . . . . . . . . . 4-59<br />
Status Page . . . . . . . . . . . . . . . . . . . . . . . . . . . . . . . . . 4-14<br />
Energy Star Program . . . . . . . . . . . . . . . . . . . . . . . . . . . . . xv<br />
Envelopes . . . . . . . . . . . . . . . . . . . . . . . . . . . . . . . . . . . . 3-10<br />
Error Handling. . . . . . . . . . . . . . . . . . . . . . . . . . . . . . . . . 4-77<br />
Error Messages . . . . . . . . . . . . . . . . . . . . . . . . . . . . . . . . 6-5<br />
F<br />
Fixing Unit<br />
Paper Jam . . . . . . . . . . . . . . . . . . . . . . . . . . . . . . . . . . 6-26<br />
Front Cover . . . . . . . . . . . . . . . . . . . . . . . . . . . . . . . . . . . . 1-2<br />
G<br />
Ground. . . . . . . . . . . . . . . . . . . . . . . . . . . . . . . . . . . . . . . . xvii<br />
H<br />
Handles . . . . . . . . . . . . . . . . . . . . . . . . . . . . . . . . . . 1-2, 1-3<br />
I<br />
Indicator<br />
Attention . . . . . . . . . . . . . . . . . . . . . . . . . . . . . . . . 1-5, 4-5<br />
Data . . . . . . . . . . . . . . . . . . . . . . . . . . . . . . . . . . . 1-5, 4-5<br />
Ready . . . . . . . . . . . . . . . . . . . . . . . . . . . . . . . . . . 1-5, 4-5<br />
Installation Precautions . . . . . . . . . . . . . . . . . . . . . . . . . . . xvi<br />
Interface. . . . . . . . . . . . . . . . . . . . . . . . . . . . . . . . . 4-66, A-2<br />
I/F Block Setting. . . . . . . . . . . . . . . . . . . . . . . . . . . . . . . 4-92<br />
Status Page . . . . . . . . . . . . . . . . . . . . . . . . . . . . . . . . . . 4-14<br />
J<br />
Job Account Setting. . . . . . . . . . . . . . . . . . . . . . . . . . . . . 4-94<br />
Job Box . . . . . . . . . . . . . . . . . . . . . . . . . . . . . . . . . . . . . . 4-22<br />
Settings . . . . . . . . . . . . . . . . . . . . . . . . . . . . . . . . . . . . . 4-40<br />
Job Log . . . . . . . . . . . . . . . . . . . . . . . . . . . . . . . . . . . . . . 4-42<br />
Job Retention<br />
Function . . . . . . . . . . . . . . . . . . . . . . . . . . . . . . . . . . . . 4-28<br />
Private Print . . . . . . . . . . . . . . . . . . . . . . . . . . . . . . . . . . 4-36<br />
Proof-and-Hold . . . . . . . . . . . . . . . . . . . . . . . . . . . . . . . 4-33<br />
Quick Copy . . . . . . . . . . . . . . . . . . . . . . . . . . . . . . . . . . 4-29<br />
K<br />
Key<br />
Arrow Keys . . . . . . . . . . . . . . . . . . . . . . . . . . . . . . 1-5, 4-6<br />
[Back] Key . . . . . . . . . . . . . . . . . . . . . . . . . . . . . . . 1-5, 4-7<br />
[Left Select] Key. . . . . . . . . . . . . . . . . . . . . . . . . . . 1-5, 4-7<br />
[MENU] Key. . . . . . . . . . . . . . . . . . . . . . . . . . . . . . 1-5, 4-6<br />
[OK] Key . . . . . . . . . . . . . . . . . . . . . . . . . . . . . . . . 1-5, 4-7<br />
[Right Select] Key . . . . . . . . . . . . . . . . . . . . . . . . . 1-5, 4-7<br />
[Stop] Key . . . . . . . . . . . . . . . . . . . . . . . . . . . . . . . 1-5, 4-6<br />
L<br />
Labels . . . . . . . . . . . . . . . . . . . . . . . . . . . . . . . . . . . . . . . . 3-9<br />
Language. . . . . . . . . . . . . . . . . . . . . . . . . . . . . . . . . . . . . 4-72<br />
Left Cover . . . . . . . . . . . . . . . . . . . . . . . . . . . . . . . . . . . . . 1-2<br />
Paper Jam . . . . . . . . . . . . . . . . . . . . . . . . . . . . . . . . . . . 6-23<br />
M<br />
Machine Parts . . . . . . . . . . . . . . . . . . . . . . . . . . . . . . . . . . 1-1<br />
Maintenance . . . . . . . . . . . . . . . . . . . . . . . . . . . . 4-105, 5-1<br />
Automatic Color Adjustment Cycle Setting . . . . . . . . . . 4-105<br />
Color Calibration . . . . . . . . . . . . . . . . . . . . . . . . . . . . . 4-106<br />
Color Registration . . . . . . . . . . . . . . . . . . . . . 4-106, 4-109<br />
Index-1
Restart. . . . . . . . . . . . . . . . . . . . . . . . . . . . . . . . . . . . . 4-113<br />
Memory<br />
Checking Expansion Memory . . . . . . . . . . . . . . . . . . . . . A-8<br />
Expansion Memory. . . . . . . . . . . . . . . . . . . . . . . . . . . . . A-6<br />
Installation . . . . . . . . . . . . . . . . . . . . . . . . . . . . . . . . . . . A-7<br />
Remove . . . . . . . . . . . . . . . . . . . . . . . . . . . . . . . . . . . . . A-7<br />
Status Page . . . . . . . . . . . . . . . . . . . . . . . . . . . . . . . . . 4-14<br />
Menu Map . . . . . . . . . . . . . . . . . . . . . . . . . . . . . . . . . . . . 4-11<br />
Message Display . . . . . . . . . . . . . . . . . . . . . . . . . . . 1-5, 4-3<br />
Display Bright. . . . . . . . . . . . . . . . . . . . . . . . . . . . . . . . 4-76<br />
Language. . . . . . . . . . . . . . . . . . . . . . . . . . . . . . . . . . . 4-72<br />
Status Information . . . . . . . . . . . . . . . . . . . . . . . . . . . . . 4-4<br />
Mode Selection Menu . . . . . . . . . . . . . . . . . . . . . . . . . . 4-10<br />
MP (Multi-Purpose) Tray . . . . . . . . . . . . . . . . . . . . . . . . . 1-3<br />
Loading Paper . . . . . . . . . . . . . . . . . . . . . . . . . . . . . . . 3-15<br />
Media Type . . . . . . . . . . . . . . . . . . . . . . . . . . . . . . . . . 4-48<br />
Paper Jam . . . . . . . . . . . . . . . . . . . . . . . . . . . . . . . . . . 6-21<br />
Paper Selection . . . . . . . . . . . . . . . . . . . . . . . . . . . . . . 4-55<br />
Paper Size . . . . . . . . . . . . . . . . . . . . . . . . . . . . . . . . . . 4-46<br />
N<br />
Network Interface Connector . . . . . . . . . . . . . . . . . . . . . . 1-3<br />
Network Settings . . . . . . . . . . . . . . . . . . . . . . . . . . 2-2, 4-65<br />
O<br />
Operation Panel . . . . . . . . . . . . . . . . . . . . . . . . . . . . 1-2, 1-5<br />
Using the Menu Selection System. . . . . . . . . . . . . . . . . . 4-8<br />
Options. . . . . . . . . . . . . . . . . . . . . . . . . . . . . . . . . . . . . . . A-5<br />
P<br />
Page Setting. . . . . . . . . . . . . . . . . . . . . . . . . . . . . . . . . . 4-62<br />
Paper<br />
Characteristic . . . . . . . . . . . . . . . . . . . . . . . . . . . . . . . . . 3-5<br />
Coated Paper. . . . . . . . . . . . . . . . . . . . . . . . . . . . . . . . . 3-11<br />
Colored Paper . . . . . . . . . . . . . . . . . . . . . . . . . . . . . . . . 3-11<br />
Envelopes . . . . . . . . . . . . . . . . . . . . . . . . . . . . . . . . . . 3-10<br />
General Guidelines. . . . . . . . . . . . . . . . . . . . . . . . . . . . . 3-2<br />
Guideline . . . . . . . . . . . . . . . . . . . . . . . . . . . . . . . . . . . . 3-4<br />
Labels . . . . . . . . . . . . . . . . . . . . . . . . . . . . . . . . . . . . . . 3-9<br />
Loading Paper into the Cassette . . . . . . . . . . . . . . . . . . 3-13<br />
Loading Paper into the MP Tray . . . . . . . . . . . . . . . . . . 3-15<br />
Media Type . . . . . . . . . . . . . . . . . . . . . . . . . . . . 4-48, 4-50<br />
Minimum and Maximum Paper Sizes . . . . . . . . . . . . . . . 3-3<br />
Other Paper Properties. . . . . . . . . . . . . . . . . . . . . . . . . . 3-6<br />
Paper Availability . . . . . . . . . . . . . . . . . . . . . . . . . . . . . . 3-2<br />
Paper Sizes . . . . . . . . . . . . . . . . . . . . . . . . 3-4, 4-46, 4-49<br />
Paper Thickness . . . . . . . . . . . . . . . . . . . . . . . . 4-51, 4-52<br />
Postcards. . . . . . . . . . . . . . . . . . . . . . . . . . . . . . . . . . . 3-10<br />
Preprinted Paper . . . . . . . . . . . . . . . . . . . . . . . . . . . . . . 3-11<br />
Recycled Paper . . . . . . . . . . . . . . . . . . . . . . . . . . . . . . . 3-11<br />
Resets Customized settings . . . . . . . . . . . . . . . . . . . . . 4-54<br />
Special Paper. . . . . . . . . . . . . . . . . . . . . . . . . . . . . . . . . 3-7<br />
Thick Paper . . . . . . . . . . . . . . . . . . . . . . . . . . . . . . . . . . 3-11<br />
Transparency . . . . . . . . . . . . . . . . . . . . . . . . . . . . . . . . . 3-8<br />
Paper Cassette . . . . . . . . . . . . . . . . . . . . . . . . . . . . . . . . 1-2<br />
Loading Paper . . . . . . . . . . . . . . . . . . . . . . . . . . . . . . . 3-13<br />
Media Type . . . . . . . . . . . . . . . . . . . . . . . . . . . . . . . . . 4-50<br />
Paper Jam . . . . . . . . . . . . . . . . . . . . . . . . 6-18, 6-19, 6-20<br />
Paper Selection . . . . . . . . . . . . . . . . . . . . . . . . . . . . . . 4-55<br />
Paper Size . . . . . . . . . . . . . . . . . . . . . . . . . . . . . . . . . . 4-49<br />
Paper Feed Mode . . . . . . . . . . . . . . . . . . . . . . . . . . . . . . 4-56<br />
Paper Feed Unit . . . . . . . . . . . . . . . . . . . . . . . . . . . . . . . . 1-4<br />
Paper Feeder . . . . . . . . . . . . . . . . . . . . . . . . . . . . . . . . . . A-9<br />
Loading Paper. . . . . . . . . . . . . . . . . . . . . . . . . . . . . . . . 3-13<br />
Media Type . . . . . . . . . . . . . . . . . . . . . . . . . . . . . . . . . . 4-50<br />
Paper Feed source . . . . . . . . . . . . . . . . . . . . . . . . . . . . 4-55<br />
Paper Jam . . . . . . . . . . . . . . . . . . . . . . . . . . . . . . . . . . 6-20<br />
Paper Size . . . . . . . . . . . . . . . . . . . . . . . . . . . . . . . . . . 4-49<br />
Paper Jams . . . . . . . . . . . . . . . . . . . . . . . . . . . . . . . . . . . 6-15<br />
Locations . . . . . . . . . . . . . . . . . . . . . . . . . . . . . . . . . . . 6-15<br />
Message . . . . . . . . . . . . . . . . . . . . . . . . . . . . . . . . . . . . 6-15<br />
Paper Output. . . . . . . . . . . . . . . . . . . . . . . . . . . . . . . . . . 4-58<br />
Paper Stopper . . . . . . . . . . . . . . . . . . . . . . . . . . . . . 1-2, 3-16<br />
Postcards . . . . . . . . . . . . . . . . . . . . . . . . . . . . . . . . . . . . 3-10<br />
Power Supply . . . . . . . . . . . . . . . . . . . . . . . . . . . . . . . . . . xvii<br />
Power Switch . . . . . . . . . . . . . . . . . . . . . . . . . . . . . . . . . . 1-3<br />
Precautions for Use. . . . . . . . . . . . . . . . . . . . . . . . . . . . . . xviii<br />
Preprinted Paper . . . . . . . . . . . . . . . . . . . . . . . . . . . . . . . 3-11<br />
Print<br />
Copies . . . . . . . . . . . . . . . . . . . . . . . . . . . . . . . . . . . . . 4-62<br />
Counter. . . . . . . . . . . . . . . . . . . . . . . . . . . . . . . . . . . . . 4-44<br />
From Application Software. . . . . . . . . . . . . . . . . . . . . . . . 2-9<br />
Orientation . . . . . . . . . . . . . . . . . . . . . . . . . . . . . . . . . . 4-62<br />
Print Quality<br />
Problems . . . . . . . . . . . . . . . . . . . . . . . . . . . . . . . . . . . . 6-3<br />
Printer Driver . . . . . . . . . . . . . . . . . . . . . . . . . . . . . . . . . . . 2-4<br />
Installing on Macintosh . . . . . . . . . . . . . . . . . . . . . . . . . . 2-6<br />
Installing on Windows . . . . . . . . . . . . . . . . . . . . . . . . . . . 2-4<br />
Printing Operation . . . . . . . . . . . . . . . . . . . . . . . . . . . . . . . 2-1<br />
R<br />
Recycled paper . . . . . . . . . . . . . . . . . . . . . . . . . . . . 3-7, 3-11<br />
S<br />
Safety Information . . . . . . . . . . . . . . . . . . . . . . . . . . . . . . . . xi<br />
Cautionary Labels . . . . . . . . . . . . . . . . . . . . . . . . . . . . . . . xii<br />
Installation Precautions . . . . . . . . . . . . . . . . . . . . . . . . . . xvi<br />
Power Supply . . . . . . . . . . . . . . . . . . . . . . . . . . . . . . . . . xvii<br />
Precautions for Use. . . . . . . . . . . . . . . . . . . . . . . . . . . . . xviii<br />
Security . . . . . . . . . . . . . . . . . . . . . . . . . . . . . . . . . . . . . . 4-85<br />
I/F Block . . . . . . . . . . . . . . . . . . . . . . . . . . . . . . . . . . . . 4-92<br />
Network . . . . . . . . . . . . . . . . . . . . . . . . . . . . . . . . . . . . 4-86<br />
Separator<br />
Cleaning . . . . . . . . . . . . . . . . . . . . . . . . . . . . . . . . . . . . . 5-8<br />
Specifications . . . . . . . . . . . . . . . . . . . . . . . . . . . . . . . . . A-10<br />
Status Monitor . . . . . . . . . . . . . . . . . . . . . . . . . . . . . . . . . 2-10<br />
Status Page. . . . . . . . . . . . . . . . . . . . . . . . . . . . . . . . . . . 4-13<br />
Contents . . . . . . . . . . . . . . . . . . . . . . . . . . . . . . . . . . . . 4-13<br />
T<br />
Thick Paper . . . . . . . . . . . . . . . . . . . . . . . . . . . . . . . . . . . 3-11<br />
TIFF/JPEG Size . . . . . . . . . . . . . . . . . . . . . . . . . . . . . . . 4-64<br />
Timer Setting. . . . . . . . . . . . . . . . . . . . . . . . . . . . . . . . . . 4-81<br />
Toner Container . . . . . . . . . . . . . . . . . . . . . . . . . . . . . . . . 1-4<br />
Frequency. . . . . . . . . . . . . . . . . . . . . . . . . . . . . . . . . . . . 5-2<br />
Replacing . . . . . . . . . . . . . . . . . . . . . . . . . . . . . . . . . . . . 5-3<br />
Setting When Color Toner Runs Out . . . . . . . . . . . . . . . 4-80<br />
Toner Kits . . . . . . . . . . . . . . . . . . . . . . . . . . . . . . . . . . . . . 5-3<br />
Top Cover . . . . . . . . . . . . . . . . . . . . . . . . . . . . . . . . . . . . . 1-2<br />
Index-2
Top Tray . . . . . . . . . . . . . . . . . . . . . . . . . . . . . . . . . . . . . . 1-2<br />
Transfer Roller<br />
Cleaning . . . . . . . . . . . . . . . . . . . . . . . . . . . . . . . . . . . . . 5-9<br />
Transparency . . . . . . . . . . . . . . . . . . . . . . . . . . . . . . . . . . 3-8<br />
Troubleshooting . . . . . . . . . . . . . . . . . . . . . . . . . . . . . . . . 6-1<br />
U<br />
USB Interface . . . . . . . . . . . . . . . . . . . . . . . . . . . . . . . . . . 1-3<br />
USB Memory<br />
Print . . . . . . . . . . . . . . . . . . . . . . . . . . . . . . . . . . . . . . . 4-16<br />
Remove . . . . . . . . . . . . . . . . . . . . . . . . . . . . . . . . . . . . 4-21<br />
Slot. . . . . . . . . . . . . . . . . . . . . . . . . . . . . . . . . . . . . 1-2, 1-5<br />
W<br />
Waste Toner Box . . . . . . . . . . . . . . . . . . . . . . . . . . . . . . . 1-4<br />
Replacing . . . . . . . . . . . . . . . . . . . . . . . . . . . . . . . . . . . . 5-6<br />
Wide A4 . . . . . . . . . . . . . . . . . . . . . . . . . . . . . . . . . . . . . 4-63<br />
X<br />
XPS Fit to Page . . . . . . . . . . . . . . . . . . . . . . . . . . . . . . . 4-63<br />
Index-3
Index-4
UTAX GmbH, Ohechaussee 235, 22848 Norderstedt, Germany