Download User Manual - Remington
Download User Manual - Remington
Download User Manual - Remington

Create successful ePaper yourself
Turn your PDF publications into a flip-book with our unique Google optimized e-Paper software.
All technical modifications reserved. 09/08. TSC 08.0634<br />
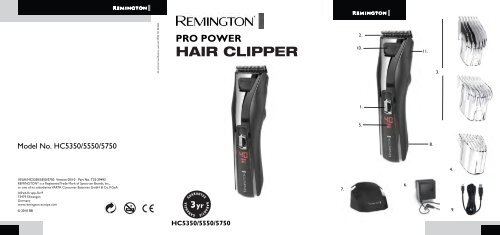
PRO POWER<br />
HAIR CLIPPER<br />
2.<br />
10.<br />
11.<br />
3.<br />
1.<br />
5.<br />
Model No. HC5350/5550/5750<br />
8.<br />
4.<br />
10/UK/HC5350/5550/5750 Version 05/10 Part No. T22-29493<br />
REMINGTON ® is a Registered Trade Mark of Spectrum Brands, Inc.,<br />
or one of its subsidiaries VARTA Consumer Batteries GmbH & Co. KGaA<br />
Alfred-Krupp-Str.9<br />
73479 Ellwangen<br />
Germany<br />
www.remington-europe.com<br />
© 2010 SBI<br />
7.<br />
.<br />
6.<br />
9.<br />
HC5350/5550/5750
REMINGTON ® SERVICE HOTLINE<br />
1. 2.<br />
3.<br />
United Kingdom<br />
+44 0800 212 438 (free call)<br />
Rayovac Europe Ltd,<br />
Watermans House, Kingsbury Crescent,<br />
The Causeway, Staines, Middlesex,<br />
TW18 3BA, UNITED KINGDOM<br />
www.remington.co.uk<br />
4.<br />
5.
ENGLISH<br />
Thank you for choosing <strong>Remington</strong>®. Our products are designed to meet the<br />
highest standard of quality, functionality and design. We hope you enjoy using<br />
your new <strong>Remington</strong>® product.<br />
Please read the instructions for use carefully and keep in a safe place for future<br />
reference.<br />
CAUTION<br />
Use this appliance only for its intended use as described in this manual.<br />
Do not use attachments not recommended by <strong>Remington</strong>®.<br />
Do not use this product if it is not working correctly, if it has been dropped or damaged,<br />
or dropped into water..<br />
DESCRIPTION<br />
1. On/Off switch<br />
<br />
2. Blade set<br />
<br />
3. 2 attachment guide combs<br />
4. Stubble comb (Only for HC5550 & HC5750)<br />
5. Digital Display (Only for HC5750)<br />
6. Charging adaptor<br />
7. Charging stand (Only for HC5750)<br />
8. Micro USB port<br />
9. Micro USB cable<br />
10. Hair thinner mechanism<br />
11. Quick Wash release button<br />
GETTING STARTED<br />
CHARGING YOUR HAIRCLIPPER<br />
Before using your hair clipper for the first time, charge for 14-16 hours<br />
Charging display light will stay on after the battery is fully charged (HC5350 & HC5550).<br />
The digital display will stay on and plug icon will stop flashing after the battery is<br />
fully charged (only for HC5750).<br />
1
ENGLISH<br />
Your clipper cannot be overcharged. However, if the product is not going to be used for an<br />
extended period time (2-3 months), unplug it from the mains and store.<br />
Fully recharge your hairclipper when you would like to use it again.<br />
To preserve the life of your batteries, let them run out every six months then recharge for<br />
14-16 hours.<br />
CHARGING VIA STANDARD ELECTRICAL SOCKET<br />
Ensure the product is switched off.<br />
Connect the charging adaptor to the product and then to the mains.<br />
When charging the LED indicator (HC5350 & HC5550) will illuminate and the digital display<br />
and plug icon (HC5750) will be displayed on the product during charging.<br />
Allow 14~16 hours for a complete charge.<br />
USB CHARGING VIA PC<br />
Ensure the product is switched off.<br />
Connect your USB cable to the USB port on the PC.<br />
Connect the USB cable to your hair clipper.<br />
Charging LED indicator (HC5350 & HC5550) will illuminate or<br />
the digital display and plug icon (HC5750) will be displayed on the product during charging.<br />
Allow 14-16 hours for a complete charge.<br />
CHARGING VIA CHARGING STAND (Only for HC5750)<br />
Ensure the product is switched off.<br />
Connect the charging adaptor to the charging stand and then to the mains.<br />
The digital display and plug icon will be displayed on the product during charging.<br />
Allow 14~16 hours for a complete charge.<br />
CORDED USE<br />
Connect the charging adaptor to the product and then to the mains.<br />
When the cord is connected to the mains, a charging LED light (HC5350 & HC5550) or<br />
plug icon (HC5750) is displayed on the hairclipper.<br />
The charging LED light (HC5350 & HC5550) and plug icon (HC5750)<br />
will turn off when the unit is switched on.<br />
CAUTION: Extended mains only use will result in the reduction of the battery life.<br />
WARNING: The hair clipper can not be operated in corded mode while connected to a PC<br />
via the USB port.<br />
CORDLESS USE<br />
When the unit is switched on and fully charged, the product can be used in cordless mode<br />
for up to 40 minutes.<br />
The digital indicator (HC5750) will display the maximum usage time, which will decrease during usage.<br />
If the digital indicator display between 0 – 5 minutes, the display will flash to<br />
indicate that the unit need to be recharged.<br />
2
ENGLISH<br />
HOW TO USE<br />
Before starting the cut<br />
Inspect the clipper making sure that it is free from hair and dirt.<br />
Seat the person so that their head is approximately at your eye level.<br />
Before cutting, always comb the hair so it is tangle free and dry.<br />
Comb position Short comb Long comb<br />
1 3 mm 24<br />
mm<br />
2 6 mm 27<br />
mm<br />
3 9 mm 30 mm<br />
4 12<br />
mm<br />
33 mm<br />
5 15<br />
mm 36 mm<br />
6 18<br />
mm 39 mm<br />
7 21 mm 42 mm<br />
1mm length is achieved without any combs.<br />
To attach a comb<br />
Hold the comb with its teeth upward<br />
Slide it onto and along the track of left and right side of the housing unit, the front of the combs<br />
firmly sits against the clipper blade.<br />
To remove the comb<br />
Holding the clipper with the blades facing away from you, firmly push the comb upward<br />
and away from the blades.<br />
Each comb attachment is marked accordingly on its outside middle surface.<br />
(3-21 mm & 24-42 mm)<br />
INSTRUCTIONS FOR HAIR CUTTING<br />
Note: For even cutting, allow the comb attachment/blade to cut its way through the hair.<br />
Do not force it through quickly. If you are cutting for the first time, start with the maximum<br />
comb attachment.<br />
STEP 1 – Nape of the neck – PICTURE 1<br />
Set the comb attachment to 3mm or 6mm.<br />
Hold the clipper with the blade teeth pointing upwards. Begin starting at the centre of the<br />
head at the base of the neck.<br />
Slowly lift the clipper, working upwards and outwards through the hair, trimming just a<br />
little at a time.<br />
STEP 2 – Back of the head – PICTURE 2<br />
With the comb attachment set on 12mm or 18mm, cut the hair at the back of the head.<br />
STEP 3 – Side of the head – PICTURE 3<br />
Set the comb attachment to 3mm or 6mm guide to trim sideburns. Then change the setting to<br />
9mm and continue to cut to the top of the head.<br />
3
ENGLISH<br />
STEP 4 – Top of the head – PICTURE 4<br />
Use the longer length comb attachment and set it to 24mm or 27mm<br />
then cut hair on top of the head against the direction in which the hair normally grows.<br />
For longer hair on top, use the longer length comb attachment (24-42mm) to achieve desired style.<br />
Always work from the back of the head.<br />
STEP 5 – The finishing touches – PICTURE 5<br />
Use the clipper without an attachment comb for close trimming around the base and sides<br />
of the neck. Use the ear comb guides to get a clean line around each ear. For the required<br />
ear comb guide, angle the clipper and lightly stroke around each ear to the back of the<br />
neck.<br />
To produce a clean straight line at the sideburns, reverse the hair clipper. Place the<br />
reversed clipper at right angles to the head, tips of the blades lightly touching the skin and<br />
then work downwards.<br />
SHORT TAPERED STYLES – “FLAT TOPS” & SHORT CUTS<br />
Starting with the longest comb attached ( 24mm-42mm ), cut from the back of the neck to<br />
the crown. Hold the guide comb flat against the head and slowly move the clipper through<br />
the hair, as shown. (PICTURE 1)<br />
Use the same procedure from the lower side to the upper side of the head, as illustrated.<br />
Then cut the hair against the direction in which it grows and level with the sides.<br />
(PICTURE 3)<br />
To give a “flat top” look, the hair on top of the head must be cut over the top of a flat<br />
comb.<br />
Use a closer guide comb to taper the hair down to the neckline as desired.<br />
INSTRUCTIONS FOR THE STUBBLE GUIDE COMB (Only for HC5550 & HC5750)<br />
The 1.5mm guide comb is designed to create the perfect 3-day beard look.<br />
Place the flat top of the trimmer comb against the skin.<br />
Slowly slide the trimmer through the beard. Repeat from different direction as necessary.<br />
If hair builds up in the trimmer comb during the trimming process, switch the unit off, pull<br />
off the comb and brush/rinse off.<br />
HAIR THINNER MECHANISM<br />
Simply adjust the hair thinner mechanism by sliding the button at the top of the hair clipper.<br />
Blending different length areas. Select the proper length guard to blend. Slide out the Texture/Thin out feature.<br />
Textured cut – Slide out the texture/thin out feature with the guard in place to give an all over textured cut.<br />
AUTO BOOST SYSTEM (Only for HC5750)<br />
There are 3 settings for the Auto Boost system: Off, Auto and Boost.<br />
If the clipper is set to Auto it will run at regular power under low load conditions.<br />
When more power is needed, the clipper with automatically sense and provide maximum Boost.<br />
If the clipper is set to Boost, it will run at maximum power at all times.<br />
DUAL BOOST SYSTEM (Only for HC5550)<br />
There are 3 settings for the Dual Boost system: Off, On, Boost.<br />
If the clipper is set to On, it will run at regular power.<br />
If the clipper is set to Boost, it will provide maximum power.<br />
4
ENGLISH<br />
CARE FOR YOUR HAIRCLIPPER<br />
Your clipper is fitted with high quality blades<br />
To ensure long lasting performance of your clipper, clean the blades and unit regularly.<br />
Always keep the attachement guide comb on the trimmer blade.<br />
AFTER EACH USE<br />
Ensure the clipper is switched off and disconnected from the mains.<br />
Brush the accumulated hair from the blades. Do not submerge the clipper in water.<br />
To clean the unit, wipe with a damp cloth and dry immediately.<br />
Note: Ensure that the clipper is turned off when cleaning.<br />
WASHABLE CLEANING<br />
The QUICK WASH SYSTEM is designed to maximise the efficiency of washable cleaning.<br />
Click the buttons that are located on the sides of the hair clipper head.<br />
The blades will slide out and the blade set can easily be cleaned under the tap.<br />
Once the blades are cleaned the blades are locked into place by pushing the blade set towards<br />
the hair clipper head and will snap into place.<br />
Do not run the entire unit under the tap, only the blade set is meant to be submerged in water.<br />
Note: Ensure that the hair clipper is turned off when cleaning.<br />
EVERY SIX MONTHS<br />
At regular intervals the Blade Set should be removed and cleaned.<br />
Remove the 2 screws retaining the fixed blade with a screwdriver. Do not remove blade<br />
set.<br />
Brush out hairs from between the blades with soft cleaning brush. Do not remove the<br />
lubricating grease from the blades. It is not necessary to remove the small moving blade<br />
from the unit.<br />
If the moving blade has been removed this can be re-fitted by slotting the coated blade<br />
holder over the pin in the centre of the interior product head. The groove on the coated<br />
blade, just below the teeth, rests on a metal plate at the opposite side to the screw holes.<br />
The fixed blade is fitted with the raised profile pointing outwards and fixed with the 2<br />
screws.<br />
Note that if the blades are not correctly aligned then cutting efficiency will be impaired.<br />
Place a few drops of cutter or sewing machine oil onto the blades. Wipe off excess oil.<br />
CAUTION:<br />
Do not use liquid cleaners on the blades or harsh or corrosive chemicals on the blade<br />
casing. Always use a soft brush to remove the accumulated hairs.<br />
Unplug the charge adaptor from the power outlet when fitting or removing attachments,<br />
or while cleaning the product.<br />
Always store this appliance and cord in a moisture-free area.<br />
Do not wrap the cord of the charging adaptor around the appliance.<br />
5
ENGLISH<br />
IMPORTANT SAFETY INSTRUCTIONS<br />
WARNING – TO REDUCE THE RISK OF BURNS, ELECTROCUTION, FIRE, OR<br />
INJURY TO PERSONS:<br />
An appliance should never be left unattended when plugged into a power outlet.<br />
Keep the power plug and cord away from heated surfaces.<br />
Make sure the power plug and cord do not get wet.<br />
Do not plug or unplug the product with wet hands.<br />
Do not use the product with a damaged cord. A replacement can be obtained via<br />
the nearest <strong>Remington</strong> ® Service Centre.<br />
Charge, use and store the product at a temperature between 15°C and 35°C.<br />
Always unplug from the mains when cleaning.<br />
Only use the parts supplied with the appliance.<br />
Keep this product out of reach of children. The use of this appliance by persons with<br />
reduced physical, sensory or mental capabilities or lack of experience and knowledge can<br />
give cause to hazards. Persons responsible for their safety should give explicit instructions<br />
or supervise the use of the appliance.<br />
Suitable for cleaning under water.<br />
PROTECT THE ENVIRONMENT<br />
The product contains a Nickel Metal Hydride cell unit. Do not dispose the trimmer in<br />
household waste at the end of its useful life. Disposal can take place at our service centres<br />
or appropriate collection sites.<br />
CAUTION:<br />
Do not put in fire or mutilate your battery packs as they may burst<br />
or release toxic materials.<br />
For further information on recycling see www.remington-europe.com<br />
6
ENGLISH<br />
BATTERY REMOVAL<br />
The battery must be removed from the appliance before it is scrapped.<br />
The appliance must be disconnected from the supply mains when removing the battery.<br />
Ensure the clipper is discharged of all power and disconnected from the mains.<br />
Lift or pry the USB port cover plate on the bottom of the clipper.<br />
Lift or pry the deco plate on the lower portion of the clipper and unscrew 1 screw located<br />
on the back housing of the clipper.<br />
Lift or pry the clipper halves apart, exposing the battery chamber.<br />
Lift or pry the USB connector and lift or pry the cover plate on the bottom of the battery chamber.<br />
Take out the battery and printed circuit board assembly from the battery chamber.<br />
Cut the tabs on both ends of the battery and remove it from the printed circuit board<br />
The battery is to be disposed of safety.<br />
SERVICE & WARRANTY<br />
This product has been checked and is free of defects. We warrant this product against any<br />
defects that are due to faulty material or workmanship for a 3 year period from the original<br />
date of consumer purchase. If the product should become defective within the warranty<br />
period, we will repair any such defect or elect to replace the product or any part of it<br />
without charge provided there is proof of purchase. This does not mean an extension of the<br />
warranty period.<br />
In the case of a warranty simply call the <strong>Remington</strong> ® Service Center in your region.<br />
This warranty is offered over and above your normal statutory rights.<br />
The warranty shall apply in all countries in which our product was sold via an authorised<br />
dealer.<br />
This warranty does not include cutters which are consumable parts. Also not covered is<br />
damage to the product by accident or misuse, abuse, alteration to the product or use inconsistent<br />
with the technical and/or safety instructions required. This warranty shall not apply if<br />
the product has been dismantled or repaired by a person not authorised by us.<br />
7