Sanding your own floors - Livos Australia
Sanding your own floors - Livos Australia
Sanding your own floors - Livos Australia

Create successful ePaper yourself
Turn your PDF publications into a flip-book with our unique Google optimized e-Paper software.
<strong>Sanding</strong><br />
<strong>your</strong> <strong>own</strong> <strong>floors</strong><br />
Pain or pleasure, DIY or professional<br />
BY ANGELA PETRUZZI<br />
Timber <strong>floors</strong> have a pleasant and<br />
natural feel to them. Although not easy,<br />
sanding and treating <strong>your</strong> floor <strong>your</strong>self<br />
is rewarding and possible. Hard work<br />
but rewarding for some. Would you do<br />
it again? Probably not.<br />
Can <strong>your</strong> <strong>floors</strong><br />
be sanded?<br />
Most timber <strong>floors</strong> are solid sawn<br />
timber that is milled with a tongue and<br />
groove to lock the boards together. They<br />
may have been sanded a number of<br />
times already making them too thin for<br />
further sanding. Do not sand the floor<br />
if the timber above the tongue is less<br />
than 3mm in depth. Further sanding<br />
may cause the top layer to splinter off or<br />
to crack and may leave the boards loose.<br />
A quick way of checking the thickness<br />
to the tongue section is by inserting a<br />
thin metal ruler into a groove.<br />
If you have manufactured <strong>floors</strong><br />
with only a thin timber veneer glued<br />
to a plywood base, you may not be able<br />
to sand them. The veneer is often too<br />
thin and if you have no experience<br />
with a belt sander, you may remove<br />
all the timber exposing the plywood<br />
and ruining the whole floor. Ask a<br />
professional floor sander for advice.<br />
Hiring the correct<br />
equipment<br />
Get extensive advice from the hire<br />
company and pay attention to the<br />
manufacturer’s instructions. Ask to be<br />
sh<strong>own</strong> how the machine works and if<br />
there are any special tricks to be aware of.<br />
Belt sander<br />
The large belt sanders are heavy so<br />
you will need help to unload. If <strong>your</strong><br />
new home is not yet completely wired<br />
up, check the power supply in the home<br />
and that of the machine in question to<br />
ensure they are compatible. If you are<br />
running extension cords over a distance<br />
and have a high demand of power<br />
supply this will cause the supply to trip<br />
which, when in the middle of working,<br />
can damage the floor. To prevent any<br />
possible accidents, be aware of where<br />
power cords are at all times.<br />
Buy several belts in different<br />
grits. With sandpaper, the bigger the<br />
number, the smoother the finish on<br />
<strong>your</strong> timber. The lower the number, the<br />
coarser the paper will be. What number<br />
you start off with depends on the state<br />
of <strong>your</strong> floor. Coarser paper removes<br />
the unwanted material faster and with<br />
less effort. So if you have an uneven<br />
surface, maybe rough recycled boards<br />
with Black Japan or heavily varnished<br />
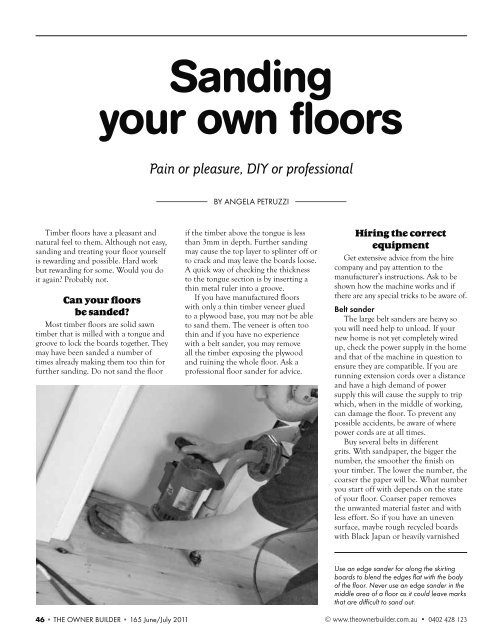
Use an edge sander for along the skirting<br />
boards to blend the edges fl at with the body<br />
of the fl oor. Never use an edge sander in the<br />
middle area of a fl oor as it could leave marks<br />
that are diffi cult to sand out.<br />
46 • THE OWNER BUILDER • 165 June/July 2011 © www.the<strong>own</strong>erbuilder.com.au • 0402 428 123
oards, then start off with a 40 grit. If<br />
<strong>your</strong> floor is new and secret nailed with<br />
not much height variation, start off<br />
with 60 grit.<br />
Check to ensure that you may return<br />
any unused belts. The usage of materials<br />
depends on the type of timber and the<br />
state it is in.<br />
Edge sander<br />
For areas where the belt sander<br />
cannot reach, such as around the<br />
skirting and doors and under cupboards<br />
you will need to hire an edge sander.<br />
Again, buy several discs with the same<br />
abrasion grades as for the belt sander.<br />
Floor buffer<br />
Depending on the finish that you<br />
want to use (refer to TOB 144 Dec 07/<br />
Jan 08 detailing timber flooring treatment<br />
options available), you may also require<br />
a floor buffer. This is used with a screen<br />
back or sanding paper to achieve a finer<br />
finish than the belts will allow. It is<br />
especially advantageous if you are using<br />
natural oils. Screen backs look like fly<br />
screens but also come in different grits<br />
and are used to remove sanding marks<br />
and give a finer finish, eliminating any<br />
scratch marks. If using oils, the machine<br />
may also be used at the end of the process<br />
to remove excess oil from the floor.<br />
Orbital and triangular sanders<br />
An orbital sander will do the finer<br />
sanding and is handy for getting into<br />
places where the larger edge sander is<br />
unable to sand; ideal also if you have<br />
stairs or steps to do.<br />
A triangle sander will do the corners<br />
and around door frames easily. If you<br />
do not hire a triangle sander, a paint<br />
scraper will do. If oiling, ensure that<br />
no sanding marks remain as the oil will<br />
show up most imperfections, especially<br />
if you are using a stain.<br />
Vacuum cleaner<br />
Don’t forget a good vacuum cleaner.<br />
If you have a large area, it may be<br />
worth <strong>your</strong> while to hire one, as small<br />
domestic ones may not cope with the<br />
amount of dust created. Even though<br />
many machines have dust extractors,<br />
there will always be a film of fine dust<br />
after sanding. Some hire machines may<br />
not be suitably maintained and might<br />
not have the vacuum working ideally<br />
and therefore not take in as much dust<br />
as they should.<br />
Dust masks and hearing protection<br />
should also be on the shopping list.<br />
Preparation<br />
The floor to be sanded must be free<br />
from all furniture. If the room has builtin<br />
cupboards or wardrobes, do these as<br />
well, otherwise they will be different to<br />
the main part of the floor and may look<br />
odd. In the scheme of things, not doing<br />
this won’t save much time or material<br />
anyway.<br />
If you have removed carpet from<br />
some of the floor, ensure the carpet<br />
ripple bar sits just inside the room.<br />
That is, if the door is closed, the carpet<br />
cannot be seen. This gives the hallway<br />
continuity. If possible remove curtains.<br />
If not, wrap in plastic sheeting and raise<br />
well above floor level. Remove ducted<br />
heating covers and stuff ducts with<br />
paper (below floor level). Ensure that<br />
metal duct casings are below floor level,<br />
if not they will damage the sanding<br />
paper when running over the edges.<br />
Seal off open doorways with drop<br />
sheets. Check the type of masking tape<br />
as some may adhere to painted surfaces.<br />
Step 1. Punching and<br />
puttying<br />
If <strong>your</strong> floor is new, it will most<br />
likely be secret nailed. The secret<br />
nailing process typically involves fixing<br />
the boards at each edge with the nails<br />
driven at a 45 degree angle. As the<br />
name suggests, the nail holes are not<br />
visible when the floor is completed. The<br />
boards are also glued to the substrate for<br />
added strength.<br />
If it is an older floor and the nails are<br />
visible then sinking them d<strong>own</strong> with a<br />
nail punch and hammer to a depth of<br />
approximately 4mm will be necessary.<br />
Any nails not sunk will damage the<br />
sanding paper and the machine drum.<br />
Vacuum to remove any dust particles<br />
in the nail holes and between boards. To<br />
ensure a good match with <strong>your</strong> timber,<br />
choose a putty to suit <strong>your</strong> flooring,<br />
or putty can be mixed to achieve the<br />
colour required. Do not use an epoxy<br />
type of putty if you will be using natural<br />
penetrating oils such as the <strong>Livos</strong> oils<br />
– Timbermate is a good match. Putty<br />
larger holes slightly overfull as putty may<br />
sink lower than floor level if the hole<br />
is not filled properly. If you have wide<br />
gaps in between <strong>your</strong> floor boards, it is<br />
best to get used to them. By puttying<br />
along the length of them, with time and<br />
floor movement these have a tendency<br />
to crack and fall out and will cause an<br />
unsightly appearance, more so than<br />
having a nice even gap.<br />
Wait till the putty is completely dry<br />
before continuing to sand. When oiling,<br />
no cutting back is necessary so puttying<br />
must be done in the initial stages.<br />
If the flooring contains natural<br />
features such as black gum veins, putty<br />
these in black while the nail holes are<br />
puttied as close as possible to the colour<br />
of the timber.<br />
Step 2. Coarse sanding<br />
(cross sanding)<br />
This first step of sanding is to<br />
provide a level and evenly sanded, bare<br />
floor free from any coatings. For new<br />
<strong>floors</strong>, this first step is used to cut the<br />
boards level by taking out any ridges or<br />
high points. With old <strong>floors</strong>, it removes<br />
the old varnish or paint. If <strong>your</strong> flooring<br />
has a heavy varnish finish or bitumen<br />
paint, you may need to start the sanding<br />
with a 24 grit belt otherwise 40 or 60<br />
grit will be sufficient.<br />
Start at a point 45 degrees to the<br />
floorboards and from which will allow<br />
the longest and widest path through<br />
the room. When starting the machine<br />
ensure that the drum is not touching<br />
the boards. Move forward slowly, easing<br />
the drum onto the boards. Lowering<br />
the drum quickly may leave grooves or<br />
‘chatter marks’ that may be difficult to<br />
sand out. Attempt to sand as close to<br />
the wall as possible. Maintain an even<br />
pressure and slowly raise the drum<br />
as you reach the extremity of the line<br />
of sanding. Begin to walk backwards,<br />
pulling the machine, easing the drum<br />
to the floor. Continue back to where<br />
you started from.<br />
When the original starting point is<br />
reached gradually raise the drum from<br />
the floor. Move the machine to the right<br />
or left of this sanded path ensuring an<br />
overlap of 50 to100 mm onto the first<br />
cut path. Check and replace clogged<br />
belts as required.<br />
Continue in this manner until you<br />
have reached the limit of accessibility.<br />
Go back to the original starting point<br />
and work away from the first cut. That<br />
means if you went to the left away from<br />
centre, then work toward the right side<br />
of the room. Much depends though on<br />
the room layout.<br />
During this process the need for<br />
repair work may become evident. Once<br />
the rough sanding has taken place,<br />
borer or termite damage may have<br />
© www.the<strong>own</strong>erbuilder.com.au • 0402 428 123<br />
THE OWNER BUILDER • 165 June/July 2011 • 47
een exposed. If repairs are required,<br />
do those before you continue with the<br />
sanding.<br />
If the floor is in a sad state the<br />
second cut can be made in the same<br />
manner as above but working at 90<br />
degrees to the first cut. Only do this if<br />
absolutely necessary and ensure that the<br />
boards are thick enough.<br />
The third cut (or as in most cases<br />
the second cut) is carried out in the<br />
direction of the boards. As the boards<br />
are now mainly level and most of the<br />
old coatings removed this cut may be<br />
done with a higher grit paper than the<br />
diagonal cuts.<br />
Once a new path has been cut,<br />
move to the left or right and ensure<br />
an overlap of 50 to 100 mm. Continue<br />
this process across the room. When<br />
the full width of the room is sanded,<br />
turn around and sand the other side of<br />
room.<br />
Step 3. Edging<br />
Now it is time to use the edge sander.<br />
The perimeter needs to be sanded level<br />
and blended into the body of the floor.<br />
Overlap a distance of some 100 to 150<br />
mm. Care should be taken that the<br />
machine is held level so that the edger<br />
does not dig groves into the boards.<br />
Repeat the sanding and edging gradually<br />
working up to a finer grit. Grades of<br />
paper used on the edging machine<br />
are the same as those used on the belt<br />
sander; if you started sanding with a 40<br />
grit and finished with 120 grit then use<br />
the same sanding grits for the edging.<br />
If you think you can take shortcuts by<br />
starting off sanding with 40 grit and<br />
then jumping to 100 grit, you will have<br />
a badly scratched floor and will need<br />
more time and materials to rectify the<br />
scratches left by the 40 grit papers.<br />
Never use an edge sander in the<br />
middle area of the floor. It could leave<br />
swirl marks or deep cuts that may be<br />
very difficult to sand out.<br />
Middle sanding<br />
The second sanding removes the<br />
scratches left from the previous sanding<br />
and creates a finer surface. Repeat the<br />
same process, but this time use a finer<br />
grit than previously. This time, only<br />
move the machine along the length of<br />
the boards; no cross cutting is necessary.<br />
Again, use the edge sander with the<br />
same grit paper that you have just used<br />
to do the main part of the floor.<br />
The final sand<br />
The final sand uses a finer grade of<br />
paper – once again reducing the depth<br />
of the scratching and prepares the floor<br />
for the coating system.<br />
Vacuum the floor, not forgetting the<br />
window sills and door frames.<br />
Corners<br />
For areas that the edge sander<br />
cannot reach use a triangle sander<br />
and sand close into the corners and<br />
around the doorframes finishing off<br />
with at least 120 grit sandpapers.<br />
Ensure that all sanding marks have<br />
been removed.<br />
If no machine is at hand, use a sharp<br />
paint scraper. The scraping action<br />
should always be in the direction of the<br />
grain. Then sand by hand along the<br />
grain of the timber to a fine finish.<br />
If you do not have a paint scraper<br />
and <strong>your</strong> corners are heavily varnished<br />
or have paint spills, use a sharp chisel to<br />
gently remove the varnish or paint, then<br />
sand by hand again along the grain of<br />
the timber.<br />
Buffing<br />
If using a synthetic varnish, then this<br />
step may not be necessary. If, however,<br />
you intend to use natural oils, it is<br />
highly recommended. This will achieve<br />
a finer finish and a surface that will not<br />
require re-sanding when rejuvenation is<br />
necessary.<br />
Fit the buffer with a white pad and<br />
a 100 grit screen back (sanding screen<br />
disc). If you have never used a buffer/<br />
rotary sander previously, start in the<br />
centre of the room and work it towards<br />
the wall slowly. Never let it sit in one<br />
place and over sand a spot.<br />
Work around the perimeter of<br />
the room. Once back to the starting<br />
point move the buffer backwards and<br />
forwards across the grain. Overlap<br />
each pass generously and sand the<br />
entire floor. Move slowly and get close<br />
to the edges. Pay particular attention<br />
to the area where the belt sander and<br />
edger overlapped. One side of the<br />
screen back should be enough for a<br />
20m 2 room. Turn the screen back<br />
upside d<strong>own</strong> and repeat the procedure,<br />
however this time working along the<br />
grain of the timber.<br />
Repeat the buffing with a 150 screen<br />
back in the same manner as above.<br />
Cleaning<br />
Vacuum thoroughly not forgetting<br />
window sills, door frames etc. It is<br />
recommended that <strong>floors</strong> be vacuumed<br />
in the same direction as the floorboards.<br />
Do not drag the vacuum cleaner along<br />
the freshly sanded boards as marks may<br />
be left.<br />
The floor should now be scratch free.<br />
If using natural penetrating oils these<br />
will enhance the colour and structure<br />
of the timber but will also highlight any<br />
imperfections in the sanding, even more<br />
so if using stains.<br />
If using a varnish, then it is<br />
imperative to remove all dust and grit<br />
from the floor and surrounding areas. If<br />
not, the dust will adhere to the freshly<br />
lacquered floor and give a gritty look.<br />
Finishing the floor<br />
Apply the floor finish you have chosen<br />
once sanding is completed. Do not allow<br />
others on the floor as they may have<br />
contaminants on their shoes that will<br />
only show up once the floor is coated.<br />
Follow the manufacturer’s instructions<br />
and wear protective equipment if<br />
necessary to guard against strong vapours.<br />
It may be necessary to arrange alternative<br />
accommodation for some days.<br />
<strong>Sanding</strong> <strong>floors</strong> is strenuous to say<br />
the least and you need to weigh up the<br />
cost of and accessibility of machines and<br />
materials and the time involved. It may<br />
be more cost effective to have it done<br />
professionally and have someone else<br />
accountable for the sanding and finishing.<br />
If you do sand and treat <strong>your</strong> floor,<br />
the sense of achievement will far exceed<br />
the aches and pains. ■<br />
Angela Petruzzi is from Anro Floorcare Pty<br />
Ltd, a fl oor sanding company that exclusively<br />
uses the <strong>Livos</strong> natural oil range of products.<br />
www.anrofloorcare.com.au<br />
• Timbermate<br />
Timbermate Woodfiller is nonacrylic,<br />
non-shrinking, non-flammable<br />
and non-solvent based.<br />
1800 35 4811, www.timbermate.com.au<br />
• <strong>Livos</strong> oils<br />
<strong>Livos</strong> <strong>Australia</strong> supplies a large range<br />
of plant based non-toxic products for<br />
various surfaces. The products are<br />
biologically degradable, sustainable and<br />
are harmless, even in direct contact with<br />
humans, animals and plants.<br />
03 9762 9181, www.livos.com.au<br />
48 • THE OWNER BUILDER • 165 June/July 2011 © www.the<strong>own</strong>erbuilder.com.au • 0402 428 123
1 2<br />
PHOTO: LYNDA WILSON<br />
3<br />
4<br />
1. A beautifully oiled blackbutt fl oor.<br />
2. Another stunning fl oor – this one is of<br />
mixed forest red timbers.<br />
3. Only start sanding along the fl oorboards<br />
as an initial sand when the fl oor surface<br />
is in very good condition i.e. no cupping<br />
and only a light coating to remove.<br />
4. A rotary buffi ng machine may be used<br />
for the fi ne sanding, as well as to remove<br />
excess oil from the surface.<br />
5. Tasmanian oak fl oor immediately after<br />
carpet was removed...<br />
6. ... natural features such as gum veins were<br />
puttied in black while the nail holes were<br />
puttied as close as possible to the colour<br />
of the timber...<br />
7. ...and the fl oor after the fi nal sanding has<br />
come up beautifully.<br />
5 6 7<br />
© www.the<strong>own</strong>erbuilder.com.au • 0402 428 123<br />
THE OWNER BUILDER • 165 June/July 2011 • 49