Installing Clipper® Fasteners with the Roller Lacer® and ... - Flexco
Installing Clipper® Fasteners with the Roller Lacer® and ... - Flexco
Installing Clipper® Fasteners with the Roller Lacer® and ... - Flexco

You also want an ePaper? Increase the reach of your titles
YUMPU automatically turns print PDFs into web optimized ePapers that Google loves.
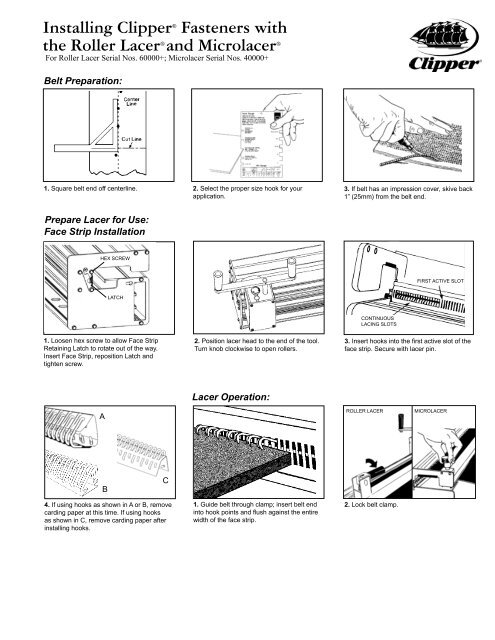
<strong>Installing</strong> Clipper <strong>Fasteners</strong> <strong>with</strong><br />
®<br />
<strong>the</strong> <strong>Roller</strong> Lacer <strong>and</strong> Microlacer ® ®<br />
For <strong>Roller</strong> Lacer Serial Nos. 60000+; Microlacer Serial Nos. 40000+<br />
Belt Preparation:<br />
1. Square belt end off centerline. 2. Select <strong>the</strong> proper size hook for your<br />
application.<br />
3. If belt has an impression cover, skive back<br />
1” (25mm) from <strong>the</strong> belt end.<br />
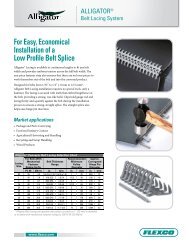
Prepare Lacer for Use:<br />
Face Strip Installation<br />
HEX SCREW<br />
FIRST ACTIVE SLOT<br />
LATCH<br />
CONTINUOUS<br />
LACING SLOTS<br />
1. Loosen hex screw to allow Face Strip<br />
Retaining Latch to rotate out of <strong>the</strong> way.<br />
Insert Face Strip, reposition Latch <strong>and</strong><br />
tighten screw.<br />
2. Position lacer head to <strong>the</strong> end of <strong>the</strong> tool.<br />
Turn knob clockwise to open rollers.<br />
3. Insert hooks into <strong>the</strong> first active slot of <strong>the</strong><br />
face strip. Secure <strong>with</strong> lacer pin.<br />
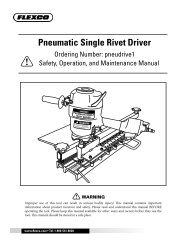
Lacer Operation:<br />
A<br />
ROLLER LACER<br />
MICROLACER<br />
B<br />
C<br />
4. If using hooks as shown in A or B, remove<br />
carding paper at this time. If using hooks<br />
as shown in C, remove carding paper after<br />
installing hooks.<br />
1. Guide belt through clamp; insert belt end<br />
into hook points <strong>and</strong> flush against <strong>the</strong> entire<br />
width of <strong>the</strong> face strip.<br />
2. Lock belt clamp.
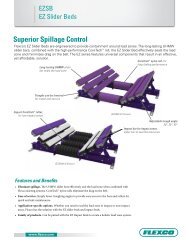
Lacer Operation (cont.):<br />
Turn knob 1½<br />
turns counterclockwise<br />
DRIVE<br />
HANDLE<br />
3. Position rollers over hooks.<br />
4. Turn adjusting knob counter-clockwise<br />
until rollers touch hooks.<br />
5. Return lacer head to end of lacer <strong>and</strong> turn<br />
adjusting knob 1½ additional turns counterclockwise.<br />
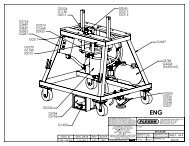
Continuous Lacing:<br />
6. Using <strong>the</strong> h<strong>and</strong>le, move <strong>the</strong> lacer head across<br />
<strong>the</strong> belt width at a smooth speed.<br />
1/2 to 1/3 of <strong>the</strong> wire<br />
diamater should be<br />
embedded into <strong>the</strong> belt.<br />
FIRST ACTIVE SLOT<br />
CONTINUOUS<br />
LACING SLOTS<br />
7. Turn adjusting knob counter-clockwise 1/2<br />
turn <strong>and</strong> return head across <strong>the</strong> belt. Repeat<br />
until hooks are embedded 1/3 to 1/2 into <strong>the</strong><br />
belt.<br />
8. Remove lacer pin. Release belt clamp.<br />
Remove belt from lacer.<br />
NOTE: The belt will need to be ‘continuous<br />
laced’ if it is wider than <strong>the</strong> lacer.<br />
1. Starting on one side of <strong>the</strong> belt, lace <strong>the</strong> first section using <strong>the</strong> ‘Lacer Operation’<br />
instructions listed above.<br />
2. Open rollers.<br />
3. Insert hooks into face strip, starting <strong>with</strong> <strong>the</strong> first active slot.<br />
4. Insert lacer pin. Remove carding paper from hooks, if applicable.<br />
5. Guiding belt through <strong>the</strong> belt clamp, position laced hooks into <strong>the</strong> continuous lacing<br />
slots, directly next to <strong>the</strong> first active slot. Keep belt flush against <strong>the</strong> face strip. Clamp<br />
belt.<br />
6. Lace this section using Steps 3-8 of <strong>the</strong> ‘Lacer Operation’ instructions.<br />
Helpful Tip: When continuous lacing it is recommended to lace <strong>the</strong> shorter length of<br />
belt first <strong>and</strong> <strong>the</strong>n continue <strong>with</strong> <strong>the</strong> longer section of belt. Example: when using a 24"<br />
<strong>Roller</strong> Lacer to lace a 36" wide belt, lace <strong>the</strong> 12" section of belt first <strong>and</strong> <strong>the</strong>n follow<br />
<strong>the</strong> process to continuous lace <strong>the</strong> remaining 24" of belt.<br />
Maintenance:<br />
• Wipe debris off chain-body extrusion periodically <strong>with</strong> a dry cloth to prolong <strong>the</strong> UHMW guide life.<br />
• If head begins to rock back <strong>and</strong> forth, visit www.flexco.com for instructions on adjustment techniques.<br />
1995 Oak Industrial Dr. NE • Gr<strong>and</strong> Rapids, MI 49505 U.S.A.<br />
Telephone: (616)-459-3196 • Fax: (616)-459-4976 • E-mail: info@flexco.com • Web: www.flexco.com<br />
Australia: 61-2-9680-3322 • China: 86-21-33528388 • Engl<strong>and</strong>: 44-1274-600-942<br />
Germany: 49-7428-9406-0 • Mexico: 52 -55- 5674-5326 • South Africa: 27-11-608-4180<br />
©2008 Flexible Steel Lacing Company. Clipper ® , <strong>Roller</strong> Lacer ® <strong>and</strong> Microlacer ® are registered trademarks.<br />
09/08. For Reorder: X1452