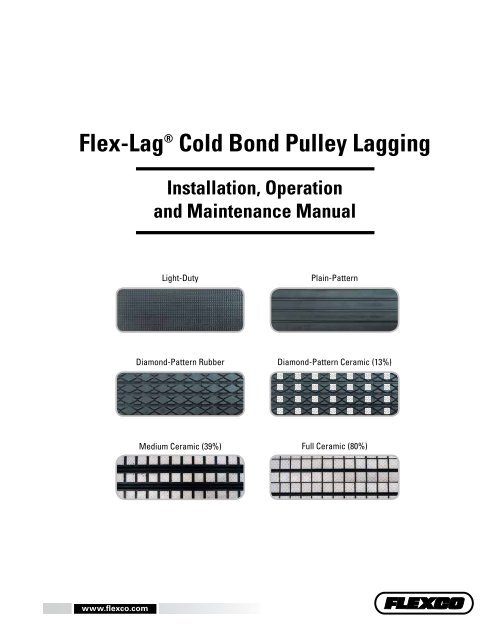
Flex-Lag® Cold Bond Pulley Lagging Installation, Operation ... - Flexco
Flex-Lag® Cold Bond Pulley Lagging Installation, Operation ... - Flexco
Flex-Lag® Cold Bond Pulley Lagging Installation, Operation ... - Flexco

Create successful ePaper yourself
Turn your PDF publications into a flip-book with our unique Google optimized e-Paper software.
<strong>Flex</strong>-Lag ® <strong>Cold</strong> <strong>Bond</strong> <strong>Pulley</strong> <strong>Lagging</strong><br />
<strong>Installation</strong>, <strong>Operation</strong><br />
and Maintenance Manual<br />
Light-Duty<br />
Plain-Pattern<br />
Diamond-Pattern Rubber<br />
Diamond-Pattern Ceramic (13%)<br />
Medium Ceramic (39%)<br />
Full Ceramic (80%)<br />
www.flexco.com
<strong>Flex</strong>-Lag ® <strong>Cold</strong> <strong>Bond</strong> <strong>Pulley</strong> <strong>Lagging</strong><br />
Purchase Date:_______________________________________________________________<br />
Purchased From:_____________________________________________________________<br />
<strong>Installation</strong> Date:_____________________________________________________________<br />
This information will be helpful for any future inquiries or questions<br />
about replacement parts, specifications or troubleshooting.<br />
2 <strong>Flex</strong>-Lag ® <strong>Cold</strong> <strong>Bond</strong> <strong>Pulley</strong> <strong>Lagging</strong>
Table of Contents<br />
Section 1 – Important Information........................................................................ 2<br />
1.1 General Introduction........................................................................................... 2<br />
1.2 User Benefits......................................................................................................... 2<br />
1.3 Service Option...................................................................................................... 2<br />
Section 2 – Safety Considerations and Precautions............................................... 3<br />
2.1 Stationary Conveyors........................................................................................... 3<br />
2.2 Operating Conveyors........................................................................................... 3<br />
Section 3 – Pre-<strong>Installation</strong> Checks and Options................................................... 4<br />
3.1 Checklist................................................................................................................ 4<br />
Section 4 – <strong>Installation</strong> Instructions................................................................... 5-8<br />
Section 5 – Pre-<strong>Operation</strong> Checklist and Testing.................................................. 9<br />
5.1 Pre-Op Checklist.................................................................................................. 9<br />
5.2 Test Run the Conveyor........................................................................................ 9<br />
Section 6 – Maintenance................................................................................ 10 - 12<br />
6.1 New <strong>Installation</strong> Inspection.............................................................................. 10<br />
6.2 Routine Visual Inspection................................................................................. 10<br />
6.3 Routine Physical Inspection.............................................................................. 10<br />
6.4 Maintenance Log................................................................................................ 11<br />
6.5 <strong>Lagging</strong> Maintenance Checklist....................................................................... 12<br />
Section 7 – Troubleshooting................................................................................. 13<br />
Section 8 – Specs and CAD Drawings............................................................. 13-19<br />
8.1 Specifications....................................................................................................... 13<br />
8.2 CAD drawing - Light Duty............................................................................... 14<br />
8.3 Plain...................................................................................................................... 15<br />
8.4 Diamond.............................................................................................................. 16<br />
8.5 Diamond Ceramic.............................................................................................. 17<br />
8.6 Medium Ceramic................................................................................................ 18<br />
8.7 Full Ceramic ...................................................................................................... 19<br />
Section 9 – <strong>Lagging</strong> Adhesives/Toolbox............................................................... 20<br />
Section 10 – Other <strong>Flex</strong>co Conveyor Products..................................................... 21<br />
1
Section 1 – Important Information<br />
1.1 General Introduction<br />
We at <strong>Flex</strong>co are very pleased that you have selected <strong>Flex</strong>-Lag® <strong>Pulley</strong> <strong>Lagging</strong> for your conveyor system.<br />
This manual will help you to understand the operation of this product and assist you in making it work up to<br />
its maximum efficiency over its lifetime of service.<br />
It is essential for safe and efficient operation that the information and guidelines presented be properly<br />
understood and implemented. This manual will provide safety precautions, installation instructions,<br />
maintenance procedures and troubleshooting tips.<br />
If, however, you have any questions or problems that are not covered, please contact your field representative<br />
or our Customer Service Department:<br />
Web site: <strong>Flex</strong>co.com<br />
Customer Service: USA: 1-800-541-8028<br />
Australia: 61-2-8818-2000 • Chile: 56-2-8967870 • China: 86-21-33528388<br />
England: 44-1274-600-942 • Germany: 49-7428-9406-0 • India: 91-44-4354-2091<br />
Mexico: 52-55-5674-5326 • Singapore: 65-6281-7278 • South Africa: 27-11-608-4180<br />
Please read this manual thoroughly and pass it on to any others who will be directly responsible for<br />
installation, operation and maintenance of this pulley lagging. While we have tried to make the installation<br />
and service tasks as easy and simple as possible, it does however require correct installation and regular<br />
inspections to maintain top working condition.<br />
1.2 User Benefits<br />
Correct installation and regular maintenance will provide the following benefits for your operation:<br />
• Eliminate belt slippage<br />
• Reduced conveyor downtime<br />
• Reduced man-hour labor<br />
• Lower maintenance budget costs<br />
• Increased service life for the lagging and pulley<br />
1.3 Service Option<br />
<strong>Flex</strong>-Lag® <strong>Pulley</strong> <strong>Lagging</strong> is designed to be easily installed and serviced by your on-site personnel. However, if<br />
you would prefer complete turn-key factory service, please contact your local <strong>Flex</strong>co Field Representative.<br />
2 <strong>Flex</strong>-Lag ® <strong>Cold</strong> <strong>Bond</strong> <strong>Pulley</strong> <strong>Lagging</strong>
Section 2 – Safety Considerations and Precautions<br />
Before installing and operating <strong>Flex</strong>-Lag <strong>Pulley</strong> <strong>Lagging</strong>, it is important to review and understand the following safety<br />
information.<br />
There are set-up, maintenance and operational activities involving both stationary and operating conveyors. Each case<br />
has a safety protocol.<br />
2.1 Stationary Conveyors<br />
The following activities are performed on stationary conveyors:<br />
• <strong>Installation</strong><br />
• Cleaning<br />
!<br />
danger<br />
It is imperative that OSHA/MSHA Lockout/Tagout (LOTO)<br />
regulations, 9 CFR 1910.147, be followed before undertaking<br />
the preceding activities. Failure to use LOTO exposes<br />
workers to uncontrolled behavior of the products caused by<br />
movement of the conveyor belt. Severe injury or death can<br />
result.<br />
Before working:<br />
• Lockout/Tagout the conveyor power source<br />
• Disengage any takeups<br />
• Clear the conveyor belt or clamp securely in place<br />
!<br />
WARNING<br />
Use Personal Protective Equipment (PPE):<br />
• Safety eyewear (splash goggles optional)<br />
• NIOSH-approved air respirator with organic<br />
vapor cartridge (if ventilation is not available as<br />
recommended in enclosed Safety Data Sheets)<br />
• Hardhat • Long-sleeve shirt<br />
• Safety footwear • Apron (optional)<br />
• Nitrile gloves<br />
Close quarters and heavy components create a worksite<br />
that compromises a worker’s eyes, feet and skull.<br />
PPE must be worn to control the foreseeable hazards<br />
associated with conveyor lagging. Serious injuries can<br />
be avoided.<br />
2.2 Operating Conveyors<br />
There are two routine tasks that must be performed while the conveyor is running:<br />
• Inspection of performance<br />
• Dynamic troubleshooting<br />
!<br />
!<br />
danger<br />
Every belt pulley is an in-running nip hazard. Never<br />
touch or prod an operating pulley. <strong>Pulley</strong> hazards cause<br />
instantaneous amputation and entrapment.<br />
WARNING<br />
<strong>Pulley</strong>s can become projectile hazards. Stay as far from the<br />
pulley as practical and use safety eyewear and headgear.<br />
Missiles can inflict serious injury.<br />
!<br />
WARNING<br />
Never adjust anything on an operating pulley.<br />
Unforseeable belt projections and tears can cause<br />
violent movements. Flailing hardware can cause<br />
serious injury or death.<br />
3
Section 3 – Pre-installation Checks and Options<br />
3.1 Checklist<br />
• Check that the lagging size is correct for the pulley width<br />
• Check that the correct amount of lagging strips are available to lag the<br />
pulley (see Page 6).<br />
• Check that the correct amount of primer, adhesive and activator are<br />
available to lag the pulley (see Page 6).<br />
• Check the carton and make sure all the parts are included<br />
• Review the “Tools Needed” list on the top of the installation instructions<br />
• Check the conveyor site:<br />
· Will the lagging be installed in a chute<br />
· Is the install on an open head pulley<br />
<strong>Flex</strong>-Lag Primer, Adhesive and Activator ONLY for use with<br />
cold-bond rubber-to-rubber or rubber-to-metal adhesion.<br />
4 <strong>Flex</strong>-Lag ® <strong>Cold</strong> <strong>Bond</strong> <strong>Pulley</strong> <strong>Lagging</strong>
Section 4 – <strong>Installation</strong> Instructions<br />
If using non-<strong>Flex</strong>co adhesives, please follow that company’s instructions for usage, mixing, application and safety<br />
procedures.<br />
<strong>Flex</strong>-Lag <strong>Pulley</strong> <strong>Lagging</strong> can be used with <strong>Flex</strong>-Lag Adhesives. <strong>Flex</strong>-Lag Adhesives consist of a Primer, Adhesive<br />
and Activator. Before using, the Primer should be thoroughly mixed. Before using, one Adhesive and one Activator<br />
should be thoroughly mixed and used within two hours. Reference the Adhesive Usage Charts on Page 6 for quantity<br />
of each material required based on <strong>Pulley</strong> Diameter and Face Width.<br />
These materials are meant for use at room temperature. The ambient temperature and temperature of the lagging<br />
and pulley must be between 50˚F-104˚F (10˚C- 40˚C), and the relative humidity should not exceed 80% during the<br />
lagging procedure. These should be checked prior to starting and occasionally during the lagging process to ensure<br />
proper bonding.<br />
Proper protective equipment should be used during the lagging process. Wear safety glasses with side shields.<br />
Wear chemical splash goggles if the possibility exists for eye contact with splashing liquid. Avoid skin contact by<br />
wearing chemically-resistant gloves (nitrile) and long sleeved shirt. An apron may be appropriate if splashing can<br />
occur. Respiratory protection may be required to avoid overexposure when handling this product. If general room<br />
ventilation is not available or sufficient use a NIOSH-approved air purifying respirator with organic vapor cartridge.<br />
Please reference the Safety Data Sheets for Adhesive, Activator and Primer to see detailed requirements. Also, please<br />
follow any local or state guidelines for use of this product.<br />
Physically lock out and tag the conveyor at the power source<br />
before you begin pulley lagging installation.<br />
Tools Needed:<br />
• Grinder (low RPM recommended)<br />
• 24 Grit Flap Disc<br />
• Bench Brush<br />
• Coarse Dish Wheel<br />
• Paint Brushes<br />
• Heavy Duty Knife<br />
• Chalk Line<br />
• Dead Blow Rubber Hammer<br />
• <strong>Lagging</strong> Stitchers/Rollers<br />
• Oscillating Tool (for cutting rubber)<br />
Fig. 1<br />
1. Prepare the pulley by removing the old lagging, paint and primer.<br />
Sand blast the entire pulley or use a grinder with 24 grit flap disc or<br />
paper disc. Use bench brush and non-oil-based metal solvent to clean<br />
remaining particles from the pulley surface. Paint the pulley surface,<br />
including the edges, with <strong>Flex</strong>-Lag Primer. Allow to dry completely –<br />
a minimum of 30 minutes.<br />
Fig. 2<br />
2. Use a grinder with coarse dish wheel to buff the edges and bottom<br />
of the lagging. Be careful not to smoke the rubber. Wipe with nonoil-based<br />
solvent to clean surface of any particles.<br />
5
Section 4 – <strong>Installation</strong> Instructions (cont.)<br />
3. Use the Strip Selection Chart at right to<br />
calculate the number of strips required for<br />
your pulley diameter. Using a heavy duty<br />
knife, cut lagging strips 4” (100mm) longer<br />
than the pulley face width. Medium and Full<br />
Ceramic lagging come in pre-specified strip<br />
lengths. Note: Do not allow ceramic tiles to<br />
sit at, or over, the edge of the pulley face.<br />
Strip Selection<br />
PULLEY DIAMETER STRIPS PULLEY DIAMETER STRIPS<br />
in. mm REQUIRED in. mm REQUIRED<br />
12.6-15.0 320-381 6 42.6-45.0 1083-1145 18<br />
15.1-17.5 382-445 7 45.1-47.5 1146-1210 19<br />
17.6-20.0 446-510 8 47.6-50.1 1211-1273 20<br />
20.1-22.5 511-573 9 50.2-52.6 1274-1336 21<br />
22.6-25.0 574-636 10 52.7-55.1 1337-1400 22<br />
25.1-27.5 637-700 11 55.2-57.6 1403-1463 23<br />
27.6-30.0 701-764 12 57.7-60.1 1466-1527 24<br />
30.1-32.5 765-827 13 60.2-62.6 1529-1590 25<br />
32.6-35.0 828-891 14 62.7-65.1 1593-1654 26<br />
35.1-37.5 892-955 15 65.2-67.6 1656-1717 27<br />
37.6-40.0 956-1018 16 67.7-70.1 1720-1781 28<br />
40.1-42.5 1019-1082 17 70.2-72.6 1783-1844 29<br />
Fig. 3<br />
FLEX-LAG ® ADHESIVE 27.0 oz. (0.8L) / ACTIVATOR 1.4 oz. (40g) (1:1 mix ratio)<br />
Face Width<br />
In. 10 14 18 22 26 30 34 38 42 46 50 54 58 62 66 70 74 78 82 86 90<br />
<strong>Pulley</strong> Diameter<br />
mm 254 356 457 559 660 762 864 965 1067 1168 1270 1372 1473 1575 1676 1778 1880 1981 2083 2184 2286<br />
8 203 1 1 1 1 1 1 1 1 2 2 2 2 2 2 2 2 2 2 3 3 3<br />
12 305 1 1 1 1 1 2 2 2 2 2 2 3 3 3 3 3 3 3 4 4 4<br />
16 406 1 1 1 2 2 2 2 2 3 3 3 3 3 4 4 4 4 4 5 5 5<br />
20 508 1 1 2 2 2 2 3 3 3 3 4 4 4 4 5 5 5 5 6 6 6<br />
24 610 1 2 2 2 2 3 3 3 4 4 4 5 5 5 5 6 6 6 7 7 7<br />
28 711 1 2 2 2 3 3 3 4 4 5 5 5 6 6 6 7 7 7 8 8 8<br />
32 813 2 2 2 3 3 4 4 4 5 5 6 6 6 7 7 8 8 8 9 9 10<br />
36 914 2 2 3 3 3 4 4 5 5 6 6 7 7 8 8 8 9 9 10 10 11<br />
40 1016 2 2 3 3 4 4 5 5 6 6 7 7 8 8 9 9 10 10 11 11 12<br />
44 1118 2 2 3 4 4 5 5 6 6 7 7 8 9 9 10 10 11 11 12 12 13<br />
48 1219 2 3 3 4 4 5 6 6 7 7 8 9 9 10 10 11 12 12 13 13 14<br />
52 1321 2 3 3 4 5 5 6 7 7 8 9 9 10 11 11 12 13 13 14 15 15<br />
56 1422 2 3 4 4 5 6 6 7 8 9 9 10 11 11 12 13 14 14 15 16 16<br />
60 1524 2 3 4 5 5 6 7 8 8 9 10 11 11 12 13 14 14 15 16 17 17<br />
FLEX-LAG ® PRIMER 25.4 oz. (.75L)<br />
<strong>Pulley</strong> Diameter<br />
Face Width<br />
In. 10 14 18 22 26 30 34 38 42 46 50 54 58 62 66 70 74 78 82 86 90<br />
mm 254 356 457 559 660 762 864 965 1067 1168 1270 1372 1473 1575 1676 1778 1880 1981 2083 2184 2286<br />
8 203 1 1 1 1 1 1 1 1 1 1 1 1 1 1 1 1 1 1 1 1 1<br />
12 305 1 1 1 1 1 1 1 1 1 1 1 1 1 1 1 1 1 1 1 1 1<br />
16 406 1 1 1 1 1 1 1 1 1 1 1 1 1 1 1 1 1 1 1 1 1<br />
20 508 1 1 1 1 1 1 1 1 1 1 1 1 1 1 1 1 1 1 1 1 1<br />
24 610 1 1 1 1 1 1 1 1 1 1 1 1 1 1 1 1 1 1 1 1 1<br />
28 711 1 1 1 1 1 1 1 1 1 1 1 1 1 1 1 1 1 1 1 1 1<br />
32 813 1 1 1 1 1 1 1 1 1 1 1 1 1 1 1 1 1 1 1 1 1<br />
36 914 1 1 1 1 1 1 1 1 1 1 1 1 1 1 1 1 1 1 1 1 2<br />
40 1016 1 1 1 1 1 1 1 1 1 1 1 1 1 1 1 1 1 1 2 2 2<br />
44 1118 1 1 1 1 1 1 1 1 1 1 1 1 1 1 1 1 2 2 2 2 2<br />
48 1219 1 1 1 1 1 1 1 1 1 1 1 1 1 1 1 2 2 2 2 2 2<br />
52 1321 1 1 1 1 1 1 1 1 1 1 1 1 1 2 2 2 2 2 2 2 2<br />
56 1422 1 1 1 1 1 1 1 1 1 1 1 1 2 2 2 2 2 2 2 2 2<br />
60 1524 1 1 1 1 1 1 1 1 1 1 1 2 2 2 2 2 2 2 2 2 2<br />
6 <strong>Flex</strong>-Lag ® <strong>Cold</strong> <strong>Bond</strong> <strong>Pulley</strong> <strong>Lagging</strong>
Section 4 – <strong>Installation</strong> Instructions (cont.)<br />
Fig. 4a<br />
Fig. 4b<br />
4. Apply first coat of adhesive. Thoroughly mix one can of adhesive and one activator at a time, immediately applying<br />
it to the pulley and strips of lagging using a circular scrubbing motion. Be sure to apply adhesive to the edges of the<br />
lagging as well. This process should use half of the adhesive/activator required in the chart on Page 6. Note: Allow 4<br />
hours for the first coat to properly cure. Temperature and humidity will affect dry time.<br />
Fig. 5<br />
5. After the first coat of adhesive has dried completely, mark a line across<br />
the pulley face using a chalk line or scriber, ensuring the line is parallel to<br />
the shaft’s centerline and square to the edge of the pulley.<br />
Fig. 6<br />
6. Apply second coat of adhesive to the pulley. Thoroughly mix one can of<br />
adhesive and activator at a time. From the perpendicular line, apply the<br />
second coat of adhesive to an area slightly greater than one strip of lagging.<br />
Fig. 7<br />
7. Apply a second coat of adhesive to one strip of lagging. Be sure to apply<br />
adhesive to the edges of the lagging as well.<br />
Fig. 8<br />
8. After the second coat has reached the appropriate tackiness (approximately<br />
2-5 minutes, touch with back of hand – feels tacky and leaves no adhesive on<br />
hand) install one strip of lagging, using the perpendicular line to assure the<br />
strip is square to the pulley. Working out from the center of the strip, use a<br />
dead blow rubber hammer for tamping to remove the air gaps, ensuring all<br />
surface area receives one hammer blow. Repeat this process with <strong>Lagging</strong><br />
Stitchers/Rollers to remove air gaps from drainage grooves. Be sure to check<br />
edges to verify seal.<br />
7
Section 4 – <strong>Installation</strong> Instructions (cont.)<br />
9. Repeat Steps 6 and 7, then place the second strip of lagging against the first,<br />
taking care to ensure there are no gaps between the lagging. This may require<br />
additional stitching between strips to remove any gaps. Repeat the tamping<br />
and stitching process in Step 8 to remove air gaps from the applied strip. Shift<br />
lagging side-to-side to align diamond/ceramic patterns.<br />
Fig. 9<br />
10. Trim the excess lagging from applied strips at the edge of the pulley using a<br />
heavy duty knife or oscillating tool. Trim lagging at an angle up and away from<br />
the pulley edge.<br />
Fig. 10<br />
Fig. 11a<br />
Fig. 11b<br />
11. To apply the last 3-4 strips, position cut-off pieces of lagging from Step 10 in the unlagged portion of the pulley.<br />
Manipulate the pieces to determine trim requirements for the last few strips. Trim the pieces in the gutters to find the<br />
proper fit. Use the pieces as templates to trim the last few strips of lagging. Note: Final strips should not consist of<br />
less than three rows.<br />
Fig. 12<br />
12. Follow Steps 6 through 10 to install the last 3-4 strips. The final piece of<br />
lagging (largest of final pieces) should drop into position. Check the fit of the<br />
last piece prior to applying the second coat of adhesive.<br />
Fig. 13<br />
13. Fill any gaps between the lagging strips with rubber sealer. Also use the<br />
buffing wheel on trimmed edge of lagging and apply final coat of adhesive<br />
to seal the edge and joint area between lagging strips.<br />
Note: Allow minimum of 24 hours of curing time before putting newly<br />
lagged pulley into use.<br />
8 <strong>Flex</strong>-Lag ® <strong>Cold</strong> <strong>Bond</strong> <strong>Pulley</strong> <strong>Lagging</strong>
Section 5 – Pre-<strong>Operation</strong> Checklist and Testing<br />
5.1 Pre-Op Checklist<br />
• Be sure that all installation materials and tools have been removed from the belt and the conveyor area.<br />
5.2 Test Run the Conveyor<br />
• Run the conveyor for at least 15 minutes and inspect the lagging performance.<br />
NOTE: Observing the pulley lagging when it is running and performing properly will help to detect problems.<br />
9
Section 6 – Maintenance<br />
<strong>Flex</strong>co lagging is designed to operate with minimum maintenance. However, to maintain superior performance some<br />
service is required. This service will ensure that the cleaner operates at optimal efficiency and problems can be identified<br />
and fixed before the lagging stops working.<br />
All safety procedures for inspection of equipment (stationary or operating) must be observed. <strong>Flex</strong>-Lag <strong>Pulley</strong> <strong>Lagging</strong><br />
operates at the discharge end of the conveyor and is in direct contact with the moving belt. Only visual observations can<br />
be made while the belt is running. Service tasks can be done only with the conveyor stopped and by observing the correct<br />
lockout/tagout procedures.<br />
6.1 New <strong>Installation</strong> Inspection<br />
After the new lagging has run for a few days a visual inspection should be made to ensure the lagging is performing<br />
properly.<br />
6.2 Routine Visual Inspection (every 6-8 weeks)<br />
A visual inspection of the lagging and belt can determine:<br />
• If there is damage to the lagging.<br />
• If fugitive material is built up on the lagging.<br />
• If there is damage to the belt.<br />
If any of the above conditions exist, a determination should be made on when the conveyor can be stopped for additional<br />
maintenance.<br />
6.3 Routine Physical Inspection (every 3-4 months)<br />
When the conveyor is not in operation and properly locked and tagged out, conduct a physical inspection of the lagging<br />
to perform the following tasks:<br />
• Clean material buildup off of the lagging.<br />
• Closely inspect the lagging for wear and any damage.<br />
• Ensure full lagging to belt contact.<br />
• Inspect the belt for damage.<br />
• Replace any worn or damaged components.<br />
• When maintenance tasks are completed, test run the conveyor to ensure the lagging is performing properly.<br />
10 <strong>Flex</strong>-Lag ® <strong>Cold</strong> <strong>Bond</strong> <strong>Pulley</strong> <strong>Lagging</strong>
Section 6 – Maintenance (cont.)<br />
6.4 Maintenance Log<br />
Conveyor Name/No.<br />
Date: Work done by: Service Quote #<br />
Activity:<br />
Date: Work done by: Service Quote #<br />
Activity:<br />
Date: Work done by: Service Quote #<br />
Activity:<br />
Date: Work done by: Service Quote #<br />
Activity:<br />
Date: Work done by: Service Quote #<br />
Activity:<br />
Date: Work done by: Service Quote #<br />
Activity:<br />
Date: Work done by: Service Quote #<br />
Activity:<br />
11
Section 6 – Maintenance (cont.)<br />
6.6 <strong>Lagging</strong> Maintenance Checklist<br />
Site: Inspected by: Date:<br />
<strong>Lagging</strong>:<br />
Beltline Information:<br />
Beltline Number:<br />
Belt Condition:<br />
Belt Width: 18" 24" 30" 36" 42" 48" 54" 60" 72"<br />
(450mm) (600mm) (750mm) (900mm) (1050mm) (1200mm) (1350mm) 1500mm) (1800mm)<br />
Head <strong>Pulley</strong> Diameter (Belt & <strong>Lagging</strong>): Belt Speed: fpm Belt Thickness:<br />
Belt Splice Condition of Splice Number of splices Skived Unskived<br />
Material conveyed<br />
Days per week run<br />
Hours per day run<br />
<strong>Lagging</strong> Life:<br />
Date installed:<br />
<strong>Lagging</strong> Thickness:<br />
Date inspected:<br />
Estimated life:<br />
<strong>Lagging</strong>: Weld-on Ceramic Rubber Other None<br />
Condition of lagging: Good Bad Other<br />
<strong>Lagging</strong>'s Overall Performance: ( Rate the following 1 - 5, 1 = very poor - 5 = very good )<br />
Appearance:<br />
Location:<br />
Maintenance:<br />
Comments:<br />
Comments:<br />
Comments:<br />
Performance: Comments:<br />
Other Comments:<br />
12 <strong>Flex</strong>-Lag ® <strong>Cold</strong> <strong>Bond</strong> <strong>Pulley</strong> <strong>Lagging</strong>
Section 7 – Troubleshooting<br />
Problem Possible Cause Possible Solutions<br />
Uneven wear in rubber<br />
lagging<br />
Delaminating<br />
Belt Tension<br />
Short Transition<br />
Wrong <strong>Lagging</strong> for Application<br />
Glue too wet or dry when applied<br />
<strong>Pulley</strong> surface not prepped correctly<br />
Change to ceramic lagging<br />
Increase distance to full trough idler<br />
Increase thickness or change to ceramic lagging<br />
Refer to instructions on p. 5-8 for proper installation instructions<br />
Refer to instructions on p. 5-8 for proper installation instructions<br />
For additional troubleshooting questions, please contact Customer Service or your territory manager.<br />
Section 8 – Specifications and CAD Drawings<br />
8.1 Specifications<br />
Criteria<br />
Total Thickness*<br />
<strong>Flex</strong>-Lag ® Rubber <strong>Flex</strong>-Lag ® Ceramic <strong>Flex</strong>-Lag ® Weld-On <br />
Rubber<br />
Light Duty Plain<br />
Ceramic 74%<br />
Diamond 13% Coverage 39% Coverage 80% Coverage<br />
Diamond Coverage<br />
1/4"<br />
(6 mm)<br />
13/32" – 1"<br />
(10 – 25 mm)<br />
13/32" – 1"<br />
(10 – 25 mm)<br />
15/32"<br />
(12 mm)<br />
Belt Width* Any Width Any Width Any Width Any Width<br />
5/8"<br />
(15 mm)<br />
18" – 84"<br />
(450 – 2100 mm)<br />
1/2"<br />
(13 mm)<br />
18" – 84"<br />
(450 – 2100 mm)<br />
9/16"<br />
(14 mm)<br />
18" – 72"<br />
(450 – 1800 mm)<br />
5/8"<br />
(15 mm)<br />
18" – 72"<br />
(450 – 1800 mm)<br />
Minimum <strong>Pulley</strong> Diameter 12" (300mm) 12” (300mm) 12” (300mm) 12” (300mm) 12” (300mm) 12” (300mm) 16" (400mm) 16” (400mm)<br />
Dry Performance Very Good Excellent Excellent Excellent Excellent Excellent Excellent Excellent<br />
Wet Performance Average Average Good Very Good Excellent Excellent Good Excellent<br />
Wear Life Good Very Good Very Good Excellent Excellent Excellent Very Good Excellent<br />
Ease of <strong>Installation</strong> Good Good Good Good Good Good Excellent Excellent<br />
Drainage Grooves No Yes Yes Yes Yes Yes Yes Yes<br />
FRAS (Fire Resistant Anti Static) No Yes Yes Yes Yes Yes Yes Yes<br />
Compound SBR SBR SBR SBR SBR SBR SBR SBR<br />
Hardness (Shore A) 68 +/-3 68 +/-3 68 +/-3 68 +/-3 68 +/-3 68 +/-3 68 +/-3 68 +/-3<br />
5° – 185° F 5° – 185° F 5° – 185° F 5° – 185° F 5° – 185° F 5° – 185° F 5° – 185° F 5° – 185° F<br />
Operating Temperature<br />
(-15° – 85° C) (-15° – 85° C) (-15° – 85° C) (-15° – 85° C) (-15° – 85° C) (-15° – 85° C) (-15° – 85° C) (-15° – 85° C)<br />
*Additional thicknesses and widths available as special orders. For weld-on lagging, this includes the steel backing plate.<br />
13
Section 8 – Specifications and CAD Drawings (cont.)<br />
8.2 <strong>Lagging</strong> - Light Duty Rubber<br />
6 -<br />
0.75<br />
+0.25<br />
200 - 0.5<br />
+0.5<br />
3300<br />
DESCRIPTION ORDERING NUMBER ITEM CODE<br />
BLACK NATURAL<br />
RUBBER<br />
WHITE NITRILE<br />
RUBBER<br />
6BLD 71077<br />
6WLD 71076<br />
14 <strong>Flex</strong>-Lag ® <strong>Cold</strong> <strong>Bond</strong> <strong>Pulley</strong> <strong>Lagging</strong>
Section 8 – Specifications and CAD Drawings (cont.)<br />
8.3 <strong>Lagging</strong> - Plain Rubber<br />
6500<br />
+0.25<br />
THICKNESS -0.75<br />
200 - 0.5<br />
+ 0.5<br />
NATURAL RUBBER FRAS RUBBER<br />
THICKNESS ITEM CODE<br />
ORDERING<br />
NUMBER WEIGHT<br />
THICKNESS ITEM CODE<br />
10 71010 10NP 16<br />
12 71012 12NP 18<br />
15 71017 15NP 23<br />
20<br />
71021<br />
20NP<br />
26<br />
25<br />
71163<br />
25NP<br />
29<br />
ORDERING<br />
NUMBER<br />
WEIGHT<br />
10 71020 10FRP 17<br />
12 71022 12FRP 20<br />
15 71015 15FRP 24<br />
20 72129 20FRP 27<br />
15
A<br />
Section 8 – Specifications and CAD Drawings (cont.)<br />
8.4 <strong>Lagging</strong> - Diamond-Pattern Rubber<br />
0.20<br />
5<br />
256<br />
6500<br />
A<br />
B<br />
200<br />
7.87<br />
0.59<br />
15<br />
B<br />
A<br />
C<br />
SECTION A-A<br />
ITEM CODE<br />
ORDERING<br />
NUMBER<br />
MATERIAL THICKNESS<br />
15ND 71006<br />
15<br />
[19/32]<br />
NATURAL<br />
RUBBER<br />
15FRD 71018<br />
15<br />
[19/32]<br />
FRAS<br />
0.43<br />
11<br />
1.50<br />
38<br />
2.68 5<br />
NOTE<br />
68<br />
-ALL DIMENSIONS IN BRACKETS ARE INCHES<br />
DETAIL B<br />
SCALE 1 : 2<br />
16 <strong>Flex</strong>-Lag ® <strong>Cold</strong> <strong>Bond</strong> <strong>Pulley</strong> <strong>Lagging</strong><br />
A<br />
B<br />
C<br />
D<br />
E<br />
D<br />
E<br />
F<br />
F<br />
REVISION CHANGE:<br />
INTIAL REVISION<br />
FLEXCO (AUST) PTY LTD<br />
18-20 Brookhollow Ave<br />
Baulkham Hills NSW 2153<br />
UNLESS NOTED OTHERWISE<br />
www.flexco.com.au<br />
ALL DIMENSIONS ARE IN MILLIMIETRES<br />
GENERAL TOLERANCE: ± 0.5mm<br />
DRAWN: MK DATE: 23.07.2012 TITLE:<br />
ANGULAR TOLERANCE: ± 0.5<br />
FLEX-LAG DIAMOND 15mm<br />
NATURAL CHK BY: RUBBER RK DATE: 23.07.2012<br />
FRAS<br />
PROPRIETRY AND CONFIDENTIAL<br />
NATURAL AND FRAS<br />
CONTAINED IN THIS DRAWING<br />
FLEXCO (AUST) PTYLTD. SCALE: 1:5 WEIGHT(kg): -<br />
DRAWING NUMBER:<br />
REV.:<br />
PART<br />
THICKNESS<br />
ECM :<br />
OR AS A WHOLE<br />
THICKNESS<br />
ITEM ORDERING<br />
ITEM ORDERING<br />
WRITTEN PERMISSION OF SHEET<br />
A3<br />
LTD IS PROHIBITED. SIZE:<br />
SHEET 1 OF 1 297<br />
in. mm CODE NUMBER in. mm CODE<br />
71006<br />
NUMBER<br />
0<br />
THE INFORMATION IS THE SOLE PROPERTY OF ANY REPRODUCTION IN WITHOUT THE FLEXCO (AUST) PTY 1 2 3 4 5 6 7 8<br />
13/32 10 71014 10FRD<br />
13/32 10 71002 10ND<br />
-<br />
15/32 12 71016 12FRD<br />
15/32 12 71004 12ND<br />
19/32 15 71018 15FRD<br />
19/32 15 71006 15ND<br />
25/32 20 71019 20FRD<br />
25/32 20 71008 20ND<br />
1 25 71152 25ND
Section 8 – Specifications and CAD Drawings (cont.)<br />
8.5 <strong>Lagging</strong> - Diamond Ceramic<br />
6500<br />
77 TYP.<br />
TILE ITEM CODE P3673<br />
THICKNESS MATERIAL ITEM CODE<br />
ORDERING<br />
NUMBER<br />
WEIGHT QTY. TILES<br />
12 NATURAL RUBBER 71155 12NDC 25 328<br />
12 FRAS 71159 12FRDC 27 328<br />
+0.25<br />
12 -0.75<br />
200 - 0.5<br />
+0.5<br />
17
Section 8 – Specifications and CAD Drawings (cont.)<br />
8.6 <strong>Lagging</strong> - Medium Ceramic<br />
NATURAL RUBBER 39% MEDIUM LAGGING LAGGING<br />
61303 [84.86] 2155<br />
TILES PER<br />
PIECE<br />
BELT<br />
BELT<br />
WIDTH<br />
WIDTH<br />
ITEM<br />
ITEM<br />
CODE<br />
CODE<br />
DIM<br />
DIM<br />
'A'<br />
'A' ORDERING<br />
ORDERING<br />
NUMBER<br />
NUMBER<br />
[18"] [18"] 450mm 450mm 61294 61294 [18.68] [18.18] 474 462 95 CLM450/18 CLM450<br />
[24"] [24"] 600mm 600mm 61295 61295 [24.63] [24.25] 626 616 125 CLM600/24 CLM600<br />
[30"] [30"] 750mm 750mm 61296 61296 [30.67] [30.3] 779 770 155 CLM750/30 CLM750<br />
[36"] [36"] 900mm 900mm 61297 61297 [36.66] [36.37] 931 924 185 CLM900/36 CLM900<br />
[42"] 1050mm 61298 [42.43] 1078 CLM1050/42<br />
[42"] 1050mm 61298 [42.61] 1082 215 CLM1050<br />
[48'] 1200mm 61299 [48.49] 1232 CLM1200/48<br />
[48'] 1200mm 61299 [48.64] 1235 245 CLM1200<br />
[54"] 1350mm 61300 [54.55] 1386 CLM1350/54<br />
[54"] [60"] 1350mm 1500mm 61300 61301 [54.64] [60.61] 1388 1540 275 CLM1500/60 CLM1350<br />
[60"] [72"] 1500mm 1800mm 61301 61302 [60.66] [72.74] 1541 1848 305 CLM1800/72 CLM1500<br />
[72"] [84"] 1800mm 2100mm 61302 61303 [72.52] [84.86] 1842 2155 365 CLM2100/84 CLM1800<br />
[84"] 2100mm<br />
425<br />
CLM2100<br />
BELT BELT WIDTH WIDTH<br />
FRAS ITEM FRAS ITEM<br />
CODE CODE DIM 'A'<br />
FRAS 39% MEDIUM LAGGING LAGGING<br />
DIM TILES 'A' PER ORDERING<br />
PIECE<br />
NUMBER<br />
[18"] [18"] 450mm 450mm 61308 61308 [18.68] 474 [18.18] 462 95 CLMF450/18<br />
[24"] [24"] 600mm 600mm 61309 61309 [24.63] 626 [24.25] 616 125 CLMF600/24 CLMF600<br />
[30"] 750mm 61310 [30.3] 770 CLMF750/30<br />
[30"] 750mm 61310 [30.67] 779 155 CLMF750<br />
[36"] 900mm 61311 [36.37] 924 CLMF900/36<br />
[36"] 900mm 61311 [36.66] 931 185 CLMF900<br />
[42"] 1050mm 61312 [42.43] 1078 CLMF1050/42<br />
[42"] 1050mm 61312 [42.61] 1082 215 CLMF1050<br />
[48'] 1200mm 61313 [48.49] 1232 CLMF1200/48<br />
[48'] 1200mm 61313 [48.64] 1235 245 CLMF1200<br />
[54"] 1350mm 61314 [54.55] 1386 CLMF1350/54<br />
[54"] 1350mm 61314 [54.64] 1388 275 CLMF1350<br />
[60"] 1500mm 61315 [60.61] 1540 CLMF1500/60<br />
[60"]<br />
[72"]<br />
1500mm<br />
1800mm<br />
61315<br />
61316<br />
[60.66] 1541<br />
[72.74] 1848<br />
305<br />
CLMF1800/72<br />
CLMF1500<br />
[72"] [84"] 1800mm 2100mm 61316 61317 [72.52] 1842 [84.86] 2155 365 CLMF2100/84<br />
CLMF1800<br />
[84"] 2100mm 61317 [84.86] 2155 425 CLMF2100<br />
10.1 8.0<br />
257 203<br />
8.0<br />
CERAMIC LENGTH DIM - 'A' DIM 'A' 203<br />
10.1<br />
257<br />
0.59<br />
15<br />
0.51<br />
13<br />
200<br />
7.87<br />
196<br />
7.72<br />
NOTES:<br />
NOTES:<br />
DIMENSIONS IN BRACKETS INCHES<br />
DIMENSIONS IN BRACKETS INCHES<br />
18 <strong>Flex</strong>-Lag ® <strong>Cold</strong> <strong>Bond</strong> <strong>Pulley</strong> <strong>Lagging</strong>
1 2 3 4 5 6 7 8<br />
Section 8 – Specifications and CAD Drawings (cont.)<br />
8.7 <strong>Lagging</strong> - Full Ceramic<br />
+0.25<br />
12 - 0.75<br />
A<br />
DIM 'B' 10<br />
-<br />
7.5<br />
3<br />
25<br />
= DIM 'A' 10<br />
=<br />
A<br />
45<br />
51<br />
B<br />
±0.5<br />
51<br />
B<br />
203<br />
51<br />
A<br />
C<br />
C<br />
+0.25<br />
12 - 0.75<br />
SECTION A-A<br />
SCALE 1 : 2<br />
7<br />
D<br />
11<br />
<strong>Flex</strong>-Lag ® Ceramic (w/Natural Rubber Base) - 1/2" (12.7mm) Thick<br />
7.5<br />
ITEM<br />
CODE<br />
ORDERING<br />
NUMBER<br />
OVERALL STRIP<br />
LENGTH<br />
CERAMIC STRIP<br />
LENGTH<br />
MAXIMUM<br />
PULLEY FACE<br />
WIDTH<br />
45°<br />
BELT WIDTH<br />
18" 34" 18" 34" CN18(34) 71111<br />
24" 39" 24" 39" CN24(39) 71112<br />
CERAMIC TILE<br />
P3672<br />
E<br />
30" 46" 30" 46" CN30(46) 71113<br />
DETAIL B TYP.<br />
SCALE 1 : 1<br />
DETAIL C<br />
SCALE 1 : 2<br />
36" 51" 36" 51" CN36(51) 71115<br />
42" 59" 42" 59" CN42(59) 71116<br />
FLEXCO (AUST) PTY LTD<br />
18-20 Brookhollow Ave<br />
REVISION CHANGE:<br />
48" 63" 48" 63" CN48(63) 71039<br />
INTIAL REVISION<br />
Baulkham Hills NSW 2153<br />
www.flexco.com.au<br />
UNLESS NOTED OTHERWISE<br />
DRAWN: MK DATE: 03.02.2012 TITLE:<br />
54" 71" 54" 71" CN54(71) 71126 F<br />
FULL CERAMIC DIMPLE LAGGING<br />
CHK BY: SA DATE: 05.03.2012<br />
-<br />
60"<br />
SCALE: 1:5 WEIGHT(kg):<br />
79" - 60" 79" CN60(79) 71127<br />
ECM : DRAWING NUMBER:<br />
REV.:<br />
SHEET<br />
A3<br />
SIZE: 72" SHEET 90" 1 OF 2 253 72" 71111 90" CN72(90) 71042<br />
ALL DIMENSIONS ARE IN MILLIMIETRES<br />
GENERAL TOLERANCE: ± 0.5mm<br />
ANGULAR TOLERANCE: ± 0.5<br />
PROPRIETRY AND CONFIDENTIAL<br />
THE INFORMATION CONTAINED IN THIS DRAWING<br />
IS THE SOLE PROPERTY OF FLEXCO (AUST) PTYLTD.<br />
0<br />
ANY REPRODUCTION IN PART OR AS A WHOLE<br />
WITHOUT THE WRITTEN PERMISSION OF<br />
FLEXCO (AUST) PTY LTD IS PROHIBITED.<br />
1 2 3 4 5 6 7 8<br />
84" 103" 84" 103" CN84(118) 71167<br />
19
Section 9 – <strong>Lagging</strong> Adhesives and Toolbox<br />
<strong>Flex</strong>-Lag ® Adhesive/Activator/Primer<br />
ORDERING NUMBER DESCRIPTION ITEM CODE WEIGHT<br />
FL-ADH-0.8 Adhesive 75017 27.0 oz (0.8L)<br />
FL-ACT Activator 70186 1.4 oz (40g)<br />
FL-PR-0.75 Primer 70189 25.4 oz (0.75L)<br />
Each <strong>Flex</strong>-Lag Adhesive is mixed with one <strong>Flex</strong>-Lag Activator.<br />
Refer to the usage chart below to calculate the number of cans<br />
required for your pulley. For sizes not included in the chart<br />
please contact <strong>Flex</strong>co Customer Service for assistance.<br />
FLEX-LAG ® ADHESIVE 27.0 oz. (0.8L) / ACTIVATOR 1.4 oz. (40g) (1:1 mix ratio)<br />
Face Width<br />
In. 10 14 18 22 26 30 34 38 42 46 50 54 58 62 66 70 74 78 82 86 90<br />
<strong>Pulley</strong> Diameter<br />
mm 254 356 457 559 660 762 864 965 1067 1168 1270 1372 1473 1575 1676 1778 1880 1981 2083 2184 2286<br />
8 203 1 1 1 1 1 1 1 1 2 2 2 2 2 2 2 2 2 2 3 3 3<br />
12 305 1 1 1 1 1 2 2 2 2 2 2 3 3 3 3 3 3 3 4 4 4<br />
16 406 1 1 1 2 2 2 2 2 3 3 3 3 3 4 4 4 4 4 5 5 5<br />
20 508 1 1 2 2 2 2 3 3 3 3 4 4 4 4 5 5 5 5 6 6 6<br />
24 610 1 2 2 2 2 3 3 3 4 4 4 5 5 5 5 6 6 6 7 7 7<br />
28 711 1 2 2 2 3 3 3 4 4 5 5 5 6 6 6 7 7 7 8 8 8<br />
32 813 2 2 2 3 3 4 4 4 5 5 6 6 6 7 7 8 8 8 9 9 10<br />
36 914 2 2 3 3 3 4 4 5 5 6 6 7 7 8 8 8 9 9 10 10 11<br />
40 1016 2 2 3 3 4 4 5 5 6 6 7 7 8 8 9 9 10 10 11 11 12<br />
44 1118 2 2 3 4 4 5 5 6 6 7 7 8 9 9 10 10 11 11 12 12 13<br />
48 1219 2 3 3 4 4 5 6 6 7 7 8 9 9 10 10 11 12 12 13 13 14<br />
52 1321 2 3 3 4 5 5 6 7 7 8 9 9 10 11 11 12 13 13 14 15 15<br />
56 1422 2 3 4 4 5 6 6 7 8 9 9 10 11 11 12 13 14 14 15 16 16<br />
60 1524 2 3 4 5 5 6 7 8 8 9 10 11 11 12 13 14 14 15 16 17 17<br />
FLEX-LAG ® PRIMER 25.4 oz. (.75L)<br />
<strong>Pulley</strong> Diameter<br />
Face Width<br />
In. 10 14 18 22 26 30 34 38 42 46 50 54 58 62 66 70 74 78 82 86 90<br />
mm 254 356 457 559 660 762 864 965 1067 1168 1270 1372 1473 1575 1676 1778 1880 1981 2083 2184 2286<br />
8 203 1 1 1 1 1 1 1 1 1 1 1 1 1 1 1 1 1 1 1 1 1<br />
12 305 1 1 1 1 1 1 1 1 1 1 1 1 1 1 1 1 1 1 1 1 1<br />
16 406 1 1 1 1 1 1 1 1 1 1 1 1 1 1 1 1 1 1 1 1 1<br />
20 508 1 1 1 1 1 1 1 1 1 1 1 1 1 1 1 1 1 1 1 1 1<br />
24 610 1 1 1 1 1 1 1 1 1 1 1 1 1 1 1 1 1 1 1 1 1<br />
28 711 1 1 1 1 1 1 1 1 1 1 1 1 1 1 1 1 1 1 1 1 1<br />
32 813 1 1 1 1 1 1 1 1 1 1 1 1 1 1 1 1 1 1 1 1 1<br />
36 914 1 1 1 1 1 1 1 1 1 1 1 1 1 1 1 1 1 1 1 1 2<br />
40 1016 1 1 1 1 1 1 1 1 1 1 1 1 1 1 1 1 1 1 2 2 2<br />
44 1118 1 1 1 1 1 1 1 1 1 1 1 1 1 1 1 1 2 2 2 2 2<br />
48 1219 1 1 1 1 1 1 1 1 1 1 1 1 1 1 1 2 2 2 2 2 2<br />
52 1321 1 1 1 1 1 1 1 1 1 1 1 1 1 2 2 2 2 2 2 2 2<br />
56 1422 1 1 1 1 1 1 1 1 1 1 1 1 2 2 2 2 2 2 2 2 2<br />
60 1524 1 1 1 1 1 1 1 1 1 1 1 2 2 2 2 2 2 2 2 2 2<br />
<strong>Flex</strong>-Lag ® Toolbox<br />
ORDERING NUMBER DESCRIPTION ITEM CODE WT. (LBS)<br />
LAGGING-TB with Power Tools 79080 32.0<br />
LAGGING-TB2 without Power Tools 79099 20.0<br />
Both Include:<br />
• 25-ft measuring tape • Paint brushes (3) • HD knife and replacement blades<br />
• BCP location tool • <strong>Lagging</strong> stitchers (3) • Bench brush<br />
• Chalk line • White paint marker • Deadblow hammer<br />
LAGGING-TB Also Includes:<br />
• Air hammer kit<br />
• Grinder<br />
• 24-grit flap disc<br />
• Metal grinding disc<br />
• Rubber buffing disc<br />
• Oscillating tool and accessories<br />
20 <strong>Flex</strong>-Lag ® <strong>Cold</strong> <strong>Bond</strong> <strong>Pulley</strong> <strong>Lagging</strong>
Section 10 – Other <strong>Flex</strong>co Conveyor Products<br />
<strong>Flex</strong>co provides many conveyor products that help your conveyors to run more efficiently and safely.<br />
These components solve typical conveyor problems and improve productivity.<br />
Here is a quick overview on just a few of them:<br />
MSP Precleaner<br />
DRX Impact Beds<br />
• Patented ConShear blade renews its cleaning edge as it wears<br />
• Visual Tension Check for optimal blade tensioning and<br />
simple retensioning<br />
• Quick and easy one-pin blade replacement Material Path<br />
Option for optimal cleaning and reduced maintenance<br />
EZS2 Secondary Cleaner<br />
• Exclusive Velocity Reduction Technology to better<br />
protect the belt<br />
• Slide-Out Service gives direct access to all impact bars<br />
for change-out<br />
• Impact bar supports for longer bar life<br />
• 4 models to custom fit to the application<br />
PT Max Belt Trainer<br />
• Long-wearing tungsten carbide blades for superior<br />
cleaning efficiency<br />
• Patented Form<strong>Flex</strong> cushions independently tension each<br />
blade to the belt for consistent, constant cleaning power<br />
• Easy to install, simple to service<br />
• Works with <strong>Flex</strong>co mechanical belt splices<br />
<strong>Flex</strong>co Specialty Belt Cleaners<br />
• Patented “pivot & tilt” design for superior training action<br />
• Dual sensor rollers on each side to minimize belt damage<br />
• Pivot point guaranteed not or freeze up<br />
• Available for topside and return side belts<br />
Belt Plows<br />
• “Limited space” cleaners for tight conveyor applications<br />
• High Temp cleaners for severe, high heat applications<br />
• A rubber fingered cleaner for chevron and raised rib belts<br />
• Multiple cleaner styles in stainless steel for corrosive applications<br />
• A belt cleaner for the tail pulley<br />
• Exclusive blade design quickly spirals debris off the belt<br />
• Economical and easy to service<br />
• Available in vee or diagonal models<br />
21
The <strong>Flex</strong>co Vision<br />
To become the leader in maximising<br />
belt conveyor productivity for our customers worldwide<br />
through superior service and innovation.<br />
1995 Oak Industrial Drive NE • Grand Rapids, MI 49505 U.S.A.<br />
Tel: (616)-459-3196 • Fax: (616)-459-4976 • E-mail: info@flexco.com • Web: www.flexco.com<br />
Australia: 61-2-8818-2000 • Chile: 56-2-8967870 • China: 86-21-33528388<br />
England: 44-1274-600-942 • Germany: 49-7428-9406-0 • India: 91-44-4354-2091<br />
Mexico: 52 -55- 5674-5326 • Singapore: 65-6281-7278 • South Africa: 27-11-608-4180 • USA: 1-630-971-0150<br />
©2013 <strong>Flex</strong>ible Steel Lacing Company. 02/13. For reorder: X2975