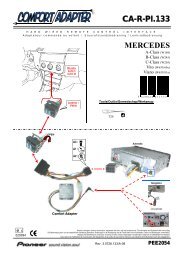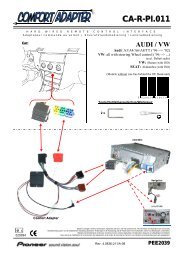
Mercedes E-Class (W211) - Pioneer
Mercedes E-Class (W211) - Pioneer
Mercedes E-Class (W211) - Pioneer

Create successful ePaper yourself
Turn your PDF publications into a flip-book with our unique Google optimized e-Paper software.
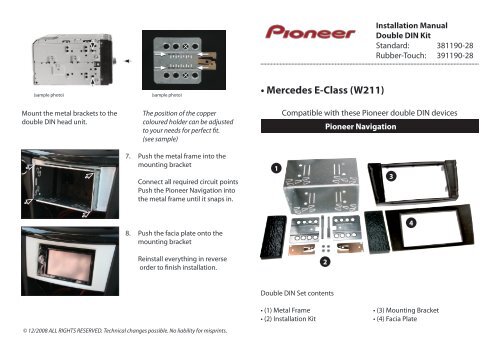
Installation Manual<br />
Double DIN Kit<br />
Standard: 381190-28<br />
Rubber-Touch: 391190-28<br />
(sample photo)<br />
Mount the metal brackets to the<br />
double DIN head unit.<br />
(sample photo)<br />
The position of the copper<br />
coloured holder can be adjusted<br />
to your needs for perfect fit.<br />
(see sample)<br />
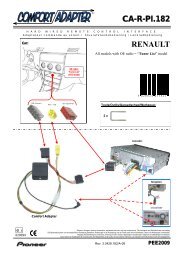
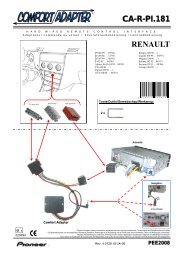
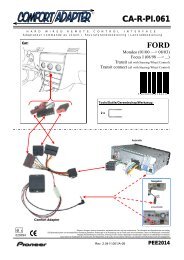
• <strong>Mercedes</strong> E-<strong>Class</strong> (<strong>W211</strong>)<br />
Compatible with these <strong>Pioneer</strong> double DIN devices<br />
<strong>Pioneer</strong> Navigation<br />
7. Push the metal frame into the<br />
mounting bracket<br />
Connect all required circuit points<br />
Push the <strong>Pioneer</strong> Navigation into<br />
the metal frame until it snaps in.<br />
1<br />
3<br />
8. Push the facia plate onto the<br />
mounting bracket<br />
4<br />
Reinstall everything in reverse<br />
order to finish installation.<br />
2<br />
© 12/2008 ALL RIGHTS RESERVED. Technical changes possible. No liability for misprints.<br />
Double DIN Set contents<br />
• (1) Metal Frame<br />
• (2) Installation Kit<br />
• (3) Mounting Bracket<br />
• (4) Facia Plate
Installation Manual Double DIN Kit<br />
1. <strong>Mercedes</strong> E-<strong>Class</strong> with<br />
OEM head unit<br />
Facelift models 2007 upwards:<br />
After Replacing the OEM head unit it is<br />
not possible to use the pocket underneath<br />
the radio anymore.<br />
4. Remove the control unit / or CD-<br />
Changer underneath the OEM<br />
radio by removing the screws at<br />
left and right side<br />
2. Pull up the gear shift cover<br />
Unclip the gear shift panel and<br />
remove it<br />
5. Remove the OEM head unit<br />
Release the two screws (see arrows)<br />
underneath the radio first - then<br />
pull out the OEM head unit<br />
3. Open the ash tray and remove the<br />
complete ash tray unit<br />
6. Place the mounting bracket on<br />
the dashboard<br />
Fix the mounting bracket with the<br />
two screws (see arrows) at the left<br />
and right side under the mounting<br />
bracket holder<br />
All installation work must be performed by a qualified professional installer only.<br />
The manufacturer / dealer is not liable for any kind of incidential or indirect damages.