SP8604_RS232_IR_FW(pdf) - Revolution Technologies
SP8604_RS232_IR_FW(pdf) - Revolution Technologies
SP8604_RS232_IR_FW(pdf) - Revolution Technologies

You also want an ePaper? Increase the reach of your titles
YUMPU automatically turns print PDFs into web optimized ePapers that Google loves.
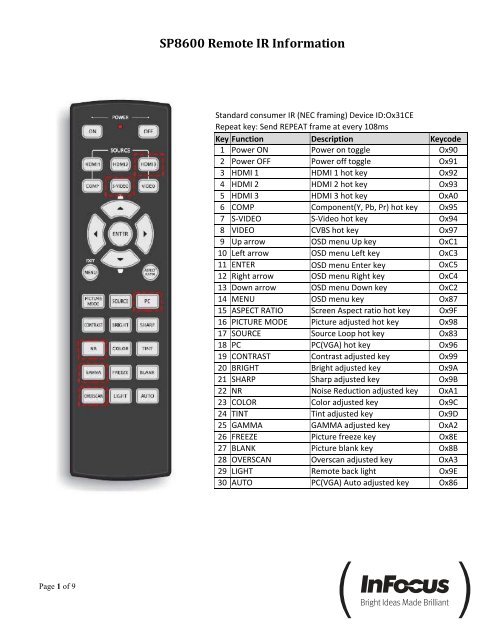
SP8600 Remote <strong>IR</strong> Information<br />
Standard consumer <strong>IR</strong> (NEC framing) Device ID:Ox31CE<br />
Repeat key: Send REPEAT frame at every 108ms<br />
Key Function Description Keycode<br />
1 Power ON Power on toggle Ox90<br />
2 Power OFF Power off toggle Ox91<br />
3 HDMI 1 HDMI 1 hot key Ox92<br />
4 HDMI 2 HDMI 2 hot key Ox93<br />
5 HDMI 3 HDMI 3 hot key OxA0<br />
6 COMP Component(Y, Pb, Pr) hot key Ox95<br />
7 S‐VIDEO S‐Video hot key Ox94<br />
8 VIDEO CVBS hot key Ox97<br />
9 Up arrow OSD menu Up key OxC1<br />
10 Left arrow OSD menu Left key OxC3<br />
11 ENTER OSD menu Enter key OxC5<br />
12 Right arrow OSD menu Right key OxC4<br />
13 Down arrow OSD menu Down key OxC2<br />
14 MENU OSD menu key Ox87<br />
15 ASPECT RATIO Screen Aspect ratio hot key Ox9F<br />
16 PICTURE MODE Picture adjusted hot key Ox98<br />
17 SOURCE Source Loop hot key Ox83<br />
18 PC PC(VGA) hot key Ox96<br />
19 CONTRAST Contrast adjusted key Ox99<br />
20 BRIGHT Bright adjusted key Ox9A<br />
21 SHARP Sharp adjusted key Ox9B<br />
22 NR Noise Reduction adjusted key OxA1<br />
23 COLOR Color adjusted key Ox9C<br />
24 TINT Tint adjusted key Ox9D<br />
25 GAMMA GAMMA adjusted key OxA2<br />
26 FREEZE Picture freeze key Ox8E<br />
27 BLANK Picture blank key Ox8B<br />
28 OVERSCAN Overscan adjusted key OxA3<br />
29 LIGHT Remote back light Ox9E<br />
30 AUTO PC(VGA) Auto adjusted key Ox86<br />
Page 1 of 9
SP8600 RS232 CODES<br />
<strong>RS232</strong> Setting<br />
Baud rate: 9600<br />
Parity check: None<br />
Data bit: 8<br />
Stop bit: 1<br />
Flow Control<br />
None<br />
Minimum delay for next command: 25ms<br />
Control Command Structure<br />
The command is structured by the Header code, command code, data code and end code.<br />
Header code Command code Data code End code<br />
HEX 7Eh Command Data 0Dh<br />
ASCII ‘~’ Command Data CR<br />
Control Sequence<br />
The projector will send a return code (0Dh) after it has received a command. If the command isn’t received correctly,<br />
the projector will not send the return code.<br />
Operation Commands<br />
The operation commands execute the basic operations of the projector.<br />
Operation ASCII HEX<br />
Power On ~ P N CR 7Eh 50h 4Eh 0Dh<br />
Power Off ~ P F CR 7Eh 50h 46h 0Dh<br />
Auto Image ~ A I CR 7Eh 41h 49h 0Dh<br />
Input Select PC ~ S R CR 7Eh 53h 52h 0Dh<br />
Input Select DVI / HDMI 1 ~ S D CR 7Eh 53h 44h 0Dh<br />
Input Select HDMI 2 ~ S H CR 7Eh 53h 48h 0Dh<br />
Input Select HDMI 3 ~ S M CR 7Eh 53h 4Dh 0Dh<br />
Input Select Video ~ S V CR 7Eh 53h 56h 0Dh<br />
Input Select S‐Video ~ S S CR 7Eh 53h 53h 0Dh<br />
Input Select Component ~ S Y CR 7Eh 53h 59h 0Dh<br />
Power On command will not work for 1 minute after the Power Off command is sent.<br />
CR : Carriage Return.<br />
Page 2 of 9
Remote Commands<br />
The remote commands simulate the codes sent from the <strong>IR</strong> remote.<br />
Button’s name ASCII HEX<br />
UP arrow ~ r U CR 7Eh 72h 55h 0Dh<br />
DOWN arrow ~ r D CR 7Eh 72h 44h 0Dh<br />
LEFT arrow ~ r L CR 7Eh 72h 4Ch 0Dh<br />
RIGH arrow ~ r R CR 7Eh 72h 52h 0Dh<br />
POWER ~ r P CR 7Eh 72h 50h 0Dh<br />
EXIT ~ r E CR 7Eh 72h 45h 0Dh<br />
INPUT ~ r I CR 7Eh 72h 49h 0Dh<br />
AUTO ~ r A CR 7Eh 72h 41h 0Dh<br />
KEYSTONE+ ~ r K CR 7Eh 72h 4Bh 0Dh<br />
KEYSTONE‐ ~ r J CR 7Eh 72h 4Ah 0Dh<br />
MENU ~ r M CR 7Eh 72h 4Dh 0Dh<br />
STATUS ~ r S CR 7Eh 72h 53h 0Dh<br />
BLANK ~ r B CR 7Eh 72h 42h 0Dh<br />
FREEZE ~ r F CR 7Eh 72h 46h 0Dh<br />
Enter ~ r N CR 7Eh 72h 4Eh 0Dh<br />
Set Value Commands<br />
ITEM ASCII HEX<br />
Brightness ~ s B ? CR 7Eh 73h 42h ?h 0Dh<br />
Contrast ~ s C ? CR 7Eh 73h 43h ?h 0Dh<br />
Color ~ s R ? CR 7Eh 73h 52h ?h 0Dh<br />
Tint ~ s N ? CR 7Eh 73h 4Eh ?h 0Dh<br />
Scaling ~ s A ? CR 7Eh 73h 41h ?h 0Dh<br />
Color Temperature ~ s T ? CR 7Eh 73h 54h ?h 0Dh<br />
Projection Mode ~ s J ? CR 7Eh 73h 4Ah ?h 0Dh<br />
? : ASCII Data<br />
Page 3 of 9
Data Range<br />
ITEM Set Data Range Source<br />
Brightness 0 ~ 100 ALL<br />
Contrast 0 ~ 100 ALL<br />
Color 0 ~ 100 Video/S‐Video/C<br />
omponent<br />
Tint 0 ~ 100 Video/S‐Video/C<br />
omponent<br />
Scaling<br />
0: AUTO<br />
ALL<br />
1: 16:9<br />
2: 4:3<br />
3: LETTER BOX<br />
4: REAL<br />
Color Temperature 0: Warm<br />
ALL<br />
1: Normal<br />
2: Cool<br />
3: Cooler<br />
4: High Cool<br />
5: Lamp Native<br />
Projection Mode<br />
0: Front Table<br />
1: Front Ceiling<br />
2: Rear Table<br />
3: Rear Ceiling<br />
ALL<br />
Example 1. Adjust Brightness value to 100<br />
Send Command : ~sB100CR<br />
Example 2. Adjust Color Temperature to Warm<br />
Send Command : ~sT2CR<br />
Query Commands<br />
ITEM ASCII HEX<br />
Software Version ~ q V CR 7Eh 71h 56h 0Dh<br />
Power State ~ q P CR 7Eh 71h 50h 0Dh<br />
Input Select ~ q S CR 7Eh 71h 53h 0Dh<br />
Lamp Hours ~ q L CR 7Eh 71h 4Ch 0Dh<br />
Brightness ~ q B CR 7Eh 71h 42h 0Dh<br />
Contrast ~ q C CR 7Eh 71h 43h 0Dh<br />
Color ~ q R CR 7Eh 71h 52h 0Dh<br />
Tint ~ q N CR 7Eh 71h 4Eh 0Dh<br />
Scaling ~ q A CR 7Eh 71h 41h 0Dh<br />
Color Temperature ~ q T CR 7Eh 71h 54h 0Dh<br />
Projection Mode ~ q J CR 7Eh 71h 4Ah 0Dh<br />
Page 4 of 9
Response messages<br />
ITEM<br />
Response Message examples<br />
Software Version<br />
…..<br />
Power State<br />
On Off<br />
Input Select<br />
PC<br />
HDMI 1<br />
HDMI 2<br />
HDMI 3<br />
VIDEO<br />
S‐VIDEO<br />
COMPONENT<br />
Lamp Hours 2000<br />
Brightness 100<br />
Contrast 100<br />
Color (Video) 100<br />
Tint (Video) 100<br />
Scaling<br />
AUTO<br />
16:9<br />
4:3<br />
LETTER BOX<br />
REAL<br />
Color Temperature Warm<br />
Normal<br />
Cool<br />
Cooler<br />
High Cool<br />
Lamp Native<br />
Projection Mode<br />
Front Table<br />
Front Ceiling<br />
Rear Table<br />
Rear Ceiling<br />
Example 1. Get Brightness value Example 2. Get Color Temperature<br />
Send Command: ~qBCR<br />
Send Command : ~qTCR<br />
Response : 100<br />
Response : Warm<br />
Page 5 of 9
Firmware Upgrade Procedure<br />
Step 1. Plug a power cord from power to the projector.<br />
Step 2. Connect a null Modem DB9 cable to the Projector and from the PC.<br />
Step 3. Run the download tool <strong>SP8604</strong>_versionXXXXX.exe.<br />
Step 4. Click “PW392 Download”, the Pixelworks FlashUpgrader will open. Make sure that Connection, COM Port, Baud<br />
Rate and Modes are set correctly. The COM port may be different for your PC.<br />
Page 6 of 9
Step 5. Click on “Choose” to select the flash file, FlashAll.inf.<br />
Step 6. Click on “Flash”, the upgrader will wait for the projector to start.<br />
Page 7 of 9
Step 7. Turn on the projector with the remote or the rear panel switch. The flash progress will be displayed.<br />
Step 8. The FlashUpgrader will return to the original window when the flash process is complete.<br />
Page 8 of 9
Page 9 of 9