Bosch - GBH4DSC - Bates Tool Hire Ltd
Bosch - GBH4DSC - Bates Tool Hire Ltd
Bosch - GBH4DSC - Bates Tool Hire Ltd

Create successful ePaper yourself
Turn your PDF publications into a flip-book with our unique Google optimized e-Paper software.
GBH 4 DFE<br />
GBH 4 DSC<br />
PROFESSIONAL<br />
* Des idées en action.<br />
Bedienungsanleitung<br />
Operating instructions<br />
Instructions d’emploi<br />
Instrucciones de servicio<br />
Manual de instruções<br />
Istruzioni d’uso<br />
Gebruiksaanwijzing<br />
Betjeningsvejledning<br />
Bruksanvisning<br />
Brukerveiledningen<br />
Käyttöohje<br />
Οδηγία χειρισµού<br />
Kullan∂m k∂lavuzu
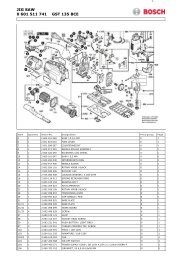
Ø 40 mm 2 608 550 074<br />
Ø 50 mm 2 608 550 075<br />
Ø 68 mm 2 608 550 076<br />
Ø 82 mm 2 608 550 077<br />
L = 105 mm 2 608 550 057<br />
L = 220 mm 2 608 598 110<br />
Ø 8 mm 2 608 596 157<br />
2 607 001 316<br />
SDS-plus:<br />
2 608 572 059<br />
2 602 025 077<br />
1 613 001 003<br />
GBH 4 DSC:<br />
2 607 018 299<br />
GBH 4 DFE:<br />
2 605 438 389<br />
GBH 4 DSC:<br />
2 605 438 376<br />
3 • 1 619 929 679 • 04.08
3<br />
1<br />
2<br />
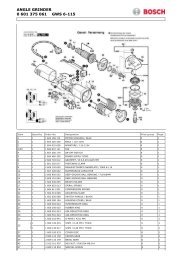
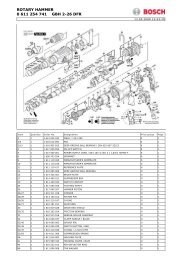
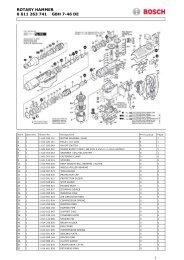
GBH 4 DFE<br />
PROFESSIONAL<br />
8<br />
6<br />
7<br />
5<br />
4<br />
3<br />
1<br />
2<br />
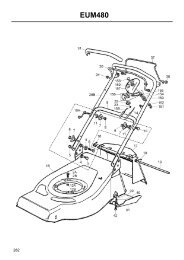
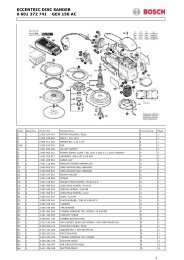
GBH 4 DSC<br />
PROFESSIONAL<br />
8<br />
6<br />
7<br />
5<br />
4<br />
10<br />
9<br />
4 • 1 619 929 679 • 04.08
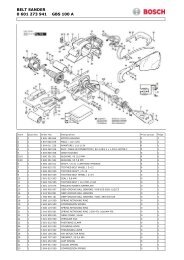
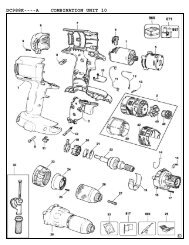
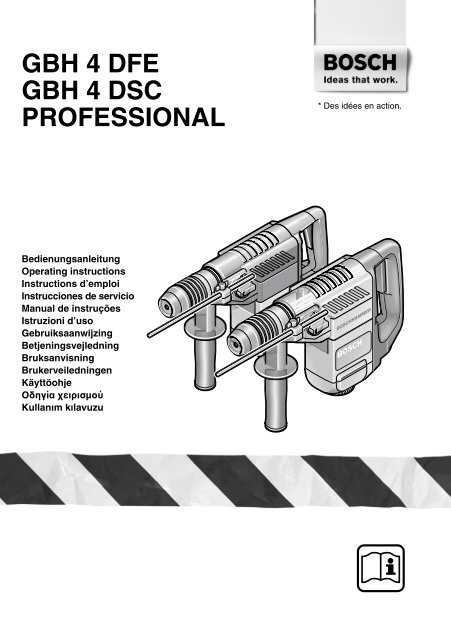
A<br />
B<br />
2<br />
2<br />
11<br />
C D<br />
E<br />
5 • 1 619 929 679 • 04.08
<strong>Tool</strong> Specifications<br />
Rotary Hammer<br />
GBH 4 DFE<br />
PROFESSIONAL<br />
GBH 4 DSC<br />
PROFESSIONAL<br />
Article number 0 611 236 7.. 0 611 222 7..<br />
Rated input power [W] 750 750<br />
Rated speed [rpm] 0 – 650 280 – 650<br />
Impact rate [bpm] 0 – 3 900 1 650 – 3 900<br />
Impact energy per stroke [J] 3.5 1 – 3.5<br />
Chisel positions 36 36<br />
<strong>Tool</strong> holder SDS-plus SDS-plus<br />
Spindle collar diameter [mm] Ø 51 Ø 51<br />
Maximum drilling Ø<br />
Concrete (twist drill bit) [mm] 4 – 30 4 – 30<br />
Brickwork (core bit) [mm] 80 80<br />
Wood [mm] 30 30<br />
Steel [mm] 13 13<br />
Weight according to EPTA-Procedure<br />
01/2003 [kg] 4.1 4.4<br />
Protection class / II / II<br />
Please observe the article number on the type plate of your machine. The trade names of the individual machines may vary.<br />
The values given are valid for nominal voltages [U] of 230/240 V. For lower voltages and models for specific countries, these<br />
values can vary.<br />
Machine Elements<br />
The numbering of the machine elements refers to<br />
the illustration of the machine on the graphics<br />
page.<br />
While reading the operating instructions, unfold<br />
the graphics page for the machine and leave it<br />
open.<br />
1 Dust protection cap<br />
2 Locking sleeve<br />
3 On/Off switch<br />
4 Mode selector switch<br />
5 Release button<br />
6 Wing bolt for depth stop adjustment<br />
7 Auxiliary handle<br />
8 Depth stop<br />
9 Thumbwheel for speed preselection<br />
(GBH 4 DSC)<br />
10 Service indicator (GBH 4 DSC)<br />
11 Keyless chuck*<br />
* Not all of the accessories illustrated or described are<br />
included as standard delivery.<br />
Noise/Vibration Information<br />
Measured values determined according to<br />
EN 60 745.<br />
Typically the A-weighted noise levels of the<br />
machine are: sound pressure level 89 dB (A);<br />
sound power level 100 dB (A). Measurement<br />
uncertainty K = 3 dB.<br />
Wear hearing protection!<br />
The typically weighted acceleration is 11 m/s 2 .<br />
Intended Use<br />
The machine is intended for hammer drilling in<br />
concrete, brick and stone as well as for light chiselling<br />
work. It is also suitable for drilling without<br />
impact in wood, metal, ceramic and plastic.<br />
12 • 1 619 929 679 • TMS • 03.08.04<br />
English - 1
For Your Safety<br />
Read all instructions. Failure to<br />
follow all instructions listed below<br />
may result in electric shock, fire<br />
and/or serious injury.<br />
SAVE THESE INSTRUCTIONS.<br />
■ When working with the machine, always<br />
hold it firmly with both hands and provide<br />
for a secure stance. The power tool is guided<br />
more secure with both hands.<br />
■ Secure the workpiece. A workpiece clamped<br />
with clamping devices or in a vice is held more<br />
securely than by hand.<br />
■ Do not work materials containing asbestos.<br />
Asbestos is considered carcinogenic.<br />
■ Always wait until the machine has come to<br />
a complete stop before placing it down. The<br />
tool insert can jam and lead to loss of control<br />
over the power tool.<br />
■ Do not use a machine with a damaged<br />
mains cable. Do not touch the damaged cable<br />
and pull the mains plug when the cable<br />
is damaged while working. Damaged cables<br />
increase the risk of an electric shock.<br />
■ Connect machines that are used in the<br />
open via a residual current device (RCD).<br />
■ Wear hearing protection. Exposure to noise<br />
can cause hearing loss.<br />
■ Always use the auxiliary handle supplied<br />
with the machine. Loss of control can cause<br />
personal injury.<br />
■ Use suitable detectors to determine if utility<br />
lines are hidden in the work area or call<br />
the local utility company for assistance.<br />
Contact with electric lines can lead to fire and<br />
electric shock. Damaging a gas line can lead<br />
to explosion. Penetrating a water line causes<br />
property damage or may cause an electric<br />
shock.<br />
■ Hold the power tool only by the insulated<br />
handles, when performing an operation<br />
where the tool insert can run into hidden<br />
wiring or its own mains cable. Contact with<br />
a “live” wire can make metal parts of the power<br />
tool “live” and lead to an electric shock.<br />
Changing the <strong>Tool</strong><br />
■ Before any work on the machine itself, pull the<br />
mains plug.<br />
With the SDS-plus tool holder, simpler and easier<br />
tool changing is possible without additional aids.<br />
Grease the shank end of the tool regularly.<br />
☞<br />
The dust protection cap 1 largely prevents the<br />
entry of drilling dust during operation. When inserting<br />
the tool, take care that the dust protection<br />
cap 1 is not damaged.<br />
A damaged dust protection cap should be<br />
changed immediately. We recommend having<br />
this carried out by an after-sales service.<br />
As a requirement of the system, the<br />
☞<br />
SDS-plus tool must rotate freely. At no-load<br />
speed, this leads to a certain amount of radial<br />
run-out.<br />
This does not affect the accuracy of the drill<br />
hole, as the bit is automatically centred during<br />
drilling.<br />
Inserting (see figure A )<br />
Clean and grease the shank end of the tool.<br />
Insert the tool in a twisting manner into the tool<br />
holder until it locks. Check if it has locked by pulling<br />
the tool.<br />
Removing (see figure B )<br />
Push back the locking sleeve 2 of the tool holder<br />
and remove the tool.<br />
13 • 1 619 929 679 • TMS • 03.08.04<br />
English - 2
Auxiliary Handle/Depth Stop<br />
■ Operate the machine only with the auxiliary<br />
handle 7.<br />
Loosen the handle by turning to the left. Rotate<br />
the auxiliary handle 7 and adapt to the working<br />
position.<br />
Afterwards tighten the handle again by turning in<br />
clockwise direction.<br />
The drilling depth can be set with the depth<br />
stop 8.<br />
For this, loosen wing bolt for depth stop adjustment<br />
6, set the required drilling depth X and<br />
tighten the wing bolt again.<br />
6<br />
Changing the<br />
Speed/Impact Rate<br />
With the On/Off switch 3, the rotational speed/impact<br />
rate can be regulated between low and high<br />
speed/rate. Light pressure on the On/Off switch 3<br />
results in a low rotational speed/impact rate, for<br />
example, for sensitive work such as hole starting.<br />
With increased pressure, the rotational speed/impact<br />
rate is increased.<br />
Speed Table (GBH 4 DSC)<br />
The electronic control enables continuous pre-selection<br />
of speed and impact rate in accordance<br />
with the material to be worked. Adjustment is carried<br />
out with the speed selector thumbwheel 9.<br />
The constant electronic control keeps the pre-selected<br />
speed and impact rate nearly constant between<br />
no-load and load conditions.<br />
The speed must be selected in accordance with<br />
the material.<br />
The values in the table are recommendations.<br />
X<br />
The ribbing on depth stop 8 must point upwards.<br />
Area of<br />
Application<br />
Impact Drilling<br />
- Stone/Concrete<br />
Impact Stop<br />
Switch<br />
Adjustment<br />
Knob<br />
Position 9<br />
5 – 6<br />
Starting Operation<br />
Observe correct mains voltage: The voltage of<br />
the power source must agree with the voltage<br />
specified on the nameplate of the machine.<br />
Equipment marked with 230 V can also be connected<br />
to 220 V.<br />
Switching On and Off<br />
To start the machine, press the On/Off switch 3<br />
and keep it depressed.<br />
To switch off the machine, release the On/Off<br />
switch 3.<br />
For low temperatures, the machine<br />
☞<br />
reaches the full hammer/impact capacity<br />
only after a certain time.<br />
This start-up time can be shortened by<br />
striking the drill/chisel against the floor one<br />
time.<br />
Chiselling 3 – 6<br />
Drilling<br />
- Wood/Steel<br />
Needle-descaling 3 – 6<br />
1 – 6/4– 6<br />
14 • 1 619 929 679 • TMS • 03.08.04<br />
English - 3
Mode Selector Switch<br />
■ Operate the mode selector switch 4 only<br />
when the machine is at a standstill.<br />
Press the release button 5 on the mode selector<br />
switch 4 and turn the switch to the desired position.<br />
Drilling<br />
Safety Clutch<br />
Hammer drilling<br />
Changing the Chiselling<br />
Position (Vario-lock)<br />
Chiselling (rotation off)<br />
If the tool insert becomes caught or<br />
jammed, the drive to the drill spindle is interrupted.<br />
Because of the forces that occur, always<br />
hold the power tool firmly with both<br />
hands and provide for a secure stance.<br />
If the drilling tool jams, switch the machine off and<br />
loosen the drilling tool. When switching the machine<br />
on with the drilling tool jammed, high reaction<br />
torques can occur!<br />
Changing the Chiselling Position<br />
(Vario-lock)<br />
The chisel can be locked in 36 positions. In this<br />
manner, the optimum working position can be set<br />
for each application.<br />
Insert the chisel in the tool holder.<br />
Press the release button 5 and turn the mode selector<br />
switch 4 at the same time to the “Chisel<br />
(Vario-lock)” position.<br />
Turn the tool holder to the desired chiselling position.<br />
Allow the mode selector switch 4 to latch in the<br />
“Chiselling” position. The tool holder is locked in<br />
this position.<br />
The mode selector switch 4 must always be<br />
locked in the “Chiselling” position when chiselling.<br />
Change the SDS-plus <strong>Tool</strong><br />
Holder<br />
Removal (see figure C )<br />
Set the mode selector switch 4 temporarily to the<br />
“Chiselling” position (drill spindle locked).<br />
Turn the locking sleeve 2 firmly counter clockwise<br />
to the stop and pull off the tool holder.<br />
Mounting<br />
Place the tool holder on the drill spindle.<br />
Turn the locking sleeve 2 counter clockwise (to<br />
the left) and press back firmly at the same time<br />
until the tool holder latches and locks itself. Ensure<br />
that the tool holder is firmly seated.<br />
15 • 1 619 929 679 • TMS • 03.08.04<br />
English - 4