Makita - 9015B - 5" Electric Angle Grinder - JW Hire & Sales Ltd
Makita - 9015B - 5" Electric Angle Grinder - JW Hire & Sales Ltd
Makita - 9015B - 5" Electric Angle Grinder - JW Hire & Sales Ltd

You also want an ePaper? Increase the reach of your titles
YUMPU automatically turns print PDFs into web optimized ePapers that Google loves.
• ALWAYS use guard with wire wheel brushes, assuring<br />
diameter of wheel fits inside guard. Wheel can shatter<br />
during use and guard helps to reduce chances of<br />
personal injury.<br />
Unplug tool and place it upside down allowing easy access<br />
to spindle. Remove any accessories on spindle. Thread wire<br />
wheel brush onto spindle and tighten with the wrenches.<br />
When using wire wheel brush, avoid applying too much pressure<br />
which causes over bending of wires, leading to premature<br />
breakage.<br />
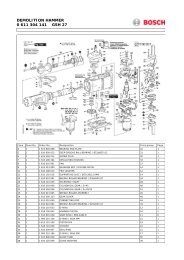
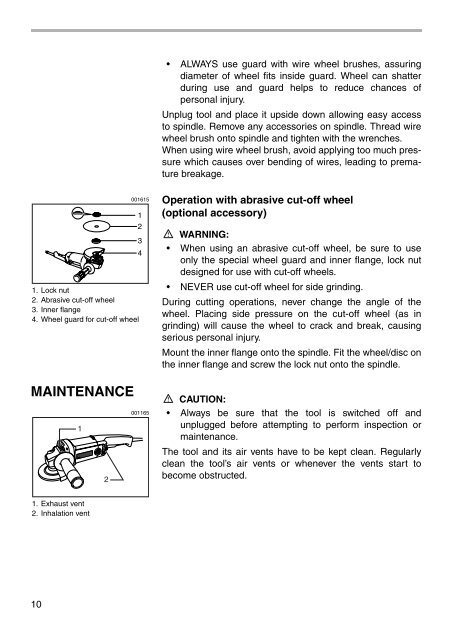
1. Lock nut<br />
2. Abrasive cut-off wheel<br />
3. Inner flange<br />
4. Wheel guard for cut-off wheel<br />
MAINTENANCE<br />
1<br />
2<br />
001615<br />
1<br />
2<br />
3<br />
4<br />
001165<br />
Operation with abrasive cut-off wheel<br />
(optional accessory)<br />
WARNING:<br />
• When using an abrasive cut-off wheel, be sure to use<br />
only the special wheel guard and inner flange, lock nut<br />
designed for use with cut-off wheels.<br />
• NEVER use cut-off wheel for side grinding.<br />
During cutting operations, never change the angle of the<br />
wheel. Placing side pressure on the cut-off wheel (as in<br />
grinding) will cause the wheel to crack and break, causing<br />
serious personal injury.<br />
Mount the inner flange onto the spindle. Fit the wheel/disc on<br />
the inner flange and screw the lock nut onto the spindle.<br />
CAUTION:<br />
• Always be sure that the tool is switched off and<br />
unplugged before attempting to perform inspection or<br />
maintenance.<br />
The tool and its air vents have to be kept clean. Regularly<br />
clean the tool’s air vents or whenever the vents start to<br />
become obstructed.<br />
1. Exhaust vent<br />
2. Inhalation vent<br />
10