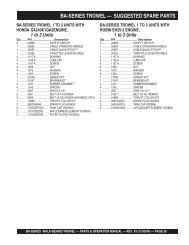
Makita - 9015B - 5" Electric Angle Grinder - JW Hire & Sales Ltd
Makita - 9015B - 5" Electric Angle Grinder - JW Hire & Sales Ltd
Makita - 9015B - 5" Electric Angle Grinder - JW Hire & Sales Ltd

You also want an ePaper? Increase the reach of your titles
YUMPU automatically turns print PDFs into web optimized ePapers that Google loves.
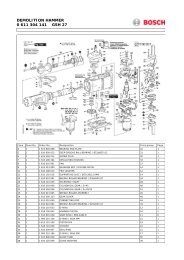
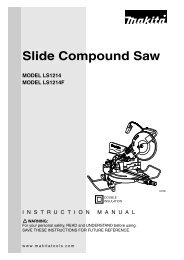
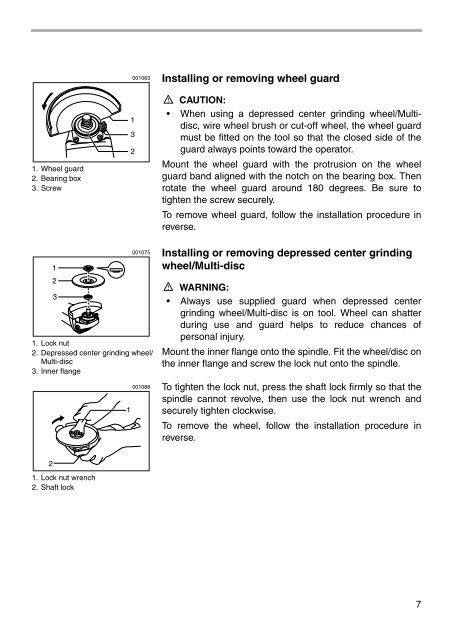
1. Wheel guard<br />
2. Bearing box<br />
3. Screw<br />
001063<br />
1<br />
3<br />
2<br />
Installing or removing wheel guard<br />
CAUTION:<br />
• When using a depressed center grinding wheel/Multidisc,<br />
wire wheel brush or cut-off wheel, the wheel guard<br />
must be fitted on the tool so that the closed side of the<br />
guard always points toward the operator.<br />
Mount the wheel guard with the protrusion on the wheel<br />
guard band aligned with the notch on the bearing box. Then<br />
rotate the wheel guard around 180 degrees. Be sure to<br />
tighten the screw securely.<br />
To remove wheel guard, follow the installation procedure in<br />
reverse.<br />
1<br />
2<br />
3<br />
1. Lock nut<br />
2. Depressed center grinding wheel/<br />
Multi-disc<br />
3. Inner flange<br />
1<br />
001075<br />
001088<br />
Installing or removing depressed center grinding<br />
wheel/Multi-disc<br />
WARNING:<br />
• Always use supplied guard when depressed center<br />
grinding wheel/Multi-disc is on tool. Wheel can shatter<br />
during use and guard helps to reduce chances of<br />
personal injury.<br />
Mount the inner flange onto the spindle. Fit the wheel/disc on<br />
the inner flange and screw the lock nut onto the spindle.<br />
To tighten the lock nut, press the shaft lock firmly so that the<br />
spindle cannot revolve, then use the lock nut wrench and<br />
securely tighten clockwise.<br />
To remove the wheel, follow the installation procedure in<br />
reverse.<br />
2<br />
1. Lock nut wrench<br />
2. Shaft lock<br />
7