Electric Griddle Instructions How to Use Care and Cleaning - Presto
Electric Griddle Instructions How to Use Care and Cleaning - Presto
Electric Griddle Instructions How to Use Care and Cleaning - Presto

You also want an ePaper? Increase the reach of your titles
YUMPU automatically turns print PDFs into web optimized ePapers that Google loves.
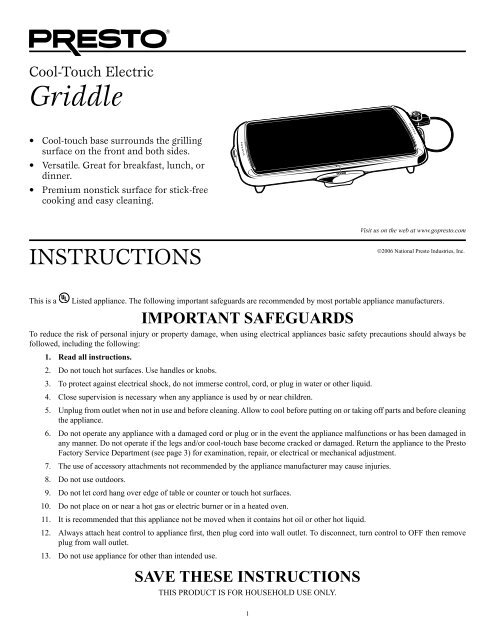
Cool-Touch <strong>Electric</strong><br />
<strong>Griddle</strong><br />
• Cool-<strong>to</strong>uch base surrounds the grilling<br />
surface on the front <strong>and</strong> both sides.<br />
• Versatile. Great for breakfast, lunch, or<br />
dinner.<br />
• Premium nonstick surface for stick-free<br />
cooking <strong>and</strong> easy cleaning.<br />
Visit us on the web at www.gopres<strong>to</strong>.com<br />
INSTRUCTIONS<br />
©2006 National Pres<strong>to</strong> Industries, Inc.<br />
This is a<br />
Listed appliance. The following important safeguards are recommended by most portable appliance manufacturers.<br />
IMPORTANT SAFEGUARDS<br />
To reduce the risk of personal injury or property damage, when using electrical appliances basic safety precautions should always be<br />
followed, including the following:<br />
1. Read all instructions.<br />
2. Do not <strong>to</strong>uch hot surfaces. <strong>Use</strong> h<strong>and</strong>les or knobs.<br />
3. To protect against electrical shock, do not immerse control, cord, or plug in water or other liquid.<br />
4. Close supervision is necessary when any appliance is used by or near children.<br />
5. Unplug from outlet when not in use <strong>and</strong> before cleaning. Allow <strong>to</strong> cool before putting on or taking off parts <strong>and</strong> before cleaning<br />
the appliance.<br />
6. Do not operate any appliance with a damaged cord or plug or in the event the appliance malfunctions or has been damaged in<br />
any manner. Do not operate if the legs <strong>and</strong>/or cool-<strong>to</strong>uch base become cracked or damaged. Return the appliance <strong>to</strong> the Pres<strong>to</strong><br />
Fac<strong>to</strong>ry Service Department (see page 3) for examination, repair, or electrical or mechanical adjustment.<br />
7. The use of accessory attachments not recommended by the appliance manufacturer may cause injuries.<br />
8. Do not use outdoors.<br />
9. Do not let cord hang over edge of table or counter or <strong>to</strong>uch hot surfaces.<br />
10. Do not place on or near a hot gas or electric burner or in a heated oven.<br />
11. It is recommended that this appliance not be moved when it contains hot oil or other hot liquid.<br />
12. Always attach heat control <strong>to</strong> appliance first, then plug cord in<strong>to</strong> wall outlet. To disconnect, turn control <strong>to</strong> OFF then remove<br />
plug from wall outlet.<br />
13. Do not use appliance for other than intended use.<br />
SAVE THESE INSTRUCTIONS<br />
THIS PRODUCT IS FOR HOUSEHOLD USE ONLY.<br />
1
Important Cord Information<br />
Connect the power supply cord <strong>to</strong> a polarized outlet only. As a safety feature, this appliance has a polarized plug (one blade is wider than<br />
the other). This plug will only fit in a polarized outlet one way. If the plug does not fit fully in the outlet, reverse the plug. If it still does<br />
not fit, contact a qualified electrician. Do not attempt <strong>to</strong> defeat this safety feature.<br />
A short power supply cord (or cord set) is provided <strong>to</strong> reduce the risk resulting from becoming entangled in or tripping over a longer<br />
cord. Extension cords may be used if care is properly exercised in their use.<br />
If an extension cord is used, the marked electrical rating of the extension cord should be at least as great as the electrical rating of the<br />
appliance. The extension cord should be arranged so that it will not drape over the counter<strong>to</strong>p or table<strong>to</strong>p where it can be pulled on by<br />
children or tripped over.<br />
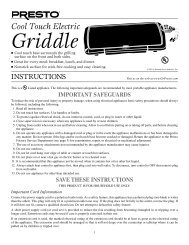
<strong>How</strong> <strong>to</strong> <strong>Use</strong><br />
Before using for the first time, become familiar with the griddle features<br />
(Fig. A). Wash griddle in warm, sudsy water, rinse, <strong>and</strong> dry. Do not immerse<br />
Control Master ® heat control or let the heat control come in contact with<br />
any liquid. “Season” the nonstick cooking surface by rubbing with a small<br />
amount of cooking oil. Remove excess oil with paper <strong>to</strong>wel.<br />
Cool-<strong>to</strong>uch<br />
base<br />
Nonstick coating Control Master ®<br />
heat control<br />
1. Place griddle on a dry, level, heat-resistant surface.<br />
2. Insert Control Master ® heat control in<strong>to</strong> griddle so the two electrical pins on<br />
Grease trough<br />
Drip tray<br />
the griddle are fully inserted in<strong>to</strong> the heat control. Connect cord <strong>to</strong> outlet. Fig. A<br />
3. Turn Control Master ® heat control <strong>to</strong> desired temperature (see page 3 for<br />
cooking temperatures). Preheat griddle. Pilot light goes off when selected temperature is reached (this takes approximately 5 <strong>to</strong> 10<br />
minutes).<br />
4. Prepare food for cooking. Because the griddle features a nonstick finish, food may be prepared with little or no oil.<br />
5. Place food on griddle <strong>and</strong> cook according <strong>to</strong> temperature-timetable (page 3). Heat should be adjusted according <strong>to</strong> personal preference<br />
<strong>and</strong> particular food being cooked. During cooking, pilot light will go on <strong>and</strong> off indicating desired temperature is being maintained.<br />
6. Turn heat control <strong>to</strong> OFF when cooking is completed. Unplug heat control from wall outlet then from appliance. Allow unit <strong>to</strong> cool<br />
before removing drip tray <strong>and</strong> before cleaning.<br />
Note: This griddle is not intended <strong>to</strong> be used as a warming tray.<br />
<strong>Care</strong> <strong>and</strong> <strong>Cleaning</strong><br />
Before initial use <strong>and</strong> after each subsequent use, wash griddle in warm, sudsy water, rinse <strong>and</strong> dry. Do not immerse Control Master ®<br />
heat control in water or let it come in contact with any liquid.<br />
For best results use nylon, plastic, wood, or rubber utensils. Do not use metal utensils as they may scratch the nonstick surface. Do not<br />
cut foods on the cooking surface.<br />
After each use, clean the nonstick surface with a non-metal cleaning pad, such as Scotch-Brite* Multi-Purpose Scrub Sponge or Scotch-<br />
Brite* Dobie* <strong>Cleaning</strong> Pad. Firm pressure can be applied, if necessary. Do not use steel wool or abrasive kitchen cleaners.<br />
In time, the nonstick finish may darken over the heating element. To remove this discoloration, use a commercial cleaner designed for<br />
cleaning surfaces, such as dip-it* destainer. These cleaners are available at most grocery <strong>and</strong> hardware s<strong>to</strong>res. Slide drip tray in<strong>to</strong> place.<br />
Preheat griddle <strong>to</strong> 225°F. Combine 1 cup of hot water <strong>and</strong> 1 tablespoon of commercial cleaner. Wearing rubber gloves, dip cleaning pad<br />
in<strong>to</strong> cleaning solution <strong>and</strong> rub over cooking surface. Continue cleaning until solution is gone. Turn griddle off <strong>and</strong> allow <strong>to</strong> cool. Wash<br />
griddle in hot, soapy water <strong>and</strong> dry.<br />
After treating the griddle with a commercial cleaner, it is recommended that the cooking surface be wiped lightly with a small amount<br />
of cooking oil before using.<br />
Some discoloration may occur inside the griddle drip tray. This is normal. The amount of discoloration will vary depending on the foods<br />
cooked <strong>and</strong> the temperature setting used. This discoloration is only visible from the inside of the drip tray <strong>and</strong> will not affect the performance<br />
of the griddle.<br />
The cool-<strong>to</strong>uch base on the griddle is easy <strong>to</strong> keep attractive <strong>and</strong> looking new. Simply wipe away spills <strong>and</strong> drips as they occur. Any food<br />
residue remaining can be removed with warm, sudsy water <strong>and</strong> a cleaning pad. Rinse <strong>and</strong> wipe dry.<br />
IMPORTANT: To insure continued accuracy of the Control Master ® heat control, avoid rough h<strong>and</strong>ling in use <strong>and</strong> s<strong>to</strong>rage.<br />
*Scotch-Brite is a trademark of 3M. Dobie is a trademark of Pechiney Plastic Packaging, Inc. dip-it is a registered trademark of Reckitt Benckiser N.V.<br />
2
Temperature–Timetable<br />
Food<br />
Temperature<br />
Approximate<br />
Cooking Time Food Temperature<br />
Approximate<br />
Cooking Time<br />
Bacon 325°–350°F 5–8 minutes Pork Chops, ½˝ thick 325°–375°F 15–20 minutes<br />
Canadian Bacon 325°–350°F 3–4 minutes Pork Chops, ¾˝ thick 325°–375°F 20–25 minutes<br />
Eggs, Fried 275°–300°F 3–5 minutes Pota<strong>to</strong>es, Cottage Fried 300°–350°F 10–12 minutes<br />
Fish 325°–375°F 5–10 minutes Sausage, Link 325°–350°F 20–30 minutes<br />
French Toast 325°–350°F 4–6 minutes Sausage, Precooked 325°–350°F 10–12 minutes<br />
Ham, ½˝ thick 325°–350°F 10–12 minutes S<strong>and</strong>wiches, Grilled 325°–350°F 5–10 minutes<br />
Ham, ¾˝ thick 325°–350°F 14–16 minutes Steak, Beef, 1˝ thick, rare 350°–400°F 6–7 minutes<br />
Hamburgers, ½˝ thick 325°–375°F 8–12 minutes Steak, Beef, 1˝ thick, medium 350°–400°F 10–12 minutes<br />
Liver 325°–350°F 5–10 minutes Steak, Beef, 1½˝ thick, rare 350°–400°F 8–10 minutes<br />
Minute Steak 375°–400°F 4–5 minutes Steak, Beef, 1½˝ thick, medium 350°–400°F 18–20 minutes<br />
Pancakes 350°–400°F 2–3 minutes<br />
Service Information<br />
If you have any questions regarding the operation of your PRESTO ® appliance or need parts for your appliance, contact us by any of<br />
these methods:<br />
• Call 1-800-877-0441 weekdays 8:00 AM <strong>to</strong> 4:30 PM (Central Time)<br />
• Email us at our website www.gopres<strong>to</strong>.com<br />
• Write:<br />
NATIONAL PRESTO INDUSTRIES, INC.<br />
Consumer Service Department<br />
3925 North Hastings Way, Eau Claire, WI 54703-3703<br />
When contacting the Consumer Service Department, please indicate the model number of the griddle, which can be found on the bot<strong>to</strong>m<br />
of the heat control receptacle. Also indicate the 4-digit date code which is stamped in the bot<strong>to</strong>m center of the griddle.<br />
Inquiries will be answered promptly by telephone, letter, or email. When writing, please include a phone number <strong>and</strong> a time when you<br />
can be reached during weekdays if possible.<br />
Any maintenance required for this product, other than normal household care <strong>and</strong> cleaning, should be performed by our Fac<strong>to</strong>ry Service<br />
Department. Be sure <strong>to</strong> indicate date of purchase <strong>and</strong> a description of defect when sending an appliance for repair. Send appliances for<br />
repair <strong>to</strong>:<br />
CANTON SALES AND STORAGE COMPANY<br />
Pres<strong>to</strong> Fac<strong>to</strong>ry Service Department<br />
555 Matthews Dr., Can<strong>to</strong>n, MS 39046-0529<br />
The Pres<strong>to</strong> Fac<strong>to</strong>ry Service Department is equipped <strong>to</strong> service all PRESTO ® appliances <strong>and</strong> supply genuine PRESTO ® parts. Genuine<br />
PRESTO ® replacement parts are manufactured <strong>to</strong> the same exacting quality st<strong>and</strong>ards as PRESTO ® appliances <strong>and</strong> are engineered specifically<br />
<strong>to</strong> function properly with its appliances. Pres<strong>to</strong> can only guarantee the quality <strong>and</strong> performance of genuine PRESTO ® parts. “Lookalikes”<br />
might not be of the same quality or function in the same manner. To ensure that you are buying genuine PRESTO ® replacement<br />
parts, look for the PRESTO ® trademark.<br />
PRESTO ® Limited Warranty<br />
This quality PRESTO ® appliance is designed <strong>and</strong> built <strong>to</strong> provide many years of satisfac<strong>to</strong>ry performance under normal household use. Pres<strong>to</strong> pledges <strong>to</strong> the<br />
original owner that should there be any defects in material or workmanship during the first year after purchase, we will repair or replace it at our option. Our<br />
pledge does not apply <strong>to</strong> damage caused by shipping. To obtain service under the warranty, return this PRESTO ® appliance, shipping prepaid, <strong>to</strong> the Fac<strong>to</strong>ry<br />
Service Department. When returning a product, please include a description of the defect <strong>and</strong> indicate the date the appliance was purchased.<br />
We want you <strong>to</strong> obtain maximum enjoyment from using this PRESTO ® appliance <strong>and</strong> ask that you read <strong>and</strong> follow the instructions enclosed. Failure <strong>to</strong> follow<br />
instructions, damage caused by improper replacement parts, abuse or misuse will void this pledge. This warranty gives you specific legal rights, <strong>and</strong> you may<br />
also have other rights which vary from state <strong>to</strong> state. This is Pres<strong>to</strong>’s personal pledge <strong>to</strong> you <strong>and</strong> is being made in place of all other express warranties.<br />
NATIONAL PRESTO INDUSTRIES, INC.<br />
Eau Claire, WI 54703-3703<br />
3<br />
Form 72-410B