

Setting Up Registrations - TryBooking
Setting Up Registrations - TryBooking
Setting Up Registrations - TryBooking

Create successful ePaper yourself
Turn your PDF publications into a flip-book with our unique Google optimized e-Paper software.
<strong>Registrations</strong><br />
How to Guide to <strong>Setting</strong> up <strong>Registrations</strong> with <strong>TryBooking</strong><br />
Overview<br />
This document is a guide for setting up any type of an event where you need your patrons to<br />
complete a series of questions at the time of confirming their order or payment. You could use<br />
this information sheet when setting up sporting team registrations, uniform orders,<br />
conferences, seminars / workshops etc.<br />
All the questions you ask can be exported into a spreadsheet for a quick sort. So do think<br />
about your questions carefully before you begin, work out what it is you need to know to<br />
complete their registration, maybe print registration tags or place their uniform order.<br />
Planning these types of events is key to getting the data exported as you need that makes<br />
your life easier.<br />
When your patron goes to register they will reach your event's homepage then continue to the<br />
next step. They will then enter the number of 'tickets' they wish to purchase, meaning the<br />
number of people they will be registering for. Once they have done so they will continue on to<br />
a page which is fundamentally your registrations page, asking for necessary information you<br />
require from the patron. Once the fields of this page have been filled in they will commence to<br />
the final page in which they are shown exactly what they have registered for before entering in<br />
payment details and receiving their receipt.<br />
All of your registration data can be exported into either a .csv or spreadsheet file.<br />
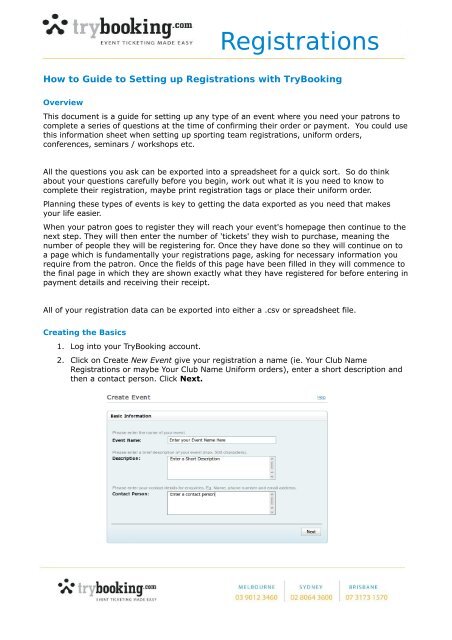
Creating the Basics<br />
1. Log into your <strong>TryBooking</strong> account.<br />
2. Click on Create New Event give your registration a name (ie. Your Club Name<br />
<strong>Registrations</strong> or maybe Your Club Name Uniform orders), enter a short description and<br />
then a contact person. Click Next.
<strong>Registrations</strong><br />
3. You will need to define a venue but whilst your event maybe registrations and people<br />
will be playing at several locations. So consider defining your Venue or select one from<br />
your Venue Templates which is your club address. Click Next.<br />
4. Enter the date and time of which people must register before (which will print onto the<br />
Tax Invoice). Note, if your event is running in daylight savings time, make sure you set<br />
the time zone correctly. Winter time Melb / Syd is GMT +10 whereas summer time will<br />
be GMT +11. This way your event will open and close correctly. Tip once your event<br />
has been created, you can edit this date and time and change it to just words such as<br />
Winter registration.
<strong>Registrations</strong><br />
5. Now enter the date and times which you wish to commence taking registrations on and<br />
when your registrations will close. Remember your registration cannot be found or<br />
booked to until the on sale date (bookings start date) has been reached.<br />
6. Define your capacity of the registrations now. <strong>Registrations</strong> are SPACE events in<br />
<strong>TryBooking</strong>. If you can only take 450 registrations please indicate the Maximum<br />
number or if you have unlimited capacity, please set this registration limit higher than<br />
you ever would expect ie 10,000.<br />
7. Now define your price(s) by clicking on Add Ticket Type.<br />
8. Add in some key words (so that people can search for your registration) and then click<br />
Create Event and Finish.
<strong>Registrations</strong><br />
9. Now that your Registration has been created you have been allocated a URL to publish<br />
on your newsletters, on your website or within your media campaigns.<br />
Now that your registration has been created, it's time to work through adding in the final<br />
touches. So open your registration by clicking on Manage Events and selecting your<br />
registration.<br />
Adding in Questions such as player details, sizes, ages or interest questions.<br />
Once you are in your event click Data Collection. Under data collection you can add fields /<br />
questions for your patrons to complete, such as name, team name, age, uniform sizes, player<br />
consent, previous history, membership details, etc.<br />
Consider what questions you need to ask, the order you need to ask them in and if<br />
they are Required fields. You may only need to know a response once per booking (ie<br />
company name, parent details) rather than frustrate your patron by asking it once for<br />
everyone (per registration ) they are booking for. You can have a combination of questions<br />
under once per booking and some once per attendee.<br />
Tips before you start:<br />
• Consider what questions you need to ask<br />
• Consider how you work with the end data and will your spreadsheet sort best if you<br />
only allow people to select from a defined list (ie maybe you can only have certain<br />
uniform shirt numbers). If you allow for single line text fields you may find that people<br />
will enter their data in all sorts of ways which makes your sorting that little harder.<br />
• Work out the order on your questions. If you later need to add in a question, you will<br />
need to add it to the bottom of your list or re enter your listing.<br />
• Add a couple of questions and then review your work by clicking on Make a Booking.<br />
• Work out if you must have that question completed OR if you live with out a full<br />
response, When you defined your questions, you will be asked if they are a mandatory<br />
field to be completed or not.<br />
• Questions you ask, can be either a Single Line text, Multi line text, list of questions,<br />
Yes/No response or Date field.<br />
• Use fields that “restrict” the registration adding data that makes your sort and final job<br />
harder if at all possible ie use a date field for a date of birth field.
<strong>Registrations</strong><br />
The use of headers<br />
seperates the different<br />
sections of the<br />
registration form<br />
making it look more<br />
appealing to the eye<br />
and informing the<br />
patron of what each<br />
section requires.<br />
This parent contact<br />
details is only asked<br />
once per booking vs<br />
the Player Registration<br />
details which is once<br />
per attendee.<br />
Much like the concept of<br />
headers, as the event<br />
organiser you can also<br />
insert information which<br />
might be helpful for the<br />
patron registering.<br />
The red asterisk<br />
means that such<br />
questions are<br />
mandatory. As the<br />
event organiser you<br />
will select whether<br />
questions should or<br />
should not be<br />
mandatory when<br />
entering in the fields<br />
under data collection<br />
Drop down boxes are<br />
useful in that they only<br />
allow the patron filling<br />
out the form to select<br />
from a range of options,<br />
therefore their answer is<br />
more specific then it<br />
might be if they were to<br />
type in the information.
<strong>Registrations</strong><br />
1. Select either Once per Booking (asks your questions only once per booking irrespective<br />
of the number of people being paid for) or Attendee (which will ask the questions once<br />
per person being paid for.<br />
2. Now click Add Field, and add a label (which is your question), define if you need this to<br />
be a field that they must complete and then what sort of field will it be. In this case<br />
below, yes it's important to know all the names of people who are registering and I'm<br />
happy for them to type into a box (single line text) this information.<br />
Keep adding in questions to ensure you get the right information to assist in the registration<br />
process but do look at your Make a Booking link as you work to review your work as you go.<br />
Tip: The Label on a field maybe too short for your explanation. Consider adding a header to<br />
your field via the header tab. A header can be text, a coloured banner which helps explain in<br />
more detail what you would like to them to complete or simply breaks up your form into logical<br />
parts ie Parent vs Player information. Headers always appear just above that field name.
<strong>Registrations</strong><br />
Adding a look and feel to your event<br />
Your Registration homepage can be given a make over. If you wish to add an image please ask<br />
your graphics person to save this image with the following criteria. The image must be either<br />
a .jpg, png or gif type file, no larger than 600 pixels wide and no larger than 30kb in size.<br />
Tip – if your image has loads of fine writing, you may find that it diminishes in clarity as you<br />
prepare it for web uploading. If this writing is important, do consider cutting just the image<br />
out and then typing in your text directly onto your event homepage. This way you keep the<br />
text clear and clean.<br />
Terms and Conditions<br />
Consider if you need to add in any terms and conditions to the registrations. This could be as<br />
simple as “thank you for registering for the Winter Season”, “no refunds will be issued” or<br />
where you quote your ABN, Indicate this is a Tax Invoice, your company name and indicate<br />
that your ticket price quote is GST inclusive.<br />
Accessing your Data<br />
Keep an eye on your registrations, via reviewing the Event Revenue Itemised report.<br />
Access who has registered and all the questions you asked via the reporting option EXPORT<br />
DATA. Select your registration, then tick the data fields you wish to export. Now click export<br />
and this will open your data into a spreadsheet. Open in your spreadsheet program and sort<br />
based on team name, etc., then date and time of booking.
<strong>Registrations</strong><br />
Checking your Work<br />
Before you publish your registration, please do check your work. As the account administrator<br />
you can click on Make a Booking from either in your Event or from your Account Dashboard.<br />
Please move through checking your work, adding at least 2 people to your list, checking your<br />
registration process for not only look and feel, but do the questions work?. Exit once you<br />
reach the shopping cart.<br />
Producer Access to Reports<br />
Don't forget if your setting up this registration for others who will need to work and market the<br />
event but not necessarily update data or access the full <strong>TryBooking</strong> account, do consider giving<br />
them “producers access” to this registration so that they can self help to the reports you wish<br />
them to access. To setup Producers Access, please go to Manage Events, Your Event Name<br />
and then Producers Access (at the bottom) and define a Password and select the reports which<br />
they can access.<br />
Now if your colleagues come to www.trybooking.com they can Log in via the Account Code and<br />
password as defined on the Producers Access screen for this ONE Registration.<br />
<strong>Registrations</strong> DEMO: www.trybooking.com/HEK
