Install and configure the Net- SNMP agent for Windows
Install and configure the Net- SNMP agent for Windows
Install and configure the Net- SNMP agent for Windows

You also want an ePaper? Increase the reach of your titles
YUMPU automatically turns print PDFs into web optimized ePapers that Google loves.
<strong>Install</strong> <strong>and</strong> <strong>configure</strong> <strong>the</strong> <strong>Net</strong>-<br />
<strong>SNMP</strong> <strong>agent</strong> <strong>for</strong> <strong>Windows</strong><br />
<br />
<br />
Version 0.2 (03/06/2008) : added a note about snmpd.conf file creation<br />
Version 0.1 (03/04/2008) : intial release<br />
This HowTo will explain how to install <strong>and</strong> <strong>configure</strong> <strong>the</strong> <strong>Net</strong>-<strong>SNMP</strong> <strong>agent</strong> <strong>for</strong><br />
<strong>Windows</strong>, as a "sub<strong>agent</strong>" of <strong>the</strong> Microsoft <strong>SNMP</strong> <strong>agent</strong>, to graph <strong>the</strong> output of<br />
custom scripts.<br />
Chapter I: Getting <strong>Net</strong>-<strong>SNMP</strong> binaries<br />
<strong>Net</strong>-<strong>SNMP</strong> 5.4.1 <strong>for</strong> <strong>Windows</strong> can be downloaded here.<br />
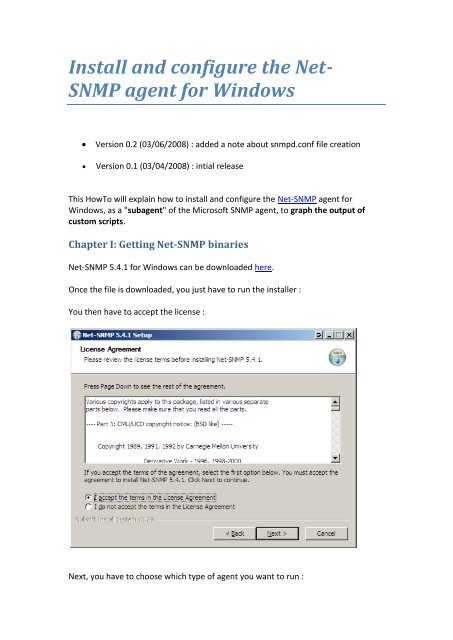
Once <strong>the</strong> file is downloaded, you just have to run <strong>the</strong> installer :<br />
You <strong>the</strong>n have to accept <strong>the</strong> license :<br />
Next, you have to choose which type of <strong>agent</strong> you want to run :
as a st<strong>and</strong>ard <strong>agent</strong><br />
as a "sub<strong>agent</strong>" of <strong>the</strong> Microsoft <strong>SNMP</strong> <strong>agent</strong><br />
Select <strong>the</strong> second option :<br />
Next, choose an installation directory (C:\usr by default) : it is better to create a<br />
Directory C:\<strong>Net</strong>-<strong>SNMP</strong>
Next, select an existing or a new Start menu folder :<br />
The installer <strong>the</strong>n copies <strong>the</strong> files :<br />
Once installed, you have to register <strong>the</strong> <strong>Net</strong>-<strong>SNMP</strong> service
Chapter II: Configuring <strong>the</strong> <strong>Net</strong>-<strong>SNMP</strong> <strong>agent</strong><br />
The <strong>Windows</strong> <strong>SNMP</strong> service must be installed, but <strong>the</strong> service must be disabled.<br />
Depending on where you've installed <strong>Net</strong>-<strong>SNMP</strong>, <strong>the</strong> main configuration file<br />
(snmpd.conf OR snmptrapd.conf) will be located in \etc\snmp (by default,<br />
C:<strong>Net</strong>-<strong>SNMP</strong>\usr\etc\snmp).<br />
The snmpd.conf OR snmptrapd.conf has to be created.<br />
SOS!!!<br />
Please note that you need to restart <strong>the</strong> "<strong>Net</strong>-<strong>SNMP</strong> Agent" service whenever you<br />
modify snmpd.conf !<br />
The minimum configuration is this one :<br />
Code:<br />
rocommunity public<br />
Start <strong>the</strong>n <strong>the</strong> "<strong>Net</strong>-<strong>SNMP</strong> Agent" service, <strong>and</strong> query it :<br />
Code:<br />
C:\<strong>Net</strong>-<strong>SNMP</strong> \usr\bin>snmpwalk.exe -v 1 -c public localhost sysdesc<br />
<strong>SNMP</strong>v2-MIB::sysDescr.0 = STRING: Hardware: x86 Family 6 Model 9 Stepping 5<br />
AT/AT COMPATIBLE - Software: <strong>Windows</strong> 2000 Version 5.1 (Build 2600<br />
Uniprocessor Free)<br />
This OID got an anwser from <strong>the</strong> Microsoft <strong>SNMP</strong> service, whereas<br />
Code:<br />
C:\<strong>Net</strong>-<strong>SNMP</strong> \usr\bin>snmpwalk.exe -v 1 -c public localhost versiontag<br />
UCD-<strong>SNMP</strong>-MIB::versionTag.0 = STRING: 5.4.1<br />
got an answer from <strong>the</strong> <strong>Net</strong>-<strong>SNMP</strong> <strong>agent</strong>.<br />
At this point, you can use <strong>the</strong> "<strong>Windows</strong> XP/2000/2003" host template in Cacti, to<br />
graph CPU usage, disk drives usage, network b<strong>and</strong>width, etc.<br />
Chapter III: Extending <strong>the</strong> <strong>Net</strong>-<strong>SNMP</strong> <strong>agent</strong><br />
A great functionnality of <strong>Net</strong>-<strong>SNMP</strong> is that you can "extend" it.<br />
Let's run <strong>the</strong> C:\temp\foo.cmd script :<br />
Code:<br />
C:\temp\foo.cmd<br />
123
Now put this in snmpd.conf :<br />
Code:<br />
exec foo c:\temp\foo.cmd<br />
The result of your script will be accessible under <strong>the</strong> ucdavis.extTable.extEntry tree :<br />
<br />
<br />
<br />
output of <strong>the</strong> script : ucdavis.extTable.extEntry.extOutput<br />
exit status : ucdavis.extTable.extEntry.extResult<br />
comm<strong>and</strong> : ucdavis.extTable.extEntry.extComm<strong>and</strong><br />
You can check <strong>the</strong> result with this <strong>SNMP</strong> query :<br />
Code:<br />
C:\temp>snmpwalk.exe -v 1 -c public localhost exttable<br />
UCD-<strong>SNMP</strong>-MIB::extIndex.1 = INTEGER: 1<br />
UCD-<strong>SNMP</strong>-MIB::extNames.1 = STRING: foo<br />
UCD-<strong>SNMP</strong>-MIB::extComm<strong>and</strong>.1 = STRING: c:\temp\foo.cmd<br />
UCD-<strong>SNMP</strong>-MIB::extResult.1 = INTEGER: 0<br />
UCD-<strong>SNMP</strong>-MIB::extOutput.1 = STRING: 123<br />
UCD-<strong>SNMP</strong>-MIB::extErrFix.1 = INTEGER: noError(0)<br />
UCD-<strong>SNMP</strong>-MIB::extErrFixCmd.1 = STRING:<br />
extOutput translates to .1.3.6.1.4.1.2021.8.1.101<br />
As "foo" is our first exec directive, add ".1" at <strong>the</strong> end of <strong>the</strong> OID.<br />
In Cacti, use <strong>the</strong> "<strong>SNMP</strong> - Generic OID Template" like this :<br />
Voila ! Result of <strong>the</strong> C:\temp\foo.cmd script is now graphed in Cacti.<br />
Chapter IV: Configure <strong>Net</strong>-<strong>SNMP</strong> <strong>agent</strong> <strong>for</strong> TUC<br />
Copy Power<strong>Net</strong>-MIB.txt to c:\<strong>Net</strong>-<strong>SNMP</strong>\usr\share\snmp\mibs\<br />
Insert to C:\<strong>Net</strong>-<strong>SNMP</strong>\usr\etc\snmp\snmpd.conf OR snmptrapd.conf<br />
traph<strong>and</strong>le Power<strong>Net</strong>-MIB::gracefullShutdown c:\<strong>Net</strong>-<br />
<strong>SNMP</strong>\usr\etc\shutdown.cmd<br />
<strong>and</strong> <strong>the</strong> file will like this :
disableAuthorization yes<br />
# Generic <strong>SNMP</strong> Traps<br />
traph<strong>and</strong>le <strong>SNMP</strong>v2-MIB::coldStart c:\<strong>Net</strong>-<strong>SNMP</strong>\usr\etc\foo.cmd cold<br />
traph<strong>and</strong>le <strong>SNMP</strong>v2-MIB::warmStart c:\<strong>Net</strong>-<strong>SNMP</strong>\usr\etc\foo.cmd warm<br />
traph<strong>and</strong>le IF-MIB::linkDown<br />
traph<strong>and</strong>le IF-MIB::linkUp<br />
c:\<strong>Net</strong>-<strong>SNMP</strong>\usr\etc\foo.cmd down<br />
c:\<strong>Net</strong>-<strong>SNMP</strong>\usr\etc\foo.cmd up<br />
# Enterprise specific traps<br />
#Trap from <strong>the</strong> DATA CENTER<br />
traph<strong>and</strong>le Power<strong>Net</strong>-MIB::gracefullShutdown c:\<strong>Net</strong>-<br />
<strong>SNMP</strong>\usr\etc\shutdown.cmd<br />
<strong>the</strong>re are two files that will execute foo.cmd <strong>and</strong> shutdown.cmd.<br />
foo.cmd will execute when a Generic <strong>SNMP</strong> Trap will accorded.<br />
Shutdown.cmd will execute when a DATA CENTER <strong>SNMP</strong> trap accoreded.<br />
Please note that you need to restart <strong>the</strong> "<strong>Net</strong>-<strong>SNMP</strong> Agent" service whenever you<br />
modify snmpd.conf !<br />
Modify <strong>the</strong> c:\<strong>Net</strong>-<strong>SNMP</strong>\usr\etc\shutdown.cmd:<br />
echo %date%-%time%-Shutdown >> c:\net-snmp\usr\etc\hello.txt<br />
c:\net-snmp\usr\etc\ShutDownSERVERS.bat<br />
in <strong>the</strong> file ShutDownSERVERS.bat you will find a example of shutdown procedure<br />
how to shutdown a server(windows or linux) from windows Server