Employee Self-Service - Kansas.gov
Employee Self-Service - Kansas.gov
Employee Self-Service - Kansas.gov

Create successful ePaper yourself
Turn your PDF publications into a flip-book with our unique Google optimized e-Paper software.
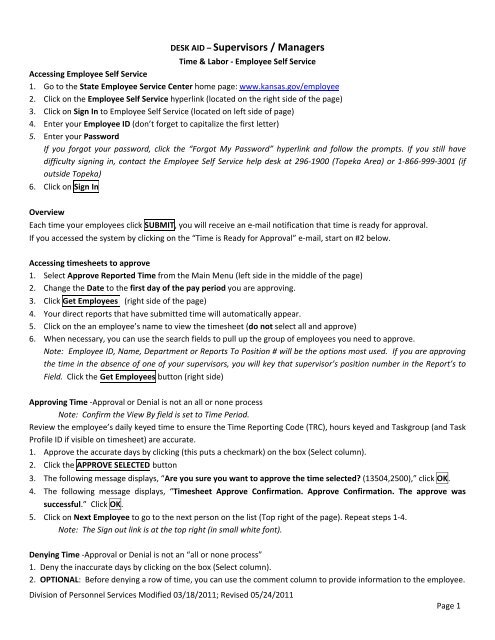
DESK AID – Supervisors / Managers<br />
Time & Labor - <strong>Employee</strong> <strong>Self</strong> <strong>Service</strong><br />
Accessing <strong>Employee</strong> <strong>Self</strong> <strong>Service</strong><br />
1. Go to the State <strong>Employee</strong> <strong>Service</strong> Center home page: www.kansas.<strong>gov</strong>/employee<br />
2. Click on the <strong>Employee</strong> <strong>Self</strong> <strong>Service</strong> hyperlink (located on the right side of the page)<br />
3. Click on Sign In to <strong>Employee</strong> <strong>Self</strong> <strong>Service</strong> (located on left side of page)<br />
4. Enter your <strong>Employee</strong> ID (don’t forget to capitalize the first letter)<br />
5. Enter your Password<br />
If you forgot your password, click the “Forgot My Password” hyperlink and follow the prompts. If you still have<br />
difficulty signing in, contact the <strong>Employee</strong> <strong>Self</strong> <strong>Service</strong> help desk at 296-1900 (Topeka Area) or 1-866-999-3001 (if<br />
outside Topeka)<br />
6. Click on Sign In<br />
Overview<br />
Each time your employees click SUBMIT, you will receive an e-mail notification that time is ready for approval.<br />
If you accessed the system by clicking on the “Time is Ready for Approval” e-mail, start on #2 below.<br />
Accessing timesheets to approve<br />
1. Select Approve Reported Time from the Main Menu (left side in the middle of the page)<br />
2. Change the Date to the first day of the pay period you are approving.<br />
3. Click Get <strong>Employee</strong>s (right side of the page)<br />
4. Your direct reports that have submitted time will automatically appear.<br />
5. Click on the an employee’s name to view the timesheet (do not select all and approve)<br />
6. When necessary, you can use the search fields to pull up the group of employees you need to approve.<br />
Note: <strong>Employee</strong> ID, Name, Department or Reports To Position # will be the options most used. If you are approving<br />
the time in the absence of one of your supervisors, you will key that supervisor’s position number in the Report’s to<br />
Field. Click the Get <strong>Employee</strong>s button (right side)<br />
Approving Time -Approval or Denial is not an all or none process<br />
Note: Confirm the View By field is set to Time Period.<br />
Review the employee’s daily keyed time to ensure the Time Reporting Code (TRC), hours keyed and Taskgroup (and Task<br />
Profile ID if visible on timesheet) are accurate.<br />
1. Approve the accurate days by clicking (this puts a checkmark) on the box (Select column).<br />
2. Click the APPROVE SELECTED button<br />
3. The following message displays, “Are you sure you want to approve the time selected? (13504,2500),” click OK.<br />
4. The following message displays, “Timesheet Approve Confirmation. Approve Confirmation. The approve was<br />
successful.” Click OK.<br />
5. Click on Next <strong>Employee</strong> to go to the next person on the list (Top right of the page). Repeat steps 1-4.<br />
Note: The Sign out link is at the top right (in small white font).<br />
Denying Time -Approval or Denial is not an “all or none process”<br />
1. Deny the inaccurate days by clicking on the box (Select column).<br />
2. OPTIONAL: Before denying a row of time, you can use the comment column to provide information to the employee.<br />
Division of Personnel <strong>Service</strong>s Modified 03/18/2011; Revised 05/24/2011<br />
Page 1
3. Click the DENY SELECTED button.<br />
4. The following message displays, “Are you sure you want to deny the time selected? (13504,10034)<br />
Once the page is saved, you will not be able to change the status from "Denied." Click OK to save the Deny action.<br />
Click Cancel to maintain the "Needs Approval" status.” Click OK<br />
5. The following message displays, “Timesheet Deny Confirmation. The Deny was successful.” Click OK .<br />
NOTE: Every time you approve, deny, or change an employee’s timesheet an e-mail notification automatically is sent<br />
to the employee.<br />
At this point, the employee should make the correction(s) and SUBMIT again for approval. Upon receipt of another e-<br />
mail notification, review the employee’s corrections and approve or deny as appropriate.<br />
Note: The Sign out link is at the top right (in small white font).<br />
Viewing the Time keyed by your <strong>Employee</strong>s<br />
From the Main Menu for the <strong>Employee</strong> <strong>Self</strong> <strong>Service</strong>, click on Report Time for My <strong>Employee</strong>s (left side of the page).<br />
In the Date field, Enter the pay period begin date for the pay period you wish to view.<br />
The Group ID is a code unique to you. You can leave this field blank if you want to see timesheets of employees that<br />
do not report directly to you, but rather to a supervisor/manager who reports to you.<br />
Confirm the View By field is set to Week.<br />
Click Get <strong>Employee</strong>s. You will see a list of your employees and the amount of time keyed, approved, denied, to be<br />
<br />
<br />
<br />
approved etc for a week. (Read through the information that is available.)<br />
Click on the an employee’s name to view the timesheet<br />
Confirm the View By field is set to Time Period.<br />
View the timesheet entries. You can click on the Previous Time Period or Next Time Period to view other timesheets.<br />
Things to Remember<br />
A signed paper time document is required anytime an individual other than the employee keys or makes corrections<br />
to the electronic time sheet. You can request a paper time document from the timekeeper or HR personnel.<br />
Division of Personnel <strong>Service</strong>s Modified 03/18/2011; Revised 05/24/2011<br />
Page 2