How to configure Office 365 in Outlook 2010 or 2013
How to configure Office 365 in Outlook 2010 or 2013
How to configure Office 365 in Outlook 2010 or 2013

Create successful ePaper yourself
Turn your PDF publications into a flip-book with our unique Google optimized e-Paper software.
<strong>How</strong> <strong>to</strong> <strong>configure</strong> <strong>Office</strong> <strong>365</strong> <strong>in</strong> <strong>Outlook</strong> <strong>2010</strong> <strong>or</strong> <strong>2013</strong> <br />
This document will help you <strong>to</strong> <strong>configure</strong> your new Microsoft <strong>Office</strong> <strong>365</strong> email and calendar<strong>in</strong>g us<strong>in</strong>g Microsoft <br />
<strong>Outlook</strong> <strong>2010</strong> <strong>or</strong> <strong>2013</strong>. <br />
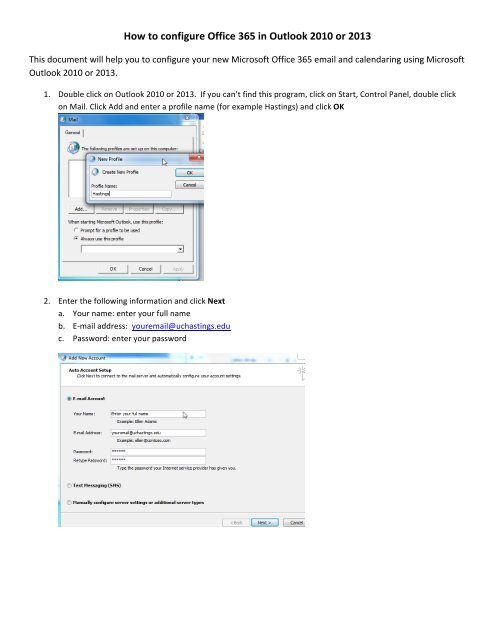
1. Double click on <strong>Outlook</strong> <strong>2010</strong> <strong>or</strong> <strong>2013</strong>. If you can’t f<strong>in</strong>d this program, click on Start, Control Panel, double click <br />
on Mail. Click Add and enter a profile name (f<strong>or</strong> example Hast<strong>in</strong>gs) and click OK <br />
2. Enter the follow<strong>in</strong>g <strong>in</strong>f<strong>or</strong>mation and click Next <br />
a. Your name: enter your full name <br />
b. E-‐mail address: youremail@uchast<strong>in</strong>gs.edu <br />
c. Passw<strong>or</strong>d: enter your passw<strong>or</strong>d
3. Once it has <strong>configure</strong>d your <strong>Outlook</strong>, click F<strong>in</strong>ish <br />
4. At the log<strong>in</strong> prompt enter your username as youremail@uchast<strong>in</strong>gs.edu and passw<strong>or</strong>d
<strong>How</strong> <strong>to</strong> <strong>configure</strong> <strong>Office</strong> <strong>365</strong> <strong>in</strong> Mac Client <br />
This document will help you <strong>to</strong> <strong>configure</strong> your new Microsoft <strong>Office</strong> <strong>365</strong> email and calendar<strong>in</strong>g us<strong>in</strong>g Mac OS X <br />
mail client. <br />
1. Launch the Mail Client from the dock, <strong>or</strong> from the application folder. <br />
2. In Mac Mail, click Mail, then Preferences. Click the + symbol <br />
3. Enter the follow<strong>in</strong>g <strong>in</strong>f<strong>or</strong>mation and click Cont<strong>in</strong>ue <br />
a. Full Name: <br />
b. Email address: youremail@uchast<strong>in</strong>gs.edu <br />
c. Passw<strong>or</strong>d: <br />
4. Choose whether <strong>to</strong> setup iCal and Address Book contacts and click Create
<strong>How</strong> <strong>to</strong> <strong>configure</strong> <strong>Office</strong> <strong>365</strong> <strong>in</strong> <strong>Outlook</strong> 2011 f<strong>or</strong> Mac <br />
This document will help you <strong>to</strong> <strong>configure</strong> your new Microsoft <strong>Office</strong> <strong>365</strong> email and calendar<strong>in</strong>g us<strong>in</strong>g Microsoft <br />
<strong>Outlook</strong> 2011 f<strong>or</strong> Mac. <br />
1. Start Microsoft <strong>Outlook</strong> 2011 f<strong>or</strong> Mac <br />
2. Click Tools, Accounts <br />
3. Click Exchange Account <br />
4. Enter the follow<strong>in</strong>g <strong>in</strong>f<strong>or</strong>mation and click Add Account <br />
a. E-‐Mail Address: youremail@uchast<strong>in</strong>gs.edu <br />
b. Method: User Name and Passw<strong>or</strong>d <br />
c. User name: youremail@uchast<strong>in</strong>gs.edu <br />
d. Passw<strong>or</strong>d:
5. Verify the <strong>in</strong>f<strong>or</strong>mation is c<strong>or</strong>rect and exit this screen.
<strong>How</strong> <strong>to</strong> <strong>configure</strong> <strong>Office</strong> <strong>365</strong> Account on Apple IOS (iPhone, iPad, iTouch, iPad M<strong>in</strong>i) <br />
1. Tab Sett<strong>in</strong>gs <br />
2. Tap Mail, contacts, Calendars
3. Tap Add Account <br />
4. Tap Microsoft Exchange
5. Enter the follow<strong>in</strong>g <strong>in</strong>f<strong>or</strong>mation: <br />
a. Email: youremail@uchast<strong>in</strong>gs.edu <br />
b. Doma<strong>in</strong>: (leave empty) <br />
c. Username: youremail@uchast<strong>in</strong>gs.edu (Be sure <strong>to</strong> enter your full email address) <br />
d. Passw<strong>or</strong>d: (enter your passw<strong>or</strong>d) <br />
e. Description: Hast<strong>in</strong>gs <br />
6. Tap Next <br />
7. Your account is be<strong>in</strong>g verified. Tap Next <br />
8. On the Sett<strong>in</strong>gs screen, select which features you’d like <strong>to</strong> synchronize your device with <strong>Office</strong> <strong>365</strong>. Tap Save.
1. Swipe <strong>to</strong> the left <br />
2. Tap Sett<strong>in</strong>gs <br />
<strong>How</strong> <strong>to</strong> <strong>configure</strong> <strong>Office</strong> <strong>365</strong> Account on W<strong>in</strong>dows 8 phone <br />
3. Tap email + Accounts <br />
4. Tap Add an account
5. Tap <strong>Outlook</strong> <br />
6. Enter your email address ( youremail@uchast<strong>in</strong>gs.edu) and passw<strong>or</strong>d and tap sign <strong>in</strong> <br />
7. Account added successfully. Tap Done.
<strong>How</strong> <strong>to</strong> <strong>configure</strong> <strong>Office</strong> <strong>365</strong> Account on Android (Smartphones and Tablets) <br />
The follow<strong>in</strong>g <strong>in</strong>structions will walk you through sett<strong>in</strong>g up your Android <strong>to</strong> access <strong>Office</strong> <strong>365</strong>. Android <br />
devices come from different manufacturers and their <strong>in</strong>terfaces and features might be different. <br />
Below is the basic <strong>in</strong>f<strong>or</strong>mation you need <strong>to</strong> get your Android device setup on <strong>Office</strong> <strong>365</strong>. <br />
1. From the Applications menu, tap Email. On some versions of Android, this may be called Mail. <br />
2. Type your full email address, f<strong>or</strong> example youremail@uchast<strong>in</strong>gs.edu, and your passw<strong>or</strong>d, and tap Next <br />
3. Select Exchange account. On some versions of Android, this may be called Exchange ActivesSync. <br />
4. Enter the follow<strong>in</strong>g <strong>in</strong>f<strong>or</strong>mation <br />
a. Doma<strong>in</strong>\Username: youremail@uchast<strong>in</strong>gs.edu <br />
b. Passw<strong>or</strong>d: your Hast<strong>in</strong>gs passw<strong>or</strong>d <br />
c. Server: outlook.office<strong>365</strong>.com <br />
5. Tap Next <br />
6. Tap OK <br />
7. Check which options <strong>to</strong> synchronize and tap Next
8. In the Activate device adm<strong>in</strong>istra<strong>to</strong>r? W<strong>in</strong>dow, tap Activate <br />
9. Give your account a name and tap Next
<strong>How</strong> <strong>to</strong> Access the <strong>Outlook</strong> Web App (OWA) f<strong>or</strong> <strong>Office</strong> <strong>365</strong> <br />
1. Open a supp<strong>or</strong>ted web browser and go <strong>to</strong> httP://outlook.ofice<strong>365</strong>.com <br />
2. Enter your username and passw<strong>or</strong>d. Your username is youremail@uchast<strong>in</strong>gs.edu Click Sign <strong>in</strong>