
Create successful ePaper yourself
Turn your PDF publications into a flip-book with our unique Google optimized e-Paper software.
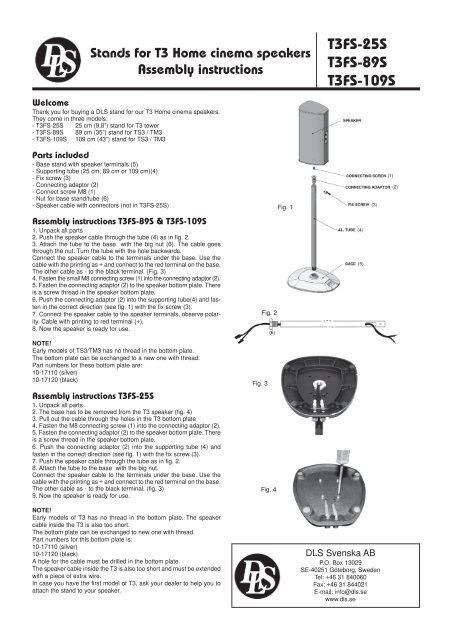
Stands for T3 Home cinema speakers<br />
Assembly instructions<br />
Welcome<br />
Thank you for buying a <strong>DLS</strong> stand for our T3 Home cinema speakers.<br />
They come in three models:<br />
- <strong>T3FS</strong>-<strong>25S</strong> 25 cm (9,8”) stand for T3 tower<br />
- <strong>T3FS</strong>-<strong>89S</strong> 89 cm (35”) stand for TS3 / TM3<br />
- <strong>T3FS</strong>-<strong>109S</strong> 109 cm (43”) stand for TS3 / TM3<br />
Parts included<br />
- Base stand with speaker terminals (5)<br />
- Supporting tube (25 cm, 89 cm or 109 cm)(4)<br />
- Fix screw (3)<br />
- Connecting adaptor (2)<br />
- Connect screw M8 (1)<br />
- Nut for base stand/tube (6)<br />
- Speaker cable with connectors (not in <strong>T3FS</strong>-<strong>25S</strong>)<br />
Assembly instructions <strong>T3FS</strong>-<strong>89S</strong> & <strong>T3FS</strong>-<strong>109S</strong><br />
1. Unpack all parts<br />
2. Push the speaker cable through the tube (4) as in fig. 2.<br />
3. Attach the tube to the base with the big nut (6). The cable goes<br />
through the nut. Turn the tube with the hole backwards.<br />
Connect the speaker cable to the terminals under the base. Use the<br />
cable with the printing as + and connect to the red terminal on the base.<br />
The other cable as - to the black terminal. (Fig. 3)<br />
4. Fasten the small M8 connecting screw (1) into the connecting adaptor (2).<br />
5. Fasten the connecting adaptor (2) to the speaker bottom plate. There<br />
is a screw thread in the speaker bottom plate.<br />
6. Push the connecting adaptor (2) into the supporting tube(4) and fasten<br />
in the correct direction (see fig. 1) with the fix screw (3).<br />
7. Connect the speaker cable to the speaker terminals, observe polarity.<br />
Cable with printing to red terminal (+).<br />
8. Now the speaker is ready for use.<br />
NOTE!<br />
Early models of TS3/TM3 has no thread in the bottom plate.<br />
The bottom plate can be exchanged to a new one with thread.<br />
Part numbers for these bottom plate are:<br />
10-17110 (silver)<br />
10-17120 (black)<br />
Assembly instructions <strong>T3FS</strong>-<strong>25S</strong><br />
1. Unpack all parts<br />
2. The base has to be removed from the T3 speaker (fig. 4)<br />
3. Pull out the cable through the holes in the T3 bottom plate<br />
4. Fasten the M8 connecting screw (1) into the connecting adaptor (2).<br />
5. Fasten the connecting adaptor (2) to the speaker bottom plate. There<br />
is a screw thread in the speaker bottom plate.<br />
6. Push the connecting adaptor (2) into the supporting tube (4) and<br />
fasten in the correct direction (see fig. 1) with the fix screw (3).<br />
7. Push the speaker cable through the tube as in fig. 2.<br />
8. Attach the tube to the base with the big nut.<br />
Connect the speaker cable to the terminals under the base. Use the<br />
cable with the printing as + and connect to the red terminal on the base.<br />
The other cable as - to the black terminal. (fig. 3)<br />
9. Now the speaker is ready for use.<br />
NOTE!<br />
Early models of T3 has no thread in the bottom plate. The speaker<br />
cable inside the T3 is also too short.<br />
The bottom plate can be exchanged to new one with thread.<br />
Part numbers for this bottom plate is:<br />
10-17110 (silver)<br />
10-17120 (black)<br />
A hole for the cable must be drilled in the bottom plate.<br />
The speaker cable inside the T3 is also too short and must be extended<br />
with a piece of extra wire.<br />
In case you have the first model of T3, ask your dealer to help you to<br />
attach the stand to your speaker.<br />
Fig. 3<br />
Fig. 2<br />
(6)<br />
Fig. 4<br />
Fig. 1<br />
<strong>T3FS</strong>-<strong>25S</strong><br />
<strong>T3FS</strong>-<strong>89S</strong><br />
<strong>T3FS</strong>-<strong>109S</strong><br />
(4)<br />
(5)<br />
(3)<br />
<strong>DLS</strong> Svenska AB<br />
P.O. Box 13029<br />
SE-40251 Göteborg, Sweden<br />
Tel: +46 31 840060<br />
Fax: +46 31 844021<br />
E-mail: info@dls.se<br />
www.dls.se<br />
(1)<br />
(2)
Stativ förr T3 Home cinema högtalare<br />
Monteringsanvisning<br />
Välkommen<br />
Tack för att du köpt <strong>DLS</strong> stativ för våra T3 hemmabiohögtalare.<br />
Stativen finns i tre olika utföranden.<br />
- <strong>T3FS</strong>-<strong>25S</strong> 25 cm (9,8”) stativ för T3 tower<br />
- <strong>T3FS</strong>-<strong>89S</strong> 89 cm (35”) stativ för TS3 / TM3<br />
- <strong>T3FS</strong>-<strong>109S</strong> 109 cm (43”) stativ för TS3 / TM3<br />
Ingående delar<br />
- Fotplatta med högtalaranslutningar (5)<br />
- Stativrör (25 cm, 89 cm eller 109 cm) (4)<br />
- Fixeringsskruv (3)<br />
- Anslutningsadapter (2)<br />
- Anslutningsskruv M8 (1)<br />
- Mutter för sammankoppling av rör och fotplatta (6)<br />
- Högtalarkabel med anslutningskontakter (ej i <strong>T3FS</strong>-<strong>25S</strong>)<br />
Montering <strong>T3FS</strong>-<strong>89S</strong> & <strong>T3FS</strong>-<strong>109S</strong><br />
1. Packa upp alla delar<br />
2. Drag kabeln genom röret som visas i bild 2.<br />
3. Montera röret i foten med den stora muttern (6). Kabeln dras genom<br />
muttern. Hålet i röret vänds bakåt. Anslut högtalarkabeln till terminalerna<br />
på bottenplattans undersida. Kabel med text är + och ansluts till<br />
röda terminalen. Den andra kabeln är - och ansluts till svart terminal.<br />
(Bild. 3)<br />
4. Skruva fast den lilla M8 skruven(1) i anslutningsadaptern.<br />
5. Skruva fast anslutningsadaptern(2) i gängan i högtalarens bottenplatta*.<br />
6. Tryck ner anslutningsadaptern i röret och fäst med fixeringsskruven<br />
(3) i rätt position (se fig. 1).<br />
7. Anslut kabeln till högtalarens terminaler. Kabeln med text till högtalarens<br />
röda terminal (+) och den andra till den svarta terminalen (-).<br />
8. Nu är högtalaren klar att anslutas till förstärkaren.<br />
* OBS!<br />
Tidiga modeller av TS3/TM3 har ingen gänga i bottenplattan.<br />
Lösa bottenplattor med gänga finns att köpa som reservdel med följande<br />
artikelnummer.<br />
10-17110 (silver)<br />
10-17120 (svart)<br />
Montering <strong>T3FS</strong>-<strong>25S</strong><br />
1. Packa upp alla delar<br />
2. Skruva loss bottendelen på T3-högtalaren (fig. 4)<br />
3. Drag ut kabeln genom hålet i T3:s bottenplatta.<br />
4. Skruva in den lilla svarta M8 skruven (1) i anslutningsadaptern.<br />
5. Skruva fast anslutningsadaptern (2) i högtalarens bottenplatta. Det<br />
finns en skruvgänga i bottenplattan*.<br />
6. Tryck ner anslutningsadaptern i röret (4) och fäst med fixeringsskruven<br />
(3) i rätt position (se fig. 1).<br />
7. Drag kabeln genom röret som visas i bild 2.<br />
8. Montera röret i foten med den stora muttern (6). Kabeln dras genom<br />
muttern. Hålet i röret vänds bakåt.<br />
Anslut kabeln till högtalarens terminaler. Kabeln med text till högtalarens<br />
röda terminal (+) och den andra till den svarta terminalen (-).<br />
9. Nu är högtalaren klar att anslutas till förstärkaren.<br />
* OBS!<br />
Tidiga modeller av T3 har ingen skruvgänga i bottenplattan. Kabeln<br />
som går in i högtalaren är också för kort.<br />
Lösa bottenplattor med gänga finns att köpa som reservdel med följande<br />
artikelnummer.<br />
10-17110 (silver)<br />
10-17120 (svart)<br />
På dessa bottenplattor måste även ett hål för kabeln borras upp.<br />
Högtalarkabeln inuti högtalaren måste också förlängas med en kort<br />
kabelstump.<br />
I det fall du har den tidiga modellen avT3, be din återförsäljare om hjälp<br />
med monteringen av stativet om du känner dig osäker på hur man gör.<br />
Fig. 2<br />
Fig. 3<br />
(6)<br />
Fig. 4<br />
Fig. 1<br />
<strong>T3FS</strong>-<strong>25S</strong><br />
<strong>T3FS</strong>-<strong>89S</strong><br />
<strong>T3FS</strong>-<strong>109S</strong><br />
M8 skruv<br />
Anslutningsadapter<br />
(3)<br />
Fixeringsskruv<br />
(4)<br />
Rör av aluminium<br />
(5)<br />
Bottenplatta<br />
<strong>DLS</strong> Svenska AB<br />
Box 13029<br />
40251 Göteborg, Sweden<br />
Tel: 031- 840060<br />
Fax: 031- 844021<br />
E-mail: info@dls.se<br />
www.dls.se<br />
(1)<br />
(2)