Formatting Excel Worksheets Additional Information
Formatting Excel Worksheets Additional Information
Formatting Excel Worksheets Additional Information

You also want an ePaper? Increase the reach of your titles
YUMPU automatically turns print PDFs into web optimized ePapers that Google loves.
NDUS Training and Documentation<br />
<strong>Formatting</strong> <strong>Excel</strong> <strong>Worksheets</strong> – <strong>Additional</strong> <strong>Information</strong><br />
When you’re formatting your worksheets, you’ll want to make your job as easy as<br />
possible. If you have several worksheets in the same workbook that need the same<br />
formatting and or text, it makes sense to apply all of that formatting only once, rather<br />
than having to format one worksheet, then create the same formats on another<br />
worksheet, and then another and so on.<br />
If you want to have more than one worksheet formatted exactly the same, here’s how to<br />
do it:<br />
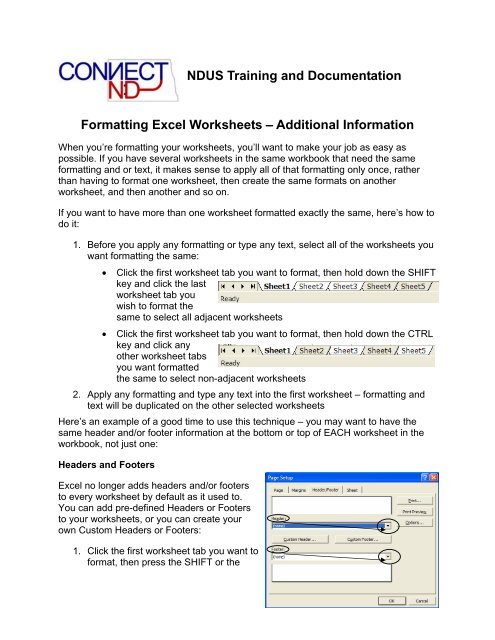
1. Before you apply any formatting or type any text, select all of the worksheets you<br />
want formatting the same:<br />
• Click the first worksheet tab you want to format, then hold down the SHIFT<br />
key and click the last<br />
worksheet tab you<br />
wish to format the<br />
same to select all adjacent worksheets<br />
• Click the first worksheet tab you want to format, then hold down the CTRL<br />
key and click any<br />
other worksheet tabs<br />
you want formatted<br />
the same to select non-adjacent worksheets<br />
2. Apply any formatting and type any text into the first worksheet – formatting and<br />
text will be duplicated on the other selected worksheets<br />
Here’s an example of a good time to use this technique – you may want to have the<br />
same header and/or footer information at the bottom or top of EACH worksheet in the<br />
workbook, not just one:<br />
Headers and Footers<br />
<strong>Excel</strong> no longer adds headers and/or footers<br />
to every worksheet by default as it used to.<br />
You can add pre-defined Headers or Footers<br />
to your worksheets, or you can create your<br />
own Custom Headers or Footers:<br />
1. Click the first worksheet tab you want to<br />
format, then press the SHIFT or the<br />
1
CTRL key and click on other worksheet tabs to select them<br />
2. On the Menu Bar, select File, Page Setup…<br />
3. Click the Header/Footer tab at the top of the Page Setup dialog box, if necessary<br />
4. To use a pre-defined header or footer, select the appropriate entry from the<br />
Header: or Footer: drop-down list box<br />
5. To create a Custom Header or Footer, click Custom Header… or Custom<br />
Footer…<br />
6. Click in the Left section: box and type text or click one of the buttons above to<br />
place that entry code left-justified at the left edge of the header or footer<br />
7. Press the Tab key to move the cursor to the Center section: - any text or entry<br />
codes will be center-justified in the header or footer<br />
8. Press the Tab key to move the cursor to the Right section: - any text or entry<br />
codes will be right-justified<br />
9. Click OK to close the Header or Footer dialog box<br />
10. Click OK to close the Page Setup dialog box<br />
Headers and footers will not be displayed in your regular worksheet view, but you will<br />
be able to view them in Print Preview and they will print with your worksheets.<br />
2