User's Manual Fully Automatic Washing Machine - Haier
User's Manual Fully Automatic Washing Machine - Haier
User's Manual Fully Automatic Washing Machine - Haier

Create successful ePaper yourself
Turn your PDF publications into a flip-book with our unique Google optimized e-Paper software.
6<br />
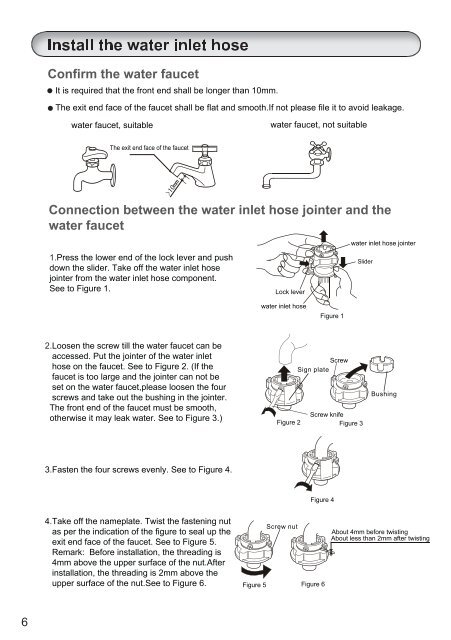
Confirm the water faucet<br />
� It is required that the front end shall be longer than 10mm.<br />
� The exit end face of the faucet shall be flat and smooth.If not please file it to avoid leakage.<br />
water faucet, suitable<br />
water faucet, not suitable<br />
The exit end face of the faucet<br />
Connection between the water inlet hose jointer and the<br />
water faucet<br />
1.Press the lower end of the lock lever and push<br />
down the slider. Take off the water inlet hose<br />
jointer from the water inlet hose component.<br />
See to Figure 1.<br />
2.Loosen the screw till the water faucet can be<br />
accessed. Put the jointer of the water inlet<br />
hose on the faucet. See to Figure 2. (If the<br />
faucet is too large and the jointer can not be<br />
set on the water faucet,please loosen the four<br />
screws and take out the bushing in the jointer.<br />
The front end of the faucet must be smooth,<br />
otherwise it may leak water. See to Figure 3.)<br />
3.Fasten the four screws evenly. See to Figure 4.<br />
4.Take off the nameplate. Twist the fastening nut<br />
as per the indication of the figure to seal up the<br />
exit end face of the faucet. See to Figure 5.<br />
Remark: Before installation, the threading is<br />
4mm above the upper surface of the nut.After<br />
installation, the threading is 2mm above the<br />
upper surface of the nut.See to Figure 6.<br />
Figure 5<br />
Lock lever<br />
water inlet hose<br />
Screw<br />
Sign plate<br />
Screw knife<br />
Figure 2 Figure 3<br />
Screw nut<br />
Figure 4<br />
Figure 6<br />
Figure 1<br />
water inlet hose jointer<br />
Slider<br />
Bushing<br />
About 4mm before twisting<br />
About less than 2mm after twisting