SPORTSMAN 125 35mm CAMERA - Photographic Memorabilia
SPORTSMAN 125 35mm CAMERA - Photographic Memorabilia
SPORTSMAN 125 35mm CAMERA - Photographic Memorabilia

Create successful ePaper yourself
Turn your PDF publications into a flip-book with our unique Google optimized e-Paper software.
<strong>SPORTSMAN</strong> <strong>125</strong><br />
<strong>35mm</strong> <strong>CAMERA</strong><br />
Instructions for use
Contents<br />
Parts of the camera page 4 and 5<br />
If 35 mm. is new to you page 8<br />
Step by step loading page 9<br />
Setting the camera for sunshine snaps page 14<br />
Unloading the camera page 18<br />
More about the camera page 20<br />
Taking close-up pictures page 22<br />
Taking flash pictures page 22<br />
Taking time exposures page 23<br />
Exposure guide page 24<br />
Accessories for the Sportsman <strong>125</strong> page 25<br />
Care of the camera page 25
KEEP THIS PAGE OPEN WHILE YOU READ THE INSTRUCTIONS<br />
1. Accessory shoe<br />
2. Film type reminder disc<br />
3. Film winding lever<br />
4. Diaphragm ring with white<br />
arrow<br />
5. Shutter release button<br />
6. Picture counter<br />
7. Rewinding relsase button<br />
8. Rewinding knob, spindle and<br />
crank<br />
9. Viewfinder<br />
10. Back catch release<br />
11. Shutter speed ring with red line<br />
12. "Depth of field" scale with<br />
diamond index mark<br />
13. Distance ring and lens<br />
14. Flash socket<br />
15. Tripod fixing screw socket
TAKING HORIZONTAL PICTURES TAKING UPRIGHT PICTURES<br />
ILFORD<br />
<strong>SPORTSMAN</strong> <strong>125</strong><br />
<strong>35mm</strong> <strong>CAMERA</strong><br />
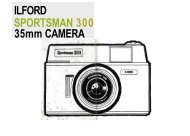
The Ilford Sportsman <strong>125</strong> camera is designed to make<br />
picture taking easy. It also allows you to make varied<br />
adjustments for more advanced photography when<br />
you have more experience.<br />
Read these instructions carefully, and examine<br />
the illustrations, then you will get good pictures from<br />
the start whether you use colour or black and white film.
If 35 mm is new to you<br />
Your camera uses black and white or colour films,<br />
35 mm. (millimetres) wide, which are available in<br />
light-proof metal containers called cassettes.<br />
The cassette of film is loaded into the camera<br />
and after each picture has been taken the film has<br />
to be wound on around a take-up spool.<br />
You do not have to look into a red window as<br />
the film winding lever winds on just the right<br />
amount of film each time. You can tell how many<br />
pictures you have taken by looking at a<br />
counter in the base of the camera. When all the<br />
film has been used it has to be rewound into<br />
the light-proof cassette before you open<br />
the back of the camera.<br />
Your Sportsman <strong>125</strong> camera takes<br />
pictures 24 x 36 mm. in size. When you<br />
hand an exposed black and white film, in its<br />
cassette, to your photo dealer for developing and<br />
printing you should ask for enprints (small<br />
enlargements) size 3½ x 5 inches or other<br />
enlargements. Colour prints are made<br />
from 35 mm. colour negative films such as<br />
Ilfocolor and colour slides from colour<br />
reversal films such as Ilfochrome.<br />
Your Sportsman <strong>125</strong> camera<br />
If your photo dealer has loaded the camera for<br />
you, you will want to start taking pictures<br />
right away. Turn to page 14 where you will find<br />
set out the essential steps for taking snapshots.<br />
But we start the book by describing the<br />
way a film should be loaded. Obtain a cassette<br />
of film and follow the step by step loading<br />
of your camera set out below. The figures in<br />
brackets throughout the booklet refer to the<br />
parts shown on pages 4 and 5.
STEP 1<br />
Step 1. Open the camera by pushing up the catch<br />
release (10) using your thumb nail or a coin.<br />
STEP 2<br />
Step 2. Push up the rewinding spindle (8).<br />
STEP 3<br />
Step 3. Drop film in and lead its end across to the<br />
take-up spool. Push down the rewinding spindle<br />
gently, rotating it slightly if necessary, to<br />
secure the cassette. Now press the shutter release<br />
button (5) as far as it will go.<br />
STEP 4<br />
Step 4. Feed end of film in wide slot of take-up<br />
spool and hook the second perforation over the<br />
projecting tooth. If wide slot is not<br />
visible rotate the spool with the thumb.
STEP 5<br />
Step 5. Ensure that the sprockets are engaged with<br />
the film perforations. Turn the take-up spool with<br />
the thumb to take up the tension of the film on<br />
the spool. Your loaded camera should look like<br />
this. Now close the back, making sure the film<br />
does not spring away from the sprockets and push<br />
it so that it snaps shut.<br />
STEP 6<br />
Step 6. Operate the film winding lever (3) as far as<br />
it will go. Now press the shutter release button<br />
and operate the film winding lever two or three<br />
times each until the picture counter (6) indicates "1".<br />
Check that the rewinding knob and crank (8)<br />
turn, as you wind on the film. Keep left hand clear of<br />
rewind knob as you wind on, to avoid damage to film.<br />
STEP 7<br />
Step 7. Now set the film type reminder disc (2).<br />
YOUR <strong>CAMERA</strong> IS NOW LOADED AND YOU<br />
ARE READY TO TAKE YOUR FIRST PICTURE
FOR ILFOCHROME 32<br />
AND ILFOCOLOR<br />
15<br />
Rotate the diaphragm ring (4)<br />
so that the white arrow is<br />
opposite "11". Let it click<br />
into place.<br />
Setting the camera<br />
for snaps in sunshine<br />
If you have not used a camera<br />
like this before follow steps 1 to 3<br />
below, which tell you how to set<br />
your camera for snapshot pictures<br />
in sunshine when you have<br />
Ilfochrome 32 colour film,<br />
Ilfocolor film or FP3 black and<br />
white film in your camera. The<br />
settings enable you to take pictures<br />
in sunshine of any subject that is<br />
more than about 7 to 8 feet away<br />
from you. You can leave the<br />
camera set like this for your snaps<br />
and then all you need do to take<br />
the picture is follow steps 4 to 7.<br />
Other films will require slightly<br />
different settings as shown on<br />
page 24.<br />
FOR FP3 FILM<br />
Rotate the diaphragm ring (4)<br />
so that the white arrow is<br />
opposite "16". Let it click<br />
into place.<br />
FOR ILFOCHROME 32<br />
ILFOCOLOR AND FP3<br />
Rotate the shutter speed ring<br />
so that the red line is<br />
opposite "60". Let it click<br />
into place.<br />
FOR ILFOCHROME 32<br />
ILFOCOLOR AND FP3<br />
Rotate distance ring (13) until<br />
"14" is opposite the diamond<br />
shaped index mark.
Steps 4-7 apply to all films<br />
STEP 4<br />
Hold the camera to your eye and steady<br />
it against your face. See page 6.<br />
MAIN LINE<br />
STEP 5<br />
Look through<br />
the viewfinder<br />
(9) at the picture<br />
to take. Have your picture framed in<br />
the main line. (Note: For close-ups<br />
see page 22).<br />
STEP 6<br />
Press the shutter release button with<br />
a firm pressure as far as it will go<br />
It will click two or three times before<br />
reaching the firing position.<br />
STEP 7<br />
Operate the film winding lever as far<br />
as it will go and then allow it to<br />
return gently to its rest position. You<br />
are now ready to take the next picture.<br />
The shutter release and the film<br />
winding lever mechanisms are<br />
interlocked. This prevents your<br />
making two pictures on the same<br />
piece of film.
18<br />
19<br />
STEP 1<br />
Lift out rewinding crank,<br />
swing it up, over and down.<br />
Unloading<br />
the camera<br />
When you have made all 36<br />
or 20 exposures (depending on<br />
the film you are using) the<br />
film must be rewound into its<br />
cassette.<br />
STEP 2<br />
STEP 3<br />
Press rewinding release button<br />
(7) and rotate rewinding crank<br />
in the direction of the arrow.<br />
Continue rewinding in this<br />
direction until it comes to a<br />
sudden stop or until it suddenly<br />
becomes easier to turn.<br />
Open the camera—see page 10.<br />
The picture counter will<br />
automatically return to "A".<br />
STEP 4<br />
Pull up the rewinding spindle<br />
and the cassette of exposed<br />
film can be tipped out of the<br />
camera.<br />
The camera is now ready to<br />
accept a new cassette of film<br />
but before loading it check<br />
that there is no small piece<br />
of film loose in the camera
2Q<br />
MORE ABOUT<br />
THE <strong>CAMERA</strong><br />
To be able to take more interesting pictures<br />
you need to know more about the controls on the<br />
camera. Here are brief details.<br />
The lens<br />
This has a focal length (distance from lens to<br />
film) of 45 mm. It has to be rotated (i.e. focused)<br />
and set to agree with the subject to camera<br />
distance. It is set in a rotating mount (13) marked<br />
with figures which are the subject to camera<br />
distances in feet. When taking close-ups (see<br />
page 22) you must measure the distance but the<br />
distance of subjects farther away can be estimated.<br />
The diaphragm<br />
or lens aperture<br />
The main purpose of the diaphragm ring is to<br />
control the intensity of the light reaching the film<br />
by altering the size of the lens aperture.<br />
Another function of the aperture is to<br />
control the range of distances within which a<br />
subject can move and still be sharply denned on<br />
the film. If the distance ring is set to 14 feet and<br />
the diaphragm ring to "16", then by referring<br />
to the "depth of field" scale (12) you can see that<br />
objects in the picture will be sharp from about<br />
7 feet to the far distance. ( is the sign for<br />
infinity or far distance). You can check the depth<br />
of field for any other combination of distance<br />
and lens aperture by referring to the scale.<br />
ILLUSTRATION OF "DEPTH OF FIELD"<br />
The Shutter<br />
This is a Prontor <strong>125</strong> with three speeds, and<br />
a "B" setting which is for time exposures.<br />
The 30, 60, <strong>125</strong>, represent fractions of a second<br />
e.g. 60 is 1/60 second. The shutter is<br />
synchronised for flash photography. Flashbulbs<br />
and electronic flash can be used, see page 22.<br />
Lens apertures are often<br />
shown with the symbol<br />
"f/" in front but this has<br />
been omitted from the<br />
Sportsman <strong>125</strong> camera to<br />
make the numbers more<br />
easily readable.<br />
A is distance setting.<br />
B to C is depth of field<br />
when using f/16,<br />
i.e. about 7 ft. to infinity.
22<br />
23<br />
Taking close-up pictures<br />
The viewfinder shows a pair of short lines<br />
inside the main frame at the top and a pair of<br />
short lines outside the main frame at the<br />
bottom. See page 16. Use these short lines to<br />
frame your picture when you are between<br />
6 feet and 3.3 feet from your subject. Measure<br />
the distance from camera to subject and rotate the<br />
distance ring (i.e. focus the lens) until the<br />
correct distance figure is opposite the<br />
diamond shaped index mark.<br />
Taking flash pictures<br />
FLASHBULBS<br />
Fit an Ilford flashgun to the accessory shoe (1)<br />
and connect the lead to the flash socket (14)<br />
on the front of the camera. Set the shutter speed<br />
ring to "30". Insert a flashbulb in the gun and<br />
when you press the shutter release button<br />
the flash will fire at the same time as the shutter<br />
opens. Refer to the flashbulb carton for the<br />
method of working out which lens<br />
aperture setting is needed.<br />
ELECTRONIC FLASH<br />
Connect the flash lead to the flash socket (14)<br />
on the front of the camera and set the shutter<br />
speed ring to "<strong>125</strong>". Refer to the flashgun<br />
manufacturer's literature for the method of<br />
working out which lens aperture setting is needed.<br />
Taking time exposures<br />
Rest the camera on a firm support (better still,<br />
screw it to a tripod by means of the screw<br />
socket (15)), set the shutter speed ring to "B"<br />
and screw a cable-release into the shutter release<br />
button. You can then operate the shutter<br />
without jerkiness and it will stay open as long<br />
as you keep pressure on the release.<br />
It is advisable to make use of an exposure meter<br />
to determine the camera settings to be used<br />
in order to obtain correctly exposed pictures.
24<br />
25<br />
Type<br />
of<br />
film<br />
FP3-<br />
for<br />
black<br />
and<br />
white<br />
Exposure guide<br />
The following table is a guide to the camera<br />
settings to be used for pictures taken between<br />
3 hours after sunrise and 3 hours before sunset<br />
with the film recommended. More accurate<br />
settings may be determined by using<br />
an exposure meter.<br />
Type of subject<br />
Landscapes,seascapes,<br />
beach scenes, snow<br />
scenes.<br />
Buildings, gardens,<br />
distant figures or<br />
groups.<br />
Close-ups of people<br />
or groups.<br />
Lens aperture to use when<br />
Sunshine<br />
blue sky<br />
f/22<br />
f/16<br />
f/11<br />
Slightly<br />
overcast<br />
f/16<br />
f/11<br />
f/8<br />
Dull<br />
f/11<br />
f/8<br />
f/5.6<br />
Shutter<br />
Speed<br />
sec<br />
Accessories for the<br />
Sportsman <strong>125</strong> camera<br />
A range of accessories is available for your<br />
Sportsman <strong>125</strong> camera. These include flashguns,<br />
a yellow filter to "bring out" the clouds in black<br />
and white photography, a U.V. filter to<br />
prevent colour pictures being too blue when taken<br />
by the sea or at high altitudes, a lens hood to<br />
prevent unwanted side-light entering the<br />
lens, supplementary lenses which fit in front<br />
of the camera lens so that you can take pictures<br />
between 3 .3 feet and 11 inches, and<br />
of course a leather ever-ready carrying case to<br />
protect your camera during use. Your<br />
photographic dealer will be pleased to help<br />
you make a suitable choice of these accessories.<br />
Care of the camera<br />
A<br />
B<br />
C<br />
For exposures with Ilford Pan F film set the<br />
speed to 1/30 sec. and use the apertures<br />
shown in the above table.<br />
For exposures with Ilford HP3 film set<br />
the speed to 1/<strong>125</strong> sec. and use<br />
the apertures shown in the above table.<br />
For exposures with colour films refer to the<br />
leaflet packed with the film.<br />
Use only a soft special lens-cleaning brush to<br />
remove dust, and lens-cleaning tissue to lightly<br />
clean the lens. Do not keep colour film for<br />
too long in your camera or the pictures may be<br />
affected by heat or high humidity. Should your<br />
camera ever need repairing send it to Ilford<br />
Limited at the address shown on the guarantee card.
26<br />
The aim of this booklet has been to help you<br />
to start taking pictures without worrying too<br />
much about the technicalities. It has set out<br />
the essential information to enable you to take<br />
good pictures from the start but cannot<br />
however cover all points you may need to know<br />
as you become more experienced. Your Ilford<br />
dealer will be pleased to help you with<br />
further points on which you need guidance.<br />
You may also write to Ilford Limited,<br />
Amateur Sales Services, Ilford, Essex.<br />
Further information on taking colour pictures is<br />
given in the booklets "All about taking colour<br />
pictures with Ilfochrome 32" and "All about<br />
taking colour pictures with Ilfocolor" published<br />
by Focal Press Limited and available<br />
from your usual photo dealer.<br />
ILFORD LIMITED ILFORD ESSEX<br />
Constant improvements in Ilford products<br />
mean that minor changes in the design<br />
or specification may occur from time to time.<br />
It will not be possible always to amend<br />
the instruction book at the same time, and<br />
the right to alter the design and specification<br />
without notice is accordingly reserved.<br />
<strong>125</strong>/B64/I0m/E<br />
Printed in England