SL5 Install - Kim Lighting
SL5 Install - Kim Lighting
SL5 Install - Kim Lighting

Create successful ePaper yourself
Turn your PDF publications into a flip-book with our unique Google optimized e-Paper software.
P.O. Box 60080 • 16555 East Gale Ave.<br />
City of Industry, California 91716-0080<br />
626/968-5666 • FAX 626/330-3861<br />
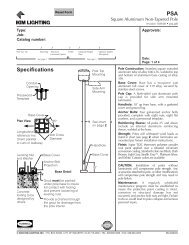
Site Lightforms - <strong>SL5</strong> <strong>Install</strong>ation Instructions<br />
<strong>SL5</strong><br />
!<br />
WARNING: Fixtures must be grounded in accordance with local codes or the National Electrical Code.<br />
Failure to do so may result in serious personal injury.<br />
MAINTENANCE: For optimum performance a regularly scheduled maintenance program should be followed.<br />
NOTE: Coated lamps are recommended for optimum uniformity of light. All electrical work should be done by<br />
a qualified electrician. KEEP THIS SHEET FOR FUTURE REFERENCE.<br />
Tool Required:<br />
Flat Blade Screwdriver<br />
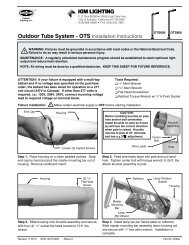
FIXTURE INSTALLATION INSTRUCTIONS:<br />
! Make certain the electrical supply is OFF before starting fixture installation.<br />
1. Lay fixture on a clean, padded surface with fixture base near power supply leads.<br />
2. Remove round head screws and template from anchor bolts.<br />
3. Attach fixture leads to power supply leads observing polarity, i.e. green-to-ground, white-to-common, and black-to<br />
voltage.<br />
4. Place fixture over conduit stub-up and set fixture orientation. Make<br />
certain that none of the wires are pinched when lowering fixture base<br />
onto anchor bolts.<br />
5. Leveling of fixture has been pre-set during anchor bolt installation.<br />
If fixture is not level, place stainless steel shims or washers (by others)<br />
under fixture base, making sure all four corners of base are<br />
resting on a solid surface.<br />
6. Secure fixture with four C-16 x 1J" hex head stainless steel black<br />
bolts and four C" flat stainless steel black washers supplied with<br />
fixture.<br />
8"<br />
9"<br />
Primary<br />
Light<br />
Direction<br />
4J" 4J"<br />
LAMP INSTALLATION OR REPLACEMENT:<br />
Tool Required:<br />
B” Allen Wrench<br />
! Make certain the electrical supply is OFF before installing or<br />
replacing lamp.<br />
1. Progressively loosen three 10-32 socket head lens screws.<br />
Note: Lens screws and gasket are self-retained to lens.<br />
2. <strong>Install</strong> lamp into socket. Coated lamps are recommended for<br />
optimum uniformity of light. Only use lamp type and wattage shown<br />
on fixture label affixed to reflector assembly.<br />
3. Replace lens assembly making sure gasket is clean. Tighten screws<br />
progressively until they bottom out to insure even gasket pressure.<br />
Cleaning Polycarbonate Lens and Reflector Assembly:<br />
Tool Required: B” Allen Wrench<br />
! Make certain the electrical supply is OFF before cleaning lens and reflector.<br />
1. Progressively loosen three 10-32 socket head lens screws. Note: Lens screws<br />
and gasket are self-retained to lens.<br />
2. Remove lamp.<br />
3. Dust the reflector with a clean, dry cloth.<br />
4. Clean polycarbonate lens with a mild detergent. Do not use an abrasive<br />
compound or clean with a dry cloth as this will scratch the lens.<br />
5. Replace lamp.<br />
6. Replace lens assembly making sure gasket is clean. Tighten screws progressively<br />
until they bottom out to insure even gasket pressure.<br />
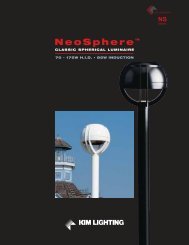
42"<br />
33"<br />
Light<br />
Center<br />
Height<br />
Fixture height may be 36" overall.<br />
Base Plan<br />
8K”<br />
Bolt<br />
Circle<br />
8”<br />
9D”<br />
Revised 06/26/12 EC 120626005 Status 7<br />
Part No. 95444
Site Lightforms - <strong>SL5</strong> <strong>Install</strong>ation Instructions<br />
Tools Required: ❑ B” Allen Wrench ❑ 10” Extension ❑ M” Open End Wrench<br />
❑ C” Socket ❑ K" Socket ❑ C” or K” Drive Ratchet<br />
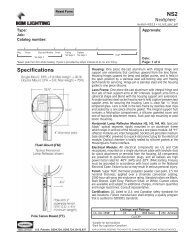
BALLAST REPLACEMENT INSTRUCTIONS:<br />
! Make certain the electrical supply is OFF before replacing<br />
ballast.<br />
1. Progressively loosen three 10-32 socket head lens screws using<br />
the B" allen wrench. Note: Lens screws and gasket are selfretained<br />
to lens.<br />
2. Remove lamp.<br />
3. Take off top cap by removing the M-18 x L" hex head bolt<br />
accessible with ratchet and 10" extension through lens opening<br />
up into fixture shaft.<br />
4. Loosen––do not remove––the M-18 x L" hex head bolt through<br />
top cap opening directly under reflector bracket.<br />
5. Loosen completely the self-retained J-20 x K" hex head screw<br />
through lens opening under rear reflector.<br />
6. Lift reflector bracket upwards until ballast assembly clears shaft<br />
and splices are accessible for disconnecting. Disconnect power<br />
supply and ground leads.<br />
7. Disconnect lamp leads. Remove two 10-32 x D" hex head screws<br />
between reflector bracket and ballast bracket.<br />
8. Replace the ballast assembly with proper type and wattage.<br />
Connect lamp leads. Hold reflector/ballast assembly at top of<br />
fixture and connect ground and power supply leads.<br />
9. Lower reflector/ballast assembly into fixture shaft making certain<br />
that none of the wires are pinched when lowering.<br />
10. Hang reflector/ballast assembly on M-18 x L" hex head bolt. Do<br />
not tighten bolt until step 13.<br />
11. Tighten the J-20 x K" long hex head thread forming screw<br />
through lens opening. Note: A small amount of pressure may be<br />
required to start thread.<br />
12. Tighten the M-18 x L" long hex head bolt through top cap<br />
opening to secure reflector/ballast assembly.<br />
13. Inspect gasket on bottom of top cap and replace if necessary.<br />
14. Secure top cap with the M-18 x L" hex head bolt.<br />
15. Re-install lamp.<br />
16. Replace lens assembly making sure gasket is clean. Tighten<br />
screws progressively until they bottom out to insure even gasket<br />
pressure.<br />
Top Cap<br />
Gasket<br />
M”-18 x L” Hex<br />
Head Screw<br />
10-32 x D”<br />
Hex Head<br />
Lamp Leads<br />
Power Supply<br />
Leads<br />
M”-18 x L’<br />
Hex Head<br />
Reflector<br />
Bracket<br />
Retainer<br />
Washer<br />
Ballast<br />
Bracket<br />
Ground<br />
Lead<br />
Lexan Lens/Gasket<br />
Assembly with Screws<br />
Fixture<br />
Body<br />
When ordering a replacement ballast specify watts, lamp type and<br />
voltage. Example: 70HPS120V.<br />
REPLACEMENT PARTS<br />
DESCRIPTION PART NUMBER<br />
Lens Assembly 84103R<br />
Top Cap Gasket 82218<br />
Mounting Bolt ✱ 58352<br />
Mounting Washer ✱ 58353<br />
✱<br />
Not shown in illustration.<br />
Page 2 <strong>Kim</strong> <strong>Lighting</strong> • 16555 E. Gale Ave. • P.O. Box 60080 • City of Industry, CA 91716-0080 • 626/968-5666 • FAX 626/330-3861
Site Liteforms - <strong>SL5</strong> <strong>Install</strong>ation Instructions<br />
KIM LIGHTING LIMITED WARRANTY<br />
When installed in accordance with <strong>Kim</strong> <strong>Install</strong>ation Instructions and accepted trade practices, the<br />
following shall apply:<br />
General Product Limited Warranty Coverage<br />
All material and component parts used in the manufacture of <strong>Kim</strong> Products, are warranted to be<br />
free from defects of material and/or workmanship for a period of 1 year from date of sale, with the<br />
following exceptions:<br />
Auxiliary Equipment<br />
All auxiliary equipment (such as lamps, ballasts, and transformers) provided by and/or included in<br />
<strong>Kim</strong> Products shall carry the component manufacturer's warranty.<br />
Copper and Bronze Landscape Components<br />
Copper and Bronze Landscape fixture components shall be warranted against defects of material<br />
and/or workmanship, and failure due to corrosion, for a period of 25 years from date of sale.<br />
Composite In-Grade Components<br />
Composite In-Grade fixture components installed below grade, shall be warranted against defects<br />
of material and/or workmanship, and failure due to corrosion, for a period of 7 years from date of<br />
sale.<br />
Aluminum Landscape Components<br />
Aluminum Landscape fixture components not in direct contact with soil, shall be warranted against<br />
defects of material and/or workmanship for a period of 3 years from date of sale. Aluminum fixture<br />
components in direct contact with soil shall be warranted from defects of material and failure due to<br />
corrosion for a period of 1 year from date of sale.<br />
Limit of Liability and General Conditions<br />
Only products which are installed, used and maintained in accordance with applicable <strong>Kim</strong> instructions,<br />
specifications and accepted trade practices, are covered by the <strong>Kim</strong> Warranty. During the<br />
warranty period, with proof of purchase, <strong>Kim</strong> will repair or replace with the same or similar product,<br />
at <strong>Kim</strong>'s option. without charge. Labor costs are the owner's responsibility and are excluded from<br />
this warranty. This warranty is void if the product is modified, tampered with, misapplied, poorly<br />
installed, improperly maintained, or subjected to abnormal conditions.<br />
Repair or replacement as provided under this warranty is the exclusive remedy of the purchaser.<br />
This warranty is in lieu of all other warranties, expressed or implied, including any implied warranty<br />
of fitness for a particular application. <strong>Kim</strong> <strong>Lighting</strong> shall not be liable to the purchaser for indirect or<br />
consequential damages.<br />
How may we serve you better?<br />
Please let us know. Visit our website at:<br />
www.kimlighting.com<br />
Your concerns are important to us.<br />
Page 3 <strong>Kim</strong> <strong>Lighting</strong> • 16555 E. Gale Ave. • P.O. Box 60080 • City of Industry, CA 91716-0080 • 626/968-5666 • FAX 626/330-3861