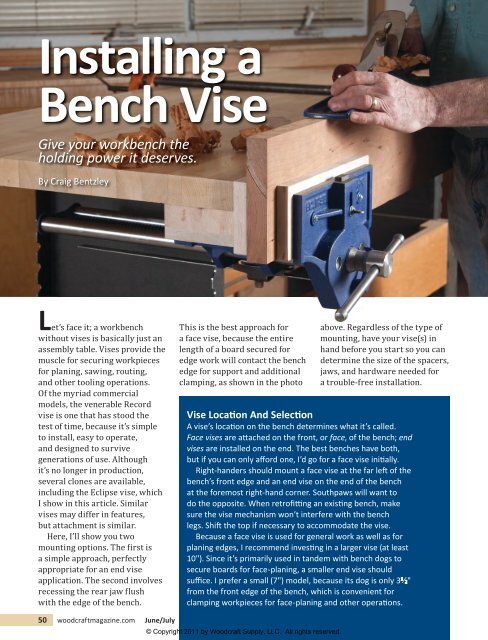
Installing a Bench Vise - Woodcraft Magazine
Installing a Bench Vise - Woodcraft Magazine
Installing a Bench Vise - Woodcraft Magazine

Create successful ePaper yourself
Turn your PDF publications into a flip-book with our unique Google optimized e-Paper software.
<strong>Installing</strong> a<br />
<strong>Bench</strong> <strong>Vise</strong><br />
Give your workbench the<br />
holding power it deserves.<br />
By Craig Bentzley<br />
Let’s face it; a workbench<br />
without vises is basically just an<br />
assembly table. <strong>Vise</strong>s provide the<br />
muscle for securing workpieces<br />
for planing, sawing, routing,<br />
and other tooling operations.<br />
Of the myriad commercial<br />
models, the venerable Record<br />
vise is one that has stood the<br />
test of time, because it’s simple<br />
to install, easy to operate,<br />
and designed to survive<br />
generations of use. Although<br />
it’s no longer in production,<br />
several clones are available,<br />
including the Eclipse vise, which<br />
I show in this article. Similar<br />
vises may differ in features,<br />
but attachment is similar.<br />
Here, I’ll show you two<br />
mounting options. The first is<br />
a simple approach, perfectly<br />
appropriate for an end vise<br />
application. The second involves<br />
recessing the rear jaw flush<br />
with the edge of the bench.<br />
This is the best approach for<br />
a face vise, because the entire<br />
length of a board secured for<br />
edge work will contact the bench<br />
edge for support and additional<br />
clamping, as shown in the photo<br />
above. Regardless of the type of<br />
mounting, have your vise(s) in<br />
hand before you start so you can<br />
determine the size of the spacers,<br />
jaws, and hardware needed for<br />
a trouble-free installation.<br />
<strong>Vise</strong> Location And Selection<br />
A vise’s location on the bench determines what it’s called.<br />
Face vises are attached on the front, or face, of the bench; end<br />
vises are installed on the end. The best benches have both,<br />
but if you can only afford one, I’d go for a face vise initially.<br />
Right-handers should mount a face vise at the far left of the<br />
bench’s front edge and an end vise on the end of the bench<br />
at the foremost right-hand corner. Southpaws will want to<br />
do the opposite. When retrofitting an existing bench, make<br />
sure the vise mechanism won’t interfere with the bench<br />
legs. Shift the top if necessary to accommodate the vise.<br />
Because a face vise is used for general work as well as for<br />
planing edges, I recommend investing in a larger vise (at least<br />
10"). Since it’s primarily used in tandem with bench dogs to<br />
secure boards for face-planing, a smaller end vise should<br />
suffice. I prefer a small (7") model, because its dog is only 3 1 ⁄2"<br />
from the front edge of the bench, which is convenient for<br />
clamping workpieces for face-planing and other operations.<br />
50 woodcraftmagazine.com June/July
Front jaw<br />
Rear<br />
jaw<br />
A<br />
Wooden<br />
cheeks<br />
Countersink the through-holes on the back of the rear<br />
jaw to allow attaching the cheek with flathead screws.<br />
Spacer<br />
blocks<br />
Connecting<br />
bracket<br />
Roll pin<br />
B<br />
Washer<br />
Install the vise with washers and lag screws that project<br />
through clearance holes in the two spacer blocks.<br />
Simple mounting<br />
The easiest installation entails<br />
making spacer blocks to set the<br />
tops of the metal jaws below the<br />
bench surface while screwing<br />
the vise to the underside of a<br />
bench. To begin, drive the roll<br />
pin from the end of the vise<br />
screw, remove the connecting<br />
bracket and the front jaw,<br />
and then degrease the vise<br />
of its protective coating.<br />
To determine the thickness<br />
of your spacer blocks, place the<br />
rear jaw upside down on the<br />
inverted benchtop and measure<br />
how much the top of the jaw<br />
projects beyond the underside.<br />
Add to that 1 ⁄ 4" for a 7" vise, or<br />
1⁄ 2" for a 10" vise. (The former<br />
is necessary for better dog<br />
height on the smaller vise.)<br />
To calculate the size of the<br />
cheeks, measure the rear jaw’s<br />
bearing surface and add enough<br />
to the cheek width so that it<br />
extends about 1 ⁄ 8" above the<br />
bench surface when installed.<br />
Next, make both cheeks the size<br />
of the rear cheek, using 3 ⁄ 4"-thick<br />
hardwood. Countersink the holes<br />
in the rear jaw (Photo A),<br />
and then attach the rear cheek<br />
with flathead wood screws<br />
and the front cheek with<br />
roundhead screws and washers.<br />
Make your spacer block(s).<br />
(Use two for an end vise to<br />
provide dog clearance.) Plane<br />
them to your determined<br />
thickness, and size them in length<br />
and width to suit the mounting<br />
hole surfaces on the rear jaw<br />
bracket, as shown in Photo B.<br />
Sandwich the blocks between the<br />
bracket and the bench, trace the<br />
locations of the mounting holes,<br />
and drill clearance holes through<br />
the spacers. Screw or glue the<br />
spacers in place, and then attach<br />
the vise to the top, using the<br />
longest possible 3 ⁄ 8" lag screws.<br />
Reattach the connecting<br />
bracket, washer, and roll pin.<br />
After turning the benchtop<br />
upright, hand-plane the<br />
tops of the wooden cheeks<br />
flush to the benchtop.<br />
Tip Alert<br />
Disassembling a vise isn’t<br />
necessary for installation,<br />
but it facilitates cleaning<br />
and mounting.<br />
Drilling Dog Holes<br />
Because most vises include an integral dog, it makes sense to<br />
incorporate a row of dog holes into your benchtop. Most commercially<br />
available dogs fit 3 ⁄4"-diameter holes, which need to be drilled precisely<br />
perpendicular to the benchtop. Make a drill guide block from 2"-thick<br />
stock, boring out the centered 3 ⁄4"-diameter hole on the drill press.<br />
Glue the block to a hooked standoff that registers against the edge<br />
of your bench as shown in the photo. (Make sure to align the hole<br />
with the dog on your vise.) Draw a centerline down the rear face of<br />
the block for positioning reference. Use a square to lay out the dog<br />
hole locations on the bench, spacing them 6" apart starting from the<br />
end of the bench. To drill each hole, align the jig’s centerline with its<br />
dog hole layout line, and clamp the jig to the bench with a backup<br />
board underneath. Then bore out the hole with a 3 ⁄4" brad-point bit.<br />
Photos: Paul Anthony June/July 2011 woodcraftmagazine.com 51
Figure 1: Elevation of Flush Mounted <strong>Vise</strong><br />
Rear jaw cheek<br />
Front jaw cheek<br />
Dog<br />
1<br />
⁄2"<br />
Rear cheek filler<br />
Rear jaw<br />
<strong>Bench</strong>top<br />
Front jaw<br />
Spacer block<br />
Connecting bracket<br />
Roll pin<br />
Washer<br />
Quick-release<br />
mechanism<br />
Align edge of cheeks<br />
with jaw projection.<br />
Flush-Mount<br />
A flush-mounted face vise<br />
offers the most versatility, but<br />
it requires more work to install.<br />
(As with the previous method,<br />
handling is easier with the<br />
vise disassembled.) First, lay<br />
out the notch in the benchtop.<br />
Its length should be the width<br />
of the jaw plus 1". The depth<br />
should equal the thickness<br />
of the rear jaw plus 3 ⁄ 4".<br />
Make the crosscut into the<br />
benchtop edge with a backsaw.<br />
Then clamp a straightedge to the<br />
bench to guide a circular saw to<br />
cut the length of the notch. Rip<br />
the notch until you intersect the<br />
previous crosscut (Photo C), and<br />
then finish up with a handsaw.<br />
Make a hardwood spacer block<br />
thick enough to locate the top of<br />
the vise jaws 1 ⁄ 2" below the top<br />
of the bench, measuring in the<br />
same manner as explained for<br />
a simple mounting. Trace the<br />
jaw’s outline and its screw holes<br />
Crosscut<br />
C<br />
Guide a circular saw along a secured straightedge to<br />
rip the length of the notch up to the crosscut.<br />
D<br />
Attach the spacer block<br />
with lag screws through<br />
counter-bored holes.<br />
52 woodcraftmagazine.com June/July 2011
onto the spacer. Next, mark out<br />
holes for four screws to attach<br />
the spacer block to the benchtop,<br />
locating them so they won’t<br />
interfere with the vise mounting<br />
screws. Drill the counterbores<br />
and 7 ⁄ 16"-diameter through-holes<br />
in the spacer block on the drill<br />
press. Center the block along<br />
the width of the notch, with the<br />
edges of each aligned flush at<br />
the front. Clamp the block in<br />
place, and then attach it to the<br />
benchtop with lag screws and<br />
washers, as shown in Photo D.<br />
To make the wooden cheek<br />
for the rear jaw, first measure<br />
the thickness of the jaw. Using a<br />
hardwood board that’s at least<br />
1" wider than the jaw’s height,<br />
plane it to the jaw’s thickness.<br />
Then trace the shape of the rear<br />
jaw onto the board, aligning<br />
the bottom edges as shown in<br />
Figure 1, and allowing an extra<br />
3⁄ 4" or so at each end. Crosscut<br />
the piece and bandsaw the<br />
interior to make the U-shaped<br />
cheek filler. Then glue it to<br />
3⁄ 4"-thick stock of similar<br />
size, as shown in Photo E.<br />
Trim the cheek assembly to<br />
rough width on the tablesaw,<br />
leaving the filler about 5 ⁄ 8" wide at<br />
the top. Then crosscut it to fit the<br />
benchtop notch. Countersink the<br />
E<br />
Glue the U-shaped cheek filler to<br />
a piece of 3 ⁄4"-thick stock to make<br />
the rough-sized rear cheek.<br />
holes on the rear jaw and attach<br />
the cheek as shown in Photo F.<br />
Position the vise on the spacer<br />
block with the cheek nestled in<br />
its notch. Mark and drill pilot<br />
holes, and attach the vise with<br />
washers and lag bolts (Photo G).<br />
Use a straightedge to ensure the<br />
face of the jaw is flush with the<br />
edge of the bench. If it’s proud,<br />
level it with a hand plane.<br />
Make the front cheek, and<br />
attach it with washers and<br />
About Our Author<br />
Craig Bentzley has been restoring antiques<br />
and building furniture for nearly 40 years.<br />
In addition to writing, Craig also teaches at guilds,<br />
woodworking shows, and at <strong>Woodcraft</strong> stores.<br />
F<br />
Attach the rear cheek with #10<br />
flathead woodscrews after<br />
countersinking the holes in the jaw.<br />
roundhead woodscrews,<br />
reassemble the vise, and turn<br />
the benchtop over. Handplane<br />
the cheeks flush with<br />
the benchtop (Photo H). My<br />
bench had radiused edges,<br />
so I chiseled away the sharp<br />
point at the corner of the<br />
cheek. Finally, apply a couple<br />
of coats of wipe-on finish to<br />
all raw wood surfaces. n<br />
G<br />
Snug the rear jaw assembly firmly in place<br />
while tightening the lag screws.<br />
H<br />
Plane the cheeks level to the benchtop, and<br />
relieve any sharp corners with a chisel (inset).<br />
Illustrations: Melanie Powell June/July 2011 woodcraftmagazine.com 53