

RenderMan-tutorial-3dworld
RenderMan-tutorial-3dworld
RenderMan-tutorial-3dworld

You also want an ePaper? Increase the reach of your titles
YUMPU automatically turns print PDFs into web optimized ePapers that Google loves.
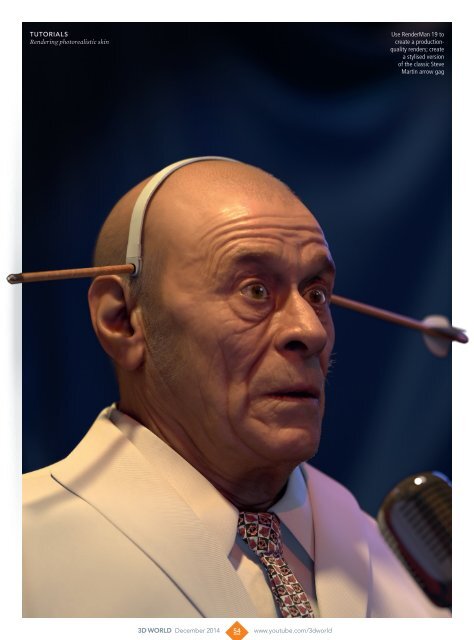
TUTORIALS<br />
Rendering photorealistic skin<br />
Use <strong>RenderMan</strong> 19 to<br />
create a productionquality<br />
renders; create<br />
a stylised version<br />
of the classic Steve<br />
Martin arrow gag<br />
3D WORLD December 2014<br />
54<br />
www.youtube.com/<strong>3dworld</strong>
RENDERMAN 19 | ZBRUSH | MAYA<br />
CREATE A PHOTOREAL<br />
MODEL IN RENDERMAN<br />
Harsh Agrawal uses the new RIS framework in <strong>RenderMan</strong><br />
to render a production-quality human head<br />
ARTIST PROFILE<br />
Harsh Agrawal<br />
Harsh Agrawal is a<br />
19-year-old CG artist<br />
interning at Pixar.<br />
He likes to combine<br />
aesthetics with his<br />
technical skills to<br />
create digital content.<br />
www.harshagrawal.co<br />
This <strong>tutorial</strong> will show you how<br />
to create a photorealistic<br />
human head using the<br />
advanced features of <strong>RenderMan</strong>,<br />
version 19. This version delivers a<br />
new rendering mode called RIS,<br />
which is designed to be fast and<br />
easy to use, while generating<br />
production-quality renders.<br />
We’ll start with a raw scan<br />
of a real person, and because<br />
<strong>RenderMan</strong> can handle extremely<br />
complex datasets, we can quickly<br />
render high-quality images<br />
straight from the original scan<br />
without bothering with topology,<br />
displacement maps, and so on.<br />
We’ll explore the workflows<br />
involved in manipulating the scan<br />
data in ZBrush to extract texture<br />
maps for our shaders. Then we’ll<br />
set up our scene in Maya using<br />
the physically based shading<br />
and lighting tools in <strong>RenderMan</strong><br />
Studio. We’ll use new workflows<br />
and traditional techniques to<br />
render out different components<br />
and combine them together for<br />
our final high-quality image.<br />
This <strong>tutorial</strong> is structured<br />
using the familiar CG pipeline,<br />
from sculpt to render. To fully<br />
demonstrate how to create<br />
photorealistic skin, I’ve included<br />
a detailed breakdown of<br />
<strong>RenderMan</strong>’s advanced skin<br />
shader, which is a fully ray-traced<br />
solution, and highlight some<br />
important techniques for getting<br />
the most realistic skin possible.<br />
I have included a link to a head<br />
scan, with a basic skin shader<br />
attached. Download the asset<br />
from www.bit.ly/188-renderman<br />
and use <strong>RenderMan</strong> 19 to light and<br />
shade your own head using the<br />
techniques shown in this <strong>tutorial</strong>.<br />
The raw scan data is provided by<br />
Ten24 (www.3dscanstore.com).<br />
Download the resources from<br />
creativebloq.com/vault/3dw188<br />
CLEANING UP THE DATA<br />
It is good idea to delete<br />
the eye from the scan<br />
mesh and create a new<br />
separate object for it,<br />
because each surface<br />
requires specialised shaders<br />
TOPICS COVERED<br />
Rendering photorealistic skin<br />
with subsurface scattering<br />
Advanced workflows<br />
for creating hair<br />
Managing over-modelled<br />
scan data<br />
Physically based<br />
lighting and shading<br />
1 REFINING THE SCAN DATA<br />
First I take the scan data and clean the mesh and<br />
add the pore details using alphas in ZBrush. Make<br />
sure to delete the eye from the scan mesh as each<br />
surface requires specalised shaders. For our lookdevelopment<br />
purposes we will simply take the high<br />
polygon model and export it from ZBrush as an<br />
.obj file, but for a real production we could spend<br />
more time cleaning the topology for animation and<br />
generating displacement maps.<br />
2 SETTING THE STAGE<br />
The concept is to create a stylised version of the<br />
classic Steve Martin arrow gag, so I need to simulate<br />
the model standing on a stage. I establish this using<br />
scene layout and set dressing. I import the head<br />
into Maya and model a suit for him. Then I add the<br />
high-poly details in ZBrush, auto unwrapping the UVs<br />
based on poly-paint details. I add a microphone<br />
and placed a drapery in the background using<br />
Maya’s nCloth.<br />
3D WORLD December 2014<br />
55<br />
www.youtube.com/<strong>3dworld</strong>
TUTORIALS<br />
Rendering photorealistic skin<br />
EXPERT TIP<br />
Defining details<br />
You can sculpt details<br />
like pores and cavities<br />
in the skin with a<br />
higher depth because<br />
small details like that<br />
get diffused out<br />
with subsurface<br />
scattering during<br />
the final render.<br />
3 CHOOSING A CAMERA LENS<br />
The camera is placed looking up at the subject.<br />
I match my Maya camera settings to a Canon EF<br />
70-200mm f/2.8 L IS II USM lens. Being a zoom lens<br />
it gets rid of convex distortions in the image. After a<br />
few adjustments I come up with a length of 170mm<br />
in Maya, with a wide aperture to give a shallow depth<br />
of field that pops the head out from the background.<br />
<strong>RenderMan</strong> provides camera controls for stylising<br />
bokeh, which I use to achieve the final look.<br />
4 PHYSICALLY BASED LIGHTING<br />
I want to create modern stage lighting with saturated<br />
colours, so I use <strong>RenderMan</strong>’s physically based spotlights<br />
and set their colour temperatures to achieve<br />
the warm and cool contrast I desire. I place bright<br />
warm key lights pointing down onto the head, and<br />
add fill lights to provide cool contrast. I use a rim light<br />
to accentuate the stubble on his face. Progressive<br />
re-rendering in <strong>RenderMan</strong> speeds up my process as<br />
it allows me to light interactively.<br />
THE SKIN SHADER<br />
<strong>RenderMan</strong>’s skin shader,<br />
PxrSkin, was is used for<br />
shading the skin. Any<br />
variations in skin like<br />
thickness, fat, veins and so<br />
on can be shown through<br />
colour variations in the maps<br />
5 SHADING SKIN COLOUR<br />
The skin shader uses a three-layer subsurface model<br />
and gives you a lot of control over ray penetration<br />
length and the scattering weight at each point. The<br />
<strong>RenderMan</strong> skin shader uses a proprietary method<br />
to calculate an accurate approximation of physically<br />
correct subsurface scattering, and because this<br />
solution is fully ray-traced, look dev is accelerated<br />
with interactive rendering. I start by painting<br />
epidermal, sub-dermal and back scatter colour maps.<br />
RADICAL RENDERING<br />
Re-rendering using RIS<br />
One great benefit of <strong>RenderMan</strong>’s<br />
RIS mode is being able to use<br />
re-rendering or incremental<br />
rendering to get immediate<br />
feedback and quick interactive<br />
render times. You can<br />
immediately see if you have<br />
chosen SSS parameters that are<br />
wrong: colour or diffusion lengths<br />
are simple to tweak and carry out<br />
look development.<br />
6 SHADING SKIN REFLECTIONS<br />
To give the skin a more realistic response, I paint<br />
a specular map based on the skin’s cavities to<br />
remove the highlights in the cavities, giving it<br />
more detail by modulating the specularity over<br />
the surface. I also paint a roughness map (left)<br />
based on specific grey values to control the wetness/<br />
oil on the skin. Getting the specular response correct<br />
is a key component in creating photorealistic skin.<br />
3D WORLD December 2014<br />
56<br />
www.youtube.com/<strong>3dworld</strong>
EXPERT TIP<br />
Optimising options<br />
<strong>RenderMan</strong> gives you a<br />
stats file that contains<br />
all the data regarding<br />
your render, render time,<br />
ray hits, total number of<br />
rays and other sampling<br />
information that can<br />
be used to optimise<br />
your scene.<br />
7 SETTING PARAMETERS<br />
The skin shader allows you to connect weight maps<br />
to control the penetration of rays at each point.<br />
I paint a far length map to control the amount of<br />
subsurface scattering at different parts of the face.<br />
Parts of the head like the ear and thin cartilage<br />
show more subsurface scattering because they<br />
are thin, but you also have the option to control<br />
the weight and length of penetration to increase<br />
scattering as desired.<br />
RENDERMAN HAIR SHADER<br />
The <strong>RenderMan</strong> hair shader,<br />
RMSHair, is used to get the<br />
hair rendered with round curve<br />
attributes. This mode also allows<br />
me to use the holdout shader<br />
available in REYES (Render<br />
Everything You’ve Ever Seen)<br />
mode to get shadows as alpha<br />
to comp the hair on top of the<br />
head rendered in RIS mode<br />
8 SHADING THE TIE<br />
The tie is shaded using <strong>RenderMan</strong>’s General<br />
Purpose Shader (PxrGPSurface). A high sheen<br />
value and higher specular roughness give a diffuse<br />
shading model for cloth. With a repeated weave<br />
pattern in the float displacement channel, a cloth<br />
shader is quickly created. A <strong>RenderMan</strong> Walking<br />
Teapot repeated pattern is made in Photoshop and<br />
used as a tiled texture for Diffuse Color.<br />
9 THE HAIR SETUP<br />
<strong>RenderMan</strong> contains two different rendering<br />
modes: a modern ray-tracing mode called RIS, and<br />
the traditional memory-efficient REYES algorithm.<br />
I use the REYES mode to render curves as hair, as<br />
the REYES-based hair shader in <strong>RenderMan</strong> Studio<br />
quickly gives me the results I want. As you have<br />
access to both REYES and RIS modes, you can render<br />
different elements of the composition in different<br />
modes and get benefits from both.<br />
RENDERMAN FOR FREE<br />
Use Pixar’s rendering tech<br />
With the release of version<br />
19, <strong>RenderMan</strong> is now freely<br />
available for all non-commercial<br />
use, without watermark or other<br />
limitation. It’s also the very same<br />
renderer Pixar uses on its own<br />
projects, such as its new animated<br />
short, Lava. So try Pixar’s<br />
advanced rendering technology<br />
for free and follow along<br />
with this <strong>tutorial</strong> using Pixar’s<br />
<strong>RenderMan</strong> for Maya. You can<br />
learn more about non-commercial<br />
<strong>RenderMan</strong> here:<br />
www.renderman.pixar.com/view/<br />
non-commercial<br />
10 RENDERING<br />
The RIS mode provides different integrators to<br />
render images. This image was rendered with the<br />
Path Tracer integrator. With this integrator, there are<br />
various sampling options available to get a highquality<br />
render and to do render optimisations. The<br />
BxDF and light samples settings can be adjusted to<br />
get rid of noise. If you see noise in specific areas of<br />
the render, switch to Manual Sampling mode and<br />
increase the subsurface samples on it.<br />
CONTACT INFO<br />
For more information on Pixar’s <strong>RenderMan</strong><br />
please contact Escape Technology<br />
Tel: 0207 734 8809<br />
Email: sales@escape-technology.com<br />
3D WORLD December 2014<br />
57<br />
www.youtube.com/<strong>3dworld</strong>