Technical Information 911 (996) Turbo Service - Bethnrayndogs.com
Technical Information 911 (996) Turbo Service - Bethnrayndogs.com
Technical Information 911 (996) Turbo Service - Bethnrayndogs.com

Create successful ePaper yourself
Turn your PDF publications into a flip-book with our unique Google optimized e-Paper software.
®<br />
<strong>Technical</strong> <strong>Information</strong><br />
Aerokit “<strong>Turbo</strong>”<br />
<strong>911</strong> (<strong>996</strong>) <strong>Turbo</strong><br />
6<br />
6/01 6658<br />
Binder - Group 6 - Body Equipment,<br />
Exterior<br />
Vehicle Type: <strong>911</strong> <strong>Turbo</strong> (<strong>996</strong>)<br />
Model Year: MY 2001 (1)<br />
Concerns:<br />
<strong>Information</strong>:<br />
Retrofitting<br />
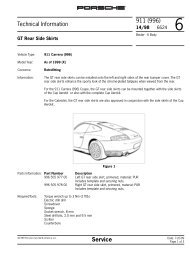
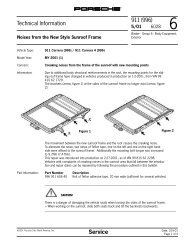
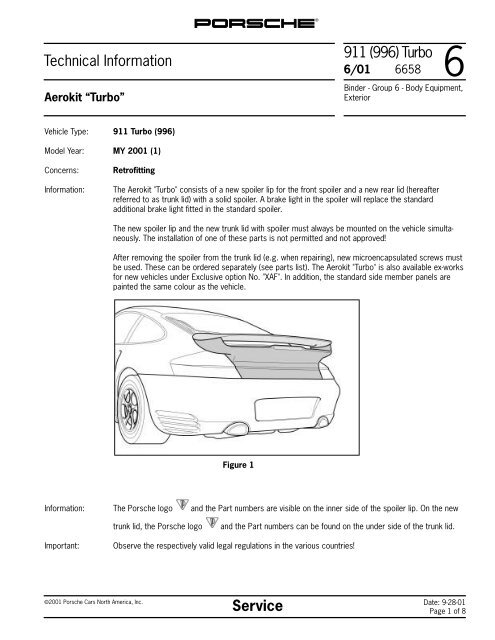
The Aerokit "<strong>Turbo</strong>" consists of a new spoiler lip for the front spoiler and a new rear lid (hereafter<br />
referred to as trunk lid) with a solid spoiler. A brake light in the spoiler will replace the standard<br />
additional brake light fitted in the standard spoiler.<br />
The new spoiler lip and the new trunk lid with spoiler must always be mounted on the vehicle simultaneously.<br />
The installation of one of these parts is not permitted and not approved!<br />
After removing the spoiler from the trunk lid (e.g. when repairing), new microencapsulated screws must<br />
be used. These can be ordered separately (see parts list). The Aerokit "<strong>Turbo</strong>" is also available ex-works<br />
for new vehicles under Exclusive option No. "XAF". In addition, the standard side member panels are<br />
painted the same colour as the vehicle.<br />
Figure 1<br />
<strong>Information</strong>: The Porsche logo and the Part numbers are visible on the inner side of the spoiler lip. On the new<br />
trunk lid, the Porsche logo<br />
and the Part numbers can be found on the under side of the trunk lid.<br />
Important:<br />
Observe the respectively valid legal regulations in the various countries!<br />
©2001 Porsche Cars North America, Inc.<br />
<strong>Service</strong><br />
Date: 9-28-01<br />
Page 1 of 8
®<br />
6 6658 ©2001 Porsche Cars North America, Inc.<br />
<strong>911</strong>(<strong>996</strong>) <strong>Turbo</strong><br />
6/01<br />
<strong>Technical</strong> <strong>Information</strong><br />
-------------------------------------------------------------------------------------------------------------------------------------------------------------------------------------------------------------------<br />
CAUTION!<br />
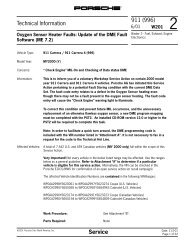
Damage to the rear spoiler when cleaning car in automatic car washes – in some cases the rear spoiler<br />
is not adequately detected by the light barriers.<br />
> If inf doubt, seek the advice of the operator of the automatic car wash.<br />
> Only wash the vehicle manually.<br />
-------------------------------------------------------------------------------------------------------------------------------------------------------------------------------------------------------------------<br />
-------------------------------------------------------------------------------------------------------------------------------------------------------------------------------------------------------------------<br />
CAUTION!<br />
Damage to the rear spoiler due to incorrect and improper use – by pushing the vehicle or by<br />
opening/closing the rear lid too violently.<br />
> Never use the rear spoiler to push the vehicle.<br />
> Carefully, i.e. gently, open the trunk lid.<br />
> Check the gap dimensions of the trunk lid relative to the body from time to time and, if necessary, get<br />
the Porsche Center to re-adjust.<br />
-------------------------------------------------------------------------------------------------------------------------------------------------------------------------------------------------------------------<br />
-------------------------------------------------------------------------------------------------------------------------------------------------------------------------------------------------------------------<br />
CAUTION!<br />
Damage (risk of destruction or damage) to the accessories or to the vehicle itself when ascending or<br />
descending steep ramps (loading the vehicle, lifting platforms, multi-storey parking lot ramps etc.) - due<br />
to the smaller overhang angle of the front spoiler in relation to the standard part.<br />
> Avoid steep access and exit ramps wherever possible.<br />
> Adopt your driving style to the local situation.<br />
-------------------------------------------------------------------------------------------------------------------------------------------------------------------------------------------------------------------<br />
Please inform your sales department of this information. Give your customer a copy of the<br />
first two pages of this <strong>Technical</strong> <strong>Information</strong> bulletin.<br />
Part Numbers: 000.044.801.99 Description: 1 x Aerokit<br />
Date: 9-28-01<br />
Page 2 of 8<br />
<strong>Service</strong>
®<br />
<strong>Technical</strong> <strong>Information</strong><br />
<strong>911</strong>(<strong>996</strong>) <strong>Turbo</strong><br />
6<br />
6/01 6658<br />
Part Numbers.: 000 044 801 99 1 x Aerokit "<strong>Turbo</strong>"<br />
<strong>996</strong> 559 237 03 4PU* 1 x "<strong>Turbo</strong>" logo, colour: silver<br />
* May be ordered separately if desired by the customer. Installation procedure is described in the <strong>Technical</strong> Manual.<br />
Parts List: <strong>996</strong>.505.986.01.G2X 1 x Spoiler lip; primered; material: PUR- R RIM<br />
<strong>996</strong>.512.992.01.G2X 1 x Spoiler; primered; material: EP-GM 30<br />
900.119.126.02 4 x Cheese head screw M6 x 18, –DIN6912–, microencapsulated<br />
<strong>996</strong>.612.070.30 1 x Electric wiring harness<br />
<strong>996</strong>.512.543.00 1 x Cover trim for underside of lid<br />
900.378.214.07 10 x Hexagon-head bolts M6 x 18, –DIN1665–<br />
<strong>996</strong>.631.165.00 1 x Cap for 3rd brake light<br />
<strong>996</strong>.631.050.01 1 x Complete brake light (incl. bulbs)<br />
<strong>996</strong>.512.987.00 2 x Adjusting element (rubber buffer) incl. collar (2 x)<br />
<strong>996</strong>.512.991.01.G2X 1 x Trunk lid; primered; material: GP/UP-GM 25 incl.supporting plate (2<br />
x) and bracket for 3rd brake light (1 x)<br />
Tools: Socket wrench for hexagon sockets a/f 4 / 5<br />
Porsche System Tester 2 – PST2<br />
Triangular scraper<br />
Pointed-nose pliers<br />
Handlamp<br />
Various slotted and crosshead screwdrivers<br />
Hexagon socket wrench a/f 10<br />
Pocket knife<br />
Sheeted paper<br />
Lifting platform<br />
Installation: 1.0 Work before painting:<br />
1.1 Set the new trunk lid carefully on the spoiler, remove the hexagon-head bolts M6 x 18 (10 x) from<br />
the cover trim (underside of the trunk lid) and remove the cover trim.<br />
1.2 Remove the 4 cheese-head screws which fasten the spoiler to the trunk lid and carefully lift the<br />
trunk lid away from the spoiler.<br />
1.3 Mask all threads (if necessary also on the spoiler supporting plates) on the trunk lid and the<br />
spoiler.<br />
<strong>Information</strong>:<br />
The supporting plates for the spoiler may not be removed from the new trunk lid, as the fastening<br />
screws are securely attached.<br />
Furthermore, the supporting plates are positioned on the trunk lid to provide optimum gap dimensions.<br />
The bracket for the 3rd brake light can also remain attached to the trunk lid.<br />
©2001 Porsche Cars North America, Inc.<br />
<strong>Service</strong><br />
Date: 9-28-01<br />
Page 3 of 8
®<br />
6 6658 ©2001 Porsche Cars North America, Inc.<br />
<strong>911</strong>(<strong>996</strong>) <strong>Turbo</strong><br />
6/01<br />
<strong>Technical</strong> <strong>Information</strong><br />
-------------------------------------------------------------------------------------------------------------------------------------------------------------------------------------------------------------------<br />
CAUTION!<br />
Damage or warping can occur to the trunk lid and the spoiler – in the event of improper painting and<br />
drying processes.<br />
> Observe the specifications and instructions for the painting of plastics as contained in the Paint Manual.<br />
> During the painting and drying process, place the parts without tension on the painting fixtures<br />
provided for this purpose (included in the packages).<br />
-------------------------------------------------------------------------------------------------------------------------------------------------------------------------------------------------------------------<br />
Installation: 1.4 Paint the spoiler lip and trunk lid with spoiler in <strong>com</strong>pliance with material specifications according<br />
to the Paint Manual.<br />
2.0 Fit the new spoiler lip (Figure 2, shaded grey) to the<br />
front spoiler.<br />
2.1 Remove the crosshead screws from the wheel arch<br />
area of the standard spoiler lip.<br />
2.2 Beginning at the middle, and working from the inner<br />
to the outer side of the spoiler lip, unclip the locking<br />
lugs using a slotted screwdriver.<br />
2.3 Beginning with the middle locking lug, carefully clip<br />
the new spoiler lip to the front spoiler.<br />
Figure 2<br />
2.4 Fasten the spoiler lip to the front spoiler using the two crosshead screws at the sides.<br />
3.0 Fit the spoiler to the trunk lid.<br />
3.1 Check the threads of the painted parts for paint impurities and, if necessary, re-cut using an M6 tap.<br />
3.2 Remove right taillight (<strong>Technical</strong> Manual, Group 9, Serv. No. 9433).<br />
3.3 Using a pointed-nose pliers, unclip the cable clip, situated at the right in the engine <strong>com</strong>partment,<br />
for the wiring harness of the luggage <strong>com</strong>partment lid (hereafter referred to as trunk lid) and dis<br />
connect the electric plug connection X23.<br />
3.4 Remove the trunk lid without the hinge with the help of a second person (<strong>Technical</strong> Manual, Group<br />
5, Serv. No. 5590).<br />
3.5 Fit right tail light (<strong>Technical</strong> Manual, Group 9, Serv. No. 9433).<br />
Date: 9-28-01<br />
Page 4 of 8<br />
<strong>Service</strong>
®<br />
<strong>Technical</strong> <strong>Information</strong><br />
<strong>911</strong>(<strong>996</strong>) <strong>Turbo</strong><br />
6<br />
6/01 6658<br />
Installation: 3.6 Lay the new trunk lid (Item A) carefully on the<br />
underside of the spoiler (Item B), position<br />
and securely fasten to the spoiler using the<br />
microencapsulated cheese head screws<br />
M6 x 18 (Item C, see also parts scope).<br />
Tightening torque: 10 Nm (7.4 ftlb.).<br />
4.0 Complete the rear lid and mount it on<br />
the vehicle.<br />
4.1 Fit the 3rd brake light.<br />
4.1.1 Feed the 2-pole connector for the 3rd brake<br />
light in through the mounting point towards<br />
the innerside of the trunk lid and connect to<br />
the 2-pole connector of the new<br />
wiring harness.<br />
Figure 3<br />
4.1.2 Carefully fit the 3rd brake light on the trunk<br />
lid. Ensure that the 3rd brake light is<br />
positioned evenly on the gap and that the<br />
seal is correctly positioned on the trunk lid.<br />
If necessary loosen the bracket for the 3rd<br />
brake light and position the 3rd brake<br />
light together with the bracket into the<br />
slot in the trunk lid.<br />
4.1.3 Fasten the hexagon-head bolts M6 x 18 to<br />
the bracket of the 3rd brake light.<br />
Tightening torque: 10 Nm (7.4 ftlbs.).<br />
4.1.4 Position the remaining connectors in the<br />
wiring harness at the other connection points<br />
on the underside of the trunk lid (see<br />
Figure 5).<br />
Figure 4<br />
4.2 Complete the trunk lid.<br />
4.2.1 Fit the new cover trim (Figure 5) to the<br />
underside of the trunk lid using the<br />
hexagon-head bolts M6 x 18 (10 x)<br />
(<strong>Technical</strong> Manual, Group 5, Serv. No. 5590).<br />
Tightening torque: 10 Nm (7.4 ftlb.).<br />
Figure 5<br />
©2001 Porsche Cars North America, Inc.<br />
<strong>Service</strong><br />
Date: 9-28-01<br />
Page 5 of 8
®<br />
6 6658 ©2001 Porsche Cars North America, Inc.<br />
<strong>911</strong>(<strong>996</strong>) <strong>Turbo</strong><br />
6/01<br />
<strong>Technical</strong> <strong>Information</strong><br />
Installation: 4.2.2 Remove fan and fan housing (Figure 6,<br />
Item A) and the engine <strong>com</strong>partment light<br />
from the old trunk lid and fit in the new<br />
trunk lid (<strong>Technical</strong> Manual, Group 5, Serv.<br />
No. 5590).<br />
4.2.3 Remove the air duct (Item B) for the air<br />
cleaner from the old trunk lid and fit in<br />
the new trunk lid (<strong>Technical</strong> Manual, Group<br />
5, Serv. No. 5590).<br />
4.2.4 Attach both collars (Item C) for the rubber<br />
buffer (Item D) to the bores in the trunk lid.<br />
Note:<br />
Figure 6<br />
While doing so, be careful not to damage<br />
the wedge incorporated into the bores, as this serves as a locking device for the collar! Remove<br />
paint runs, if any, from the bores using a pocket knife or a triangular scraper. De-burr the bores if<br />
necessary.<br />
4.2.5 After positioning the collar, carefully drive it into the bore using a plastic hammer.<br />
4.2.6 Carefully remove the rubber seal from the old trunk lid and fit in the new trunk lid.<br />
4.3 Mount the new trunk lid on the vehicle.<br />
4.3.1 With the help of a second person, place the trunk lid on the lid hinges and loosely position<br />
the old hexagon-head bolts (4 x).<br />
4.3.2 Clip the electric wiring assembly into the cable guide at the right shock absorber and feed<br />
in to the engine-<strong>com</strong>partment, to the connector on the right-hand side.<br />
4.3.3 Create a 12-pole electric plug connection.<br />
4.3.4 Position the trunk lid on the trunk lid hinges corresponding to the areas stripped of paint by the<br />
screw heads and check the joint dimensions according to the <strong>Technical</strong> Manual, Group 5.<br />
4.3.5 Fasten the hexagon-head bolts to the trunk lid hinges.<br />
Tightening torque: 10 Nm (7.4 ftlb.).<br />
4.3.6 Remove the upper part of the lock from the old trunk lid and loosely pre-fit in the new trunk lid.<br />
4.3.7 Adjust the upper part of the lock and fasten securely.<br />
Tightening torque: 10 Nm (7.4 ftlb.).<br />
Date: 9-28-01<br />
Page 6 of 8<br />
<strong>Service</strong>
®<br />
<strong>Technical</strong> <strong>Information</strong><br />
<strong>911</strong>(<strong>996</strong>) <strong>Turbo</strong><br />
6<br />
6/01 6658<br />
Installation: 5.0 Function tests.<br />
5.1 Perform a closing test on the new trunk lid<br />
and, if necessary, re-adjust the upper part of<br />
the lock.<br />
5.2 Test that the 3rd brake light is functioning.<br />
Ensure that all bulbs in the brake light light<br />
up.<br />
If it is functioning correctly, clip in the side<br />
cap of the 3rd brake light (<strong>Technical</strong> Manual,<br />
Group 5, Serv. No. 5590).<br />
Figure 7<br />
5.3 Switch on the car ignition, connect and<br />
switch on the PST2.<br />
5.4 Select vehicle type "<strong>911</strong> (<strong>996</strong>)", read out the error log and, if necessary, delete.<br />
5.5 Function test "Engine-<strong>com</strong>partment purge fan".<br />
5.5.1 Select the menu item "DME control module" and confirm with the >> key.<br />
5.5.2 After reading out the DME control module, select the menu item "Engine <strong>com</strong>partment<br />
purge fan" and start with the F8 key.<br />
5.5.3 Hold a sheet of paper between the spoiler and the engine <strong>com</strong>partment lid in the area of<br />
the ventilation slots.<br />
5.5.4 If the fan is functioning correctly, the sheet should be sucked on to the trunk lid.<br />
5.5.5 Return to the main menu of the PST2, switch off the PST2 and disconnect it from the diagnostic<br />
socket.<br />
Working Time: 55 90 61 60 –Aerokit "<strong>Turbo</strong>" trunk lid (1 x) painted– 190 TU<br />
Trunk lid removed –new part painted–<br />
Without: Paint preparation (separate LO No.)!<br />
Materials:<br />
11 MU<br />
66 58 61 60 –Aerokit "<strong>Turbo</strong>" spoiler (1 x) painted– 190 TU<br />
Spoiler removed –new part painted–<br />
Without: Paint preparation (separate LO No.)!<br />
Materials:<br />
10 MU<br />
©2001 Porsche Cars North America, Inc.<br />
<strong>Service</strong><br />
Date: 9-28-01<br />
Page 7 of 8
®<br />
6 6658 ©2001 Porsche Cars North America, Inc.<br />
<strong>911</strong>(<strong>996</strong>) <strong>Turbo</strong><br />
6/01<br />
<strong>Technical</strong> <strong>Information</strong><br />
Working Time 66 58 31 03 –Rear spoiler (1 x) converted– 170 TU<br />
(cont’d.): Includes: Standard spoiler lip and standard trunk lid<br />
removed, standard trunk lid disassembled.<br />
Aerokit "<strong>Turbo</strong>" trunk lid <strong>com</strong>pleted, fitted and<br />
gap dimensions adjusted.<br />
Aerokit "<strong>Turbo</strong>" spoiler lip fitted.<br />
Functioning of brake light in new rear spoiler<br />
and engine-<strong>com</strong>partment purge fan in new<br />
trunk lid checked.<br />
66 58 55 09 –Rear spoiler (1 x) replaced– 150 TU<br />
Includes: Trunk lid removed, disassembled and new<br />
Aerokit "<strong>Turbo</strong>" trunk lid <strong>com</strong>pleted, fitted and<br />
gap dimensions adjusted. Functioning of brake<br />
light in new rear spoiler and engine-<strong>com</strong>partment<br />
purge fan in new trunk lid checked.<br />
66 03 61 60 –Aerokit "<strong>Turbo</strong>" spoiler lip (1 x) painted– 110 TU<br />
Aerokit "<strong>Turbo</strong>" spoiler lip removed –new part<br />
painted –<br />
Without: Paint preparation (separate LO No.)!<br />
Materials:<br />
4 MU<br />
66 03 55 09 –Spoiler lip (1 x) replaced– 50 TU<br />
Spoiler lip removed and new Aerokit "<strong>Turbo</strong>"<br />
spoiler lip fitted.<br />
References: <strong>911</strong> <strong>Turbo</strong> <strong>Technical</strong> Manual, Groups 5/6/9:<br />
> Repair: 5 - Rear body joint dimensions<br />
55 90 19 - Removing and installing rear lid<br />
55 90 37 - Disassembling and assembling rear lid<br />
63 15 37 - Disassembling and assembling front spoiler<br />
94 33 19 - Removing and fitting bulb for taillight<br />
Important Notice: Porsche Cars N.A <strong>Technical</strong> Bulletins are intended for use by professional technicians, not a “Do-it-yourselfer.” They are written to inform these technicians of conditions that may occur<br />
on some vehicles, or to provide information that could assist in the proper service of a vehicle. Special tools may be required to perform certain operations identified in these bulletins. Use of tools and procedures<br />
other than those re<strong>com</strong>mended in these bulletins may be detrimental to the safe operation of your vehicle. Properly trained technicians have the equipment, tools, safety instructions and know-how to do<br />
a job properly and safely. If a condition is described, do not assume that the bulletin applies to your vehicle, or that your vehicle will have that condition. See your Porsche Dealer for information on whether your<br />
vehicle may benefit from the information. Part numbers listed in these bulletins are for reference only. Always check with your authorized Porsche dealer to verify correct part numbers.<br />
©2001 Porsche Cars North America, Inc.<br />
Dealership<br />
Distribution<br />
Routing<br />
<strong>Service</strong> Manager Shop Foreman <strong>Service</strong> Technician<br />
Asst. Manager Warranty Admin. <strong>Service</strong> Technician<br />
Porsche, the Porsche marque, Carrera, Boxster, Tiptronic, VarioCam, VarioRam, Tequipment and PCM are registered trademarks. The <strong>911</strong> and the distinctive shapes of the Porsche automobiles are trademarks<br />
of Dr. Ing. h.c.F. Porsche AG.<br />
Date: 9-28-01<br />
Page 8 of 8<br />
<strong>Service</strong>