Servicing CV Joints - Formula Ford Zetec
Servicing CV Joints - Formula Ford Zetec
Servicing CV Joints - Formula Ford Zetec

Create successful ePaper yourself
Turn your PDF publications into a flip-book with our unique Google optimized e-Paper software.
<strong>Servicing</strong> <strong>CV</strong> <strong>Joints</strong><br />
General<br />
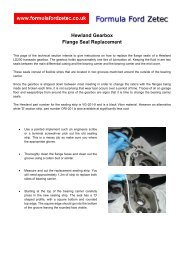
The drive shaft constant velocity joints transmit the engines power from the gearbox drive flange to the drive shafts<br />
and from the drive shafts to the rear wheels via the rear upright drive cup. There are a number of different types of<br />
<strong>CV</strong> joints used on <strong>Formula</strong> <strong>Ford</strong> <strong>Zetec</strong>'s, some have three bearings, some have four. Keeping the joints maintained<br />
is important and they should be dismantled, cleaned, inspected and greased at least once per year.<br />
Having the joints packed with the correct grease will reduce friction, reduce wear and helps to minimise water<br />
ingress. Neglected <strong>CV</strong> joints are often the root cause of a snapped drive shaft.<br />
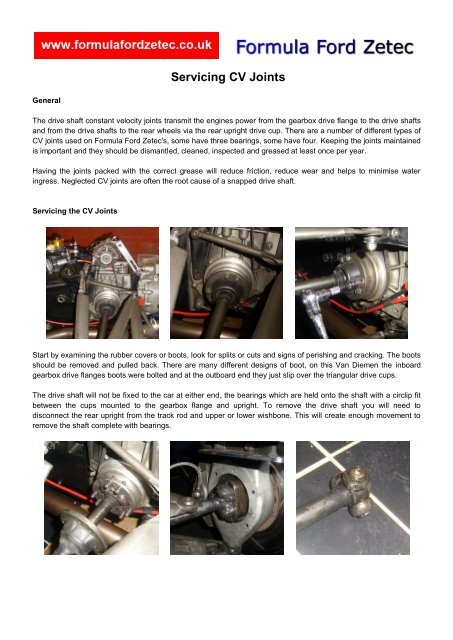
<strong>Servicing</strong> the <strong>CV</strong> <strong>Joints</strong><br />
Start by examining the rubber covers or boots, look for splits or cuts and signs of perishing and cracking. The boots<br />
should be removed and pulled back. There are many different designs of boot, on this Van Diemen the inboard<br />
gearbox drive flanges boots were bolted and at the outboard end they just slip over the triangular drive cups.<br />
The drive shaft will not be fixed to the car at either end, the bearings which are held onto the shaft with a circlip fit<br />
between the cups mounted to the gearbox flange and upright. To remove the drive shaft you will need to<br />
disconnect the rear upright from the track rod and upper or lower wishbone. This will create enough movement to<br />
remove the shaft complete with bearings.
Inspection and Cleaning<br />
With the drive shafts removed all the parts can be cleaned and inspected. Check that all of the spherical bearings<br />
turn freely and smoothly and that the assemblies move freely on the splined ends of the drive shafts. Clean out all<br />
of the old grease from the inside of drive cups. Check for damage such as cracks or corrosion. At the centre of the<br />
gearbox drive flange of this Van Diemen there is a spring and abutment. The abutment and spring arrangement<br />
keeps the drive shaft pressed into the upright drive cup and is what permits the shaft its lateral movement.<br />
Greasing and Rebuilding<br />
Once all of the parts have been cleaned and inspected they can be greased and replaced. It is essential that you<br />
use a specific <strong>CV</strong> joint grease, such as a good quality Lithium-Moly based grease, which is normally darker in<br />
colour due to the Molybdenum content.<br />
Smear a generous amount or grease onto the bearings and splines and pack the inside of the drive cups. Replace<br />
the spring and abutment and carefully place the inboard end of the drive shaft into the gearbox cup. You will need<br />
to support the drive shaft as the upright is moved back into position and the triangular drive cup is engaged.<br />
Replace the suspension bolts and tighten correctly.<br />
Technical articles should be taken as advice only, if in any doubt consult a qualified mechanic or the parts supplier/manufacture.<br />
www.formulafordzetec.co.uk<br />
Author: James Chapman