How to Add Related Columns - Magaya
How to Add Related Columns - Magaya
How to Add Related Columns - Magaya

You also want an ePaper? Increase the reach of your titles
YUMPU automatically turns print PDFs into web optimized ePapers that Google loves.
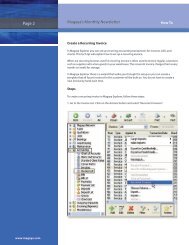
Page 2<br />
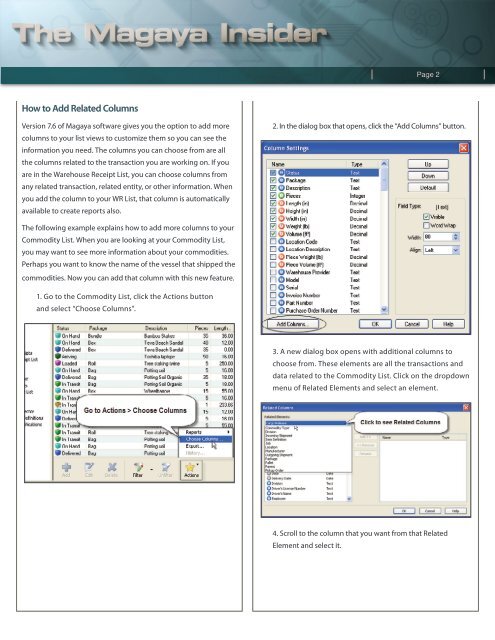
<strong>How</strong> <strong>to</strong> <strong>Add</strong> <strong>Related</strong> <strong>Columns</strong><br />
Version 7.6 of <strong>Magaya</strong> software gives you the option <strong>to</strong> add more<br />
columns <strong>to</strong> your list views <strong>to</strong> cus<strong>to</strong>mize them so you can see the<br />
information you need. The columns you can choose from are all<br />
the columns related <strong>to</strong> the transaction you are working on. If you<br />
are in the Warehouse Receipt List, you can choose columns from<br />
any related transaction, related entity, or other information. When<br />
you add the column <strong>to</strong> your WR List, that column is au<strong>to</strong>matically<br />
available <strong>to</strong> create reports also.<br />
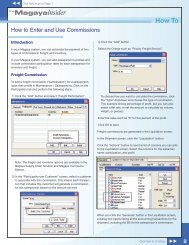
2. In the dialog box that opens, click the “<strong>Add</strong> <strong>Columns</strong>” but<strong>to</strong>n.<br />
The following example explains how <strong>to</strong> add more columns <strong>to</strong> your<br />
Commodity List. When you are looking at your Commodity List,<br />
you may want <strong>to</strong> see more information about your commodities.<br />
Perhaps you want <strong>to</strong> know the name of the vessel that shipped the<br />
commodities. Now you can add that column with this new feature.<br />
1. Go <strong>to</strong> the Commodity List, click the Actions but<strong>to</strong>n<br />
and select “Choose <strong>Columns</strong>”.<br />
3. A new dialog box opens with additional columns <strong>to</strong><br />
choose from. These elements are all the transactions and<br />
data related <strong>to</strong> the Commodity List. Click on the dropdown<br />
menu of <strong>Related</strong> Elements and select an element.<br />
4. Scroll <strong>to</strong> the column that you want from that <strong>Related</strong><br />
Element and select it.
Page 3<br />
5. Click the <strong>Add</strong> but<strong>to</strong>n <strong>to</strong> move the selected column from the<br />
list of Available <strong>Columns</strong> <strong>to</strong> create your list of Selected <strong>Columns</strong>.<br />
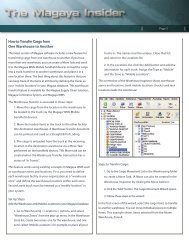
8. The new column is also available <strong>to</strong> create reports.<br />
Click the Actions but<strong>to</strong>n and select the new column name.<br />
6. Click OK. The column is now available in your list<br />
of commodities.<br />
9. The report document can be saved, sent over the <strong>Magaya</strong><br />
Network, or emailed.<br />
7. Move the column so it appears where you would like it.<br />
Click OK. The Commodity List now displays the new column<br />
and thevessel which is pulled from the outgoing shipment<br />
transactions.<br />
With this new feature in <strong>Magaya</strong> software, you can cus<strong>to</strong>mize<br />
any columns in any list so you can view the data your business needs.