BatteryMINDer 12-24-36 Instructions - Battery Web
BatteryMINDer 12-24-36 Instructions - Battery Web
BatteryMINDer 12-24-36 Instructions - Battery Web

Create successful ePaper yourself
Turn your PDF publications into a flip-book with our unique Google optimized e-Paper software.
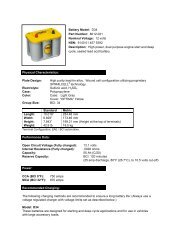
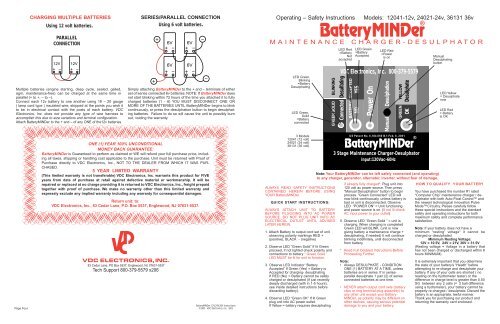
CHARGING MULTIPLE BATTERIES<br />
Using <strong>12</strong> volt batteries.<br />
SERIES/PARALLEL CONNECTION<br />
Operating – Safety <strong>Instructions</strong> Models: <strong>12</strong>041-<strong>12</strong>v, <strong>24</strong>021-<strong>24</strong>v, <strong>36</strong>131 <strong>36</strong>v<br />
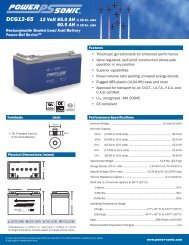
Using 6 volt batteries.<br />
®<br />
PARALLEL<br />
CONNECTION<br />
<strong>12</strong>V<br />
<strong>12</strong>V<br />
Multiple batteries (engine starting, deep cycle, sealed, gelled,<br />
agm, maintenance-free) can be charged at the same time in<br />
parallel (+ to +, – to –).<br />
Connect each <strong>12</strong>v battery to one another using 18 – 20 gauge<br />
( lamp cord type ) insulated wire, stripped at the points you wish it<br />
to be in electrical contact with the posts of each battery. VDC<br />
Electronics, Inc. does not provide any type of wire harness to<br />
accomplish this due to size variations and terminal configuration.<br />
Attach <strong><strong>Battery</strong>MINDer</strong> to the + and – of any ONE of the<strong>12</strong>v batteries.<br />
Page Four<br />
6V<br />
6V<br />
6V<br />
6V<br />
Simply attaching <strong><strong>Battery</strong>MINDer</strong> to the + and – terminals of either<br />
set of series connected 6v batteries.NOTE:If <strong><strong>Battery</strong>MINDer</strong> does<br />
not start blinking within 72 hours of the time you attached it to fully<br />
charged batteries (1 - 6) YOU MUST DISCONNECT ONE OR<br />
MORE OF THE BATTERIES UNTIL <strong><strong>Battery</strong>MINDer</strong> begins to blink<br />
continuously, or press the desulphation button to begin desulphating<br />
batteries. Failure to do so will cause the unit to possibly burn<br />
out, voiding the warranty.<br />
<strong>12</strong>2222222222223<br />
ONE (1) YEAR 100% UNCONDITIONAL<br />
4 4<br />
<strong><strong>Battery</strong>MINDer</strong> is Guaranteed to perform as claimed or WE will refund your full purchase price, including<br />
all taxes, shipping or handling cost applicable to the purchase. Unit must be returned with Proof of<br />
4 4<br />
4 5 YEAR LIMITED WARRANTY<br />
4<br />
4<br />
repaired or replaced at no charge providing it is returned to VDC Electronics,Inc.,freight prepaid<br />
4<br />
4<br />
Return unit: to:<br />
4<br />
677777772222278<br />
VDC ELECTRONICS, INC.<br />
83 Cedar Lane, PO Box 5537, Englewood, NJ 07631-5537<br />
Tech Support 800-379-5579 x206<br />
<strong><strong>Battery</strong>MINDer</strong> <strong>12</strong>V,<strong>24</strong>V,<strong>36</strong>V <strong>Instructions</strong><br />
©2001 VDC Electronics, Inc. 9/01<br />
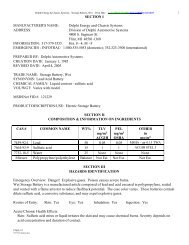
MAINTENANCE CHARGER-DESULPHATOR<br />
LED Green,<br />
Blinking<br />
=<strong>Battery</strong><br />
Desulphating<br />
LED Green,<br />
Solid<br />
=<strong>Battery</strong><br />
connected<br />
3 Models<br />
<strong>12</strong>041 (<strong>12</strong> volt)<br />
<strong>24</strong>021 (<strong>24</strong> volt)<br />
<strong>36</strong>131 (<strong>36</strong> volt)<br />
ALWAYS READ SAFETY INSTRUCTIONS<br />
CONTAINED HEREIN BEFORE USING<br />
YOUR <strong><strong>Battery</strong>MINDer</strong>.<br />
QUICK START INSTRUCTIONS:<br />
ALWAYS ATTACH UNIT TO BATTERY<br />
BEFORE PLUGGING INTO AC POWER<br />
SOURCE. DO NOT PLUG UNIT INTO AC<br />
ELECTRICAL OUTLET UNTIL ADVISED<br />
LATER HEREIN.<br />
1.Attach <strong>Battery</strong> to output cord set of unit<br />
observing polarity markings RED +<br />
(positive), BLACK - (negative)<br />
2.Observe LED “Green Solid” If lit Green<br />
proceed, if not lighted check polarity and<br />
connections to battery “ Green Solid ”<br />
LED MUST be lit for unit to function.<br />
3. Observe LED Indicator “<strong>Battery</strong><br />
Accepted” If Green (Yes) = <strong>Battery</strong> is<br />
Accepted for charging- desulphating<br />
If RED (No) = <strong>Battery</strong> cannot be safely<br />
charged or desulphated (if just recently<br />
deeply discharged (with in 1-5 hours),<br />
see inside detailed instructions before<br />
discarding battery).<br />
4.Observe LED “Green OK” If lit Green<br />
plug unit into AC power outlet.<br />
If Yellow = battery requires desulphating<br />
BLINKING<br />
GREEN SOLID<br />
LED Red<br />
=<strong>Battery</strong><br />
Not<br />
accepted<br />
VDC Electronics, Inc. 800-379-5579<br />
Connected Desulfating<br />
BATTERY ACCEPTED<br />
NO YES<br />
LED Green<br />
=<strong>Battery</strong><br />
Accepted<br />
Power On<br />
LED Red<br />
=Power<br />
is on<br />
Manual Desulphation<br />
3 Stage Maintenance Charger-Desulphator<br />
Input:<strong>12</strong>0Vac-60Hz<br />
if already fully charged*.Plug unit into<br />
<strong>12</strong>0 volt ac power source.Then press<br />
“Manual Desulphation” button to begin<br />
process.“Green Connected” LED will<br />
now blink continuously, unless battery is<br />
bad or unit is disconnected.Observe<br />
LED “POWER ON” = Unit functioning<br />
and power source is on.(If not lit check<br />
AC input power to your outlet).<br />
5.Observe LED “Green Solid ” = unit is<br />
charging.When charging is completed<br />
Green LED will BLINK, (unit is now<br />
giving battery a maintenance charge +<br />
desulphating, if needed) It will continue<br />
blinking indefinitely, until disconnected<br />
from battery.<br />
* Read Full Detailed <strong>Instructions</strong> Before<br />
Proceeding Further.<br />
YELLOW<br />
Desulphate<br />
GREEN<br />
OK<br />
US Patent No. 6,184,650 B.1-Feb. 6, 2001<br />
Note:Your <strong><strong>Battery</strong>MINDer</strong> can be left safely connected (and operating)<br />
to any charger,generator,alternator,inverter,without fear of damage.<br />
Note:<br />
• Always DESULPHATE - CONDITION<br />
ONE (1) BATTERY AT A TIME, unless<br />
batteries are in series.If in seriesparallel<br />
desulphate 1 pair (2) of series<br />
connected batteries at one time.<br />
• NEVER attach output cord sets (battery<br />
clips or ring terminal-plug assembly) to<br />
any other unit except your <strong>Battery</strong>-<br />
MINDer, as polarity may be different on<br />
other devices, causing serious potential<br />
damage to you and your battery.<br />
®<br />
Manual<br />
Desulphating<br />
button<br />
LED Yellow<br />
= Desulphate<br />
now<br />
LED Red<br />
= <strong>Battery</strong><br />
is OK<br />
HOW TO QUALIFY YOUR BATTERY<br />
You have purchased the number #1 rated<br />
“Computer Chip” maintenance charger / desulphator<br />
with both Auto-Float Control and<br />
the newest technological innovation Pulse<br />
ModeCircuitry.Please carefully follow<br />
these special instructions and the standard<br />
safety and operating instructions for both<br />
maximum safety and complete performance<br />
satisfaction.<br />
Note: If your battery does not have a<br />
minimum “resting” voltage* it cannot be<br />
charged or desulphated.<br />
Minimum Resting Voltage:<br />
<strong>12</strong>V = 10.5V, <strong>24</strong>V = 21V,<strong>36</strong>V = 31.5V<br />
(Resting voltage = Voltage in a battery that<br />
has not been charged or discharged within 8<br />
hours MINIMUM).<br />
It is extremely important that you determine<br />
the state of your battery’s “Health” before<br />
attempting to re-charge and desulphate your<br />
battery.If any of your cells are shorted ( no<br />
reading on the hydrometer tester) or the<br />
difference in charge level is greater than 0.50<br />
SG between any 2 cells (= 2 ball difference<br />
using a hydrometer), your battery cannot be<br />
properly re-charged / desulphate.Discard the<br />
battery in an appropriate, lawful manner.<br />
Thank you for purchasing our product and<br />
returning the warranty card enclosed.
Underwriters Laboratories (UL)<br />
REQUIRED SAFETY<br />
INSTRUCTIONS<br />
1. Do not expose charger to rain or snow.<br />
It is designed to operate ONLY<br />
INDOORS.<br />
2. USE of any attachment not specifically<br />
recommended by the battery charger<br />
manufacturer for use with this exact<br />
model of charger may result in risk of<br />
fire & electric shock or injury to person.<br />
3. An extension cord should not be used,<br />
unless absolutely necessary. Use of an<br />
improper extension cord could result in<br />
fire or electric shock. If extension cord<br />
must be used be sure: a. Pins on plug<br />
of extension cord are the same number,<br />
size, & shape of plug on charger<br />
b. Extension cord is properly wired and<br />
in good condition.c.Wire size is large<br />
enough for AC ampere rating of<br />
charge as specified below:<br />
Length of cord, feet (meters)<br />
25(7.6) 60(15.2) 100(30.5) 150(45.6)<br />
AWG Size 18<br />
4. Do not use charger if it received a sharp<br />
blow, been dropped, or damaged.<br />
5. Charger contains no serviceable parts.<br />
If it fails for any reason, return to the<br />
address shown within for a free<br />
replacement under warranty.<br />
6. To reduce risk of electric shock, unplug<br />
charger from outlet before attempting<br />
any maintenance or cleaning.<br />
7. WARNING - RISK OF EXPLOSIVE<br />
GASES. WHENEVER YOU WORK NEAR<br />
A LEAD ACID BATTERY IT IS<br />
DANGEROUS. BATTERIES GENERATE<br />
EXPLOSIVE GASES DURING NORMAL<br />
BATTERY OPERATION. FOR THIS<br />
REASON, IT IS OF UTMOST<br />
IMPORTANCE THAT EACH TIME<br />
BEFORE USING YOUR CHARGER, YOU<br />
READ THIS MANUAL AND FOLLOW THE<br />
INSTRUCTIONS EXACTLY.<br />
To reduce risk of battery explosion, follow<br />
these instructions and those published<br />
by the battery manufacturer and the<br />
manufacturer of any equipment you plan<br />
to use in the vicinity of the battery.<br />
Review cautionary markings on the<br />
products and the engine.<br />
8. PERSONAL PRECAUTIONS when<br />
working with/near a lead acid battery.<br />
a. Someone should be able to hear your<br />
voice or close enough to aid you when<br />
working near a lead acid battery.<br />
b. Have fresh water and soap nearby case<br />
battery acid contact skin, clothing, or<br />
eyes. Wear complete eye protection and<br />
clothing protection. Avoid touching<br />
eyes while working near battery.<br />
d. If battery acid does contact skin or<br />
clothing, wash immediately with soap<br />
and water. If acid entered the eye,<br />
immediately flood the eye with running<br />
water for at least 10 minutes and get<br />
help immediately.<br />
Page Two<br />
e. NEVER smoke or allow a spark of flame<br />
near battery or engine.<br />
f. Be extra cautious to reduce risk of<br />
dropping a metal tool or auto part onto<br />
battery. It might spark or short circuit<br />
battery or other electrical part that may<br />
cause an explosion.<br />
g. Remove personal metal items such as<br />
rings, bracelets, necklaces, and<br />
watches when working with a lead acid<br />
battery. A lead acid battery can produce<br />
a short circuit current high enough to<br />
weld a ring or the like to metal, causing<br />
a severe burn.<br />
h. Charger is designed to be used for<br />
recharging lead acid batteries ONLY.<br />
Never use it to power a low voltage<br />
electrical system, or for attempting to<br />
recharge dry cell batteries that are<br />
commonly used in house holds. These<br />
batteries may explode and cause injury<br />
to persons and damage property<br />
NEVER CHARGE A FROZEN BATTERY OR<br />
ONE AT A TEMPERATURE ABOVE <strong>12</strong>3° F.<br />
PREPARING TO CHARGE<br />
a. If necessary to remove battery from<br />
equipment to charge, always remove<br />
ground terminal first. Turn off all<br />
accessories in the vehicle, so as not to<br />
cause an arc.<br />
b. Be sure area around battery is well<br />
ventilated while battery is being<br />
charged. Gas vapors can be forcefully<br />
blown away by using a piece of<br />
non-metallic material as a fan.<br />
c. Clean battery terminals. Be careful to<br />
keep corrosion from contacting eyes.<br />
d. Add distilled water to each cell until<br />
battery acid reaches level specified by<br />
the manufacturer. This helps Purge<br />
excessive gas from cells. Do not<br />
overfill. For a battery with out cell caps,<br />
follow manufacturer’s recharging<br />
instructions.<br />
e. Study all battery manufacturer’s<br />
specific instructions such as removing<br />
cell caps while charging and<br />
recommended charge rates.<br />
f. Determine voltage of battery by referring<br />
to equipment owner’s manual<br />
and make sure that charger output<br />
voltage is correct.<br />
CHARGER LOCATION<br />
a. Make sure charger is as far away from<br />
battery as output cables permit.<br />
b. Never place charger directly above battery<br />
being charged; gases from battery will<br />
corrode and damage charger.<br />
c. Never allow battery acid to drip on charger<br />
when reading specific gravity or filling.<br />
d. Do not operate charger in a closed-in area<br />
or restrict ventilation in any way.<br />
e. Do not set battery on top of charger.<br />
DC CONNECTION PRECAUTIONS<br />
a. Connect and disconnect DC output clips<br />
from battery only after removing charger<br />
from outlet.<br />
b. Attach clips to battery posts and twist or<br />
rock back and forth several times to make<br />
good contact. This tends to keep clips<br />
from slipping off terminals and reduces<br />
risk of sparking.<br />
FOLLOW THESE INSTRUCTIONS WHEN<br />
BATTERY IS INSTALLED IN EQUIPMENT<br />
(VEHICLE, PWC, BOAT, TRACTOR,<br />
ETC.) A SPARK NEAR BATTERY MAY<br />
CAUSE BATTERY TO EXPLODE. TO<br />
REDUCE RISK OF A SPARK NEAR<br />
BATTERY:<br />
c.Position DC<br />
output cord to<br />
reduce risk of<br />
damage by hood,<br />
door,<br />
covers, or moving<br />
engine parts.<br />
d. Stay clear of fan blades,<br />
belts, pulleys, and other<br />
parts that<br />
can cause injuries.<br />
e. Check polarity of battery<br />
posts. POSITIVE (POS, P, +)<br />
usually has a<br />
larger diameter<br />
<strong>Battery</strong><br />
clips and<br />
Plug-In<br />
than NEGATIVE (NEG, N, -)POST.<br />
f. Determine which post of battery is<br />
grounded (connected) to the chassis of<br />
equipment. If negative post is grounded<br />
see Item N. If positive post is grounded<br />
see item P. N. For negative grounded<br />
equipment, connect POSITIVE (RED) clip<br />
from charger to POSITIVE (POS, P, +)<br />
ungrounded post of battery. Connect<br />
NEGATIVE (BLACK) clip to vehicle chassis<br />
or engine block away from battery. Do not<br />
connect clip to carburetor, fuel lines, or<br />
metal body parts.<br />
g. For positive ground equipment, connect<br />
NEGATIVE (BLACK) clip from charger to<br />
NEGATIVE (NEG, N,) UNGROUNDED<br />
POST OF BATTERY. Connect POSITIVE<br />
(RED) CLIP to chassis or engine block<br />
away from battery. Do not connect clip to<br />
carburetor, fuel lines, or sheet metal body<br />
parts. Connect to heavy gauge metal part<br />
of frame or engine.<br />
Ring terminals<br />
and Plug-In<br />
h. When disconnecting charger, disconnect<br />
charger from AC outlet, then remove clips<br />
from vehicle chassis, and battery posts.<br />
Operating instructions for charge information.<br />
FOLLOW THESE STEPS WHEN BATTERY<br />
IS OUTSIDE OF VEHICLE OR EQUIPMENT.<br />
A SPARK NEAR THE BATTERY MAY CAUSE<br />
BATTERY EXPLOSION. TO REDUCE RISK OF A<br />
SPARK NEAR BATTERY:<br />
a. Check polarity<br />
of battery<br />
posts. POSI-<br />
TIVE (POS,P,+)<br />
usually has a<br />
large diameter<br />
than NEGATIVE<br />
(NEG, N, -)<br />
battery post.<br />
b. Connect<br />
(RED) charger<br />
clip to<br />
(POS+) post<br />
of battery.<br />
c. Position<br />
yourself and<br />
free end of<br />
cable as far<br />
away from battery<br />
as possible, then<br />
connect<br />
NEGATIVE<br />
(BLACK)<br />
charger clip to<br />
free end of<br />
cable.<br />
d. Do not face<br />
battery when<br />
making final<br />
connections.<br />
e. When<br />
disconnecting<br />
charger,<br />
always<br />
do<br />
so in<br />
reverse<br />
sequence of<br />
connecting<br />
procedure and break<br />
first connection while as far away from<br />
battery as practical.<br />
f. A marine (boat) battery must be removed<br />
and charged on shore. To charge it on<br />
board requires equipment specifically<br />
designed for marine use.<br />
MAINTENANCE INSTRUCTIONS<br />
DO NOT ATTEMPT TO REPAIR. UNIT IS<br />
NOT DESIGNED TO BE REPAIRED. ALL<br />
SERVICING SHOULD BE PERFORMED BY<br />
VDC Electronics, Inc. PERSONNEL.<br />
DESULPHATION<br />
Your <strong><strong>Battery</strong>MINDer</strong> will remove sulphate<br />
build-up from the storage plates of your<br />
battery automatically or at the push of the<br />
button. This process can take from several<br />
hours to several weeks. Observing your<br />
unit’s LED test indicator labeled “Green OK<br />
Yellow Desulphate” is the easiest way to<br />
determine if desulphation is needed.<br />
Remember, to obtain an accurate condition,<br />
you must test battery after it has “rested” =<br />
battery that is fully charged 8+ hours ago,<br />
without any load being applied to it.<br />
OPERATING INSTRUCTIONS:<br />
DO NOT ATTEMPT TO OPERATE<br />
CHARGER BEFORE READING AND<br />
FULLY UNDERSTANDING ALL SAFETY<br />
INSTRUCTIONS AS OUTLINED PRIOR.<br />
CALL OUR TOLL FREE TELEPHONE<br />
NUMBER IF YOU HAVE ANY QUESTIONS<br />
WHATSOEVER.<br />
1. <strong><strong>Battery</strong>MINDer</strong> is designed to fully<br />
charge your battery(s), and should be<br />
left connected to the battery at all times<br />
the battery is not in use. Failure to<br />
maintain the battery in a full charge<br />
condition at all times will cause the<br />
battery to sulphate, seriously limiting<br />
it’s life and performance. In addition,<br />
this ensures you will always have a fully<br />
charged battery. The amount of<br />
electricity it uses when the battery is<br />
fully charged is less than 10¢ month<br />
even when electricity costs as much as<br />
18¢ /kWh. Compare this cost to needing<br />
to replace a battery after only one<br />
season of use due to sulphation caused<br />
by improper charging and/or storage.<br />
2. After carefully reading and fully<br />
understanding the safety instructions,<br />
provided in these instructions, each<br />
time you wish to store your battery or<br />
whenever you will not be using it for a 4<br />
days or more, simply attach<br />
<strong><strong>Battery</strong>MINDer</strong> as described in the<br />
safety instructions and let it do its job.<br />
NOTE: It is normal for <strong><strong>Battery</strong>MINDer</strong> to<br />
feel warm to the touch during the<br />
charging cycle, especially with older<br />
and/or large batteries. Unit will begin to<br />
cool, when it nears the end of the<br />
charging mode and during the entire float<br />
maintenance + desulphation mode.<br />
The Green LED desulphation and<br />
maintenance indicator will light when you<br />
have properly attached unit’s clips to the<br />
battery posts ie: Red marked clip to (+)<br />
post and Black marked clip (–) post of<br />
battery. LED will begin to blink when<br />
battery has been fully charged and is now<br />
in the Auto-Float Maintenance and<br />
desulphation mode. The Red LED will<br />
come on when the unit is plugged into<br />
live <strong>12</strong>0 volt AC electrical outlet. It will<br />
remain on throughout the entire charging<br />
mode as well as during the float<br />
maintenance mode. SHOULD THE Red<br />
indicator NOT REMAIN ON, CHECK TO<br />
BE SURE UNIT IS PLUGGED IN AND<br />
OUTLET IS STILL LIVE. If outlet is live<br />
and Red LED does not light, unit is NOT<br />
PROPERLY CHARGING or MAINTAINING<br />
battery correctly. Disconnect unit and<br />
return immediately to VDC Electronics for<br />
inspection / repair or replacement.<br />
NOTE: Certain of the Green LED<br />
indicators will light even when unit is not<br />
connected to a live outlet, as they are<br />
activated by the battery’s own voltage. Do<br />
not leave <strong><strong>Battery</strong>MINDer</strong> connected to the<br />
battery without electrical power. The<br />
battery energy used to light these LEDs<br />
will cause battery to discharge over time.<br />
IMPORTANT: It is recommended to charge<br />
large capacity deeply discharged<br />
batteries with your standard charger<br />
before attaching <strong><strong>Battery</strong>MINDer</strong> to<br />
minimize the time it takes for<br />
<strong><strong>Battery</strong>MINDer</strong> to enter the Desulphation<br />
Maintenance mode. If the Green LED<br />
does not start blinking within 72 hours<br />
after unit has been attached to a fully<br />
charged battery the BATTERY MAY HAVE<br />
A SHORTED CELL OR IS TOO HIGHLY<br />
SULPHATED TO ACCEPT A PROPER<br />
CHARGE. Do not continue. Disconnect<br />
the battery and have it load tested.<br />
DE-SULPHATION BUTTON<br />
If <strong><strong>Battery</strong>MINDer</strong> is unable to bring the<br />
battery up to a full charge voltage, it will not<br />
“blink” and will remain in the charge mode<br />
(solid Green), rather than going into the<br />
Maintenance Desulphator (blinking Green)<br />
mode. Your battery may not be able to be<br />
properly charged, or conditioned. However,<br />
by pressing the button the unit will go into<br />
the desulphation stage. You may then be<br />
able to save your battery. Leave your battery<br />
connected to <strong><strong>Battery</strong>MINDer</strong> for a minimum<br />
of 1 week before re-testing it.<br />
Note: If your battery does not have a<br />
minimum “resting”* voltage.It cannot be<br />
properly charged or de-sulphated. Replace<br />
<strong>Battery</strong>. Minimum Resting Voltage:<br />
<strong>12</strong>V = 10.5V, <strong>24</strong>V = 21V, <strong>36</strong>V = 31.5V<br />
(*Resting Voltage = Voltage in a battery that<br />
has not been charged or discharged within 8<br />
hours MINIMUM)<br />
IMPORTANT: <strong><strong>Battery</strong>MINDer</strong> will have no<br />
electrical output unless it is connected to a<br />
“healthy” battery. Testing it with a Volt or Amp<br />
meter, without the unit being connected<br />
across a good battery, will result in a false<br />
reading. If you experience any problems or<br />
are not sure of how to properly use/connect<br />
your <strong><strong>Battery</strong>MINDer</strong>, please call our Toll-<br />
Free Technical Support line, 800-379-5579<br />
number and leave us a detailed message<br />
explaining your problem.<br />
Note: If your battery does not have a<br />
minimum “resting”* voltage. it cannot be<br />
properly charged or de-sulphated. Replace<br />
<strong>Battery</strong> ( *Resting voltage = Voltage in a<br />
battery that has not been charged or<br />
discharged within 8 hours MINIMUM)<br />
Use your <strong><strong>Battery</strong>MINDer</strong> on your battery at<br />
ALL times (winter, summer, spring or fall)<br />
that your battery will not be used for 4 days<br />
or more. This will prevent new Sulphation<br />
from taking place and will lead to<br />
dramatically increased battery life and<br />
performance. DO NOT REMOVE<br />
<strong><strong>Battery</strong>MINDer</strong> from your battery unless<br />
you place the battery back in service.<br />
FAILURE TO KEEP <strong><strong>Battery</strong>MINDer</strong><br />
CONNECTED TO YOUR BATTERY AT ALL<br />
TIMES THE BATTERY IS NOT IN SERVICE<br />
WILL AFFECT PERFORMANCE CLAIMS.<br />
Page Three