
Create successful ePaper yourself
Turn your PDF publications into a flip-book with our unique Google optimized e-Paper software.
VAUDE ProDUktschUlUng/VAUDE ProDUct trAining 2011 © Copyright VAUDE Sport gmbh & Co. Kg • 06.2010<br />
� www.VAUDE.com<br />
tiPPs UnD tricks/tiPs AnD tricks<br />
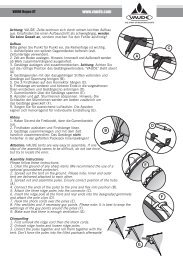
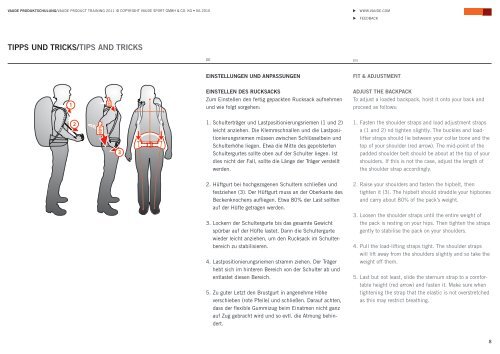
1<br />
2<br />
80%<br />
20%<br />
3<br />
DE En<br />
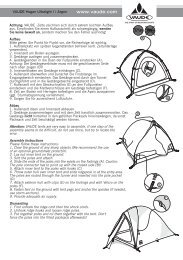
EinstEllUngEn UnD AnPAssUngEn<br />
EinstEllEn DEs rUcksAcks<br />
Zum Einstellen den fertig gepackten rucksack aufnehmen<br />
und wie folgt vorgehen:<br />
1. Schulterträger und Lastpositionierungsriemen (1 und 2)<br />
leicht anziehen. Die Klemmschnallen und die Lastpositionierungsriemen<br />
müssen zwischen Schlüsselbein und<br />
Schulterhöhe liegen. Etwa die mitte des gepolsterten<br />
Schultergurtes sollte oben auf der Schulter liegen. ist<br />
dies nicht der Fall, sollte die Länge der träger verstellt<br />
werden.<br />
2. hüftgurt bei hochgezogenen Schultern schließen und<br />
festziehen (3). Der hüftgurt muss an der oberkante des<br />
beckenknochens aufliegen. Etwa 80% der Last sollten<br />
auf der Hüfte getragen werden.<br />
3. Lockern der Schultergurte bis das gesamte gewicht<br />
spürbar auf der Hüfte lastet. Dann die Schultergurte<br />
wieder leicht anziehen, um den rucksack im Schulterbereich<br />
zu stabilisieren.<br />
4. Lastpositionierungsriemen stramm ziehen. Der träger<br />
hebt sich im hinteren Bereich von der Schulter ab und<br />
entlastet diesen Bereich.<br />
5. Zu guter Letzt den Brustgurt in angenehme Höhe<br />
verschieben (rote pfeile) und schließen. Darauf achten,<br />
dass der flexible gummizug beim Einatmen nicht ganz<br />
auf Zug gebracht wird und so evtl. die Atmung behindert.<br />
� FEEDBAcK<br />
Fit & ADJUstmEnt<br />
ADJUst thE BAckPAck<br />
to adjust a loaded backpack, hoist it onto your back and<br />
proceed as follows:<br />
1. Fasten the shoulder straps and load adjustment straps<br />
a (1 and 2) nd tighten slightly. the buckles and loadlifter<br />
straps should lie between your collar bone and the<br />
top of your shoulder (red arrow). the mid-point of the<br />
padded shoulder belt should be about at the top of your<br />
shoulders. if this is not the case, adjust the length of<br />
the shoulder strap accordingly.<br />
2. raise your shoulders and fasten the hipbelt, then<br />
tighten it (3). the hipbelt should straddle your hipbones<br />
and carry about 80% of the pack’s weight.<br />
3. Loosen the shoulder straps until the entire weight of<br />
the pack is resting on your hips. then tighten the straps<br />
gently to stabilise the pack on your shoulders.<br />
4. Pull the load-lifting straps tight. the shoulder straps<br />
will lift away from the shoulders slightly and so take the<br />
weight off them.<br />
5. Last but not least, slide the sternum strap to a comfortable<br />
height (red arrow) and fasten it. make sure when<br />
tightening the strap that the elastic is not overstretched<br />
as this may restrict breathing.<br />
8