Create successful ePaper yourself
Turn your PDF publications into a flip-book with our unique Google optimized e-Paper software.
VAUDE ProDUktschUlUng/VAUDE ProDUct trAining 2011 © Copyright VAUDE Sport gmbh & Co. Kg • 06.2010<br />
� www.VAUDE.com<br />
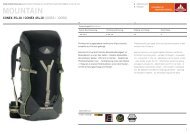
moUntAin<br />
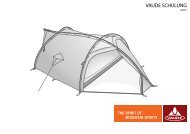
sPlinE 30 / sPlinE 40 (10062 / 10061)<br />
DE En<br />
Anwendungen/Applications<br />
� FEEDBAcK<br />
Alpine mountaineering climbing and touring trekking and Hiking Urbantravel<br />
• • • • • • • • • • • • •<br />
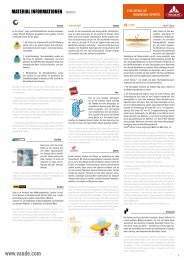
Leichter, professionell ausgestatteter technischer Alpinrucksack,<br />
komplett aus cordura gefertigt.<br />
Keramik-Print verleiht höchste Abriebsbeständigkeit im<br />
Bodenbereich und an den Seiten - infopanel zu alpinen<br />
notsituationen unter dem Deckel - rV-Fach im Deckel -<br />
geräteschlaufen - Seitliche Kompressionsgurte komplett<br />
verstaubar - e-link-System<br />
gewicht/weight<br />
1290 / 1320 gr<br />
Lightweight, professional and technical Alpine backpack,<br />
made completely from cordura.<br />
special ceramic print gives highest abrasion resistance at<br />
bottom and side parts - information panel for alpine emergency<br />
situations under the lid - zip pocket in the lid - gear<br />
loops - side compression straps are completely stowable<br />
- e-link system: backpack can be attached to Edelrid<br />
climbing harnesses - opening for hydration system<br />
1
VAUDE ProDUktschUlUng/VAUDE ProDUct trAining 2011 © Copyright VAUDE Sport gmbh & Co. Kg • 06.2010<br />
� www.VAUDE.com<br />
tEchnik/tEchnologiE<br />
DE En<br />
kÖrPErkontAktrÜckEn<br />
Ein Körperkontaktrücken liegt am rücken an, wodurch die<br />
Last nah am Köperschwerpunkt getragen wird.<br />
rucksäcke mit Körperkontaktrücken eignen sich deshalb<br />
am besten für bewegungsintensiven Bergsport wie z.B.<br />
Hochtouren, Klettern oder Skitouren.<br />
VortEilE:<br />
• Durch den körpernahen Sitz hat die person volle bewegungsfreiheit.<br />
• Die Last wird gleichmäßig verteilt.<br />
• Der rucksack kann schwer beladen werden.<br />
nAchtEil:<br />
• Weniger belüftung des rückens.<br />
� FEEDBAcK<br />
FUll contAct BAck<br />
A full contact back brings in the pack close to the body,<br />
allowing the load to be carried closer to the wearer’s center<br />
of gravity.<br />
Backpacks with full contact backs are ideally suited for<br />
mountain sports that are extremely motion intensive such<br />
as mountaineering, climbing and ski touring.<br />
Pros:<br />
• A close fitting pack allows the wearer full freedom of<br />
movement.<br />
• the load is evenly distributed.<br />
• the backpack can be heavily loaded.<br />
cons:<br />
• Less ventilation of the back.<br />
2
VAUDE ProDUktschUlUng/VAUDE ProDUct trAining 2011 © Copyright VAUDE Sport gmbh & Co. Kg • 06.2010<br />
� www.VAUDE.com<br />
tEchnik/tEchnologiE<br />
DE En<br />
kÖrPErkontAktrÜckEn: ProFlEX<br />
Das Proflex rückensystem wurde speziell für den alpinen<br />
Einsatz entwickelt.<br />
Der extra leichte Körperkontaktrücken ist bequem und<br />
besonders flexibel. mit Proflex kann das gepäck näher am<br />
Körper getragen werden für mehr Bewegungsfreiheit beim<br />
Bergsteigen und Klettern.<br />
FEAtUrEs<br />
Herausnehmbarer Alurahmen<br />
Ein leichter, speziell gebogener Alurahmen in der rückenkonstruktion<br />
sorgt für Stabilität und lässt sich bei Bedarf<br />
schnell herausnehmen.<br />
gEPrägtEr schAUmstoFF-rÜckEn<br />
Für hohen tragekomfort verwenden wir eine neuartige<br />
Konstruktion aus speziell geprägtem Schaumstoff. Diese<br />
strategisch positionierte Prägung des rückenteils entspricht<br />
dem Verlauf der wirbelsäule. Der viskoelastische<br />
Schaumstoff verhindert Druckstellen und sorgt dafür, dass<br />
sich der rucksack an die Bewegungen des trägers anpasst.<br />
BEnEFits<br />
• Leichter Körperkontaktrücken.<br />
• Volle Flexibilität.<br />
• Druck wird von der Schaumprägung absorbiert.<br />
� FEEDBAcK<br />
FUll contAct BAck: ProFlEX<br />
the Proflex suspension system is specially conceived for<br />
alpine use.<br />
the lightweight full contact back is extremely comfortable<br />
and very flexible. the Proflex system allows the pack to be<br />
worn closer to the body for greater freedom of movement<br />
when climbing and mountaineering.<br />
FEAtUrEs<br />
removable aluminum stay<br />
A lightweight, curved aluminum stay in the suspension<br />
system ensures stability and can be quickly removed when<br />
necessary.<br />
contoUrED FoAm BAck<br />
For enhanced carrying comfort we use specially contoured<br />
foam in a newly developed construction. this strategically<br />
positioned contouring of the back panel is designed to<br />
follow the curvature of the spine. the viscoelastic foam<br />
prevents pressure points and ensures that the pack adjusts<br />
to the movements of the wearer.<br />
BEnEFits<br />
• Lightweight full contact back<br />
• Full flexibility<br />
• Foam contouring absorbs pressure<br />
3
VAUDE ProDUktschUlUng/VAUDE ProDUct trAining 2011 © Copyright VAUDE Sport gmbh & Co. Kg • 06.2010<br />
� www.VAUDE.com<br />
tEchnik/tEchnologiE<br />
DE En<br />
VErstAUBArE komPrEssion UnD gErätEhAltErUng<br />
(sPlinE & conEX)<br />
Wenn die Kompressionsriemen und/oder die gerätebefestigung<br />
nicht benötigt werden, können sie über eine Kederschiene<br />
in einer tasche im Boden des rucksacks verstaut<br />
werden. Zudem können Kompression und gerätebefestigung<br />
stufenlos über den Keder positioniert werden.<br />
Der rucksack erhält so eine „aufgeräumte“ Funktion: Es<br />
wird verhindert, dass sich lose riemen in Felsstrukturen<br />
verfangen können.<br />
Durch die freie Positionierbarkeit der gerätebefestigung<br />
auf dem Keder können auch extrem geformte Eisgeräte<br />
optimal befestigt werden.<br />
� FEEDBAcK<br />
stowABlE comPrEssion strAPs AnD lAsh Points<br />
(sPlinE&conEX)<br />
Unused compression straps and lash points can be stowed<br />
in a pocket in the bottom compartment of the pack using a<br />
slide rail. You can also use the slide rail to precisely position<br />
your straps and loops just where you want them.<br />
this allows you to “clean up” your pack so that straps<br />
can’t get caught on anything when you’re climbing.<br />
thanks to the adjustable positioning of the pack’s gear<br />
loops on the slide rail, ice tools with extreme shapes can<br />
also be conveniently carried on the pack.<br />
4
VAUDE ProDUktschUlUng/VAUDE ProDUct trAining 2011 © Copyright VAUDE Sport gmbh & Co. Kg • 06.2010<br />
� www.VAUDE.com<br />
tEchnik/tEchnologiE<br />
DE En<br />
VErstAUBArEs DEckElFAch<br />
Besonders beim Klettern ist es wichtig, dass der Kopf<br />
ausreichend Bewegungsfreiheit hat (uneingeschränkte<br />
Sicht!). Um dies zu gewährleisten kann der Deckel<br />
unserer Spline rucksäcke in seinem Hauptfach<br />
verstaut werden. mit einem zusätzlichen Flap kann<br />
der packsack mit zwei reißverschlüssen wieder<br />
verschlossen werden.<br />
Dieses Feature reduziert die Höhe des rucksacks<br />
im Halsbereich. Der Kletterer hat so mehr<br />
Bewegungsfreiheit für den Kopf – vor allem wenn Helm<br />
und/oder Kapuze getragen werden.<br />
� FEEDBAcK<br />
stowABlE liD<br />
there are some occasions when freedom of movement for<br />
your head is of vital importance – for example, when you’re<br />
climbing and need an unrestricted view.<br />
the Spline backpacks feature a lid compartment that can<br />
be stowed into the main compartment when needed, guaranteeing<br />
full freedom of movement. the pack can be then<br />
fully closed using an additional flap and two zips when the<br />
lid is stowed away.<br />
this feature reduces the height of the backpack, so climbers<br />
have more room to move their heads around when<br />
they really need it, such as when wearing a helmet and/or<br />
a hood.<br />
5
VAUDE ProDUktschUlUng/VAUDE ProDUct trAining 2011 © Copyright VAUDE Sport gmbh & Co. Kg • 06.2010<br />
� www.VAUDE.com<br />
tEchnik/tEchnologiE<br />
DE En<br />
shiElDtEch<br />
VAUDE SHiELD tEcH schützt die rucksäcke an besonders<br />
strapazierten Stellen mit einem zusätzlichen Abrasion-<br />
Print. Dieser erhöht die Abriebsresistenz an diesen Stellen<br />
und die Langlebigkeit des rucksacks wird erhöht.<br />
kErAmik-Print<br />
Die Seiten und der Boden sind mit einem extrem abriebfesten<br />
Keramik-Print versehen. Durch diese robuste<br />
Beschichtung wird das cordura nahezu doppelt so widerstandsfähig<br />
wie unbeschichtetes cordura.<br />
� FEEDBAcK<br />
shiElDtEch<br />
VAUDE SHiELD tEcH protects the backpack at high<br />
wear-and-tear points with an additional abrasion-print. this<br />
improves abrasion resistance in these areas and increases<br />
the lifespan of the backpack.<br />
cErAmic-Print<br />
An extremely abrasion-proof ceramic print has been<br />
applied to the sides and bottom of the pack. with this<br />
rugged coating the cordura fabric becomes almost twice as<br />
durable as uncoated cordura.<br />
6
VAUDE ProDUktschUlUng/VAUDE ProDUct trAining 2011 © Copyright VAUDE Sport gmbh & Co. Kg • 06.2010<br />
� www.VAUDE.com<br />
tiPPs UnD tricks/tiPs AnD tricks<br />
g<br />
g<br />
g<br />
g<br />
kg<br />
g<br />
kg<br />
g<br />
DE En<br />
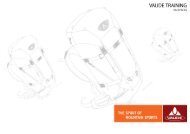
EinstEllUngEn UnD AnPAssUngEn<br />
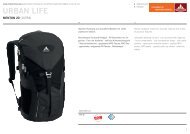
gEwichtsVErtEilUng<br />
Es ist wirklich wichtig seinen rucksack entsprechend<br />
nebenstehendem Bild zu packen. Entscheidend ist, dass<br />
der Körperschwerpunkt durch die rucksacklast nicht zu<br />
weit nach hinten, oben oder unten verschoben wird. ist<br />
dies der Fall, muss die muskulatur ausgleichen und es<br />
kommt zu Verspannungen und muskelverhärtungen, die zu<br />
Kopfschmerzen führen können. Je näher der Schwerpunkt<br />
mit aufgesetztem rucksack am eigentlichen Körperschwerpunkt<br />
ist, desto besser ist das gleichgewichtsgefühl und<br />
desto weniger spürt man die Last.<br />
trAgEgEwicht<br />
Als Faustregel gilt, dass auf längeren touren nicht mehr als<br />
25 - 30 % des eigenen Körpergewichts getragen werden<br />
sollte. nur sehr gut trainierte sollten diesen wert überschreiten.<br />
Kleinere Kinder gewöhnen sich schnell an den<br />
Umgang und das gehen mit Kinderrucksäcken, dabei sollten<br />
sie aber nicht mehr als das Pausenbrot, ein Stofftier<br />
und evtl. den eigenen Schlafsack tragen.<br />
� FEEDBAcK<br />
Fit & ADJUstmEnt<br />
wEight DistriBUtion<br />
it is very important to load your backpack as shown on the<br />
diagram seen here. it is essential that the body’s center<br />
of gravity is not shifted too far backwards, upwards or<br />
downwards by the weight of the pack. if this happens, your<br />
muscles have to compensate leading to muscle tension<br />
and strain, which may result in headaches. the closer your<br />
backpack’s center of gravity is to your own, the better your<br />
balance and the less you will feel the weight.<br />
loAD<br />
As a rule of thumb, you should not carry more than 25 –<br />
30% of your own body weight on longer hikes. only well<br />
conditioned hikers should carry more than this. Small<br />
children can easily get used to hiking and wearing a backpack,<br />
but they should never carry more than a snack, a<br />
stuffed animal and possibly their own sleeping bag.<br />
7
VAUDE ProDUktschUlUng/VAUDE ProDUct trAining 2011 © Copyright VAUDE Sport gmbh & Co. Kg • 06.2010<br />
� www.VAUDE.com<br />
tiPPs UnD tricks/tiPs AnD tricks<br />
1<br />
2<br />
80%<br />
20%<br />
3<br />
DE En<br />
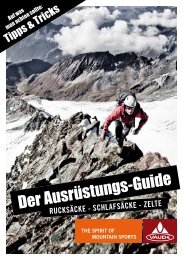
EinstEllUngEn UnD AnPAssUngEn<br />
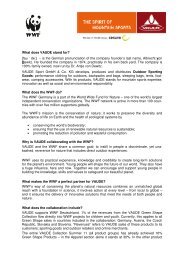
EinstEllEn DEs rUcksAcks<br />
Zum Einstellen den fertig gepackten rucksack aufnehmen<br />
und wie folgt vorgehen:<br />
1. Schulterträger und Lastpositionierungsriemen (1 und 2)<br />
leicht anziehen. Die Klemmschnallen und die Lastpositionierungsriemen<br />
müssen zwischen Schlüsselbein und<br />
Schulterhöhe liegen. Etwa die mitte des gepolsterten<br />
Schultergurtes sollte oben auf der Schulter liegen. ist<br />
dies nicht der Fall, sollte die Länge der träger verstellt<br />
werden.<br />
2. hüftgurt bei hochgezogenen Schultern schließen und<br />
festziehen (3). Der hüftgurt muss an der oberkante des<br />
beckenknochens aufliegen. Etwa 80% der Last sollten<br />
auf der Hüfte getragen werden.<br />
3. Lockern der Schultergurte bis das gesamte gewicht<br />
spürbar auf der Hüfte lastet. Dann die Schultergurte<br />
wieder leicht anziehen, um den rucksack im Schulterbereich<br />
zu stabilisieren.<br />
4. Lastpositionierungsriemen stramm ziehen. Der träger<br />
hebt sich im hinteren Bereich von der Schulter ab und<br />
entlastet diesen Bereich.<br />
5. Zu guter Letzt den Brustgurt in angenehme Höhe<br />
verschieben (rote pfeile) und schließen. Darauf achten,<br />
dass der flexible gummizug beim Einatmen nicht ganz<br />
auf Zug gebracht wird und so evtl. die Atmung behindert.<br />
� FEEDBAcK<br />
Fit & ADJUstmEnt<br />
ADJUst thE BAckPAck<br />
to adjust a loaded backpack, hoist it onto your back and<br />
proceed as follows:<br />
1. Fasten the shoulder straps and load adjustment straps<br />
a (1 and 2) nd tighten slightly. the buckles and loadlifter<br />
straps should lie between your collar bone and the<br />
top of your shoulder (red arrow). the mid-point of the<br />
padded shoulder belt should be about at the top of your<br />
shoulders. if this is not the case, adjust the length of<br />
the shoulder strap accordingly.<br />
2. raise your shoulders and fasten the hipbelt, then<br />
tighten it (3). the hipbelt should straddle your hipbones<br />
and carry about 80% of the pack’s weight.<br />
3. Loosen the shoulder straps until the entire weight of<br />
the pack is resting on your hips. then tighten the straps<br />
gently to stabilise the pack on your shoulders.<br />
4. Pull the load-lifting straps tight. the shoulder straps<br />
will lift away from the shoulders slightly and so take the<br />
weight off them.<br />
5. Last but not least, slide the sternum strap to a comfortable<br />
height (red arrow) and fasten it. make sure when<br />
tightening the strap that the elastic is not overstretched<br />
as this may restrict breathing.<br />
8
VAUDE ProDUktschUlUng/VAUDE ProDUct trAining 2011 © Copyright VAUDE Sport gmbh & Co. Kg • 06.2010<br />
� www.VAUDE.com<br />
tiPPs UnD tricks/tiPs AnD tricks<br />
1<br />
D<br />
2<br />
DE En<br />
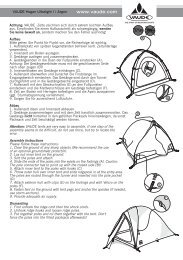
AUsrÜstUngsBEFEstigUng:<br />
sEitlichE ski-BEFEstigUng<br />
ski-BEFEstigUng<br />
Es gibt drei möglichkeiten seine Skier am rucksack zu<br />
befestigen:<br />
� FEEDBAcK<br />
AttAching gEAr:<br />
siDE AttAchEmEnt<br />
AttAching skis<br />
there are three ways to attach skis to your backpack:<br />
oPtion 1: siDE AttAchmEnt<br />
mÖglichkEit 1: sEitlichE skiBEFEstigUng<br />
1 2 • Attaching 3 your skis 4 to the side of your backpack is the<br />
• Die seitliche Skifixierung ist die stabilste Verbindung most secure option.<br />
von Ski und rucksack.<br />
• one ski is attached to the left-hand side, one to the<br />
• Die Skier werden seitlich angebracht. Jeweils ein Ski right of the pack. with the bottom surface against the<br />
ist links und ein Ski rechts anzubringen. Dazu wird der pack, slide each ski down into the dedicated lower loop<br />
jeweilige Ski, mit dem Belag zum rucksack, von oben until you reach the ski binding, then tighten the upper<br />
in die untere seitliche Aufnahmeschlaufe geschoben bis compression loop to fix the ski firmly.<br />
die Bindung auf der Schlaufe aufsteht. mit dem oberen<br />
5<br />
Kompressionsgurt werden die Skier fixiert und festge- hint:<br />
6<br />
Skis are most secure if they are tied together at<br />
zurrt.<br />
the top. You can do this with a long piece of cord. this<br />
holds them more securely on the side and stops them from<br />
tipp: Am besten halten die Ski, wenn man sie oben zu- swaying back and forth.<br />
sammenbindet. Dazu reicht ein ausreichend langes Stück<br />
reepschnur. Dadurch sitzen sie stabiler an der Seite und<br />
können nicht hin- und herbaumeln.<br />
9
VAUDE ProDUktschUlUng/VAUDE ProDUct trAining 2011 © Copyright VAUDE Sport gmbh & Co. Kg • 06.2010<br />
� www.VAUDE.com<br />
tiPPs UnD tricks/tiPs AnD tricks<br />
DE En<br />
AUsrÜstUngsBEFEstigUng: wAnDErstÖckE<br />
wanderstöcke werden unten in die Schlaufe eingesteckt.<br />
Anschließend den Schaft oben mit dem Klettriemen befestigen.<br />
� FEEDBAcK<br />
AttAching gEAr: trEkking PolEs<br />
trekking Poles are inserted from below into the loop and<br />
fixed the same way as the ice equipment on top.<br />
please fix the shaft afterwards on top with the Velcro strap<br />
by opening it, putting the shaft inside and closing it again.<br />
10
VAUDE ProDUktschUlUng/VAUDE ProDUct trAining 2011 © Copyright VAUDE Sport gmbh & Co. Kg • 06.2010<br />
� www.VAUDE.com<br />
tiPPs UnD tricks/tiPs AnD tricks<br />
1<br />
2<br />
DE En<br />
AUsrÜstUngsBEFEstigUng: EisgErätEBEFEstigUng<br />
Der Schaft des gerätes wird von oben durch die Schlaufe<br />
geführt und umgeschlagen<br />
Anschließend den Schaft oben mit dem Klettriemen befestigen.<br />
� FEEDBAcK<br />
AttAching gEAr: icE tools<br />
the shaft of the ice equipment is inserted from the top<br />
through the loop and then folded down.<br />
Fix the shaft afterwards on top with the Velcro strap by<br />
opening it, putting the shaft inside and closing it again.<br />
11
VAUDE ProDUktschUlUng/VAUDE ProDUct trAining 2011 © Copyright VAUDE Sport gmbh & Co. Kg • 06.2010<br />
� www.VAUDE.com<br />
tiPPs UnD tricks/tiPs AnD tricks<br />
DE En<br />
EinstEllUng AlUrAhmEn<br />
Um die Passform des rückens noch individueller zu gestalten<br />
besitzen die rückensysteme Proflex und Anatomic<br />
Alpin einen heruasnehmbaren Alurahmen.<br />
Alurahmen lösen und aus dem rückensystem herausziehen<br />
Passform prüfen: der Alurahmen ist bereits anatomisch<br />
vorgeformt, seine paßform lässt sich jedoch noch weiter<br />
optimieren. Dazu sollte eine zweite Person die Streben<br />
gegen den rücken halten.<br />
individuelle Anpassung: im idealfall folgen die Streben bereits<br />
der rückenform des trägers. tut sie das nicht, passt<br />
man sie durch sanftes Biegen über dem Knie oder einer<br />
runden tischkante an.<br />
Beim wiedereinsetzten des Alurahmens auf die richtige<br />
richtung achten<br />
� FEEDBAcK<br />
AlUminUm FrAmE ADJUstmEnt<br />
in order to offer even greater custom-fitting individual back<br />
adjustability, we‘ve provided our Proflex and Anatomic Alpin<br />
suspension systems with removable aluminum frames.<br />
release the aluminum frame and take it out of the back.<br />
Check for fit: the aluminum frame is already anatomically<br />
shaped, yet you can even further optimize its fit. to do this<br />
you need a second person to hold the stays against your<br />
back.<br />
individual adjustment: ideally the stays already follow the<br />
curvature of your back. if this is not the case, then you can<br />
bend them by gently pressing them against your knee or<br />
the corner of a table.<br />
when reinserting the aluminum frame please make sure<br />
that it is in the right direction.<br />
12
VAUDE ProDUktschUlUng/VAUDE ProDUct trAining 2011 © Copyright VAUDE Sport gmbh & Co. Kg • 06.2010<br />
� www.VAUDE.com<br />
tiPPs UnD tricks/tiPs AnD tricks<br />
1<br />
3<br />
2<br />
DE En<br />
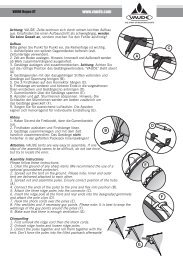
richtig PAckEn - in wElchEs FAch gEhÖrt wAs<br />
Damit der rucksack so komfortabel wie möglich auf dem<br />
rücken sitzt, sollte der Schwerpunkt der Last möglichst<br />
oberhalb des Körperschwerpunkts liegen. Der Körperschwerpunkt<br />
liegt bei den meisten menschen ungefähr zwischen<br />
Bauchnabel und Hüfte. Deshalb sollten schwere Ausrüstungsgegenstände<br />
möglichst nah am rücken zwischen<br />
Schultern und Bauchnabel transportiert werden. Je näher<br />
der Schwerpunkt mit aufgesetztem rucksack am eigentlichen<br />
Körperschwerpunkt ist, desto besser ist das gleichgewichtsgefühl<br />
und desto weniger spürt man die Last.<br />
1. Deckelfach: Ein Deckelfach ist ab einer bestimmten größe<br />
des rucksacks Standard. hier gehören alle kleineren<br />
Ausrüstungsgegenstände hinein, die griffbereit sein müssen,<br />
z.B. Handy, gPS, Kompass, taschentücher, mütze,<br />
Schokoriegel und Erste Hilfe Set. Auf keinen Fall sollte<br />
man schwere, massive gegenstände, wie etwa eine volle<br />
trinkflasche im Deckelfach transportieren. Zum einen<br />
wird der Schwerpunkt verlagert, zum andern kann der<br />
schwere gegenstand gegen den Kopf schlagen.<br />
2. Hauptfach: Beim Packen des Hauptfachs muss taktisch<br />
vorgegangen werden: Unten, oben und an den<br />
Seiten sollten leichtere Dinge gepackt werden, z.B.<br />
Bekleidung. in der mitte und nahe am rücken sind die<br />
schweren gepäckstücke zu verstauen, wie z.B. Kletterausrüstung<br />
(Karabiner, Keile, Expressen), Zelt, Konserven<br />
oder wasservorrat.<br />
3. bodenfach: Die meisten größeren rucksäcke (ab ca. 40<br />
Litern) haben ein vom hauptfach getrenntes bodenfach.<br />
Hier können am besten leichtere und voluminöse<br />
gegenstände verstaut werden, die im Hauptfach zu viel<br />
Platz einnehmen, z.B. der Schlafsack, Schuhe oder ein<br />
Sack mit Schmutzwäsche.<br />
� FEEDBAcK<br />
PAcking corrEctly – whAt goEs whErE<br />
in order to ensure that your backpack fits as comfortably<br />
as possible, the loaded pack’s center of gravity should lie<br />
directly above your own. most people’s center of gravity<br />
lies somewhere between their waist and hips. Heavy items<br />
should therefore be carried in the middle of the pack, as<br />
close in to the back as possible, and centered between<br />
your shoulder blades. the closer your pack’s center of<br />
gravity is to your own, the better your balance and the less<br />
you feel the weight of the load.<br />
1. Lid compartment: A lid compartment is standard on<br />
backpacks of a certain size and above. this is where<br />
you pack all small items of gear that need to be close at<br />
hand, e.g. mobile phone, gPS, compass, tissues, cap,<br />
chocolate bars and first aid set. you should never put<br />
heavy, bulky items such as a full water bottle into the<br />
lid of your backpack. For one thing you will shift the<br />
center of gravity up too high, and for another the heavy<br />
object may hit you on your head.<br />
2. main compartment: You should take a tactical approach<br />
to packing the main compartment: Lighter items such<br />
as clothing should be packed at the bottom, top and on<br />
the sides. Heavier items such as climbing equipment<br />
(carabiners, wedges, quickdraws), the tent, tinned food<br />
or water supplies should be packed in the middle, close<br />
in to your back.<br />
3. bottom Compartment: most larger backpacks (approx.<br />
40 liter or more) have a bottom compartment that is<br />
separate from the main compartment. this is the best<br />
place to store lightweight, bulky items that would take<br />
up too much room in the main compartment, such as a<br />
sleeping bag, shoes or dirty laundry bag.<br />
13
VAUDE ProDUktschUlUng/VAUDE ProDUct trAining 2011 © Copyright VAUDE Sport gmbh & Co. Kg • 06.2010<br />
� www.VAUDE.com<br />
tiPPs UnD tricks/tiPs AnD tricks<br />
5<br />
4<br />
6<br />
DE En<br />
richtig PAckEn - in wElchEs FAch gEhÖrt wAs<br />
4. Außen- und Netztaschen: Seitliche Außen- oder Netztaschen<br />
bieten zusätzlichen Stauraum für Kleinigkeiten<br />
und empfehlen sich für Dinge, die schnell zur Hand<br />
sein müssen (regenjacke, mütze, taschentücher, Handschuhe,<br />
etc). Sie sollten ungefähr gleichschwer beladen<br />
sein. Vorsicht bei spitzen gegenständen – diese können<br />
bei einem Sturz das Netzmaterial durchstoßen.<br />
5. Kartenfach: Einige wander- und trekkingrucksäcke<br />
haben seitlich angebrachte Kartentaschen. Diese sind<br />
groß genug für alle gängigen Kartenformate. Außerdem<br />
lassen sie sich bequem von außen erreichen, ohne dass<br />
das Hauptfach geöffnet werden muss.<br />
6. trinksystem: in fast allen VAUDE rucksackmodellen ist<br />
eine trinksystemaufnahme zu finden. Das Fach ist immer<br />
rückennah angebracht, um den Körperschwerpunkt<br />
nicht negativ zu beeinflussen. Der trinksystemausgang<br />
ist immer im bereich der Schulterträger zu finden.<br />
� FEEDBAcK<br />
PAcking corrEctly – whAt goEs whErE<br />
4. outer Pockets and mesh Pockets: Side outer or mesh<br />
pockets offer room for smaller items and are perfect<br />
for all the things you need to have close at hand (rain<br />
jacket, cap, tissues, gloves etc.). they should be packed<br />
to about the same weight on each side. Be careful about<br />
sharp objects – they may easily pierce the mesh material<br />
in a fall.<br />
5. map Pocket: A range of hiking and trekking backpacks<br />
have map pockets on the side. these are large enough<br />
for all regular sized maps. they are also easily accessible<br />
from the outside, so you can get at them without<br />
having to open the main compartment.<br />
6. hydration System: Almost all VAUDE backpack models<br />
are hydration system compatible. the pocket for the hydration<br />
bladder always lies close to your back so that it<br />
doesn’t offset your center of gravity. the hydration tube<br />
port can always be found near the shoulder straps.<br />
14
VAUDE ProDUktschUlUng/VAUDE ProDUct trAining 2011 © Copyright VAUDE Sport gmbh & Co. Kg • 06.2010<br />
� www.VAUDE.com<br />
tiPPs UnD tricks/tiPs AnD tricks<br />
DE En<br />
rEPArAtUr UnD PFlEgE<br />
reinigen: Flecken und Schmutz entfernt man am besten<br />
mit einem feuchten Schwamm und einer milden Seife. Bei<br />
sehr starken Verschmutzungen kann der rucksack auch in<br />
der Dusche oder Badewanne gereinigt werden. rucksäcke<br />
nicht in die reinigung oder in die waschmaschine geben!<br />
Zum trocknen an einem gut belüfteten ort aufhängen.<br />
garantie, Pflege und reparatur: Dem Erstbesitzer wird<br />
auf VAUDE rucksäcke eine dreijährige garantie gegen<br />
material- und Verarbeitungsfehler gewährt. grundsätzlich<br />
können alle beschädigten Ausrüstungsgegenstände bei uns<br />
eingeschickt und gegen rechnung repariert werden. Egal,<br />
ob ein reißverschluss ausgetauscht oder ein Loch gestopft<br />
werden muss, unsere reparatur-profis können (fast)<br />
alles reparieren. Kleinere reparaturen können aber auch<br />
ohne Probleme daheim oder beim Händler vorgenommen<br />
werden:<br />
schwergängige reißverschlüsse: Schwergängige reißverschlüsse<br />
werden am besten mit einem Silikonspray (z.B, aus<br />
dem baumarkt) behandelt. Einfach auf die reißverschlüsse<br />
aufsprühen und sie gehen wieder leicht auf und zu.<br />
löcher: Kommen am häufigsten am boden des rucksacks<br />
vor. Die einfachste Lösung ist ein reparatur-Klebeband<br />
(z.b. K-tape) mit dem kleinere Löcher von innen zugeklebt<br />
werden können. Ab einer bestimmten größe müssen die<br />
Löcher allerdings genäht werden.<br />
Beschädigte schnallen: Bei manchen rucksäcken können<br />
defekte Schnallen leicht selbst ausgetauscht werden. Dazu<br />
muss die beschädigte Schnalle aus ihrem Band ausgefädelt<br />
und die neue eingefädelt werden.<br />
� FEEDBAcK<br />
cArE AnD rEPAir<br />
cleaning: Stains and dirt are best removed using a damp<br />
sponge and a mild detergent. if the backpack is heavily<br />
soiled, it can be washed under the shower or in the bathtub.<br />
never wash it in a washing machine or dryclean!! to<br />
dry the pack, hang it in a well ventilated place.<br />
guarantee, care and repair: VAUDE gives original owners<br />
a three-year guarantee on their backpack against material<br />
and manufacturing defects. Essentially all damaged equipment<br />
can be sent into us and will be repaired for a charge.<br />
no matter whether it’s a zipper that needs replacing or<br />
a hole that needs mending, our repair professionals can<br />
repair (almost) anything. minor repairs can however also be<br />
made at home or at a dealer’s.<br />
stiff Zippers: Stiff zippers are best treated with a silicon<br />
spray (e.g. from a hardware store). Simply spray onto the<br />
zippers and they can easily be opened and closed again.<br />
holes: these usually appear in the bottom of the backpack.<br />
the easiest solution is to glue smaller holes from the inside<br />
with duct tape. Larger holes have to be sewn up.<br />
Damaged Buckles: on many backpacks you can easily<br />
replace defective buckles yourself. to do this, unthread the<br />
strap from the damaged buckle and thread it through the<br />
new one.<br />
15