ComProbe User Manual - Frontline Test Equipment
ComProbe User Manual - Frontline Test Equipment
ComProbe User Manual - Frontline Test Equipment

Create successful ePaper yourself
Turn your PDF publications into a flip-book with our unique Google optimized e-Paper software.
Revision Date: 3/27/2014<br />
<strong>ComProbe</strong> ® <strong>User</strong> <strong>Manual</strong>
Copyright © 2000-2014 <strong>Frontline</strong> <strong>Test</strong> <strong>Equipment</strong>, Inc. All rights reserved.<br />
FTS, <strong>Frontline</strong>, <strong>Frontline</strong> <strong>Test</strong> System, <strong>ComProbe</strong> Protocol Analysis System and <strong>ComProbe</strong> are registered trademarks<br />
of <strong>Frontline</strong> <strong>Test</strong> <strong>Equipment</strong>, Inc.<br />
FTS4BT, BPA 500, and BPA 600 is a trademark of <strong>Frontline</strong> <strong>Test</strong> <strong>Equipment</strong>, Inc.<br />
The Bluetooth SIG, Inc. owns the Bluetooth word mark and logos, and any use of such marks by <strong>Frontline</strong> is<br />
under license. All other trademarks and registered trademarks are property of their respective owners.<br />
i
Contents<br />
Chapter 1: <strong>ComProbe</strong> Hardware & Software 1<br />
1.1 What is in this manual 1<br />
1.2 Minimum System Requirements 2<br />
1.3 Software Installation 2<br />
1.3.1 From CD: 2<br />
1.3.2 From Download: 2<br />
Chapter 2: Getting Started 3<br />
2.1 BPA 500 Hardware 3<br />
2.1.1 Attaching Antennas 3<br />
2.1.2 Connecting/Powering <strong>ComProbe</strong> 3<br />
2.1.3 <strong>ComProbe</strong>® BPA 500 LED 5<br />
2.1.3.1 LE Section 5<br />
2.1.3.2 Classic Section 5<br />
2.1.4 Connecting for ProbeSync 6<br />
2.2 Data Capture Methods 6<br />
2.2.1 Opening <strong>ComProbe</strong>® Data Capture Method 6<br />
2.2.2 BPA 500 Data Capture Methods 8<br />
2.3 Control Window 9<br />
2.3.1 Control Window Toolbar 9<br />
2.3.2 Configuration Information on the Control Window 10<br />
2.3.3 Status Information on the Control Window 11<br />
2.3.4 Frame Information on the Control Window 11<br />
2.3.5 Drop-Down Menus 11<br />
2.3.6 Minimizing Windows 12<br />
Chapter 3: Configuration Settings 13<br />
3.1 BPA 500 Configuration 13<br />
3.1.1 BPA 500 - Update Firmware 13<br />
ii
3.1.2 BPA 500 I/O Settings 13<br />
3.1.2.1 Datasource Toolbar/Menu 13<br />
3.1.2.2 Selecting BPA 500 Devices Under <strong>Test</strong> 14<br />
3.1.2.3 BPA 500 Devices Under <strong>Test</strong> 16<br />
3.1.2.4 BPA 500 Device Database 28<br />
3.1.2.5 BPA 500 Information 29<br />
3.1.2.6 BPA 500 Advanced Classic Settings 29<br />
Chapter 4: Capturing and Analyzing Data 32<br />
4.1 Capture Data 32<br />
4.1.1 Capturing Data to Disk 32<br />
4.1.2 Capturing Data with BPA 500 Devices 33<br />
4.1.3 Extended Inquiry Response 36<br />
4.2 Protocol Stacks 36<br />
4.2.1 Protocol Stack Wizard 37<br />
4.2.2 Creating and Removing a Custom Stack 38<br />
4.2.3 Reframing 39<br />
4.2.4 Unframing 40<br />
4.2.5 How the Analyzer Auto-traverses the Protocol Stack 40<br />
4.2.6 Providing Context For Decoding When Frame Information Is Missing 41<br />
4.3 Analyzing Byte Level Data 41<br />
4.3.1 Event Display 41<br />
4.3.2 The Event Display Toolbar 42<br />
4.3.3 Opening Multiple Event Display Windows 44<br />
4.3.4 Calculating CRCs or FCSs 44<br />
4.3.5 Calculating Delta Times and Data Rates 45<br />
4.3.6 Switching Between Live Update and Review Mode 45<br />
4.3.7 Data Formats and Symbols 46<br />
4.3.7.1 Switching Between Viewing All Events and Viewing Data Events 46<br />
4.3.7.2 Switching Between Hex, Decimal, Octal or Binary 46<br />
iii
4.3.7.3 Switching Between ASCII, EBCDIC, and Baudot 48<br />
4.3.7.4 Selecting Mixed Channel/Sides 48<br />
4.3.7.5 List of all Event Symbols 48<br />
4.3.7.6 Font Size 50<br />
4.4 Analyzing Protocol Decodes 51<br />
4.4.1 Frame Display Window 51<br />
4.4.1.1 Frame Display Toolbar 54<br />
4.4.1.2 Frame Display Status Bar 57<br />
4.4.1.3 Hiding and Revealing Protocol Layers in the Frame Display 58<br />
4.4.1.4 Physical vs. Logical Byte Display 58<br />
4.4.1.5 Sorting Frames 58<br />
4.4.1.6 Frame Display - Find 58<br />
4.4.1.7 Synchronizing the Event and Frame Displays 60<br />
4.4.1.8 Working with Multiple Frame Displays 61<br />
4.4.1.9 Working with Panes on Frame Display 61<br />
4.4.1.10 Frame Display - Byte Export 62<br />
4.4.1.11 Panes in the Frame Display 64<br />
4.4.1.12 Protocol Layer Colors 71<br />
4.4.1.13 Protocol Filtering From the Frame Display 71<br />
4.4.2 Bluetooth Timeline 74<br />
4.4.2.1 Bluetooth Timeline Packet Depiction 75<br />
4.4.2.2 Bluetooth Timeline Packet Navigation and Selection 78<br />
4.4.2.3 Bluetooth Timeline Toolbar 79<br />
4.4.2.4 Bluetooth Timeline Menu Bar 80<br />
4.4.2.5 Bluetooth Timeline Visual Elements 82<br />
4.4.2.6 Bluetooth Timeline Zooming 84<br />
4.4.2.7 Bluetooth Timeline Throughput Displays 84<br />
4.4.2.8 Export Payload Throughput Over Time 86<br />
4.4.2.9 Object Throughput Stats File 87<br />
iv
4.4.2.10 Bluetooth Timeline Discontinuities 88<br />
4.4.2.11 Legend 89<br />
4.4.2.12 Bluetooth® Timeline: Packets Missing Bluetooth Clock 89<br />
4.4.3 low energy Timeline 89<br />
4.4.3.1 low energy Timeline Toolbar 90<br />
4.4.3.2 low energy Timeline Legend 91<br />
4.4.3.3 Throughput Displays 91<br />
4.4.3.4 The Timeline 94<br />
4.4.3.5 low energy Timeline Visual Elements 98<br />
4.4.3.6 low energy Packet Discontinuities 100<br />
4.4.3.7 low energy Timeline Navigating and Selecting Data 100<br />
4.4.3.8 le Timeline Zooming 101<br />
4.4.4 Message Sequence Chart 104<br />
4.4.4.1 Message Sequence Chart - Search 109<br />
4.4.4.2 Message Sequence Chart - Go To Frame 110<br />
4.4.4.3 Message Sequence Chart - First Error Frame 111<br />
4.4.4.4 Message Sequence Chart - Printing 112<br />
4.4.5 Packet Error Rate Statistics 113<br />
4.4.5.1 Classic Bluetooth Packet Error Rate 114<br />
4.4.5.2 Bluetooth low energy Packet Error Rate 114<br />
4.4.5.3 Packet Error Rate - Channels (Classic and le) 115<br />
4.4.5.4 Packet Error Rate - Pie Chart and Expanded Chart 116<br />
4.4.5.5 Packet Error Rate - Legend 117<br />
4.4.5.6 Packet Error Rate - Additional Statistics 118<br />
4.4.5.7 Packet Error Rate - Sync Selected Packets With Other Windows 118<br />
4.4.5.8 Packet Error Rate - Export 118<br />
4.4.5.9 Packet Error Rate - Scroll Bar 119<br />
4.4.5.10 Packet Error Rate - No Packets Displayed with Missing Channel Numbers 121<br />
4.5 Data/Audio Extraction 122<br />
v
4.6 Statistics 125<br />
4.6.1 Statistics Window 125<br />
4.6.2.1 Statistics Graphs 126<br />
4.6.2 Graphs 126<br />
4.6.2.2 Printing Graphs 126<br />
Chapter 5: Navigating and Searching the Data 127<br />
5.1 Find 127<br />
5.1.1 Searching within Decodes 127<br />
5.1.2 Searching by Pattern 130<br />
5.1.3 Searching by Time 131<br />
5.1.4 Using Go To 133<br />
5.1.5 Searching for Special Events 135<br />
5.1.6 Searching by Signal 136<br />
5.1.7 Searching for Data Errors 140<br />
5.1.8 Find - Bookmarks 143<br />
5.1.9 Changing Where the Search Lands 144<br />
5.1.10 Subtleties of Timestamp Searching 144<br />
5.2 Bookmarks 144<br />
5.2.1 Adding, Modifying or Deleting a Bookmark 145<br />
5.2.2 Displaying All and Moving Between Bookmarks 146<br />
5.3 Filtering 147<br />
5.3.1 About Display Filters 147<br />
5.3.1.1 Creating a Display Filter 147<br />
5.3.1.2 Including and Excluding Radio Buttons 149<br />
5.3.1.3 Named Display Filters 149<br />
5.3.1.4 Using Compound Display Filters 149<br />
5.3.1.5 Defining Node and Conversation Filters 151<br />
5.3.1.6 The Difference Between Deleting and Hiding Display Filters 152<br />
5.3.1.7 Editing Filters 154<br />
vi
5.3.2 Protocol Filtering From the Frame Display 156<br />
5.3.2.1 Quick Filtering on a Protocol Layer 156<br />
5.3.2.2 Easy Protocol Filtering 157<br />
5.3.2.3 Filtering On the Summary Layer Protocol 157<br />
5.3.2.4 Filtering on all Frames with Errors from the Frame Display 157<br />
Chapter 6: Saving and Importing Data 158<br />
6.1 Saving Your Data 158<br />
6.1.1 Saving the Entire Capture File using File Save or the Save icon 158<br />
6.1.2 Saving the Entire Capture File with Save Selection 159<br />
6.1.3 Saving a Portion of a Capture File 160<br />
6.1.4 Confirm Capture File (CFA) Changes 160<br />
6.1.5 Adding Comments to a Capture File 161<br />
6.2 Loading and Importing a Capture File 161<br />
6.2.1 Loading a Capture File 161<br />
6.2.2 Importing Capture Files 162<br />
6.3 Printing 162<br />
6.3.1 Printing from the Frame Display/HTML Export 162<br />
6.3.2 Printing from the Event Display 165<br />
6.4 Exporting 166<br />
6.4.1 Frame Display Export 166<br />
6.4.2 Exporting a File with Event Display Export 167<br />
6.4.2.1 Export Filter Out 169<br />
6.4.2.2 Exporting Baudot 169<br />
Chapter 7: General Information 170<br />
7.1 System Settings and Progam Options 170<br />
7.1.1 System Settings 170<br />
7.1.1.1 Series of files 170<br />
7.1.1.2 Single File 171<br />
7.1.1.3 Common Options 172<br />
vii
7.1.1.4 System Settings - Disabled/Enabled Options 172<br />
7.1.1.5 Advanced System Options 173<br />
7.1.1.6 Selecting Start Up Options 173<br />
7.1.2 Changing Default File Locations 174<br />
7.1.3 Side Names 176<br />
7.1.4 Timestamping 177<br />
7.1.4.1 Timestamping Options 177<br />
7.2 Technical Information 179<br />
7.2.1 Performance Notes 179<br />
7.2.2 Ring Indicator 180<br />
7.2.3 Progress Bars 180<br />
7.2.4 Event Numbering 180<br />
7.2.5 Useful Character Tables 181<br />
7.2.5.1 ASCII Codes 181<br />
7.2.5.2 Baudot Codes 182<br />
7.2.5.3 EBCDIC Codes 182<br />
7.2.5.4 Communication Control Characters 183<br />
7.2.6 The <strong>Frontline</strong> Serial Driver 184<br />
7.2.7 DecoderScript Overview 184<br />
7.3 Contacting Technical Support 185<br />
7.3.1 Instructional Videos 185<br />
Appendix 1: Application Notes 186<br />
1.1 Bluetooth Virtual Sniffing 187<br />
1.1.1 Introduction 187<br />
1.1.2 Why HCI Sniffing and Virtual Sniffing are Useful 187<br />
1.1.3 Bluetooth Sniffing History 187<br />
1.1.4 Virtual Sniffing—What is it? 188<br />
1.1.5 The Convenience and Reliability of Virtual Sniffing 189<br />
1.1.6 How Virtual Sniffing Works 189<br />
viii
1.1.7 Virtual Sniffing and Bluetooth Stack Vendors 189<br />
1.1.8 Case Studies: Virtual Sniffing and Bluetooth Mobile Phone Makers 190<br />
1.1.9 Virtual Sniffing and You 190<br />
Index 192<br />
List of Figures<br />
Figure 1. Front Panel 3<br />
Figure 2. <strong>ComProbe</strong> BPA 500 with antennas attached. 3<br />
Figure 3. Back Panel - Power 4<br />
Figure 4. Back Panel - USB 4<br />
Figure 5. BPA 500 Front Panel LEDs 5<br />
Figure 6. Desktop Folder Link 7<br />
Figure 7. BPA 500 Update Firmware Dialog 13<br />
Figure 8. BPA 500 Datasource Dialog 15<br />
Figure 9. BPA 500 Classice Channel Map 16<br />
Figure 10. BPA 500 Devices Under <strong>Test</strong> - LE Only Tab 17<br />
Figure 11. BPA 500 LE Encryption 17<br />
Figure 12. BPA 500 Devices Under <strong>Test</strong> - Classic Only Single Connection 19<br />
Figure 13. BPA 500 Classic Encrytion 20<br />
Figure 14. BPA 500 Devices under <strong>Test</strong> - Dual Mode 21<br />
Figure 15. BPA 500 Classic Encryption 22<br />
Figure 16. BPA 500 Devices Under <strong>Test</strong> - Classic Only Multiple Connections 25<br />
Figure 17. BPA 500 Classic Encryption 26<br />
Figure 18. BPA 500 Datasource Device Database Tab 28<br />
Figure 19. BPA 500 Datasource Information Tab 29<br />
Figure 20. BPA 500 Datasource Devices Under <strong>Test</strong> Advance Classic Settings Dialog 30<br />
Figure 21. Packet Transfer Dialog 33<br />
Figure 22. BPA 500 Datasource Dialog 34<br />
Figure 23. Frame Display Extended Inquire Response 36<br />
Figure 24. Event Display 42<br />
ix
Figure 25. Delta fields 45<br />
Figure 26. Format Menu 47<br />
Figure 27. Header labels, right click 47<br />
Figure 28. Data display right click menu 47<br />
Figure 29. Event Display Options menu 51<br />
Figure 30. Event Display Font Size Selection 51<br />
Figure 31. Frame Display with all panes active 52<br />
Figure 32. Frame Display Find text entry field 59<br />
Figure 33. Searh/Find Dialog 59<br />
Figure 34. Frame Display File menu, Byte Export 62<br />
Figure 35. Byte Export dialog 63<br />
Figure 36. Save As dialog 63<br />
Figure 37. Sample Exported Frames Text File 64<br />
Figure 38. Example Protocol Tags 65<br />
Figure 39. Summay pane (right) with Decoder pane (left) 66<br />
Figure 40. Frame Display Protocol Layer Color Selector 71<br />
Figure 41. Frame Display Quick Filtering and Hiding Protocols Dialog 72<br />
Figure 42. Bluetooth Timeline Packet Depiction with Packet Information Shown 75<br />
Figure 43. Bluetooth Timeline Packet Discontinuity, cross-hatched area. 88<br />
Figure 44. Missing packets message in timeline pane. 89<br />
Figure 45. Bluetooth low energy Timeline 90<br />
Figure 46. Bluetooth low energy Timeline Throughput Graph 92<br />
Figure 47. Creating Encrypted MIC in Frame Display Summary pane 94<br />
Figure 48. Bluetoothlow energy Timeline 95<br />
Figure 49. Diagram of low energy Timeline Flow with Segment and Row Relationship 96<br />
Figure 50. Device Address Rows 96<br />
Figure 51. Radio Rows 97<br />
Figure 52. low energy Timeline and Frame Display Packet Synchronization 98<br />
Figure 53. Timeline Markers Shown Snapped to End of Packet 98<br />
Figure 54. Bluetooth le Timeline Segment Timestamp and Zoom Value 98<br />
Figure 55. Bluetooth le Timeline Packet Info Line 99<br />
x
Figure 56. Bluetooth le Timeline Packet Info Line for Multiple Selected Packets 99<br />
Figure 57. Bluetooth low energy Packet Discontinuity 100<br />
Figure 58. low energy Timeline Zoom menu 102<br />
Figure 59. Message Sequence Chart Window 105<br />
Figure 60. Classic and LE tabs 106<br />
Figure 61. Frame# and Time Display, inside red box. 107<br />
Figure 62. MSC Synchronization with Frame Display 107<br />
Figure 63. Control and Signaling Frames Summay 108<br />
Figure 64. Packet Layers Shown in Different Colors 108<br />
Figure 65. Right-Click in Ctrl Summary to Display Show in MSC 108<br />
Figure 66. MSC View of Selected Packet from Ctrl Summary 109<br />
Figure 67. Return to Text View Using Right-Click Menu 109<br />
Figure 68. Highlighted First Search Result 110<br />
Figure 69. Message Sequence Chart Print Preview 112<br />
Figure 70. Print Preview Toolbar 112<br />
Figure 71. Classic Bluetooth PER Stats Window 114<br />
Figure 72. Bluetooth low energy PER Stats Window 114<br />
Figure 73. Classic Bluetooth Packet Error Rate Channels 115<br />
Figure 74. Bluetooth low energy Packet Error Rate Channels 115<br />
Figure 75. PER Stats Scroll Bar 119<br />
Figure 76. Data/Audio Extraction Settings dialog 123<br />
Figure 77. Data and Audio Extraction Status 124<br />
Figure 78. Rename To in the bottom section of Data Extraction Status 125<br />
Figure 79. Find Diaglog 127<br />
Figure 80. Find Decode Tab Search for String 128<br />
Figure 81. Find Decode Tab Side Restriction 128<br />
Figure 82. Find Pattern Tab 130<br />
Figure 83. Find Pattern Tab Side Restrictions 131<br />
Figure 84. Find by Time tab 132<br />
Figure 85. Find Go To tab 134<br />
Figure 86. Find Special Events tab 136<br />
xi
Figure 87. Find Signal tab. 137<br />
Figure 88. Find Signal Tab 138<br />
Figure 89. Find Error tab. 141<br />
Figure 90. Find Bookmark tab. 143<br />
Figure 91. Bookmarked Frame (3) in the Frame Display 144<br />
Figure 92. Find Window Bookmark tab Used to Move Around With Bookmarks 146<br />
Figure 93. Example: Set Conditions Self Configuring Based on Protocol Selection 148<br />
Figure 94. Example: Set Conditions Self Configuring Based on Frame Range 148<br />
Figure 95. Two Filter Conditions Added with an AND Operator 150<br />
Figure 96. Save Named Filter Condition Dialog 151<br />
Figure 97. Using Named Filters Section of Quick Filters to Show/Hide Filters 153<br />
Figure 98. Set Condition Dialog in Advanced View 155<br />
Figure 99. Rename Filters Dialog 155<br />
Figure 100. Frame Display Quick Filtering and Hiding Protocols Dialog 156<br />
Figure 101. Windows Save dialog 159<br />
Figure 102. Frame Display Print Dialog 163<br />
Figure 103. Frame Display HTML Export Dialog 164<br />
Figure 104. Save As Dialog 165<br />
Figure 105. Event Display Print Dialog 166<br />
Figure 106. Event Display Export Example: .csv file. 167<br />
Figure 107. Example: .csv Event Display Export, Excel spreadsheet 169<br />
Figure 108. System Settings for defining how to capture data 170<br />
Figure 109. Advanced System Options dialog 173<br />
Figure 110. Start Up Options dialog 174<br />
Figure 111. File Locations dialog 175<br />
Figure 112. File Locations Browse dialog 175<br />
Figure 113. Example: Side Names Where "Slave" and "Master" are current 176<br />
Figure 114. Timestamping Options dialog 177<br />
xii
Chapter 1: <strong>ComProbe</strong> Hardware & Software<br />
<strong>Frontline</strong> <strong>Test</strong> <strong>Equipment</strong> <strong>ComProbe</strong> family of protocol analyzers work with the following technologies.<br />
• Classic Bluetooth<br />
• Bluetooth low energy<br />
• Dual Mode Bluetooth (simultaneous Classic and low energy)<br />
• Bluetooth Coexistence with 802.11<br />
• Bluetooth HCI (USB, SD, High Speed UART)<br />
• NFC<br />
• 802.11 (Wi-Fi)<br />
• SD<br />
• USB<br />
• HSU (High Speed UART)<br />
The <strong>ComProbe</strong> hardware interfaces with your computer that is running our robust software engine called the<br />
<strong>ComProbe</strong> Protocol Analysis System or <strong>ComProbe</strong> software. Whether you are sniffing the air or connecting directly<br />
to the chip <strong>Frontline</strong> analyzers use the same powerful <strong>ComProbe</strong> software to help you test, troubleshoot,<br />
and debug communications faster.<br />
<strong>ComProbe</strong> software is an easy to use and powerful protocol analysis platform. Simply use the appropriate<br />
<strong>ComProbe</strong> hardware or write your own proprietary code to pump communication streams directly into the<br />
<strong>ComProbe</strong> software where they are decoded, decrypted, and analyzed. Within the <strong>ComProbe</strong> software you<br />
see packets, frames, events, coexistence, binary, hex, radix, statistics, errors, and much more.<br />
This manual is a user guide that takes you from connecting and setting up the hardware through all of the<br />
<strong>ComProbe</strong> software functions for your <strong>ComProbe</strong> hardware. Should you have any questions contact the <strong>Frontline</strong><br />
Technical Support Team.<br />
1.1 What is in this manual<br />
The <strong>ComProbe</strong> <strong>User</strong> <strong>Manual</strong> comprises the following seven chapters. The chapters are organized in the<br />
sequence you would normally follow to capture and analyze data: set up, configure, capture, analyze, save. You<br />
can read them from beginning to end to gain a complete understanding of how to use the <strong>ComProbe</strong> hardware<br />
and software or you can skip around if you only need a refresher on a particular topic. Use the Contents, Index,<br />
and Glossary to find the location of particular topics.<br />
• Chapter 1 <strong>ComProbe</strong> Hardware and Software. This chapter will describe the minimum computer<br />
requirements and how to install the software.<br />
• Chapter 2 Getting Started. Here we describe how to set up and connect the hardware, and how to apply<br />
power. This chapter also describes how to start the <strong>ComProbe</strong> software in Data Capture Methods. You<br />
will be introduced to the Control window that is the primary operating dialog in the <strong>ComProbe</strong> software.<br />
1
• Chapter 3 Configuration Settings. The software and hardware is configured to capture data. Configuration<br />
settings may vary for a particular <strong>ComProbe</strong> analyzer depending on the technology and network<br />
being sniffed. There are topics on configuring protocol decoders used to disassemble packets into<br />
frames and events.<br />
• Chapter 4 Capturing and Analyzing Data. This Chapter describes how to start a capture session and<br />
how to observe the captured packets, frames, layers and events.<br />
• Chapter 5 Navigating and Searching the Data. Here you will find how to move through the data and<br />
how to isolate the data to specific events, often used for troubleshooting device design problems.<br />
• Chapter 6 Saving and Importing Data. When a live capture is completed you may want to save the captured<br />
data for future analysis, or you may want to import a captured data set from another developer or<br />
for use in interoperability testing. This chapter will explain how to do this for various data file formats.<br />
• Chapter 7 General Information. This chapter provides advanced system set up and configuration information,<br />
timestamping information, and general reference information such as ASCII, baudot, and EBCDIC<br />
codes. This chapter also provides information on how to contact <strong>Frontline</strong>'s Technical Support team<br />
should you need assistance.<br />
1.2 Minimum System Requirements<br />
• PC with Windows XP 32 bit, (Service Pack 2 or higher), Windows 7 (32 or 64 bit)<br />
• Pentium 2 GHz processor<br />
• RAM Requirements: 2 GB minimum, 4 GB recommended<br />
• 100 MB free Hard Disk Space<br />
• USB 2.0 High Speed enabled port<br />
1.3 Software Installation<br />
1.3.1 From CD:<br />
Insert the <strong>ComProbe</strong> installer disc into your DVD drive. Click on the Install CPAS shortcut and follow the directions.<br />
1.3.2 From Download:<br />
Download the latest CPAS installer from FTE.com. Once downloaded, double-click the installer and follow the<br />
directions.<br />
2
Chapter 2: Getting Started<br />
In this chapter we introduce you to the <strong>ComProbe</strong> hardware and show how to start the <strong>ComProbe</strong> analyzer software<br />
and explain the basic software controls and features for conducting the protocol analysis.<br />
2.1 BPA 500 Hardware<br />
The following sections describe the <strong>ComProbe</strong> BPA 500 hardware connectors and hardware setup. the BPA<br />
500 analyzer is a <strong>Frontline</strong> legacy product no longer manufactured or sold. This section is provided for those<br />
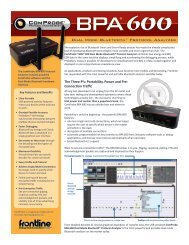
users still using the BPA 500 protocol analysis system. The BPA 600 protocol analyzer is a replacement for the<br />
BPA 500 analyzer.<br />
2.1.1 Attaching Antennas<br />
When you remove the <strong>ComProbe</strong> from the box, the first step is to attach the antennas (Figure 1).<br />
Figure 1. Front Panel<br />
1. Attach antennas to RF under LE and RF under CLASSIC.<br />
Figure 2. <strong>ComProbe</strong> BPA 500 with antennas attached.<br />
2.1.2 Connecting/Powering <strong>ComProbe</strong><br />
Once you have attached the antennas, the next step is to power up and connect the <strong>ComProbe</strong> BPA 500 to the<br />
computer.<br />
3
1. Insert the power cable (DC connector) from the 12 volt AC adapter into the "Power" port on the<br />
<strong>ComProbe</strong> (Figure 3).<br />
Figure 3. Back Panel - Power<br />
2. Plug the 12 volt AC adapter into the AC power source.<br />
AC Adapter Details:<br />
ECOPAC (UK) POWER LTD, Switch Mode Power Supply –<br />
Model: 3A-181WP09<br />
P/N: T3508ST<br />
Input: 100-240V~, 50-60Hz, 0.6A<br />
Output: +9V-2.0A<br />
3. Insert the USB cable into the USB port on the <strong>ComProbe</strong> (Figure 4).<br />
Figure 4. Back Panel - USB<br />
Note: The <strong>ComProbe</strong> WILL NOT function properly when only the USB is plugged in.<br />
The AC power must also be connected.<br />
4. Insert the other end of the USB cable into the PC.<br />
5. Turn on the devices that you are testing.<br />
6. Finally position the BPA 500 between the devices.<br />
4
It may be easier to sync and then capture data if the devices are somewhat separated because<br />
Bluetooth adjusts power levels on devices that are in close proximity, which can affect the ability to<br />
sync and the quality of the trace. Also, don't place the BPA 500 right next to the computer; close<br />
proximity to the computer could cause some interference.<br />
2.1.3 <strong>ComProbe</strong> ® BPA 500 LED<br />
The BPA 500 has seven LEDs on the RF panel. In the center are the Ready and External Clock green LEDs.<br />
When the Ready LED is illuminated the device has booted and is prepared to begin receiving signals for processing.<br />
The External Clock, when illuminated, indicates that the device is actively using the external clock.<br />
2.1.3.1 LE Section<br />
Figure 5. BPA 500 Front Panel LEDs<br />
The LE (low energy) RF section of the panel has three blue LEDs: Sync 1, 2, and 3, one for each Bluetooth LE<br />
radio chip. The behavior of each LED is as follows:<br />
LED Off<br />
Steady Blue<br />
Flash Blue<br />
(The LED will regularly alternate<br />
between blue and off with a<br />
frequency of about 4 times a<br />
second.)<br />
Sniffing low energy advertising traffic, or sniffing has not started.<br />
Capturing data from a low energy data connection. Since the connection<br />
events in a data connection are fairly short, the LED will be on for a short time<br />
and thus appear to flash on briefly and then off again. When sniffing a single<br />
connection the frequency with which the LED flashes represents the duration<br />
of the connection interval.<br />
The sniffer is capturing ID packets. That is, the master device is paging the<br />
slave, but the connection is not yet established. When the connection gets<br />
established it will be followed by a Classic LED and thus the LE LED is off.<br />
2.1.3.2 Classic Section<br />
The Classic RF section of the panel has two tri-colored LEDs: Sync 1 and 2, one for each Classic Bluetooth<br />
radio chip. The behavior of each LED is as follows.<br />
5
LED Off<br />
Steady Yellow<br />
Flash Blue/Yellow<br />
(Regularly alternating between<br />
yellow and blue with a frequency<br />
of about 4 times a second.)<br />
Steady Blue<br />
Flash Pink<br />
(Regularly alternating between a<br />
pale pink and off with a frequency<br />
of about 6 times a second.)<br />
Out of lock when sniffing a Classic connection, or sniffing has not started.<br />
Sniffer is ready to capture the master connecting to the slave<br />
Sniffer is capturing the master paging the slave, but the connection has not<br />
been established yet.<br />
Sniffing Classic connection and locked.<br />
Classic connection has terminated and sniffer is in Alternate mode. The<br />
sniffer will only be able to follow a reconnection for a short period in this state<br />
and will thus resync quickly.<br />
2.1.4 Connecting for ProbeSync<br />
Any <strong>ComProbe</strong> analyzer with ProbeSync can be connected together to run off of a common clock, ensuring<br />
that the timestamps are precisely synchronized between the sniffing hardware.<br />
Simply plug the supplied Cat 5 cable into the OUT connector on the sniffer that will be supplying the clock (the<br />
master) and connect the other end to the IN connector on the sniffer to be sharing the master’s clock (the<br />
slave). If more than two <strong>ComProbe</strong> devices or BPA 500 hardware are used, just connect the OUT connector<br />
from the first slave to the second slave IN connector. If a BPA 500 hardware is being used with another<br />
<strong>ComProbe</strong> device, the BPA 500 hardware must be the master. The combined length of all the ProbeSync cables<br />
connected at a given time should not exceed 1.5 meters (4.5 feet).<br />
2.2 Data Capture Methods<br />
This section describes how to load <strong>Frontline</strong> <strong>Test</strong> <strong>Equipment</strong>, Inc <strong>ComProbe</strong> Protocol Analysis System software,<br />
and how to select the data capture method for your specific application.<br />
2.2.1 Opening <strong>ComProbe</strong> ® Data Capture Method<br />
On product installation, the installer creates a folder on the windows desktop labeled "<strong>Frontline</strong> <strong>ComProbe</strong> Protocol<br />
Analysis System ".<br />
1. Double-click the "<strong>Frontline</strong> <strong>ComProbe</strong> Protocol Analysis System" desktop folder<br />
This opens a standard Windows file folder window.<br />
6
Figure 6. Desktop Folder Link<br />
2. Double-click on <strong>Frontline</strong> <strong>ComProbe</strong> Protocol Analysis System and the system displays the<br />
Select Data Capture Method dialog.<br />
Note: You can also access this dialog by selecting Start > All Programs > <strong>Frontline</strong> <strong>ComProbe</strong><br />
Protocol Analysis System (Version #) > <strong>Frontline</strong> <strong>ComProbe</strong> Protocol Analysis System<br />
This dialog lists all the methods <strong>ComProbe</strong> supports in a tree control. See Protocol List<br />
Three buttons appear at the bottom of the dialog; Run, Cancel, and Help. When the dialog first opens, Cancel<br />
and Help are active, and the Run button is inactive (grayed out).<br />
starts the selected protocol stack.<br />
closes the dialog and exits the user back to the desktop.<br />
takes the user to this help file as does pressing the F1 key.<br />
3. Expand the folder and select the data capture method that matches your configuration.<br />
4. Click on the Run button and the <strong>ComProbe</strong> Control Window will openconfigured to the selected<br />
capture method.<br />
Note: If you don't need to identify a capture method, then click the Run button to start the analyzer.<br />
Creating a Shortcut<br />
A checkbox labeled Create Shortcut When Run is located near the bottom of the dialog. This box is unchecked<br />
by default. Select this checkbox, and the system creates a shortcut for the selected method, and<br />
7
places it in the "<strong>Frontline</strong> <strong>ComProbe</strong> Protocol Analysis System " desktop folder and in the start menu<br />
when you click the Run button. This function allows you the option to create a shortcut icon that can be placed<br />
on the desktop. In the future, simply double-click the shortcut to start the analyzer in the associated protocol.<br />
Supporting Documentation<br />
The <strong>Frontline</strong> <strong>ComProbe</strong> Protocol Analysis System directory contains supporting doucmentation for development<br />
(Automation, DecoderScript, application notes), documentation (Quick Start Guides and <strong>User</strong> <strong>Manual</strong>),<br />
and maintenance tools.<br />
2.2.2 BPA 500 Data Capture Methods<br />
<strong>ComProbe</strong> ® Protocol Analysis System has different data capture methods to accommodate various applications.<br />
• BR/EDR - low energy Air Sniffing<br />
o<br />
o<br />
o<br />
This method requires one BPA 500 <strong>ComProbe</strong> and is used to capture combined BR/EDR and<br />
Bluetooth ® low energy data.<br />
Used for typical applications to capture Classic Bluetooth and Bluetooth low energy data.<br />
Modes include:<br />
o<br />
o<br />
o<br />
o<br />
LE Only - Bluetooth low energy only<br />
Classic Only Single Connection<br />
Dual Mode - Classic Bluetooth and Bluetooth low energy.<br />
Classic Only Multiple Connections<br />
8
• Classic/low energy/802.11 Air Sniffing (optional)<br />
• Two 802.11 and One BPA500<br />
o<br />
o<br />
o<br />
o<br />
This method requires one BPA 500 <strong>ComProbe</strong> and two <strong>ComProbe</strong> 802.11 hardware.<br />
An 802.11 <strong>ComProbe</strong> hardware is included with the Wi-Fi Option.<br />
Used for Bluetooth Classic/low energy/802.11 coexistence analysis.<br />
Captures Bluetooth Classic, low energy, and 802.11 data and displays in the Frame Display and<br />
Coexistence View.<br />
• 802.11/Classic/low energy Coexistence<br />
o<br />
o<br />
This method requires one <strong>ComProbe</strong> BPA500 and one <strong>ComProbe</strong> 802.11 hardware.<br />
Captures Bluetooth Classic, low energy, and 802.11 data and displays in the Frame Display and<br />
Coexistence View.<br />
2.3 Control Window<br />
The analyzer displays information in multiple windows, with each window presenting a different type of information.<br />
The Control window opens when the Run button is clicked in the Capture Method window. The Control<br />
window provides access to each <strong>ComProbe</strong> analyzer functions and settings as well as a brief overview of the<br />
data in the capture file. Each icon on the toolbar represents a different data analysis function. A sample Control<br />
Window is shown below.<br />
Because the Control window can get lost behind other windows, every window has a Home icon that<br />
brings the Control window back to the front. Just click on the Home icon to restore the Control window.<br />
2.3.1 Control Window Toolbar<br />
Toolbar icon displays vary according to operating mode and/or data displayed. Available icons appear in color,<br />
while unavailable icon are not visible. Grayed-out icons are available for the <strong>ComProbe</strong> hardware and software<br />
configuration in use but are not active until certain operating conditions occur. All toolbar icons have corresponding<br />
menu bar items or options.<br />
Open File - Opens a capture file.<br />
9
I/O Settings - Opens settings<br />
Stop Capture - Available after data capture has started. Click to stop data capture. Data can be<br />
reviewed and saved, but no new data can be captured.<br />
Save - Saves the file the capture file.<br />
Clear - Clears or saves the capture file.<br />
Event Display - (framed data only) Opens a Event Display, with the currently selected bytes<br />
highlighted.<br />
Frame Display - (framed data only) Opens a Frame Display, with the frame of the currently<br />
selected bytes highlighted.<br />
Notes - Opens the Notes dialog.<br />
Statistics Window - Opens up the Statistics window.<br />
Cascade - Arranges windows in a cascaded display.<br />
Bluetooth Packet Timeline - Opens the Packet Timeline dialog.<br />
Coexistence View - Opens the Coexistence View dialog.<br />
Low energy - Opens the low energy Timeline dialog.<br />
Extract Data/Audio - Opens the Extract Data/Audio dialog.<br />
MSC Chart - Opens the Message Sequence Chart<br />
Bluetooth low energy Packet Error Rate Statistics - Opens the Packet Error Rate Statistics<br />
window.<br />
Bluetooth Classic Packet Error Rate Statistics - Opens the Packet Error Rate Statistics window.<br />
2.3.2 Configuration Information on the Control Window<br />
The Configuration bar (just below the toolbar) displays the hardware configuration and may include I/O settings.<br />
It also provides such things as name of the network card, address information, ports in use, etc.<br />
10
2.3.3 Status Information on the Control Window<br />
The Status bar located just below the Configuration bar on the Control window provides a quick look at current<br />
activity in the analyzer.<br />
• Capture Status displays Not Active, Paused or Running and refers to the state of data capture. It will also<br />
display whether you are capturing to a series of files or capturing to a single file.<br />
o<br />
o<br />
o<br />
Not Active means that the analyzer is not currently capturing data.<br />
Paused means that data capture has been suspended.<br />
Running means that the analyzer is actively capturing data.<br />
• % Used<br />
The next item shows how much of the buffer or capture file has been filled. For example, if you are capturing<br />
to disk and have specified a 200 Kb capture file, the bar graph tells you how much of the capture file<br />
has been used. When the graph reaches 100%, capture either stops or the file begins to overwrite the oldest<br />
data, depending on the choices you made in the System Settings.<br />
• Utilization/Events<br />
The second half of the status bar gives the current utilization and total number of events seen on the network.<br />
This is the total number of events monitored, not the total number of events captured. The analyzer is<br />
always monitoring the circuit, even when data is not actively being captured. These graphs allow you to<br />
keep an eye on what is happening on the circuit, without requiring you to capture data.<br />
2.3.4 Frame Information on the Control Window<br />
Frame Decoder information is located just below the Status bar on the Control window. It displays two pieces<br />
of information.<br />
• Frame Decoder (233 fps) displays the number of frames per second being decoded. You can toggle this<br />
display on/off with Ctrl-D, but it is available only during a live capture.<br />
• #132911 displays the total frames decoded.<br />
• 100% displays the percentage of buffer space used.<br />
2.3.5 Drop-Down Menus<br />
The menus that you see on the Control Window and dialogs like Frame Display and Event Display vary<br />
depending on whether the data is being captured live or whether you are looking at a .cfa file. You will see<br />
11
File, Edit, View, Filter, Bookmarks, Live, Options, Window, and Help. Most of the options are self explanatory.<br />
• Many of the File/Edit menu items are standard Windows type commands: Open, Close, Save, Recent<br />
Files, etc. There are, however, several of these menu items that have unique functionality:<br />
• Recreate Companion File: This option is available when you are working with decoders. If you<br />
change a decoder while working with data, you can use Recreate Companion File to recreate the ".frm<br />
file", the companion file to the ".cfa file". Recreating the ".frm file" helps ensure that the decoders will<br />
work properly.<br />
• Reload Decoders: When clicked, the plug-ins are reset and received frames are decoded again.<br />
• Under the View menu you can choose which <strong>Frontline</strong> windows are available to open.<br />
• Live contains commands that are used in capturing data.<br />
• Under Options you have opportunities to set/modify various system settings. These include:<br />
o<br />
o<br />
o<br />
o<br />
Hardware Settings<br />
I/O Settings<br />
System Settings<br />
Check for New Releases at Startup: When this is enabled, the application automatically checks for<br />
the latest <strong>Frontline</strong> releases. If a new version is detected, a dialog appears similar to the sample<br />
below . The system and version will vary dependent upon the <strong>ComProbe</strong> ® hardware being used.<br />
• The Window menu displays the open <strong>Frontline</strong> dialogs and standard options like Cascade, Minimize,<br />
Tile, etc.<br />
• Within the Help menu you can open the electronic Help file, About
Chapter 3: Configuration Settings<br />
In this section we show how to configure each of the <strong>Frontline</strong> <strong>ComProbe</strong> analyzer using the <strong>ComProbe</strong> software<br />
for capturing data .<br />
3.1 BPA 500 Configuration<br />
3.1.1 BPA 500 - Update Firmware<br />
When you select the Update Firmware on the BPA 500 Information, the Update <strong>ComProbe</strong> BPA 500 firmware<br />
dialog appears. You use this dialog to update your <strong>ComProbe</strong> hardware with the latest firmware.<br />
It is very important that you update the firmware. If the firmware versions are not the same, you will not be<br />
able to start sniffing.<br />
Figure 7. BPA 500 Update Firmware Dialog<br />
1. Make sure the cabling is attached to the <strong>ComProbe</strong> hardware.<br />
Transport<br />
Transport displays the ID number for the transport device(s) that you have connected. The device(s)<br />
will either be a USB to SPI converter or a SPI to LPT converter.<br />
Classic Firmware File/low energy Firmware File<br />
You do not have to change anything for the Classic Firmware File and low energy Firmware File.<br />
2. Select Flash Device.<br />
The download begins, with the Status bar displaying the progress. When the download is complete,<br />
you can check the firmware version by checking the Status dialog.<br />
BPA 500 - Information<br />
3.1.2 BPA 500 I/O Settings<br />
3.1.2.1 Datasource Toolbar/Menu<br />
The Datasource dialog toolbar and menu options are listed below.<br />
13
Toolbar<br />
Start Sniffing button to begin sniffing. All settings are saved automatically<br />
when you start sniffing.<br />
Pause button to stop sniffing.<br />
When you select the Discover Devices button, the software lists all the discoverable<br />
Bluetooth devices on the Device Database dialog.<br />
Save button to save the configuration if you made changes but did not begin<br />
sniffing. All settings are saved automatically when you start sniffing.<br />
Help button opens the help file.<br />
Menu<br />
File<br />
View<br />
BPA 500<br />
Save and Exit options, self explanatory.<br />
Hides or displays the toolbar.<br />
Start Sniffing, Stop Sniffing, Resync Now, Discover Devices<br />
Help Opens <strong>ComProbe</strong> Help, and About BPA 500.<br />
3.1.2.2 Selecting BPA 500 Devices Under <strong>Test</strong><br />
The Devices Under <strong>Test</strong> dialog has all the setup information the analyzer needs in order to synchronize with<br />
the piconet and capture data. The analyzer requires information on the clock synchronization method and the<br />
device address of the device to initially sync to. You must also choose what to sniff.<br />
14
Figure 8. BPA 500 Datasource Dialog<br />
You can choose to capture data using:<br />
• low energy only<br />
• Classic (BR/EDR) only<br />
• Dual Mode - Combination of Classic and low energy<br />
• Classic Only, Multiple Connections<br />
Select one of these links above for explanations on how to configure each option.<br />
There are a couple of other functions on the dialog that you need to understand.<br />
3.1.2.2.1 Advanced<br />
Click here to see the BPA 500 Advanced Classic Settings.<br />
3.1.2.2.2 Channel Map<br />
The Channel map shows which channels are available for Adaptive Frequency Hopping.<br />
• Channel Map : Click this button to toggle on/off the display of the Channel Map.<br />
15
Figure 9. BPA 500 Classice Channel Map<br />
This display is used to determine which channels are available with<br />
• White<br />
• Red<br />
• Blue<br />
Channel is currently available for use.<br />
When Adaptive Frequency Hopping is in use, red indicates that the channel is marked as<br />
unavailable<br />
Indicates that a packet was captured on the channel.<br />
The Clear button resets each indicator back to the White state. The indicators are also reset whenever a new<br />
Channel Map goes into effect.<br />
3.1.2.2.3 Status Window<br />
A status window at the bottom of the dialog displays information about recent activity.<br />
3.1.2.3 BPA 500 Devices Under <strong>Test</strong><br />
3.1.2.3.1 BPA 500 - Devices Under <strong>Test</strong> - LE Only<br />
There are four ways to sniff Bluetooth wireless technology communications using the <strong>ComProbe</strong> BPA 500 Dual<br />
Mode Bluetooth Protocol Analyzer. You choose the mode you will be using by selecting one of the following<br />
radio buttons on the Devices Under <strong>Test</strong> tab in the BPA 500 datasource dialog:<br />
1. LE Only<br />
2. Classic Only Single Connection<br />
3. Dual Mode<br />
4. Classic Only Multiple Connections<br />
3.1.2.3.1.1 Setup - LE Only<br />
By selecting the "LE Only" radio button under the "Devices Under <strong>Test</strong>" tab you can configure the BPA 500 protocol<br />
analyzer for sniffing Bluetooth low energy communications.<br />
16
Figure 10. BPA 500 Devices Under <strong>Test</strong> - LE Only Tab<br />
The default value in the "LE Device" drop down is "Sync with First Master". To begin sniffing Bluetooth low<br />
energy simply click the red button to start. The analyzer will capture packets from the first Master that makes a<br />
connection . To capture the advertising traffic and the connection(s), you must specify a device address.<br />
Specifying the LE Device Address<br />
1. If you would like you may specify the LE device you are testing by typing in or choosing its<br />
address (BD_ADDR). You can type it directly into the drop down, or choose it from the existing<br />
previous values list in the drop down.<br />
To enter the device manually type the address - 12 digit hex number (6 octets). The "0x" is automatically typed<br />
in the drop down control.<br />
Once you have the devices address identified, the next step is to identify the Encryption.<br />
LE Encryption<br />
Figure 11. BPA 500 LE Encryption<br />
2. Enter the Long Term Key for the Encryption.<br />
The Long Term Key is similar to the Link key in Classic. It is a persistent key that is stored in both devices and<br />
used to derive a fresh encryption key each time the devices go encrypted.<br />
There are a few differences though:<br />
17
In Classic the Link key is derived from inputs from both devices and is calculated in the same way independently<br />
by both devices and then stored persistently. The link key itself is never transmitted over the air during<br />
pairing<br />
In LE, the long term key is generated solely on the slave device and then, during pairing, is distributed to a master<br />
device that wants to establish an encrypted connection to that slave in the future. Thus the long term key is<br />
transmitted over the air, albeit encrypted with a one-time key derived during the pairing process and discarded<br />
afterwards (the so called short term key).<br />
Unlike the link key, this long term key is directional, i.e. it is only used to for connections from the master to the<br />
slave (referring to the roles of the devices during the pairing process). If the devices also want to connect the<br />
other way round in the future, the device in the master role (during the pairing process) also needs to send its<br />
own long term key to the device in the slave role during the pairing process (also encrypted with the short<br />
term key of course), so that the device which was in the slave during the pairing process can be a master in the<br />
future and connect to the device which was master during the pairing process (but then would be in a slave<br />
role).<br />
Since most simple LE devices are only ever slave and never master at all, the second long term key exchange is<br />
optional during the pairing process.<br />
Note: If you use Copy/Paste to insert the Long Term Key , <strong>Frontline</strong> will auto correct (remove<br />
invalid white spaces) to correctly format the key.<br />
3. Enter a PIN or out-of-band (OOB) value for Pairing.<br />
This optional information offers alternative pairing methods.<br />
One of two pieces of data allow alternative pairing:<br />
1. PIN is a six-digit (or less if leading zeros are omitted) decimal number.<br />
2. Out-of-Band (OOB) data is a 16-digit hexadecimal code which the devices exchange via a channel<br />
that is different than the le transmission itself. This channel is called OOB<br />
For off-the-shelf devices we cannot sniff OOB data, but in the lab you may have access to the data<br />
exchanged through this channel.<br />
Click here to see how to capture data after completing the configuration.<br />
3.1.2.3.2 BPA 500 - Devices Under <strong>Test</strong> - Classic Only Single Connection<br />
There are four ways to sniff Bluetooth wireless technology communications using the <strong>ComProbe</strong> BPA 500 Dual<br />
Mode Bluetooth Protocol Analyzer. You choose the mode you will be using by selecting one of the following<br />
radio buttons on the Devices Under <strong>Test</strong> tab in the BPA 500 datasource dialog:<br />
1. LE Only<br />
2. Classic Only Single Connection<br />
3. Dual Mode<br />
4. Classic Only Multiple Connections<br />
18
3.1.2.3.2.1 Setup - Classic Only Single Connection<br />
Figure 12. BPA 500 Devices Under <strong>Test</strong> - Classic Only Single Connection<br />
Specifying the Bluetooth Device Address (BD_ADDR)<br />
The analyzer needs to know the Bluetooth Device Address (BD_<br />
ADDR) for the Slave and the Master. You can specify the<br />
Bluetooth Device Address in multiple ways.<br />
1. Select the Bluetooth Device Address (BD_ADDR) for<br />
Classic Slave: from a list of available devices from the<br />
Device Database. You can also type in the address as a<br />
12 digit hex number (6 octets). The "0x" is automatically<br />
typed in by the control. Any devices entered<br />
this way is added to the Device Database.<br />
2. Select the Bluetooth Device Address (BD_ADDR)<br />
for Classic Master: from a list of available devices<br />
from the Device Database. You can also type in the address as a 12 digit hex number (6 octets).<br />
The "0x" is automatically typed in by the control. Any devices entered this way is added to the<br />
Device Database.<br />
19
Classic Encryption<br />
Once you have the devices address identified, the next step is to identify the Encryption.<br />
Figure 13. BPA 500 Classic Encrytion<br />
Bluetooth devices can have their data encrypted when they communicate. Bluetooth devices on an encrypted<br />
link share a common link key in order to exchange encrypted data. How that link key is created depends upon<br />
the pairing method used.<br />
There are three encryption options in the I/O Settings dialog.<br />
1. PIN Code (ASCII)<br />
2. PIN Code (Hex)<br />
3. Link Key<br />
You are able to switch between these methods in the I/O Settings window. When you select a method, a note<br />
appears at the bottom of the dialog reminding you what you need to do to successfully complete the dialog.<br />
• The first and second options use a PIN Code to generate the Link Key. The devices generate link Keys<br />
during the Pairing Process based on a PIN Code. The Link Key generated from this process is also based<br />
on a random number so the security cannot be compromised. If the analyzer is given the PIN Code it can<br />
determine the Link Key using the same algorithm. Since the analyzer also needs the random number, the<br />
analyzer must catch the entire Pairing Process or else it cannot generate the Link Key and decode the<br />
data.<br />
Example:<br />
If the ASCII character PIN Code is ABC and you choose to enter the ASCII characters, then select PIN Code<br />
(ASCII) from the Encryption drop down list and enter ABC in the field below.<br />
If you choose to enter the Hex equivalent of the ASCII character PIN Code ABC, then select PIN Code (Hex)<br />
from the Encryption drop down list and enter 0x414243 in the field. Where 41 is the Hex equivalent of the letter<br />
A, 42 is the Hex equivalent of the letter B, and 43 is the Hex equivalent of the letter C.<br />
Note: When PIN Code (Hex) is selected from the Encryption drop down list, the 0x prefix is entered automatically.<br />
• Third, if you know the Link Key in advance you may enter it directly. Select Link Key in the Encryption<br />
list and then enter the Link Key in the edit box. If the link key is already in the database, the Link Key<br />
is automatically entered in the edit box after the Master and Slave have been selected. You can also pick<br />
Choose Pair from Device Database to select a Master, Slave and Link Key from the Device Database.<br />
When the devices are in the debug mode Secure Simple Pairing (SSP) is automatically supported with<br />
no configuration. We support SSP when the devices are not in the debug mode if they have the private<br />
key of one of the devices. Contact <strong>Frontline</strong> technical support for further assistance with this process.<br />
20
• Select an Encryption option.<br />
• Enter a value for the encryption.<br />
3.1.2.3.3 BPA 500 - Devices Under <strong>Test</strong> - Dual Mode<br />
There are four ways to sniff Bluetooth wireless technology communications using the <strong>ComProbe</strong> BPA 500 Dual<br />
Mode Bluetooth Protocol Analyzer. You choose the mode you will be using by selecting one of the following<br />
radio buttons on the Devices Under <strong>Test</strong> tab in the BPA 500 datasource dialog:<br />
1. LE Only<br />
2. Classic Only Single Connection<br />
3. Dual Mode<br />
4. Classic Only Multiple Connections<br />
Note: When selecting and using either "Dual Mode" or "Classic Only Multiple Connection" you<br />
must connect both antennas (LE and Classic) to the <strong>ComProbe</strong> BPA 500 hardware.<br />
3.1.2.3.3.1 Setup - Dual Mode<br />
Specifying the Bluetooth Device Address (BD_ADDR)<br />
Figure 14. BPA 500 Devices under <strong>Test</strong> - Dual Mode<br />
The analyzer needs to know the Bluetooth Device Address (BD_ADDR) for the Slave and the Master. You can<br />
specify the Bluetooth Device Address in multiple ways.<br />
21
1. Select the Bluetooth Device Address (BD_ADDR)<br />
for Classic Slave: from a list of available devices<br />
from the Device Database. You can also type in the<br />
address as a 12 digit hex number (6 octets). The "0x"<br />
is automatically typed in by the control. Any<br />
devices entered this way is added to the Device<br />
Database.<br />
2. Select<br />
the<br />
B-<br />
luetooth Device Address (BD_ADDR) for Classic Master: from a list of available devices from<br />
the Device Database. You can also type in the address as a 12 digit hex number (6 octets). The<br />
"0x" is automatically typed in by the control. Any devices entered this way is added to the<br />
Device Database.<br />
3. Specify the BD_ADDR for the LE Device by selecting "Sync<br />
with Classic Devices Only". By doing this, the low energy<br />
device will follow connections from or to the specified<br />
device, or from or to the first Classic device that connects<br />
over LE.<br />
Classic Encryption<br />
Figure 15. BPA 500 Classic Encryption<br />
Bluetooth devices can have their data encrypted when they communicate. Bluetooth devices on an encrypted<br />
link share a common link key in order to exchange encrypted data. How that link key is created depends upon<br />
the pairing method used.<br />
There are three encryption options in the I/O Settings dialog.<br />
a. PIN Code (ASCII)<br />
b. PIN Code (Hex)<br />
c. Link Key<br />
22
• The firs tand second options use a PIN Code to generate the Link Key. The devices generate link Keys during<br />
the pairing process based on a PIN Code. The second Link Key generated from this process is also based on<br />
a random number so the security cannot be compromised. If the analyzer is given the PIN Code it can<br />
determine the Link Key using the same algorithm. Since the analyzer also needs the random number, the<br />
analyzer must catch the entire Pairing Process or else it cannot generate the Link Key and decode the data.<br />
Example:<br />
If the ASCII character PIN Code is ABC and you choose to enter the ASCII characters, then select PIN Code<br />
(ASCII) from the Encryption drop down list and enter ABC in the field below.<br />
If you choose to enter the Hex equivalent of the ASCII character PIN Code ABC, then select PIN Code (Hex)<br />
from the Encryption drop down list and enter 0x414243 in the field. Where 41 is the Hex equivalent of the<br />
letter A, 42 is the Hex equivalent of the letter B, and 43 is the Hex equivalent of the letter C.<br />
Note: When PIN Code (Hex) is selected from the Encryption drop down list, the 0x prefix is<br />
entered automatically.<br />
• Third, if you know the Link Key in advance you may enter it directly. Select Link Key in the Encryption<br />
list and then enter the Link Key in the edit box. If the link key is already in the database, the Link<br />
Key is automatically entered in the edit box after the Master and Slave have been selected. You can also<br />
pick Choose Pair from Device Database to select a Master, Slave and Link Key from the Device Database.<br />
LE Encryption<br />
1. Select an Encryption option.<br />
2. Enter a value for the encryption.<br />
BPA 500 LE Encryption<br />
1. Enter the Long Term Key for the LE Encryption.<br />
The Long Term Key is similar to the Link key in Classic. It is a persistent key that is stored in both<br />
devices and used to derive a fresh encryption key each time the devices go encrypted.<br />
There are a few differences though:<br />
In Classic the Link key is derived from inputs from both devices and is calculated in the same way<br />
independently by both devices and then stored persistently. The link key itself is never transmitted<br />
over the air during pairing.<br />
In LE, the long term key is generated solely on the slave device and then, during pairing, is distributed<br />
to a master device that wants to establish an encrypted connection to that slave in the<br />
future. Thus the long term key is transmitted over the air, albeit encrypted with a one-time key<br />
derived during the pairing process and discarded afterwards (the so called short term key).<br />
23
Unlike the link key, this long term key is directional, i.e. it is only used to for connections from the<br />
master to the slave (referring to the roles of the devices during the pairing process). If the devices<br />
also want to connect the other way round in the future, the device in the master role (during the<br />
pairing process) also needs to send its own long term key to the device in the slave role during the<br />
pairing process (also encrypted with the short term key of course), so that the device which was in<br />
the slave during the pairing process can be a master in the future and connect to the device which<br />
was master during the pairing process (but then would be in a slave role).<br />
Since most simple LE devices are only ever slave and never master at all, the second long term key<br />
exchange is optional during the pairing process.<br />
Note: If you use Copy/Paste to insert the Long Term Key , <strong>Frontline</strong> will auto correct<br />
(remove invalid white spaces) to correctly format the key.<br />
2. Enter a PIN or out-of-band (OOB) value for Pairing.<br />
This optional information offers alternative pairing methods.<br />
One of two pieces of data allow alternative pairing:<br />
1. PIN is a six-digit (or less if leading zeros are omitted) decimal number.<br />
2. Out-of-Band (OOB) data is a 16-digit hexadecimal code which the devices exchange via a channel<br />
that is different than the le transmission itself. This channel is called OOB.<br />
For off-the-shelf devices we cannot sniff OOB data, but in the lab you may have access to the<br />
data exchanged through this channel.<br />
3.1.2.3.4 BPA 500 - Devices Under <strong>Test</strong> - Classic Only Multiple Connection<br />
There are four ways to sniff Bluetooth wireless technology communications using the <strong>ComProbe</strong> BPA 500 Dual<br />
Mode Bluetooth Protocol Analyzer. You choose the mode you will be using by selecting one of the following<br />
radio buttons on the Devices Under <strong>Test</strong> tab in the BPA 500 datasource dialog:<br />
1. LE Only<br />
2. Classic Only Single Connection<br />
3. Dual Mode<br />
4. Classic Only Multiple Connections<br />
Note: When selecting and using either "Dual Mode" or "Classic Only Multiple Connection" you<br />
must connect both antennas (LE and Classic) to the <strong>ComProbe</strong> BPA 500 hardware.<br />
24
3.1.2.3.4.1 Setup - Classic Only Multiple Connections<br />
Figure 16. BPA 500 Devices Under <strong>Test</strong> - Classic Only Multiple Connections<br />
Specifying the Bluetooth Device Address (BD_ADDR)<br />
The analyzer needs to know the Bluetooth Device Address (BD_ADDR) for the Slave and the Master. You can<br />
specify the Bluetooth Device Address in multiple ways.<br />
1. Select the Bluetooth Device Address (BD_ADDR) for<br />
Classic Slave: from a list of available devices from the<br />
Device Database. You can also type in the address as a<br />
12 digit hex number (6 octets). The "0x" is automatically<br />
typed in by the control. Any devices entered<br />
this way is added to the Device Database.<br />
2. Select<br />
the<br />
25
Bluetooth Device Address (BD_ADDR) for Classic Master: from a list of available devices from<br />
the Device Database. You can also type in the address as a 12 digit hex number (6 octets). The<br />
"0x" is automatically typed in by the control. Any devices entered this way is added to the<br />
Device Database.<br />
Classic Encryption<br />
Figure 17. BPA 500 Classic Encryption<br />
Bluetooth devices can have their data encrypted when they communicate. Bluetooth devices on an encrypted<br />
link share a common link key in order to exchange encrypted data. How that link key is created depends upon<br />
the pairing method used.<br />
There are three encryption options in the I/O Settings dialog.<br />
• PIN Code (ASCII)<br />
• PIN Code (Hex)<br />
• Link Key<br />
You are able to switch between these methods in the I/O Settings window. When you select a method, a note<br />
appears at the bottom of the dialog reminding you what you need to do to successfully complete the dialog.<br />
• The first and second options use a PIN Code to generate the Link Key. The devices generate link Keys<br />
during the Pairing Process based on a PIN Code. The Link Key generated from this process is also based<br />
on a random number so the security cannot be compromised. If the analyzer is given the PIN Code it can<br />
determine the Link Key using the same algorithm. Since the analyzer also needs the random number, the<br />
analyzer must catch the entire Pairing Process or else it cannot generate the Link Key and decode the<br />
data.<br />
Example:<br />
If the ASCII character PIN Code is ABC and you choose to enter the ASCII characters, then select PIN Code<br />
(ASCII) from the Encryption drop down list and enter ABC in the field below.<br />
If you choose to enter the Hex equivalent of the ASCII character PIN Code ABC, then select PIN Code (Hex) from<br />
the Encryption drop down list and enter 0x414243 in the field. Where 41 is the Hex equivalent of the letter A,<br />
42 is the Hex equivalent of the letter B, and 43 is the Hex equivalent of the letter C.<br />
Note: When PIN Code (Hex) is selected from the Encryption drop down list, the 0x prefix is entered automatically.<br />
• Third, if you know the Link Key in advance you may enter it directly. Select Link Key in the Encryption<br />
list and then enter the Link Key in the edit box. If the link key is already in the database, the Link<br />
Key is automatically entered in the edit box after the Master and Slave have been selected. You can also<br />
pick Choose Pair from Device Database to select a Master, Slave and Link Key from the Device<br />
26
Database.<br />
When the devices are in the debug mode Secure Simple Pairing (SSP) is automatically supported with<br />
no configuration. We support SSP when the devices are not in the debug mode if they have the private<br />
key of one of the devices. Contact <strong>Frontline</strong> technical support for further assistance with this process.<br />
1. Select an Encryption option.<br />
2. Enter a value for the encryption.<br />
3.1.2.3.5 Programmatically Update Link Key from 3rd Party Software<br />
Now the BPA 500 & protocol analyzer user can update the link keys for either of the classic links using a very<br />
common Windows message WM_COPYDATA. The mechanism is to send a WM_COPYDATA message to the BPA<br />
500 & datasource.<br />
The best scenario for doing this is when the devices are doing SSP and they are NOT in debug mode. The following<br />
is a snippet of code that gives an example of programmatically sending link key to the <strong>ComProbe</strong> Protocol<br />
Analysis System software. In order to do this the user needs to know both addresses of the devices in the<br />
link for which they wish to update the link key. Also, the DataSource expects the master and slave addresses in<br />
LSB to MSB format.<br />
If the link key is sent to CPAS after encryption has been turned on over the air, CPAS will flag an error on the<br />
Start Encryption packet. Depending on when the link key has been sent down, CPAS may however still be able<br />
to sniff the link successfully. In order to guarantee that CPAS is able to sniff the link the link key should be sent<br />
to CPAS as soon as it is available and before encryption has been turned on over the air.<br />
#define HCI_LINK_KEY 1000<br />
HWND nHandle = ::FindWindow(NULL,"BPA 500 datasource");<br />
if(nHandle != 0)<br />
{<br />
COPYDATASTRUCT ds;<br />
enum<br />
{<br />
EncryptionKeySize = 16,<br />
sizeAddressDevice = 6<br />
};<br />
BYTE abytAddressDevice1[sizeAddressDevice] = { 0x12, 0x34, 0x56, 0x78, 0x9a, 0xbc };<br />
//LSB->MSB<br />
BYTE abytAddressDevice2[sizeAddressDevice] = { 0x21, 0x43, 0x65, 0x87, 0xa9, 0xcb };<br />
BYTE abytLinkKey[EncryptionKeySize] = { 0xff, 0xff, 0xff, 0xff, 0xff, 0xff, 0xff, 0xff, 0xff, 0xff,<br />
0xff, 0xff, 0xff, 0xff, 0xff, 0xff };<br />
ds.cbData = sizeAddressDevice + sizeAddressDevice + EncryptionKeySize;<br />
ds.dwData = HCI_LINK_KEY;<br />
BYTE bytData[sizeAddressDevice + sizeAddressDevice + EncryptionKeySize];<br />
memcpy(&bytData,&abytAddressDevice1,sizeAddressDevice);<br />
memcpy(&bytData[sizeAddressDevice],&abytAddressDevice2,sizeAddressDevice);<br />
27
memcpy(&bytData<br />
[sizeAddressDevice+sizeAddressDevice],&abytLinkKey,EncryptionKeySize);<br />
ds.lpData = &bytData;<br />
::SendMessage(nHandle, WM_COPYDATA, (WPARAM)GetSafeHwnd(), (LPARAM)&ds);<br />
}<br />
3.1.2.4 BPA 500 Device Database<br />
The Device Database contains information about the devices that have been discovered or entered by the user<br />
when using BPA 500 protocol analyzer.<br />
Figure 18. BPA 500 Datasource Device Database Tab<br />
The Device Database is automatically updated when you perform certain operation like initiating a Refresh<br />
Device List or entering encryption information from the Devices Under <strong>Test</strong> dialog.<br />
• When you select the Discover button, BPA 500 software lists all the discoverable Bluetooth devices.<br />
• When you select a device from the list, then click Select, the information is transferred to the Devices<br />
Under <strong>Test</strong> dialog.<br />
• You can delete records one at a time by selecting the record, then selecting Delete.<br />
• You can also delete all the records by selecting Delete All.<br />
• Select Close to close the dialog.<br />
• The Help button brings up more Help information.<br />
• A message box at the bottom of the dialog displays the BPA 500 devices that are connected.<br />
28
3.1.2.5 BPA 500 Information<br />
The BPA 500 Information dialog is one of the three tabs that appear when you first start BPA 500 protocol analyzer<br />
software.<br />
Figure 19. BPA 500 Datasource Information Tab<br />
Note: You can also access these three by selecting I/O Settings or Hardware Settings from the Options menu<br />
on the Control Window toolbar.<br />
There are several pieces of information on this display:<br />
• The current firmware is displayed under Firmware Version.<br />
• If you want to make sure the most up-to-date list of devices is shown, select Refresh Device list.<br />
• If you want to load the latest firmware, you select the Update Firmware button.<br />
• A message box at the bottom of the dialog displays the BPA 500 devices that are connected.<br />
3.1.2.6 BPA 500 Advanced Classic Settings<br />
The Advanced Classic Settings dialog contains additional options for synchronizing the analyzer with the link to<br />
capture data.<br />
29
Figure 20. BPA 500 Datasource Devices Under <strong>Test</strong> Advance Classic Settings Dialog<br />
1. Automatically initiate Clock Synchronization Options<br />
• If you would like to have the analyzer re-synchronize when a Link Manager Detach (LMP_<br />
Detach) packet is received after a specific period of time or when the <strong>ComProbe</strong>® analyzer has<br />
not been locked to the Master Clock, you must select the option here and set the time period.<br />
This option is not automatically available if either Classic Only Single Connection, Dual Mode,<br />
or Classic Only Multiple Connections was selected in the Devices Under <strong>Test</strong> tab. To activate<br />
this option you must have checked Alternate Clock Synchronization in the Devices Under<br />
<strong>Test</strong> tab. If the box was not checked the seconds ago box is grayed out. For low energy devices<br />
this option is automatically selected.<br />
2. <strong>ComProbe</strong><br />
Some packet types can be so numerous that they may make it more difficult to locate data packets<br />
in the Frame Display window. You have several options to exclude certain types of packets.<br />
• Filter out ID packets - When this is checked, all ID packets are filtered out.<br />
• Filter out Nulls and Polls - When this is checked, Nulls and Polls packets are filtered out.<br />
• Filter out SCO/eSCO - When this is checked, SCO/eSCO packets are filtered out.<br />
• Prioritized Decryption can be selected if you are having trouble establishing the correct<br />
decryption. This option adjusts the data capture to give priority to establishing the proper<br />
decryption over receiving frames. If you select this option, some frames may be dropped, but<br />
establishing the decryption key will be more efficient.<br />
• Sniffer Diagnostics - When this is checked, some diagnostic data from the <strong>ComProbe</strong> are captured<br />
and stored in the .cfa file. This is useful when a .cfa file is sent to <strong>Frontline</strong> for analysis<br />
and diagnosis. Technical Support may ask you to check this option when you are experiencing<br />
issues with BPA 500.<br />
30
• Single Link Filtering - When this is checked, only packets from the specific Master and Slave<br />
selected in Devices Under <strong>Test</strong> are displayed. Data from other devices that may be connected<br />
to the Master will be filtered out.<br />
3. Frame Slicing Settings<br />
• Frame Slicing Settings allows you to enter the size of the largest frame allowed to pass the<br />
analyzer without having any bytes removed. The second field tells the analyzer the number of<br />
bytes you would like to capture if the frame is larger than the allowable value indicated in the<br />
first field.<br />
4. Channel Map<br />
• Clear on Resync -used to clear the map each time a re-synchronization occurs<br />
• Send with Data - allows you to send a map each time data is sent instead of just sending a<br />
map when changes occur.<br />
31
Chapter 4: Capturing and Analyzing Data<br />
The following sections describe the various <strong>ComProbe</strong> software functions that capture and display data packets.<br />
4.1 Capture Data<br />
4.1.1 Capturing Data to Disk<br />
Note: Capture is not available in Viewer mode.<br />
1. Click the Start Capture icon to begin capturing to a file. This icon is located on the Control,<br />
Event Display, and Frame Display windows.<br />
Files are placed in My Capture Files by default and have a .cfa extension. Choose Directories from<br />
the Options menu on the Control window to change the default file location.<br />
Note: For the Dashboard, when you capture to series of files, the window displays the data from the<br />
beginning of the first capture, even when a new file in the series is created. This is because the Dashboard<br />
is a "Session Monitor", which means that even if you capture to a series of files, the data from<br />
the first file is always displayed. The display does not refresh when a new capture file in a series is<br />
created.<br />
2. Watch the status bar on the Control window to monitor how full the file is. When the file is full,<br />
it begins to wrap, which means the oldest data will be overwritten by new data.<br />
3. Click the Stop icon to temporarily stop data capture. Click the Start Capture icon again to<br />
resume capture. Stopping capture means no data will be added to the capture file until capture is<br />
resumed, but the previously captured date remains in the file.<br />
4. To clear captured data, click the Clear icon .<br />
• If you select Clear after selecting Stop, a dialog appears asking whether you want to save the<br />
data.<br />
o You can click Save File and enter a file name when prompted .<br />
o<br />
o<br />
If you choose Do Not Save, all data will be cleared.<br />
If you choose Cancel, the dialog closes with no changes.<br />
• If you select the Clear icon while a capture is occurring:<br />
o<br />
o<br />
The capture stops.<br />
A dialog appears asking if you want to save the capture<br />
32
o<br />
o<br />
You can select Yes and save the capture or select No and close the dialog. In either case,<br />
the existing capture file is cleared and a new capture file is started.<br />
If you choose Cancel, the dialog closes with no changes.<br />
To see how to capture to a single file, choose System Settings from the Options menu on the Control window.<br />
When live capture stops, no new packets are sniffed but there can still be packets that were previously sniffed<br />
but not yet read by the <strong>ComProbe</strong> analyzer. This happens when packets are being sniffed faster than the<br />
<strong>ComProbe</strong> analyzer can process them. These packets are stored either on the <strong>ComProbe</strong> hardware itself or in a<br />
file on the PC. If there are remaining packets to be processed when live capture stops the Transferring Packets<br />
dialog below is displayed showing the packets yet to be read by the <strong>ComProbe</strong> analyzer. The dialog shows<br />
the name of each <strong>ComProbe</strong> hardware device, its process id in square brackets, and the number of packets<br />
remaining. These stored packets are read until they’re exhausted or the user clicks the Discard button on the<br />
dialog.<br />
Unlike 802.11, Bluetooth packets never come in faster than the datasource can process them. However,<br />
Bluetooth packets must still be stored so that they can be read in chronological order with the 802.11 packets.<br />
Figure 21. Packet Transfer Dialog<br />
4.1.2 Capturing Data with BPA 500 Devices<br />
Once you have completed the Devices Under <strong>Test</strong> selection, you are ready to capture data.<br />
Note: Data Capture is not available in Viewer mode.<br />
33
Figure 22. BPA 500 Datasource Dialog<br />
1. Select the start sniffing button on the toolbar or,Start Sniffing on the BPA 500 menu.<br />
2. The pairing process between the devices begins.<br />
As data is being captured, the Status message at the top of the window indicates the synchronization status of<br />
the <strong>ComProbe</strong> analyzer. Also, the color of the <strong>ComProbe</strong> icon changes depending on the synchronization state.<br />
There are four states:<br />
Red = Halted/Pending<br />
Green = Waiting for the master to connect to the slave<br />
Blue = Synchronized with the master clock — link active<br />
Grey = Synchronized with the master clock — link inactive<br />
Yellow = Waiting for the master to resume transmission<br />
34
When you are capturing data, there are several important concepts to consider.<br />
• Files are placed in My Capture Files by default and have a .cfa extension. Choose Directories from the<br />
Options menu on the Control window to change the default file location.<br />
• Watch the status bar on the Control window to monitor how full the file is. When the file is full, it<br />
begins to wrap, which means the oldest data will be overwritten by new data.<br />
• Click the Stop icon to temporarily stop data capture. Click the Start Capture icon again to resume<br />
capture. Stopping capture means no data will be added to the capture file until capture is resumed, but<br />
the previously captured date remains in the file.<br />
• To clear captured data, click the Clear icon .<br />
o<br />
If you select Clear after selecting Stop, a dialog appears asking whether you want to save the data.<br />
• You can click Save File and enter a file name when prompted .<br />
• If you choose Do Not Save, all data will be cleared.<br />
• If you choose Cancel, the dialog closes with no changes.<br />
o<br />
If you select the Clear icon while a capture is occurring:<br />
• The capture stops.<br />
• A dialog appears asking if you want to save the capture<br />
• You can select Yes and save the capture or select No and close the dialog. In either case, the<br />
existing capture file is cleared and a new capture file is started.<br />
• If you choose Cancel, the dialog closes with no changes.<br />
• The link key/pin code can be changed while sniffing and the changes will be automatically saved in the<br />
configuration file.<br />
o<br />
o<br />
o<br />
o<br />
o<br />
While the device is sniffing click in the Classic Encryption link key/pin code field. This action<br />
places the focus on that window.<br />
Change the link key/pin code.<br />
The Status window at the bottom of the page will inform the user to move focus away from the link<br />
key/pin code window.<br />
Click the mouse outside the link key/pin code field or press the Tab key. This action will remove the<br />
focus from the link key/pin code window.<br />
The link key/pin code changes are<br />
automatically saved to the configuration<br />
file.<br />
35
4.1.3 Extended Inquiry Response<br />
Extended Inquiry Response (EIR) is a tab that appears automatically on the Frame Display window when you<br />
capture data.<br />
Figure 23. Frame Display Extended Inquire Response<br />
EIR displays extensive information about the Bluetooth devices that are discovered as data is being captured.<br />
Before the EIR tab was created, this type of information was not available until a connection was made to a<br />
device. Therefore, EIR can be used to determine whether a connection can/should be made to a device prior<br />
to making the connection.<br />
Note: If a Bluetooth device does not support Extended Inquiry Response, the tab displays<br />
Received Signal Strength Indication (RSSI) data, which is less extensive than EIR data.<br />
4.2 Protocol Stacks<br />
36
4.2.1 Protocol Stack Wizard<br />
The Protocol Stack wizard is where you define the<br />
protocol stack you want the analyzer to use when<br />
decoding frames.<br />
To start the wizard:<br />
1. Choose Protocol Stack from the<br />
Options menu on the Control window or<br />
click the Protocol Stack icon<br />
the Frame Display.<br />
on<br />
2. Select a protocol stack from the list, and<br />
click Finish.<br />
Most stacks are pre-defined here. If you have special<br />
requirements and need to set up a custom stack, see<br />
Creating and Removing a Custom Stack on page 38.<br />
1. If you select a custom stack (i.e. one that was defined by a user and not included with the analyzer),<br />
the Remove Selected Item From List button becomes active.<br />
2. Click the Remove Selected Item From Listbutton to remove the stack from the list. You cannot<br />
remove stacks provided with the analyzer. If you remove a custom stack, you need to define it<br />
again in order to get it back.<br />
If you are changing the protocol stack for a capture file, you may need to reframe. See Reframing on page 39<br />
for more information.<br />
You cannot select a stack or change an existing one for a capture file loaded into the Capture File Viewer (the<br />
Capture File Viewer is used only for viewing capture files and cannot capture data). Protocol Stack changes can<br />
only be made from a live session.<br />
If you are using Modbus TCP over Ethernet, you need to set up a node database giving the IP addresses for the<br />
Master and Slave devices. for more information.<br />
37
4.2.2 Creating and Removing a Custom Stack<br />
To create a custom stack:<br />
1. Choose Protocol Stack from<br />
the Options menu on the Control<br />
window or click the Protocol<br />
Stack icon on the<br />
Frame Display toolbar.<br />
2. Select Build Your Own from<br />
the list and click Next.<br />
3. The system displays an information<br />
screen that may help you<br />
decide if you need to define<br />
your own custom stack. Defining<br />
a custom stack means that<br />
the analyzer uses the stack for<br />
every frame. Frames that do<br />
not conform to the stack are<br />
decoded incorrectly. Click<br />
Next to continue.<br />
Select Protocols<br />
1. Select a protocol from the list<br />
on the left.<br />
2. Click the right arrow button to<br />
move it to the Protocol<br />
Decode Stack box on the<br />
right, or double-click the protocol<br />
to move it to the right.<br />
3. To remove a protocol from the<br />
stack, double-click it or select<br />
it and click the left arrow button.<br />
4. If you need to change the<br />
order of the protocols in the<br />
stack, select the protocol you want to move, and click on the Move Up and Move Down buttons<br />
until the protocol is in the correct position.<br />
5. The lowest layer protocol is at the top of the list, with higher layer protocols listed underneath.<br />
Auto-traversal (Have the analyzer Determine Higher Layers)<br />
If you need to define just a few layers of the protocol stack, and the remaining layers can be determined based<br />
on the lower layers:<br />
38
1. Click the All additional stack layers can be determined automatically button.<br />
2. If your protocol stack is complete and there are no additional layers, click the There are no additional<br />
stack layers button.<br />
3. If you select this option, the analyzer uses the stack you defined for every frame. Frames that do<br />
use this stack are decoded incorrectly.<br />
Save the Stack<br />
1. Click the Add To Predefined List button.<br />
2. Give the stack a name, and click Add.<br />
In the future, the stack appears in the Protocol Stack List on the first screen of the Protocol Stack wizard.<br />
Remove a Stack<br />
1. Select it in the first screen and click Remove Selected Item From List.<br />
2. If you remove the stack, you must to recreate it if you need to use it again.<br />
Note: If you do not save your custom stack, it does appear in the predefined list, but applies to<br />
the frames in the current session. However, it is discarded at the end of the session.<br />
4.2.3 Reframing<br />
If you need to change the protocol stack used to interpret a capture file and the framing is different in the new<br />
stack, you need to reframe in order for the protocol decode to be correct. You can also use Reframe to frame<br />
unframed data. The original capture file is not altered during this process.<br />
Note: You cannot reframe from the Capture File Viewer (accessed by selecting Capture File<br />
Viewer or Load Capture File to start the software and used only for viewing capture files).<br />
To reframe your data, load your capture file, select a protocol stack, and then select Reframe from the File<br />
menu on the Control window. Reframe is only available if the frame recognizer used to capture the data is different<br />
from the current frame recognizer.<br />
In addition to choosing to Reframe, you can also be prompted to Reframe by the Protocol Stack Wizard.<br />
1. Load your capture file by choosing Open from the File menu on the Control window, and select<br />
the file to load.<br />
2. Select the protocol stack by choosing Protocol Stack from the Options menu on the Control window,<br />
select the desired stack and click Finish.<br />
3. If you selected a protocol stack that includes a frame recognizer different from the one used to capture<br />
your data, the Protocol Stack Wizard asks you if you want to reframe your data. Choose<br />
Yes.<br />
4. The analyzer adds frame markers to your data, puts the framed data into a new file, and opens the<br />
new file. The original capture file is not altered.<br />
See Unframing on page 40 for instructions on removing framing from data.<br />
39
4.2.4 Unframing<br />
This function removes start-of-frame and end-of-frame markers from your data. The original capture file is not<br />
altered during this process. You cannot unframe from the Capture File Viewer (accessed by selecting Capture<br />
File Viewer or Load Capture File to start the software and used only for viewing capture files).<br />
To manually unframe your data:<br />
1. Select Unframe from the File menu on the Control window. Unframe is only available if a protocol<br />
stack was used to capture the data and there is currently no protocol stack selected.<br />
In addition to choosing to Unframe, you can also be prompted to Unframe by the Protocol Stack Wizard.<br />
1. Load your capture file by choosing Open from the File menu on the Control window.<br />
2. Select the file to load.<br />
3. Choose Protocol Stack from the Options menu on the Control window<br />
4. Select None from the list<br />
5. Click Finish. The Protocol Stack Wizard asks you if you want to unframe your data and put it into a<br />
new file.<br />
6. Choose Yes.<br />
The system removes the frame markers from your data, puts the unframed data into a new file, and opens the<br />
new file. The original capture file is not altered.<br />
See Reframing on page 39 for instructions on framing unframed data.<br />
4.2.5 How the Analyzer Auto-traverses the Protocol Stack<br />
In the course of doing service discovery, devices ask for and receive a Protocol Descriptor List defining which<br />
protocol stacks the device supports. It also includes information on which PSM to use in L2CAP, or the channel<br />
number for RFCOMM, or the port number for TCP or UDP. The description below talks about how the analyzer<br />
auto-traverses from L2CAP using a dynamically assigned PSM, but the principle is the same for RFCOMM channel<br />
numbers and TCP/UDP port numbers.<br />
The analyzer looks for SDP Service Attribute Responses or Service Search Attribute Responses carrying protocol<br />
descriptor lists. If the analyzer sees L2CAP listed with a PSM, it stores the PSM and the UUID for the next protocol<br />
in the list.<br />
After the SDP session is over, the analyzer looks at the PSM in the L2CAP Connect frames that follow. If the PSM<br />
matches one the analyzer has stored, the analyzer stores the source channel ID and destination channel ID, and<br />
associates those channel IDs with the PSM and UUID for the next protocol. Thereafter, when the analyzer sees<br />
L2CAP frames using those channel IDs, it can look them up in its table and know what the next protocol is.<br />
In order for the analyzer to be able to auto-traverse using a dynamically assigned PSM, it has to have seen the<br />
SDP session giving the Protocol Descriptor Lists, and the subsequent L2CAP connection using the PSM and identifying<br />
the source and channel IDs. If the analyzer misses any of this process, it is not able to auto-traverse. It stops<br />
decoding at the L2CAP layer.<br />
40
For L2CAP frames carrying a known PSM (0x0001 for SDP, for example, or 0x0003 for RFCOMM), the analyzer<br />
looks for Connect frames and stores the PSM along with the associated source and destination channel IDs. In<br />
this case the analyzer does not need to see the SDP process, but does need to see the L2CAP connection process,<br />
giving the source and destination channel IDs.<br />
4.2.6 Providing Context For Decoding When Frame Information Is<br />
Missing<br />
There may be times when you need to provide information to the analyzer because the context for decoding a<br />
frame is missing. For example, if the analyzer captured a response frame, but did not capture the command<br />
frame indicating the command.<br />
The analyzer provides a way for you to supply the context for any frame, provided the decoder supports it. (The<br />
decoder writer has to include support for this feature in the decoder, so not all decoders support it. Note that<br />
not all decoders require this feature.)<br />
If the decoder supports user-provided context, three items are active on the Options menu of the Control window<br />
and the Frame Display window. These items are Set Initial Decoder Parameters, Automatically<br />
Request Missing Decoding Information, and Set Subsequent Decoder Parameters. (These items are not<br />
present if no decoder is loaded that supports this feature.)<br />
Set Initial Decoder Parameters is used to provide required information to decoders that is not context<br />
dependent but instead tends to be system options for the protocol.<br />
Choose Set Initial Decoder Parameters in order to provide initial context to the analyzer for a decoder. A dialog<br />
appears that shows the data for which you can provide information.<br />
If you need to change this information for a particular frame :<br />
1. Right-click on the frame in the Frame Display window<br />
2. Choose Provide .<br />
Alternatively, you can choose Set Subsequent Decoder Parameter from the Options menu.<br />
3. This option brings up a dialog showing all the places where context data was overridden.<br />
4. If you know that information is missing, you can't provide it, and you don't want to see dialogs<br />
asking for it, un-check Automatically Request Missing Decoding Information.<br />
5. When unchecked, the analyzer doesn't bother you with dialogs asking for frame information that<br />
you don't have. In this situation, the analyzer decodes each frame until it cannot go further and<br />
then simply stop decoding.<br />
4.3 Analyzing Byte Level Data<br />
4.3.1 Event Display<br />
To open this window click the Event Display icon<br />
on the Control window toolbar.<br />
The Event Display window provides detailed information about every captured event. Events include data<br />
bytes, data related information such as start-of-frame and end-of-frame flags, and the analyzer information,<br />
41
such as when the data capture was paused. Data bytes are displayed in hex on the left side of the window, with<br />
the corresponding ASCII character on the right.<br />
Figure 24. Event Display<br />
Click on an event to find out more about it. The three status lines at the bottom of the window are updated with<br />
information such as the time the event occurred (for data bytes, the time the byte was captured), the value of<br />
the byte in hex, decimal, octal, and binary, any errors associated with the byte, and more.<br />
Events with errors are shown in red to make them easy to spot.<br />
When capturing data live, the analyzer continually updates the Event Display as data is captured. Make sure the<br />
Lock icon is displayed on the toolbar to prevent the display from updating (Clicking on the icon again will<br />
unlock the display). While locked, you can review your data, run searches, determine delta time intervals<br />
between bytes, and check CRCs. To resume updating the display, click the Lock icon again.<br />
You can have more than one Event Display open at a time. Click the Duplicate View icon to create a<br />
second, independent Event Display window. You can lock one copy of the Event Display and analyze your<br />
data, while the second Event Display updates as new data is captured.<br />
Event Display is synchronized with the Frame Display and Mesage Sequence Chart dialogs. Selecting a byte<br />
in Event Display will also select the related frame in the Frame Display and the related message in the Message<br />
Sequence Chart.<br />
4.3.2 The Event Display Toolbar<br />
Home – Brings the Control window to the front.<br />
Home – Brings the Control window to the front.<br />
42
Start Capture - Begins data capture to disk.<br />
Stop Capture - Closes a capture file and stops data capture to disk.<br />
Save - Prompts user for a file name. If the user supplies a name, a .cfa file is saved.<br />
Clear- Discards the temporary file and clears the display.<br />
MSC Chart - Opens the Message Sequence Chart<br />
Lock - In the Lock state, the window is locked so you can review a portion of data. Data capture<br />
continues in the background. Clicking on the Lock icon unlocks the window.<br />
Unlock - In the Unlock state, the screen fills in the data captured since the screen lock and<br />
moves down to display incoming data again. Clicking on the Unlock icon locks the window.<br />
Duplicate View - Creates a second Event Display window identical to the first.<br />
Frame Display - (framed data only) Brings up a Frame Display, with the frame of the currently<br />
selected bytes highlighted.<br />
Display Capture Notes - Brings up the Capture Notes window where you can view or add<br />
notes to the capture file.<br />
Add/Modify Bookmark - Add a new or modify an existing bookmark.<br />
Display All Bookmarks - Shows all bookmarks and lets you move between bookmarks.<br />
Find - Search for errors, string patterns, special events and more.<br />
Go To - Opens the Go To dialog, where you can specify which event number to go to.<br />
CRC - Change the algorithm and seed value used to calculate CRCs. To calculate a CRC, select<br />
a byte range, and the CRC appears in the status lines at the bottom of the Event Display.<br />
Mixed Sides - (Serial data only) By default, the analyzer shows data with the DTE side above<br />
the DCE side. This is called DTE over DCE format. DTE data has a white background and DCE<br />
data has a gray background. The analyzer can also display data in mixed side format. In this<br />
format, the analyzer does not separate DTE data from DCE data but shows all data on the<br />
43
same line as it comes in. DTE data is still shown with a white background and DCE data with a<br />
gray background so that you can distinguish between the two. The benefit of using this<br />
format is that more data fits onto one screen.<br />
Character Only - The analyzer shows both the number (hex, binary, etc.) data and the character<br />
(ASCII, EBCDIC or BAUDOT) data on the same screen. If you do not wish to see the hex<br />
characters, click on the Character Only button. Click again to go back to both number and<br />
character mode.<br />
Number Only - Controls whether the analyzer displays data in both character and number<br />
format, or just number format. Click once to show only numeric values, and again to show<br />
both character and numeric values.<br />
All Events - Controls whether the analyzer shows all events in the window, or only data<br />
bytes. Events include control signal changes and framing information.<br />
Timestamping Options – Brings up the timestamping options window which has options for<br />
customizing the display and capture of timestamps.<br />
4.3.3 Opening Multiple Event Display Windows<br />
Click the Duplicate View icon<br />
from the Event Display toolbar to open a second Event Display window.<br />
You can open as many Event Display windows as you like. Each Event Display is independent of the others<br />
and can show different data, use a different radix or character set, or be frozen or live.<br />
The Event Display windows are numbered in the title bar. If you have multiple Event Displays open, click on<br />
the Event Display icon on the Control window toolbar to show a list of all the Event Displays currently<br />
open. Select a window from the list to bring it to the front.<br />
4.3.4 Calculating CRCs or FCSs<br />
The cyclic redundancy check (CRC) is a function on the Event Display window used to produce a checksum.<br />
The frame check sequence (FCS) are the extra checksum characters added to a frame to detect errors.<br />
1. Open the Event Display window.<br />
2. Click and drag to select the data for which you want to generate a CRC.<br />
44
3. Click on the CRC icon .<br />
4. In the CRC dialog box, click on the down arrow to show<br />
the list of choices for CRC algorithms..<br />
5. Enter a Seed value in hexadecimal if desired.<br />
6. Click OK to generate the CRC. It appears in the byte<br />
information lines at the bottom of the Event Display window.<br />
Whenever you select a range of data, a CRC is calculated<br />
automatically.<br />
4.3.5 Calculating Delta Times and Data Rates<br />
1. Click on the Event Display icon on the Control window to open the Event Display window.<br />
2. Use the mouse to select the data you want to calculate a delta time and rate for.<br />
3. The Event Display window displays the delta time and the data rate in the status lines at the bottom<br />
of the window.<br />
Figure 25. Delta fields<br />
4.3.6 Switching Between Live Update and Review Mode<br />
The Event Display and Frame Display windows can update to display new data during live capture, or be<br />
frozen to allow data analysis. By default, the Event Display continually updates with new data, and the Frame<br />
Display is locked.<br />
45
1. Make sure the Lock icon is active so the display is locked and unable to scroll.<br />
2. Click the Unlock icon again to resume live update.<br />
The analyzer continues to capture data in the background while the display is locked. Upon resuming live<br />
update, the display updates with the latest data.<br />
You can have more than one Event Display or Frame Display window open at a time. Click the Duplicate<br />
View icon to open additional Event or Frame Display windows. The lock/resume function is independent<br />
on each window. This means that you can have two Event Display windows open simultaneously, and one window<br />
can be locked while the other continues to update.<br />
4.3.7 Data Formats and Symbols<br />
4.3.7.1 Switching Between Viewing All Events and Viewing Data<br />
Events<br />
By default, the analyzer on the Event Display dialog shows all events 1 that include:<br />
• Data bytes<br />
• Start-of-frame<br />
• End-of-frame characters<br />
• Data Captured Was Paused.<br />
Click on the Display All Events icon<br />
to remove the non-data events. Click again to display all events.<br />
See List of all Event Symbols on page 48 for a list of all the special events shown in the analyzer and what they<br />
mean.<br />
4.3.7.2 Switching Between Hex, Decimal, Octal or Binary<br />
On the Event Display window the analyzer displays data in Hex by default. There are several ways to change the<br />
radix 2 used to display data.<br />
Go to the Format menu and select the radix you want. A check mark next to the radix indicates which set is currently<br />
being used.<br />
1 An event is anything that happens on the circuit or which affects data capture. Data bytes, control<br />
signal changes, and long and short breaks are all events, as are I/O Settings changes and<br />
Data Capture Paused and Resumed.<br />
2 The base of a number system. Binary is base 2, octal is base 8, decimal is base 10 and hexadecimal<br />
is base 16.<br />
46
Figure 26. Format Menu<br />
1. Right-click on the data display header labels and choose a different radix.<br />
Figure 27. Header labels, right click<br />
2. Or right-click anywhere in the data display and select a different radix.<br />
Figure 28. Data display right click menu<br />
on the Event Display tool-<br />
If you want to see only the numerical values, click on the Numbers Only icon<br />
bar.<br />
47
4.3.7.3 Switching Between ASCII, EBCDIC, and Baudot<br />
On the Event Display window, the analyzer displays data in ASCII by default when you click on the Characters<br />
Only icon<br />
. There are several ways to change the character set used to display data.<br />
1. Go to the Format menu and select the character set you want. A check mark next to the character<br />
set indicates which set is currently being used.<br />
2. With the data displayed in characters, right-click on the data panel header label to choose a different<br />
character set.<br />
If you want to see only characters, click on the Characters Only icon<br />
on the Event Display toolbar.<br />
4.3.7.4 Selecting Mixed Channel/Sides<br />
If you want to get more data on the Event Display window, you can switch to mixed sides mode. This mode<br />
puts all the data together on the same line. Data from one side (Slave ) is shown on a white background and<br />
data from the other side ( Master )is shown on a gray background.<br />
1. Click once on the Mixed Sides icon to put the display in mixed sides mode.<br />
2. Click again to return to side over side mode.<br />
3. You can right click in the center of the data display window to change between mixed and side<br />
over side modes by selecting Display Sides Together. A check mark is displayed. Click on Display<br />
Sides Together to remove the check mark and return to side-by-side display.<br />
4. Right click in the sides panel on the right of the data display and select Display Sides Together.<br />
A check mark is displayed. Click on Display Sides Together to remove the check mark and<br />
return to side-by-side display.<br />
4.3.7.5 List of all Event Symbols<br />
By default, the Event Display shows all eventsevents 1 , which includes control signal changes, start and end of<br />
frame characters and flow control changes. If you want to see only the data bytes, click on the All Events button<br />
. Click again to display all events.<br />
Click on a symbol, and the analyzer displays the symbol name and sometimes additional information in the<br />
status lines at the bottom of the Event Display window. For example, clicking on a control signal change symbol<br />
displays which signal(s) changed.<br />
In addition to data bytes, the events shown are (in alphabetical order):<br />
1 An event is anything that happens on the circuit or which affects data capture. Data bytes, control<br />
signal changes, and long and short breaks are all events, as are I/O Settings changes and<br />
Data Capture Paused and Resumed.<br />
48
Abort<br />
Broken Frame - The frame did not end when the analyzer expected it to. This occurs most often<br />
with protocols where the framing is indicated by a specific character, control signal change, or<br />
other data related event.<br />
Buffer Overflow - Indicates a buffer overflow error. A buffer overflow always causes a broken<br />
frame.<br />
Control Signal Change - One or more control signals changed state. Click on the symbol, and the<br />
analyzer displays which signal(s) changed at the bottom of the Event Display window.<br />
Data Capture Paused - The Pause icon was clicked, pausing data capture. No data is recorded<br />
while capture is paused.<br />
Data Capture Resumed - The Pause icon was clicked again, resuming data capture.<br />
Dropped Frames - Some number of frames were lost. Click on the symbol, and the analyzer displays<br />
many frames were lost at the bottom of the Event Display window.<br />
End of Frame - Marks the end of a frame.<br />
Flow Control Active - An event occurred which caused flow control to become active (i.e.<br />
caused the analyzer to stop transmitting data) Events which activate flow control are signal<br />
changes or the receipt of an XON character.<br />
Flow Control Inactive - An event occurred which caused flow control to become inactive (i.e.<br />
caused the analyzer to transmit data). Events which deactivate flow control are signal changes<br />
or the receipt of an XOFF character.<br />
Frame Recognizer Change - A lowest layer protocol was selected or removed here, causing the<br />
frame recognizer to be turned off or on.<br />
I/O Settings Change - A change was made in the I/O Settings window which altered the baud,<br />
parity, or other circuit setting.<br />
Long Break<br />
Low Power - The battery in the <strong>ComProbe</strong> ® is low.<br />
Short Break<br />
SPY Event (SPY Mode only) - SPY events are commands sent by the application being spied on to<br />
the UART.<br />
49
Start of Frame - Marks the start of a frame.<br />
Begin Sync Character Strip<br />
End Sync Character Strip<br />
Sync Dropped<br />
Sync Found<br />
Sync Hunt Entered<br />
Sync Lost<br />
<strong>Test</strong> Device Stopped Responding - The analyzer lost contact with the <strong>ComProbe</strong> for some<br />
reason, often because there is no power to the <strong>ComProbe</strong>.<br />
<strong>Test</strong> Device Began Responding - The analyzer regained contact with the <strong>ComProbe</strong>.<br />
Timestamping Disabled - Timestamping was turned off. Events following this event are not<br />
timestamped.<br />
Timestamping Enabled - Timestamping was turned on. Events following this event have<br />
timestamps.<br />
Truncated Frame- A frame that is not the same size as indicated within its protocol.<br />
Underrun Error<br />
Unknown Event<br />
4.3.7.6 Font Size<br />
The font size can be changed on several Event Display windows. Changing the font size on one window does<br />
not affect the font size on any other window.<br />
To change the font size:<br />
50
1. Click on Event Display menu Options, and select Change the Font Size.<br />
2. Choose a font size from the list.<br />
Figure 29. Event Display Options menu<br />
3. Click OK.<br />
Figure 30. Event Display Font Size Selection<br />
4.4 Analyzing Protocol Decodes<br />
4.4.1 Frame Display Window<br />
To open this window<br />
Click the Frame Display icon<br />
menu.<br />
on the Control window toolbar, or select Frame Display from the View<br />
51
Figure 31. Frame Display with all panes active<br />
Frame Display Panes<br />
The Frame Display window is used to view all frame related information. It is composed of a number of different<br />
sections or "panes", where each pane shows a different type of information about a frame.<br />
• Summary Pane - The Summary Pane displays a one line summary of each frame for every protocol<br />
found in the data, and can be sorted by field for every protocol. Click here for an explanation of the symbols<br />
next to the frame numbers.<br />
• Decode Pane - The Decode Pane displays a detailed decode of the highlighted frame. Fields selected in<br />
the Decode Pane have the appropriate bit(s) or byte(s) selected in the Radix, Binary, Character , and<br />
Event panes<br />
• Radix Pane - The Radix Pane displays the logical data bytes in the selected frame in either hexadecimal,<br />
decimal or octal.<br />
• Binary Pane - The Binary Pane displays a binary representation of the logical data bytes.<br />
• Character Pane - The Character Pane displays the character representation of the logical data bytes in<br />
either ASCII, EBCDIC or Baudot.<br />
• Event Pane - The Event Pane displays the physical data bytes in the frame, as received on the network.<br />
By default, all panes except the Event Pane are displayed when the Frame Display is first opened.<br />
Protocol Tabs<br />
Protocol filter tabs are displayed in the Frame Display above the Summary pane.<br />
52
• These tabs are arranged in separate colorcoded<br />
groups. These groups and their colors<br />
are General (white), Classic Bluetooth<br />
(blue), Bluetooth low energy (green),<br />
802.11 (orange), USB (purple), NFC<br />
(brown) and SD (teal). The General group<br />
applies to all technologies. The other<br />
groups are technology-specific.<br />
• Clicking on a protocol filter tab in the General<br />
group filters in all packets containing<br />
that protocol regardless of each packet’s technology.<br />
• Clicking on a protocol filter tab in a technology-specific group filters in all packets containing that protocol<br />
on that technology.<br />
• A protocol filter tab appears in the General group only if the protocol occurs in more than one of the technology-specific<br />
tab groups. For example, if L2CAP occurs in both Classic Bluetooth and Bluetooth low<br />
energy , there will be L2CAP tabs in the General group, the Classic Bluetooth group, and the Bluetooth low<br />
energy group.<br />
Select the Unfiltered tab to display all packets.<br />
There are several special tabs that appear in the Summary Pane when certain conditions are met. These tabs<br />
appear only in the General group and apply to all technologies. The tabs are:<br />
• Bookmarks appear when a bookmark is first seen.<br />
• Errors appear when an error is first seen. An error is a physical error in a data byte or an error in the protocol<br />
decode.<br />
• Info appears when a frame containing an Information field is first seen.<br />
The tabs disappear when the capture buffer is cleared during live capture or when decoders are reloaded,<br />
even if one of the tabs is currently selected. They subsequently reappear as the corresponding events are<br />
detected.<br />
Comparing Frames<br />
If you need to compare frames, you can open additional Frame Display windows by clicking on the Duplicate<br />
View icon<br />
Frame Wrapping and Display<br />
. You can have as many Frame Display windows open at a time as you wish.<br />
In order to assure that the data you are seeing in Frame Display are current, the following messages appear<br />
describing the state of the data as it is being captured.<br />
• All Frame Display panes except the Summary pane display "No frame selected" when the selected frame<br />
is in the buffer (i.e. not wrapped out) but not accessible in the Summary pane. This can happen when a<br />
tab is selected that doesn’t filter in the selected frame.<br />
• When the selected frame wraps out (regardless of whether it was accessible in the Summary pane) all<br />
Frame Display panes except the Summary pane display "Frame wrapped out of buffer".<br />
53
• When the selected frame is still being captured, all Frame Display panes except the Summary pane display<br />
"Frame incomplete".<br />
4.4.1.1 Frame Display Toolbar<br />
The buttons that appear in the Frame Display window vary according to the particular configuration of the analyzer.<br />
For controls not available the icons will be grayed-out.<br />
Control – Brings the Control window to the front.<br />
Open File - Opens a capture file.<br />
I/O Settings - Opens the I/O Settings dialog.<br />
Start Capture - Begins data capture to a user designated file.<br />
Stop Capture - Closes a capture file and stops data capture to<br />
disk.<br />
Save - Save the currently selected bytes or the entire buffer to<br />
file.<br />
Clear- Discards the temporary file and clears the display.<br />
Event Display – Brings the Event Display window to the front.<br />
Show Message Sequence Chart - Message Sequence Chart<br />
(MSC) displays information about the messages passed<br />
between protocol layers.<br />
Duplicate View - Creates a second Frame Display window<br />
identical to the first.<br />
Apply/Modify Display Filters - Opens the Display Filter dialog.<br />
54
Quick Protocol Filter - brings up a dialog box where you can filter<br />
or hide one or more protocol layers.<br />
Protocol Stack - brings up the Protocol Stack Wizard where you<br />
can change the stack used to decode framed data<br />
Reload Decoders - When Reload Decoders is clicked, the plugins<br />
are reset and received frames are re-decoded. For<br />
example, If the first frame occurs more than 10 minutes in the<br />
past, the 10-minute utilization graph stays blank until a frame<br />
from 10 minutes ago or less is decoded.<br />
Find - Search for errors, string patterns, special events and<br />
more.<br />
Display Capture Notes - Brings up the Capture Notes window<br />
where you can view or add notes to the capture file.<br />
Add/Modify Bookmark - Add a new or modify an existing bookmark.<br />
Display All Bookmarks - Shows all bookmarks and lets you move<br />
between bookmarks.<br />
Bluetooth Timeline - Opens the Bluetooth Timeline<br />
Coexistence View - Opens the Coexistence View<br />
low energy Timeline- Opens the low energy Timeline<br />
Extract Data - Opens the Extract Data dialog.<br />
Bluetooth low energy Packet Error Rate Statistics Opens the<br />
Packet Error Rate Statistics display<br />
55
Bluetooth Classic Packet Error Rate Statistics - Opens the Packet<br />
Error Rate Statistics display.<br />
Reload Decoders - When Reload Decoders is clicked, the plug-ins are reset and received frames are<br />
re-decoded. For example, If the first frame occurs more than 10 minutes in the past, the 10-minute<br />
utilization graph stays blank until a frame from 10 minutes ago or less is decoded.<br />
Filter: Text giving the filter currently in use. If no filter is being<br />
used, the text reads "All Frames" which means that nothing is<br />
filtered out. To see the text of the entire filter, place the cursor<br />
over the text and a ToolTip pops up with the full text of the filter.<br />
The following icons all change how the panes are arranged on the Frame Display. Additional layouts<br />
are listed in the View menu.<br />
Show Default Panes - Returns the panes to their default settings.<br />
Show Only Summary Pane - Displays only the Summary pane.<br />
Shall All Panes Except Event Pane - Makes the Decode pane<br />
taller and the Summary pane narrower.<br />
Toggle Display Lock - Prevents the display from updating.<br />
Go To Frame<br />
First Frame - Moves to the first frame in the buffer.<br />
Previous Frame - Moves to the previous frame in the buffer.<br />
Next Frame - Moves to the next frame in the buffer.<br />
Last Frame - Moves to the last frame in the buffer.<br />
56
Find on Frame Display only searches the Decode Pane for a<br />
value you enter in the text box.<br />
Find Previous Occurrence - Moves to the previous occurrence<br />
of the value in the Frame Display Find.<br />
Find Next Occurrence - Moves to the next occurrence of the<br />
value in the Frame Display Find.<br />
Cancel Current Search - Stops the current Frame Display Find.<br />
Summary Drop Down Box: Lists all the protocols found in the<br />
data in the file. This box does not list all the protocol decoders<br />
available to the analyzer, merely the protocols found in the<br />
data. Selecting a protocol from the list changes the Summary<br />
pane to display summary information for that protocol. When a<br />
low energy predefined Named Filter (like Nulls and Polls) is<br />
selected, the Summary drop-down is disabled.<br />
Text with Protocol Stack: To the right of the Summary Layer box is some text giving the protocol stack<br />
currently in use.<br />
Note: If the frames are sorted in other than ascending frame number order, the order of the<br />
frames in the buffer is the sorted order. Therefore the last frame in the buffer may not have the<br />
last frame number.<br />
4.4.1.2 Frame Display Status Bar<br />
The Frame Display Status bar appears at the bottom of the Frame Display. It contains the following information:<br />
• Frame #s Selected: Displays the frame number or numbers of selected (highlighted) frames, and the total<br />
number of selected frames in parentheses<br />
• Total Frames: The total number of frames in the capture buffer or capture file in real-time<br />
• Frames Filtered In: The total number of frames displayed in the filtered results from user applied filters<br />
in real-time<br />
57
4.4.1.3 Hiding and Revealing Protocol Layers in the Frame Display<br />
Hiding protocol layers refers to the ability to prevent a layer from being displayed on the Decode pane. Hidden<br />
layers remain hidden for every frame where the layer is present, and can be revealed again at any time. You<br />
can hide as many layers as you wish.<br />
Note: Hiding from the Frame Display affects only the data shown in the Frame Display and not any information<br />
in any other window.<br />
There are two ways to hide a layer.<br />
1. Right-click on the layer in the Decode pane, and choose Hide [protocol name] Layer In All<br />
Frames.<br />
2. Click the Set Protocol Filtering button on the Summary pane toolbar. In the Protocols to Hide<br />
box on the right, check the protocol layer(s) you want hidden. Click OK when finished.<br />
To reveal a hidden protocol layer:<br />
1. Right-click anywhere in the Decode pane<br />
2. Choose Show [protocol name] Layer from the right-click menu, or click the Set Protocol Filtering<br />
button and un-check the layer or layers you want revealed.<br />
4.4.1.4 Physical vs. Logical Byte Display<br />
The Event Display window and Event Pane in the Frame Display window show the physical bytes. In other<br />
words, they show the actual data as it appeared on the circuit. The Radix, Binary and Character panes in the<br />
Frame Display window show the logical data, or the resulting byte values after escape codes or other character<br />
altering codes have been applied (a process called transformation).<br />
As an example, bytes with a value of less than 0x20 (the 0x indicates a hexadecimal value) cannot be transmitted<br />
in Async PPP. To get around this, a 0x7d is transmitted before the byte. The 0x7d says to take the next<br />
byte and subtract 0x20 to obtain the true value. In this situation, the Event pane displays 0x7d 0x23, while the<br />
Radix pane displays 0x03.<br />
4.4.1.5 Sorting Frames<br />
By default, frames are sorted in ascending numerical sequence by frame number. Click on a column header in<br />
the Summary pane to sort the frames by that column. For example, to sort the frames by size, click on the<br />
Frame Size column header.<br />
An embossed triangle next to the header name indicates which column the frames are sorted by. The direction<br />
of the triangle indicates whether the frames are in ascending or descending order, with up being ascending.<br />
Note that it may take some time to sort large numbers of frames.<br />
4.4.1.6 Frame Display - Find<br />
Frame Display has a simple Find function that you can use to search the Decode Pane for any alpha numeric<br />
value. This functionality is in addition to the more robust Search/Find dialog.<br />
Frame Display Find is located below the toolbar on the Frame Display dialog.<br />
58
Figure 32. Frame Display Find text entry field<br />
Where the more powerful Search/Find functionality searches the Decode, Binary, Radix, and Character<br />
panes on Frame Display using TImestamps, Special Events, Bookmarks, Patterns, etc.,<br />
Figure 33. Searh/Find Dialog<br />
Find on Frame Display only searches the Decode Pane for a value you enter in the text box.<br />
To use Find:<br />
1. Select the frame where you want to begin the search.<br />
2. Enter a value in the Find text box.<br />
Note: Note: The text box is disabled during a live capture.<br />
3. Select Find Previous Occurrence to begin the search on frames prior to the frame you selected,<br />
or Find Next Occurrence<br />
59
to begin the search on frames following the frame you selected.<br />
The next occurrence of the value (if it is found) will be highlighted<br />
in the Decode Pane.<br />
4. Select Find Previous Occurrence or Find Next Occurrence<br />
to continue the search.<br />
There are several important concepts to remember with Find.<br />
• When you enter a search string and select Enter, the search moves forward.<br />
• If you select Find Previous Occurrence, when the search reaches the first frame it will then cycle to the<br />
last frame and continue until it reaches the frame where the search began.<br />
• Shift + F3 is a shortcut for Find Previous Occurrence.<br />
• If you select Find Next Occurrence, when the search reaches the last frame it will then cycle to the first<br />
frame and continue until it reaches the frame where the search began.<br />
• F3 is a shortcut for Find Next Occurrence.<br />
• You cannot search while data is being captured.<br />
• After a capture is completed, you cannot search until Frame Display has finished decoding the frames.<br />
• Find is not case sensitive.<br />
• The status of the search is displayed<br />
at the bottom of the dialog.<br />
• The search occurs only on the protocol<br />
layer selected.<br />
• To search across all the protocols<br />
on the Frame Display, select the<br />
Unfiltered tab.<br />
• A drop-down list displays the search values entered during the current<br />
session of Frame Display.<br />
• The search is cancelled when you select a different protocol tab during<br />
a search.<br />
• You can cancel the search at any time by selecting the Cancel Current<br />
Search<br />
button.<br />
4.4.1.7 Synchronizing the Event and Frame Displays<br />
The Frame Display is synchronized with the Event Display. Click on a frame in the Frame Display and the<br />
corresponding bytes is highlighted in the Event Display. Each Frame Display has its own Event Display.<br />
As an example, here's what happens if the following sequence of events occurs.<br />
60
1. Click on the Frame Display icon in Control window toolbar to open the Frame Display.<br />
2. Click on the Duplicate View icon to create Frame Display #2.<br />
3. Click on Event Display icon in Frame Display #2. Event Display #2 opens. This Event<br />
Display is labeled #2, even though there is no original Event Display, to indicate that it is synchronized<br />
with Frame Display #2.<br />
4. Click on a frame in Frame Display #2. The corresponding bytes are highlighted in Event Display<br />
#2.<br />
5. Click on a frame in the original Frame Display. Event Display #2 does not change.<br />
4.4.1.8 Working with Multiple Frame Displays<br />
Multiple Frame Displays are useful for comparing two frames side by side. They are also useful for comparing<br />
all frames against a filtered subset or two filtered subsets against each other.<br />
• To create a second Frame Display, click the Duplicate View icon on the Frame Display toolbar.<br />
This creates another Frame Display window. You can have as many Frame Displays open as you wish.<br />
Each Frame Display is given a number in the title bar to distinguish it from the others.<br />
• To navigate between multiple Frame Displays, click on the Frame Display icon in the Control window<br />
toolbar.<br />
A drop-down list appears, listing all the currently open Frame Displays.<br />
• Select the one you want from the list and it comes to the front.<br />
Note: When you create a filter in one Frame Display, that filter does not automatically appear<br />
in other Frame Display windows. You must use the Hide/Reveal feature to display a filter created<br />
in one Frame Display in different Frame Display window.<br />
Note: When you have multiple Frame Display windows open and you are capturing data, you<br />
may receive an error message declaring that "Filtering cannot be done while receiving data this<br />
fast." If this occurs, you may have to stop filtering until the data is captured.<br />
4.4.1.9 Working with Panes on Frame Display<br />
When the Frame Display first opens, all panes are displayed except the Event pane (To view all the panes,<br />
select Show All Panes from the View menu).<br />
• The Toggle Expand Decode Pane icon makes the decode pane longer to view lengthy decodes<br />
better.<br />
• The Show Default Panes icon returns the Frame Display to its default settings.<br />
61
• The Show only Summary Pane icon displays on the Summary Pane.<br />
To close a pane, right-click on the pane and select Hide This Pane from the pop-up menu, or de-select Show<br />
[Pane Name] from the View menu.<br />
To open a pane, right-click on the any pane and select Show Hidden Panes from the pop-up menu and select<br />
the pane from the fly-out menu, or select Show [Pane Name] from the View menu.<br />
To re-size a pane, place the cursor over the pane border until a double-arrow cursor appears. Click and drag on<br />
the pane border to re-size the pane.<br />
4.4.1.10 Frame Display - Byte Export<br />
The captured frames can be exported as raw bytes to a text file.<br />
1. From the Frame Display File menu select Byte Export....<br />
Figure 34. Frame Display File menu, Byte Export<br />
2. From the Byte Export window specify the frames to export.<br />
• All Frames exports all filtered-in frames including those scrolled off the Summary pane.<br />
Filtered-in frames are dependent on the selected Filter tab above the Summary pane. Filteredout<br />
frames are not exported.<br />
• Selected Frames export is the same as All Frames export except that only frames selected in<br />
the Summary pane will be exported.<br />
62
Figure 35. Byte Export dialog<br />
Click the OK button to save the export. Clicking the Cancel button will exit Byte Export.<br />
3. The Save As dialog will open. Select a directory location and enter a file name for the exported<br />
frames file.<br />
Click on the Save button.<br />
Figure 36. Save As dialog<br />
The exported frames are in a text file that can be opened in any standard text editing application. The header<br />
shows the export type, the capture filename, the selected filter tab, and the number of frames. The body<br />
shows the frame number, the timestamp in the same format shown in the Frame Display Summary pane, and<br />
the frame contents as raw bytes.<br />
63
Figure 37. Sample Exported Frames Text File<br />
4.4.1.11 Panes in the Frame Display<br />
4.4.1.11.1 Summary Pane<br />
The Summary pane displays a one-line summary of every frame in a capture buffer or file, including<br />
frame number, timestamp, length and basic protocol information. The protocol information included for each<br />
frame depends on the protocol selected in the summary layer box (located directly below the main toolbar).<br />
On a two-channel circuit, the background color of the one-line summary indicates whether the frame came<br />
from the DTE or the DCE device. Frames with a white background come from the DTE device, frames with a<br />
gray background come from the DCE device.<br />
The <strong>ComProbe</strong> USB Summary pane in displays a one-line summary of every transaction in a capture buffer or<br />
file. Whenever there is a transaction it is shown on a single line instead of showing the separate messages that<br />
comprise the transaction. The Msg column in that case says “Transaction”.<br />
Each message in a transaction contains a packet identifier (PID). All of the PIDs in a transaction are shown in the<br />
transaction line.<br />
All "IN" transactions (i.e. transactions that contain an IN token message) are shown with a purple background.<br />
All other transactions and all non-transactions are shown with a white background. "IN" transactions have special<br />
coloring because that is the only place where the primary data flow is from a device to the Host.<br />
The protocol information included for each frame depends on the protocol selected in the summary layer box<br />
(located directly below the main toolbar).<br />
Frame numbers in red indicate errors, either physical (byte-level) or frame errors. If the error is a frame error<br />
in the displayed protocol layer, the bytes where the error occurred is displayed in red. The Decode Pane gives<br />
precise information as to the type of error and where it occurred.<br />
The Summary pane is synchronized with the other panes in this window. Click on a frame in the Summary<br />
pane, and the bytes for that frame is highlighted in the Event pane while the Decode pane displays the full<br />
decode for that frame. Any other panes which are being viewed are updated accordingly. If you use one pane<br />
to select a subset of the frame, then only that subset of the frame is highlighted in the other panes.<br />
Protocol Tabs<br />
Protocol filter tabs are displayed in the Frame Display above the Summary pane.<br />
64
• These tabs are arranged in separate color-coded groups. These groups and their colors are General (white),<br />
Classic Bluetooth (blue), Bluetooth low energy (green), 802.11 (orange), USB (purple), and SD (brown). The<br />
General group applies to all technologies. The other groups are technology-specific.<br />
Figure 38. Example Protocol Tags<br />
• Clicking on a protocol filter tab in the General group filters in all packets containing that protocol<br />
regardless of each packet’s technology.<br />
• Clicking on a protocol filter tab in a technology-specific group filters in all packets containing that protocol<br />
on that technology.<br />
• A protocol filter tab appears in the General group only if the protocol occurs in more than one of the<br />
technology-specific tab groups. For example, if L2CAP occurs in both Classic Bluetooth and Bluetooth<br />
low energy , there will be L2CAP tabs in the General group, the Classic Bluetooth group, and the<br />
Bluetooth low energy group.<br />
Select the Unfiltered tab to display all packets.<br />
There are several special tabs that appear in the Summary pane when certain conditions are met. These tabs<br />
appear only in the General group and apply to all technologies. The tabs are:<br />
• Bookmarks appear when a bookmark is first seen.<br />
• Errors appear when an error is first seen. An error is a physical error in a data byte or an error in the protocol<br />
decode.<br />
• Info appears when a frame containing an Information field is first seen.<br />
The tabs disappear when the capture buffer is cleared during live capture or when decoders are reloaded,<br />
even if one of the tabs is currently selected. They subsequently reappear as the corresponding events are<br />
detected.<br />
The tabs disappear when the capture buffer is cleared during live capture or when decoders are reloaded,<br />
even if one of the tabs is currently selected. They subsequently reappear as the corresponding events are<br />
detected.<br />
Use the navigation icons, keyboard or mouse to move through the frames. The icons and move you<br />
to move to a specific frame num-<br />
to the first and last frames in the buffer, respectively. Use the Go To icon<br />
ber.<br />
Placing the mouse pointer on a summary pane header with truncated text displays a tooltip showing the full<br />
header text.<br />
65
Sides in Bluetooth low energy<br />
Figure 39. Summay pane (right) with Decoder pane (left)<br />
A Bluetooth low energy data connection consists of connection events, which are a series of transmissions on<br />
the same channel. In each connection event the master transmits first, then the slave, and then the devices<br />
take turns until the connection event is finished.<br />
When the data connection is encrypted and the packets are successfully decrypted, the sniffer can determine<br />
exactly who sent which packet (only non-empty, encrypted packets – empty packets are never encrypted).<br />
These packets are labeled either ‘M’ for master or ‘S’ for slave.<br />
When the data connection is unencrypted or when encrypted packets are not successfully decrypted by the<br />
sniffer, the sniffer cannot distinguish the two devices’ (master and slave) packets by their content, just by the<br />
packet timing. In those cases we label each device as side ‘1’ or ‘2’, not as master or slave. In each connection<br />
event, packets sent by the device which transmitted first in the connection event are labeled ‘1’, and packets<br />
sent by the device which transmitted second are labeled ‘2’.<br />
If no packets in the connection event are missed by the sniffer, the device labeled ‘1’ is the master and the<br />
device labeled ‘2’ is the slave. However, if we do not capture the very first packet in a connection event (i.e.<br />
the packet sent by the master) but do capture the packet sent by the slave, we label the slave as side ‘1’ since it<br />
is the first device we heard in the connection event. Because there is potential clock drift since the last connection<br />
event, we cannot use the absolute timing to correct this error; there would still be cases where we get<br />
it wrong. Therefore we always assign ‘1’ to the first packet in a connection event. So even though it is rare,<br />
there are connection events where packets sent by the slave device are labeled ‘1’ and packets sent by the master<br />
are labeled ‘2’.<br />
Finally, in a noisy environment it is also possible that the sniffer does not capture packets in the middle of a connection<br />
event. If this occurs and the sniffer cannot determine the side for the remaining packets in that connection<br />
event, the side is labeled ‘U’ for “unknown”.<br />
4.4.1.11.2 Customizing Fields in the Summary Pane<br />
You can modify the Summary Pane in Frame Display.<br />
Summary pane columns can be reordered by dragging any column to a different position.<br />
Fields from the Decode pane can be added to the summary pane by dragging any Decodepane field to the<br />
desired location in the summary pane header. If the new field is from a different layer than the summary pane<br />
a plus sign (+) is prepended to the field name and the layer name is added in parentheses. The same field can<br />
66
e added more than once if desired, thus making it possible to put the same field at the front and back (for<br />
example) of a long header line so that the field is visible regardless of where the header is scrolled to.<br />
An added field can be removed from the Summary pane by selecting Remove New Column from the rightclick<br />
menu.<br />
The default column layout (both membership and order) can be restored by selecting Restore Default<br />
Columns from the Format or right-click menus.<br />
Changing Column Widths<br />
To change the width of a column:<br />
1. Place the cursor over the right column divider until the cursor changes to a solid double arrow.<br />
2. Click and drag the divider to the desired width.<br />
3. To auto-size the columns, double-click on the column dividers.<br />
Hiding Columns<br />
To hide a column:<br />
1. Drag the right divider of the column all the way to the left.<br />
2. The cursor changes to a split double arrow when a hidden column is present.<br />
3. To show the hidden column, place the cursor over the divider until it changes to a split double<br />
arrow, then click and drag the cursor to the right.<br />
4. The Frame Size, Timestamp, and Delta columns can be hidden by right-clicking on the header<br />
and selecting Show Frame Size Column, Show Timestamp Column, or Show Delta Column.<br />
Follow the same procedure to display the columns again.<br />
Moving Columns - Changing Column Order<br />
To move a column :<br />
1. Click and hold on the column header<br />
2. Drag the mouse over the header row.<br />
3. A small white triangle indicates where the column is moved to.<br />
4. When the triangle is in the desired location, release the mouse.<br />
Restoring Default Column Settings<br />
To restore columns to their default locations, their default widths, and show any hidden columns<br />
1. Right-click on any column header and choose Restore Default Column Widths, or select<br />
Restore Default Column Widths from the Format menu.<br />
67
4.4.1.11.3 Frame Symbols in the Summary Pane<br />
A green dot means the frame was decoded successfully, and the protocol listed in the Summary<br />
Layer drop-down box exists in the frame. No dot means the frame was decoded successfully,<br />
but the protocol listed in the Summary Layer drop-down box does not exist in the frame.<br />
A green circle means the frame was not fully decoded. There are several reasons why this might<br />
happen.<br />
• One reason is that the frame compiler hasn't caught up to that frame yet. It takes some<br />
time for the analyzer to compile and decode frames. Frame compilation also has a lower<br />
priority than other tasks, such as capturing data. If the analyzer is busy capturing data,<br />
frame compilation may fall behind. When the analyzer catches up, the green circle<br />
changes to either a green dot or no dot.<br />
• Another reason is if some data in the frame is context dependent and we don't have the<br />
context. An example is a compressed header where the first frame gives the complete<br />
header, and subsequent frames just give information on what has changed. If the analyzer<br />
does not capture the first frame with the complete header, it cannot decode subsequent<br />
frames with partial header information.<br />
A magenta triangle indicates that a bookmark is associated with this frame. Any comments associated<br />
with the bookmark appear in the column next to the bookmark symbol.<br />
4.4.1.11.4 Decode Pane<br />
The Decode pane (aka detail pane) is a post-process display that provides a detailed decode of each<br />
frame transaction (sometimes referred to as a frame). The decode is presented in a layered format that can be<br />
expanded and collapsed depending on which layer or layers you are most interested in. Click on the plus sign to<br />
expand a layer. The plus sign changes to a minus sign. Click on the minus sign to collapse a layer. Select Show<br />
All or Show Layers from the Format menu to expand or collapse all the layers. Layers retain their expanded<br />
or collapsed state between frames.<br />
Protocol layers can be hidden, preventing them from being<br />
displayed on the Decode pane. Right-click on any protocol<br />
layer and choose Hide [protocol name] from the right-click<br />
menu.<br />
In a USB transaction, all messages that comprise the transaction<br />
are shown together in the detail pane. The color coding<br />
that is applied to layers when the detail pane displays a single message is applied to both layers and messages<br />
when the detail pane displays a transaction. To keep the distinction between layers and messages clear, each<br />
header of each message in the detail pane ends with the word “Message” or “Messages”. The latter is used<br />
because data and handshake messages are shown as a single color-coded entry<br />
Each protocol layer is represented by a color, which is used to highlight the bytes that belong to that protocol<br />
layer in the Event, Radix, Binary and Character panes. The colors are not assigned to a protocol, but are<br />
assigned to the layer.<br />
The Event, Radix, Binary, Character and Decode panes are all synchronized with one another. Clicking on an<br />
element in any one of the panes highlights the corresponding element in all the other panes.<br />
68
Click the Toggle Expand Decode Pane icon to make the Decode pane taller. This allows for more of a<br />
lengthy decode to be viewed without needing to scroll.<br />
4.4.1.11.5 Radix or Hexadecimal Pane<br />
The Radix pane displays the logical bytes in the frame in<br />
either hexadecimal, decimal or octal. The radix can be<br />
changed from the Format menu, or by right-clicking on the<br />
pane and choosing Hexadecimal, Decimal or Octal.<br />
Because the Radix pane displays the logical bytes rather than<br />
the physical bytes, the data in the Radix pane may be different<br />
from that in the Event pane. See Physical vs. Logical<br />
Byte Display for more information.<br />
Colors are used to show which protocol layer each byte<br />
belongs to. The colors correspond to the layers listed in the<br />
Decode pane.<br />
The Event, Radix, Binary, Character and Decode panes are all synchronized with one another. Clicking on an element<br />
in any one of the panes highlights the corresponding element in all the other panes.<br />
4.4.1.11.6 Character Pane<br />
The Character pane represents the logical bytes in the<br />
frame in ASCII, EBCDIC or Baudot. The character set can<br />
be changed from the Format menu, or by right-clicking on<br />
the pane and choosing the appropriate character set.<br />
Because the Character pane displays the logical bytes<br />
rather than the physical bytes, the data in the Character<br />
pane may be different from that in the Event pane. See<br />
Physical vs. Logical Byte Display for more information.<br />
Colors are used to show which protocol layer each byte<br />
belongs to. The colors correspond to the layers listed in the<br />
Decode pane.<br />
The Event, Radix, Binary, Character and Decode panes<br />
are all synchronized with one another. Clicking on an element<br />
in any one of the panes highlights the corresponding element in all the other panes.<br />
4.4.1.11.7 Binary Pane<br />
The Binary pane displays the logical bytes in the frame in binary.<br />
Because the Binary pane displays the logical bytes rather than the physical bytes, the data in the Binary pane<br />
may be different from that in the Event pane. See Physical vs. Logical Byte Display for more information.<br />
Colors are used to show which protocol layer each byte belongs to. The colors correspond to the layers listed in<br />
the Decode pane.<br />
69
The Event, Radix, Binary, Character and Decode panes are all synchronized with one another. Clicking on an<br />
element in any one of the panes highlights the corresponding element in all the other panes.<br />
4.4.1.11.8 Event Pane<br />
The Event pane shows the physical<br />
bytes in the frame. You can choose<br />
between displaying only the data events<br />
or displaying all events by clicking the All<br />
Events icon .<br />
Displaying all events means that special<br />
events, such as Start of Frame, End of<br />
Frame and any signal change events, are<br />
displayed as special symbols within the<br />
data.<br />
The status lines at the bottom of the pane give the same information as the status lines in the Event Display<br />
window. This includes physical data errors, control signal changes (if appropriate), and timestamps.<br />
Because the Event pane displays the physical bytes rather than the logical bytes, the data in the Event pane<br />
may be different from that in the Radix, Binary and Character panes. See Physical vs. Logical Byte Display for<br />
more information.<br />
Colors are used to show which protocol layer each byte belongs to. The colors correspond to the layers listed<br />
in the Decode pane.<br />
The Event, Radix, Binary, Character and Decode panes are all synchronized with one another. Clicking on an<br />
element in any one of the panes highlights the corresponding element in all the other panes.<br />
4.4.1.11.9 Change Text Highlight Color<br />
Whenever you select text in the Binary, Radix, or Character<br />
panes in Frame Display, the text is displayed with<br />
a highlight color. You can change the color of the highlight.<br />
1. Select Change Text Highlight Color from the<br />
Options menu. You can also access the option<br />
by right clicking in any of the panes.<br />
2. Select a color from the drop-down menu.<br />
3. Click OK.<br />
The highlight color for the text is changed.<br />
Select Cancel to discard any selection. Select Defaults to return the highlight color to blue.<br />
70
4.4.1.12 Protocol Layer Colors<br />
4.4.1.12.1 Data Byte Color Notation<br />
The color of the data in the panes specifies which layer of the protocol stack the data is from. All data from the<br />
first layer is bright blue, the data from the second layer is green, the third layer is pink, etc. The protocol name<br />
for each layer in the Decode pane is in the same color. Note that the colors refer to the layer, not to a specific<br />
protocol. In some situations, a protocol may be in two different colors in two different frames, depending on<br />
where it is in the stack. You can change the default colors for each layer.<br />
Red is reserved for bytes or frames with errors. In the Summary pane, frame numbers in red mean there is an<br />
error in the frame. Also, the Errors tab is displayed in red. This could be a physical error in a data byte or an<br />
error in the protocol decode. Bytes in red in the Radix, Character, Binary and Event panes mean there is a<br />
physical error associated with the byte.<br />
4.4.1.12.2 Changing Protocol Layer Colors<br />
You can differentiate different protocol layers in the Decode, Event, Radix, Binary and Character panes.<br />
1. Choose Select Protocol Layer Colors from the Options menu to change the colors used.<br />
The colors for the different layers is displayed.<br />
2. To change a color, click on the arrow next to each layer and select a new color.<br />
3. Select OK to accept the color change and return to Frame Display.<br />
Select Cancel to discard any selection. Select Defaults to return the highlight colors to the default settings.<br />
Figure 40. Frame Display Protocol Layer Color Selector<br />
4.4.1.13 Protocol Filtering From the Frame Display<br />
71
4.4.1.13.1 Quick Filtering on a Protocol Layer<br />
On the Frame Display , click the Quick Filtering icon<br />
or select Quick Filtering from the Filter menu.<br />
This opens a dialog that lists all the protocols discovered so far. The protocols displayed change depending on<br />
the data received.<br />
Figure 41. Frame Display Quick Filtering and Hiding Protocols Dialog<br />
The box on the left is Protocols To Filter In. When you select the checkbox for a protocol in the Protocols to<br />
Filter In, the Summary pane will only display those frames that contain data from that protocol.<br />
If you filter on more than one protocol, the result are all frames that contain at least one of<br />
those protocols. For example, if you filter on IP and IPX NetBIOS, you receive all frames that<br />
contain either IP or IPX NetBIOS (or both). A Quick Filter tab then appears on the Frame<br />
Display. Changing the filter definition on the Quick Filter dialog changes the filter applied on the Quick Filter<br />
tab. Quick filters are persistent during the session, but are discarded when the session is closed.<br />
The box in the center is the Protocols To Hide. When you select the checkbox for a protocol in the Protocols<br />
To Hide, data for that protocol will not appear in the Decode, Binary, Radix, and Character panes. The<br />
frames containing that type data will still appear in the Summary pane, but not in the Decode, Binary, Radix,<br />
and Character panes.<br />
The box on the right is the Named Filters. It contains filters that you create<br />
using the Named Filter and Set Condition dialogs. When you select<br />
the checkbox for the Name Filters, a tab appears on the Summary Pane<br />
that displays the frame containing the specific data identified in the filter.<br />
The named Filter tab remains on the Frame Display Summary<br />
Pane unless you hide it using the Hide/Show Display<br />
Filters dialog.<br />
With low energy, the Configured BT Low energy devices and Exclude<br />
NULLS and POLLs are default named filters.<br />
Check the small box next to the name of each protocol you want to filter<br />
in, hide, or Named Filter to display.<br />
Then click OK<br />
72
4.4.1.13.2 Frame Display - Right Click Filtering<br />
In Frame Display, protocols are displayed as tabs in the Summary pane. When you select a tab, the protocol<br />
layers are displayed. The layers vary depending on the protocol.<br />
You can create additional protocol tabs that highlight specific layers in the Summary pane using the Filtering<br />
Results dialog.<br />
Note: The Filtering Results dialog is not available for all layers because the information within<br />
those layers is not sortable, like time.<br />
To use the Filtering Results dialog:<br />
1. Right-click on a value in the Summary<br />
pane. For example, the "S" for Slave under<br />
Role<br />
2. On the drop-down list select Filter in name<br />
= value, where name is the column name<br />
and value is the column-value to filter. For<br />
our example "Filter in Role = Slave"<br />
appears in the menu.<br />
The Filtering Results dialog appears.<br />
3. Enter a name for the Filter or use the default name.<br />
4. Click OK.<br />
A new protocol tab with the "Filter Name" you just created appears in the Summary pane.<br />
The new tab displays data specific to the layer you selected.<br />
4.4.1.13.3 Easy Protocol Filtering<br />
There are two types of easy protocol filtering. The first method lets you filter on the protocol shown in the Summary<br />
pane, and the second lets you filter on any protocol discovered on the network so far.<br />
4.4.1.13.3.1 Filtering On the Summary Layer Protocol<br />
To filter on the protocol in the Summary in the Frame Display window pane:<br />
1. Select the tab of the desired protocol, or open the Summary combo box.<br />
2. Select the desired protocol.<br />
3. To filter on a different layer, just select another tab, or change the layer selection in the combo<br />
box.<br />
4.4.1.13.3.2 Filtering on all Frames with Errors from the Frame Display<br />
To filter on all frames with errors:<br />
73
1. Open the Frame Display window.<br />
2. Click the starred Quick Filter icon or select Quick Filtering from the Filter menu<br />
3. Check the box for All Frames With Errors in the Protocols To Filter In pane, and click OK.<br />
4. The system creates a tab on the Frame Display labeled "Errors" that displays the results<br />
of the All Frames With Errors filter.<br />
Note: When you have multiple Frame Display windows open and you are capturing data,<br />
you may receive an error message declaring that "Filtering cannot be done while receiving data<br />
this fast." If this occurs, you may have to stop filtering until the data is captured.<br />
4.4.2 Bluetooth Timeline<br />
In addition to the Coexistence View, which displays both Bluetooth® and 802.11 data together, you can also see<br />
more information about Bluetooth in a separate dialog. The Bluetooth Timeline displays packet information<br />
with an emphasis on temporal information and payload throughput. The timelines also provide selected information<br />
from Frame Display.<br />
The timelines provide a rich set of diverse information about Bluetooth packets, both individually and as a<br />
range. Information is conveyed using text, color, graphic size, line type, and position.<br />
You access the Bluetooth Timeline by selecting Bluetooth Timeline from the Control window View menu or<br />
by clickingthe Bluetooth Timeline icon<br />
on the Control window toolbar or Frame Display.<br />
74
4.4.2.1 Bluetooth Timeline Packet Depiction<br />
Figure 42. Bluetooth Timeline Packet Depiction with Packet Information Shown<br />
• The timeline shows Bluetooth packets within a specific period of time.<br />
• The time segments flow left to right and down, following a complete row across. Then you move down<br />
to the next row, go across, then down to the next row, just like reading a book, upper left corner to<br />
lower right corner.<br />
• Within each row are two divisions: M (master) and S (Slave). Packets are placed on M or S depending<br />
on the data's role.<br />
• Placing the mouse pointer on a packet displays information about that packet in an information box.<br />
• Selecting a packet by clicking on it shows information about that packet above the timeline.<br />
• You can use the arrow keys to move to the next or previous packet. You can select multiple packets by<br />
dragging within the timeline or by holding the SHIFT key down while arrowing.<br />
• Using the mouse scroll wheel scrolls the timeline vertically. You can also zoom by using a right click<br />
(which displays specific magnification values), using the + and - Zoom tools, or by selecting a value<br />
from the Zoom menu.<br />
• Packet height indicates speed (1, 2, or 3 Mbits/sec). Packet length indicates duration (for reference, the<br />
duration of a slot is 625-µs). Packet height and length together indicate size (speed times duration).<br />
A packet is drawn using the following components:<br />
75
• A “max packet on wire reference” rectangle (light solid lines). This indicates the packet in the air with a max<br />
payload.<br />
• A “max actual payload reference” rectangle (dark solid lines). This indicates a max payload as would be<br />
extracted by the receiving device (if the payload in the air contains forward error correction (FEC), it is<br />
longer than the actual payload). The position of the beginning of the rectangle indicates where the payload<br />
begins in time.<br />
• An “actual payload” colored sub-rectangle (packet category-specific; blue here). This indicates the actual<br />
received payload with FEC (if any) removed. It is the beginning portion of the “max actual payload reference”<br />
rectangle. If the actual payload is of max size, the entire “max actual payload reference” rectangle<br />
is colored.<br />
• An “unused payload reference” sub-rectangle (always white). This indicates the unused portion of a maximum<br />
payload. It is the remaining portion of the “max actual payload reference” rectangle. The packet in<br />
76
the air does not leave room for this. It is indicated for reference only.<br />
• A “max speed reference” rectangle (dashed lines). This is used to extend the height to that of a 3 Mbits/sec<br />
packet, and appears only for packets whose speed is less than that. The packet shown here has a speed of 1<br />
Mbit/sec because the height of the other rectangles is 1/3 of the total height.<br />
• The part of the “max packet on wire reference” rectangle (light solid lines) that trails the “max actual payload<br />
reference” rectangle (dark solid lines) is partly packet in the air (if the payload on the wire contained<br />
FEC) and partly trailer (CRC, etc). There is always a trailer, so there is always a little space (subject to round<br />
off error and pixel granularity) between the ends of the two rectangles.<br />
This table shows how packets are colored:<br />
Packet Category Packet Types Color<br />
ALC<br />
DM1, DM3, DM5, DH1,<br />
2-DH1, 3-DH1, DH3,<br />
2-DH3, 3-DH3, DH5,<br />
Black<br />
77
Packet Category Packet Types Color<br />
2-DH5, 3-DH5, AUX1<br />
SCO HV1, HV2, HV3, DV Pink<br />
eSCO<br />
EV3, 2-EV3, 3-EV3, EV4,<br />
EV5, 2-EV5, 3-EV5<br />
Purple<br />
LMP* DM1, DV Dark Blue<br />
FHS FHS Light Blue<br />
NULL NULL Light Gray<br />
POLL POLL Light Brown<br />
Filler<br />
Filler provided by<br />
<strong>ComProbe</strong> software<br />
Dark Gray<br />
*LMP is a protocol layer that uses either DM1 or DV packets. If a packet<br />
has an LMP layer, the LMP color is used instead of the packet type color.<br />
This table summarizes the various ways in which packet information is presented:<br />
Information Text Color<br />
Graphic<br />
size<br />
Position<br />
Packet Type<br />
X<br />
Packet Category<br />
X<br />
Protocol X X<br />
Time of occurence X X<br />
Source device X X<br />
Duration<br />
X<br />
Size in bytes X X<br />
Size as a percent of max size for<br />
that packet type<br />
Speed<br />
X<br />
X<br />
X<br />
Status X X<br />
4.4.2.2 Bluetooth Timeline Packet Navigation and Selection<br />
• Buttons, menu items, and keystrokes can be used to go to the next or previous packet, next or previous<br />
error packet, next or previous retransmitted packet (Bluetooth only), and the first or last packet.<br />
78
• If there is no selected packet in the timeline, First Packet , Next Packet , and Last Packet<br />
are enabled, but Previous Packet<br />
is not.<br />
• A single packet is selected either by clicking on it, navigating to it, or selecting it in the Frame Display.<br />
Selecting a packet activates Previous Packet.<br />
• Selecting Previous Packet with a packet that is currently not visible, places it in the top row (i.e. the display<br />
scrolls up just enough to make it visible).<br />
• Selecting Next Packet with a packet that is currently not visible, places it in the bottom row (i.e. the display<br />
scrolls down just enough to make it visible).<br />
• Selecting Previous Packet or Next Packet for a packet that’s currently visible selects it without<br />
scrolling.<br />
• Multiple packets are selected either by dragging the mouse or by holding down the shift key while navigating<br />
or clicking.<br />
• When a single packet is selected in the timeline, it is also becomes selected in the Frame Display.<br />
When multiple packets are selected in the timeline, only one of them is selected in the Frame Display.<br />
• The left arrow key goes to the previous packet. The right arrow key goes to the next packet. The Ctrlleft<br />
arrow key goes to the previous error packet. The Ctrl-right arrow key goes to the next error packet.<br />
4.4.2.3 Bluetooth Timeline Toolbar<br />
The toolbarbar contains the following:<br />
Lock - The Lock button only appears in live mode and is automatically depressed when the<br />
user scrolls.<br />
Unlock<br />
First Packet<br />
Previous Packet<br />
Next Packet<br />
79
Last Packet<br />
Previous Retransmitted Packet<br />
Next Retransmitted Packet<br />
Previous Error Packet<br />
Next Error Packet<br />
Zoom In - Click on the icon each time to zoom in from 4800 slots to 12 slots<br />
Zoom Out - Click on the icon each time to zoom out from 12 slots to 4800 slots<br />
Reset - The Reset button appears only in live mode. Reset causes all packet data up to that<br />
point to be deleted from the Packet Timeline display. This does not affect the data in Frame<br />
Display. Resetting the display may be useful when the most recent throughput values are of<br />
interest.<br />
4.4.2.4 Bluetooth Timeline Menu Bar<br />
The Bluetooth Timeline menu bar contains the following:<br />
File Menu<br />
Toggle Display Lock (available only in live mode)<br />
Reset (available only in live mode)<br />
Exit<br />
Zoom Menu<br />
Menu Item<br />
Keyboard Short-cut<br />
Zoom In<br />
Zoom Out<br />
Ctrl+Plus<br />
Ctrl+Minus<br />
80
Zoom Menu<br />
Menu Item<br />
Keyboard Short-cut<br />
Zoom In Tool<br />
Zoom Out Tool<br />
Selection Tool<br />
12 Slots (3 X 4)<br />
36 Slots (6 X 6)<br />
144 Slots (12 X 12)<br />
324 Slots (18 X 18)<br />
576 Slots (24 X 24)<br />
900 Slots (30 X 20)<br />
1296 Slots (36 X 36)<br />
1764 Slots (42 X 42)<br />
2304 Slots (48 X 48)<br />
2916 Slots (54 X 54)<br />
3600 Slots (60 X 60)<br />
4356 Slots (66 X 66)<br />
5184 Slots (72 X 72)<br />
Navigate Menu<br />
Navigate Menu:<br />
Keyboard Shortcuts:<br />
First Packet<br />
Last Packet<br />
Previous Packet<br />
Next Packet<br />
Home<br />
End<br />
Left Arrow<br />
Right Arrow<br />
Previous Retransmitted Packet<br />
Next Retransmitted Packet<br />
Previous Error Packet<br />
Next Error Packet<br />
Ctrl+Left Arrow<br />
Ctrl+Right Arrow<br />
81
Navigate Menu<br />
Selected Packet<br />
Toggle Display Lock (available only in live mode)<br />
Enter<br />
L<br />
Throughput Menu<br />
Export Payload<br />
Throughput Over Time<br />
Export Object<br />
Throughput Stats<br />
Help Topics<br />
About<br />
Help Menu<br />
4.4.2.5 Bluetooth Timeline Visual Elements<br />
The Bluetooth Timeline consists of the following visual elements:<br />
• The timeline shows Bluetooth packets within a specific period of time.<br />
• The timeline shows Bluetooth packets within a specific period of time.<br />
• The time segments flow left to right and down, following a complete row across. Then you move down<br />
to the next row, go across, then down to the next row, just like reading a book, upper left corner to<br />
lower right corner.<br />
• Within each row are two divisions: M (master) and S (Slave). Packets are placed on M or S depending<br />
on source of the data withing the link.<br />
• Placing the mouse pointer on a packet displays information about that packet in an information box.<br />
• Selecting a packet by clicking on it shows information about that packet above the timeline.<br />
• You can use the arrow keys to move to the next or previous packet.You can select multiple packets by<br />
dragging within the timeline or by holding the SHIFT key down while arrowing.<br />
• Using the mouse scroll wheel scrolls the timeline vertically. You can also zoom by using a right click<br />
(which displays specific magnification values), using the + and - Zoom tools, or by selecting a value<br />
from the Zoom menu.<br />
• Packet height indicates speed (1, 2, or 3 Mbits/sec). Packet length indicates duration (for reference, the<br />
duration of a slot is 625-µs). Packet height and length together indicate size (speed times duration).<br />
82
• Rows of Bluetooth Slots: Each slot begins at the left edge of the vertical blue bar. There are two Bluetooth<br />
clocks per slot. Each slot represents 0.000625 seconds, or 625 µs.<br />
• ‘M’ and ‘S’ labels: Within each row, master and slave packets are indicated on the left side of the row. By<br />
default, all possible slave devices (there can be up to 7) are put on the S sub-row, but checking the Show<br />
slave LT_ADDR checkbox shows all existing slave device sub-rows with numbered labels (some or all of<br />
S1, S2, …, S7).<br />
• Bluetooth Clock: The Bluetooth clock of the first slot in each row is shown underneath each row.<br />
• Packet Info Line: The packet info line appears just above the timeline and displays information for the currently<br />
selected packet(s). If only one packet is selected, this information consists of the packet number,<br />
packet type, Bluetooth clock (Bluetooth only), Timestamp, and Duration. Duration is shown as<br />
"Unknown" when the selected packet has an error.<br />
If multiple packets are selected, this information consists of the packet range, the Bluetooth clock delta<br />
(Bluetooth only), the Timestamp delta, and Span. Span is shown as "Unknown" when the last packet in the<br />
selected range has an error since its duration is unknown. A user can use these to verify the average<br />
throughput calculations.<br />
Selected packets are bounded by a magenta rectangle. See the Packet Navigation and Selection section.<br />
• Floating Information Window (aka Tooltip): The information window displays when the mouse cursor hovers<br />
on a packet (not slot). It persists as long as the mouse cursor stays on the packet or tooltip. For<br />
Bluetooth, the tooltip shows the packet number (in bold), the Baseband layer decode from the decode<br />
pane of the Frame Display (with the percentage of the Payload Length max added).<br />
Discontinuities are indicated by cross-hatched slots. See the Discontinuities section.<br />
• Zoom Tools: Zoom tools zoom in or out while maintaining the position on the screen of the area under<br />
the zoom tool. This makes it possible to zoom in or out for a specific packet or area of the timeline. See<br />
the “Zooming” section.<br />
• Packet Status: Packet status is indicated by color codes. A yellow slot indicates a re-transmitted packet, a<br />
dark red slot indicates a CRC error, and a small red triangle in the upper-left corner of the packet (not the<br />
slot) indicates a decode error.<br />
• Right-Click Menu: The right-click menu provides zooming and tool selection. See the “Zooming” section.<br />
• Graphical Packet Depiction: Each packet within the visible range is graphically depicted. See the “Packet<br />
Depiction” section.<br />
• Swap Button: The Swap button switches the position of the Timeline and the Throughput graph.<br />
• Show Running Average: Selecting this check box shows a running average in the Throughput Over Time<br />
graph as an orange line.<br />
• Show slave LT_ADDR: Selecting this checkbox displays the Slave LT_ADDR in the timeline row labels<br />
Note: The raw timestamp value is the number of 100-nanosecond intervals since the beginning<br />
of January 1, 1601. This is standard Windows time.<br />
83
4.4.2.6 Bluetooth Timeline Zooming<br />
Zoom features can be accessed from the Zoom menu, clicking a zoom tool on the toolbar, or by right clicking<br />
on the Timeline window.<br />
A couple of things to remember about Zooming.<br />
• Zoom tools accessed using the right click menu allow you to maintain the current position on the screen<br />
and precisely zoom in to a specific packet.<br />
• Selecting a Zoom icon (+ or -) on the toolbar does not change the pointer to a Zoom tool. Each distinct<br />
click only zooms in our out.<br />
• Zoom tools accessed from the Zoom menu have a pointer<br />
in the upper-left corner which is useful for specifying the<br />
zoom location and bringing up a tool tip of a specific<br />
packet.<br />
4.4.2.7 Bluetooth Timeline Throughput Displays<br />
Throughput is payload over time. There are 3 categories of throughput:<br />
• Average Payload<br />
• 1-second Payload<br />
• Average Payload Throughput - Selected<br />
In computing throughput, payload is not counted from Bluetooth packets that have a CRC error (dark red slot) or<br />
that are a retransmission (yellow slot).<br />
4.4.2.7.1 Bluetooth Timeline Average Payload Throughput<br />
The figure depicts the Throughput display with the Average Throughput<br />
indicators in the left column.<br />
Average Throughput is the total payload over the entire session divided<br />
by the total time. Total time is calculated by taking the difference in<br />
timestamps between the first and last packet. In Bluetooth, timestamp difference<br />
is used instead of Bluetooth clock count because timestamp difference is immune to role switches.<br />
However, this can result in inaccuracies when the duration is small enough that a coarse timestamp granularity<br />
is significant.<br />
• Average Throughput is shown as 0 when there is only one packet, because in that case the timestamp difference<br />
is 0 and an average cannot be computed.<br />
• Duration is the beginning of the first packet to the end of the last packet.<br />
• Duration for average throughput is beginning of first packet to end of last packet. If a single packet is<br />
selected, the duration of that packet is used.<br />
84
• Average Throughput is shown for all devices, master devices, and slave devices.<br />
• A horizontal bar indicates relative percentage. Text displays the throughput value.<br />
4.4.2.7.2 Bluetooth ® Timeline 1 Second Throughput Indicators<br />
• 1-Second Payload Throughput is the total payload over the most<br />
recent one second of duration (This is determined by counting<br />
Bluetooth clocks). It is cleared after each discontinuity. A discontinuity<br />
is when the Bluetooth clock goes forward more than<br />
two (2) seconds or goes backwards any amount. This is caused<br />
by either a role switch or Bluetooth clock rollover . The<br />
Bluetooth clock count is used instead of timestamp difference because the Bluetooth clock count is precise;<br />
however, if timestamp difference were used it would not be necessary to clear the 1-second throughput<br />
after each discontinuity. Note: The raw timestamp value is the number of 100-nanosecond intervals<br />
since the beginning of January 1, 1601. This is standard Windows time.<br />
• 1-second throughput is not an average. It is simply the total payload over the most recent one second of<br />
duration. Since it’s not an average, it behaves differently than average throughput. In particular, while<br />
average throughput can be very large with only a couple of packets (since it’s dividing small payload by<br />
small time), 1-second throughput is very small (since it counts only what it sees and doesn't try to extrapolate).<br />
• A 1-second throughput is shown for all devices, master devices, and slave devices.<br />
• A horizontal bar indicates percentage of max, and text gives the actual throughput.<br />
4.4.2.7.3 Average Payload Throughput (bits/s) (Selected)<br />
The following figure depicts the Throughput display with the Average Payload Throughput (bits/sec) (Selected)<br />
indicators in the left column. This portion of the dialog displays average throughput for a selected packet<br />
range when you select a packet from the Timeline.<br />
Average throughput is the total payload over the entire<br />
session divided by the total time. Total time is calculated<br />
by taking the difference in timestamps between the first<br />
and last packet. In Bluetooth, timestamp difference is<br />
used instead of Bluetooth clock count because timestamp<br />
difference is immune to role switches. However, this can<br />
result in inaccuracies when the duration is small enough that a coarse timestamp granularity is significant.<br />
• Duration for average throughput is beginning of first packet to end of last packet. If a single packet is<br />
selected, the duration of that packet is used.<br />
• Average throughput can be nonzero when a single packet is selected.<br />
• Average throughput is shown for all devices, master devices, and slave devices.<br />
• A horizontal bar indicates relative percentage. Text displays the throughput value<br />
4.4.2.7.4 Bluetooth Payload Throughput Over Time Graph<br />
The following figure depicts the Payload Throughput Over Time graph.<br />
85
The Payload Throughput Over Time graph<br />
shows total payload for each successive time<br />
interval. The time interval is initially 0.1<br />
second. Each time the number of throughput<br />
elements reaches 100, they are collapsed into<br />
a set of 50 by combining adjacent elements<br />
and doubling the duration of each element.<br />
Collapsing thus occurs as follows:<br />
• T-<br />
he bottom of the graph shows a beginning time and an ending<br />
time. The beginning time is relative to the start of the session<br />
and initially 0. When packets start wrapping out it becomes the<br />
relative time offset of the first available packet. The ending<br />
time is always the total time of the session.<br />
• Discontinuities are indicated by vertical dashed lines.<br />
• A green view port indicates the time range corresponding to<br />
the visible slots in the timeline. The view port can be moved<br />
by clicking elsewhere in the graph or by dragging. Whenever it<br />
is moved, the timeline scrolls to match. When the slot range in the timeline changes, the view port<br />
moves and resizes as necessary to match.<br />
• The Swap button - switches the position of the Timeline and the Throughput graph.<br />
• Show Running Average - Selecting this check box shows a running average in the Throughput Over<br />
Time graph as an orange line.<br />
• Show slave LT_ADDR - Selecting this checkbox displays the Slave LT_ADDR in the timeline row<br />
labels.<br />
Comparison with the Coexistence View Throughput Graph<br />
The throughput graphs for Classic Bluetooth in the Coexistence View and the Bluetooth Timeline can look quite<br />
different even though they are plotting the same data. The reason is that the Coexistence View uses<br />
timestamps while the Bluetooth Timeline uses Bluetooth clocks, and they do not always match up exactly. This<br />
mismatch can result in the data for a particular packet being included in different intervals in the two throughput<br />
graphs, and can have a significant impact on the shapes of the two respective graphs. This can also result in<br />
the total duration of the two throughput graphs being different.<br />
Another factor that can affect total duration is that the Bluetooth Timeline’s throughput graph stops at the last<br />
Classic Bluetooth packet while the Coexistence View’s Throughput Graph stops at the last packet regardless of<br />
technology.<br />
4.4.2.8 Export Payload Throughput Over Time<br />
In the Bluetooth Timeline you can create and save a comma-separated values (.csv) file that contains information<br />
about the Payload Throughput Over Time graph. The file contains the following information:<br />
• Sequence Number<br />
• Beginning Packet<br />
• Ending Packet<br />
86
• Bit Count<br />
• Duration (Secs)<br />
• Bits/Sec<br />
• Running Average (Bits/Sec)<br />
To create the file:<br />
1. Select Export Payload Throughput Over Time from<br />
the Throughput menu.<br />
The Save As menu appears.<br />
2. Select a location where you want to save the file.<br />
3. Enter a File Name.<br />
4. Select Save.<br />
Note: In live mode, default path name is C:\Documents<br />
and Settings\All <strong>User</strong>s\Documents\<strong>Frontline</strong> <strong>Test</strong> <strong>Equipment</strong>\My Log<br />
Files\PayloadThroughputOverTime.csv. In view mode, default path name is cfa<br />
basepathname with " (PayloadThroughputOverTime).csv" appended.<br />
The file is saved and you can open it in a simple text editor or database application.<br />
4.4.2.9 Object Throughput Stats File<br />
In the Bluetooth Timeline you can create and save a comma-separated values (.csv) file that contains information<br />
about objects in the timeline. The file contains the following information:<br />
• Name<br />
• Length (bytes)<br />
• Connection Packet Number<br />
• Begin Transfer Packet Number<br />
• End Transfer Packet Number<br />
• Disconnection Packet Number<br />
• Connection Duration<br />
• (Fractional Seconds)<br />
• Transfer Duration<br />
• (Fractional Seconds)<br />
• Connection Throughput (bits/s)<br />
• Transfer Throughput (bits/s)<br />
• Transfer Duration Percentage of Connection Duration<br />
• No Errors Packet Count (Includes Decode Errors) (While Connected)<br />
87
• Retransmitted Packet Count (While Connected)<br />
• Header Errors Packet Count (While Connected)<br />
• Payload/CRC Errors Packet Count (While Connected)<br />
To create the file:<br />
1. Select Export Object Throughput Stats from the<br />
Throughput menu.<br />
The Save As menu appears.<br />
2. Select a location where you want to save the file.<br />
3. Enter a File Name.<br />
4. Select Save.<br />
Note: In live mode, the default path name is<br />
C:\Documents and Settings\All <strong>User</strong>s\Documents\<strong>Frontline</strong> <strong>Test</strong> <strong>Equipment</strong>\My<br />
Log Files\ObjectThroughputStats.csv. In view mode, default path name is cfa<br />
basepathname with " (ObjectThroughputStats).csv" appended.<br />
The file is saved and you can open it in a simple text editor or database application<br />
4.4.2.10 Bluetooth Timeline Discontinuities<br />
The following figure depicts a discontinuity between two packets.<br />
Figure 43. Bluetooth Timeline Packet Discontinuity, cross-hatched area.<br />
To keep the timeline and the throughput graph manageable, big jumps in the Bluetooth clock are not represented<br />
linearly. Instead, they are shown as discontinuities. A discontinuity is said to exist when the Bluetooth<br />
clock goes forward more than two (2) seconds or backwards any amount. A discontinuity is indicated by a<br />
cross-hatched slot in the timeline and a corresponding vertical dashed line in the throughput graph. The<br />
Bluetooth clock can jump forward when capture is paused or when there is a role switch (in a role switch, a different<br />
device becomes master, and since each device keeps its own Bluetooth clock, the clock can change radically),<br />
and backwards when there is a role switch or clock rollover<br />
Note: The raw timestamp value is the number of 100-nanosecond intervals since the beginning<br />
of January 1, 1601. This is standard Windows time.<br />
88
4.4.2.11 Legend<br />
This legend identifies the color coding found in the timeline.<br />
4.4.2.12 Bluetooth ® Timeline: Packets Missing Bluetooth Clock<br />
Captured data that is missing the Bluetooth clock, such as HCI and BTSnoop, will not display packets. In an<br />
instance when the data is missing the clock the Bluetooth Timeline will display a message in the Throughput<br />
Graph and the Timeline: "Packets without a Bluetooth clock (such as HCI) won't be shown."<br />
Figure 44. Missing packets message in timeline pane.<br />
4.4.3 low energy Timeline<br />
The Bluetooth ® low energy Timeline displays packet information with an emphasis on temporal information<br />
and payload throughput. The timeline also provides selected information from Frame Display.<br />
The timeline provides a rich set of diverse information about low energy packets, both individually and as a<br />
range. Information is conveyed using text, color, packet size, and position.<br />
89
Figure 45. Bluetooth low energy Timeline<br />
You access the Timeline by selecting Bluetooth low energy Timeline from the View menu or by pressing the<br />
Bluetooth low energy Timeline icon<br />
In computing throughput, packets that have a CRC error are excluded.<br />
4.4.3.1 low energy Timeline Toolbar<br />
The toolbar contains the following:<br />
on the Control window toolbar and Frame Display toolbar.<br />
Lock - The Lock button only appears in live mode and is automatically depressed when the<br />
user scrolls.<br />
Unlock<br />
First Packet<br />
Previous Packet<br />
Next Packet<br />
Last Packet<br />
90
Previous Interframe Spacing (IFS) Error<br />
• Interframe Spacing is considered valid if it is within 150 μs + or – 2us<br />
• If the Interframe Spacing is less than 148 us or greater than 152 us but less than or<br />
equal to 300 μs, it is considered an IFS error.<br />
Next Interframe Spacing (IFS) Error<br />
• Interframe Spacing is considered valid if it is within 150 μs + or – 2us<br />
• If the Interframe Spacing is less than 148 us or greater than 152 μs but less than or<br />
equal to 300 us, it is considered an IFS error.<br />
Previous Error Packet<br />
Next Error Packet<br />
Zoom In<br />
Zoom Out<br />
Reset - The Reset button appears only in live mode. Reset causes all packet data up to that<br />
point to be deleted from the Packet Timeline display. This does not affect the data in<br />
Frame Display. Resetting the display may be useful when the most recent throughput values<br />
are of interest.<br />
4.4.3.2 low energy Timeline Legend<br />
This legend identifies the color coding found in the timeline.<br />
• When you select a packet in the timeline, items in the legend that<br />
relate to the packet are highlighted.<br />
• Bold text indicates that the type of packet has been seen in the<br />
timeline.<br />
4.4.3.3 Throughput Displays<br />
Throughput is payload over time. There are 3 categories of throughput:<br />
91
4.4.3.3.1 Average and 1 Second Packet Throughput<br />
The figure depicts the Average and 1 Second Packet Throughput displays.<br />
This display appears when you select the Packet Throughput<br />
radio button.<br />
• Average Packet Throughput is the total packet size over the<br />
entire session divided by the total time. Total time is calculated<br />
by taking the difference in timestamps between the first and last packet.<br />
• 1-Second Packet Throughput is the total packet size over the most recent one second.<br />
• Width = peak =: This displays the maximum throughput seen so far.<br />
• A horizontal bar indicates percentage of max seen up to that point, and text gives the actual throughput.<br />
4.4.3.3.2 Average and 1 Second Payload Throughput<br />
The figure depicts the Average and One Second Payload Throughput<br />
display. This display appears when you select the Payload Throughput<br />
radio button.<br />
• Average Payload Throughput is the total payload over the entire<br />
session divided by the total time.<br />
• 1-second Payload Throughputis the total payload over the most recent one second.<br />
• Width = peak =: This displays the maximum throughput seen so far.<br />
Note: 1-second throughput behaves differently than average throughput. In particular, while<br />
average throughput can be very large with only a couple of packets (since it’s dividing small<br />
packet or payload size by small time), 1-second throughput can be very small since it divides<br />
by an entire one second.<br />
4.4.3.3.3 Throughput Graph<br />
The following figure depicts the Throughput Graph.<br />
Figure 46. Bluetooth low energy Timeline Throughput Graph<br />
The Swap button switches the position of the Timeline and the Throughput graph.<br />
92
Selecting Throughput Display<br />
• Selecting Packet Throughput displays just the Packet Throughput in graph form and displays the Average<br />
and Average and 1 Second Packet Throughput on the left side of the dialog. The y-axis numbers<br />
appear in blue.<br />
• Selecting Payload Throughput displays just the Payload Throughput in graph form and displays the<br />
Average and Average and 1 Second Payload Throughput on the left side of the dialog.. The y-axis numbers<br />
appear in green.<br />
• Selecting Include MIC will include the transmitted 32 bit Message Integrity Check data in the throughput.<br />
You may want to include Message Integrity Checks in your throughput even though MIC is not application data.<br />
MICs are transmitted and you may want to included in the throughput as a measure of how active your radio<br />
was.<br />
In this example the 1 Second Payload<br />
Throughput is 1,360 bits/sec when<br />
Include MIC is not checked. By checking<br />
the Include MIC box the MIC data<br />
is included in the throughput data and<br />
1 Second Payload Throughput<br />
increases to 1,840 bits/sec. This capture<br />
file has 15 MICs in the last second<br />
of the file. A MIC is 32 bits for a total of<br />
32 bits X 15 MICs = 480 bits.<br />
he easiest way to view MIC data is to use the Frame Display.<br />
T-<br />
1. Using the Decoder pane scroll through the frames until LE<br />
Data shows "Encrypted MIC".<br />
2. Place the cursor on the Encrypted MIC data and while holding<br />
the left mouse button drag the field to the Summary<br />
pane.<br />
3. An Encrypted MIC column is added to the Summary pane.<br />
93
Figure 47. Creating Encrypted MIC in Frame Display Summary pane<br />
• Selecting Both displays both Packet and Payload Throughput. The y-axis numbers appear in blue. In the<br />
Throughput Graph packets appears as:<br />
• Packet Throughput = Blue<br />
• Payload Throughput = Green<br />
• Selecting Configured Devices: Dispalays data from configured devices.The low energy Timeline considers<br />
a packet to be from a configured device if:<br />
1. The packet has an LE ADV layer and field "Meets Predefined Filter Criteria for BT low<br />
energy devices" == "Yes" in the LE BB layer,<br />
2. or the packet has anLE DATA layer.<br />
• Selecting All Devices displays data from all available devices.<br />
The bottom of the graph shows a beginning time and an ending time. The beginning time is relative to the start<br />
of the session and is initially 0. When packets start wrapping out it becomes the relative time offset of the first<br />
available packet. The ending time is always the total time of the session.<br />
Discontinuities are indicated by vertical dashed lines.<br />
A purple viewport indicates the time range corresponding to the visible timeline. The viewport can be moved<br />
by clicking elsewhere in the graph or by dragging it. Whenever it is moved, the timeline scrolls to match.<br />
When the timestamp range in the timeline changes, the viewport moves and resizes as necessary to match.<br />
Note: The raw timestamp value is the number of 100-nanosecond intervals since the beginning<br />
of January 1, 1601. This is standard Windows time.<br />
4.4.3.4 The Timeline<br />
The low energy Timeline shows Bluetooth packets within a specific period of time. Time is shown as one or<br />
more contiguous segments. Within each segment are one or more source access address or radio rows.<br />
94
Figure 48. Bluetoothlow energy Timeline<br />
4.4.3.4.1 How Packets Are Displayed<br />
Bluetooth low energy packets are displayed in the low energy timeline in Segments and Rows.<br />
• Segments are "pieces" of the timeline. You can zoom in to show just one segment, or you can zoom out to<br />
show multiple segments. In multiple segment displays the segments are contiguous from top to bottom.<br />
Refer to the diagram below. The top-most segment contains the beginning timestamp on the left. The<br />
timeline proceeds from left to right in a segment, and continues in the next segment down beginning on<br />
the left of that segment. If you zoom out to show two segments the viewable timeline appears in those two<br />
segments. You will use the scroll bar on the right to scroll through the timeline.<br />
In a one-segment display the viewable timeline appears in that one segment. You will scroll through the<br />
timeline using the scroll bar appearing at the bottom of the timeline display.<br />
• Rows show either the access address of the configured devices or of all discovered devices. Because the<br />
segments are contiguous in multiple segment displays, the rows in each segment are identical.<br />
In the following diagram we see a three segment display showing the timeline flow.<br />
95
Figure 49. Diagram of low energy Timeline Flow with Segment and Row Relationship<br />
• Rows can display either source device access addresses or the three radios receiving the data..You choose<br />
with methods by selecting Show Device Address Rows or Show Radio Rows from the Format menu.<br />
4.4.3.4.2 Format Menu<br />
Show Device Address Rows will display rows of packets<br />
from sending devices. The source device address will<br />
appear on the left of each row.<br />
Show Radio Rows will display rows packets received on<br />
radios 0,1, or 2. The radio number will appear on the left of<br />
each row.<br />
o<br />
The Addr rows display packets sent by that access address for all devices or configured devices. You<br />
select All Devices or Configured Devices using the radio buttons.The address shown is the access<br />
address for the device.<br />
Figure 50. Device Address Rows<br />
o The Radio rows display packets received by that radio ( 0, 1, or 2).<br />
96
Figure 51. Radio Rows<br />
• The mouse wheel scrolls the timeline horizontally when displaying a single segment, and scrolls vertically<br />
when displaying multiple segments<br />
• You can also zoom by using the right-click menu (which displays magnification values), using the + and -<br />
Zoom buttons on the toolbar, or by selecting a value from the Zoom menu.<br />
• Packet length indicates duration<br />
• The Timeline and Frame Display are synchronized so the packet range selected by the user in one is<br />
automatically selected in the other. For the selected packet range, the Timeline shows various duration<br />
values (Gap, Timestamp Delta, and Span), but only if both the first and last packet in the range are<br />
available in the Timeline. If not, those values are shown as “n/a”. Packets that are not displayed in the<br />
Timeline are Sniffer Debug packets, non-LE packets (e.g. WiFi), and packets that are not from a Configured<br />
Device the Configured Devices radio button is checked.<br />
97
Figure 52. low energy Timeline and Frame Display Packet Synchronization<br />
4.4.3.5 low energy Timeline Visual Elements<br />
The low energy Timeline consists of the following visual elements:<br />
• Time Markers - Time markers indicated by vertical blue lines are shown at 1.25 ms intervals. The markers<br />
are provided to help visualize the timescale and are also useful when using dual-mode chips that do<br />
BR/EDR and LE at the same time. Time markers snap to the beginning of the first data packet by default, but<br />
they can be snapped to the beginning or end of any packet by right-clicking on a packet and selecting Align<br />
Time Marker to Beginning of Packet or Align Time Marker to End of Packet. All other markers will shift<br />
relative to that new reference point.<br />
Figure 53. Timeline Markers Shown Snapped to End of Packet<br />
• Timestamp - The beginning and ending timestamp for each segment is displayed beneath each segment.<br />
When showing multiple segments the beginning timestamp is the same as the ending timestamp of the previous<br />
segment.<br />
In addition to the timestamps the segment information bar shows the zoom value in the center of the bar.<br />
Figure 54. Bluetooth le Timeline Segment Timestamp and Zoom Value<br />
Note: The raw timestamp value is the number of 100-nanosecond intervals since the beginning<br />
of January 1, 1601. This is standard Windows time.<br />
98
• Packet Info Line - The packet info line appears just above the timeline and displays information for the currently<br />
selected packet.<br />
Figure 55. Bluetooth le Timeline Packet Info Line<br />
• When you select multiple packets, the info line includes:<br />
o<br />
o<br />
o<br />
Gap - duration between the end of the first selected packet and the beginning of the last selected<br />
packet.<br />
Timestamp Delta - Duration between the beginnings of the first and last packets selected.<br />
Span - Duration between the beginning of the first selected packet and the end of the last selected<br />
packet<br />
Figure 56. Bluetooth le Timeline Packet Info Line for Multiple Selected Packets<br />
• Floating Information Window (aka Tooltip) - The information window displays when the mouse cursor<br />
hovers on a packet. It persists as long as the mouse cursor stays on the packet.<br />
• Discontinuities - Discontinuities are indicated by cross-hatched slots. See the Discontinuities section.<br />
• Packet Status - Packet status is indicated by color codes. Refer to low energy Timeline Legends.<br />
• Right-Click Menu. - The right-click menu provides zooming and time marker alignment.<br />
• Graphical Packet Depiction - each packet within the visible range is graphically depicted. See the<br />
Packet Depiction section.<br />
• Swap Button - The Swap button switches the position of the Timeline and the Throughput<br />
graph.<br />
• Show Running Average - -Selecting this check box shows a running average in the Throughput Over<br />
Time graph as an orange line .<br />
99
4.4.3.6 low energy Packet Discontinuities<br />
The following figure depicts a discontinuity between two packets.<br />
Figure 57. Bluetooth low energy Packet Discontinuity<br />
To keep the timeline and the throughput graph manageable, big jumps in the timestamp are not represented<br />
linearly. Instead, they are shown as discontinuities. A discontinuity exists between a pair of packets when the<br />
timestamp delta (the timestamp of the second packet minus the timestamp of the first packet) is (1) more than<br />
4.01 seconds or (2) is negative. The reason that the discontinuity trigger is set at 4.01 seconds is because the<br />
maximum connection interval time is 4 seconds.<br />
A discontinuity is indicated by a cross-hatched pattern drawn between two packets and a corresponding vertical<br />
dashed line in the throughput graph. When the timestamp delta is greater than 4.01 seconds, the discontinuity<br />
is a cosmetic convenience that avoids excessive empty space. When the timestamp delta is negative,<br />
the discontinuity is necessary so that the packets can be drawn in the order that they occur.<br />
4.4.3.7 low energy Timeline Navigating and Selecting Data<br />
Buttons, menu items, and keystrokes can be used to go to the next or previous packet, next or previous invalid<br />
interframe spacing (IFS), next or previous error packet, and the first or last packet.<br />
• If there is no selected packet in the timeline, First Packet , Next Packet , and Last Packet<br />
are enabled, but Previous Packet<br />
is not.<br />
• A single packet is selected either by clicking on it, navigating to it, or selecting it in the Frame Display.<br />
o<br />
Single Segment Navigation:<br />
• Selecting Previous Packet will select the next packet in time (moving back in time to the left)<br />
regardless of which row it is on. If the previous packet is not in the display or if a portion of the<br />
packet is visible, the display will scroll to the next packet and it will appear selected on the left<br />
of the display. The timestamp will change with the scrolling of the display.<br />
• Selecting Next Packet will select the next packet in time (moving forward in time to the right). If<br />
the next packet is not in the display, the display will scroll to the next packet and it will appear<br />
selected on the right of the display. The timestamp will change with the scrolling of the display.<br />
o<br />
Multiple Segment Navigation:<br />
100
• Selecting Previous Packet will select the next packet moving back in time (to the left) on the segment<br />
and will select the previous packet regardless of which or segment it is in.<br />
If the selected packet overlaps with the previous segment, the display will show the packet selected<br />
in both segments.<br />
If the previous packet is not shown in the timeline display or a portion of the packet is displayed,the<br />
display will move the view port back in time and will display the selected packet in the top segment<br />
on the left edge. Each segment's timestamps will synchronously change as the view port scrolls backwards<br />
in time.<br />
• Selecting Next Packet will select the next packet moving forward in time (to the right)on the to the<br />
next packet regardless of which row or segment it is in.<br />
If the next packet overlaps on a following segment, the display will show the packet selected in both<br />
segments.<br />
If the next packet is not shown in the timeline display on any segment or a portion of the packet is<br />
displayed, the display will move the view port forward in time and will display the selected packet in<br />
the bottom segment on the right edge. Each segment's timestamps will synchronously change as the<br />
view port scrolls forward in time. All subsequent selected next packets will appear on the right of<br />
the bottom segment.<br />
• Multiple packets are selected either by dragging the mouse or by holding down the shift key while navigating<br />
or clicking.<br />
• When a single packet is selected in the timeline it is also becomes selected in the Frame Display. When<br />
multiple packets are selected in the timeline, only one of them is selected in the Frame Display.<br />
• The keyboard left arrow key goes to the previous packet. The right arrow key goes to the next packet.<br />
The Ctrl-left arrow key goes to the previous error packet. The Ctrl-right arrow key goes to the next error<br />
packet.<br />
• The mouse scroll wheel will scroll the timeline as long as the cursor is in the dialog.<br />
4.4.3.8 le Timeline Zooming<br />
Zoom features can be accessed from the Bluetooth low energy Timeline Zoom menuor by right-clicking on<br />
the Timeline window.<br />
A couple of things to remember about Zooming.<br />
• Zooming using the toolbar buttons in a single segment display is relative to the center of the display.<br />
That is as you zoom out those packets on the left and right halves will move closer to the center. If you<br />
zoom in, those packets inthe left and right halves will move towards the left and right edges respectively.<br />
• Zooming using the toolbar buttons in a multiple segment display is relative to the number of segments. If<br />
you have a single display and zoom out they will become two segments, then three segments, then six,<br />
and so forth.<br />
• Selecting a Zoom icon (+ or -) on the toolbar zooms in our out.<br />
• The current Zoom setting is shown in the center of the timeline segment information bar at the bottom of<br />
each timeline segment.<br />
101
• If you are in multiple segments the segment information bar will show the zoom level with the text "<br />
(Contiguous time segment x/n)" where "x" is 1,2, 3... segment and "n" is the total numbr of segments. For<br />
example: :"(Contiguous time segment 2/3)".<br />
4.4.3.8.1 Zoom menu<br />
Figure 58. low energy Timeline Zoom menu<br />
102
4.4.3.8.1.1 Single Segment Zoom<br />
Zoom Menu Single Segment: Each selection defines the timeline displayed, the number of segments, and number<br />
of 1.25 ms markers withing the segment. For example, selecting "33.75 ms (1x27)" will display "33.75 ms"<br />
of the throughput graph in "1" segment with "27" markers.<br />
The scroll bar at the bottom of the segment will scroll the throughput graph view port.<br />
103
4.4.3.8.1.2 Multiple Segments<br />
Zoom Menu Multiple Segment: Each selection defines the timeline view port, the number of segments, and<br />
number of 1.25 ms markers withing the segment. For example, selecting "7.5 ms (6 1.25 ms time intervals<br />
(3x2))" will display "7.5 ms" of the total timeline in "3" segments of with "2" markers per segment for a total of<br />
"6" markers.<br />
The scroll bar at the left of the segments will scroll the view through the timeline.<br />
4.4.4 Message Sequence Chart<br />
The Message Sequence Chart (MSC) displays information about the messages passed between protocol layers.<br />
MSC displays a concise overview of a Blutetooth connection, highlighting the essential elements fo the connection.<br />
At a glance, you can see the flow of the data including role switches, connection requests, and errors.<br />
You can look at all the packets int he capture, or filter by protocol or profile. the MSC is color coded for a clear<br />
and easy view of your data.<br />
104
Figure 59. Message Sequence Chart Window<br />
How do I access the chart?<br />
You access the Message Sequence Chart by selecting the icon<br />
the Control window or Frame Display.<br />
or MSC Chart from the View menu from<br />
What do I see on the dialog?<br />
menu.<br />
At the top of the dialog you see four icons that you use to zoom in and out of the display<br />
vertically and horizontally. The same controls are available under the View<br />
There are three navigation icons also on the toolbar.<br />
This takes you to the first Information Frame.<br />
This takes you to first Protocol State Message.<br />
This takes you to the first Error Frame. Click here to learn more about this option.<br />
If there is both Classic and low energy packets, there will be a Classic and LE tab at the top of the dialog.<br />
105
Figure 60. Classic and LE tabs<br />
If the Classic tab is selected, you will see Classic protocols. If you select the LE tab, you will see LE Protocols. If<br />
there is only Classic or only LE, the Classic and LE tabs will not appear.<br />
Also along the top of the dialog are a series of protocol<br />
tabs. The tabs will vary depending on the protocols.<br />
Clicking on a tab displays the messaging<br />
between the master and slave for that<br />
protocol. For example, if you select<br />
RFCOMM, you will see the messaging<br />
between the RFCOMM{M} Master, and<br />
the RFCOMM{S} Slave.<br />
The Non-Message Summary tab displays<br />
all the non-message items in the data.<br />
The Ctrl Summary tab displays the signaling<br />
packets for all layers in one window<br />
in the order in which they are received.<br />
The information in the colored boxes displays general information about the messaging. The same is true for<br />
each one of the protocols.<br />
If you want to see the all the messaging in one dialog, you select the All Layers tab.<br />
When you move the mouse over<br />
the message description you see<br />
an expanded tool tip.<br />
If you position the cursor outside<br />
of the message box, the tool tip<br />
will only display for a few<br />
seconds.<br />
If, however, you position the<br />
cursor within the tool tip box, the<br />
message will remain until you move the cursor out of the box.<br />
Additionally, If you right click on a message description, you will see the select Show all Layers button.<br />
106
When you select Show all Layers, the chart will display all the messaging layers.<br />
The Frame# and Time of the packets are displayed on the left side of the chart.<br />
Figure 61. Frame# and Time Display, inside red box.<br />
If you click on the description of the message interaction, the corresponding information is highlighted in Frame<br />
Display.<br />
How do I navigate in the dialog?<br />
Figure 62. MSC Synchronization with Frame Display<br />
You can use the navigation arrows at the bottom and the right side of the dialog to move vertically and horizontally.<br />
You can also click and hold while moving the pointer within dialog that brings up a directional arrow<br />
that you can use to move left/right and up/down.<br />
Ctrl Summary tab<br />
When you select the Ctrl Summary tab you will see a summary of the control and signaling frames in the order<br />
that they are received/transmitted from and to devices.<br />
107
Figure 63. Control and Signaling Frames Summay<br />
The frame numbered is shown, whether the message comes from the Master or Slave, the message Address,<br />
the message itself, and the timestamp.<br />
Additionally, the control/signaling packets for each layer are shown in a different background color.<br />
Figure 64. Packet Layers Shown in Different Colors<br />
If you right click within the Ctrl Summary, you can select Show in MSC.<br />
Figure 65. Right-Click in Ctrl Summary to Display Show in MSC<br />
The window then displays the same information, but in the normal MSC view.<br />
108
Figure 66. MSC View of Selected Packet from Ctrl Summary<br />
You can return to the text version by using a right click and selecting Show in Text.<br />
Figure 67. Return to Text View Using Right-Click Menu<br />
You can also choose to show:<br />
• Frame # only<br />
• Time only<br />
• Show both Frame# and Time<br />
• Hide both Frame# and Time<br />
4.4.4.1 Message Sequence Chart - Search<br />
The Message Sequence Chart has a Search function that makes it easy to find a specific type message within the<br />
layers.<br />
109
When you select the 1) Search icon or 2)<br />
use F3 key, the Select layer and message dialog<br />
appears.<br />
From this dialog you can search for specific protocol<br />
messages or search for the first error frame.<br />
1. On the MSC dialog select one of the protocol tabs at the top.<br />
Note: If you select All Layers in Step 1, the Protocol Layers drop-down list is active.<br />
If you select any of the other single protocols, the Protocol Layers drop-down is<br />
grayed out.<br />
2. Or Open the Search dialog using the Search icon or the F3 key.<br />
3. Select a specific Protocol Message<br />
from the drop-down list.<br />
4. Once you select the Protocol Message,<br />
click OK<br />
The Search dialog disappears and the first search<br />
result is highlight in the Message Sequence Chart.<br />
Figure 68. Highlighted First Search Result<br />
If there is no instance of the search value, you see this following dialog.<br />
Once you have set the search value, you can 1) use the Search Previous<br />
and Search Next buttons or 2) F2 and F4 to move to the next or<br />
previous frame in the chart.<br />
4.4.4.2 Message Sequence Chart - Go To Frame<br />
The Message Sequence Chart has a Go To Frame function that makes it easy to find a specific frame within<br />
the layers.<br />
In addition to Search, you can also locate specific frames by clicking on the Go To Frame<br />
toolbar icon.<br />
110
1. Click Go To Frame in the toolbar.<br />
2. Enter a frame number in the Enter frame No.: text box.<br />
3. Click OK.<br />
The Go To Frame dialog disappears and the selected frame is highlighted<br />
in the chart.<br />
Once you have identified the frame in Go To, you can 1) use the Search Previous<br />
buttons or 2) F2 and F4 keys to move to the next or previous frame in the chart.<br />
and Search Next<br />
4.4.4.3 Message Sequence Chart - First Error Frame<br />
When you select Go to first error frame from the toolbar<br />
, the Select layer dialog appears.<br />
You have to select a layer from the drop down list to choose what layer you want to search for the error.<br />
Once you select a layer, then OK, the first error for that layer will be displayed.<br />
If no error is found, a dialog will announce that event.<br />
111
4.4.4.4 Message Sequence Chart - Printing<br />
There are three standard MSC print buttons. Print Preview, Print, and Cancel Printing.<br />
Print Preview<br />
1. When you select Print Preview , the Print Setup dialog appears.<br />
2. You next need to select your printer from the drop-down list, set printer properties, and format the<br />
print output..<br />
3. Then you select OK.<br />
After you select OK, the Message Sequence Chart Print Preview dialog appears.<br />
Figure 69. Message Sequence Chart Print Preview<br />
The information in the dialog will vary depending on the layer that is selected in the Message Sequence Chart,<br />
the properties of the printer you select, and the amount of data in the layer (which will correspond to the number<br />
of pages displayed).<br />
You control what you see and when to print using the toolbar at the top of the dialog.<br />
Figure 70. Print Preview Toolbar<br />
Print: Prints all the pages to the printer you select in Print Setup dialog.<br />
Cancel Printing: Cancels the current printing.<br />
Zoom In Horizontally, Zoom Out Horizontally, Zoom In Vertically, and Zoom<br />
Out Vertically allow you to change the look of the printed page.<br />
112
• Zoom In Horizontally expands the data horizontally so it can be easier to read.<br />
• Zoom Out Horizontally squeezes the data together so that more fits on one page.<br />
• Zoom in Vertically expands the data vertically so it can be easier to read.<br />
• Zoom Out Vertically squeezes the data so that more fits on one page.<br />
The current page text box displays the page number that is currently being shown<br />
on the dialog.<br />
the data for that page.<br />
You can enter a number in the text box, then press Enter, and the dialog will display<br />
If the data requires multiple pages, the navigation buttons will take you to the:<br />
• First page<br />
• Previous Page<br />
• Next Page<br />
• Last Page<br />
Close Print Preview closes the dialog and returns to the Message Sequence Chart.<br />
The Select font size drop-down allows you to select the text font size for the printed data. Simply<br />
select a font size from the drop-down list.<br />
When you select Print, you will output the data that is currently being displayed.<br />
4.4.5 Packet Error Rate Statistics<br />
The Packet Error Rate (PER) Stats view provides a dynamic graphical representation of the Packet Error Rate<br />
for each channel. The dialog displays a graph for each channel numbered 0 through 78.<br />
Data Analysis<br />
Packet Error Rate Stats assist in detecting bad communication connections. When a high percentage of retransmits,<br />
and/or header/payload errors occur, careful analysis of the statistics indicate whether the two<br />
devices under test are experiencing trouble communicating, or the packet sniffer is having difficulty listening.<br />
Generally, if the statistics display either a large number of re-transmits with few errors or an equal number of<br />
errors and re-transmits, then the two devices are not communicating clearly. However, if the statistics display a<br />
large number of errors and a small number of re-transmits, then the packet sniffer is not receiving the transmissions<br />
clearly.<br />
You can access this window in Bluetooth low energy by selecting the Bluetooth low energy Packet Error<br />
Rates Statistics icon from the Control window or Frame Display. You can also open the window from<br />
the View menu on the same windows.<br />
113
4.4.5.1 Classic Bluetooth Packet Error Rate<br />
Figure 71. Classic Bluetooth PER Stats Window<br />
4.4.5.2 Bluetooth low energy Packet Error Rate<br />
Figure 72. Bluetooth low energy PER Stats Window<br />
114
4.4.5.3 Packet Error Rate - Channels (Classic and le)<br />
The main portion of the PER Stats dialog displays the 40 individual channels, 0-39, for Bluetooth low energy<br />
Figure 73. Classic Bluetooth Packet Error Rate Channels<br />
Figure 74. Bluetooth low energy Packet Error Rate Channels<br />
• For Bluetooth low energy: Each channel contains a bar that displays the number of packets with no<br />
errors in green, packets with CRC errors in dark red..<br />
115
• The red number at the top of the channel shows the percentage of Header Error and Payload/CRC Errors<br />
in relationship to the total number of packets in the channel.<br />
• The light blue number at the top of each channel shows the megahertz (MHz) for the channel if the<br />
option is chosen in the Additional Statistics section.<br />
• When you select a channel, detailed information for that channel is displayed in the expanded chart on<br />
the upper right.<br />
• The channels change dynamically as the Viewport is moved or new data appears within the Viewport.<br />
• The Channel Not Available symbol is displayed if the channel is not available in the<br />
most recent channel map that is in or before the last selected packet, even if that channel<br />
map comes before the first selected packet.<br />
• "s" changes the size of the entire dialog.<br />
• "c" changes the contrast of the dialog<br />
• The Reset button is only available in live mode. The button will appear in the<br />
lower right-hand corner of the Channels section. Clicking on the Reset button<br />
will clear all prior data from PER Stats.<br />
4.4.5.4 Packet Error Rate - Pie Chart and Expanded<br />
Chart<br />
The Expanded PER Stats Chart (in the upper right ) displays detailed information about the channel selected<br />
from the main channel dialog.<br />
Expanded Chart<br />
Pie Chart<br />
• When PER Stats is first opened, Channel 0 is displayed in the expanded chart.<br />
• The top orange number on the Y-Axis displays the maximum number of packets in Snap Mode. If Snap<br />
Mode is turned off, the number will display in light blue.<br />
• The number of the selected channel is displayed in the upper-left corner of the expanded chart.<br />
• The combined value of Header and Payload/CRC errors for the channel is displayed in red as a percentage<br />
to the right of the channel number.<br />
116
• The megahertz (MHz) value is displayed in light blue text if the MHz option is selected in the Additional<br />
Statistics section.<br />
• The number of packets with no errors is displayed in light green in the bar chart.<br />
• All the values, except MHz, change dynamically when multiple time periods are selected in the Scroll<br />
Bar.<br />
• When you select the in the upper-right corner, the bar chart is replaced<br />
by a pie chart. The pie chart applies to all channels, not a selected channel.<br />
To return to the bar chart, click on the channel again or click on the<br />
the upper right hand corner.<br />
in<br />
4.4.5.5 Packet Error Rate - Legend<br />
The Legend displays color coded information about the channel selected.<br />
Classic Bluetooth<br />
Bluetooth low energy<br />
For Classic Bluetooth<br />
• The number of Packets with No Errors and percentage of packets with No Errors in relationship to total<br />
packets for the channel is displayed in green.<br />
• The number of Packets with Header Errors and percentage of packets with Header Errors in relationship<br />
to total packets for the channel is displayed in red.<br />
• The number of Packets with Payload/CRC Errors and percentage of packets with Payload/CRC Errors<br />
in relationship to total packets for the channel is displayed in dark red.<br />
• The number of Retransmitted Packets and percentage of Retransmitted packets in relationship to total<br />
packets for the channel is displayed in yellow.<br />
• Total packets and Total percentage is displayed in light blue.<br />
For Bluetooth low energy:<br />
• The number of Packets with No Errors and percentage of packets with No Errors in relationship to total<br />
packets for the channel is displayed in green.<br />
• The number of Packets with CRC Errors and percentage of packets with CRC Errors in relationship to<br />
total packets for the channel is displayed in dark red.<br />
• Total packets and Total percentage is displayed in light blue.<br />
117
For a description of the Channel Not Available symbol, see PER Stats Channel.<br />
4.4.5.6 Packet Error Rate - Additional Statistics<br />
This Additional Statistics section of PER Stats displays information about selected<br />
packets, duration, and Y-Axis max, and it also has two controls.<br />
• Selecting MHz On displays the megahertz value for each channel in the<br />
main channels chart and also in the expanded chart.<br />
• Selecting MHz Off removes the megahertz value.<br />
• Selected Packets displays the packet range selected in the Scroll Bar. This includes inapplicable Inapplicable<br />
packets include Wi-Fi packets, Sniffer Debug packets, any packets that are not relevant to PER<br />
Stats. Inapplicable packets do not appear as part of the Additional Statistics. packets.<br />
• Selected Duration identifies the total amount of time in the selected packet range displayed in the Scroll<br />
Bar.<br />
• Duration Per Bar in Scrollbar: identifies the amount of time represented by each bar in the Scroll Bar.<br />
• The Channel Graph Y-Axis Max can display two different values. When the Snap Arrow is orange ,<br />
the values for channels in the main chart are shown in relative terms in Snap Mode. This means that one<br />
channel (or channels) with the greatest value is "snapped" to the top of the chart. In the graphic below<br />
left, Channel 33 is snapped to the top of the chart.<br />
The channel(s) with the greatest value become a full-scale reference display for the other channels that<br />
have been relatively scaled. Channel comparisons become easier.<br />
With Snap On you can select multiple time values in the Scroll Bar.<br />
When the Snap Arrow is white (Snap Mode turned off), the values<br />
for channels in the main chart are shown in absolute values<br />
where the max value of each channel graph is the same regardless of<br />
the position of the Viewport. Channel 33, which is snapped to the<br />
top of the chart in Snap Mode (shown above left), appears like the right image when Snap Mode is<br />
turned off.<br />
• Scrollbar Y-Axis Max displays the maximum Y-Axis value in the Scroll Bar.<br />
4.4.5.7 Packet Error Rate - Sync Selected Packets With Other Windows<br />
By default, and unlike other windows, PER Stats is not synchronized with<br />
other windows such as Frame Display in that selecting a frame range in<br />
one does not highlight the same frame range in the other. This ensures<br />
that Frame Display isn’t constantly re-synchronizing during live capture<br />
while the view-port is maximized in PER Stats. If PER Stats synchronization is desired, it can be enabled by checking<br />
the Sync Selected Packets with Other Windows checkbox.<br />
4.4.5.8 Packet Error Rate - Export<br />
The Export section of PER Stats allows you to export data to a .csv or .txt file.<br />
118
1. To use the Export, select a range of data using the Viewport.<br />
2. Select .csv or .txt from Export Selected Data, depending on<br />
what type of data file you want. The Save As dialog appears.<br />
3. Select a location where you want to save the file in "Save in:".<br />
4. Enter a file name in "File name:".<br />
5. Select "Save".<br />
The file will be saved to that location.<br />
4.4.5.9 Packet Error Rate - Scroll Bar<br />
The PER Stats Scroll Bar displays stats for all packets, divided into equal time intervals.<br />
Figure 75. PER Stats Scroll Bar<br />
119
• Captured data begins to appear on the left and fills the width of the bar, left to right.<br />
• The vertical bars in the Scroll Bar each indicate a fixed duration. When data first appears in the Scroll<br />
Bar as it is being captured, each bar equals one second. When the data fills the bar, reaching the right<br />
side limit, the last bar moves back to the center of the Scroll Bar. The bars stay the same size, but<br />
doubles in duration (for example, the first time the Scroll Bar fills, the bars return to the middle, but now<br />
each bar represent two seconds of time instead of one). Each time the bars cycle to the middle, the time<br />
they represent doubles. When the bars move and the Viewport (see below) is not maximized, the Viewport<br />
moves with the bars so that the same packet range is indicated. When the Viewport is maximized it<br />
stays maximized regardless of what the bars do. This ensures that the display can be made to reflect all<br />
packets at all times by maximizing the .<br />
• The Viewport is used to select single or multiple vertical bars .<br />
• You can drag the sides of the Viewport or the slider buttons to select multiple bars, representing a greater<br />
time range.<br />
• You can click and drag the Viewport within the Scroll Bar.<br />
• When you select a packet range in Frame Display that includes only some of the frames in PER Stats,<br />
the Viewport snaps up against the side of the bar with the unselected frames .<br />
• When you select a packet range in Frame Display that includes all of the frames in PER Stats, the Viewport<br />
displays a space between the Viewport sides and the bar .<br />
• Double clicking anywhere inside the Scroll Bar selects the entire Scroll Bar. Double clicking again<br />
toggles back to the previous size of the Viewport.<br />
• Selecting Ctrl+A is the same as double-clicking.<br />
• Clicking on a vertical bar left justifies the Viewport to that bar.<br />
• Shift-clicking on a bar extends the nearest Viewport side to include that bar.<br />
• The Home key moves the Viewport to the left edge.<br />
• The End key moves the Viewport to the right edge.<br />
• Pressing the left arrow button , the left arrow key, or the up arrow key moves the Viewport to the<br />
left, one vertical bar at a time.<br />
• Pressing the right arrow button . the right arrow key, or the down arrow key moves the Viewport to<br />
the right, one vertical bar at a time.<br />
120
• Pressing the double left arrow button or the PgUp key moves the Viewport to the left by the current<br />
width of the Viewport. Holding down the Shift key will prevent the Viewport from moving if there is<br />
not enough room to move by its full width.<br />
• Pressing the double right arrow button or the PgDn key moves the Viewport to the right by the current<br />
width of the Viewport. Holding down the Shift key will prevent the Viewport from moving if there<br />
is not enough room to move by its full width.<br />
• Holding the Shift key down and the right or left arrows moves the right side of the Viewport.<br />
• Holding the Ctrl key down and the right or left arrows moves the left side of the Viewport.<br />
• The Scroll bar includes inapplicable packets (sniffer debug, WiFi, etc) so that the packet range selected<br />
in Frame Display can be shown. Inapplicable packets are not, however, included in the statistics reports.<br />
• If the Viewport is adjusted within PER Stats, as opposed to selecting a packet range in Frame Display, it<br />
uses only whole bars on both sides.<br />
• Statistics are retained for all packets regardless of whether any of those packets have wrapped out. You<br />
can select the Reset button , which is located above the right portion of the Scroll Bar, to<br />
discard all stats for packets received up to that point.<br />
• The Reset button is only available when you are capturing data.<br />
4.4.5.10 Packet Error Rate - No Packets Displayed with Missing Channel<br />
Numbers<br />
Note: This topic applies only to Classic Bluetooth.<br />
Captured data that is missing channel numbers, such as HCI and BTSnoop, will not display packets. In an instance<br />
when the data is missing channel numbers the PER Stats will display a message in the Scroll Bar: "Packets<br />
without a channel number (such as HCI) won't be shown."<br />
121
4.5 Data/Audio Extraction<br />
You use Data/Audio Extraction to pull out data from various decoded Bluetooth protocols. Once you have<br />
extracted the data, you can save them into different file types, such as text files, graphic files, email files, .mp3<br />
files, and more. Then you can examine the specific files information individually.<br />
1. You access this dialog by selecting Extract Data/Audio from the View menu or by clicking on the icon<br />
from the toolbar .<br />
122
Figure 76. Data/Audio Extraction Settings dialog<br />
2. Choose a checkbox(es) on the left side of the dialog to identify from which profile(s) you want to<br />
extract data.<br />
It's important to note that if there is no data for the profile(s) you select, no extracted file is created.<br />
3. If you want the file(s) to open automatically after they are extracted, select the Open File(s) After<br />
Extraction checkbox.<br />
Note: This does not work for SCO/eSCO.<br />
4. Click on a radio button to write the streams as Two Mono Files or as One Stereo File.<br />
Note: This option is for SCO/eSCO only.<br />
5. Select the checkbox if you want to convert A-Law and µ-law to Linear PCM.<br />
CVSD are always converted to Linear PCM. It's probably a good idea to convert to Linear PCM since<br />
more media players accept this format.<br />
Note: This option is for SCO/eSCO only.<br />
6. Select the Add Silence packets to insert the silence packets (dummy packets) for the reserved<br />
empty slots into the extracted file. If this option is not selected, the audio packets are extracted<br />
without inserting the silence packets for the reserved empty slots.<br />
Note: This option is for SCO/eSCO only.<br />
123
7. Select Extract.<br />
A Save As dialog appears.<br />
The application will assign a file name and<br />
file type for each profile you select in Step 1<br />
above. The file type varies depending on the<br />
original profile. A separate file for each profile<br />
will be created, but only for those profiles<br />
with available data.<br />
8. Select a location for the file.<br />
9. Click Save.<br />
The Data Extraction Status and Audio<br />
Extraction Status dialogs appear. When the<br />
process is complete the dialogs display what<br />
files have been created and where they are located.<br />
Figure 77. Data and Audio Extraction Status<br />
If you selected Open Files(s) After Extraction, the files open automatically.<br />
10. If you did not select this option, you can open a file by simply double-clicking on the name.<br />
Also, if a file type is unknown, you can select the file and it appears in the Rename to: text box.<br />
124
Figure 78. Rename To in the bottom section of Data Extraction Status<br />
Then you can rename the file, adding a file type to attempt to open the file.<br />
When you are finished, select Close to close the dialogs.<br />
4.6 Statistics<br />
4.6.1 Statistics Window<br />
Note: This information applies when running FTS4BT in any of the following modes OR<br />
when viewing a capture file created using any of these modes:<br />
• High Speed Serial HCI<br />
• High Speed UART (HSU)<br />
• USB HCI<br />
The Statistics window supplies basic information about the data on the network. When reviewing a capture file,<br />
the Statistics window shows a summary of the data in the file.<br />
on the Control window toolbar, or choose Stat-<br />
To open the Statistics window, click the Statistics icon<br />
istics from the View menu on the Control window.<br />
The analyzer monitors the network and collects statistics all the time, even when data is not actively being captured.<br />
Activate the Lock icon to stop the window from updating. Click the Unlock icon again to<br />
resume updating. The analyzer continues to monitor network traffic while the Statistics window is locked, so<br />
you may see the numbers jump right after updating has resumed, reflecting all the statistics that were gathered<br />
while the window was locked.<br />
125
4.6.2 Graphs<br />
4.6.2.1 Statistics Graphs<br />
Open the Statistics window and click on the picture of a graph<br />
name from the Graph menu on the Statistics window.<br />
on the table header, or choose the graph<br />
The Frame Sizes Graph window has Session, Resettable and Buffer tabs that correspond to the tabs on the<br />
Statistics window. Each tab shows the data that corresponds to the appropriate tab on the Statistics window.<br />
The Frame Sizes Graph window displays the number of frames of each length in either a pie chart or bar<br />
graph format. Click the Pie icon to display a pie chart, and click the Bar icon to display a bar graph.<br />
For networks with more than one side, the analyzer displays one graph for each side. To view the aggregate of<br />
all sides, click the Aggregate icon .<br />
4.6.2.2 Printing Graphs<br />
Click the Print icon<br />
to print the graph. The analyzer prints exactly what is shown on the window.<br />
126
Chapter 5: Navigating and Searching the Data<br />
The following sections describe how to navigate through the data and how to find specific data or packet conditions<br />
of interest to the user.<br />
5.1 Find<br />
Capturing and decoding data within the <strong>ComProbe</strong> ® analyzer produces a wealth of information for analysis. This<br />
mass of information by itself, however, is just that, a mass of information. There has to be ways to manage the<br />
information. <strong>ComProbe</strong> software provides a number of different methods for making the data more accessible.<br />
One of these methods is Find.<br />
Figure 79. Find Diaglog<br />
Find, as the name suggests, is a comprehensive search function that allows users to search for strings or patterns<br />
in the data or in the frame decode. You can search for errors, control signal changes, bookmarks, special<br />
events, time, and more. Once the information is located, you can easily move to every instance of the Find results.<br />
5.1.1 Searching within Decodes<br />
Searching within decodes lets you to do a string search on the data in the Decode Pane of the Frame Display<br />
window.<br />
To access the search within decodes function:<br />
127
1. Open a capture file to search.<br />
2. Open the Event Display or Frame Display window.<br />
3. Click on the Find icon or choose Find from the Edit menu.<br />
4. Click on the Decode tab of the Find dialog.<br />
Note: The tabs displayed on the Find dialog depend on the product you are running and the content<br />
of the capture file you are viewing.<br />
Figure 80. Find Decode Tab Search for String<br />
Figure 81. Find Decode Tab Side Restriction<br />
There are several options for error searching on the Decoder tab.<br />
128
• Search For String in Decoder allows you to enter a string in the text box. You can use characters, hex<br />
or binary digits, wildcards or a combination of any of the formats when entering your string. Every time<br />
you type in a search string, the analyzer saves the search. The next time you open Find, the drop-down<br />
list will contain your search parameters.<br />
• Search for All Errors finds frame errors as well as frames with byte-level errors (such as parity or CRC<br />
errors).<br />
• Search for Frame Errors Only finds frame specific errors, such as frame check errors.<br />
• Search for Information Frame only searches information frames.<br />
1. Enter the search string.<br />
2. Check Ignore Case to do a case-insensitive search.<br />
3. When you have specified the time interval you want to use, click on the Find Next or Find Previous<br />
buttons to start the search from the current event.<br />
The result of the search is displayed in the Decode pane in Frame Display.<br />
Side Restrictions - Side Restriction means that the analyzer<br />
looks for a pattern coming wholly from the DTE or DCE side. If<br />
you choose to search without regard for data origin, the analyzer<br />
looks for a pattern coming from one or both sides. For example,<br />
if you choose to search for the pattern ABC and you choose to<br />
search without regard for data origin, the analyzer finds all three<br />
instances of ABC shown here.<br />
The first pattern, with the A and the C coming from the DTE<br />
device and the B coming from the DCE is a good example of how<br />
using a side restriction differs from searching without regard to<br />
data origin. While searching without regard for data origin finds<br />
all three patterns, searching using a side restriction never finds<br />
the first pattern, because it does not come wholly from one side<br />
or the other.<br />
If you choose to search for the pattern ABC, and you restrict the<br />
search to just the DTE side, the analyzer finds the following pattern:<br />
In this example, the analyzer finds only the second pattern (highlighted<br />
above) because we restricted the search to just the DTE<br />
side. The first pattern doesn't qualify because it is split between<br />
the DTE and DCE sides, and the third pattern, though whole,<br />
comes from just the DCE side.<br />
If we choose both the DTE and the DCE sides in the above<br />
example, then the analyzer finds the second pattern followed by<br />
the third pattern, but not the first pattern. This is because each<br />
side has one instance in which the whole pattern can be found.<br />
The analyzer completely searches the DTE side first, followed by the DCE side.<br />
Note: Side Restriction is available for pattern and error searching.<br />
129
1. Select one of the two options.<br />
2. Select DTE, DCE, or both.<br />
3. When you made your selections, click on the Find Next or Find Previous buttons to start the<br />
search from the current event.<br />
The result of the search is displayed in the Decode pane in Frame Display.<br />
5.1.2 Searching by Pattern<br />
Search by Pattern lets you perform a traditional string search. You can combine any of the formats when entering<br />
your string, and your search can include wildcards.<br />
To access the search by pattern function:<br />
1. Open a capture file to search.<br />
2. Open the Event Display or Frame Display window.<br />
3. Click on the Find icon or choose Find from the Edit menu.<br />
4. Click on the Pattern tab of the Find dialog.<br />
Note: The tabs displayed on the Find dialog depend on the product you are running and the content<br />
of the capture file you are viewing.<br />
Figure 82. Find Pattern Tab<br />
130
Figure 83. Find Pattern Tab Side Restrictions<br />
Pattern allows you to enter a string in the text box. You can use characters, hex or binary digits, control characters,<br />
wildcards or a combination of any of the formats when entering your string. Every time you type in a<br />
search string, the <strong>ComProbe</strong> analyzer saves the search. The next time you open Find, the drop-down list will<br />
contain your search parameters.<br />
1. Enter the search pattern.<br />
2. Check Ignore Case to do a case-insensitive search.<br />
3. When you have specified the pattern you want to use, click on the Find Next or Find Previous<br />
buttons to start the search from the current event.<br />
The result of the search is displayed in the in Frame Display and Event Display.<br />
Refer to Searching by Decode on page 127 for information on Side Restrictions<br />
5.1.3 Searching by Time<br />
Searching with Time allows you search on timestamps on the data in Frame Display and Event Display window.<br />
To access the search by time function:<br />
1. Open a capture file to search.<br />
2. Open the Event Display or Frame Display window.<br />
131
3. Click on the Find icon or choose Find from the Edit menu.<br />
4. Click on the Time tab of the Find dialog.<br />
Note: The tabs displayed on the Find dialog depend on the product you are running and the content<br />
of the capture file you are viewing.<br />
Figure 84. Find by Time tab<br />
The analyzer can search by time in several different ways.<br />
Search for Absolute/Relative timestamp.<br />
• Absolute - An absolute timestamp search means that the analyzer searches for an event at the exact date<br />
and time specified. If no event is found at that time, the analyzer goes to the nearest event either before<br />
or after the selected time, based on the "Go to the timestamp" selection.<br />
• Relative - A relative search means that the analyzer begins searching from whatever event you are currently<br />
on, and search for the next event a specific amount of time away.<br />
1. Select Absolute or Relative<br />
2. Select the date and time using the drop-down lists for Month, Year, Day, Hour, Minute, Second,<br />
1/10000000.<br />
Note: Month and Year are not available if you select Relative.<br />
132
3. When you have specified the time interval you want to use, click on the Go To, Move Forward or<br />
Move Backward buttons to start the search from the current event.<br />
Note: When you select Absolute as Search for, Go To is available. When you<br />
select Relative as Search for, Move Forward or Move Backwardis available.<br />
Go to the timestamp: On or before/ On or after<br />
The analyzer searches for an event that matches the time specified. If no event is found at the time specified,<br />
the analyzer goes to the nearest event either before or after the specified time. Choose whether to have the<br />
analyzer go to the nearest event before the specified time or after the specified time by clicking the appropriate<br />
radio button in the Go to the timestamp box.<br />
If you are searching forward in the buffer, you usually want to choose the On or After option. If you choose the<br />
On or Before option, it may be that the analyzer finishes the search and not move from the current byte, if that<br />
byte happens to be the closest match.<br />
When you select Absolute as Search for, the radio buttons are On or before the specified time or On or after<br />
the specified time. When you select Relative as Search for, the radio buttons are On or before the specified<br />
time relative to the first selected item or On or after the specified time relative to the last selected item.<br />
1. Select On or before the specified time or On or after the specified time.<br />
2. When you have specified the time interval you want to use, click on the Go To, Move Forward or<br />
Move Backward buttons to start the search from the current event.<br />
When you select Absolute as Search for, Go To is available. When you select Relative as Search<br />
for, Move Forward or Move Backwardis available.<br />
There are a couple of other concepts to understand in respect to searching with timestamps.<br />
• The analyzer skips some special events that do not have timestamps, such as frame markers. Data events<br />
that do not have timestamps because timestamping was turned off either before or during capture are also<br />
skipped.<br />
• Timestamping can be turned on and off while data is being captured. As a result, the capture buffer may<br />
have some data with a timestamp, and some data without. When doing a search by timestamp, the analyzer<br />
ignores all data without a timestamp.<br />
• The raw timestamp value is the number of 100-nanosecond intervals since the beginning of January 1,<br />
1601. This is standard Windows time.<br />
5.1.4 Using Go To<br />
Searching with Go To allows you to go to a particular frame or event, or to move through the data X number of<br />
events or frames at a time. You can move either forward or backwards through the data.<br />
To access the Go To function:<br />
133
1. Open a capture file to search.<br />
2. Open the Event Display or Frame Display window.<br />
3. Click on the Find icon or choose Find from the Edit menu.<br />
4. Click on the Go To tab of the Find dialog.<br />
5. The system displays the Find dialog with the Go To tab selected.<br />
Note: The tabs displayed on the Find dialog depend on the product you are running and the<br />
content of the capture file you are viewing.<br />
To go to a particular frame :<br />
1. Select the Frame Number radio button<br />
2. Type the frame number in the box.<br />
3. Click the Go To button.<br />
Figure 85. Find Go To tab<br />
4. To move forward or backward a set number of frames, type in the number of frames you want to<br />
move<br />
5. Then click the Move Forward or Move Back button.<br />
To go to a particular event :<br />
1. Select the Data Event Number or All Events Number radio button.<br />
2. Type the number of the event in the box.<br />
3. Click the Go To button.<br />
134
4. To move forward or backwards through the data, type in the number of events that you want to<br />
move each time.<br />
5. Then click on the Move Forward or Move Backward button.<br />
6. For example, to move forward 10 events, type the number 10 in the box, and then click on Move<br />
Forward. Each time you click on Move Forward, <strong>Frontline</strong> moves forward 10 events.<br />
See Event Numbering for why the Data Event Number and All Events Number may be different. As a general<br />
rule, if you have the Show All Events icon depressed on the Event Display window or Frame Display<br />
Event pane, choose All Events Number. If the Show All Events button is up, choose Data Event Number.<br />
5.1.5 Searching for Special Events<br />
<strong>Frontline</strong> inserts or marks events other than data bytes in the data stream. For example, the analyzer inserts<br />
start-of-frame and end-of-frame markers into framed data, marking where each frame begins and ends. If a<br />
hardware error occurs, the analyzer shows this using a special event marker. You can use Find to locate single<br />
or multiple special events.<br />
To access the search for special events function:<br />
1. Open a capture file to search.<br />
2. Open the Event Display or Frame Display window.<br />
3. Click on the Find icon or choose Find from the Edit menu.<br />
4. Click on the Special Events tab of the Find dialog.<br />
Note: The tabs displayed on the Find dialog depend on the product you are running<br />
and the content of the capture file you are viewing.<br />
135
Figure 86. Find Special Events tab<br />
5. Check the event or events you want to look for in the list of special events. Use Check All or<br />
Uncheck All buttons to make your selections more efficient.<br />
6. Click Find Next and Find Previous to move to the next instance of the event.<br />
Not all special events are relevant to all types of data. For example, control signal changes are relevant only to<br />
serial data and not to Ethernet data.<br />
For a list of all special events and their meanings, see List of All Event Symbols on page 48.<br />
5.1.6 Searching by Signal<br />
Searching with Signal allows you to search for changes in control signal states for one or more control signals.<br />
You can also search for a specific state involving one or more control signals, with the option to ignore those<br />
control signals whose states you don’t care about.<br />
The analyzer takes the current selected byte as its initial condition when running searches that rely on finding<br />
events where control signals changed.<br />
To access the search by time function:<br />
1. Open a capture file to search.<br />
2. Open the Event Display or Frame Display window.<br />
3. Click on the Find icon or choose Find from the Edit menu.<br />
4. Click on the Signal tab of the Find dialog.<br />
136
Note: The tabs displayed on the Find dialog depend on the product you are running and the content<br />
of the capture file you are viewing.<br />
Figure 87. Find Signal tab.<br />
137
Figure 88. Find Signal Tab<br />
You will choose one qualifier—Searching for event where, then choose one or more control signals<br />
Control Signals<br />
The section with the check boxes allows you to specify which control signals the analyzer should pay attention<br />
to when doing the search. The analyzer pays attention to any control signal with a check mark.<br />
• Click on a box to place a check mark next to a control signal<br />
• Click again to uncheck the box<br />
• By default, the analyzer searches all control signals, which means all boxes start out checked.<br />
For example, if you are only interested in finding changes in RTS and CTS, you would check those two boxes<br />
and uncheck all the other boxes. This tells the analyzer to look only at the RTS and CTS lines when running<br />
the search. The other signals are ignored.<br />
The control signals types include:<br />
• USB - Pin 1<br />
• USB - Pin 2<br />
• USB - Pin 3<br />
• USB - Pin 4<br />
or<br />
138
• RS232 - Request to Send (RTS)<br />
• RS232 - Clear to Send (CTS)<br />
• RS232 - Data Set Ready (DSR)<br />
• RS232 - Data Terminal Ready (DTR)<br />
• RS232 - Carrier Detect (CD)<br />
• RS232 - Ring Indicator (RI).<br />
Click here to learn more about the Breakout Box and Pins 1 - 4.<br />
Searching for event where:<br />
• The first three options are all fairly similar, and are described together. These options are searching for an<br />
event where:<br />
o<br />
o<br />
o<br />
One or more control signals changed<br />
One or more control signals changed from off to on<br />
One or more control signals changed from on to off<br />
• Searching for an event where one or more signals changed means that the analyzer looks at every control<br />
signal that you checked, and see if any one of those signals changed state at any time.<br />
o<br />
If you want to look at just one control signal:<br />
• Check the box for the signal.<br />
• Uncheck all the other boxes.<br />
• Choose to search for an event where one or more signals changed.<br />
• The analyzer notes the state of the selected signal at the point in the buffer where the cursor is,<br />
search the buffer, and stop when it finds an event where RTS changed state.<br />
• If the end of the buffer is reached before an event is found, the analyzer tells you that no matches<br />
were found.<br />
• Searching for events where control signals changed state from off to on, or vice versa, is most useful if the<br />
signals are usually in one state, and you want to search for occasions where they changed state.<br />
For example:<br />
o<br />
o<br />
o<br />
o<br />
If DTR is supposed to be on all the time but you suspect that DTR is being dropped<br />
Tell the analyzer to look only at DTR by checking the DTR box and unchecking the others<br />
Do a search for where one or more control signals changed from on to off.<br />
The analyzer would search the DTR signal and stop at the first event where DTR dropped from on to<br />
off.<br />
• Searching for an Exact State<br />
139
To search for an exact state means that the analyzer finds events that match exactly the state of the control<br />
signals that you specify.<br />
o<br />
o<br />
o<br />
o<br />
o<br />
First, choose to search for an event where your choices exactly describe the state.<br />
This changes the normal check boxes to a series of radio buttons labeled On, Off and Don’t Care for<br />
each control signal.<br />
Choose which state you want each control signal to be in.<br />
Choose Don’t Care to have the analyzer ignore the state of a control signal.<br />
When you click Find Next, the analyzer searches for an event that exactly matches the conditions<br />
selected, beginning from the currently selected event.<br />
o If the end of the buffer is reached before a match is found, the analyzer asks you if you want to continue<br />
searching from the beginning.<br />
o If you want to be sure to search the entire buffer, place your cursor on the first event in the buffer.<br />
o<br />
Select one of the four radio buttons to choose the condition that must be met in the search<br />
o Select one or more of the checkboxes for Pin 1, 2, 3, or 4.<br />
o<br />
Click Find Next to locate the next occurrence of the search criteria or Find Previous to locate an<br />
earlier occurrence of the search criteria.<br />
5.1.7 Searching for Data Errors<br />
The analyzer can search for several types of data errors. Searching for data error sallows you to choose which<br />
errors you want to search for and whether to search the DTE or DCE data or both. Bytes with errors are shown<br />
in red in the Event Display window, making it easy to find errors visually when looking through the data.<br />
To access the search by time function:<br />
1. Open a capture file to search.<br />
2. Open the Event Display or Frame Display window.<br />
3. Click on the Find icon or choose Find from the Edit menu.<br />
4. Click on the Errors tab of the Find dialog.<br />
Note: The tabs displayed on the Find dialog depend on the product you are running and the content<br />
of the capture file you are viewing.<br />
140
Figure 89. Find Error tab.<br />
Searching for event where<br />
The first three options are all fairly similar, and are described together. These options are searching for an<br />
event where:<br />
• one or more error conditions changed<br />
• one or more error conditions occurred<br />
• one or more error conditions were off (i.e. no errors occurred)<br />
Selecting Which Errors to Search<br />
The section with the check boxes allows you to choose which errors the analyzer should look for. Click on a<br />
box to check or un-check it.<br />
If you want to search only for overrun errors<br />
• check the box if shown<br />
• un-check the other boxes.<br />
To search for all types of errors<br />
• check all boxes<br />
The most common search is looking for a few scattered errors in otherwise clean data.<br />
To do this type of search:<br />
• choose to Search for an event where one or more error conditions occurred<br />
• choose which errors to look for<br />
• By default, the analyzer looks for all types of errors.<br />
141
In contrast, searching for an event where one or more error conditions were off means that the analyzer looks<br />
for an event where the errors were not present.<br />
For example, if you have data that is full of framing errors, and you know that somewhere in your 20 megabyte<br />
capture file the framing got straightened out, you could choose to search for an event where one or more<br />
error conditions were off, and choose to search only for framing. The analyzer searches the file, and finds the<br />
point at which framing errors stopped occurring.<br />
Searching for an event where the error conditions changed means that the analyzer searches the data and stop<br />
at every point where the error condition changed from on to off, or off to on.<br />
For example, if you have data where sometimes the framing is wrong and sometimes right, you would choose<br />
to search framing errors where the error condition changed. This first takes you to the point where the framing<br />
errors stopped occurring. When you click Find Next, the analyzer stops at the point when the errors began<br />
occurring again. Clicking Find Previous will search backwards from the current postion.<br />
The analyzer takes the current selected byte as its initial condition when running searches that rely on finding<br />
events where error conditions changed. The analyzer searches until it finds an event where error conditions<br />
changed or it reaches the end of the buffer, at which point the analyzer tells you that there are no more events<br />
found in the buffer. If you are searching for an exact match, the analyzer asks you if you want to continue<br />
searching from the beginning of the buffer.<br />
Searching for Exact Error Conditions<br />
To search for an exact state means that the<br />
analyzer finds events that exactly match<br />
the error conditions that you specify.<br />
• Select the This exactly describes the<br />
state radio button.<br />
• This changes the normal check boxes<br />
to a series of radio buttons labeled<br />
On, Off and Don’t Care for each error.<br />
o<br />
o<br />
o<br />
On means that the error occurred<br />
Off means that the error did not<br />
occur<br />
Don’t Care means that the analyzer<br />
ignores that error condition.<br />
• Select the appropriate state for each type of error.<br />
Example:<br />
If you need to find an event where just an overrun error occurred, but not any other type of error, you would<br />
choose overrun error to be On, and set all other errors to Off. This causes the analyzer to look for an event<br />
where only an overrun error occurred.<br />
If you want to look for events where overrun errors occurred, and other errors may have also occurred but it<br />
really doesn’t matter if they did or not, choose overrun to be On, and set the others to Don’t Care. The analyzer<br />
ignores any other type of error, and find events where overrun errors occurred.<br />
To find the next error, click the Find Next button. To find an error that occurred earlier in the buffer to where<br />
you are, click the Find Previous button.<br />
142
5.1.8 Find - Bookmarks<br />
Searching with Bookmarks allows you search on specific bookmarks on the data in Frame Display and Event<br />
Display window. Bookmarks are notes/reminders of interest that you attach to the data so they can be<br />
accessed later.<br />
To access the search for bookmarks<br />
1. Open a capture file to search.<br />
2. Open the Event Display or Frame Display window.<br />
3. Click on the Find icon or choose Find from the Edit menu.<br />
4. Click on the Bookmarks tab of the Find dialog.<br />
Note: The tabs displayed on the Find dialog depend on the product you are running and the content of the capture<br />
file you are viewing.<br />
There are several ways to locate bookmarks.<br />
Figure 90. Find Bookmark tab.<br />
• Select the bookmark you want to move to and click the Go To button.<br />
• Simply double-click on the bookmark.<br />
• Click the Move Forward and Move Back buttons to move through the frames to the bookmarks shown<br />
in the window. When the bookmark is found it is highlighted in the window.<br />
There are three ways to modify bookmarks:<br />
1. Click on Delete to remove the selected bookmark.<br />
2. Click on Modify... to change the selected Bookmark name.<br />
3. Remove All will delete all bookmarks in the window.<br />
143
The Find window Bookmark tab will also appear when using functions other than Find such as when clicking<br />
on the Display All Bookmarks<br />
icon.<br />
5.1.9 Changing Where the Search Lands<br />
When doing a search in the analyzer, the byte or bytes matching the search criteria are highlighted in the Event<br />
Display. The first selected byte appears on the third line of the display.<br />
To change the line on which the first selected byte appears:<br />
1. Open fts.ini (located in the C:\<strong>User</strong>\Public\Public Documents\<strong>Frontline</strong><br />
<strong>Test</strong> <strong>Equipment</strong>\)<br />
2. Go to the [CVEventDisplay] section<br />
3. Change the value for SelectionOffset.<br />
4. If you want the selection to land on the top line of the display, change the SelectionOffset to 0<br />
(zero).<br />
5.1.10 Subtleties of Timestamp Searching<br />
Timestamping can be turned on and off while data is being captured. As a result, the capture buffer may have<br />
some data with a timestamp, and some data without. When doing a search by timestamp, the analyzer ignores<br />
all data without a timestamp.<br />
Note: The raw timestamp value is the number of 100-nanosecond intervals since the beginning<br />
of January 1, 1601. This is standard Windows time.<br />
5.2 Bookmarks<br />
Bookmarks are electronic sticky notes that you attach to frames of interest so they can be easily found later. In<br />
Frame Display bookmarked frames appear with a magenta triangle icon next to them.<br />
Figure 91. Bookmarked Frame (3) in the Frame Display<br />
In the Event Display bookmarks appear as a dashed line around the start of frame<br />
marker.<br />
Bookmarks are easy to create and maintain, and are a very valuable tool for data analysis.<br />
When you create or modify a bookmark, you have up to 84 characters to explain a<br />
problem, leave yourself a reminder, leave someone else a reminder, etc. Once you create a bookmark it will<br />
be saved with the rest of the data in the .cfa file. When you open a .cfa file, the bookmarks are available to you.<br />
144
Once you have created a bookmark, you can use the Find function or other navigation methods to locate and<br />
move among them.<br />
5.2.1 Adding, Modifying or Deleting a Bookmark<br />
You can add, modify, or delete a bookmarks from Frame Display and Event Display<br />
Add:<br />
1. Select the frame or event you want to bookmark.<br />
2. There are three ways to access the Add Bookmark dialog.<br />
a. Select Add or Modify Bookmark from the Bookmarks menu on the Frame Display and<br />
Event Display,<br />
b. Select the Add or Modify Bookmark icon on one of the toolbars, or<br />
c. Right-click on the frame/event and choosing Add Bookmark….<br />
3. In the dialog box, add a comment (up to 84 characters) in the text box to identify the bookmark.<br />
4. Click OK.<br />
Once you create a bookmark it will be saved with the rest of the data in the .cfa file. When you open a .cfa file,<br />
the bookmarks are available to you.<br />
Modify<br />
1. Select the frame or event with the bookmark to be edited.<br />
2. There are three ways to access the Add/Modfy Bookmark dialog.<br />
a. Select Add or Modify Bookmark from the Bookmarks menu on the Frame Display and<br />
Event Display'<br />
b. Select the Add or Modify Bookmark icon on one of the toolbars, or<br />
c. Right-click on the frame/event and choosing Modify Bookmark… on the selection.<br />
3. Change the comment in the dialog box<br />
4. Click OK. The edited bookmark will be saved as a part of the .cfa file.<br />
Delete<br />
5. You can also select Display All Bookmarks from the Frame Display and Event Display toolbar<br />
or the Bookmarks menu. the Find window will open on the Bookmark tab. Select the bookmark<br />
you want to modify and click the Modify… button. Change the comment in the dialog box,<br />
and click OK.<br />
1. Select the frame or event with the bookmark to be deleted.<br />
2. There are three ways to access the Add/Modfy Bookmark dialog.<br />
145
a. Select Add or Modify Bookmark from the Bookmarks menu on the Frame Display and<br />
Event Display,<br />
b. Select the Add or Modify Bookmark icon on one of the toolbars, or<br />
c. Right-click on the frame/event and choosing Modify Bookmark… on the selection.<br />
3. Click on the Delete button. The bookmark will be deleted.<br />
4. You can also select Display All Bookmarks from the Frame Display and Event Display toolbar<br />
or the Bookmarks menu. the Find window will open on the Bookmark tab. Select the bookmark<br />
you want to delete and click the Delete button.<br />
5.2.2 Displaying All and Moving Between Bookmarks<br />
There are three ways to move between bookmarks.<br />
1. Press the F2 key to move to the next frame or event with a bookmark.<br />
2. Select Go to Next Bookmark from the Bookmarks menu.<br />
3. Click the Display All Bookmarks icon . Select the bookmark you want to move to and<br />
click the Go To button, or simply double-click on the bookmark. Click the Move Forward and<br />
Move Back buttons to cycle through the bookmarks.<br />
Figure 92. Find Window Bookmark tab Used to Move Around With Bookmarks<br />
To delete a bookmark, select it and click the Delete button.<br />
To modify a bookmark, select it and click the Modify button.<br />
Click Remove All to delete all the bookmarks.<br />
146
5.3 Filtering<br />
5.3.1 About Display Filters<br />
A display filter looks at frames that have already been captured. It looks at every frame in the capture buffer<br />
and displays those that match the filter criteria. Frames that do not match the filter criteria are not displayed.<br />
Display filters allow a user to look at a subset of captured data without affecting the capture content. There are<br />
three general classes of display filters:<br />
• Protocol Filters<br />
• Named Filters<br />
• Quick Filter<br />
Protocol Filters<br />
Protocol filters test for the existence of a specific single layer. The system creates a protocol filter for each<br />
decoder that is loaded if that layer is encountered in a capture session.<br />
There are also three special purpose filters that are treated as protocol filters:<br />
• All Frames with Errors<br />
• All Frames with Bookmarks<br />
• All Special Information Nodes<br />
Named Filters<br />
• Named filters test for anything other than simple single layer existence. Named filters can be constructed<br />
that test for the existence of multiple layers, field values in layers, frame sizes, etc., as well as combinations<br />
of those things. Named filters are persistent across sessions.<br />
• Named filters are user-defined. <strong>User</strong>-defined filters persist in a template file. <strong>User</strong> defined filters can be<br />
deleted.<br />
Quick Filters<br />
• Quick Filters are combinations of Protocol Filters and/or Named Filters that are displayed on the Quick<br />
Filter tab.<br />
• Quick Filters cannot be saved and do not persist across sessions.<br />
• Quick Filters are created on the Quick Filter Dialog.<br />
5.3.1.1 Creating a Display Filter<br />
There are two steps to using a display filter. Define the filter conditions, and then apply the filter to the data set.<br />
The system combines both filter definition and application in one dialog.<br />
147
1. Click the Display Filters icon on the Frame Display window or select Apply/Modify Display<br />
Filters from the Filter menu to open the Set Condition dialog box. The Set Condition dialog is<br />
self configuring which means that when you Select each frame under Conditions the following displayed<br />
fields depend on your selection. With each subsequent selection the dialog fields will change<br />
depending on you selection in that field.<br />
Figure 93. Example: Set Conditions Self Configuring Based on Protocol Selection<br />
Figure 94. Example: Set Conditions Self Configuring Based on Frame Range<br />
2. Select Include or Exclude to add filtered data or keep out filtered data respectively.<br />
3. Select the initial condition for the filter from the drop-down list.<br />
4. Set the parameters for the selected condition in the fields provided. The fields that appear in the<br />
dialog box are dependent upon the previous selection. Continue to enter the requested parameters<br />
in the fields provided until the condition statement is complete.<br />
5. Click OK. The system displays the Save Named Condition dialog. Provide a name for the filter<br />
condition or accept the default name provided by the system and click OK. Prohibited characters<br />
are left bracket '[', right bracket ']' and equal sign '='. The Set Condition dialog box closes, creates<br />
a tab on the Frame Display with the filter name, and applies the filter.<br />
The filter also appears in the Quick Filtering and Hiding Protocols dialog.<br />
When a display filter is applied, a description of the filter appears to the right of the toolbar in the Frame Display<br />
windows.<br />
148
Notes:<br />
• The system requires naming and saving of all filters created by the user.<br />
• The OK button on the Set Condition dialog box is unavailable (grayed out) until the condition selections<br />
are complete.<br />
• When you have multiple Frame Display windows with a display filter or filters, those filter do not automatically<br />
appear in other Frame Display windows. You must use the Hide/Reveal feature to display a<br />
filter created in one Frame Display in different Frame Display window.<br />
5.3.1.2 Including and Excluding Radio Buttons<br />
All filter dialog boxes contain an Include and an Exclude radio button. These buttons are mutually exclusive.<br />
The Include/Exclude selection becomes part of the filter definition, and appears as part of the filter description<br />
displayed to the right of the Toolbar.<br />
Include: A filter constructed with the "Include" button selected, returns a data set that includes frames that<br />
meet the conditions defined by the filter and omits frames that do not.<br />
Exclude: A filter constructed with the "Exclude" button selected, returns a data set that excludes frames that<br />
meet the conditions defined by the filter and consists of frames that do not.<br />
5.3.1.3 Named Display Filters<br />
You can create a unique display filter by selecting a data type on the Frame Display and using a right click<br />
menu. When you create a Name Filter, it appears in the Quick Filtering dialog, where you can use it do customize<br />
the data you see in the Frame Display panes.<br />
1. Select a frame in the Frame Display Summary Pane.<br />
2. Right click in the one of the data columns in the Summary Pane: CRC, NESN, DS, Packet Success,<br />
Ethertype, Source Address, etc.<br />
3. Select Filter in (data type) = . The Filtering Results<br />
dialog appears.<br />
4. Enter a name for the filter<br />
5. Select OK.<br />
The filter you just created appears in the Named Filters section<br />
of the Quick Filtering dialog.<br />
5.3.1.4 Using Compound Display Filters<br />
Compound filters use boolean logic to create complex and precise filters. There are three primary Boolean<br />
logic operators: AND, OR, and NOT.<br />
The AND operator narrows the filter, the OR operator broadens the filter, and the NOT operator excludes<br />
conditions from the filtered results. Include parentheses in a compound filter to nest condition sets within larger<br />
condition sets, and force the filter-processing order.<br />
149
There are two steps to using a compound filter. Define the filter conditions, and then apply the filter to the data<br />
set. The analyzer combines both filter definition and application in one dialog.<br />
1. Click the Display Filters icon on the Frame Display window or select Apply/Modify Display<br />
Filters… from the filter menu to open the Set Condition dialog box.<br />
2. Click the Advanced button on the Set Condition dialog box.<br />
3. Select Include or Exclude radio button.<br />
Now you can set the conditions for the filter.<br />
4. Select the initial condition for the filter<br />
from the combo box at the bottom of the<br />
dialog for Select each frame.<br />
5. Set the parameters for the selected condition<br />
in the fields provided. The fields<br />
that appear in the dialog box are dependent<br />
upon the previous selection. Continue<br />
to enter the requested parameters in the<br />
fields provided until the conditions statement is complete.<br />
Figure 95. Two Filter Conditions Added with an AND Operator<br />
6. Click the plus icon on the left side of the dialog box and repeat steps 4 and 5 for the next<br />
condition. Use the up and down arrow icons on the left side of the dialog box to order<br />
your conditions, and the delete button<br />
to delete conditions from your filter.<br />
7. Continue adding conditions until your filter is complete.<br />
8. Include parentheses as needed and set the boolean operators.<br />
9. Click OK.<br />
10. The system displays the Save Named Condition dialog. Provide a name for the filter condition or<br />
accept the default name provided by the system and click OK.<br />
150
Figure 96. Save Named Filter Condition Dialog<br />
The Set Condition dialog box closes, creates a tab on the Frame Display with the filter name, and applies the<br />
filter.<br />
When a display filter is applied, a description of the filter<br />
appears to the right of the toolbar in the Frame<br />
Display windows.<br />
Note: The OK button on the Set Condition dialog box is unavailable (grayed out) until the condition<br />
selections are complete.<br />
5.3.1.5 Defining Node and Conversation Filters<br />
There are two steps to using Node and Conversation display filter. Define the filter conditions, and then apply<br />
the filter to the data set. The analyzer combines both filter definition and application in one dialog.<br />
1. Click the Display Filters icon on the Frame Display window or select Apply/Modify Display<br />
Filters… from the filter menu to open the Set Condition dialog box.<br />
2. From the Select each frame combo box choose frames with the conversation as the initial condition.<br />
3. Select an address type—IP, MAC, TCP/UDB—from the Typecombo box (The address type selection<br />
populates both Address combo boxes with node address in the data set that match the type<br />
selection).<br />
4. Select a node address from the first Address combo box.<br />
5. Choose a direction arrow from the direction box . The left arrow filters on all<br />
frames where the top node address is the destination, the right arrow filters on<br />
all frames where the top node address is the source, and the double arrow filters<br />
on all frames where the top node address is either the source or the destination.<br />
6. If you want to filter on just one node address, skip step 7 and continue with<br />
step 8.<br />
7. If you want to filter on traffic going between two address nodes (i.e. a conversation), select a<br />
151
node address from the second Address combo box..<br />
8. Click OK. The Set Condition dialog box closes and the analyzer applies the filter.<br />
When a display filter is applied, a description of the filter appears to the right of the toolbar in the Frame Display<br />
windows.<br />
Note: The OK button is unavailable (grayed out) until the condition selections are complete.<br />
5.3.1.6 The Difference Between Deleting and Hiding Display Filters<br />
If you wish to remove a filter from the system permanently, then use the Delete procedure. However, if all you<br />
want to do is remove a filter as a means to un-clutter the display, then use the Hide procedure.<br />
Deleting a saved filter removes the filter from the current session and all subsequent sessions. In order to<br />
retrieve a deleted filter, the user must recreate it using the Set Conditions dialog.<br />
Hiding a filter merely removes the filter from the display. A hidden filter can be reapplied using the Show/Hide<br />
procedure.<br />
5.3.1.6.1 Deleting Saved Display Filters<br />
1. Select Delete Display Filters from the<br />
Filter menu in the Frame Display<br />
window to open the Delete Named<br />
Condition dialog. The system displays<br />
the Delete Named Condition dialog<br />
with a list of all user defined filters.<br />
2. Select the filter to be deleted from the<br />
list.<br />
3. Click the Delete button.<br />
4. Click OK. The Delete Named Condition<br />
dialog box closes and the system deletes<br />
the filter.<br />
5.3.1.6.2 Hiding/Showing a Display Filter<br />
Hiding a Display Filter. If a display filter is showing the following steps will hide that filter but will not delete it.<br />
152
1. Select Hide/Show Display Filters…<br />
from the Filter menu on<br />
the Frame Display window<br />
to open the Hide/Show Filters<br />
dialog. The system displays the<br />
Hide/Show Filters dialog with<br />
a list of all user defined filters.<br />
2. Select the filter to be hidden<br />
from the combo box.<br />
3. Click the Hide button. The Hide button is only showing if the selected filter is currently showing<br />
in the Frame Display.<br />
4. Click OK. The Hide/Show Filters dialog box closes, and the system hides the filter and removes<br />
the filter tab from the Frame Display.<br />
Showing a Hidden Display Filter. If a display filter is hidden the following steps will reveal that filter in the Frame<br />
Display.<br />
1. Select Hide/Show Display Filters… from the Filter menu in the Frame Display window to<br />
open the Hide/Show Filters dialog. The system displays the Hide/Show Filters dialog with a list<br />
of all user defined filters.<br />
2. Select the filter to be revealed from the combo box.<br />
3. Click the Show button.<br />
4. Click OK. The Hide/Show Filters dialog box closes and the system reveals the filter in the<br />
Frame Display.<br />
You can also open the Quick Filter dialog and check the box next to the hidden filter to show or hide a display filter.<br />
Figure 97. Using Named Filters Section of Quick Filters to Show/Hide Filters<br />
Note: When you have multiple Frame Display windows with a display filter or filters, those filter<br />
do not automatically appear in other Frame Display windows. You must use the Hide/Show<br />
dialog to display a filter created in one Frame Display in different Frame Display window.<br />
153
5.3.1.7 Editing Filters<br />
5.3.1.7.1 Modifying a Condition in a Filter<br />
1. Click the Display Filters icon on the Frame<br />
Display window or select Apply/Modify Display<br />
Filters… from the Filter menu to open the Set<br />
Condition dialog box. The Set Condition dialog<br />
box displays the current filter definition at the top<br />
of the dialog. To display another filter, click the<br />
Open icon, and select the filter from the popup<br />
list of all the saved filters.<br />
2. Edit the desired parameter of the condition: Because the required fields for a condition statement<br />
depend upon previously selected parameters, the Set Condition dialog box may display additional<br />
fields that were not present in the original filter. In the event this occurs, continue to enter the<br />
requested parameters in the fields provided until the condition statement is complete.<br />
3. Click OK. The system displays the Save Named Condition dialog. Ensure that the filter name is<br />
displayed in the text box at the top of the dialog, and click OK. If you choose to create an additional<br />
filter, then provide a new name for the filter condition or accept the default name provided<br />
by the system and click OK.) The Set Condition dialog box closes, and the system applies the<br />
modified filter.<br />
5.3.1.7.2 Deleting a Condition in a Filter<br />
If a display filter has two or more conditions you can delete conditions. If there is only one condition set in the<br />
filter you must delete the filter using Delete Display Filters… from the Filters menu.<br />
1. Click the Display Filters icon on the Frame Display window or select Apply/Modify Display<br />
Filters… from the Filter menu to open the Set Condition dialog box. Click on the Advanced button<br />
to show the condition in Boolean format. The dialog box displays the current filter definition. To display<br />
another filter, click the Open<br />
filters.<br />
icon, and select the filter from the pop-up list of all the saved<br />
154
Figure 98. Set Condition Dialog in Advanced View<br />
2. Select the desired condition from the filter definition.<br />
3. Click the Delete Selected Line icon.<br />
4. Edit the Boolean operators and parentheses as needed.<br />
5. Click OK. The system displays the Save Named Condition dialog. Ensure that the filter name is<br />
displayed in the text box at the top of the dialog, and click OK. (If you choose to create an additional<br />
filter, then provide a new name for the filter condition or accept the default name provided<br />
by the system and click OK.) The Set Condition dialog box closes, and the system applies the<br />
modified filter.<br />
5.3.1.7.3 Renaming a Display Filter<br />
1. Select Rename Display Filters… from the Filter menu in the Frame Display window to<br />
open the Rename Filter dialog. The system displays the Rename Filter dialog with a list of all user<br />
defined filters in the Filters combo box.<br />
Figure 99. Rename Filters Dialog<br />
2. Select the filter to be renamed from the combo box.<br />
155
3. Enter a new name for the filter in the New Name box. Optionally click the Apply button and the<br />
new name will appear in the Filters combo box and the New Name box will empty. This option<br />
allows you to rename several filters without closing the Rename Filter dialog each time.<br />
4. Click OK. The Rename Filter dialog box closes and the system renames the filter.<br />
5.3.2 Protocol Filtering From the Frame Display<br />
5.3.2.1 Quick Filtering on a Protocol Layer<br />
On the Frame Display , click the Quick Filtering icon<br />
or select Quick Filtering from the Filter menu.<br />
This opens a dialog that lists all the protocols discovered so far. The protocols displayed change depending on<br />
the data received.<br />
Figure 100. Frame Display Quick Filtering and Hiding Protocols Dialog<br />
The box on the left is Protocols To Filter In. When you select the checkbox for a protocol in the Protocols to<br />
Filter In, the Summary pane will only display those frames that contain data from that protocol.<br />
If you filter on more than one protocol, the result are all frames that contain at least one of<br />
those protocols. For example, if you filter on IP and IPX NetBIOS, you receive all frames that<br />
contain either IP or IPX NetBIOS (or both). A Quick Filter tab then appears on the Frame<br />
Display. Changing the filter definition on the Quick Filter dialog changes the filter applied on the Quick Filter<br />
tab. Quick filters are persistent during the session, but are discarded when the session is closed.<br />
The box in the center is the Protocols To Hide. When you select the checkbox for a protocol in the Protocols<br />
To Hide, data for that protocol will not appear in the Decode, Binary, Radix, and Character panes. The<br />
frames containing that type data will still appear in the Summary pane, but not in the Decode, Binary, Radix,<br />
and Character panes.<br />
156
The box on the right is the Named Filters. It contains filters that you create<br />
using the Named Filter and Set Condition dialogs. When you select<br />
the checkbox for the Name Filters, a tab appears on the Summary Pane<br />
that displays the frame containing the specific data identified in the filter.<br />
The named Filter tab remains on the Frame Display Summary<br />
Pane unless you hide it using the Hide/Show Display<br />
Filters dialog.<br />
With low energy, the Configured BT Low energy devices and Exclude<br />
NULLS and POLLs are default named filters.<br />
Check the small box next to the name of each protocol you want to filter<br />
in, hide, or Named Filter to display.<br />
Then click OK<br />
5.3.2.2 Easy Protocol Filtering<br />
There are two types of easy protocol filtering. The first method lets you filter on the protocol shown in the Summary<br />
pane, and the second lets you filter on any protocol discovered on the network so far.<br />
5.3.2.3 Filtering On the Summary Layer Protocol<br />
To filter on the protocol in the Summary in the Frame Display window pane:<br />
1. Select the tab of the desired protocol, or open the Summary combo box.<br />
2. Select the desired protocol.<br />
3. To filter on a different layer, just select another tab, or change the layer selection in the combo<br />
box.<br />
5.3.2.4 Filtering on all Frames with Errors from the Frame Display<br />
To filter on all frames with errors:<br />
1. Open the Frame Display window.<br />
2. Click the starred Quick Filter icon or select Quick Filtering from the Filter menu<br />
3. Check the box for All Frames With Errors in the Protocols To Filter In pane, and click OK.<br />
4. The system creates a tab on the Frame Display labeled "Errors" that displays the results<br />
of the All Frames With Errors filter.<br />
Note: When you have multiple Frame Display windows open and you are capturing data,<br />
you may receive an error message declaring that "Filtering cannot be done while receiving data<br />
this fast." If this occurs, you may have to stop filtering until the data is captured.<br />
157
Chapter 6: Saving and Importing Data<br />
6.1 Saving Your Data<br />
You can save all or part of the data that you have captured. You can also load a previously saved capture file, and<br />
save a portion of that file to another file. This feature is useful if someone else needs to see only a portion of<br />
the data in your capture file.<br />
On the Control toolbar you can set up to capture a single file or series of files. Click here to see those settings.<br />
There are two ways to save portions or all of the data collected during a data capture. Click here to see how to<br />
capture data.<br />
6.1.1 Saving the Entire Capture File using File Save or the Save<br />
icon<br />
This option is only available when you select Single File from the Capture Mode on System Settings. Click<br />
here to learn more about selecting Save options from System Settings.<br />
1. If you are capturing data, click on the Stop icon to stop data capture. You cannot save data<br />
to file while it is being captured.<br />
2. Open the Event Display or Frame Display window.<br />
3. Click the Save icon, or select Save from the File menu.<br />
158
Figure 101. Windows Save dialog<br />
4. Type a file name in the File name box at the bottom of the screen.<br />
5. Browse to select a specific directory. Otherwise your file is saved in the default capture file directory.<br />
6. When you are finished, click OK.<br />
6.1.2 Saving the Entire Capture File with Save Selection<br />
1. If you are capturing data, click on the Stop icon to stop data capture. You cannot save data<br />
to file while it is being captured.<br />
2. Open the Event Display or Frame Display window.<br />
3. Right click in the data<br />
4. Select Save Selection or Save As from the right<br />
click menu.<br />
5. Click on the radio button labeled Entire File.<br />
6. Choose to save Events or Frames . Choosing to<br />
save Events saves the entire contents of the capture<br />
file. Choosing to save Frames does not save all<br />
events in the capture file.<br />
7. Type a file name in the As box at the bottom of the<br />
screen. Click the Browse icon to browse to a specific<br />
directory. Otherwise your file is saved in the<br />
159
default capture file directory.<br />
8. When you are finished, click OK.<br />
6.1.3 Saving a Portion of a Capture File<br />
1. If you are capturing data, click on the Stop icon to pause data capture. You cannot save<br />
data to a file while it is being captured.<br />
2. Open the Event Display or Frame Display window, depending on whether you want<br />
to specify a range in bytes or in frames.<br />
3. Select the portion of the data that you want to save. Click and drag to select data, or click on the<br />
first item, move to the last item and Shift+Click to select the entire range, or use the Shift key<br />
with the keyboard arrows or the navigation icons in the Frame Display toolbar. If the range you<br />
want to save is too large to select, note the numbers of the first and last item in the range.<br />
4. Right click in the data<br />
5. Select Save Selection or Save As from the right<br />
click menu<br />
6. Click on the radio button labeled Selection. If you<br />
selected a range, make sure the starting and ending<br />
numbers are correct. To specify a range, type the<br />
numbers of the first and last items in the range in<br />
the boxes.<br />
7. Select either Events or Frames to indicate whether<br />
the numbers are event or frame numbers.<br />
8. Type a file name in the As box at the bottom of the<br />
screen. Click the Browse icon to browse to a specific<br />
directory. Otherwise your file is saved in the<br />
default capture file directory.<br />
9. Click OK when you are finished.<br />
6.1.4 Confirm Capture File (CFA) Changes<br />
This dialog appears when you close a capture file after changing the Notes, the protocol stack, or bookmarks.<br />
The dialog lists information that was added or changed and allows you to select which information to save, and<br />
whether to save it to the current file or to a new one.<br />
Changes made to the file appear in a list in the left pane. You can click on each item to see details in the right<br />
pane about what was changed for each item. You simply check the boxes next to the changes you want to<br />
keep. Once you decide what changes to keep, select one of the following:<br />
• Save To This File – Saves the changes you have made to the current capture file.<br />
• Save As – Saves the changes to a new file.<br />
160
• Cancel the Close Operation – Closes the file and returns you back to the display. No changes are saved.<br />
• Discard Changes – Closes the file without saving any of the changes made to the notes, bookmarks, or<br />
protocol stack.<br />
6.1.5 Adding Comments to a Capture File<br />
The Notes feature allows you to add comments to a CFA file. These comments can be used for many purposes.<br />
For example, you can list the setup used to create the capture file, record why the file is useful to keep, or<br />
include notes to another person detailing which frames to look at and why. (Bookmarks are another useful way<br />
to record information about individual frames.)<br />
To open the Notes window :<br />
1. Click the Show Notes icon . This icon is present on the toolbars of the Frame Display<br />
, as well as the Event Display . Notes can be selected from the Edit menu on one of these<br />
windows.<br />
2. Type your comments in the large edit box on the Notes window. The Cut, Copy, Paste features<br />
are supported from Edit menu and the toolbar<br />
features are all supported from Edit menu and the toolbar<br />
when text is selected. Undo and Redo<br />
at the current cursor location.<br />
3. Click the thumbtack icon to keep the Notes window on top of any other windows.<br />
4. When you're done adding comments, close the window.<br />
5. When you close the capture file, you are asked to confirm the changes to the capture file. See<br />
Confirming Capture File (CFA) Changes for more information.<br />
6.2 Loading and Importing a Capture File<br />
6.2.1 Loading a Capture File<br />
From the Control Window:<br />
1. Go to the File menu.<br />
2. Choose a file from the recently used file list.<br />
3. If the file is not in the File menu list, select Open Capture File from the File menu or simply click<br />
on the Open icon<br />
on the toolbar.<br />
4. Capture files have a .cfa extension. Browse if necessary to find your capture file.<br />
5. Click on your file, and then click Open.<br />
161
6.2.2 Importing Capture Files<br />
1. From the Control window , go to the File menu and select Open Capture File or click on the<br />
Open icon on the toolbar.<br />
2. Left of the File name text box, select from the drop-down list Supported File Types box to All<br />
Importable File Types or All Supported File Types (*.cfa, *.log, *.txt, *.csv, *.cap). Select the file<br />
and click Open.<br />
The analyzer automatically converts the file to the analyzer's format while keeping the original file in its original<br />
format. You can save the file in the analyzer's format, close the file without saving it in the analyzer's format, or<br />
have the analyzer automatically save the file in the analyzer's format (see the System Settings to set this option).<br />
All of these options keep your original file untouched.<br />
When you first open the file, the analyzer brings up the Protocol Stack window and ask you what protocol<br />
decodes, if any, you want to use. You must choose a protocol decode at this point for the analyzer to decode<br />
the data in the file. If you open a file without using any decodes, and decide later that you want to apply a<br />
decode, choose Reframe from the File menu on the Control window.<br />
6.3 Printing<br />
6.3.1 Printing from the Frame Display/HTML Export<br />
The Frame Display Print dialog and the Frame Display HTML Export are very similar. This topic discusses<br />
both dialogs.<br />
Frame Display Print<br />
The Frame Display Print feature provides the user with the option to print the capture buffer or the current<br />
selection. The maximum file size, however, that can be exported is 1000 frames.<br />
When Print Preview is selected, the output displays in a browser print preview window, where the user can<br />
select from the standard print options. The output file format is in html, and uses the Microsoft Web Browser<br />
Control print options for background colors and images.<br />
Print Background Colors Using Internet Explorer<br />
1. Open the Tools menu on the browser menu bar<br />
2. Select “Internet Options…” menu entry.<br />
3. Click Advanced tab.<br />
4. Check “Print background colors and images” under the Printing section<br />
5. Click the Apply button, then click OK<br />
Configure the Print File Range in the Frame Display Print Dialog<br />
Selecting more than one frame in the Frame Display window defaults the radio button in the Frame Display<br />
Print dialog to Selection and allows the user to choose the All radio button. When only one frame is selected,<br />
the All radio button in the Frame Display Print dialog is selected.<br />
How to Print Frame Display Data<br />
162
1. Select Print or Print Preview from the File menu on the Frame Display window to display the<br />
Frame Display Print dialog. Select Print if you just want to print your data to your default<br />
printer. Select Print Preview if you want access to printer options.<br />
2. Choose to include the Summary pane (check the box) in the print output. The Summary pane<br />
appears at the beginning of the printed output in tabular format. If you select All layers in the<br />
Detail Section, the Data Bytes option becomes available.<br />
3. In the Detail Section, choose to exclude—No decode section—the decode from the Detail pane<br />
in the Frame Display, or include All Layers or Selected Layers Only. If you choose to include<br />
selected layers, then select (click on and highlight) the layers from the list box.<br />
4. Click on selected layers in the list to de-select, or click the Reset Selected Layers button to deselect<br />
all selected layers.<br />
Figure 102. Frame Display Print Dialog<br />
5. Select the range of frames to include All or Selection in the Frame Range section of the Frame<br />
Display Print dialog.<br />
Choosing All prints up to 1000 frames from the buffer.<br />
Choosing Selection prints only the frames you select in the Frame Display window.<br />
6. Selecting the Delete File deletes the temporary html file that was used during printing<br />
7. Click the OK button.<br />
If you chose Print Preview, the system displays your data in a browser print preview display with options for<br />
printing such as page orientation and paper size. You can also use your Printer Preferences dialog to make<br />
some of these selections. When printing your data, the analyzer creates an html file and prints the path to the<br />
file at the bottom of the page. This file can be opened in your browser, however, it may appear different than<br />
the printed version.<br />
Frame Display HTML Export<br />
163
The Frame Display HTML Export feature provides the user with the option to export the capture buffer to an<br />
.html file. The maximum file size, however, that can be exported is 1000 frames.<br />
How to export display data to an .html file<br />
1. Select HTML Export from the File menu on the Frame Display window to display the Frame Display<br />
HTML Export.<br />
Figure 103. Frame Display HTML Export Dialog<br />
2. From this point the procedure is the same as steps 2 through 5 in "How to Print Frame Display<br />
Data" above.<br />
3. Click the OK button.<br />
The Save As dialog appears<br />
164
Figure 104. Save As Dialog<br />
4. Enter a name for the file you want to save. The .htm extension is automatically added.<br />
5. Select Save<br />
The file is saved as a .htm file in the file location you chose<br />
6.3.2 Printing from the Event Display<br />
The Event Display Print feature provides the user with the option to print either the entire capture buffer or<br />
the current selection. When Print Preview is selected, the output displays in a browser print preview window<br />
where the user can select from the standard print options. The output file format is in html, and uses the<br />
Microsoft Web Browser Control print options for background colors and images (see below).<br />
Print Background Colors Using Internet Explorer<br />
1. Open the Tools menu on the browser menu bar<br />
2. Select “Internet Options…” menu entry.<br />
3. Click Advanced tab.<br />
4. Check “Print background colors and images” under the Printing section<br />
5. Click the Apply button, then click OK<br />
The Event Display Print feature uses the current format of the Event Display as specified by the user.<br />
See About Event Display for an explanation on formatting the Event Display prior to initiating the print feature.<br />
Configure the Print File Range in the Event Display Print dialog<br />
Selecting more than one event in the Event Display window defaults the radio button in the Event Display Print<br />
dialog to Selection and allows the user to choose the All radio button. When only one event is selected , the All<br />
radio button in the Event Display Print dialog is selected.<br />
How to Print Event Display Data to a Browser<br />
165
1. Select Print or Print Preview from the File menu on the Event Display window to display the<br />
Event Display Print dialog. Select Print if you just want to print your data to your default printer.<br />
Select Print Preview if you want access to printer options.<br />
2. Select the range of events to include from either All or Selection in the Event Range section of the<br />
Event Display Print dialog. Choosing All prints all of the events in the capture file or buffer. Choosing<br />
Selection prints only the selected events in the Event Display window.<br />
Note: In order to prevent a Print crash, you cannot select All if there are more than<br />
100,000 events in the capture buffer.<br />
Note: Note: See "Configure the Print File Range in the Event Display Print Dialog"<br />
above for an explanation of these selections<br />
3. Click the OK button.<br />
Figure 105. Event Display Print Dialog<br />
If you chose Print Preview, the system displays your data in a browser print preview display with options for<br />
printing such as page orientation and paper size. You can also use your Printer Preferences dialog to make<br />
some of these selections. When printing your data, the analyzer creates an html file and prints the path to the<br />
file at the bottom of the page. This file can be opened in your browser, however, it may appear different than<br />
the printed version.<br />
6.4 Exporting<br />
6.4.1 Frame Display Export<br />
You can dump the contents of the Summary pane on the Frame Display into a Comma Separated File (.csv).<br />
To access this feature:<br />
1. Right click on the Summary pane or open the Frame Display File menu.<br />
2. Select the Export… menu item.<br />
3. Select a storage location and enter a File name.<br />
4. Select Save.<br />
166
6.4.2 Exporting a File with Event Display Export<br />
With the Event Display Export dialog you can export the contents of the Event Display dialog as a test (.txt),<br />
CSV (.csv.), HTML (.htm), or Binary File (.bin). You also have the option of exporting the entire capture buffer or<br />
just the current selection of the Event Display dialog.<br />
How to Export Event Display Data to a File<br />
Figure 106. Event Display Export Example: .csv file.<br />
1. Select Export Events from the File menu on the Event Display window to display the Event Display<br />
Export dialog.<br />
2. Enter a file path and name, or click the browser button to display the Windows Save As dialog<br />
and navigate to the desired storage location.<br />
3. Select a file type from the Save as type: drop-down List Menu on the Event Display Export dialog.<br />
Select from among the following file formats:<br />
Text File (*.txt)<br />
CSV File (*.csv)<br />
HTML File (*.html)<br />
Binary File (*.bin)<br />
4. Select the range of events to include in the file from either All or Selection in the Event Range section<br />
of the Event Display Export dialog.<br />
• Selecting more than one event in the Event Display window defaults the radio button in the<br />
Event Display Export dialog to Selection and allows the user to choose the All radio button.<br />
• When only one event is selected (something must be selected), the All radio button in the<br />
Event Display Export dialog is selected by default.<br />
5. Next you need to select the Side variable for serial communications.<br />
167
• is used to determine whether you want to export data from , or both.<br />
• Choose Host, Function\Control or Both to determine how you want to export the data.<br />
5. Choose Host, Function\Control or Both to determine how you want to export the data.<br />
6. Choose whether you want to display multiple events or single events per row.<br />
Events Per Row: You can choose to display Multiple Events Per Row, but this method contains no<br />
timestamps. If you select One Event Per Row, you can display timestamps. multiple events or<br />
single events per row.<br />
.<br />
Note: The raw timestamp value is the number of 100-nanosecond intervals since<br />
the beginning of January 1, 1601. This is standard Windows time.<br />
The timestamp data types displayed in columns for One Event Per Row.<br />
Timestamp<br />
Delta<br />
Event Number<br />
Byte Number<br />
Frame Number<br />
Type<br />
Hex<br />
Dec<br />
Oct<br />
Bin<br />
Side<br />
ASCII | 7-bit ASCII | EBCDIC | Baudot<br />
RTS<br />
CTS<br />
DSR<br />
DTR<br />
CD<br />
RI<br />
UART Overrun<br />
Parity Error<br />
Framing Error<br />
168
7. If you select .csv as the file type, choose whether you want to hide/display Preambles or<br />
Column Headings in the exported file<br />
8. Click Save. The Event Display Export file is saved to the locations you specified in File name.<br />
6.4.2.1 Export Filter Out<br />
Figure 107. Example: .csv Event Display Export, Excel spreadsheet<br />
You can filter out data you don't want or need in your text file.<br />
(This option is available only for serial data.) In the Filter Out box, choose which side to filter out: the DTE data,<br />
the DCE data or neither side (don't filter any data.) For example, if you choose the radio button for DTE data,<br />
the DTE data would be filtered out of your export file and the file would contain only the DCE data.<br />
You can also filter out Special Events (which is everything that is not a data byte, such as control signal changes<br />
and Set I/O events), Non-printable characters or both. If you choose to filter out Special Events, your export file<br />
would contain only the data bytes. Filtering out the non-printable characters means that your export file would<br />
contain only special events and data bytes classified as printable. In ASCII, printable characters are those with<br />
hex values between $20 and $7e.<br />
6.4.2.2 Exporting Baudot<br />
When exporting Baudot, you need to be able to determine the state of the shift character. In a text export, the<br />
state of the shift bit can be determined by the data in the Character field. When letters is active, the character<br />
field shows letters and vice versa.<br />
169
Chapter 7: General Information<br />
7.1 System Settings and Progam Options<br />
7.1.1 System Settings<br />
Open the System Settings window by choosing System Settings from the Options menu on the Control window.<br />
To enable a setting, click in the box next to the setting to place a checkmark in the box. To disable a setting,<br />
click in the box to remove the checkmark. When viewing a capture file, settings related to data capture are<br />
grayed out.<br />
There are two ways you can capture data: Series of files or Single File.<br />
7.1.1.1 Series of files<br />
Figure 108. System Settings for defining how to capture data<br />
This option lets you capture to more than one file, based on file size or time.<br />
• Restart Capturing After Saving or Clearing Capture File: the analyzer restarts capture to the file immediately<br />
after the file is closed.<br />
• Wrap Series of Files: When enabled, the analyzer wraps the file when it becomes full. The oldest events<br />
are moved out of the file to make room for new events. Any events moved out of the file are lost.<br />
When disabled, the analyzer stops capture when the file becomes full. Either reset the file or close your<br />
capture file to continue.<br />
• File Size:<br />
1. Click the Min button to see/set the minimum acceptable value for the file size.<br />
2. Click the Max button to see/set the maximum acceptable value for the file size.<br />
170
You can accept these values, or you can enter a unique file size. But if you try to close the dialog after<br />
entering a value greater than the maximum or less than the<br />
minimum, you will see th1s dialog.<br />
• Default:<br />
Enter a name for the capture file in the Default text box. Each<br />
saved file will begin with this name. The name of each file is<br />
the name you give it in the Name box followed by the date,<br />
time and a number. The date and time are when the series was<br />
opened. The number increments with each file. This guarantees<br />
unique file names are created.<br />
• Append Series Start/Date & File Number:<br />
Select this radio button to automatically append a start date (yyyy-mm-dd_hhmmss) and file number (001)<br />
when capturing a series of files.<br />
• Append File Start Date/Time:<br />
Select this radio button to automatically append a start date (yyyy-mm-dd_hhmmss) when capturing a<br />
single file.<br />
• Maximum number of files:<br />
Set the maximum number of files in the series in the Maximum number of files box. The next file starts<br />
when the currently open file is full.<br />
• Start new file after:<br />
If you want to start a new file on a periodic basis, check the box for Start new file after and put in the number<br />
of hours after which a new file is started. Note that if the currently open file becomes full before the<br />
time limit has been reached, a new file is opened immediately rather than lose data. Capturing stops if the<br />
maximum number of files has been used unless Wrap Files has been checked. If Wrap Files has been<br />
checked the analyzer erases the oldest file in the series and makes a new file.<br />
• Start up<br />
Opens the Program Start up Options window. Start up options let you choose whether to start data capture<br />
immediately on opening the analyzer.<br />
• Advanced<br />
Opens the Advanced System Options window. The Advanced Settings should only be changed on advice<br />
of technical support.<br />
7.1.1.2 Single File<br />
This option allows the analyzer to capture data to a file. Each time you capture the file you must provide a file<br />
name. The size of each file cannot larger than the number given in File Size (in K). The name of each file is the<br />
name you give it in the Name box followed by the date and time. The date and time are when the series was<br />
opened.<br />
171
7.1.1.3 Common Options<br />
• Restart Capturing After Saving or Clearing Capture File<br />
If the Automatically Restart feature is enabled, the analyzer restarts capture to the file immediately after the<br />
file is closed.<br />
• Wrap File<br />
When enabled, the analyzer wraps the file when it becomes full. The oldest events are moved out of the<br />
file to make room for new events. Any events moved out of the file are lost. When disabled, the analyzer<br />
stops capture when the file becomes full. Either reset the file or close your capture file to continue.<br />
• File Size: The size of the file will depend of the available hard disk space.<br />
1. Click the Min button to see/set the minimum acceptable value for the file size.<br />
2. Click the Max button to see/set the maximum acceptable value for the file size.<br />
You can accept these values, or you can enter a unique file<br />
size. But if you try to close the dialog after entering a value<br />
greater than the maximum or less than the minimum, you will<br />
see the following dialog.<br />
• Start up<br />
Opens the Program Start up Options window. Start up options let you choose whether to start data capture<br />
immediately on opening the analyzer.<br />
• Advanced<br />
Opens the Advanced System Options window. The Advanced Settings should only be changed on advice of<br />
technical support.<br />
7.1.1.4 System Settings - Disabled/Enabled Options<br />
Some of the System Settings options are disabled depending upon the status of the data capture session.<br />
• As the default, all the options on the System Settings dialog are enabled.<br />
• Once the user begins to capture data by selecting the Start Capture button, some of the options on the<br />
System Settings dialog are disabled until the user stops data capture and either saves or erases the captured<br />
data.<br />
• The user can go into the Startup options and Advanced system options on the System Settings dialog<br />
and make changes to the settings at any time.<br />
172
7.1.1.5 Advanced System Options<br />
These parameters affect fundamental aspects of the software, and it is unlikely that you ever have to change<br />
them. If you do change them and need to return them to their original values, the default value is listed in parentheses<br />
to the right of the value box.<br />
Most technical support problems are not related to these parameters, and as changing them could have serious<br />
consequences for the performance of the analyzer, we strongly recommend contacting technical support<br />
before changing any of these parameters.<br />
To access the Advanced System Options:<br />
1. Go to the Control window.<br />
2. Choose System Settings from the Options menu.<br />
3. On the System Settings window, click the Advanced button.<br />
Figure 109. Advanced System Options dialog<br />
• Driver Receive Buffer Size in Kbytes - This is the size of the buffer used by the driver to store incoming<br />
data. This value is expressed in Kbytes.<br />
• Driver Action Queue Size In Operating System Pages - This is the size of the buffer used by the driver<br />
to store data to be transmitted. This value is expressed in operating system pages.<br />
• Frame Completion Timeout in Seconds - This is the number of seconds that the analyzer waits to receive<br />
data on a side while in the midst of receiving a frame on that side.<br />
If no data comes in on that side for longer than the specified number of seconds, an "aborted frame" event<br />
is added to the Event Display and the analyzer resumes decoding incoming data. This can occur when capturing<br />
interwoven data (DTE and DCE) and one side stops transmitting in the middle of a frame.<br />
The range for this value is from 0 to 999,999 seconds. Setting it to zero disables the timeout feature.<br />
Note: This option is currently disabled.<br />
7.1.1.6 Selecting Start Up Options<br />
To open this window:<br />
173
1. Choose System Settings from the Options menu on the Control window.<br />
2. On the System Settings window, click the Start Up button.<br />
3. Choose one of the options to determine if the analyzer starts data capture immediately on starting<br />
up or not.<br />
Figure 110. Start Up Options dialog<br />
• Don't start capturing immediately - This is the default setting. The analyzer begins monitoring data but<br />
does not begin capturing data until clicking the Start Capture<br />
or Frame Display windows.<br />
icon on the Control, Event Display<br />
• Start capturing to a file immediately - When the analyzer starts up, it immediately opens a capture file<br />
and begins data capture to it. This is the equivalent of clicking the Start Capture icon. The file is<br />
given a name based on the settings for capturing to a file or series of files in the System Settings window.<br />
• Start capturing immediately to the following file: - Enter a file name in the box below this option. When<br />
the analyzer starts up, it immediately begins data capture to that file. If the file already exists, the data in<br />
it is overwritten.<br />
7.1.2 Changing Default File Locations<br />
The analyzer saves user files in specific locations by default. Capture files are placed in the My Capture Files directory<br />
and configurations are put in My Configurations. These locations are set at installation.<br />
Follow the steps below to change the default locations.<br />
1. Choose Directories from the Options menu on the Control window to open the File Locations window.<br />
174
Figure 111. File Locations dialog<br />
2. Select the default location you wish to change.<br />
3. Click Modify.<br />
4. Browse to a new location.<br />
5. Click OK.<br />
6. Click OK when finished.<br />
Figure 112. File Locations Browse dialog<br />
If a user sets the My Decoders directory such that it is up-directory from an installation path, multiple instances<br />
of a personality entry may be detected, which causes a failure when trying to launch <strong>Frontline</strong>. For example, if<br />
an <strong>Frontline</strong> product is installed at C:\<strong>User</strong>s\Public\Public Documents\<strong>Frontline</strong> <strong>Test</strong> <strong>Equipment</strong>\My Decoders\<br />
then "My Decoders" cannot be set to any of the following:<br />
• C:\ My Decoders\<br />
• C:\<strong>User</strong>s\ My Decoders\<br />
• C:\<strong>User</strong>s\\Public\My Decoders\<br />
• C:\<strong>User</strong>s\Public\Public Documents\My Decoders\<br />
• or to any directory that already exists in the path C:\<strong>User</strong>s\Public\Public Documents\<strong>Frontline</strong> <strong>Test</strong> <strong>Equipment</strong>\My<br />
Decoders\<br />
Default Capture File Folder Checkbox<br />
175
If the Use Last Opened Folder for Capture Files checkbox is checked, then the system automatically changes<br />
the default location for saving capture files each time you open a file from or save a file to a new location. For<br />
example, let's say the default location for saving capture files is Drive A > Folder A. Now you select the Use<br />
Last Opened Folder for Capture Files checkbox. The next time, however, you open a capture file from a different<br />
location, Folder B > Removable Flash Drive for example. Now when you save the capture file, it will be<br />
saved to Folder B > Removable Flash Drive. Also, all subsequent files will be saved to that location. This remains<br />
true until you open a file from or save a file to a different location.<br />
There is one caveat to this scenario, however. Let's say you have selected Use Last Opened Folder for Capture<br />
Files and opened a file from a location other than the default directory. All subsequent capture files will<br />
be saved to that location. Suppose, however, the next time you want to save a capture file, the new file location<br />
is not available because the directory structure has changed: a folder has been moved, a drive has been<br />
reassigned, a flash drive has been disconnected, etc. In the case of a "lost" directory structure, subsequent capture<br />
files will be saved to the default location. <strong>ComProbe</strong> software will always try to save a file to the folder<br />
where the last file was opened from or saved to, if Use Last Opened Folder for Capture Files is checked.<br />
If, however, the location is not accessible, files are saved to the default directory that is set at installation.<br />
If the checkbox is unchecked, then the system always defaults to the directory listed in the File Locations dialog.<br />
7.1.3 Side Names<br />
The Side Names dialog is used to change the names of objects and events that appear in various displays. The<br />
Side Names dialog will change depending on the sniffing technology in use at the time the software was<br />
loaded.<br />
Changes to the Names are used throughout the program.<br />
Figure 113. Example: Side Names Where "Slave" and "Master" are current<br />
1. To open the Side Names dialog, choose Side Names… from the Options menu on the Control window.<br />
2. To change a name, click on the name given in the Current Names column, and then click again<br />
to modify the name (a slow double-click).<br />
3. Select OK to initiate the changes. The changes that have been made will not fully take effect for<br />
any views already open. Closing and reopening the views will cause the name change to take<br />
effect.<br />
4. To restore the default values, click the Set Defaults button.<br />
176
7.1.4 Timestamping<br />
Timestamping is the process of precise recording in time of packet arrival. Timestamps is an optional parameter<br />
in the Frame Display and Event Display that can assist in troubleshooting a network link.<br />
7.1.4.1 Timestamping Options<br />
The Timestamping Options window allows you to enable or disable timestamping, and change the resolution of<br />
the timestamps for both capture and display purposes.<br />
To open this window:<br />
Choose Set Timestamp Format… from the Options menu on the Frame Display and Event Display window or<br />
click on the Timestamping Option<br />
will open.<br />
icon in the Event Display toolbar. The Timestamping Options window<br />
7.1.4.1.1 Enabling/Disabling Timestamp<br />
Figure 114. Timestamping Options dialog<br />
To enable timestamping click to make a check appear in the checkbox Store Timestamps (This time takes<br />
effect immediately). Removing the check will disable timestamping.<br />
7.1.4.1.2 Changing the Timestamp Resolution<br />
This option affects the resolution of the timestamp stored in the capture file. The default timestamp is 10 milliseconds.<br />
This value is determined by the operating system and is the smallest "normal" resolutions possible.<br />
Note: The raw timestamp value is the number of 100-nanosecond intervals since the beginning<br />
of January 1, 1601. This is standard Windows time.<br />
177
It is also possible to use "high resolution"<br />
timestamping. High resolution timestamp<br />
values are marked by an asterisk as high<br />
resolution in the drop down list. To<br />
change timestamping resolutions:<br />
1. Go to the Capture Options section<br />
of the window.<br />
2. Change the resolution listed in<br />
the Storage Resolution box.<br />
Note: If you change the resolution,<br />
you need to exit the analyzer and restart in order for the change to take<br />
effect.<br />
7.1.4.1.2.1 Performance Issues with High Resolution Timestamp<br />
There are two things to be aware of when using high resolution timestamps. The first is that high resolution<br />
timestamps take up more space in the capture file because more bits are required to store the timestamp.<br />
Also, more timestamps need to be stored than at normal resolutions. The second issue is that using high resolution<br />
timestamping may affect performance on slower machines<br />
For example, if 10 bytes of data are captured in 10 milliseconds at a rate of 1 byte per millisecond, and the<br />
timestamp resolution is 10 milliseconds, then only one timestamp needs to be stored for the 10 bytes of data. If<br />
the resolution is 1 millisecond, then 10 timestamps need to be stored, one for each byte of data. If you have<br />
two capture files, both of the same size, but one was captured using normal resolution timestamping and the<br />
other using high resolution, the normal resolution file has more data events in it, because less room is used to<br />
store timestamps.<br />
You can increase the size of your capture file in the System Settings.<br />
7.1.4.1.3 Switching Between Relative and Absolute Time<br />
With Timestamping you can choose to employ Relative Time or Absolute time.<br />
1. Choose System Settings from the Options menu on the Control window, and click the<br />
Timestamping Options button, or click the click the Timestamping Options icon<br />
from the<br />
Event Display<br />
window.<br />
2. Go to the Display Options section at the bottom of the window and find the Display Relative<br />
Timestamps checkbox.<br />
3. Check the box to switch the display to relative timestamps. Remove the check to return to absolute<br />
timestamps.<br />
Note: The options in this section affect only how the timestamps are displayed on the screen,<br />
not how the timestamps are recorded in the capture file.<br />
• Display Raw Timestamp Value shows the timestamp as the total time in hundred nanoseconds from a<br />
specific point in time.<br />
178
• Display Relative Timestamps shows the timestamp as the amount of time that has passed since the first<br />
byte was captured. It works just like a stop watch in that the timestamp for the first byte is 0:00:00.0000<br />
and all subsequent timestamps increment from there. The timestamp is recorded as the actual time, so you<br />
can flip back and forth between relative and actual time as needed.<br />
• Selecting both values displays the total time in nanoseconds from the start of the capture as opposed to a<br />
specific point in time.<br />
• Selecting neither value displays the actual chronological time.<br />
When you select Display Relative Timestamp you can set the number of digits to display using the up or<br />
down arrows on the numeric list.<br />
7.1.4.1.4 Displaying Fractions of a Second<br />
1. Choose System Settings from the Options menu on the Control window, and click the<br />
Timestamping Options button, or click the click the Timestamping Options icon<br />
from the<br />
Event Display<br />
window.<br />
2. Go to the Display Options section at the bottom of the window, and find the Number of Digits to<br />
Display box.<br />
3. Click on the arrows to change the number. You can display between 0 and 6 digits to the right of<br />
the decimal point.<br />
7.2 Technical Information<br />
7.2.1 Performance Notes<br />
As a software-based product, the speed of your computer’s processor affects the analyzer’s performance.<br />
Buffer overflow errors are an indicator that the analyzer is unable to keep up with the data. The information<br />
below describes what happens to the data as it arrives, what the error means, and how various aspects of the<br />
analyzer affect performance. Also included are suggestions on how to improve performance.<br />
The analyzer's driver takes data from the driver and counts each byte as they are put into the driver’s buffer.<br />
The analyzer's driver tells the user interface that data is ready to be processed. The analyzer takes the data from<br />
the driver’s buffer and puts the data into the capture buffer.<br />
Driver Buffer Overflows occur when the user interface does not retrieve frames from the driver quickly<br />
enough. Buffer overflows are indicated in the Event Display window by a plus sign within a circle. Clicking on<br />
the buffer overflow symbol displays how many frames have been lost.<br />
There are several things that you can do to try and solve this problem.<br />
• Use capture filters to filter out data you don't need to see. Capture filters reduce the amount of data processed<br />
by the analyzer. (Ethernet Only)<br />
• Close all other programs that are doing work while the analyzer is running. Refrain from doing searches<br />
in the Event Display window or other processor intensive activities while the analyzer is capturing data.<br />
179
• Timestamping takes up processor time, primarily not in timestamping the data, but in writing the<br />
timestamp to the file. Try turning off timestamping from the Timestamping Options window.<br />
• For Driver Buffer Overflows, change the size of the driver buffer. This value is changed from the<br />
Advanced System Settings. Go to the Control window and choose System Settings from the Options<br />
menu. Click on the Advanced button. Find the value Driver Receive Buffer Size in Operating System<br />
Pages. Take the number listed there and double it.<br />
• The analyzer’s number one priority is capturing data; updating windows is secondary. However, updating<br />
windows still takes a certain amount of processor time, and may cause the analyzer to lose data<br />
while the window is being updated. Some windows require more processing time than others because the<br />
information being displayed in them is constantly changing. Refrain from displaying data live in the<br />
Event Display and Frame Display windows. The analyzer can capture data with no windows other than<br />
the Control window open.<br />
• If you are still experiencing buffer overflows after trying all of the above options, then you need to use a<br />
faster PC.<br />
7.2.2 Ring Indicator<br />
The following information applies when operating the analyzer in Spy mode or Source DTE, No FTS Cables<br />
mode. When using the cables supplied with the analyzer to capture or source data, Ring Indicator (RI) is routed<br />
to a different pin which generates interrupts normally.<br />
There is a special case involving Ring Indicator and computers with 8250 UARTs or UARTs from that family<br />
where the state of RI may not be captured accurately. Normally when a control signal changes state from high<br />
to low or low to high, an interrupt is generated by the UART, and the analyzer goes to see what has changed<br />
and record it. Ring Indicator works a little differently. An interrupt is generated when RI changes from high to<br />
low, but not when RI changes from low to high. If Ring Indicator changes from low to high, the analyzer does not<br />
know that RI has changed state until another event occurs that generates an interrupt. This is simply the way the<br />
UART works, and is not a deficiency in the analyzer software.<br />
To minimize the chance of missing a Ring Indicator change, the analyzer polls the UART every millisecond to see<br />
if RI has changed. It is still possible for the analyzer to miss a Ring Indicator change if RI and only RI changes state<br />
more than once per millisecond.<br />
UARTs in the 8250 family include 8250s, 16450s, 16550s and 16550 variants. If you have any questions about<br />
the behavior of your UART and Ring Indicator, please contact technical support.<br />
7.2.3 Progress Bars<br />
The analyzer uses progress bars to indicate the progress of a number of different processes. Some progress<br />
bars (such as the filtering progress bar) remain visible, while others are hidden.<br />
The title on the progress bar indicates the process underway.<br />
7.2.4 Event Numbering<br />
This section provides information about how events are numbered when they are first captured and how this<br />
affects the display windows in the analyzer. The information in this section applies to frame numbering as well.<br />
When the analyzer captures an event, it gives the event a number. If the event is a data byte event, it receives a<br />
byte number in addition to an event number. There are usually more events than bytes, with the result is that a<br />
180
yte might be listed as Event 10 of 16 when viewing all events, and Byte 8 of 11 when viewing only the data<br />
bytes.<br />
The numbers assigned to events that are wrapped out of the buffer are not reassigned. In other words, when<br />
event number 1 is wrapped out of the buffer, event number 2 is not renumbered to event 1. This means that<br />
the first event in the buffer may be listed as event 11520 of 16334, because events 1-11519 have been<br />
wrapped out of the buffer. Since row numbers refer to the event numbers, they work the same way. In the<br />
above example, the first row would be listed as 2d00 (which is hex for 11520.)<br />
The advantage of not renumbering events is that you can save a portion of a capture file, send it to a colleague,<br />
and tell your colleague to look at a particular event. Since the events are not renumbered, your colleague’s file<br />
use the same event numbers that your file does.<br />
7.2.5 Useful Character Tables<br />
7.2.5.1 ASCII Codes<br />
181
7.2.5.2 Baudot Codes<br />
7.2.5.3 EBCDIC Codes<br />
182
7.2.5.4 Communication Control Characters<br />
Listed below in alphabetical order are the expanded text meanings for common ANSI communication control<br />
characters, and two-character system abbreviation for each one. Some abbreviations have forward slash characters<br />
between the two letters. This is to differentiate the abbreviations for a control character from a hex number.<br />
For example, the abbreviation for Form Feed is listed as F/F, to differentiate it from the hex number FF.<br />
Communications Control Characters<br />
Abbreviation Control Character Text<br />
AK ACK Acknowledge<br />
BL BEL Bell<br />
BS BS Backspace<br />
CN CAN Cancel<br />
CR CR Carriage Return<br />
D/1-4 DC1-4 Device Control 1-4<br />
D/E DEL Delete<br />
DL DLE Data Link Escape<br />
EM EM End of Medium<br />
EQ ENQ Enquiry<br />
ET EOT End of Transmission<br />
E/C ESC Escape<br />
E/B ETB End of Transmission<br />
Block<br />
EX ETX End of Text<br />
F/F FF Form Feed<br />
FS FS File Separator<br />
GS GS Group Separator<br />
HT HT Horizontal Tabulation<br />
LF LF Line Feed<br />
NK NAK Negative Acknowledge<br />
NU NUL Null<br />
RS RS Record Separator<br />
SI SI Shift In<br />
183
Communications Control Characters(continued)<br />
Abbreviation Control Character Text<br />
SO SO Shift Out<br />
SH SOH Start of Heading<br />
SX STX Start of Text<br />
SB SUB Substitute<br />
SY SYN Synchronous Idle<br />
US US Unit Separator<br />
VT VT Vertical Tabulation<br />
7.2.6 The <strong>Frontline</strong> Serial Driver<br />
<strong>ComProbe</strong> software uses custom versions of the standard Windows serial drivers in order to capture data.<br />
These drivers are usually installed during the routine product installation. However, if you need to install the<br />
serial driver after <strong>ComProbe</strong> software has already been installed, please refer to the instructions available in<br />
the Setup folder installed under Start | Programs | [Product Name and version #] | Setup | How to Install the<br />
FTS Serial Driver.<br />
7.2.7 DecoderScript Overview<br />
The DecoderScript Reference <strong>Manual</strong> and <strong>User</strong> Guide is delivered with each <strong>Frontline</strong> <strong>ComProbe</strong> ® Protocol<br />
Analysis System installation package under Developer Tools. The manual is also available on-line at FTE.com.<br />
The main purpose of this manual is to describe DecoderScript, the language used in writing decoders.<br />
DecoderScript allows you to create new decoders or modify existing decoders to expand the functionality of<br />
your <strong>ComProbe</strong> protocol analyzer. DecoderScript displays protocol data, checks the values of fields, validates<br />
checksums, converts and combines field values for convenient presentation. Decoders can also be augmented<br />
with custom C++-coded functions, called "methods", to extend data formatting, validation, transformations, and<br />
so on.<br />
A decoder defines field-by-field how a protocol message can be taken apart and displayed. The core of each<br />
"decoder" is a program that defines how the protocol data is broken up into fields and displayed in the Frame<br />
Display window of the analyzer software.<br />
This manual provides instruction on how to create and use custom decoders. When reading the manual for the<br />
first time, we encourage you to read the chapters in sequence. The chapters are organized in such a way to<br />
introduce you to DecoderScript writing step- by- step.<br />
Screenshots of the <strong>ComProbe</strong> protocol analyzer have been included in the manual to illustrate what you see on<br />
your own screen as you develop decoders. But you should be aware for various reasons, the examples may be<br />
slightly different from the ones that you create. The differences could be the result of configuration differences<br />
or because you are running a newer version of the program. Do not worry if an icon seems to be missing, a font<br />
is different, or even if the entire color scheme appears to have changed. The examples are still valid.<br />
Examples of decoders, methods, and frame recognizers are included in this manual. You can cut and paste from<br />
these examples to create your own decoders.<br />
184
A quick note here: Usually the pasted code appears the same as the original in your editor. Some editors, however,<br />
change the appearance of the text when it is pasted (something to do with whether it is ASCII or Unicode<br />
text). If you find that the pasted text does not appear the same as the original, you can transfer the code into a<br />
simple text editor like Notepad, save it as an ANSI (ASCII) file, then use it in your decoder.<br />
These files are installed in the FTE directory of the system Common Files directory. The readme file in the root<br />
directory of the protocol analyzer installation contains a complete list of included files. Most files are located in<br />
My Decoders and My Methods.<br />
We will be updating our web site with new and updated utilities, etc, on a regular basis and we urge decoder<br />
writers to check there occasionally.<br />
7.3 Contacting Technical Support<br />
Technical support is available in several ways. The online help system provides answers to many user related<br />
questions. <strong>Frontline</strong>'s website has documentation on common problems, as well as software upgrades and utilities<br />
to use with our products.<br />
On the Web: http://fte.com/support/supportrequest.aspx<br />
Email:<br />
tech_support@fte.com<br />
If you need to talk to a technical support representative about your <strong>ComProbe</strong> BPA 500 product, support is available<br />
between 9 am and 5 pm, U.S. Eastern Time zone, Monday through Friday. Technical support is not available<br />
on U.S. national holidays.<br />
Phone: +1 (434) 984-4500<br />
Fax: +1 (434) 984-4505<br />
7.3.1 Instructional Videos<br />
<strong>Frontline</strong> provides a series of videos to assist the user and may answer your questions. These videos can be<br />
accessed at fte.com/support/videos.aspx. On this web page use the Video Filters sidebar to select instructional<br />
videos for your product.<br />
185
Appendix 1: Application Notes<br />
1. Bluetooth Virtual Sniffing<br />
186
1.1 Bluetooth Virtual Sniffing<br />
1.1.1 Introduction<br />
The <strong>ComProbe</strong> software Virtual sniffing function simplifies Bluetooth® development and is easy to use. <strong>Frontline</strong>’s<br />
Virtual sniffing with Live Import provides the developer with an open interface from any application to<br />
<strong>ComProbe</strong> software so that data can be analyzed and processed independent of sniffing hardware. Virtual sniffing<br />
can also add value to other Bluetooth development tools such as Bluetooth stack SDKs (Software Development<br />
Kits) and Bluetooth chip development kits.<br />
This white paper discusses:<br />
• Why HCI sniffing and Virtual sniffing are useful.<br />
• Bluetooth sniffing history.<br />
• What is Virtual sniffing?<br />
• Why Virtual sniffing is convenient and reliable.<br />
• How Virtual sniffing works.<br />
• Virtual sniffing and Bluetooth stack vendors.<br />
• Case studies: Virtual sniffing and Bluetooth mobile phone makers.<br />
• Virtual sniffing and you. • Where to go for more information.<br />
1.1.2 Why HCI Sniffing and Virtual Sniffing are Useful<br />
Because the Bluetooth protocol stack is very complex, a Bluetooth protocol analyzer is an important part of all<br />
Bluetooth development environments. The typical Bluetooth protocol analyzer “taps” a Bluetooth link by capturing<br />
data over the air. For many Bluetooth developers sniffing the link between a Bluetooth Host CPU and a<br />
Bluetooth Host Controller—also known as HCI-sniffing—is much more useful than air sniffing.<br />
HCI-sniffing provides direct visibility into the commands being sent to a Bluetooth chip and the responses to<br />
those commands. With air sniffing a software engineer working on the host side of a Bluetooth chip has to infer<br />
and often guess at what their software is doing. With HCI-sniffing, the software engineer can see exactly what is<br />
going on. HCI-sniffing often results in faster and easier debugging than air sniffing.<br />
<strong>ComProbe</strong> software’s Virtual sniffing feature is a simple and easy way to perform HCI-sniffing. Virtual sniffing is<br />
not limited to just HCI-sniffing, but it is the most common use and this white paper will focus on the HCI-sniffing<br />
application of Virtual sniffing.<br />
It is also important to understand that <strong>ComProbe</strong> software is a multi-mode product. <strong>ComProbe</strong> software does<br />
support traditional air sniffing. It also supports serial HCI sniffing (for the H4 (HCI UART), H5 (3-wire UART) , and<br />
BCSP (BlueCore Serial Protocol) protocols), USB HCI (H2) sniffing, SDIO sniffing, and Virtual sniffing. So with<br />
<strong>ComProbe</strong> software nothing is sacrificed—the product is simply more functional than other Bluetooth protocol<br />
analyzers.<br />
1.1.3 Bluetooth Sniffing History<br />
<strong>Frontline</strong> has a strong appreciation for the importance of HCI sniffing because of the way we got involved with<br />
Bluetooth. Because of our company history, we are uniquely qualified to offer a multi-mode analyzer that<br />
187
provides many ways to sniff and supports a wide variety of protocols. This brief Bluetooth sniffing history should<br />
help you understand our approach to Bluetooth protocol analysis.<br />
In the early days of Bluetooth, there were no commercially available Bluetooth protocol analyzers, so<br />
developers built their own debug tools and/or used protocol analyzers that weren’t built for Bluetooth. Many<br />
developers built homegrown HCI analyzers—basically hex dumps and crude traces—because they recognized<br />
the need for visibility into the HCI interface and because it was too difficult to build air sniffers. Several companies<br />
developed air sniffers because they saw a market need and because they realized that they could<br />
charge a high price (USD $25,000 and higher).<br />
Two Bluetooth chip companies, Silicon Wave and Broadcom were using <strong>Frontline</strong>’s Serialtest® serial analyzer to<br />
capture serial HCI traffic and then they would manually decode the HCI byte stream. This manual decoding was<br />
far too much work and so, independently, Silicon Wave and Broadcom each requested that <strong>Frontline</strong> produce a<br />
serial HCI Bluetooth analyzer that would have all the features of Serialtest. In response to these requests <strong>Frontline</strong><br />
developed SerialBlue®—the world’s first commercially available serial HCI analyzer.<br />
The response to SerialBlue was very positive. When we asked our Bluetooth customers what they wanted next<br />
we quickly learned that there was a need for an affordable air sniffer that provided the same quality as SerialBlue.<br />
We also learned that the ultimate Bluetooth analyzer would be one that sniff air and sniff HCI simultaneously.<br />
As work was progressing on our combination air sniffer and HCI sniffer the functional requirements for<br />
Bluetooth analyzers were changing. It was no longer good enough just to decode the core Bluetooth protocols<br />
(LMP, HCI, L2CAP, RFCOMM, and OBEX). Applications were beginning to be built on top of Bluetooth and therefore<br />
application level protocol decoding was becoming a requirement. For example, people were starting to<br />
browse the Internet using Bluetooth-enabled phones and PDAs therefore a good Bluetooth analyzer would<br />
need to support TCP/IP, HTTP, hands-free, A2DP, etc.<br />
For <strong>Frontline</strong> to support for these higher levels protocols was no problem since they were already in use in<br />
other <strong>Frontline</strong> analyzer products. People have been using <strong>Frontline</strong> Serialtest serial analyzers and Ethertest<br />
Ethernet analyzer to troubleshoot TCP/IP and Internet problems for many years.<br />
As we continued to work closely with the Bluetooth community we also came across one other requirement:<br />
sniffing itself had to be made easier. We took a two-pronged approach to this problem. We simplified air sniffing<br />
(and we continue to work on simplifying the process of air sniffing) and we invented Virtual sniffing.<br />
1.1.4 Virtual Sniffing—What is it?<br />
Historically, protocol analyzers have physically tapped the circuit being sniffed. For example, an Ethernet circuit<br />
is tapped by plugging into the network. A serial connection is sniffed by passively bridging the serial link. A<br />
Bluetooth air sniffer taps the piconet by synchronizing its clock to the clock of the piconet Master.<br />
Not only is there a physical tap in traditional sniffing, but the sniffer must have some knowledge of the physical<br />
characteristics of the link being sniffed. For example, a Bluetooth air sniffer must know the BD_ADDR of at least<br />
one piconet member to allow it perform clock synchronization. A serial sniffer must know the bit rate of the<br />
tapped circuit or be physically connected to the clock line of the circuit.<br />
With Virtual sniffing the protocol analyzer itself does not actually tap the link and the protocol analyzer does not<br />
require any knowledge of the physical characteristics of the link.<br />
In computer jargon, “virtual” means “not real”. Virtual memory is memory that doesn’t actually exist. Virtual<br />
reality is something that looks and feels real, but isn’t real. So we use the term Virtual sniffing, because there is<br />
sniffing taking place, but not in the traditional physical sense.<br />
188
1.1.5 The Convenience and Reliability of Virtual Sniffing<br />
Virtual sniffing is the most convenient and reliable form of sniffing and should be used in preference to all<br />
other forms of sniffing whenever practical. Virtual sniffing is convenient because it requires no setup to use<br />
except for a very small amount of software engineering (typically between one and four hours) that is done<br />
once and then never again. Once support for Virtual sniffing has been built into application or into a development<br />
environment none of the traditional sniffing setup work need be done.<br />
This means:<br />
• NO piconet synchronization.<br />
• NO serial connection to tap.<br />
• NO USB connection to tap.<br />
Virtual sniffing is reliable because there is nothing that can fail. With Virtual sniffing all data is always captured.<br />
1.1.6 How Virtual Sniffing Works<br />
<strong>ComProbe</strong> software Virtual sniffing works using a feature called Live Import. Any application can feed data into<br />
<strong>ComProbe</strong> software using Live Import. A simple API provides four basic functions and a few other more<br />
advanced functions. The four basic Live Import functions are:<br />
• Open a connection to <strong>ComProbe</strong> software.<br />
• Close a connection to <strong>ComProbe</strong> software.<br />
• Send an entire packet to <strong>ComProbe</strong> software.<br />
• Send a single byte to <strong>ComProbe</strong> software.<br />
All applications that send data to <strong>ComProbe</strong> software via Live Import use the first two functions. Usually only<br />
one of the two Send functions is used by a particular application. When <strong>ComProbe</strong> software receives data from<br />
the application via Live Import, the data is treated just as if it had been captured on a <strong>Frontline</strong> <strong>ComProbe</strong><br />
sniffer. The entire protocol stack is fully decoded.<br />
With Virtual sniffing the data can literally be coming from anywhere. <strong>ComProbe</strong> software does not care if the<br />
data being analyzed is being captured on the machine where <strong>ComProbe</strong> software is running or if the data is<br />
being captured remotely and passed into <strong>ComProbe</strong> software over an Internet connection.<br />
1.1.7 Virtual Sniffing and Bluetooth Stack Vendors<br />
As the complexity of the Bluetooth protocol stack increases Bluetooth stack vendors are realizing that their customers<br />
require the use of a powerful Bluetooth protocol analyzer. Even if the stack vendor’s stack is bug free,<br />
there are interoperability issues that must be dealt with.<br />
The homegrown hex dumps and trace tools from the early days of Bluetooth just are not good enough anymore.<br />
And building a good protocol analyzer is not easy. So stack vendors are partnering with <strong>Frontline</strong>. This permits<br />
the stack vendors to concentrate of improving their stack.<br />
The typical Bluetooth stack vendor provides a Windows-based SDK. The stack vendor interfaces their SDK to<br />
<strong>ComProbe</strong> software by adding a very small amount of code to the SDK, somewhere in the transport area, right<br />
about in the same place that HCI data is sent to the Host Controller.<br />
189
If <strong>ComProbe</strong> software is installed on the PC and the Virtual sniffer is running then the data will be captured and<br />
decoded by <strong>ComProbe</strong> software, in real-time. If <strong>ComProbe</strong> software is not installed or the Virtual sniffer is not<br />
running then no harm is done. Virtual sniffing is totally passive and has no impact on the behavior of the SDK.<br />
One <strong>Frontline</strong> stack vendor partner feels so strongly about <strong>ComProbe</strong> software that not only have they built Virtual<br />
sniffing support in their SDK, but they have made <strong>ComProbe</strong> software an integral part of their product offering.<br />
They are actively encouraging all customers on a worldwide basis to adopt <strong>ComProbe</strong> software as their<br />
protocol analysis solution.<br />
1.1.8 Case Studies: Virtual Sniffing and Bluetooth Mobile Phone<br />
Makers<br />
Case Study # 1<br />
A Bluetooth mobile phone maker had been using a homemade HCI trace tool to debug the link between the<br />
Host CPU in the phone the Bluetooth chip. They also were using an air sniffer. They replaced their entire sniffing<br />
setup by moving to <strong>ComProbe</strong> software.<br />
In the original test setup the Host CPU in the phone would send debug messages and HCI data over a serial link.<br />
A program running on a PC logged the output from the Host CPU. To implement the new system using Virtual<br />
sniffing, a small change was made to the PC logging program and it now sends the data to <strong>ComProbe</strong> software<br />
using the Live Import API. The HCI traffic is fully decoded and the debug messages are decoded as well.<br />
The decoder for the debug messages was written using <strong>ComProbe</strong> software’s DecoderScript feature. Decoder-<br />
Script allows <strong>ComProbe</strong> software user to write custom decodes and to modify decodes supplied with<br />
<strong>ComProbe</strong> software. DecoderScript is supplied as a standard part of <strong>ComProbe</strong> software. In this case, the customer<br />
also created a custom decoder for HCI Vendor Extensions.<br />
The air sniffer that was formerly used has been replaced by the standard <strong>ComProbe</strong> software air sniffer.<br />
Case Study # 2<br />
A second Bluetooth mobile phone maker plans to use Virtual sniffing in conjunction with a Linux-based custom<br />
test platform they have developed. Currently they capture serial HCI traffic on their Linux system and use a set<br />
of homegrown utilities to decode the captured data.<br />
They plan to send the captured serial HCI traffic out of the Linux system using TCP/IP over Ethernet. Over on the<br />
PC running <strong>ComProbe</strong> software they will use a simple TCP/IP listening program to bring the data into the PC and<br />
this program will hand the data off to <strong>ComProbe</strong> software using the Live Import API.<br />
1.1.9 Virtual Sniffing and You<br />
If you are a Bluetooth stack vendor, a Bluetooth chip maker, or a maker of any other products where integrating<br />
your product with <strong>ComProbe</strong> software’s Virtual sniffing is of interest please contact <strong>Frontline</strong> to discuss your<br />
requirements. There are numerous approaches that we can use to structure a partnership program with you.<br />
We believe that a partnership with <strong>Frontline</strong> is an easy and cost-effective way for you to add value to your<br />
product offering.<br />
If you are end customer and you want to take advantage of Virtual sniffing, all you need to do is buy any <strong>Frontline</strong><br />
Bluetooth product. Virtually sniffing comes standard with product.<br />
190
Author: Eric Kaplan<br />
Publish Date: May 2003<br />
Revised: December 2013<br />
191
Index<br />
Aborted Frame 173<br />
Absolute Time 178<br />
Adding a New Predefined Stack 38<br />
Adding Comments To A Capture File 161<br />
Advanced Settings 171<br />
Advanced System Options 173<br />
A<br />
Apply Capture Filters 149<br />
Apply Display Filters 147, 149, 151-152, 154-<br />
155<br />
ASCII 48<br />
character set 181<br />
viewing data in 48<br />
ASCII Codes 181<br />
ASCII Pane 69<br />
Auto-Sizing Column Widths 66<br />
Automatically Request Missing Decoding Information<br />
41<br />
Automatically Restart 170<br />
Automatically Restart Capturing After 'Clear Capture<br />
Buffer' 170<br />
Automatically Save Imported Capture Files 170<br />
Autotraversal 38, 40<br />
Average Throughput Indicators<br />
Average Throughput - Selected 85<br />
Average_Throughput_Indicators 84<br />
Bar Charts 126<br />
Baudot 48, 169<br />
Baudot Codes 181<br />
B<br />
Begin Sync Character Strip 50<br />
Binary 46, 131<br />
Binary Pane 69<br />
BL 183<br />
Bookmarks 144-146<br />
Boolean 149, 154-155<br />
BPA - Update Firmware 13<br />
BPA 500 - Capture Data 33<br />
BPA 500 - Classic 18, 24<br />
BPA 500 - Hardware Settings 29<br />
BPA 500 - low energy 16, 21<br />
BPA 500 Advanced I/O Settings 29<br />
BPA 500 BR/EDR IO Settings 14<br />
BPA 500 Data Capture Methods 8<br />
BPA 600 27<br />
BPA Device Database 28<br />
Broken Frame 49<br />
BS 183<br />
BT Timeline Legend 89<br />
Buffer 159, 170<br />
Buffer Overflow 170<br />
Buffer/File Options 170<br />
Byte 45-46, 70, 180<br />
Searching 133<br />
byte export 62<br />
C<br />
Calculating Data Rates and Delta Times 45<br />
Capture Buffer 159, 170, 172<br />
Capture Buffer Size 170<br />
Capture File 32, 159-162, 170, 172<br />
auto-save imported files 170<br />
192
capture to a series of files 170<br />
capture to one file 170<br />
changing default location of 174<br />
changing max size of 170, 172<br />
framing captured data 39<br />
loading 161<br />
reframing 39<br />
removing framing markers 40<br />
saving 159-160<br />
starting capture to file 32<br />
Capturing 32<br />
Data to Disk 32<br />
CFA file 160-161<br />
Changing Default File Locations 174<br />
Character 131, 183<br />
Character Pane 69<br />
Character Set 48, 181-182<br />
Characters Per Second Table 126<br />
Choosing a Data Capture Method 6<br />
Clear Capture Buffer 170<br />
CN 183<br />
Color of Data Bytes 71<br />
Colors 71<br />
Comma Separated File 166<br />
Compound Display Filters 149<br />
<strong>ComProbe</strong> BPA 500 - Classic Only Single Connection<br />
18<br />
Confirm CFA Changes 160<br />
Context For Decoding 41<br />
Control Characters 183<br />
Control Signals 49, 176<br />
Control Window 12, 170<br />
Configuration Information 10<br />
Conversation Filters 151<br />
CPAS - Capture Data 33<br />
CPAS Control Window Toolbar 9<br />
CR 183<br />
CRC 44<br />
CSV Files 166<br />
Custom Protocol Stack 36, 38<br />
Custom Stack 37-38<br />
Customizing Fields in the Summary Pane 66<br />
D<br />
D/1 183<br />
D/2 182<br />
D/3 182<br />
D/4 182<br />
D/E 183<br />
Data 45, 158-159<br />
Capturing 32<br />
Data Byte Color Denotation 71<br />
Data Errors 140<br />
Data Extraction 122<br />
Data Rates 45<br />
Decimal 46<br />
Decode Pane 68<br />
decoder 184<br />
DecoderScript 184<br />
Decodes 36, 41, 51, 58, 68, 127<br />
Default File Locations 174<br />
Deleting Display Filters 152<br />
Delta Times 45<br />
193
Direction 151<br />
Directories 174<br />
Disabling 170<br />
Discontinuities 88<br />
Display Filters 147, 152-155<br />
Display Options 179<br />
DL 183<br />
Dots 67<br />
Driver 184<br />
Duplicate View 42, 44, 61<br />
E<br />
E/B 183<br />
E/C 183<br />
Easy Protocol Filtering 73, 157<br />
EBCDIC 48<br />
EBCDIC Codes 182<br />
EIR 36<br />
EM 183<br />
EQ 183<br />
Errors 73, 140, 157, 176<br />
ET 183<br />
Event Display 41, 60, 167<br />
Event Display Export 167<br />
Event Display Toolbar 42<br />
Event Numbering 180<br />
Event Pane 70<br />
Event Symbols 48<br />
EX 183<br />
Exclude 149<br />
Exclude Radio Buttons 149<br />
Expand All/Collapse All 68<br />
Expand Decode Pane 61<br />
Export<br />
Export Baudot 169<br />
Export Events 167<br />
Export Filter Out 169<br />
Export Payload Throughput Over Time 86<br />
Extended Inquiry Response 36<br />
F/F 183<br />
FCSs 44<br />
Field Width 66<br />
File 158-161, 170<br />
File Locations 174<br />
File Series 170<br />
File Types Supported 161<br />
Filtering 72-73, 156-157<br />
Filters 72-73, 147-149, 151-157<br />
Find 128, 130, 132, 134-135, 140<br />
Find - Bookmarks 143<br />
Find Introduction 127<br />
Font Size 50<br />
Frame Display 51, 54, 57-58, 60-61, 66-71<br />
Frame Display - Change Text Highlight<br />
Color 70<br />
Frame Display - Find 58<br />
Frame Display Status Bar 57<br />
Frame Display Toolbar 54<br />
Frame Display Window 52<br />
Frame Recognizer Change 49<br />
Frame Symbols 67<br />
Frame Display - Right Click Filtering 73<br />
Frame Information on the Control Window 11<br />
F<br />
194
Freeze 45<br />
FS 183<br />
FTS Serial Driver 184<br />
low energy Timeline Introduction 89<br />
Low Power 49<br />
M<br />
G<br />
Main Window 9<br />
Go To 133<br />
Graphs 126<br />
Green Dots in Summary Pane 67<br />
GS 183<br />
H<br />
Hex 46<br />
Hexadecimal 69<br />
Hiding Display Filters 152<br />
Hiding Protocol Layers 58<br />
High Resolution Timestamping 178<br />
HT 183<br />
I<br />
I/O Settings Change 49<br />
Icons in Data on Event Display 48<br />
Importable File Types 162<br />
Importing Capture Files 161<br />
INCLUDE 149<br />
Include/Exclude 149<br />
L<br />
Layer Colors 71<br />
LF 183<br />
Link Key 18, 21, 24, 33<br />
LSB 20, 26, 35<br />
Live Update 46<br />
Logical Byte Display 58<br />
Logical Bytes 58<br />
Long Break 49<br />
Menus 11<br />
Message Sequence Chart 104<br />
Message Sequence Chart - Find and Go To 109<br />
Message Sequence Chart - Go To 110<br />
Minimizing 12<br />
Missing Bluetooth Clock 89<br />
Mixed Channel/Sides 48<br />
Mixed Sides Mode 48<br />
Modem Lead Names 176<br />
Modify Display Filters 154-155<br />
Multiple Event Displays 44<br />
Multiple Frame Displays 61<br />
N<br />
NK 183<br />
Node Filters 151<br />
Nonprintables 169<br />
Notes 161<br />
NU 183<br />
Number Set 46<br />
Numbers 181<br />
O<br />
Object Throughput Stats File 87<br />
Octal 46<br />
One_Second_Throughput_Indicators 85<br />
Open 44<br />
Open Capture File 161<br />
Options 170, 173-174, 177<br />
195
Overriding Frame Information 41<br />
Overrun Errors 141<br />
P<br />
Packet Error Rate (PER Stats) 113<br />
Packet Error Rate 113<br />
PER Stats Scroll Bar 119<br />
Packet Timeline 79, 88<br />
Packet Timeline Menu Bar 80<br />
Packet_Depiction 74<br />
Packet_Navigation_and_Selection 78<br />
Packet_Timeline_Introduction 74<br />
Packet_Timeline_Visual_Elements 82<br />
Panes 61<br />
Pattern 130<br />
Pause 32<br />
Performance Notes 179<br />
Pie Charts 126<br />
Printing 126, 165<br />
Printing from the Frame Display 162<br />
Progress Bars 180<br />
Protocol<br />
Protocol Layer Colors 71<br />
Protocol Layer Filtering 71, 156<br />
Protocol Stack 37-38, 40<br />
Q<br />
Quick Filtering 72, 74, 156-157<br />
R<br />
Radix 46, 69<br />
Reframe 39<br />
Reframing 39<br />
Relative Time 132, 178<br />
Remove<br />
Bookmarks 145-146<br />
Columns 67<br />
Custom Stack 37<br />
Filters 152<br />
Framing Markers 40<br />
Renaming 155<br />
Reset Panes 61<br />
Resolution 177<br />
Resumed 49<br />
Revealing Display Filters 152<br />
Revealing Protocol Layers 58<br />
RS 183<br />
Save 148, 158-160<br />
Save As 158<br />
Saving 159-160, 170<br />
Display Filter 147<br />
Imported Capture Files 170<br />
Saving the Capture File using File > Save or<br />
the Save icon 158<br />
Search 127, 130-131, 133, 135, 140, 144, 146<br />
binary value 130<br />
bookmarks 146<br />
character string 130<br />
errors 140<br />
event number 134<br />
frame number 134<br />
hex pattern 130<br />
pattern 130<br />
special event 135<br />
timestamp 131<br />
S<br />
196
wildcards 130<br />
Seed Value 44<br />
Serial Driver 184<br />
Short Break 49<br />
Side Names 176<br />
Sides 176<br />
Sorting Frames 58<br />
Special Events 135<br />
Start 48<br />
Start Up Options 173<br />
Statistics 125<br />
Statistics Graphs 126<br />
Summary 64<br />
Summary Layer Protocol 73, 157<br />
Summary Pane 64, 66-67<br />
Sync Dropped 50<br />
Sync Found 50<br />
Sync Hunt Entered 50<br />
Sync Lost 50<br />
Synchronization 60<br />
System Settings 170, 173<br />
Timestamping Enabled 50<br />
Timestamping Options 170, 177<br />
Timestamping Resolution 177<br />
Timestamps 177-178<br />
Transferring Packets 32<br />
Truncated Frame 50<br />
U<br />
Underrun Error 50<br />
Unframe 40<br />
Unframe Function 40<br />
Unframing 40<br />
Unknown Event 50<br />
V<br />
vendor specific decoder 184<br />
Viewing Data Events 46<br />
W<br />
Wrap Buffer/File 170<br />
Wrap Files 171<br />
Z<br />
Zooming<br />
Zooming 84<br />
T<br />
Technical Support 185<br />
<strong>Test</strong> Device Began Responding 50<br />
<strong>Test</strong> Device Stopped Responding 50<br />
Throughput Displays<br />
Throughput_Displays 84<br />
Throughput Graph 86<br />
Timestamp 144, 177-178<br />
Timestamping 144, 177-178<br />
Timestamping Disabled 50<br />
197