You also want an ePaper? Increase the reach of your titles
YUMPU automatically turns print PDFs into web optimized ePapers that Google loves.
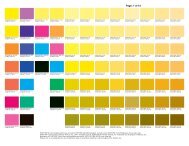
1<br />
Switch on the<br />
unwinder, printer<br />
and rewinder.<br />
2X<br />
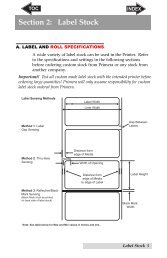
<strong>Loading</strong> <strong>Label</strong> <strong>Stock</strong> Quick Reference Guide<br />
2 Place the label stock<br />
roll (max 12" OD) on<br />
the unwinder chuck.<br />
Push the stock all the<br />
way back until it<br />
touches the stop disc.<br />
Stop Disc<br />
3 The loose stock should fall on<br />
the right side of the roll. Turn<br />
the tension knob clockwise to<br />
secure the roll to the chuck.<br />
Turn the knob as as tight as<br />
you can! Feed the stock under<br />
the dancer arm and through<br />
the cutter.<br />
Tension Knob<br />
Dancer Arm<br />
Cutter<br />
4<br />
Continue feeding the stock<br />
into the printer feeder tray.<br />
Feed the stock under the green<br />
guides and under the paper<br />
feed roller. Stop feeding when<br />
the leading edge of the stock<br />
has covered the red stop block<br />
printed just outside the feeder<br />
door entrance.<br />
Green Guides<br />
Feed Roller<br />
Red Stop Block<br />
5 Place an empty label<br />
core on the rewinder<br />
chuck. Push the core all<br />
the way back until it<br />
touches the back label<br />
guide disc.<br />
6<br />
Place the outer label guide<br />
disc on to the rewinder chuck.<br />
Push the guide until it touches<br />
the rewinder core. Turn the<br />
tension knob clockwise to<br />
secure the core and the label<br />
guide to the chuck.<br />
Note: Some cores may be shorter<br />
than the the stock width. If so,<br />
make sure the distance between<br />
the label guide discs is slightly<br />
larger than the stock width.
7 Print your label according to Section 5 of the manual.<br />
Note: Depending on when the printer was last used, the fuser will need to heat up or cool down before the printer will print.<br />
This can take from 2 seconds to 2 minutes.<br />
8a<br />
Attach the label stock to the<br />
rewinder core.<br />
As the printer is preparing to<br />
print, get a piece of tape ready.<br />
It is best to stand to the right<br />
side of printer with your arms<br />
above the rewinder roll. As<br />
the stock is ejected from the<br />
printer guide it with your left<br />
hand through the tensioner<br />
unit. As soon as it clears the<br />
tensioner place the tape on the<br />
middle of the end of the stock.<br />
8b<br />
4 Seconds<br />
The stock will continue to<br />
feed at a slower speed.<br />
When it reaches the<br />
rewinder, attach it to the top<br />
of the empty label core.<br />
Position the stock so that it<br />
that it is centered on the<br />
core.<br />
8c<br />
Immediately after the label stock is attached,<br />
engage the Rewinder by flipping the<br />
Rewinder Dancer Arm toward the printer<br />
until it touches the paper.<br />
Important! To minimize the slack loop that<br />
will be created under the rewinder, it is<br />
very important that you engage this arm<br />
immediately after the label stock is taped<br />
to the core.<br />
i<br />
Important Note: The taping process<br />
occurs very quickly so you may not<br />
get the label stock attached correctly<br />
the first time you try it. It is important<br />
to attach the label stock centered<br />
on the core. If the attached label<br />
stock is too far to the right or left the<br />
the paper may fold over itself and<br />
cause an uneven wrap. If you think<br />
the label stock was not attached<br />
properly, cancel the print job using<br />
the control panel on the front of the<br />
printer.<br />
070609-511223