View the instruction manual for this product - Starizona
View the instruction manual for this product - Starizona
View the instruction manual for this product - Starizona

You also want an ePaper? Increase the reach of your titles
YUMPU automatically turns print PDFs into web optimized ePapers that Google loves.
The MicroTouch Autofocuser is designed to work with Fea<strong>the</strong>rtouch Focusers from<br />
Starlight Instruments. It allows automatic focusing with CCD and DSLR cameras.<br />
Included is FocusMax software to automatically focus <strong>the</strong> telescope <strong>for</strong> imaging. Manual<br />
focus is also possible using <strong>the</strong> hand controller. The hand control features an LCD screen<br />
<strong>for</strong> displaying a digital readout of focus position as well as in<strong>for</strong>mation used <strong>for</strong><br />
programming <strong>the</strong> temperature compensation feature.<br />
The MicroTouch Autofocuser is compatible with Fea<strong>the</strong>rtouch Cray<strong>for</strong>d focusers,<br />
Fea<strong>the</strong>rtouch SCT MicroFocusers, and Fea<strong>the</strong>rtouch MicroFocusers <strong>for</strong> Takahashi and<br />
TeleVue refractors. An optional larger focus motor allows use with <strong>the</strong> Starlight<br />
Instruments 3.5” focuser.<br />
Included Parts<br />
• Hand Control<br />
• Focus Motor<br />
• Focuser Gear<br />
• Motor Connector Cable<br />
• USB Cable<br />
• 12-Volt Power Cord (AC or DC, user selected)<br />
• 3 Hex-Head Wrenches<br />
• MicroTouch & FocusMax Software<br />
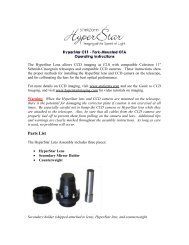
Hand control, receiver, motor, cables
Installing <strong>the</strong> Focus Motor<br />
The following directions are illustrated using a Fea<strong>the</strong>rtouch SCT MicroFocuser, but <strong>the</strong><br />
<strong>instruction</strong>s are identical <strong>for</strong> any Fea<strong>the</strong>rtouch focuser.<br />
1) Begin by removing both <strong>the</strong> brass fine focus and black standard focus knobs from<br />
<strong>the</strong> focuser. Use <strong>the</strong> included medium size hex-head wrench to remove <strong>the</strong> knobs.<br />
2) Install <strong>the</strong> small brass gear onto <strong>the</strong> focus shaft. The gear goes toward <strong>the</strong><br />
telescope, with <strong>the</strong> smaller gear hub away from <strong>the</strong> scope, as shown below. The<br />
gear should NOT quite touch <strong>the</strong> brass bearing hub on <strong>the</strong> focuser. Insert <strong>the</strong> gear<br />
all <strong>the</strong> way onto <strong>the</strong> shaft <strong>the</strong>n back it off slightly. Use <strong>the</strong> small hex-head wrench<br />
to lock <strong>the</strong> gear in place.<br />
Note: The gear has a small insert to allow installation on different size focus shafts. The<br />
insert can only be removed from one side. Using one of <strong>the</strong> hex-head wrenches to push<br />
<strong>the</strong> insert out can be helpful.
3) Slide <strong>the</strong> focus motor onto <strong>the</strong> focuser. You may need to rotate <strong>the</strong> motor slightly<br />
to allow <strong>the</strong> motor gear and focuser gear to mesh. The motor can be rotated to <strong>the</strong><br />
desired position after <strong>the</strong> gears have meshed. When installed properly, <strong>the</strong> motor<br />
will completely cover <strong>the</strong> silver portion of <strong>the</strong> focuser. Use <strong>the</strong> large hex-head<br />
wrench to lock <strong>the</strong> motor in place.<br />
Connect Hand Control<br />
4) Use <strong>the</strong> included RJ11 cable to connect <strong>the</strong> motor to <strong>the</strong> hand control.<br />
Using <strong>the</strong> MicroTouch Autofocuser Manually<br />
You can use <strong>the</strong> MicroTouch focuser to focus <strong>the</strong> telescope visually by using <strong>the</strong> IN and<br />
OUT buttons. This is also how you will approximately focus <strong>the</strong> telescope when using a<br />
camera, be<strong>for</strong>e using <strong>the</strong> autofocus routine.
MicroTouch Hand Control Menus<br />
The LCD screen light turns on when <strong>the</strong> hand control is powered up. If desired, press <strong>the</strong><br />
LIGHT button to turn <strong>the</strong> light off.<br />
Pressing MODE once displays <strong>the</strong> current ambient temperature. The default display is<br />
°F. To change to °C, press <strong>the</strong> SET button while <strong>the</strong> temperature is displayed.<br />
The following menus are accessed sequentially by pressing <strong>the</strong> MODE button: Temp<br />
Comp, Learning, Wireless, Motor Rev, and Reset Position. Each is described in detail<br />
below.<br />
Temp Comp<br />
This activates <strong>the</strong> Temperature Compensation feature of <strong>the</strong> MicroTouch Autofocuser.<br />
Press SET to turn <strong>this</strong> feature on. In order <strong>for</strong> <strong>the</strong> Temperature Compensation feature to<br />
work, it must learn how to compensate <strong>for</strong> changes based on <strong>the</strong> optical system being<br />
used. This is done using <strong>the</strong> Learning menu (below).<br />
Learning<br />
The Temperature Compensation feature works by learning how much focus change is<br />
necessary to compensate <strong>for</strong> a given temperature change. For example, on a certain<br />
system, a temperature drop of 1°F might require a focus position shift of 25 counts.<br />
There<strong>for</strong>e, if <strong>the</strong> temperature drops by 2 degrees, <strong>the</strong> focuser would move 50 counts to<br />
keep <strong>the</strong> telescope in focus. The focuser must learn <strong>the</strong> exact focus shift required <strong>for</strong> a<br />
given telescope and configuration (so adding a focal reducer, <strong>for</strong> example, would require<br />
<strong>the</strong> focuser to be recalibrated).<br />
To activate <strong>the</strong> Learning mode, press and hold <strong>the</strong> SET button <strong>for</strong> a few seconds until <strong>the</strong><br />
display shows Mode: Learning. The word Learning will blink while <strong>the</strong> focuser is being<br />
calibrated. The current position of <strong>the</strong> focuser is displayed.<br />
Press MODE once to view <strong>the</strong> current temperature. Wait until <strong>the</strong> temperature has<br />
changed. A temperature change of 5°F is recommended <strong>for</strong> <strong>the</strong> most accurate calibration.<br />
Once <strong>the</strong> temperature has changed, refocus <strong>the</strong> telescope (ei<strong>the</strong>r <strong>manual</strong>ly or using <strong>the</strong><br />
autofocus routine described in <strong>the</strong> next section). Return to <strong>the</strong> Learning menu and hold<br />
SET again until <strong>the</strong> display shows Mode: Idle. The temperature compensation is now<br />
set.<br />
Go to <strong>the</strong> Temp Comp menu and press SET to turn <strong>the</strong> temperature compensation on.<br />
More advanced temperature compensation control is available through <strong>the</strong> MicroTouch<br />
software.
Wireless<br />
This turns <strong>the</strong> wireless communications on or off. The default <strong>for</strong> <strong>the</strong> MicroTouch<br />
Autofocuser is OFF. If <strong>the</strong> autofocuser is upgraded to <strong>the</strong> wireless version, <strong>the</strong> mode<br />
must be changed to ON.<br />
Motor Rev<br />
This reverses <strong>the</strong> direction of <strong>the</strong> motor.<br />
Reset Position<br />
The default position of <strong>the</strong> digital readout is 30000. The range of focus is 0-60000. If <strong>the</strong><br />
focuser is moved to ei<strong>the</strong>r end of <strong>this</strong> range, press MODE until Reset Position? appears.<br />
Press and hold <strong>the</strong> SET button until <strong>the</strong> display blinks and resets. The position has now<br />
been reset to 30000. If a different default position is desired, it is possible to program<br />
<strong>this</strong> using <strong>the</strong> MicroTouch software (described below).
Installing <strong>the</strong> MicroTouch and FocusMax Software<br />
Load <strong>the</strong> included CD. On <strong>the</strong> CD will be two installation files, one <strong>for</strong> <strong>the</strong> MicroTouch<br />
software and one <strong>for</strong> FocusMax. The MicroTouch software installation file is called<br />
Setup. Open <strong>this</strong> file and follow <strong>the</strong> directions given to install <strong>the</strong> MicroTouch software.<br />
The program will be located in <strong>the</strong> Windows Start Menu under All Programs ><br />
<strong>Starizona</strong> > MicroTouch > MicroTouch.<br />
Open <strong>the</strong> FocusMax installer and follow <strong>the</strong> directions given to install <strong>the</strong> FocusMax<br />
software. The program will be located in <strong>the</strong> Windows Start Menu under All Programs<br />
> FocusMax.<br />
Installing <strong>the</strong> MicroTouch Hardware Drivers<br />
Connect <strong>the</strong> included USB cable to <strong>the</strong> hand control <strong>the</strong>n to <strong>the</strong> computer. The Found<br />
New Hardware Wizard should appear. Select <strong>the</strong> automatic install routine. The wizard<br />
should find <strong>the</strong> included drivers and successfully install <strong>the</strong> hardware.<br />
If, <strong>for</strong> some reason, Windows cannot automatically install <strong>the</strong> hardware, you can run <strong>the</strong><br />
hardware installer again and <strong>manual</strong>ly select <strong>the</strong> driver. The driver is located in <strong>the</strong><br />
Program Files > <strong>Starizona</strong> > USB2Driver folder and is called SiUSBXp.sys.
MicroTouch Software<br />
Launch <strong>the</strong> MicroTouch software. The Setup menu is displayed. The default connection<br />
is USB2. The MicroTouch Autofocuser is backward compatible to USB1.1. If your<br />
computer only has USB1.1 ports, select USB from <strong>the</strong> drop down menu. Press Connect<br />
to connect to <strong>the</strong> MicroTouch Autofocuser.<br />
Setup Menu<br />
Actual Temp °F<br />
The temperature read by <strong>the</strong> MicroTouch temperature sensor may not be exactly <strong>the</strong> same<br />
as <strong>the</strong> actual ambient temperature, due to heat given off by <strong>the</strong> electronics in <strong>the</strong><br />
autofocuser. Note that <strong>for</strong> <strong>the</strong> temperature compensation feature, only <strong>the</strong> difference in<br />
temperature—not <strong>the</strong> actual temperature—is <strong>the</strong> only factor. However, if you wish <strong>the</strong><br />
displayed temperature to be correct, you can enter <strong>the</strong> known ambient temperature in <strong>this</strong><br />
box and <strong>the</strong> software will calculate <strong>the</strong> offset between <strong>the</strong> actual and displayed<br />
temperatures and show <strong>the</strong> actual temperature in <strong>the</strong> Temperature Compensation window.
Set Speed Delay<br />
This sets <strong>the</strong> time delay be<strong>for</strong>e <strong>the</strong> motor ramps up to full speed. The default is 1.0<br />
second. This means <strong>the</strong> focus motor will begin moving slowly <strong>the</strong>n accelerate to full<br />
speed after 1 second. This allows more precise <strong>manual</strong> focusing. Changing <strong>the</strong> value to<br />
0 would eliminate any delay and <strong>the</strong> motor would turn full speed immediately upon a<br />
move command.<br />
Set Steps<br />
This sets <strong>the</strong> number of steps of <strong>the</strong> motor per count of <strong>the</strong> digital display. The default is<br />
1 step per count. For each count on <strong>the</strong> digital display <strong>the</strong> motor will move one step, i.e.,<br />
pressing <strong>the</strong> IN or OUT button once will move <strong>the</strong> motor one step. There are 300 counts<br />
per revolution of <strong>the</strong> motor (and since <strong>the</strong> motor drives <strong>the</strong> 10:1 fine focus of <strong>the</strong><br />
Fea<strong>the</strong>rtouch Focuser, <strong>this</strong> equals 3000 counts per revolution of <strong>the</strong> focuser). Increasing<br />
<strong>the</strong> steps per count reduces <strong>the</strong> resolution but increases <strong>the</strong> range of <strong>the</strong> focuser. For<br />
example, setting <strong>the</strong> steps per revolution to 2 cuts <strong>the</strong> resolution in half, but doubles <strong>the</strong><br />
focus range. The count range is still 0-60000, but <strong>the</strong> equivalent range is 0-120000. It<br />
may be desirable to change <strong>the</strong> steps per count if greater focus range is needed <strong>for</strong><br />
focusing eyepieces visually or <strong>for</strong> a focuser with a greater range of travel. Any value<br />
from 1-10 can be selected.<br />
Set Motor Speed<br />
There are two choices <strong>for</strong> motor speed, Normal and High. Normal speed turns <strong>the</strong><br />
motor gear about once every 1 second. High speed doubles <strong>the</strong> rate of revolution. High<br />
speed allows large focus changes in less time, but it produces less torque, so heavier<br />
loads, such as a large-<strong>for</strong>mat CCD camera on a Cray<strong>for</strong>d focuser, should always be<br />
moved at Normal speed to avoid slippage.<br />
Upgrading Firmware<br />
If new versions of <strong>the</strong> MicroTouch firmware <strong>for</strong> ei<strong>the</strong>r <strong>the</strong> hand control or <strong>the</strong> motor<br />
control become available <strong>the</strong>y can be downloaded and installed into <strong>the</strong> MicroTouch<br />
Autofocuser.<br />
To upgrade <strong>the</strong> hand control firmware, select <strong>the</strong> Hand Controller button under<br />
Upgrading Firmware. A window will display allowing you to select <strong>the</strong> firmware file.<br />
Press and hold both <strong>the</strong> IN and OUT buttons on <strong>the</strong> hand control <strong>the</strong>n select <strong>the</strong> file on<br />
<strong>the</strong> computer while holding <strong>the</strong> buttons down. Release <strong>the</strong> buttons after selecting file.<br />
The LCD will display PROG MODE and <strong>the</strong> firmware will be downloaded to <strong>the</strong> hand<br />
control.<br />
To upgrade <strong>the</strong> motor controller firmware, simply click on <strong>the</strong> Motor Controller button<br />
under Upgrading Firmware and select <strong>the</strong> appropriate file in <strong>the</strong> window that appears.<br />
The upload will begin automatically.
Movement Menu<br />
The Movement menu is <strong>the</strong> main window <strong>for</strong> controlling <strong>the</strong> MicroTouch Autofocuser in<br />
<strong>manual</strong> mode.<br />
The current position of <strong>the</strong> focuser is displayed. The up and down arrows correspond to<br />
<strong>the</strong> OUT and IN buttons on <strong>the</strong> hand control, respectively. (IN decreases <strong>the</strong> count,<br />
OUT increases <strong>the</strong> count.)<br />
Target Position allows <strong>the</strong> user to select a given position and send <strong>the</strong> focuser to that<br />
position. The default position is 30000. Select <strong>the</strong> desired position and press GOTO to<br />
move <strong>the</strong> focuser to that position. Any value from 0-60000 can be selected.<br />
Pressing Reset to Target Position changes <strong>the</strong> displayed count to <strong>the</strong> Target Position.<br />
For example: The default focus position when <strong>the</strong> MicroTouch is turned on is 30000. If,<br />
after <strong>manual</strong>ly focusing <strong>the</strong> telescope using <strong>the</strong> IN/OUT buttons, <strong>the</strong> position reads<br />
15000, you can enter 30000 into <strong>the</strong> Target Position, select Reset to Target Position,<br />
and <strong>the</strong> counter will be set to 30000 without moving <strong>the</strong> focuser. This sets <strong>the</strong> current<br />
position to <strong>the</strong> middle of <strong>the</strong> focus range. Any value from 0-60000 may be selected.
Stored Positions can be saved. For example, if you use a narrowband filter <strong>for</strong> imaging<br />
which significantly changes <strong>the</strong> focus position, you can find <strong>the</strong> correct focus position<br />
and save that position. For example: The telescope is focused <strong>the</strong>n <strong>the</strong> counter reset to<br />
30000. The telescope is <strong>the</strong>n refocused <strong>for</strong> <strong>the</strong> filtered camera. Say <strong>the</strong> new value is<br />
31500. This position can be saved by selecting Store under Stored Positions. In <strong>the</strong><br />
future, after <strong>the</strong> telescope is properly focused without <strong>the</strong> filter and <strong>the</strong> counter reset to<br />
30000, <strong>the</strong> stored position can be selected from <strong>the</strong> drop down menu and <strong>the</strong> focus<br />
position of <strong>the</strong> filtered camera selected. (Note that offset positions such as <strong>this</strong> will only<br />
be approximate as temperature changes may affect actual focus differences. Offset focus<br />
positions are still helpful <strong>for</strong> getting <strong>the</strong> telescope close to focus be<strong>for</strong>e running <strong>the</strong><br />
autofocus routine.)<br />
The Halt button can be used to stop <strong>the</strong> MicroTouch focuser in <strong>the</strong> process of moving to<br />
a new position.<br />
Temperature Compensation<br />
This menu gives you control over <strong>the</strong> temperature compensation feature of <strong>the</strong><br />
MicroTouch Autofocuser. It includes <strong>the</strong> same basic controls as <strong>the</strong> hand control, as<br />
described above, as well as additional features <strong>for</strong> more advanced control.
The current temperature is displayed in °C. Turn On Learning works <strong>the</strong> same as <strong>the</strong><br />
Learning feature in <strong>the</strong> hand control, described above. Once calibrated, <strong>the</strong> temperature<br />
coefficient (<strong>the</strong> number of counts per degree of temperature change) is displayed. This<br />
number can be <strong>manual</strong>ly changed by typing in a new number and selecting <strong>the</strong> New<br />
Coefficient button. This is helpful if you change between multiple systems which have<br />
previously been calibrated so that <strong>the</strong> temperature coefficients are known.<br />
Turn On Compensation activates <strong>the</strong> temperature compensation function. In <strong>this</strong> mode,<br />
temperature compensation is continuous and no <strong>manual</strong> position commands will be<br />
accepted by <strong>the</strong> focuser. Press <strong>the</strong> Turn Off Compensation button to exit <strong>this</strong> mode.<br />
A useful feature <strong>for</strong> users taking sequences of images is to only adjust focus between<br />
exposures. To do <strong>this</strong>, select Snapshot to store <strong>the</strong> current temperature and position<br />
in<strong>for</strong>mation. After an exposure has finished, select Compensate Immediate and <strong>the</strong><br />
focuser will move to <strong>the</strong> correct new position based on <strong>the</strong> new temperature.<br />
At <strong>the</strong> bottom of <strong>the</strong> Movement screen is a strip chart showing temperature trend. The<br />
arrow buttons at <strong>the</strong> upper left of <strong>this</strong> chart can be used to change <strong>the</strong> sample rate. The<br />
default is 5 seconds, meaning <strong>the</strong> chart will plot <strong>the</strong> temperature every five seconds. This<br />
gives a range of 6 minutes 15 seconds. Any sample rate value can be selected from 1-250<br />
seconds. This gives a time span of 1 minute 15 seconds up to 5 hours 12 minutes 30<br />
seconds. The chart can display a range of +/- 3 degrees. If <strong>the</strong> temperature changes by<br />
more that +/- 1 degree, <strong>the</strong> chart shifts to move <strong>the</strong> current temperature curve to <strong>the</strong><br />
center of <strong>the</strong> graph.
Diagnostics Menu<br />
The Diagnostics window shows <strong>the</strong> current status of <strong>the</strong> MicroTouch Autofocuser and its<br />
connection to <strong>the</strong> computer.<br />
When properly connected, <strong>the</strong> Hand Controller, Motor Controller and Temperature<br />
Sensor status windows will display OK. The windows <strong>for</strong> Number of Corrupted<br />
Packets and Number of Comm. Timeouts displays <strong>the</strong> history of <strong>the</strong> communication<br />
status between <strong>the</strong> hand control and wireless receiver.<br />
Version numbers of <strong>the</strong> hand controller and motor controller firmware are displayed. See<br />
above <strong>for</strong> details on upgrading firmware.