Debossing Debossing - Framers Corner
Debossing Debossing - Framers Corner
Debossing Debossing - Framers Corner

You also want an ePaper? Increase the reach of your titles
YUMPU automatically turns print PDFs into web optimized ePapers that Google loves.
How to Use the <strong>Debossing</strong> Tools<br />
The <strong>Debossing</strong> Tools are designed to replace the Blade Cartridge<br />
in the Head. You will be prompted on the screen to change to the<br />
appropriately colored <strong>Debossing</strong> Tool, and if necessary, change the<br />
Blade Depth. After the CMC has debossed the elements desired,<br />
you will be prompted to replace the debossing tool with the Blade<br />
Cartridge.<br />
How to Install the <strong>Debossing</strong> Tool<br />
Press the Blade Cartridge Release Lever to remove the Blade Cartridge.<br />
Select the desired Deboss Tool:<br />
Deboss Blue Cartridge - Wide<br />
Deboss Red Cartridge - Medium<br />
Deboss White Cartridge - Thin<br />
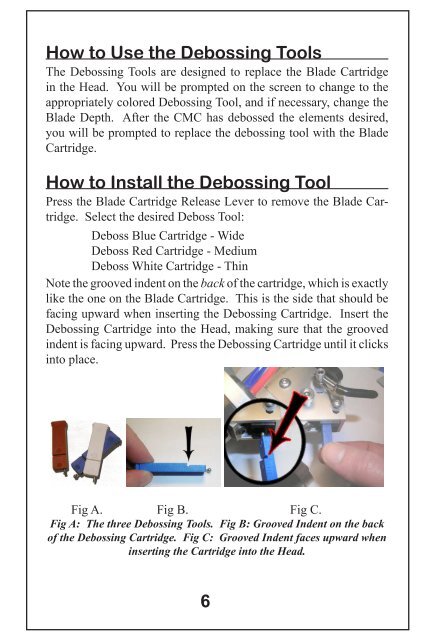
Note the grooved indent on the back of the cartridge, which is exactly<br />
like the one on the Blade Cartridge. This is the side that should be<br />
facing upward when inserting the <strong>Debossing</strong> Cartridge. Insert the<br />
<strong>Debossing</strong> Cartridge into the Head, making sure that the grooved<br />
indent is facing upward. Press the <strong>Debossing</strong> Cartridge until it clicks<br />
into place.<br />
Before You Deboss - Initial Calibration<br />
There is a configuration field for each of the three <strong>Debossing</strong> Tools.<br />
These parameters fine tune the placement, the pressure, the size, and<br />
the timing of the debossed elements.<br />
The standard configuration settings are reasonably close, but there<br />
are a few adjustments you will need to make to accommodate the<br />
variations between machines and the debossing cartridges themselves.<br />
This will ensure you get the results you want from the tools and that<br />
the debossed elements are registered perfectly with the openings.<br />
There is a test mat already designed for every adjustment you will<br />
need to make.<br />
Find the Depth Setting<br />
To begin you will need to do some experimentation to determine<br />
the proper pressure. The Blade Depth Knob sets the pressure. The<br />
setting will be approximately 15. This may be a few points more or<br />
less depending on your machine, the matboard you are using and the<br />
effect you want. You will need to this for each tool, too.<br />
Begin with the Wide (Blue) Tool. There are test mats in the software<br />
for each tool. The designs have a variety of curves and straight lines<br />
in all directions so that you will be able to see if the tool is tearing<br />
the surface in any of these situations.<br />
Click the Load Saved Mat button in the Main Screen.<br />
Double click on the Test Mats folder then double click on the folder<br />
DB Test Mats.<br />
Fig A. Fig B. Fig C.<br />
Fig A: The three <strong>Debossing</strong> Tools. Fig B: Grooved Indent on the back<br />
of the <strong>Debossing</strong> Cartridge. Fig C: Grooved Indent faces upward when<br />
inserting the Cartridge into the Head.