T225 Operators Manual - Framers Corner
T225 Operators Manual - Framers Corner
T225 Operators Manual - Framers Corner
You also want an ePaper? Increase the reach of your titles
YUMPU automatically turns print PDFs into web optimized ePapers that Google loves.
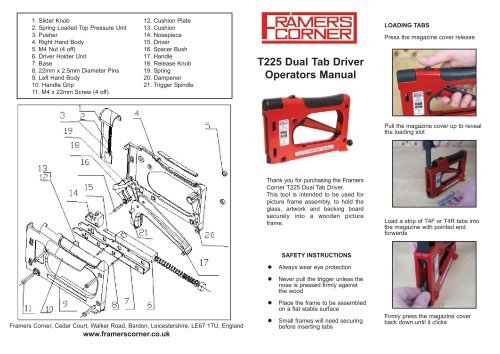
1. Slider Knob<br />
2. Spring Loaded Top Pressure Unit<br />
3. Pusher<br />
4. Right Hand Body<br />
5. M4 Nut (4 off)<br />
6. Driver Holder Unit<br />
7. Base<br />
8. 22mm x 2.5mm Diameter Pins<br />
9. Left Hand Body<br />
10. Handle Grip<br />
11. M4 x 22mm Screw (4 off)<br />
12. Cushion Plate<br />
13. Cushion<br />
14. Nosepiece<br />
15. Driver<br />
16. Spacer Bush<br />
17. Handle<br />
18. Release Knob<br />
19. Spring<br />
20. Dampener<br />
21. Trigger Spindle<br />
<strong>T225</strong> Dual Tab Driver<br />
<strong>Operators</strong> <strong>Manual</strong><br />
LOADING TABS<br />
Press the magazine cover release<br />
Pull the magazine cover up to reveal<br />
the loading slot<br />
Thank you for purchasing the <strong>Framers</strong><br />
<strong>Corner</strong> <strong>T225</strong> Dual Tab Driver.<br />
This tool is intended to be used for<br />
picture frame assembly, to hold the<br />
glass, artwork and backing board<br />
securely into a wooden picture<br />
frame.<br />
Load a strip of T4F or T4R tabs into<br />
the magazine with pointed end<br />
forwards<br />
SAFETY INSTRUCTIONS<br />
l<br />
Always wear eye protection<br />
l<br />
Never pull the trigger unless the<br />
nose is pressed firmly against<br />
the wood<br />
<strong>Framers</strong> <strong>Corner</strong>, Cedar Court, Walker Road, Bardon, Leicestershire, LE67 1TU, England<br />
www.framerscorner.co.uk<br />
l<br />
l<br />
Place the frame to be assembled<br />
on a flat stable surface<br />
Small frames will need securing<br />
before inserting tabs<br />
Firmly press the magazine cover<br />
back down until it clicks
INSERTING TABS<br />
1) Press the nose of the tab driver<br />
firmly against the back of the frame<br />
in the position you want to insert the<br />
tab.<br />
2) Ensure the frame is held securely<br />
so it will not move as the tab is<br />
inserted.<br />
3) Squeeze the trigger until it<br />
releases the spring and inserts the<br />
tab.<br />
4) Release the trigger.<br />
5) Move to the next position and<br />
repeat the process.<br />
6) For frames up to 300mm x 300mm<br />
we recommend using 2 tabs on each<br />
side ( Total 8 ). Larger frames may<br />
require more tabs.<br />
7) When working with softwood the<br />
tab will be inserted to a depth of<br />
around 7mm. If you are working with<br />
hardwood it may be necessary to<br />
increase the spring tension to<br />
maintain this depth of insert. Turn the<br />
tensioning screw clockwise to<br />
increase the spring tension. It is<br />
advisable to lower the spring tension<br />
again afterwards as it also adds<br />
resistance to the trigger, causing<br />
operator fatigue.<br />
If this is not possible remove the<br />
nosepiece by undoing the securing<br />
screw and removing the bolt. The<br />
nose piece will then pull out.<br />
Declaration of Conformity for CE Marking<br />
<strong>Framers</strong> <strong>Corner</strong><br />
Cedar Court, Walker Road, Bardon Hill, Leicestershire, LE67 1TU, England<br />
Declare that<br />
Models<br />
Picture Frame Fixing Tool<br />
T120, T220, <strong>T225</strong> and T240<br />
Conforms with the following Directives:<br />
Machinery Directive 2006/42/EC<br />
And further conforms with the following EU harmonized standard;<br />
EN ISO 12100:2010<br />
When new, the tab drive is lubricated.<br />
Over time it may be necesary to<br />
reapply lubrication. It is not<br />
recommended you undo all the<br />
screws holding the driver together as<br />
there are several springs contained<br />
inside, and they are difficult to<br />
reassemble.<br />
As required, remove the nose and<br />
apply lubricant between the Base<br />
and Driver Holder Unit, Parts 6 & 7.<br />
Use authentic <strong>Framers</strong> <strong>Corner</strong> Tabs:<br />
T4F Flexible Type or T4R Rigid Type.<br />
Size: 15mm length x 4.3mm width x<br />
0.4mm thickness.<br />
I hereby declare that equipment named above has been tested and found to<br />
comply with the relevant sections of the above referenced specifications.<br />
The machinery complies with all essential requirements of the directive.<br />
MAINTENANCE<br />
In the event of a tab jamming in the<br />
driver, it can most often be pulled out<br />
with a pair of pliers.<br />
Signed: ____________ Dated: 04/05/2012 Location: Leicestershire<br />
Richard Cook<br />
Director


