Babka! Babka! Babka! Recipes and Fun Facts - Hazon
Babka! Babka! Babka! Recipes and Fun Facts - Hazon
Babka! Babka! Babka! Recipes and Fun Facts - Hazon
Create successful ePaper yourself
Turn your PDF publications into a flip-book with our unique Google optimized e-Paper software.
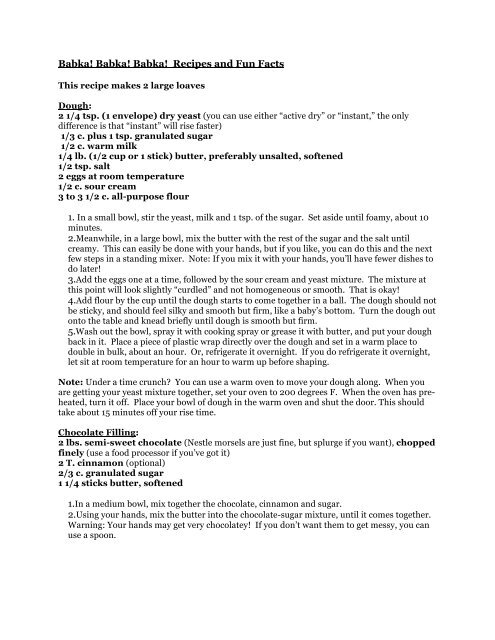
<strong>Babka</strong>! <strong>Babka</strong>! <strong>Babka</strong>! <strong>Recipes</strong> <strong>and</strong> <strong>Fun</strong> <strong>Facts</strong><br />
This recipe makes 2 large loaves<br />
Dough:<br />
2 1/4 tsp. (1 envelope) dry yeast (you can use either “active dry” or “instant,” the only<br />
difference is that “instant” will rise faster)<br />
1/3 c. plus 1 tsp. granulated sugar<br />
1/2 c. warm milk<br />
1/4 lb. (1/2 cup or 1 stick) butter, preferably unsalted, softened<br />
1/2 tsp. salt<br />
2 eggs at room temperature<br />
1/2 c. sour cream<br />
3 to 3 1/2 c. all-purpose flour<br />
1. In a small bowl, stir the yeast, milk <strong>and</strong> 1 tsp. of the sugar. Set aside until foamy, about 10<br />
minutes.<br />
2.Meanwhile, in a large bowl, mix the butter with the rest of the sugar <strong>and</strong> the salt until<br />
creamy. This can easily be done with your h<strong>and</strong>s, but if you like, you can do this <strong>and</strong> the next<br />
few steps in a st<strong>and</strong>ing mixer. Note: If you mix it with your h<strong>and</strong>s, you’ll have fewer dishes to<br />
do later!<br />
3.Add the eggs one at a time, followed by the sour cream <strong>and</strong> yeast mixture. The mixture at<br />
this point will look slightly “curdled” <strong>and</strong> not homogeneous or smooth. That is okay!<br />
4.Add flour by the cup until the dough starts to come together in a ball. The dough should not<br />
be sticky, <strong>and</strong> should feel silky <strong>and</strong> smooth but firm, like a baby’s bottom. Turn the dough out<br />
onto the table <strong>and</strong> knead briefly until dough is smooth but firm.<br />
5.Wash out the bowl, spray it with cooking spray or grease it with butter, <strong>and</strong> put your dough<br />
back in it. Place a piece of plastic wrap directly over the dough <strong>and</strong> set in a warm place to<br />
double in bulk, about an hour. Or, refrigerate it overnight. If you do refrigerate it overnight,<br />
let sit at room temperature for an hour to warm up before shaping.<br />
Note: Under a time crunch? You can use a warm oven to move your dough along. When you<br />
are getting your yeast mixture together, set your oven to 200 degrees F. When the oven has preheated,<br />
turn it off. Place your bowl of dough in the warm oven <strong>and</strong> shut the door. This should<br />
take about 15 minutes off your rise time.<br />
Chocolate Filling:<br />
2 lbs. semi-sweet chocolate (Nestle morsels are just fine, but splurge if you want), chopped<br />
finely (use a food processor if you’ve got it)<br />
2 T. cinnamon (optional)<br />
2/3 c. granulated sugar<br />
1 1/4 sticks butter, softened<br />
1.In a medium bowl, mix together the chocolate, cinnamon <strong>and</strong> sugar.<br />
2.Using your h<strong>and</strong>s, mix the butter into the chocolate-sugar mixture, until it comes together.<br />
Warning: Your h<strong>and</strong>s may get very chocolatey! If you don’t want them to get messy, you can<br />
use a spoon.
Streusel Topping:<br />
1 2/3 c. powdered sugar<br />
1 1/3 c. all purpose flour<br />
1 1/2 sticks unsalted butter<br />
In a large bowl, combine sugar, flour, <strong>and</strong> butter. Using a fork or your h<strong>and</strong>s, mix until fully<br />
combined with clumps ranging in size from crumbs to 1 inch. You probably won’t need this<br />
much topping, but it also freezes well.<br />
Shaping <strong>and</strong> baking:<br />
1. When the dough has doubled in bulk, punch it down, remove it from the bowl onto a<br />
floured surface, <strong>and</strong> divide it in half. Cover one of the halves with plastic wrap. Butter your<br />
loaf pans <strong>and</strong> have them ready to go.<br />
2.Roll the first half out into a large rectangle-like shape (it doesn’t have to be perfect, you’re<br />
going to roll it up), about a quarter-inch thick. If the dough starts to stick to the table or the<br />
rolling pin, just sprinkle some more flour on top of or under the dough.<br />
3.Take half of the chocolate mixture <strong>and</strong> spread it evenly over the dough, leaving about a 1/4-<br />
inch border all the way around.<br />
4.From the end of the rectangle closest to you, roll the dough up, as tightly as you can (this is<br />
what will give you layers).<br />
5. When you have a log, bring the two ends together <strong>and</strong> then twist the dough on top of itself<br />
(like when you twist hair). Tuck any ends underneath <strong>and</strong> fit into the loaf pan.<br />
6.Crack one egg into a small bowl <strong>and</strong> whisk it quickly with a fork. Brush your egg wash over<br />
the loaf <strong>and</strong> cover it with streusel topping.<br />
7.Repeat Steps 2-7 with the second half of the dough.<br />
8. Preheat the oven to 375 degrees F. Loosely cover loaves with plastic wrap <strong>and</strong> let rise until<br />
doubled in bulk again, about a half hour.<br />
9. Before putting the loaves in the oven, make sure that there is an even layer of streusel on<br />
top of the babka, adding more if necessary (who doesn’t like streusel?). Bake loaves for about<br />
45 minutes to an hour or until golden brown. Serve warm, if possible.<br />
<strong>Facts</strong> about babka:<br />
1. “<strong>Babka</strong>” means “gr<strong>and</strong>mother” in Polish. It is also the name of a popular Russian <strong>and</strong><br />
Polish coffee cake. Apparently it’s called babka because in its original form it was “stout <strong>and</strong><br />
round, just like most gr<strong>and</strong>mothers.” I prefer to think it’s called babka now because pretty<br />
much the only person who may know how to make it is your gr<strong>and</strong>ma.<br />
2.The Polish coffee cake that inspired Jewish babka was originally made in a tube pan, or a<br />
“Turk’s Head Pan” with scalloped edges, which reminded people of a gr<strong>and</strong>mother’s skirts.<br />
3.Jewish babka came along as late as the 19th century, <strong>and</strong> was probably invented when<br />
Jewish housewives took extra challah dough, rolled it out, <strong>and</strong> then rolled it up again with jam<br />
or cinnamon.<br />
4.Though you can make cinnamon or chocolate babka, which are traditionally Jewish, you<br />
can also be adventurous <strong>and</strong> add dried fruit to the filling. Finely chopped sour cherries or<br />
cranberries are good choices.<br />
5.Another nice alternative is an almond filling: 1 1/4 c. almonds, toasted; 1 stick of butter; 1/2<br />
c. packed light brown sugar; vanilla <strong>and</strong> almond extract to taste; combine with golden raisins<br />
<strong>and</strong>/or cherries.


![2011 Israel Sustainable Food Tour Schedule [PDF]. - Hazon](https://img.yumpu.com/50366185/1/190x245/2011-israel-sustainable-food-tour-schedule-pdf-hazon.jpg?quality=85)


