2008 All Rear Shocks Owners Manual - Manitou
2008 All Rear Shocks Owners Manual - Manitou
2008 All Rear Shocks Owners Manual - Manitou

Create successful ePaper yourself
Turn your PDF publications into a flip-book with our unique Google optimized e-Paper software.
Normal Conditions – Long/Frequent Rides<br />
• Clean rear shock body after every ride.<br />
• Clean and re-grease air canister every 2 months (air shocks only).<br />
• Send to service center for oil change and inspection after every 150 hours of use.<br />
Severe Conditions (mud, rain, snow, extreme dust) –<br />
Short/Infrequent Rides<br />
• Clean rear shock body after every ride.<br />
• Clean and re-grease air canister every 2 months (air shocks only).<br />
• Send to service center for oil change and inspection after every 150 hours of use.<br />
Severe Conditions (mud, rain, snow, extreme dust) –<br />
Long/Frequent Rides<br />
• Clean rear shock body after every ride.<br />
• Clean and re-grease air canister every month (air shocks only).<br />
• Send to service center for oil change and inspection after every 150 hours of use.<br />
For updates and tuning information, visit our website at www.HBsuspension.com.<br />
For new hardware, contact HB Suspension at (888) 686-3472 or order from the<br />
website at www.HBsuspension.com.<br />
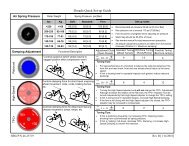
SPV SET-UP QUICK REFERENCE GUIDE - <strong>2008</strong><br />
THIS QUICK REFERENCE GUIDE IS TO BE USED AFTER<br />
YOU HAVE COMPLETELY READ THE OWNER’S MANUAL.<br />
COIL AND AIR SHOCK INITIAL SET UP<br />
1<br />
2<br />
3<br />
4<br />
5<br />
6<br />
SET SPV PRESSURE:<br />
Range should be between 50-175 psi. Pressure should be between 50-70% of body weight. More pressure will<br />
create more compression damping, hold the bike up more and pedal better. Less pressure will create less<br />
compression damping, allow more sag, be more responsive and supple. Always set the No Tools volume adjuster<br />
to “1” before making pressure adjustments. Note: SWINGER AIR shocks with external platform adjustment come<br />
fully charged at the factory so no initial pressure adjustment is needed.<br />
SET SPV VOLUME:<br />
You should begin with the 16 mm adjuster completely backed out or with the No Tools volume adjuster set to “1.”<br />
Turning the volume adjuster inwards (or to a higher number in the case of No Tools volume adjustment) will<br />
create a more progressive damping effect making the suspension firmer from the middle to bottom out. Turning<br />
the volume adjuster outwards (or to a lower number in the case of No Tools volume adjustment) will make the<br />
rear shock more linear in compression damping and be a softer finish.<br />
ADJUST SAG:<br />
Sag is the amount the shock compresses under normal body weight. Recommendations:<br />
Cross country: 25-30% Sag<br />
Freeriding: 30-40% Sag<br />
Downhill: 30-45% Sag<br />
REBOUND DAMPING:<br />
Turn the blue knob located on the eyelet mount clockwise to increase rebound damping.<br />
LOW-SPEED COMPRESSION DAMPING (EVOLVER ISX-6, SWINGER X6, AND<br />
REVOX ISX ONLY):<br />
Turn in the red adjustment knob to increase chassis stability (also may decrease supple feel of shock).<br />
HIGH-SPEED COMPRESSION DAMPING (EVOLVER ISX-6, SWINGER X6, AND<br />
REVOX ISX ONLY):<br />
Turn in the black adjustment knob to increase high-speed bottoming resistance.<br />
NOTE: On EVOLVER ISX-6, SWINGER X6, and REVOX ISX, please make sure that the two compression adjuster<br />
knobs on the reservoir are fully open when setting the shock pressure and volume. You can turn them after you<br />
set up the pressure and volume adjuster to achieve more compression damping.<br />
8