How to Set Up A Carracho Server How to Set Up A ... - ADSLNet
How to Set Up A Carracho Server How to Set Up A ... - ADSLNet
How to Set Up A Carracho Server How to Set Up A ... - ADSLNet

Create successful ePaper yourself
Turn your PDF publications into a flip-book with our unique Google optimized e-Paper software.
<strong>How</strong> <strong>to</strong> <strong>Set</strong> <strong>Up</strong> A<br />
<strong>Carracho</strong> <strong>Server</strong><br />
Here's an overly detailed and illustrated «how-<strong>to</strong>…». This is setting how <strong>to</strong> set<br />
up your server made as easy and detailed as possible. You might not need<br />
so many explanations, but after helping several «newbies» setting up their servers<br />
I found that many do need all the help they can get…<br />
• To get the necessary applications, go <strong>to</strong> http://www.carracho.com and download the latest server software.<br />
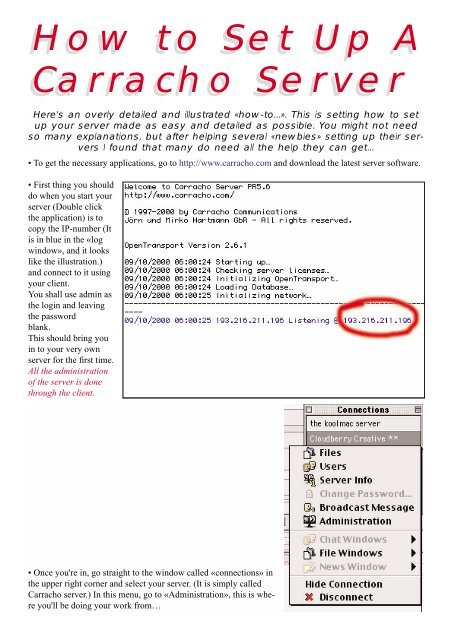
• First thing you should<br />
do when you start your<br />
server (Double click<br />
the application) is <strong>to</strong><br />
copy the IP-number (It<br />
is in blue in the «log<br />
window», and it looks<br />
like the illustration.)<br />
and connect <strong>to</strong> it using<br />
your client.<br />
You shall use admin as<br />
the login and leaving<br />
the password<br />
blank.<br />
This should bring you<br />
in <strong>to</strong> your very own<br />
server for the first time.<br />
All the administration<br />
of the server is done<br />
through the client.<br />
• Once you're in, go straight <strong>to</strong> the window called «connections» in<br />
the upper right corner and select your server. (It is simply called<br />
<strong>Carracho</strong> server.) In this menu, go <strong>to</strong> «Administration», this is where<br />
you'll be doing your work from…
• The First thing you wanna do is change your admin login and password. You have <strong>to</strong> go in<strong>to</strong><br />
«Accounts». Highlight the account called «Administra<strong>to</strong>r» and choose «modify account» from the bot<strong>to</strong>m<br />
menu. Choose any login and password you like, but be sure <strong>to</strong> remember it (or you'll have <strong>to</strong> start again<br />
from scratch). You shouldn't have <strong>to</strong> change the permissions, all the boxes should be checked except «cus<strong>to</strong>m<br />
root direc<strong>to</strong>ry». When this is done, you're certain no one can login <strong>to</strong> your server and mess up with<br />
your preferences. You should try re-loging <strong>to</strong> your server <strong>to</strong> make sure you spelled everything right before<br />
you go any further.<br />
The blank fields in the illustration above is just becouse I didn’t want anyone <strong>to</strong> know the logins of me or<br />
my co-admins and accountholders.<br />
• The next thing <strong>to</strong> do would<br />
be <strong>to</strong> decide your server's<br />
name. You have <strong>to</strong> go in<strong>to</strong><br />
«<strong>Server</strong> Info» (Still in<br />
Administration, as you can se<br />
from the above illustration.)<br />
You can enter your server<br />
name, the opera<strong>to</strong>r's name,<br />
the location (If you wish <strong>to</strong>.<br />
As you can see from the illustration<br />
I haven’t put anuthing<br />
there.) and what your server<br />
is all about in «description».<br />
You probably should leave<br />
the banner for later, you're not<br />
in a hurry... though you<br />
should know that <strong>Carracho</strong><br />
reads only banners in .pngformat.<br />
To place one, you only<br />
have <strong>to</strong> click «load», locate it<br />
Your users can look at your server information, so it might be a good idea<br />
<strong>to</strong> be careful what info you put in it.<br />
and select it... if you want it <strong>to</strong> lead users <strong>to</strong> a web page or (As me - an e-mail), you can enter the URL in the<br />
appropriate box.<br />
Before you leave that window, click upload at the bot<strong>to</strong>m <strong>to</strong> save your changes. You won't be able <strong>to</strong> see the<br />
changes until you log off and then back in.
• Before you continue in administration,<br />
you should put your<br />
files on the server. There's no<br />
need <strong>to</strong> upload them. Simply go<br />
back <strong>to</strong> the <strong>Carracho</strong> <strong>Server</strong><br />
Folder. Locate the one named<br />
«files» and open it. It's empty.<br />
(By the way, of all the folders in<br />
there, it's the only one you'll use<br />
for now.) All you need <strong>to</strong> do is<br />
put the files you want <strong>to</strong> offer<br />
inside that folder. For more<br />
security, you can put only aliases<br />
in there.<br />
• If not, make sure you don't<br />
give ANYONE the ability <strong>to</strong><br />
delete folders and files (in their<br />
accounts permissions). As much<br />
as you may like and trust your<br />
friends, accidents does happen.<br />
Over 100Mb of material is easily<br />
lost, and it hurts.<br />
• You'll probably want <strong>to</strong><br />
creat an uploads folder.<br />
Since you can't change a<br />
normal folder in<strong>to</strong> an uploads<br />
folder from your desk<strong>to</strong>p,<br />
you'll have <strong>to</strong> do it<br />
from the «Root» in your<br />
client, - which is the files<br />
window. There shouldn't be<br />
any files in your Root, so<br />
click on refresh. Then highlight<br />
the «uploads» folder<br />
and click on the folder with<br />
a yellow «i» sign at the <strong>to</strong>p<br />
of the Root. If<br />
you haven't created<br />
one yet, do<br />
so by clicking<br />
the folder with a<br />
yellow «+» sign.<br />
It is also at the<br />
<strong>to</strong>p of the Rootfolder.<br />
At the<br />
bot<strong>to</strong>m of the<br />
new window,<br />
you can choose<br />
the folder type, upload in this case. Press «save».<br />
• To create a drop box, repeat what you just did and select the appropriate folder type. Drop-boxes can’t be viwed<br />
by anyone unless you have given them permission <strong>to</strong> do so when you created their account. (In permissions)
• To manage the News, go back in<strong>to</strong> «Administration» and select «Newsgroup Management». The newsgroups<br />
can be added, modified, deleted and refreshed using the but<strong>to</strong>ns at the bot<strong>to</strong>m of your window. When<br />
you create a Newsgroup, i suggest you set them <strong>to</strong> never expire. For general newsgroups, you can allow<br />
users, guest and administra<strong>to</strong>rs <strong>to</strong> both read and post. If you want <strong>to</strong> create a Newsgroup for account<br />
requests (Wich is very useful, since sometimes, guests can't upload in<strong>to</strong> drop boxes.) you should allow users<br />
and guests <strong>to</strong> Post only, and admins <strong>to</strong> post and read. This way, no one but the admins will be able <strong>to</strong> see the<br />
logins and passwords asked in the account requests.<br />
• Stay in «Administration» and go in<strong>to</strong><br />
«Advanced». There's no need <strong>to</strong> change the server<br />
port (6700), unless you intend <strong>to</strong> run two<br />
servers at the same time. Then you can simply<br />
change the second server's port (6700) for any<br />
number you like. It doesn't matter wich.<br />
• «Max connections» <strong>to</strong> your server is <strong>to</strong> your<br />
liking, though for a 56k, it might be wise <strong>to</strong> set<br />
a limit of about 10 since every user logged on<br />
<strong>to</strong> your server uses a little bandwith, therefore<br />
slowing you down.<br />
• «Max connections per IP» is the number of<br />
time the same user can be connected <strong>to</strong> your server<br />
simultaneously. Usually this is just one, but<br />
it's up <strong>to</strong> you.<br />
• «Max simultaneous file transfer» is the number<br />
of files that can be downloaded from your<br />
server at the same time.<br />
• «Max simul. file transfers per user» is usually<br />
set <strong>to</strong> one or two. You might want <strong>to</strong> set this<br />
one <strong>to</strong> one especially if the number you entered after «Max simultaneous file transfer» is lower or equal <strong>to</strong><br />
the «Max connections» number. Two sim. transfer per user allows user <strong>to</strong> upload while they download, but<br />
people often use the second <strong>to</strong> download anyway, so it's a lot less troble <strong>to</strong> set it <strong>to</strong> one...<br />
The «Allow/Deny IP» window is used <strong>to</strong> ban and de-ban people from your server.<br />
You can also ban a user that is still on your user list by highlighting that user and then click on him/her while<br />
holding down the «ctrl» key and choose «ban» from that menu.<br />
Before you leave that window, click upload at the bot<strong>to</strong>m <strong>to</strong> save your changes.
• The Trackers (Still in<br />
Administration) are what<br />
you finish with because it's<br />
what will allow users <strong>to</strong> find<br />
your server. Therefore, you<br />
want your server <strong>to</strong> be ready<br />
before you list with trackers.<br />
To add, modify or remove a<br />
tracker, use the but<strong>to</strong>ns at<br />
the bot<strong>to</strong>m of the window.<br />
Enter a description of your<br />
server that will appear next<br />
<strong>to</strong> your server name in the<br />
tracker list. Select your speed<br />
modem at the bot<strong>to</strong>m left<br />
of the window and then<br />
check the box called<br />
«Register server with<br />
<strong>Carracho</strong> Trackers».<br />
Congratulations! Your server<br />
is now accessible by any carracho<br />
user.<br />
As you can see I use Bloodhound Tracker at bloodhound.dyndns.org.<br />
But you can find a list of working trackers at Tracker-Tracker on the<br />
web. The URL is http://www.tracker-tracker.com<br />
Before you leave that window, click upload at the bot<strong>to</strong>m <strong>to</strong> save your changes. You won't be able <strong>to</strong> see the<br />
changes until you log off and then back in.<br />
• The agreement isn't necessary,<br />
though it can still be useful <strong>to</strong><br />
explain the rules of your server,<br />
what it's all about and so on. I<br />
suggest you make it short and<br />
easy <strong>to</strong> read since few people<br />
bother with it anyway, unfortunately.<br />
But then, if a user breaks the<br />
rules and gets kicked, he won't be<br />
able <strong>to</strong> say he wasn't warned.<br />
To put color, bold, funky fonts<br />
and so on in your agreement create<br />
the it with a Word Processing<br />
application and copy/paste it in<br />
the «Agreement» window in<br />
«Administration».<br />
• In addition <strong>to</strong> the things I have<br />
described so far you will find<br />
«<strong>Server</strong> Log» and «Statistics» in<br />
«Admin-istration».<br />
Both of these speaks for themself.<br />
It is simply a possibility for the<br />
admin <strong>to</strong> check uploads against<br />
downloads. The number of hits on<br />
the server, and so on.<br />
The server log also gives you the<br />
IP-number and name of the guest,<br />
and wich file they downloaded.
• Many Sysops encurage their users <strong>to</strong> use chat. Chat is used both <strong>to</strong> be socialand «shoot the breeze» with<br />
other users, and <strong>to</strong> get help if you’ve got a problem with anything.<br />
In the smallest illustration you will se wich but<strong>to</strong>n <strong>to</strong> press <strong>to</strong> get in<strong>to</strong> chat (And the newsgroups). In order<br />
<strong>to</strong> invite another user <strong>to</strong> join chat, you just hilight the user in «users» and drag him or her in<strong>to</strong> the users-frame<br />
in «Public chat».<br />
In most of the windows you have open while using the client<br />
you will find submenues at the bot<strong>to</strong>m. You can explore these<br />
for yourself.<br />
Well, that should cover everything you need <strong>to</strong> know <strong>to</strong> get<br />
your server started. If there's something<br />
that you don’t understand, or if you'd like <strong>to</strong> know more<br />
about something feel free <strong>to</strong> email me at eye@wolf-web.com<br />
with your questions. Or you could try asking around <strong>to</strong> other<br />
admins. Most of them will be glad <strong>to</strong> help...<br />
GOOD LUCK!<br />
Thanks <strong>to</strong> Red (RedMercedez@yahoo.com) for letting me<br />
use his document.<br />
i<br />
If you intend <strong>to</strong> create a porn or banner server, please trash this document and move on <strong>to</strong> Hotline.<br />
There are lots of youngsters using <strong>Carracho</strong>. Some of them are not older than ten years.<br />
Porn will also draw unwanted attention <strong>to</strong> <strong>Carracho</strong>. There are many idealististic and<br />
humanitary organisastions that would be glad <strong>to</strong> serve the gouverment ilegal porndistibu<strong>to</strong>urs<br />
heads on a plattern. Besides it is so easy <strong>to</strong> get porn other places on the net. (Both<br />
Hotline and the web are filled with it…) So theres no need <strong>to</strong> bring it <strong>to</strong> Caracho.<br />
Please keep <strong>Carracho</strong> the clean and cool community it has grown <strong>to</strong> be!<br />
This document is not copyrighted. It is made by Neo, sysop at Cloudberry Creative and The Happy Huntingground