Instruction Manual - APEXi USA
Instruction Manual - APEXi USA
Instruction Manual - APEXi USA

Create successful ePaper yourself
Turn your PDF publications into a flip-book with our unique Google optimized e-Paper software.
<strong>Instruction</strong> <strong>Manual</strong><br />
<br />
<br />
<br />
<br />
<br />
<br />
ELECTRONICS TECHNOLOGY<br />
<br />
<br />
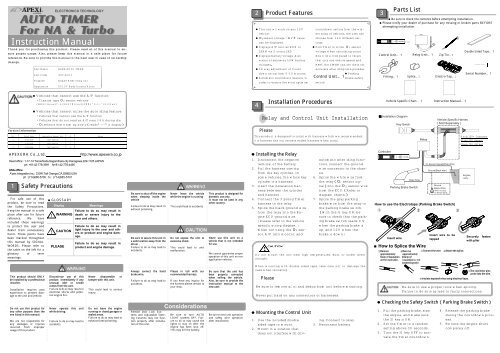
Product Features<br />
<br />
<br />
<br />
<br />
<br />
<br />
<br />
<br />
<br />
<br />
<br />
<br />
<br />
<br />
<br />
<br />
<br />
<br />
<br />
<br />
<br />
<br />
<br />
Control Unit<br />
<br />
<br />
<br />
<br />
Parts List<br />
Be sure to check the contents before attempting installation.<br />
Please notify your dealer of purchase for any missing or broken parts BEFORE<br />
attempting installation.<br />
Control Unit<br />
Relay Unit<br />
Zip Tie<br />
Fitting Splice Electro-Tap<br />
Double Sided Tape<br />
<br />
Serial Number<br />
Version Information<br />
<br />
<br />
<br />
<br />
<br />
<br />
<br />
<br />
<br />
Installation Procedures<br />
<br />
Please<br />
Vehicle Specific Chart<br />
Installation Diagram<br />
Key Swich<br />
<strong>Instruction</strong> <strong>Manual</strong><br />
Vehicle Specific Harnes<br />
Sold Separately<br />
<br />
<br />
<br />
<br />
<br />
<br />
Relay<br />
<br />
<br />
<br />
APEXERA Co.,Ltd. http://www.apexera.co.jp<br />
Head office 1-17-14 Tanashioda,Sagamihara-city Kanagawa,229-1125 JAPAN<br />
ph: +81-42-778-3991 fx+81-42-778-4495<br />
<strong>USA</strong> office<br />
A’pex Integration,Inc.330WTaft Orange,CA.92865,<strong>USA</strong><br />
ph : (714)685-5700 fx : (714)685-5701<br />
<br />
Safety Precautions<br />
For safe use of this<br />
product, be sure to read<br />
the Safety Precautions.<br />
Keep the manual in a safe<br />
place after use for future<br />
reference. We have<br />
included these warnings<br />
to protect the user and<br />
dealer from unnecessary<br />
harm. These points have<br />
been marked throughout<br />
this manual by SIGNAL<br />
WORDS. Please refer to<br />
the table on the left for a<br />
glossary of term<br />
meanings.<br />
This product should ONLY<br />
be installed by a professional<br />
installer.<br />
Installation requires past<br />
experience to prevent damage<br />
to the unit and vehicle.<br />
Do not use this product for<br />
any other purpose than the<br />
one listed in this manual.<br />
<br />
We are not responsible for<br />
any damages or injuries<br />
incurred from improper<br />
usage of this product.<br />
GLOSSARY<br />
Display <br />
<br />
<br />
Failure to do so may result in<br />
WARNING<br />
<br />
death or severe injury to the<br />
user and others.<br />
<br />
CAUTION<br />
PLEASE<br />
Discontinue use of this<br />
product immediately if any<br />
unusual odor or smoke<br />
comes from the unit.<br />
Failure to do so may result in<br />
electrical shorts and potential<br />
engine fire.<br />
Never operate this unit<br />
while driving.<br />
<br />
<br />
Failure to do so may lead to<br />
accidents.<br />
Meanings <br />
Failure to do so may result in<br />
light injury to the user and others<br />
or product and engine damage.<br />
Failure to do so may result in<br />
product and engine damage.<br />
Never disassemble or<br />
tamper with this unit.<br />
<br />
<br />
This could lead to serious<br />
injury.<br />
<br />
<br />
<br />
Do not leave the engine<br />
running in closed garages or<br />
sealed areas.<br />
Failure to do so may lead to<br />
exhaust fume poisoning.<br />
Be sure to shut off the engine<br />
when sleeping inside the<br />
vehicle<br />
<br />
Failure to do so may result in<br />
exhaust poisoning<br />
Be sure to secure this unit in<br />
a safe location away from the<br />
driver .<br />
Failure to do so may lead to<br />
accidents.<br />
Always connect the hand<br />
brake wire.<br />
<br />
Failure to do so may lead to<br />
accidents.<br />
Remote Door Lock Systems<br />
and Adjustable Steering<br />
Columns may not function<br />
properly after installation<br />
of this unit.<br />
Never leave the vehicle<br />
while the engine is running<br />
<br />
<br />
This could lead to accidents<br />
Do not expose the unit to<br />
excessive shock.<br />
<br />
This could lead to unit<br />
malfunction.<br />
Please in tall with our<br />
recommended harness.<br />
<br />
If you have any inquiry for<br />
the harness please contact to<br />
your shop.<br />
<br />
Considerations<br />
Be sure to turn AUTO<br />
LIGHT systems OFF. Failure<br />
to do so may cause the<br />
lights to stay on after the<br />
engine has been shut off.<br />
This may kill the battery.<br />
This product is designed for<br />
domestic use only.<br />
It must not be used in any<br />
other country.<br />
Never use this unit on a<br />
vehicle that is not intended<br />
for use.<br />
<br />
<br />
We cannot guarantee proper<br />
operation of this unit on non<br />
application vehicles.<br />
Be sure that the unit has<br />
been properly connected<br />
when selling the vehicle.<br />
Also, be sure to provide the<br />
instruction manual to the<br />
new user.<br />
Be sure to test unit operation<br />
and safety wire operation<br />
after installation.<br />
<br />
Installing the Relay<br />
<br />
<br />
<br />
<br />
<br />
<br />
<br />
<br />
<br />
<br />
<br />
<br />
<br />
<br />
<br />
<br />
<br />
<br />
Mounting the Control Unit<br />
<br />
<br />
<br />
<br />
<br />
<br />
<br />
<br />
<br />
<br />
<br />
<br />
<br />
<br />
<br />
<br />
<br />
<br />
<br />
<br />
<br />
<br />
<br />
<br />
<br />
<br />
<br />
Please<br />
<br />
<br />
<br />
<br />
<br />
Controller<br />
How to use the Electrotaps (Parking Brake Switch)<br />
Insert wire<br />
(Glay Wire)<br />
Perking Brake Switch<br />
How to Splice the Wire<br />
<br />
<br />
Checking the Safety SwitchParking Brake Switch<br />
<br />
<br />
<br />
<br />
<br />
<br />
<br />
O2 Sensor Signal(White Wire)<br />
Ground(Black wier)<br />
Ground<br />
(Black<br />
<br />
Wire)<br />
When not using<br />
O2 Sensor Signal.<br />
Insert wire to be<br />
tapped<br />
Engiine<br />
ECU<br />
Securely fasten<br />
with plier
Operation<br />
<br />
<br />
<br />
<br />
<br />
<br />
<br />
<br />
<br />
Display Parameters<br />
A/F ratio<br />
Sensor Voltage<br />
Battery Voltage<br />
Countdown time<br />
<br />
To toggle between A/F ratioO2 Sensor Voltage Battery Voltage After<br />
Idling Time,<br />
Activate the knob either UP or DOWN<br />
Display Selection<br />
<br />
To activate Setting Mode…<br />
<br />
Hold the knob to the RIGHT<br />
<br />
<br />
After setting…<br />
Hold the knob to the LEFT<br />
<br />
<br />
<br />
<br />
How to Set<br />
<br />
Activate the knob either UP or<br />
DOWN<br />
Set the minimum warning battery<br />
voltage<br />
Choose between10.0V15.0Vin<br />
0.1Vincrements<br />
To activate Setting Mode…<br />
<br />
Hold the knob to the RIGHT<br />
<br />
<br />
For Calculation Mode<strong>Manual</strong> or Auto<br />
<br />
<br />
Hold the knob to the RIGHT<br />
<br />
After setting…<br />
Hold the knob to the LEFT<br />
<br />
How to Set<br />
Select Calculation Mode<br />
Hold knob to the RIGHT<br />
<br />
<br />
<br />
<br />
<br />
<br />
<br />
<br />
<br />
To enter the setting mode…<br />
<br />
Hold the knob to the RIGHT<br />
<br />
<br />
How to set…<br />
<br />
<br />
<br />
<br />
<br />
Once setting is complete… <br />
Hold knob to the LEFT<br />
This will return to the Display Mode<br />
Procedure<br />
<br />
<br />
<br />
<br />
<br />
<br />
Tilting knob to RIGHT or<br />
LEFTwill change the range<br />
of A/F , O2 data (see Table1)<br />
<br />
<br />
<br />
<br />
<br />
<br />
<br />
<br />
Turn the TIMER OFF when not in use.<br />
To turn the TIMER OFF…<br />
<br />
Hold the knob to the LEFT<br />
<br />
<br />
<br />
<br />
<br />
To turn the TIMER back ON…<br />
<br />
Hold the knob to the LEFT<br />
<br />
Hold the knob to the RIGHT<br />
<br />
<br />
To turn engine OFF during a TIMER countdown…<br />
<br />
<br />
Hold the knob to the LEFT<br />
<br />
Hold the knob to the RIGHT<br />
<br />
<br />
<br />
Changing the after idling time during TIMER countdown…<br />
<br />
<br />
Tilt knob UP<br />
<br />
Tilt knob DOWN<br />
<br />
After Idle Time<br />
A/FRatio<br />
<br />
O2Sensor<br />
Voltage<br />
Battery Voltage<br />
Activate the knob either UP or<br />
DOWN<br />
Parameters that can be Set<br />
A/F ratio according to O2 Sensor Voltage<br />
O2Sensor Voltage according to A/F ratio<br />
Minimum Battery Voltage Warning<br />
Countdown Time<br />
<br />
<br />
<br />
<br />
<br />
<br />
<br />
<strong>Manual</strong> Mode<br />
If display looks like below,The unit is<br />
in<strong>Manual</strong> Mode<br />
Minute<br />
Second<br />
<br />
<br />
<br />
<br />
<br />
Select<br />
sec<br />
sec<br />
sec<br />
sec<br />
sec<br />
sec<br />
min<br />
minsec<br />
min<br />
miSec<br />
min<br />
min<br />
min<br />
min<br />
min<br />
min<br />
Hold<br />
Auto Mode<br />
If display looks like below,The unit is<br />
inAuto Mode<br />
MAX Countdown<br />
Value<br />
This sets the<br />
maximum<br />
amount of<br />
idle time.<br />
<br />
Value denotes<br />
MIN-<br />
UTES. Please<br />
choose<br />
between 1<br />
min8 min<br />
Auto Calculation MIN Countdown<br />
Rate<br />
Value<br />
This sets the<br />
auto calculation<br />
rate of<br />
the Timer.<br />
<br />
There are<br />
three modes,<br />
H” High<br />
“n” Normal<br />
“L” Low<br />
This sets the<br />
minimum<br />
amount of<br />
idle time.<br />
The vehicle<br />
will always<br />
idle for at<br />
least this<br />
amount of<br />
time.<br />
Choose<br />
between 0~60<br />
seconds in 10<br />
second<br />
increments.<br />
<br />
<br />
<br />
<br />
<br />
<br />
<br />
<br />
To enter the setting mode…<br />
<br />
Hold the knob to the RIGHT<br />
<br />
<br />
<br />
How to set…<br />
<br />
<br />
<br />
<br />
<br />
Once setting is complete…<br />
Hold the knob to the LEFT<br />
Procedure<br />
<br />
<br />
<br />
<br />
Tilting knob to RIGHT or<br />
LEFTwill change the range<br />
of A/F , O2 data (see Table1)<br />
<br />
<br />
<br />
<br />
<br />
<br />
<br />
<br />
<br />
<br />
<br />
<br />
<br />
<br />
<br />
<br />
<br />
<br />
<br />
<br />
<br />
<br />
<br />
If the O2 sensor has not warmed up<br />
enough,<br />
will flash red and green.<br />
Once the O2 sensor warms up, the display<br />
mode will initiate.<br />
When the A/F reaches over 10.0,<br />
<br />
will flash red.<br />
When the A/F goes under 20.0<br />
<br />
will flash green.